Communication between two Arduino Nano ESP32
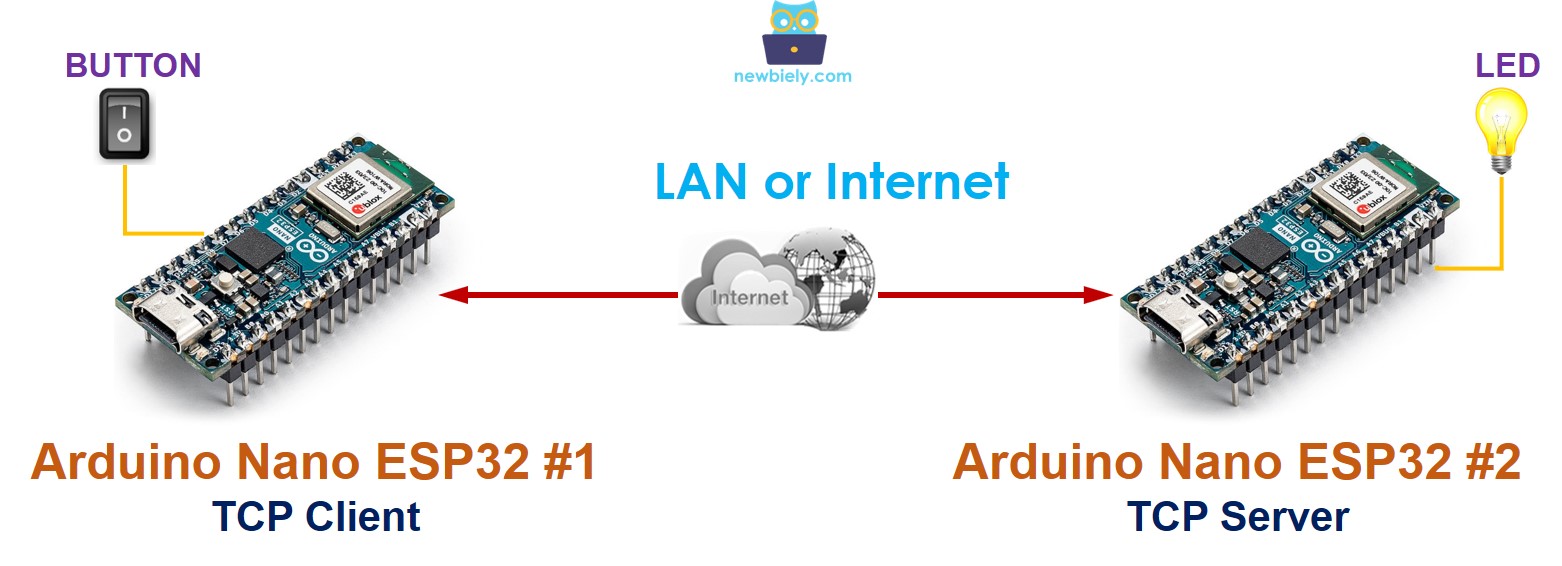
This guide shows you how to establish a connection between two Arduino Nano ESP32 devices using TCP/IP over WiFi and exchange data. One Arduino Nano ESP32 functions as a TCP client while the other acts as a TCP server. Let's delve into the process with an example:
- The first Arduino Nano ESP32 (referred to as Arduino Nano ESP32 #1The second Arduino Nano ESP32 (referred to as Arduino Nano ESP32 #2) is connected to an LED and serves as the TCP server.Both Arduino Nano ESP32 devices connect to each other through the local LAN or Internet.When the button on Arduino Nano ESP32 #1Arduino Nano ESP32 #2 to turn on.
Hardware Preparation
Or you can buy the following kits:
1 × DIYables ESP32 Starter Kit (ESP32 included) 1 × DIYables Sensor Kit (18 sensors/displays) Disclosure: Some of the links provided in this section are Amazon affiliate links. We may receive a commission for any purchases made through these links at no additional cost to you.
Additionally, some of these links are for products from our own brand, DIYables .Buy Note: Use the LED Module for easier wiring. It includes an integrated resistor.
Communication between two Arduino Nano ESP32 - Overview
There are various methods to enable communication between "Arduino Nano ESP32 #1" and "Arduino Nano ESP32 #2." The choice of method depends on the distance between them. Some of the options include:
Methods Distance SPI very short I2C very short UART (TTL) very short UART (RS-232/485/422) short Bluetooth short LoRa long WiFi unlimited(*) ※ NOTE THAT:
(*):
- If both Arduino Nano ESP32 devices are connected to the internet, the communication distance is unlimited.
- If both Arduino Nano ESP32 devices are not connected to the internet but are connected to the same LAN (Local Area Network), the communication distance is limited to within the LAN network.
This tutorial is going to use WiFi for communication between two ESP32.
Communication between two Arduino Nano ESP32 via WiFi
Two Arduino Nano ESP32 devices can establish communication via WiFi under the following conditions:
- If both Arduino Nano ESP32 devices are within the same LAN (Local Area Network), they can communicate without needing to connect to the internet.
- If the two Arduino Nano ESP32 devices are in different LAN networks, they must connect to the Internet to facilitate communication.
There are two primary methods for communication between two Arduino Nano ESP32 devices:
- Direct Communication:
- In this method, one Arduino Nano ESP32 acts as a TCP client while the other serves as a TCP server. They communicate directly with each other over WiFi.
- Both Arduino Nano ESP32 devices act as TCP clients and communicate indirectly through a centralized server such as an MQTT server. You can refer to the tutorial on ESP32-to-Arduino Nano ESP32 Communication via MQTT for implementation details.
- Self-defined protocol over raw TCP (used for direct communication)
- Modbus TCP (used for direct communication)
- HTTP (used for direct communication)
- Telnet (used for direct communication)
- SSH (used for direct communication)
- MQTT (used for indirect communication via a server)
^ Indirect Communication via a Centralized Server (e.g., MQTT server):
It needs an application protocol that two Arduino Nano ESP32 uses to communicate to each other. For example:
Example Application
Let's implement the following application: A button or switch connected to Arduino Nano ESP32 #1 will control an LED connected to Arduino Nano ESP32 #2 via WiFi.
To simplify, we'll use a self-defined protocol (created by us, not a standard).
Self-defined Protocol
We define a simple protocol as follows:
- Create a TCP connection between Arduino Nano ESP32 #1 and Arduino Nano ESP32 #2
- Arduino Nano ESP32 #1:
- TCP client: actively makes TCP connection request to Arduino Nano ESP32 #2
- If the switch's state is changed to ON, Arduino Nano ESP32 #1 sends a byte (command) with value 1 to Arduino Nano ESP32 #2.
- If the switch's state is changed to OFF, Arduino Nano ESP32 #1 sends a byte (command) with value 0 to Arduino Nano ESP32 #2.
- Arduino Nano ESP32 #2:
- TCP server: listens to a TCP connection request from Arduino Nano ESP32 #1. If there is a TCP request, it accepts and the connection is created.
- If It receives a byte:
- If the value is 1, Turn LED on
- If the value is 0, Turn LED off
- Wiring Diagram for Arduino Nano ESP32 #1: TCP CLIENT + A BUTTON/SWITCH
- Wiring Diagram for Arduino Nano ESP32 #2: TCP SERVER + AN LED
- Arduino Nano ESP32 - LED tutorial
- Arduino Nano ESP32 - Button tutorial
- If this is the first time you use ESP32, see how to setup environment for Arduino Nano ESP32 on Arduino IDE.
- Wire a button/switch to Arduino Nano ESP32 #1
- Wire an LED to Arduino Nano ESP32 #2
- Open Arduino IDE (called Arduino IDE #1)
- Install ezButton library on Arduino IDE
- Connect Arduino Nano ESP32 #1 to PC via USB cable and select COM port of Arduino Nano ESP32 #1 on Arduino IDE #1
- Open another Arduino IDE window (called Arduino IDE #2) by clicking on Arduino IDE icon on your PC (important!())
- Connect Arduino Nano ESP32 #2 to PC via USB cable and select COM port of Arduino Nano ESP32 #2 on Arduino IDE #2
- Copy Arduino Nano ESP32 #1 code, paste to Arduino IDE #1 and save it (named ESP321)
- Copy Arduino Nano ESP32 #2 code, paste to Arduino IDE #2 and save it (named ESP322)
- Upload Arduino Nano ESP32 #2 code to Arduino Nano ESP32 #2 first
- Open Serial Monitor on Arduino IDE #2, get TCP Server IP address
- Update TCP Server IP address in Arduino Nano ESP32 #1 code
- Upload Arduino Nano ESP32 #1 code to Arduino Nano ESP32 #1
- Open Serial Monitor on Arduino IDE #1
- Press and hold the button on Arduino Nano ESP32 #1 → see LED's state on Arduino Nano ESP32 #2 (ON)
- Release button on Arduino Nano ESP32 #1 → see LED's state on Arduino Nano ESP32 #2 (OFF)
- Do the above process several times.
- See output on both Serial Monitors
- Serial Monitor of Arduino Nano ESP32 #1
- Serial Monitor of Arduino Nano ESP32 #2
- (): If you open Arduino IDE #2 window via "File" → "New" or "Open" from Arduino IDE #2 window, you will NOT be able to open two Serial Monitors for two Arduino Nano ESP32 in the same PC at the same time.
- There is an alternative to this self-defined protocol. It is the Modbus TCP. The Modbus protocol is standardized, it has many advantages over the self-defined protocol. See more in Arduino Nano ESP32 - Modbus tutorial
Wiring Diagram
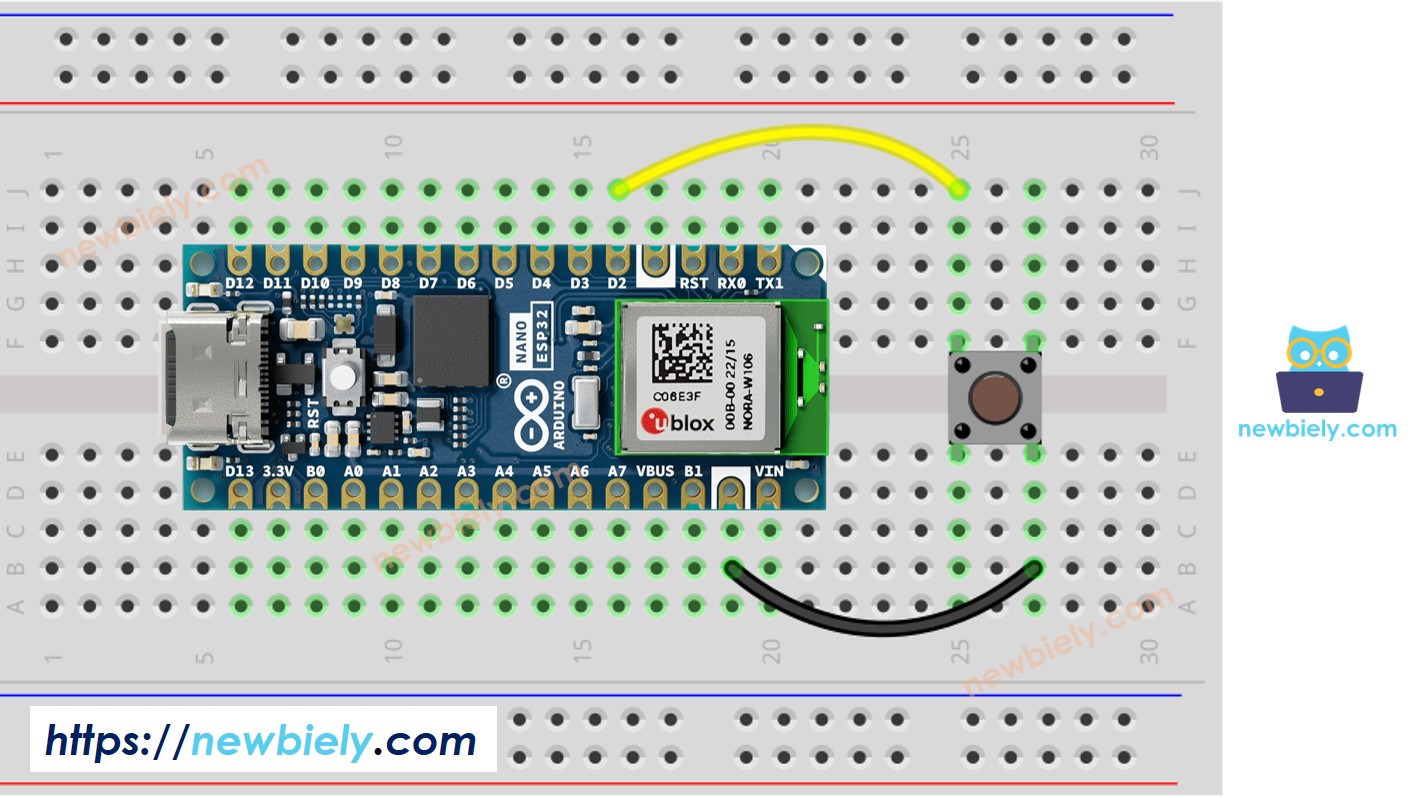
This image is created using Fritzing. Click to enlarge image
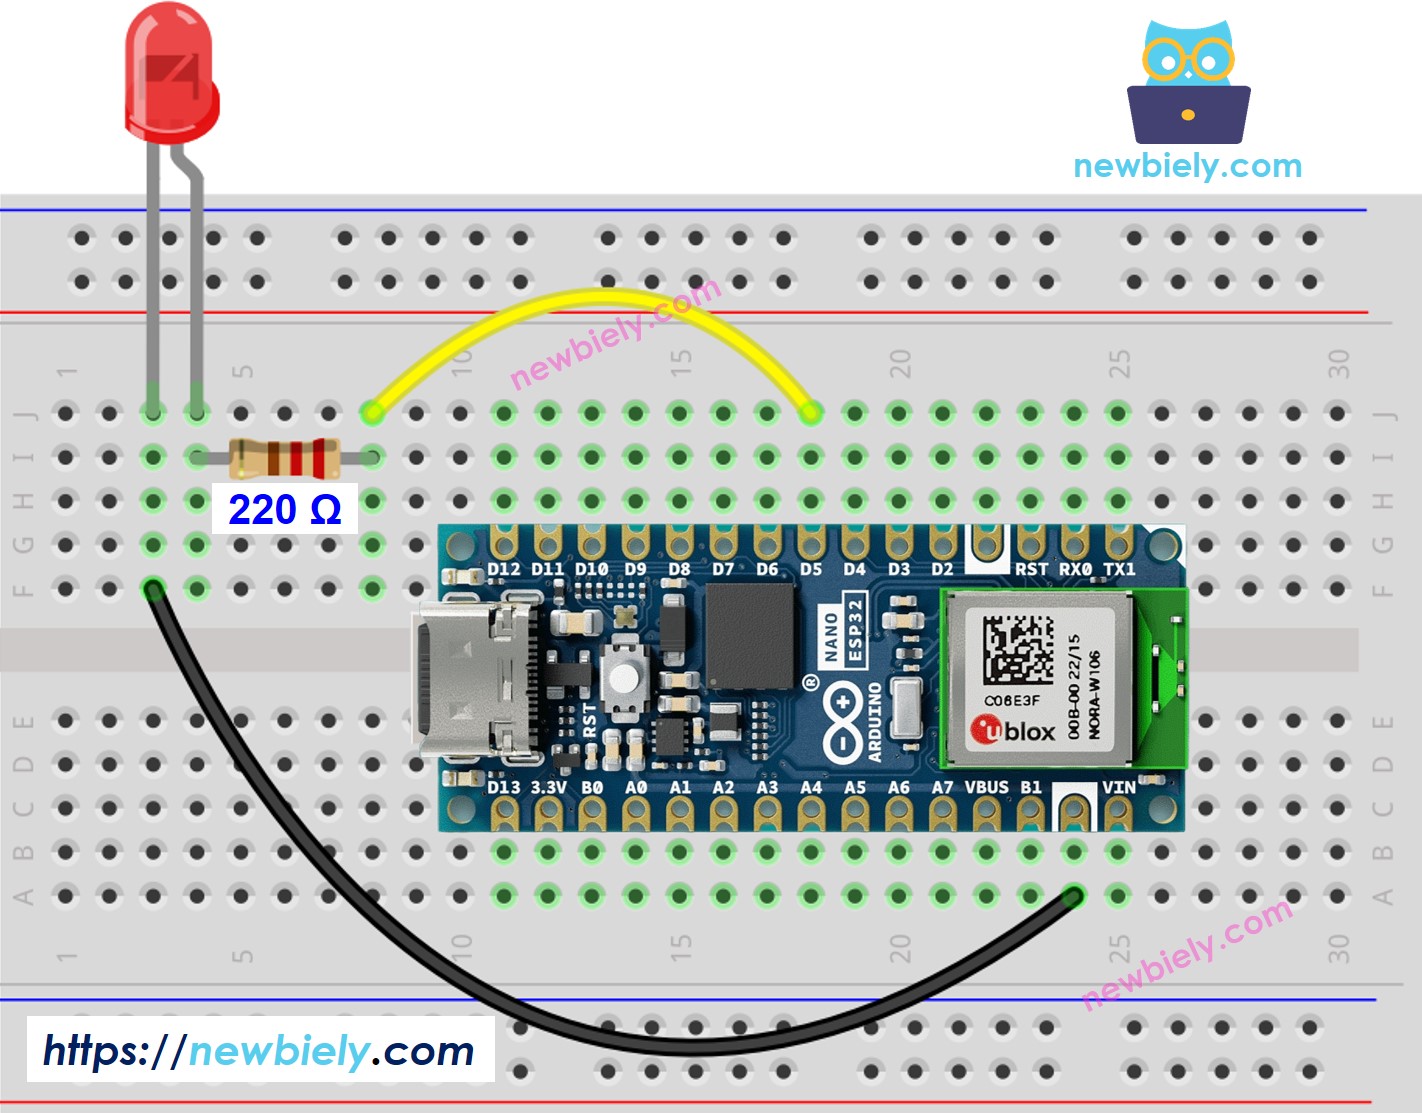
This image is created using Fritzing. Click to enlarge image
※ NOTE THAT:
It needs touse a resistor for LED if it does not have a built-in resistor. We have dedicated tutorials for button and LED. You can learn more about them in:
Arduino Nano ESP32 Code for Arduino Nano ESP32 #1
/* * This Arduino Nano ESP32 code was developed by newbiely.com * * This Arduino Nano ESP32 code is made available for public use without any restriction * * For comprehensive instructions and wiring diagrams, please visit: * https://newbiely.com/tutorials/arduino-nano-esp32/communication-between-two-arduino-nano-esp32 */ // ESP32: TCP CLIENT + A BUTTON/SWITCH #include <ezButton.h> #include <WiFi.h> #define BUTTON_PIN D2 // The Arduino Nano ESP32 pin connected to the button const char WIFI_SSID[] = "YOUR_WIFI_SSID"; // CHANGE TO YOUR WIFI SSID const char WIFI_PASSWORD[] = "YOUR_WIFI_PASSWORD"; // CHANGE TO YOUR WIFI PASSWORD const char* serverAddress = "192.168.0.180"; // CHANGE TO ESP32#2'S IP ADDRESS const int serverPort = 4080; ezButton button(BUTTON_PIN); // create ezButton WiFiClient TCPclient; void setup() { Serial.begin(9600); button.setDebounceTime(50); // set debounce time to 50 milliseconds Serial.println("Arduino Nano ESP32 #1: TCP CLIENT + A BUTTON/SWITCH"); // Connect to Wi-Fi WiFi.begin(WIFI_SSID, WIFI_PASSWORD); while (WiFi.status() != WL_CONNECTED) { delay(1000); Serial.println("Connecting to WiFi..."); } Serial.println("Connected to WiFi"); // connect to TCP server (Arduino #2) if (TCPclient.connect(serverAddress, serverPort)) { Serial.println("Connected to TCP server"); } else { Serial.println("Failed to connect to TCP server"); } } void loop() { button.loop(); // MUST call the loop() function first if (!TCPclient.connected()) { Serial.println("Connection is disconnected"); TCPclient.stop(); // reconnect to TCP server (Arduino #2) if (TCPclient.connect(serverAddress, serverPort)) { Serial.println("Reconnected to TCP server"); } else { Serial.println("Failed to reconnect to TCP server"); } } if (button.isPressed()) { TCPclient.write('1'); TCPclient.flush(); Serial.println("- The button is pressed, sent command: 1"); } if (button.isReleased()) { TCPclient.write('0'); TCPclient.flush(); Serial.println("- The button is released, sent command: 0"); } }Arduino Nano ESP32 Code for Arduino Nano ESP32 #2
/* * This Arduino Nano ESP32 code was developed by newbiely.com * * This Arduino Nano ESP32 code is made available for public use without any restriction * * For comprehensive instructions and wiring diagrams, please visit: * https://newbiely.com/tutorials/arduino-nano-esp32/communication-between-two-arduino-nano-esp32 */ // ESP32 #2: TCP SERVER + AN LED #include <WiFi.h> #define LED_PIN D5 // The Arduino Nano ESP32 pin connected to LED #define SERVER_PORT 4080 const char WIFI_SSID[] = "YOUR_WIFI_SSID"; // CHANGE TO YOUR WIFI SSID const char WIFI_PASSWORD[] = "YOUR_WIFI_PASSWORD"; // CHANGE TO YOUR WIFI PASSWORD WiFiServer TCPserver(SERVER_PORT); void setup() { Serial.begin(9600); pinMode(LED_PIN, OUTPUT); Serial.println("Arduino Nano ESP32 #2: TCP SERVER + AN LED"); // Connect to Wi-Fi WiFi.begin(WIFI_SSID, WIFI_PASSWORD); while (WiFi.status() != WL_CONNECTED) { delay(1000); Serial.println("Connecting to WiFi..."); } Serial.println("Connected to WiFi"); // Print your local IP address: Serial.print("ESP32 #2: TCP Server IP address: "); Serial.println(WiFi.localIP()); Serial.println("ESP32 #2: -> Please update the serverAddress in ESP32 #1 code"); // Start listening for a TCP client (from ESP32 #1) TCPserver.begin(); } void loop() { // Wait for a TCP client from ESP32 #1: WiFiClient client = TCPserver.available(); if (client) { // Read the command from the TCP client: char command = client.read(); Serial.print("ESP32 #2: - Received command: "); Serial.println(command); if (command == '1') digitalWrite(LED_PIN, HIGH); // Turn LED on else if (command == '0') digitalWrite(LED_PIN, LOW); // Turn LED off client.stop(); } }Detailed Instructions
8 Serial.println("Hello World!");Message (Enter to send message to 'Arduino Nano ESP32' on 'COM15')New Line9600 baudArduino Nano ESP32 #2: TCP SERVER + AN LED TCP Server IP address: 192.168.0.2 -> Please update the serverAddress in Arduino Nano ESP32 #1 code8 Serial.println("Hello World!");Message (Enter to send message to 'Arduino Nano ESP32' on 'COM15')New Line9600 baudArduino Nano ESP32 #1: TCP CLIENT + A BUTTON/SWITCH Arduino Nano ESP32 #1: Connected to TCP server Arduino Nano ESP32 #1: - The button is pressed, sent command: 1 Arduino Nano ESP32 #1: - The button is released, sent command: 0 Arduino Nano ESP32 #1: - The button is pressed, sent command: 1 Arduino Nano ESP32 #1: - The button is released, sent command: 0 Arduino Nano ESP32 #1: - The button is pressed, sent command: 1 Arduino Nano ESP32 #1: - The button is released, sent command: 08 Serial.println("Hello World!");Message (Enter to send message to 'Arduino Nano ESP32' on 'COM15')New Line9600 baudArduino Nano ESP32 #2: TCP SERVER + AN LED Arduino Nano ESP32 #2: TCP Server IP address: 192.168.0.2 Arduino Nano ESP32 #2: -> Please update the serverAddress in Arduino Nano ESP32 #1 code Arduino Nano ESP32 #2: - Received command: 1 Arduino Nano ESP32 #2: - Received command: 0 Arduino Nano ESP32 #2: - Received command: 1 Arduino Nano ESP32 #2: - Received command: 0 Arduino Nano ESP32 #2: - Received command: 1 Arduino Nano ESP32 #2: - Received command: 0※ NOTE THAT:
Video Tutorial
How to connect two Arduino Nano ESP32 via Internet
Learn More