Arduino Nano ESP32 - GPS
In this guide, we'll discover how to extract GPS coordinates (longitude, latitude, altitude), GPS speed (in kilometers per hour), and date-time information from the NEO-6M GPS module. Additionally, we'll explore the process of calculating the distance between the current GPS position and a predefined set of GPS coordinates (such as the coordinates of London).
Hardware Preparation
Or you can buy the following kits:
| 1 | × | DIYables Sensor Kit (18 sensors/displays) |
Disclosure: Some of the links provided in this section are Amazon affiliate links. We may receive a commission for any purchases made through these links at no additional cost to you.
Additionally, some of these links are for products from our own brand, DIYables .
Additionally, some of these links are for products from our own brand, DIYables .
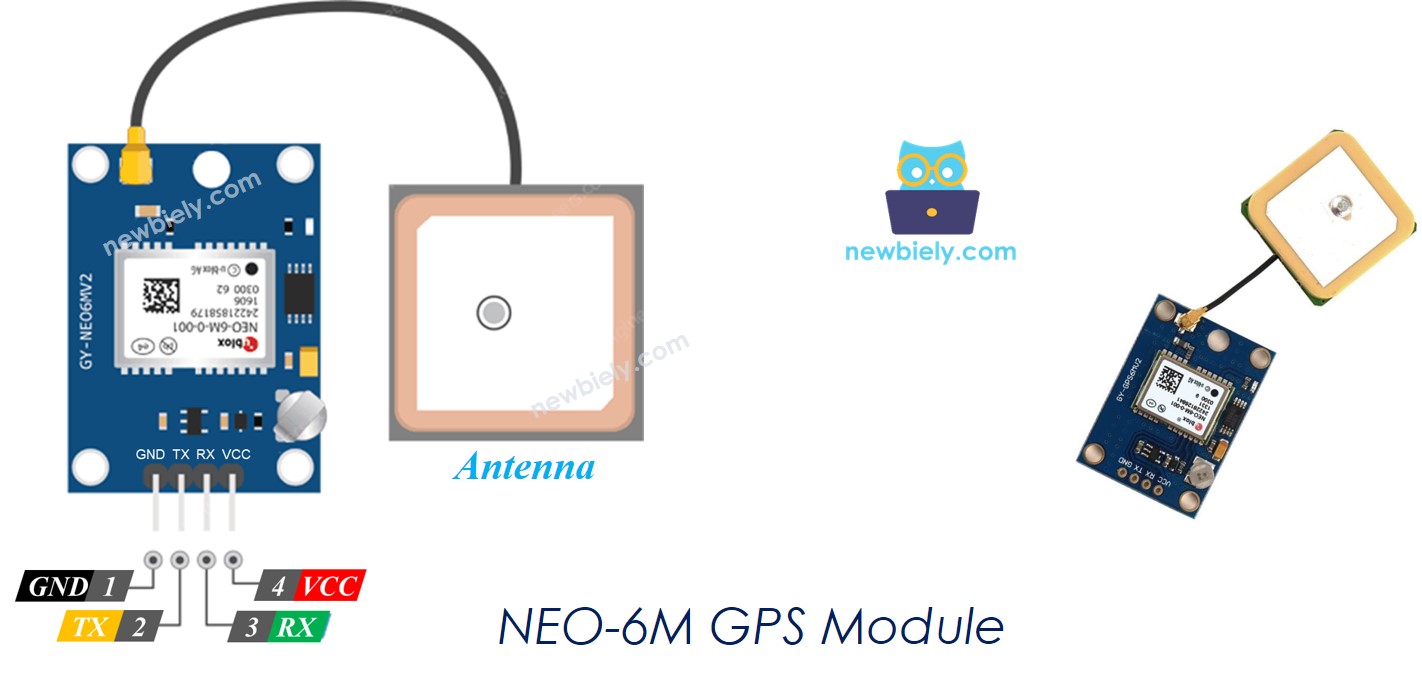
Overview of NEO-6M GPS module
Pinout
The NEO-6M GPS module has 4 pins:
- VCC pin: needs to be connected to VCC (3.3V or 5V)
- GND pin: needs to be connected to GND (0V)
- TX pin: is used for communication between the GPS module and ESP32, needs to be connect to Serial RX pin on Arduino Nano ESP32.
- RX pin: is used for communication between the GPS module and ESP32, needs to be connect to Serial TX pin on Arduino Nano ESP32.
Wiring Diagram
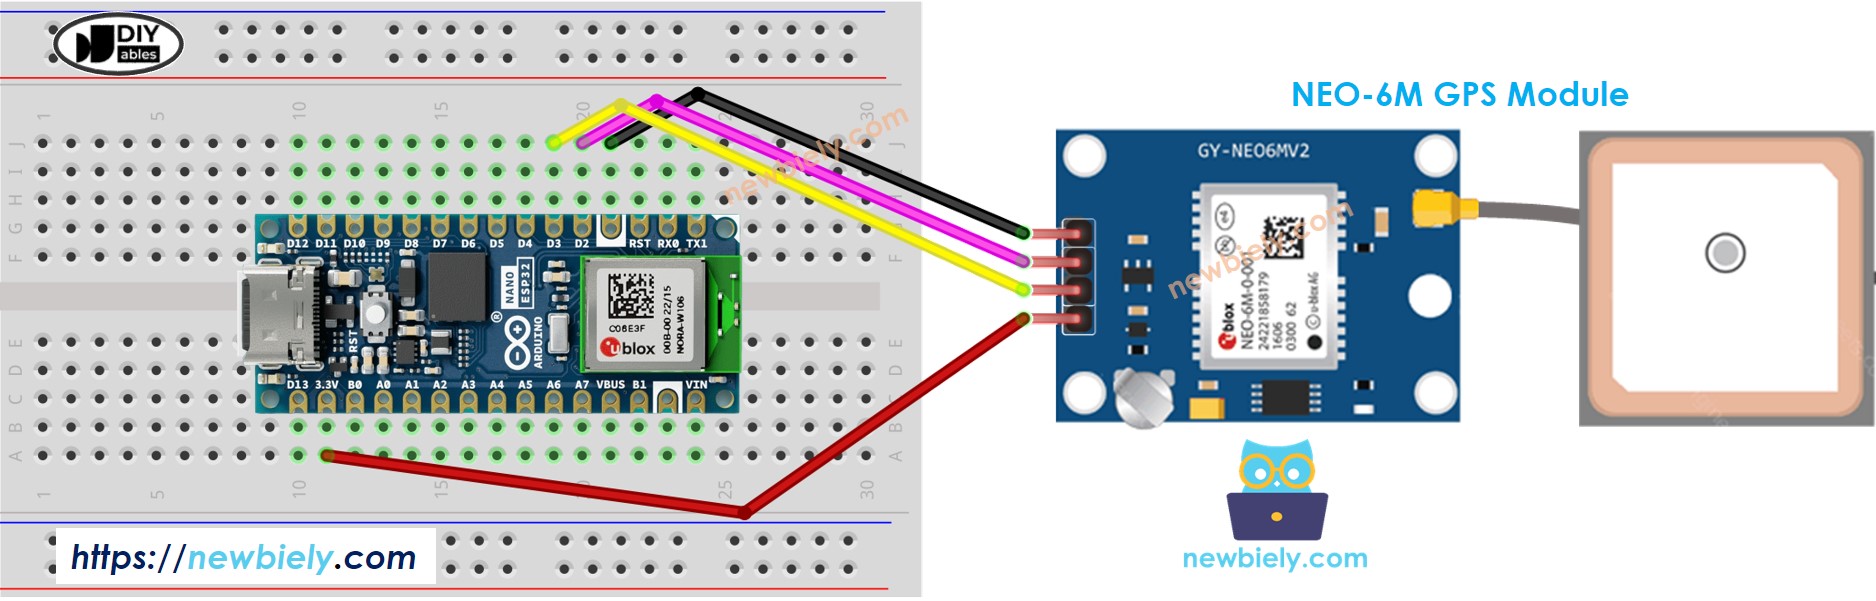
This image is created using Fritzing. Click to enlarge image
Arduino Nano ESP32 Code
Reading GPS coordinates, speed (km/h), and date time
/*
* This Arduino Nano ESP32 code was developed by newbiely.com
*
* This Arduino Nano ESP32 code is made available for public use without any restriction
*
* For comprehensive instructions and wiring diagrams, please visit:
* https://newbiely.com/tutorials/arduino-nano-esp32/arduino-nano-esp32-gps
*/
#include <TinyGPS++.h>
#define RX1PIN D2 // The Arduino Nano ESP32 pin connected to the TX of the GPS module
#define TX1PIN D3 // The Arduino Nano ESP32 pin connected to the RX of the GPS module
TinyGPSPlus gps; // The TinyGPS++ object
void setup() {
Serial.begin(9600);
Serial1.begin(9600, SERIAL_8N1, RX1PIN, TX1PIN);
Serial.println(F("Arduino - GPS module"));
}
void loop() {
if (Serial1.available() > 0) {
if (gps.encode(Serial1.read())) {
if (gps.location.isValid()) {
Serial.print(F("- latitude: "));
Serial.println(gps.location.lat());
Serial.print(F("- longitude: "));
Serial.println(gps.location.lng());
Serial.print(F("- altitude: "));
if (gps.altitude.isValid())
Serial.println(gps.altitude.meters());
else
Serial.println(F("INVALID"));
} else {
Serial.println(F("- location: INVALID"));
}
Serial.print(F("- speed: "));
if (gps.speed.isValid()) {
Serial.print(gps.speed.kmph());
Serial.println(F(" km/h"));
} else {
Serial.println(F("INVALID"));
}
Serial.print(F("- GPS date&time: "));
if (gps.date.isValid() && gps.time.isValid()) {
Serial.print(gps.date.year());
Serial.print(F("-"));
Serial.print(gps.date.month());
Serial.print(F("-"));
Serial.print(gps.date.day());
Serial.print(F(" "));
Serial.print(gps.time.hour());
Serial.print(F(":"));
Serial.print(gps.time.minute());
Serial.print(F(":"));
Serial.println(gps.time.second());
} else {
Serial.println(F("INVALID"));
}
Serial.println();
}
}
if (millis() > 5000 && gps.charsProcessed() < 10)
Serial.println(F("No GPS data received: check wiring"));
}
Detailed Instructions
To get started with Arduino Nano ESP32, follow these steps:
- If you are new to Arduino Nano ESP32, refer to the tutorial on how to set up the environment for Arduino Nano ESP32 in the Arduino IDE.
- Wire the components according to the provided diagram.
- Connect the Arduino Nano ESP32 board to your computer using a USB cable.
- Launch the Arduino IDE on your computer.
- Select the Arduino Nano ESP32 board and its corresponding COM port.
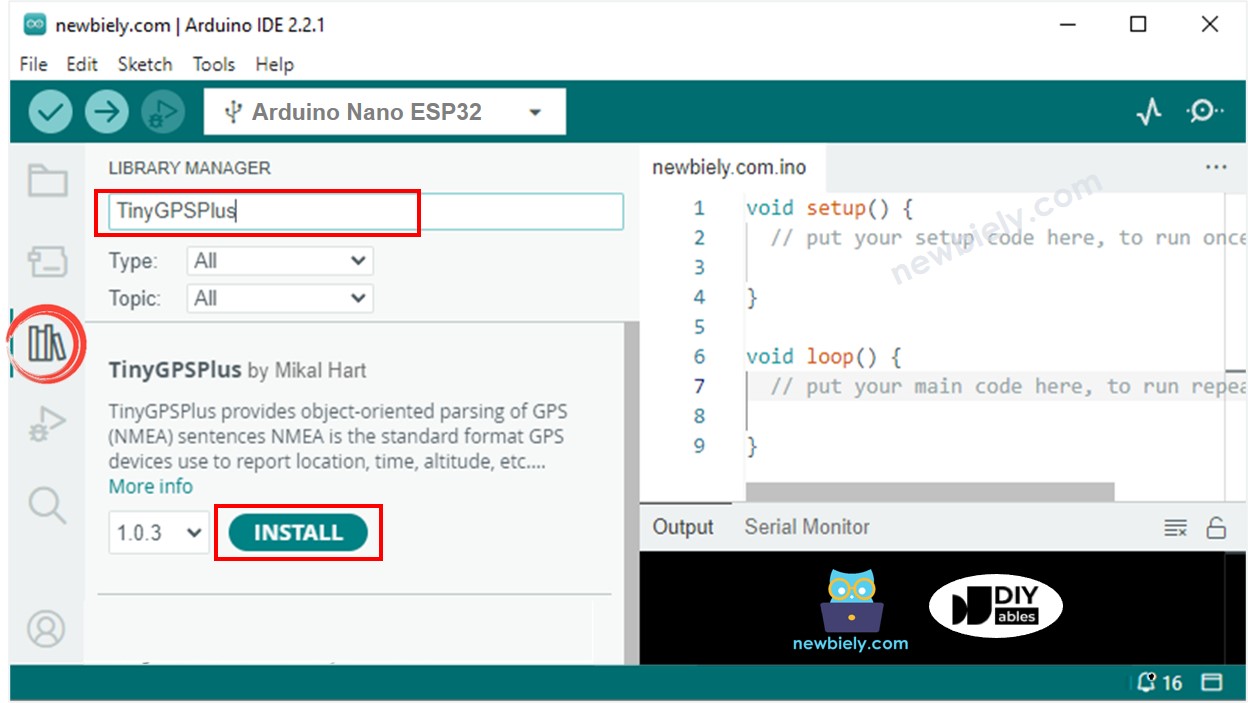
- Click to the Libraries icon on the left bar of the Arduino IDE.
- Search “TinyGPSPlus”, then find the TinyGPSPlus library by Mikal Hart
- Click Install button to install TinyGPSPlus library.
- Copy the above code and open with Arduino IDE
- Click Upload button on Arduino IDE to upload code to Arduino Nano ESP32
- See the result on Serial Monitor:
8
Serial.println("Hello World!");
Message (Enter to send message to 'Arduino Nano ESP32' on 'COM15')
New Line
9600 baud
Calculating the distance from current location to a predefined location
The below code calculates the distance between the current location and London (lat:51.508131 , long: -0.128002)
/*
* This Arduino Nano ESP32 code was developed by newbiely.com
*
* This Arduino Nano ESP32 code is made available for public use without any restriction
*
* For comprehensive instructions and wiring diagrams, please visit:
* https://newbiely.com/tutorials/arduino-nano-esp32/arduino-nano-esp32-gps
*/
#include <TinyGPS++.h>
#define RX1PIN D2 // The Arduino Nano ESP32 pin connected to the TX of the GPS module
#define TX1PIN D3 // The Arduino Nano ESP32 pin connected to the RX of the GPS module
TinyGPSPlus gps; // The TinyGPS++ object
const double LONDON_LAT = 51.508131;
const double LONDON_LON = -0.128002;
void setup() {
Serial.begin(9600);
Serial1.begin(9600, SERIAL_8N1, RX1PIN, TX1PIN);
Serial.println(F("Arduino - GPS module"));
}
void loop() {
if (Serial1.available() > 0) {
if (gps.encode(Serial1.read())) {
if (gps.location.isValid()) {
double latitude = gps.location.lat();
double longitude = gps.location.lng();
unsigned long distanceKm = TinyGPSPlus::distanceBetween(latitude, longitude, LONDON_LAT, LONDON_LON) / 1000;
Serial.print(F("- latitude: "));
Serial.println(latitude);
Serial.print(F("- longitude: "));
Serial.println(longitude);
Serial.print(F("- distance to London: "));
Serial.println(distanceKm);
} else {
Serial.println(F("- location: INVALID"));
}
Serial.println();
}
}
if (millis() > 5000 && gps.charsProcessed() < 10)
Serial.println(F("No GPS data received: check wiring"));
}
Detailed Instructions
- Copy the above code and open with Arduino IDE
- Click Upload button on Arduino IDE to upload code to Arduino Nano ESP32
- See the result on Serial Monitor:
8
Serial.println("Hello World!");
Message (Enter to send message to 'Arduino Nano ESP32' on 'COM15')
New Line
9600 baud