Arduino Nano ESP32 - Potentiometer Servo Motor
This tutorial instructs you how to use Arduino Nano ESP32 to control the angle of a servo motor based on the input value from a potentiometer. In detail, we will learn:
- How to connect the potentiometer and servo motor to Arduino Nano ESP32
- How to program Arduino Nano ESP32 to read the value from a potentiometer and control a servo motor accordingly.
Hardware Preparation
Or you can buy the following kits:
| 1 | × | DIYables Sensor Kit (30 sensors/displays) | |
| 1 | × | DIYables Sensor Kit (18 sensors/displays) |
Disclosure: Some of the links provided in this section are Amazon affiliate links. We may receive a commission for any purchases made through these links at no additional cost to you.
Additionally, some of these links are for products from our own brand, DIYables .
Additionally, some of these links are for products from our own brand, DIYables .
Overview of Servo Motor and Potentiometer
If you are unfamiliar with servo motors and potentiometers, including pinout, functioning, and programming, the following tutorials will be helpful:
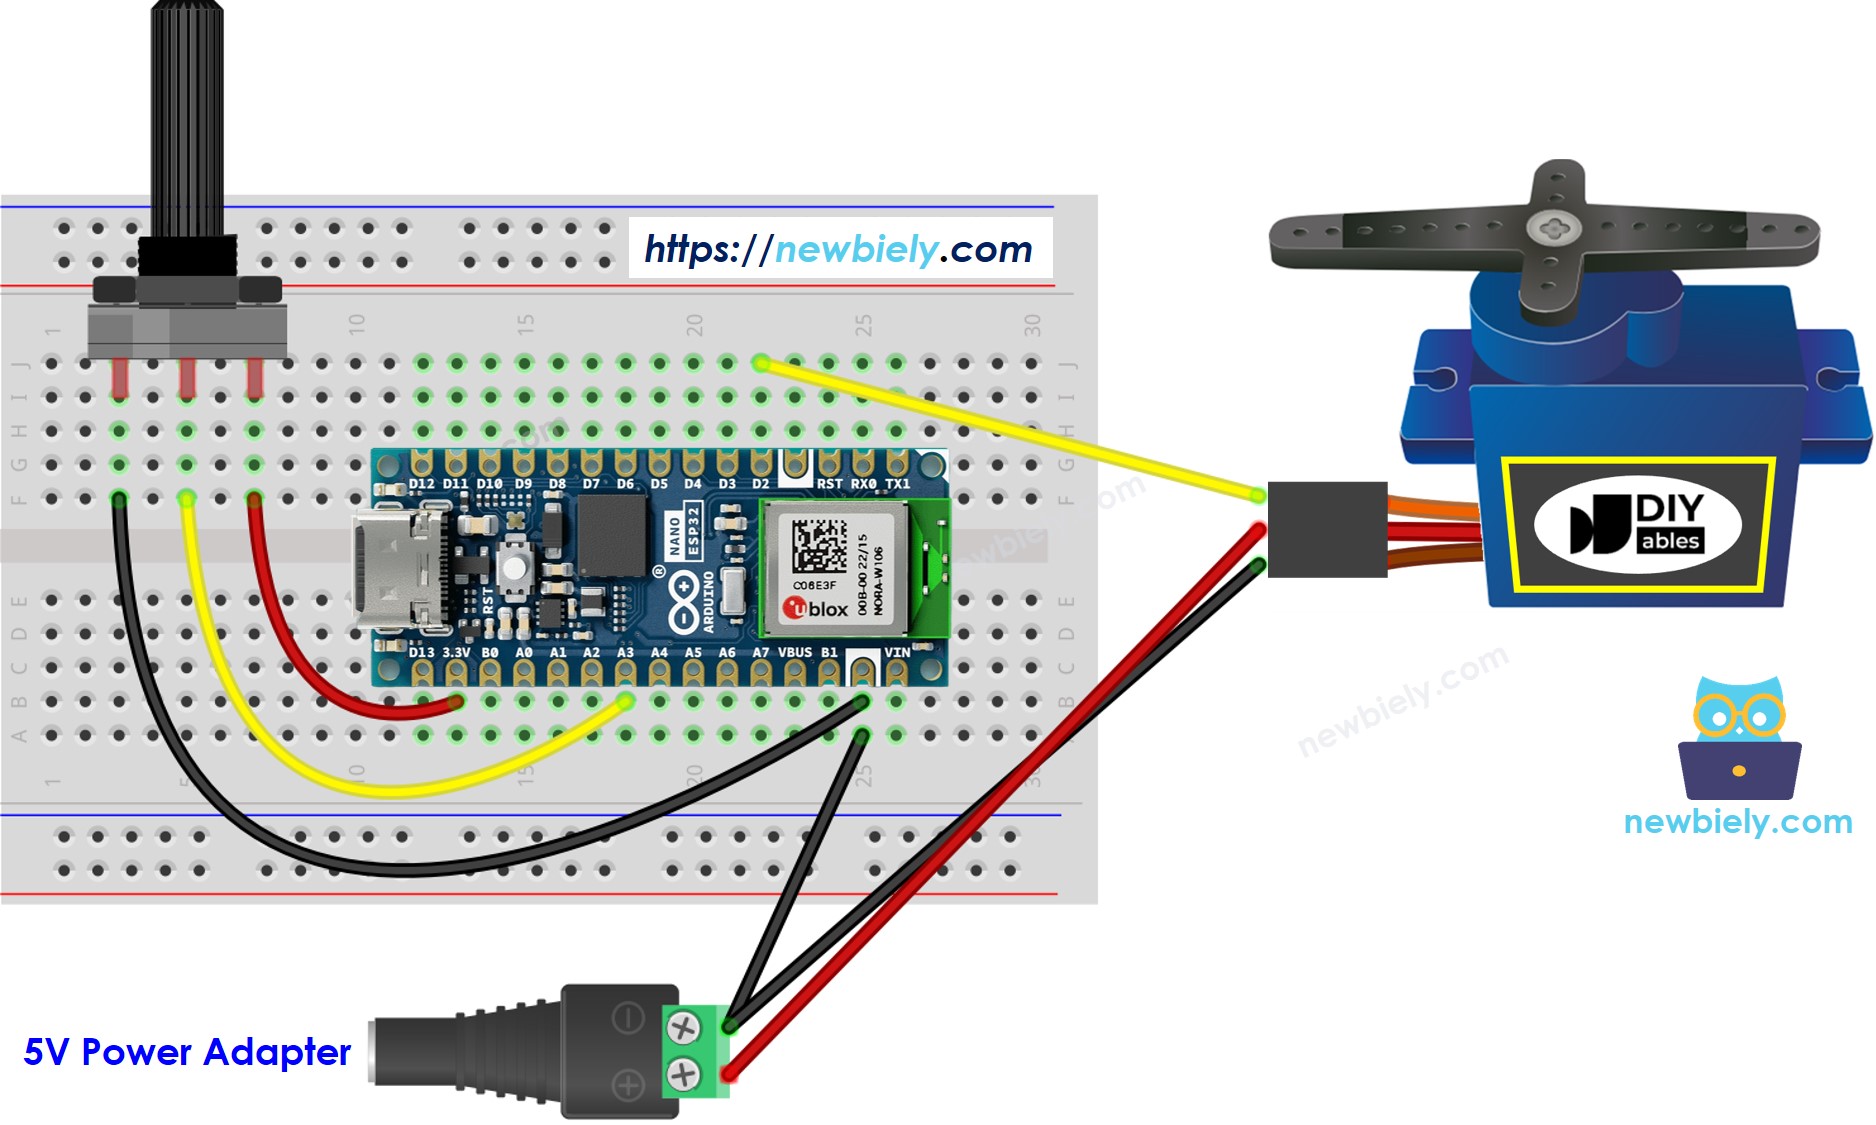
Wiring Diagram

This image is created using Fritzing. Click to enlarge image
How To Program
- Read the value from the potentiometer (ranging from 0 to 1023)
int analog_value = analogRead(A3);
- Convert it it to an angle in the range of 0 to 180.
int angle = map(analog_value, 0, 1023, 0, 180);
- Control the servo to the specified angle.
servo.write(angle);
Arduino Nano ESP32 Code
/*
* This Arduino Nano ESP32 code was developed by newbiely.com
*
* This Arduino Nano ESP32 code is made available for public use without any restriction
*
* For comprehensive instructions and wiring diagrams, please visit:
* https://newbiely.com/tutorials/arduino-nano-esp32/arduino-nano-esp32-potentiometer-servo-motor
*/
#include <ESP32Servo.h>
#define PIN_POTENTIOMETER A3 // The Arduino Nano ESP32 pin connected to potentiometer
#define PIN_SERVO D2 // The Arduino Nano ESP32 pin connected to servo motor
Servo servo; // create servo object to control a servo
void setup() {
// initialize serial communication at 9600 bits per second:
Serial.begin(9600);
// set the ADC attenuation to 11 dB (up to ~3.3V input)
analogSetAttenuation(ADC_11db);
servo.attach(PIN_SERVO); // attaches the Arduino Nano ESP32 pin to the servo object
}
void loop() {
// reads the value of the potentiometer (value between 0 and 4095)
int analogValue = analogRead(PIN_POTENTIOMETER);
// scales it to use it with the servo (value between 0 and 180)
int angle = map(analogValue, 0, 4095, 0, 180);
// sets the servo position according to the scaled value
servo.write(angle);
// print out the value
Serial.print("Analog value: ");
Serial.print(analogValue);
Serial.print(" => Angle: ");
Serial.println(angle);
delay(100);
}
Detailed Instructions
- If you are new to Arduino Nano ESP32, refer to the tutorial on how to set up the environment for Arduino Nano ESP32 in the Arduino IDE.
- Wire the components as shown in the diagram.
- Connect the Arduino Nano ESP32 board to your computer using a USB cable.
- Open Arduino IDE on your computer.
- Choose the Arduino Nano ESP32 board, and its respective COM port.
- Copy the code above and open it in the Arduino IDE.
- Click the Upload button in the Arduino IDE to transfer the code to the Arduino Nano ESP32.

- Open the Serial Monitor
- Turn the potentiometer
- Check out the servo motor's rotation
- View the result in the Serial Monitor
COM6
Analog: 0, Angle: 0
Analog: 85, Angle: 14
Analog: 201, Angle: 35
Analog: 286, Angle: 50
Analog: 370, Angle: 65
Analog: 444, Angle: 78
Analog: 521, Angle: 91
Analog: 608, Angle: 106
Analog: 690, Angle: 121
Analog: 793, Angle: 139
Analog: 907, Angle: 159
Analog: 1023, Angle: 180
Analog: 1023, Angle: 180
Autoscroll
Clear output
9600 baud
Newline
Code Explanation
Check out the line-by-line explanation contained in the comments of the source code!
