Arduino Nano ESP32 - Temperature Sensor - OLED

This tutorial instructs you how to read the temperature from DS18B20 one wire sensor and display it on an OLED.

Hardware Preparation

1×Arduino Nano ESP32
1×USB Cable Type-C
1×SSD1306 I2C OLED Display 128x64
1×DS18B20 Temperature Sensor (WITH Adapter)
1×DS18B20 Temperature Sensor (WITHOUT Adapter)
1×Breadboard
1×Jumper Wires
1×(Recommended) Screw Terminal Adapter for Arduino Nano

Or you can buy the following sensor kits:

1×DIYables Sensor Kit (30 sensors/displays)
1×DIYables Sensor Kit (18 sensors/displays)
Disclosure: Some of the links provided in this section are Amazon affiliate links. We may receive a commission for any purchases made through these links at no additional cost to you. We appreciate your support.

Buy Note: Many DS18B20 sensors available in the market are unreliable. We strongly recommend buying the sensor from the DIYables brand using the link provided above. We tested it, and it worked reliably.

Overview of OLED and DS18B20 Temperature Sensor

If you do not know about OLED and DS18B20 Temperature Sensor (pinout, how it works, how to program ...), learn about them in the following tutorials:

Wiring Diagram

The wiring diagram between Arduino Nano ESP32 and DS18B20 Temperature Sensor OLED

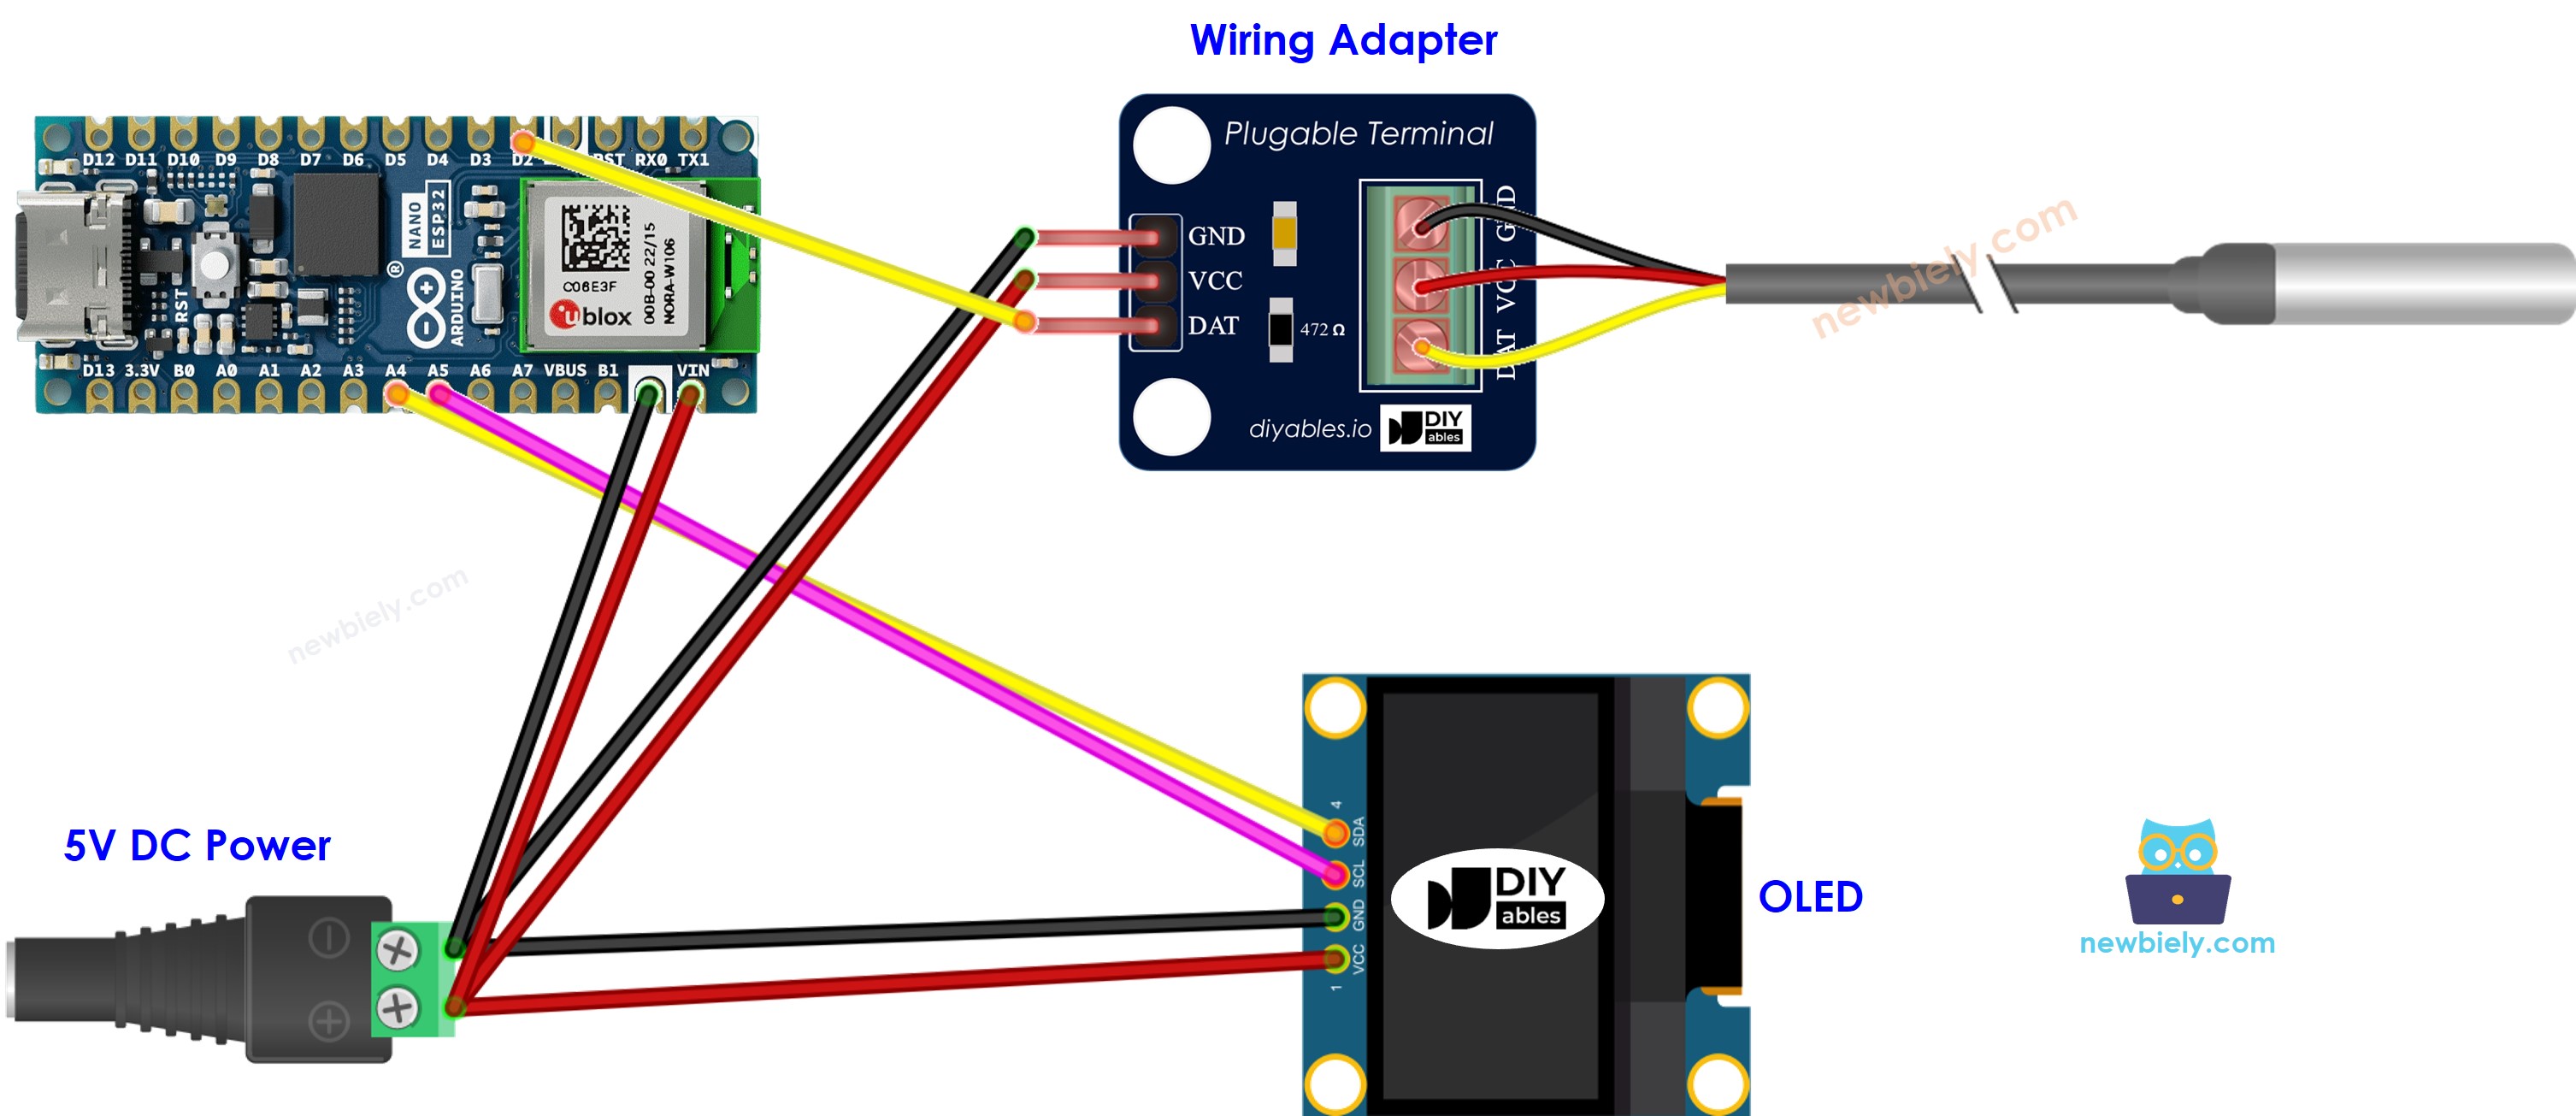
This image is created using Fritzing. Click to enlarge image

We suggest purchasing a DS18B20 sensor that comes with a wiring adapter for easy connection. The adapter has a built-in resistor, eliminating the need for a separate one in the wiring.

Arduino Nano ESP32 Code - Temperature from DS18B20 Temperature Sensor and display it on OLED

/* * This Arduino Nano ESP32 code was developed by newbiely.com * * This Arduino Nano ESP32 code is made available for public use without any restriction * * For comprehensive instructions and wiring diagrams, please visit: * https://newbiely.com/tutorials/arduino-nano-esp32/arduino-nano-esp32-temperature-sensor-oled */ #include <Wire.h> #include <Adafruit_GFX.h> #include <Adafruit_SSD1306.h> #include <OneWire.h> #include <DallasTemperature.h> #define SCREEN_WIDTH 128 // OLED display width, in pixels #define SCREEN_HEIGHT 64 // OLED display height, in pixels #define SENSOR_PIN D2 // The Arduino Nano ESP32 pin connected to DS18B20 sensor's data pin Adafruit_SSD1306 oled(SCREEN_WIDTH, SCREEN_HEIGHT, &Wire, -1); // create SSD1306 display object connected to I2C OneWire oneWire(SENSOR_PIN); // setup a oneWire instance DallasTemperature DS18B20(&oneWire); // pass oneWire to DallasTemperature library String temperature; void setup() { Serial.begin(9600); // initialize OLED display with address 0x3C for 128x64 if (!oled.begin(SSD1306_SWITCHCAPVCC, 0x3C)) { Serial.println(F("SSD1306 allocation failed")); while (true); } delay(2000); // wait for initializing oled.clearDisplay(); // clear display oled.setTextSize(2); // text size oled.setTextColor(WHITE); // text color oled.setCursor(0, 10); // position to display DS18B20.begin(); // initialize the sensor temperature.reserve(10); // to avoid fragmenting memory when using String } void loop() { DS18B20.requestTemperatures(); // send the command to get temperatures float tempCelsius = DS18B20.getTempCByIndex(0); // read temperature in Celsius temperature = String(tempCelsius, 2); // two decimal places temperature += "°C"; Serial.println(temperature); // print the temperature in Celsius to Serial Monitor oledDisplayCenter(temperature); } void oledDisplayCenter(String text) { int16_t x1; int16_t y1; uint16_t width; uint16_t height; oled.getTextBounds(text, 0, 0, &x1, &y1, &width, &height); // display on horizontal and vertical center oled.clearDisplay(); // clear display oled.setCursor((SCREEN_WIDTH - width) / 2, (SCREEN_HEIGHT - height) / 2); oled.println(text); // text to display oled.display(); }

Detailed Instructions

To get started with Arduino Nano ESP32, follow these steps:

  • If you are new to Arduino Nano ESP32, refer to the tutorial on how to set up the environment for Arduino Nano ESP32 in the Arduino IDE.
  • Wire the components according to the provided diagram.
  • Connect the Arduino Nano ESP32 board to your computer using a USB cable.
  • Launch the Arduino IDE on your computer.
  • Select the Arduino Nano ESP32) board and its corresponding COM port.
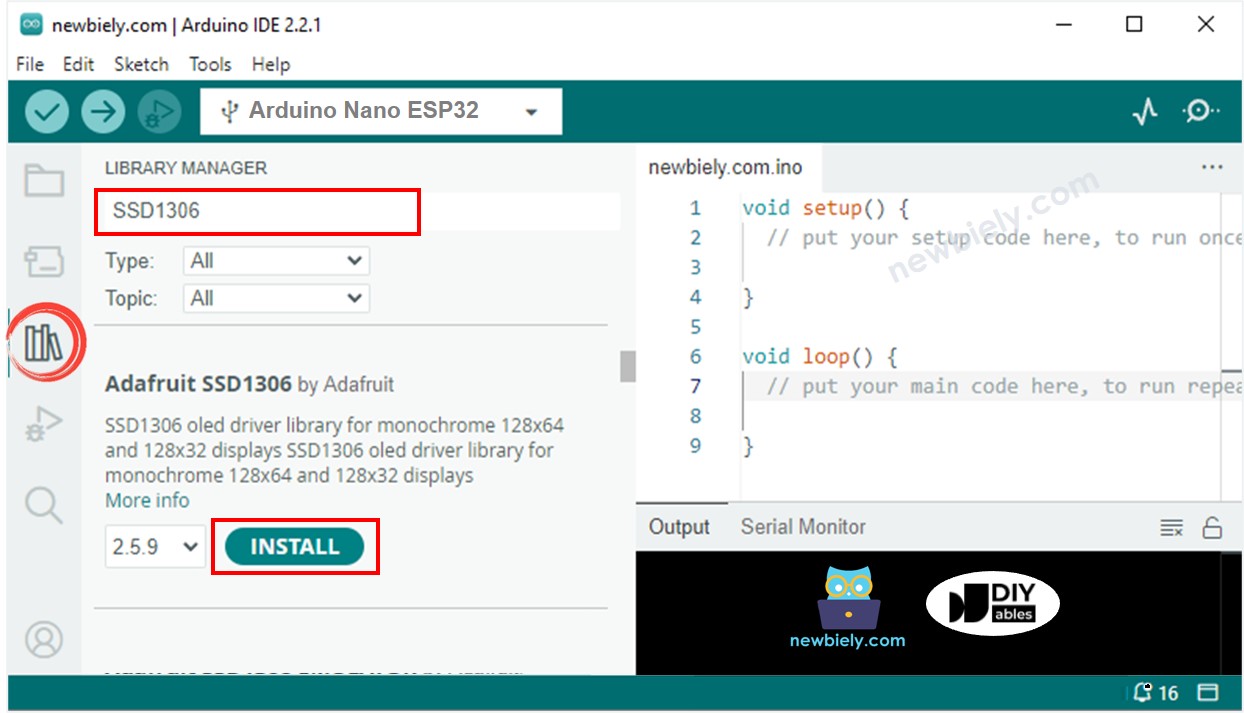
  • Click to the Libraries icon on the left bar of the Arduino IDE.
  • Search “SSD1306”, then find the SSD1306 library by Adafruit
  • Click Install button to install the library.
Arduino Nano ESP32 OLED library
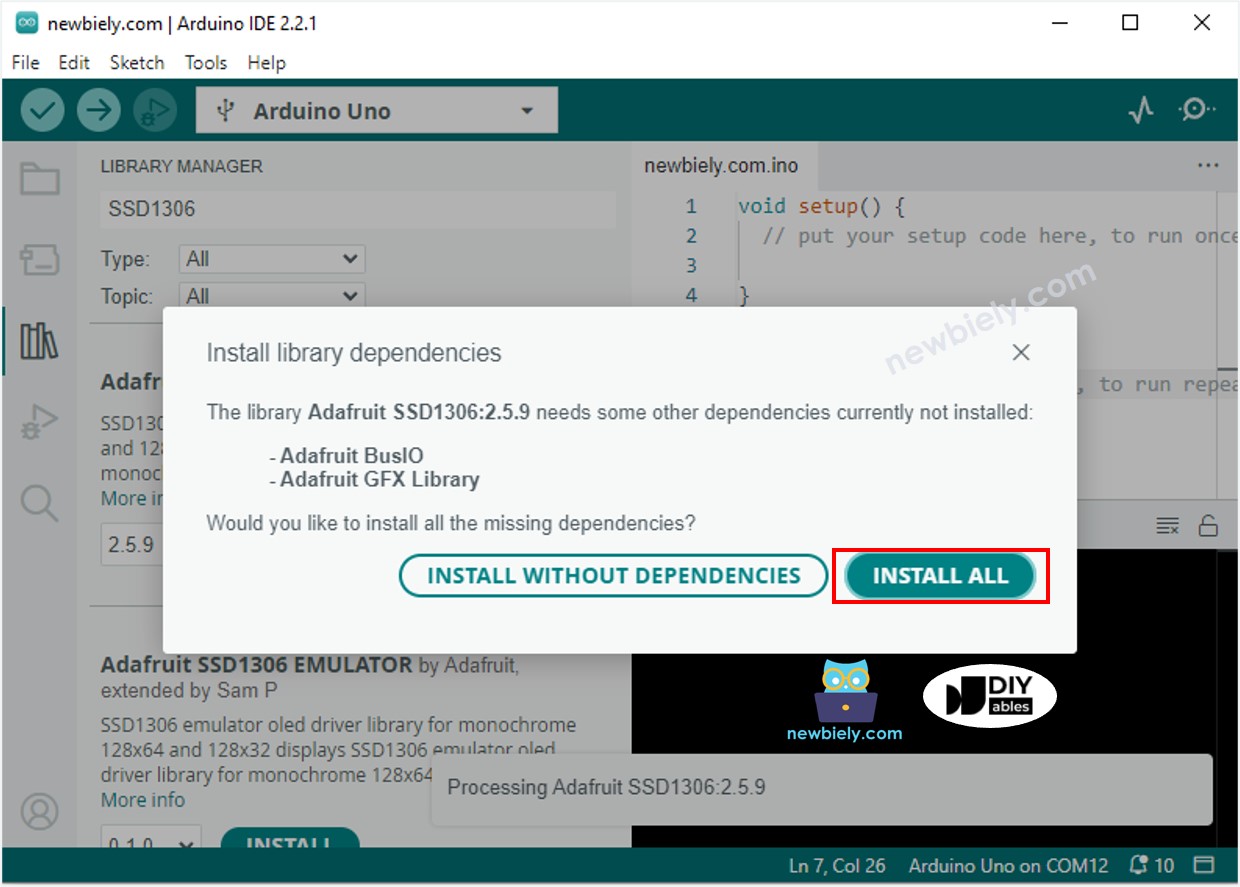
  • You will be asked for intalling some other library dependencies
  • Click Install All button to install all library dependencies.
Arduino Nano ESP32 Adafruit GFX sensor library
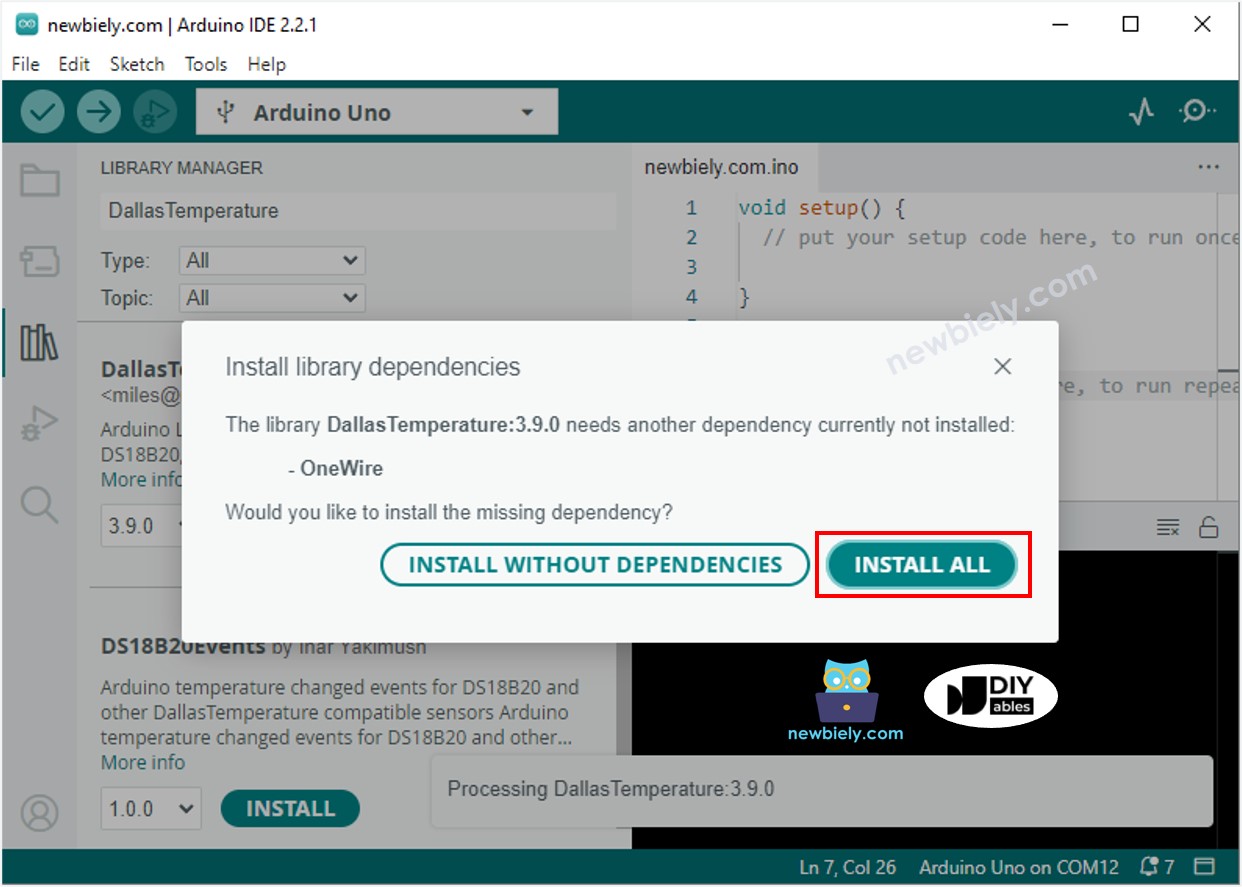
  • Search “DallasTemperature” on the search box, then look for the DallasTemperature library by Miles Burton.
  • Click Install button to install DallasTemperature library.
Arduino Nano ESP32 Dallas Temperature library
  • You will be asked to install the dependency. Click Install All button to install OneWire library.
Arduino Nano ESP32 onewire library
  • Copy the above code and open with Arduino IDE
  • Click Upload button on Arduino IDE to upload code to ESP32
  • Put the sensor on hot and cold water, or grasp the sensor by your hand
  • See the result on OLED

※ NOTE THAT:

The about code automatically horizontal and vertical center aligns the text on OLED display

Video Tutorial

※ OUR MESSAGES

  • As freelancers, We are AVAILABLE for HIRE. See how to outsource your project to us
  • Please feel free to share the link of this tutorial. However, Please do not use our content on any other websites. We invested a lot of effort and time to create the content, please respect our work!