Raspberry Pi - DHT11
This tutorial instructs you how to use Raspberry Pi to read the temperature and humidity from DHT11 sensor. In detail, we will learn:
- How to connect Raspberry Pi to the DHT11 sensor
- How to program Raspberry Pi to read temperature and humidity values from a DHT11
We suggest:
- Utilizing a waterproof DS18B20 temperature sensor if you are only looking to measure temperature. This is an affordable and tidy sensor that can be placed in either hot or cold water.
- Utilizing a DHT22 temperature and humidity sensor if you are only looking to measure temperature and humidity with a higher accuracy.
Hardware Preparation
Or you can buy the following kits:
| 1 | × | DIYables Sensor Kit (18 sensors/displays) |
Additionally, some of these links are for products from our own brand, DIYables .
Overview of DHT11 Temperature and Humidity Sensor
The Temperature and Humidity Sensor Pinout
The DHT11 on the market comes with two forms: sensor and module.
The DHT11 sensors in their original form have four pins:
- GND: This pin must be connected to ground (0V)
- VCC: This pin must be connected to the voltage supply (5V)
- DATA: This pin is used for communication between the sensor and Raspberry Pi
- NC: This pin should not be connected and can be ignored
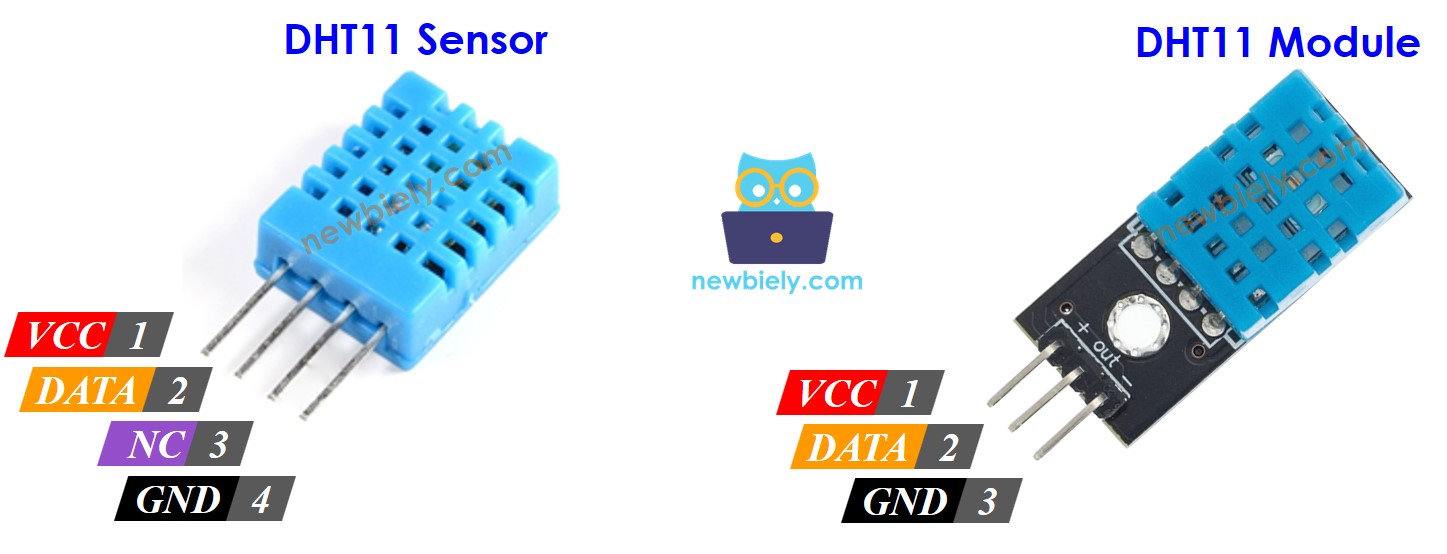
The DHT11 module has three pins:
- GND pin (-): must be connected to GND (0V)
- VCC pin (+): must be connected to VCC (5V)
- OUT pin: used for communication between the sensor and Raspberry Pi
※ NOTE THAT:
The arrangement of pins on a module can differ between manufacturers. It is essential to always use the labels printed on the module when working with it. Be sure to take a close look!
Wiring Diagram
Wiring to Raspberry Pi is the same for both sensors. In its original form, a resistor with a value between 5K and 10K Ohms is necessary to keep the data line high, thus enabling communication between the sensor and the Raspberry Pi.
Raspberry Pi - DHT11 Sensor Wiring
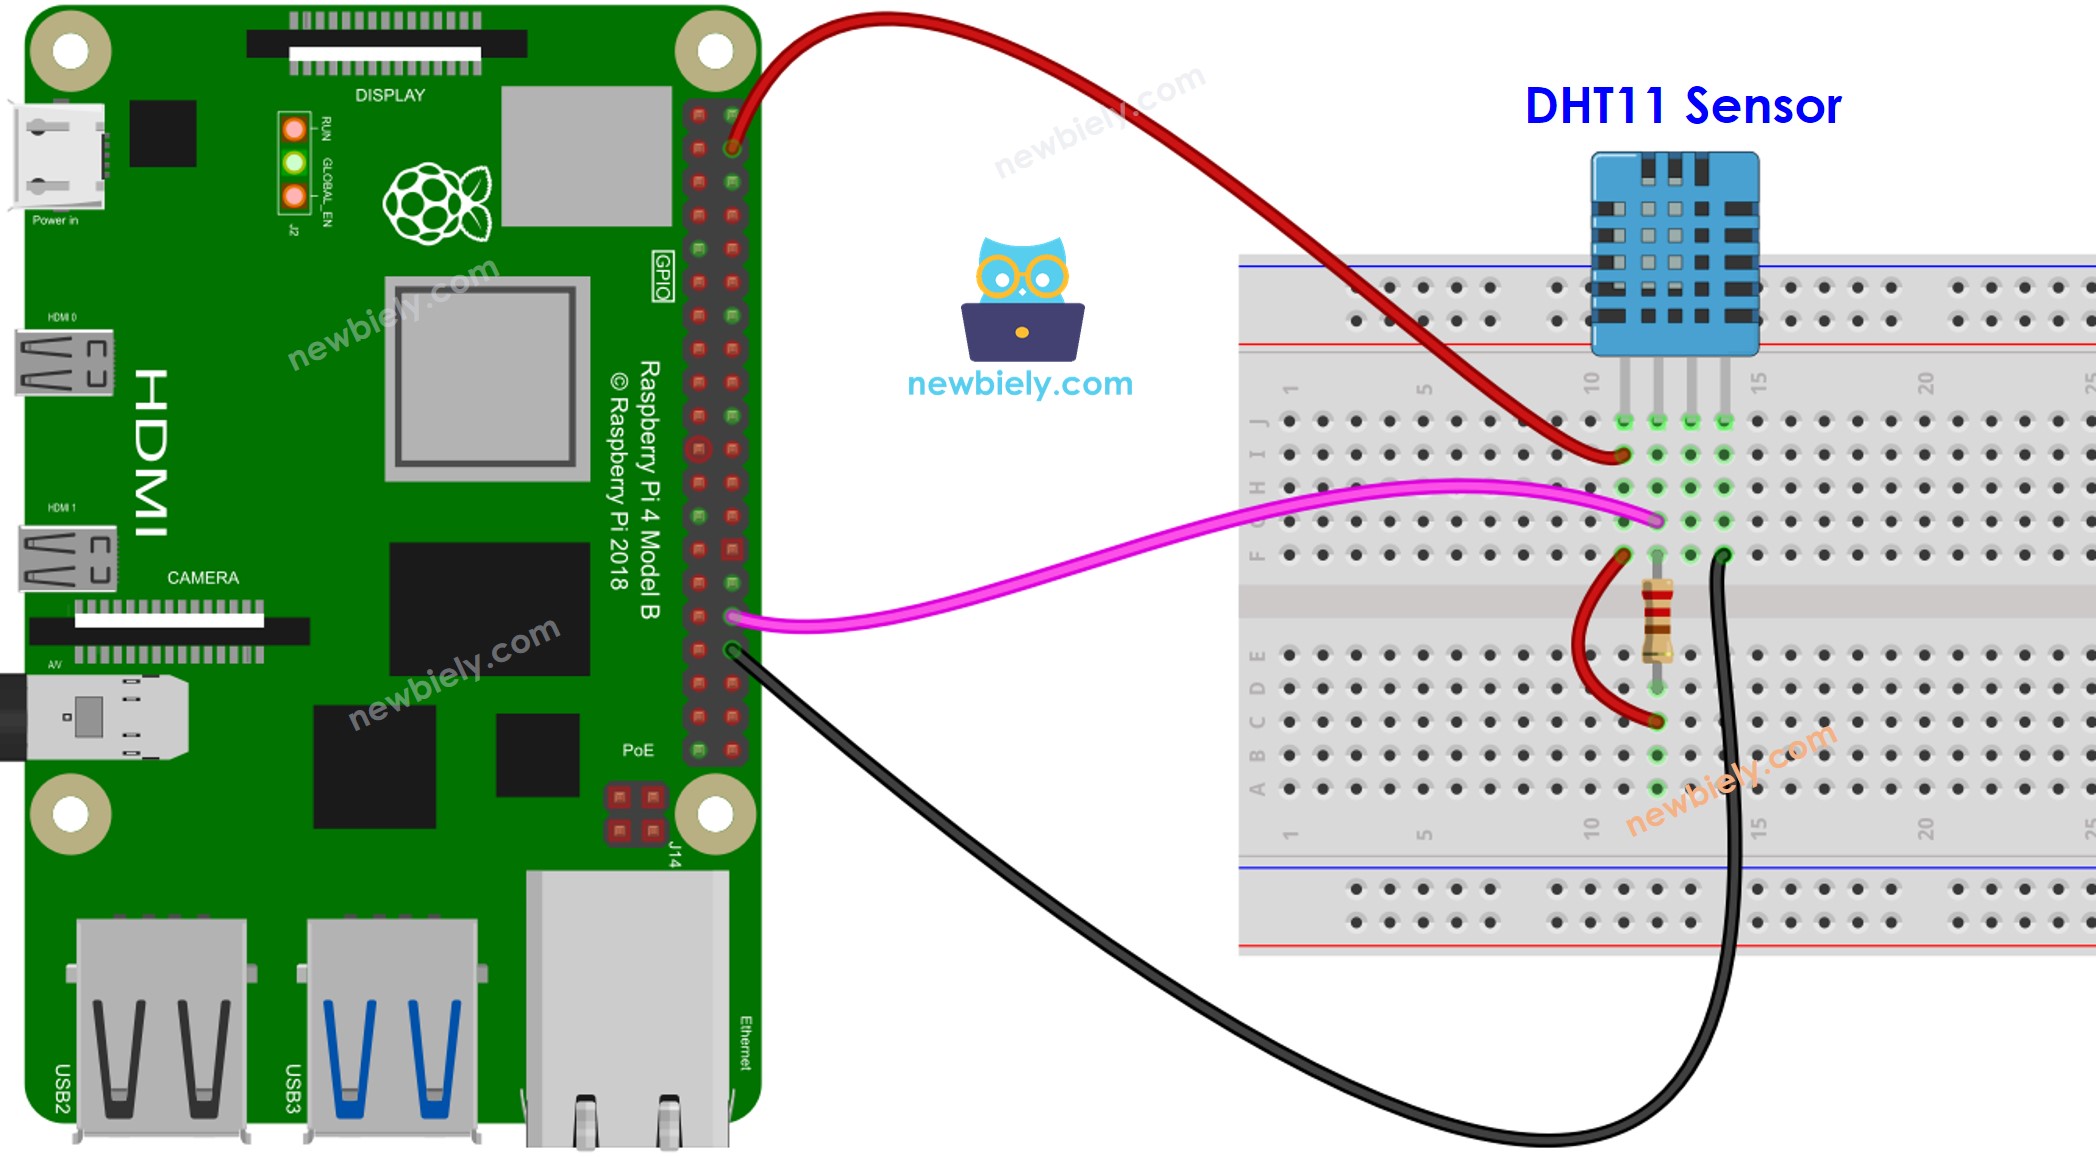
This image is created using Fritzing. Click to enlarge image
Connect the DHT11 sensor to the Raspberry Pi as follows:
- DHT11 VCC pin to Raspberry Pi 5V (pin 2 or any 5V GPIO pin)
- DHT11 GND pin to Raspberry Pi GND (pin 30 or any GND GPIO pin)
- DHT11 DATA pin to a GPIO pin on the Raspberry Pi (e.g., GPIO 12 (pin 32).
For better stability, you need to add a resistor (a value between 5K and 10K Ohms) between the VCC and DATA pins of the DHT11.
Raspberry Pi - DHT11 Module Wiring
Most DHT11 sensor modules come with an integrated resistor, thus eliminating the need for additional wiring or soldering.
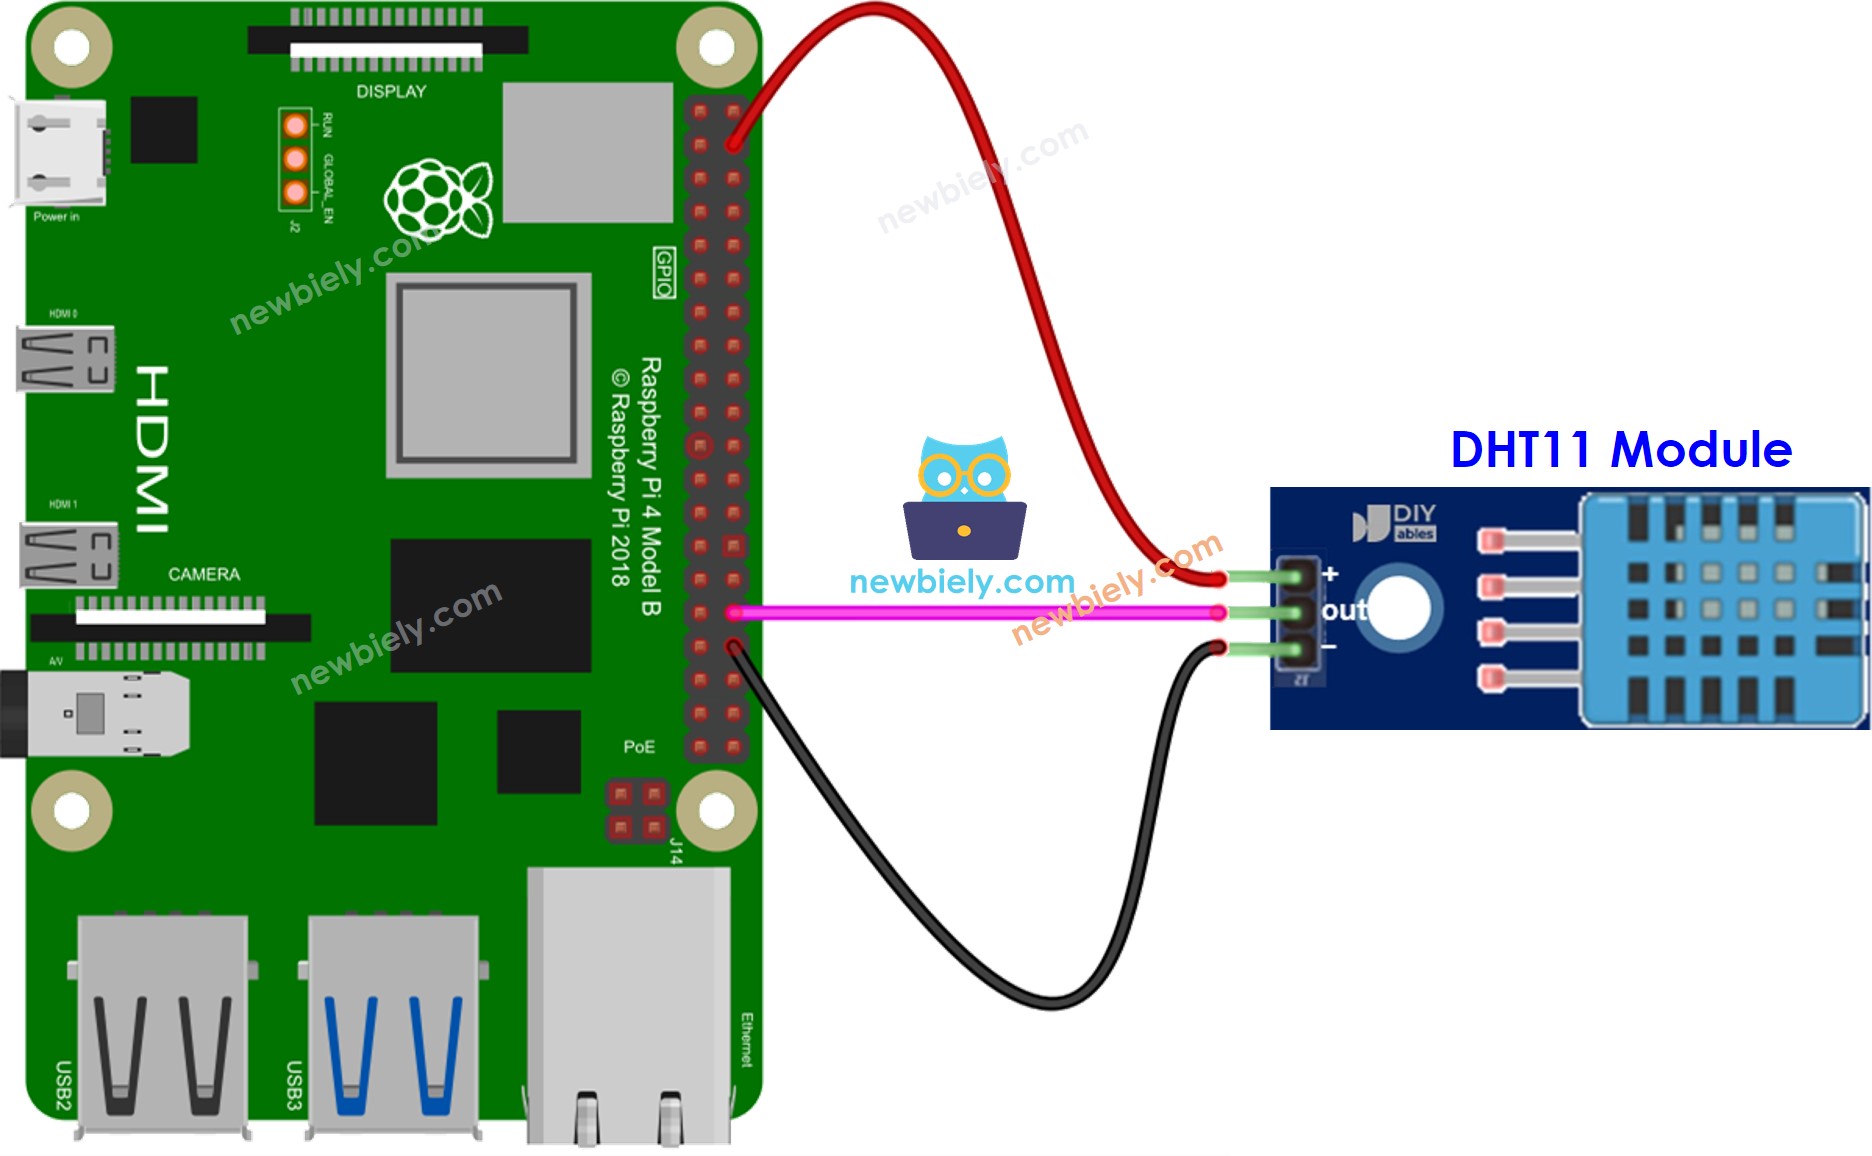
This image is created using Fritzing. Click to enlarge image
To simplify and organize your wiring setup, we recommend using a Screw Terminal Block Shield for Raspberry Pi. This shield ensures more secure and manageable connections, as shown below:

Connect the DHT11 module to the Raspberry Pi as follows:
- DHT11 VCC pin to Raspberry Pi 5V (pin 2 or any 5V GPIO pin)
- DHT11 GND pin to Raspberry Pi GND (pin 30 or any GND GPIO pin)
- DHT11 DATA pin to a GPIO pin on the Raspberry Pi (e.g., GPIO 12 (pin 32).
How To Program for Raspberry Pi to read Temperature and Humidity from DHT11 Sensor
Detailed Instructions
- Make sure you have Raspbian or any other Raspberry Pi compatible operating system installed on your Pi.
- Make sure your Raspberry Pi is connected to the same local network as your PC.
- Make sure your Raspberry Pi is connected to the internet if you need to install some libraries.
- If this is the first time you use Raspberry Pi, See how to set up the Raspberry Pi
- Connect your PC to the Raspberry Pi via SSH using the built-in SSH client on Linux and macOS or PuTTY on Windows. See to how connect your PC to Raspberry Pi via SSH.
- Make sure you have the RPi.GPIO library installed. If not, install it using the following command:
- Install the library for DHT11 temperature and humidity sensor by running the following command:
- Create a Python script file DHT11.py and add the following code:
- Save the file and run the Python script by executing the following command in the Terminal:
- Check the results on the terminal.
The script continuously reads the sensor data every 2 seconds (as specified in the time.sleep(2) line), so you will see updated readings like this every 2 seconds until you stop the script by pressing Ctrl + C keys in the terminal.
If, for any reason, the script fails to read data from the sensor, it will display:
Additional Knowledge
Remember that the DHT11 sensor is not the most accurate or reliable sensor available. If you need more precision, you might consider using the DHT22 or other more advanced sensors.
Let's compare DHT11 and DHT22 sensors.
The commons between DHT11 and DHT22
- Providing the temperature and humidity information.
- Pinouts remain the same.
- The wiring to Raspberry Pi is unchanged.
The differences between DHT11 and DHT22
| DHT11 | DHT22 | |
|---|---|---|
| Price | ultra low cost | low cost |
| Temperature Range | 0°C to 50°C | -40°C to 80°C |
| Temperature Accuracy | ± 2°C | ± 0.5°C |
| Humidity Range | 20% to 80% | 0% to 100% |
| Humidity Accuracy | 5% | ± 2 to 5% |
| Reading Rate | 1Hz (once every second) | 0.5Hz (once every 2 seconds) |
| Body size | 15.5mm x 12mm x 5.5mm | 15.1mm x 25mm x 7.7mm |
Evidently, the DHT22 is more precise than the DHT11 and has a broader range, though it is pricier.