Raspberry Pi - LED Matrix
This tutorial instructs you how to use Raspberry Pi with LED matrix display. In detail, we will learn:
- About LED matrix display
- How to connect Raspberry Pi to 8x8 LED matrix
- How to connect Raspberry Pi to 32x8 LED matrix
- How to program Raspberry Pi to display text, numbers, and animated effects on the LED matrix.
Subsequently, customizing the code for other LED matrices such as 16x8, 64x8 and so on is straightforward.
Hardware Preparation
Or you can buy the following kits:
| 1 | × | DIYables Sensor Kit (18 sensors/displays) |
Additionally, some of these links are for products from our own brand, DIYables .
Overview of LED Matrix
LED matrix displays are commonly referred to as LED displays or dot matrix displays.
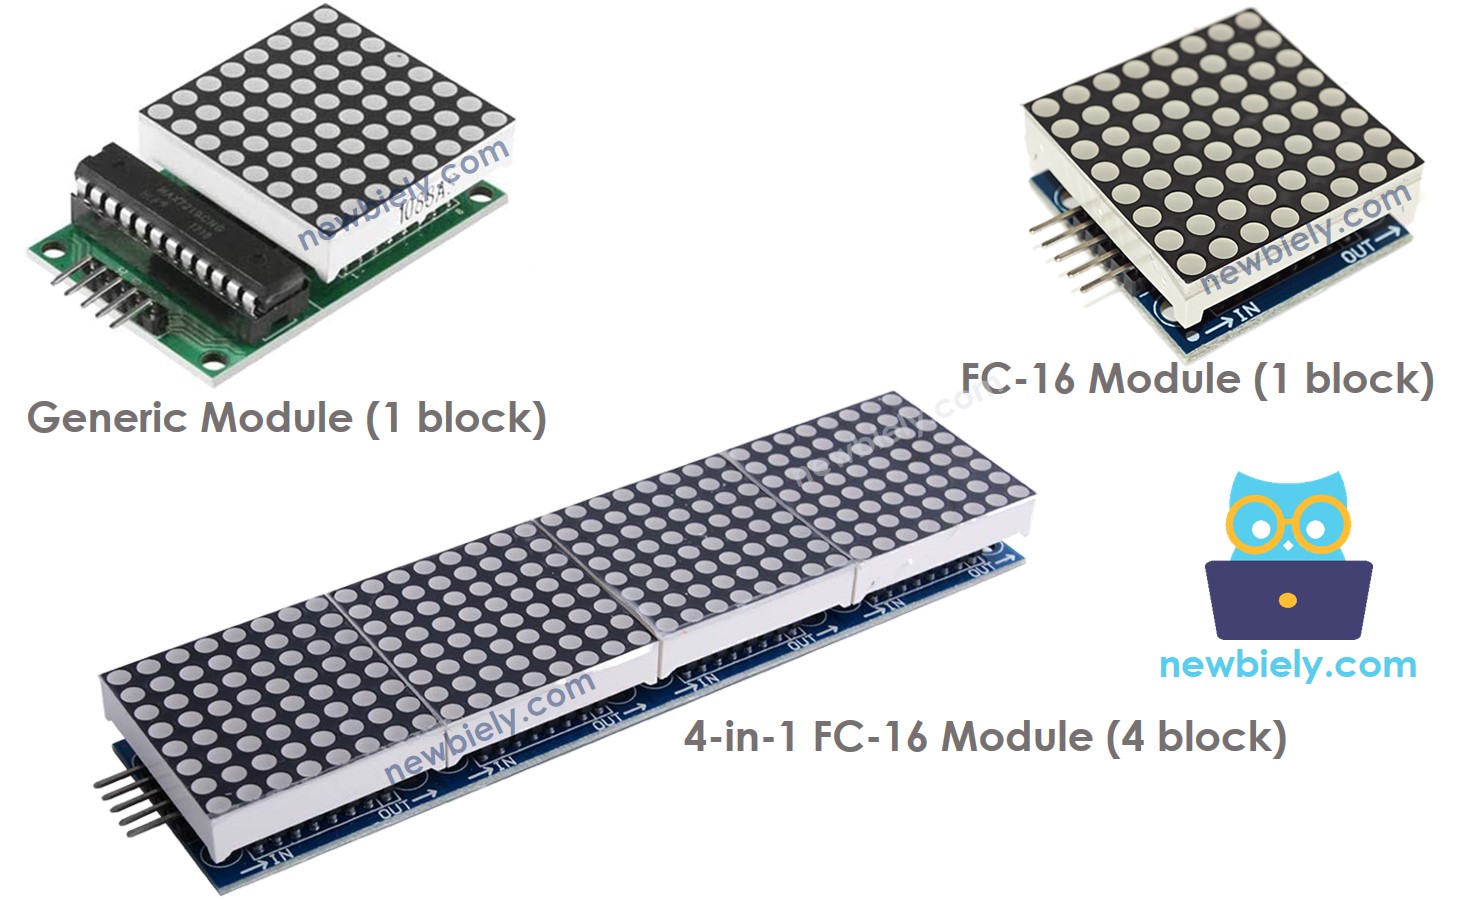
LED Matrix come in many varieties. The MAX7219-based LED matrix is popularly used with Raspberry Pi. It has the following characteristics:
- A single block comprises a base unit of an LED matrix, which contains an 8x8 LED matrix (64 LED) and a MAX7219 driver.
- There are two types of blocks available: the generic module and the FC-16 module.
- You can create a LED matrix with one block or multiple blocks connected in a daisy-chain.
- Pre-built multiple-block LED Matrix (e.g. 4-in-1, 8-in-1) are also available for purchase.
- Alternatively, you can buy multiple blocks and wire them together to form a LED matrix with the desired size.
- In the Raspberry Pi code, you will need to declare the size of the LED matrix you are using.
The LED Matrix Pinout
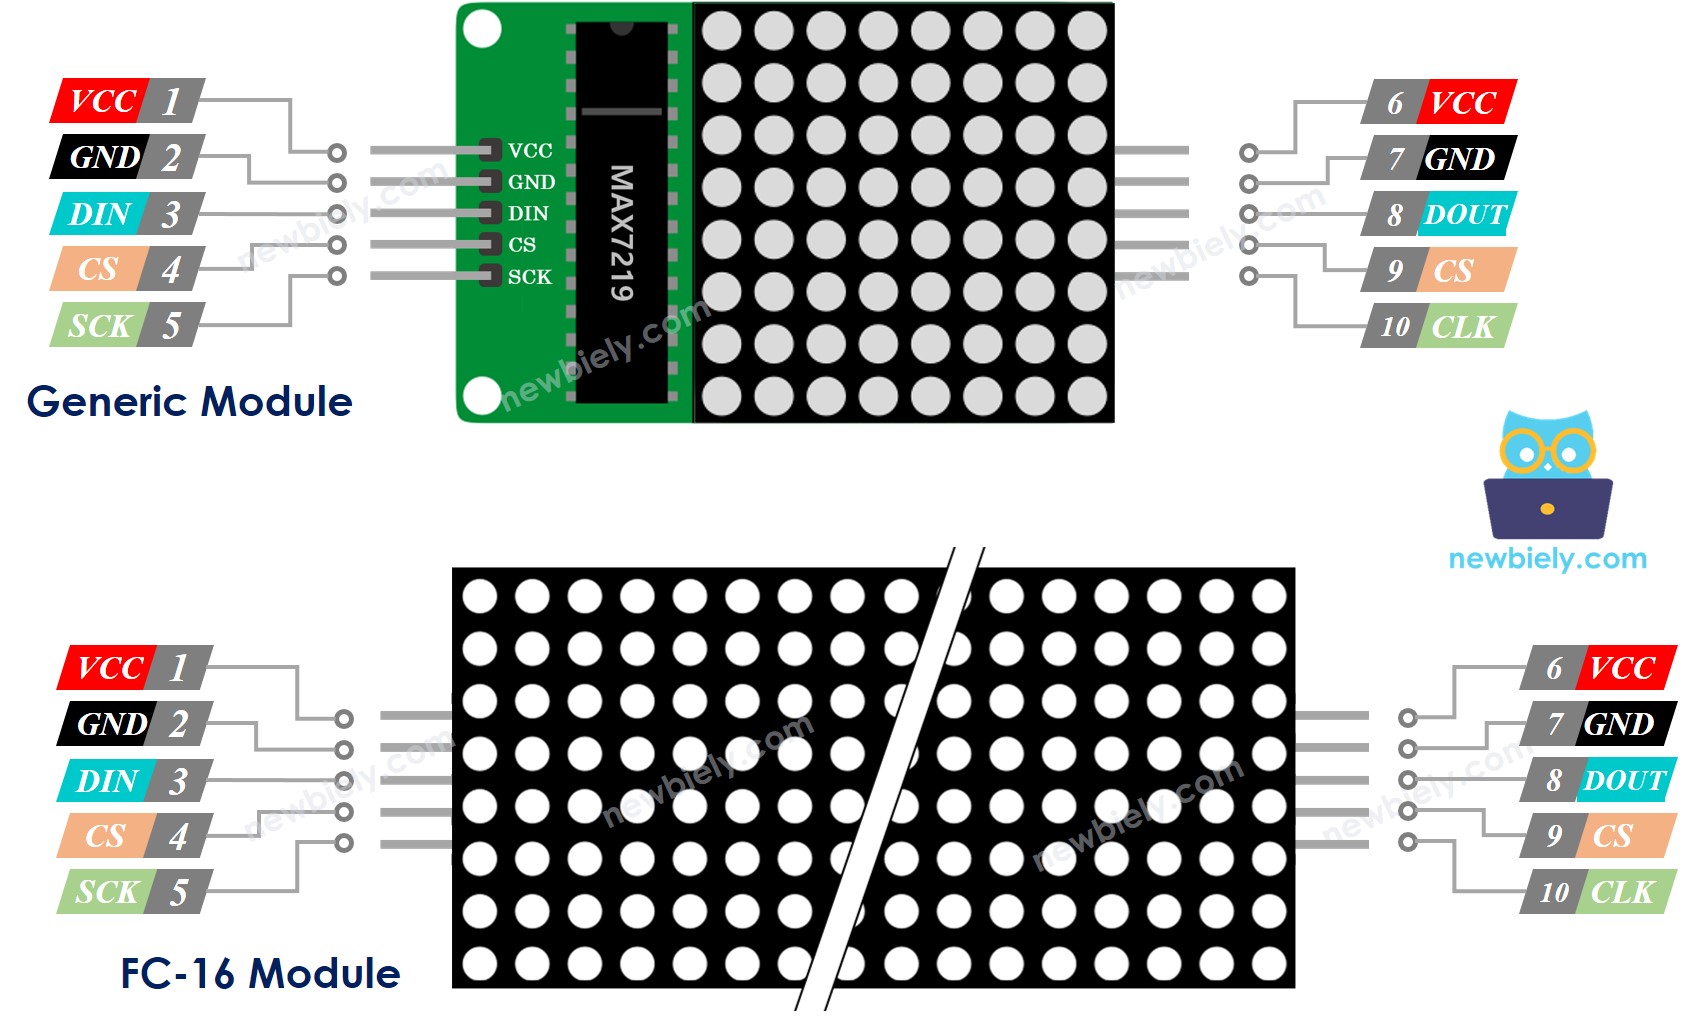
A LED Matrix is composed of one or multiple blocks. Each block has two sets of pins:
- Input pins group:
- VCC: connected to 5V power supply.
- GND: connected to ground.
- DIN: Data pin, linked to the GPIO10 (MOSI) pin of the Raspberry Pi.
- CS: Chip Select, linked to the GPIO8 (SPI CE0) pin of the Raspberry Pi.
- CLK: Clock pin, linked to the GPIO11 (SPI CLK) pin of the Raspberry Pi.
- Output pins group:
- VCC: connects to VCC on the following module.
- GND: connects to GND on the following module.
- DOUT: Data Out, links to the DIN pin of the next module.
- CS: connects to CS on the next module.
- CLK: connects to CLK on the next module.
Wiring Diagram
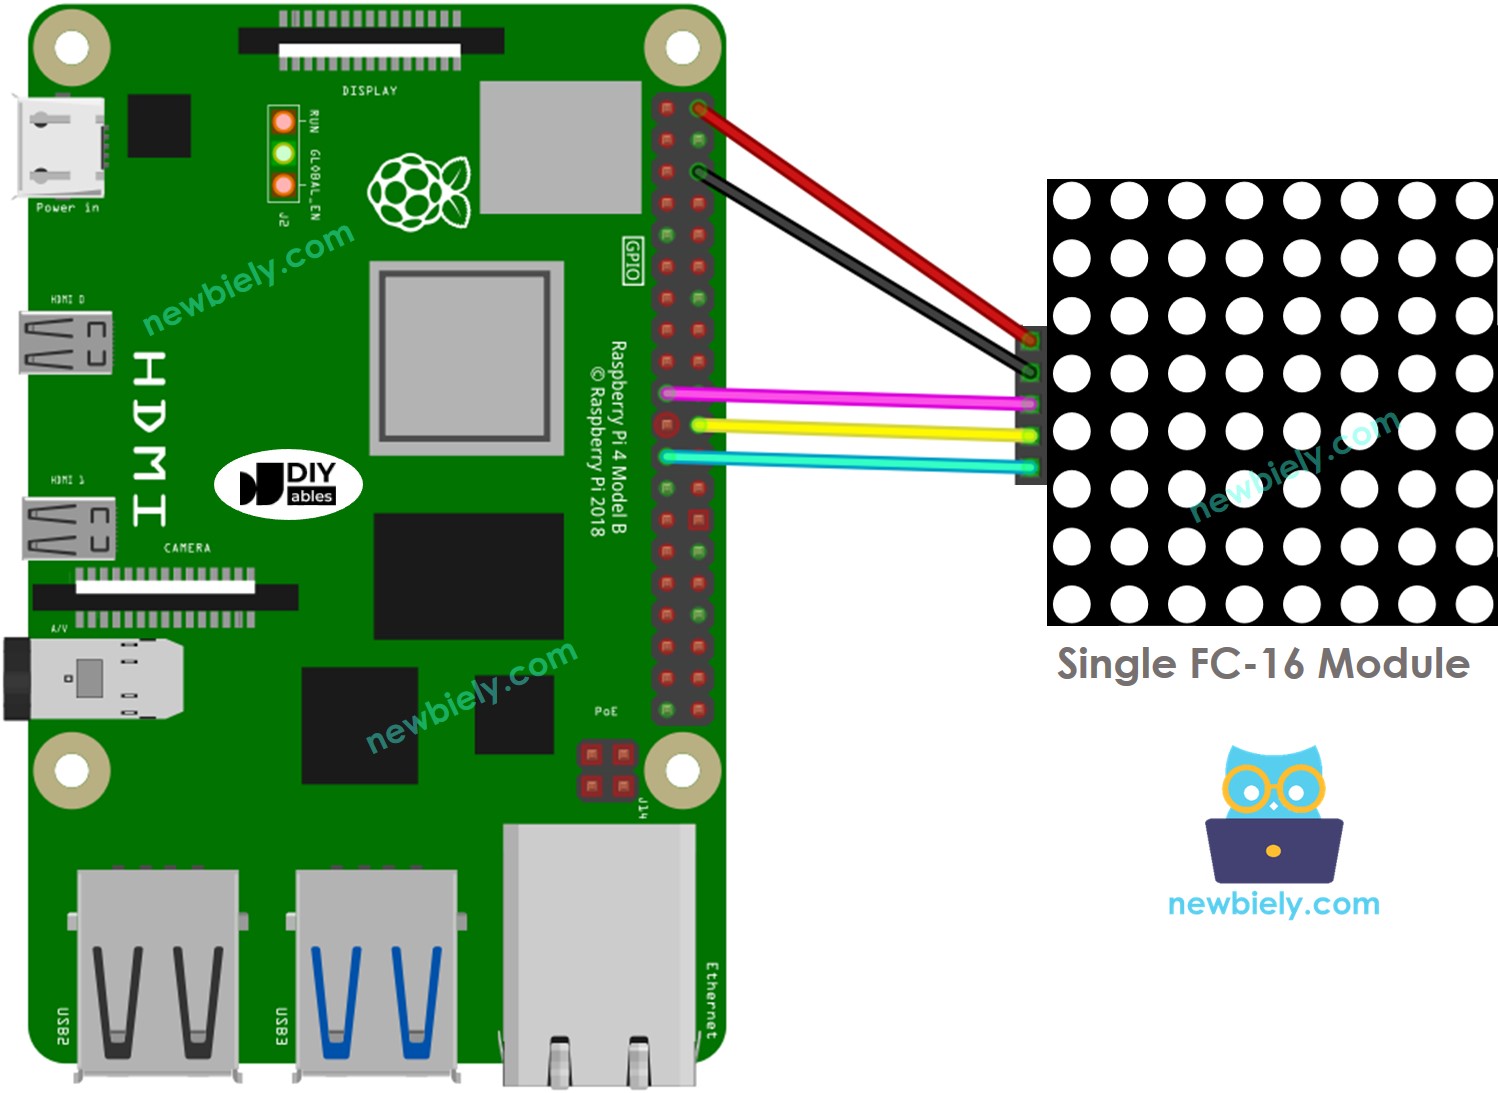
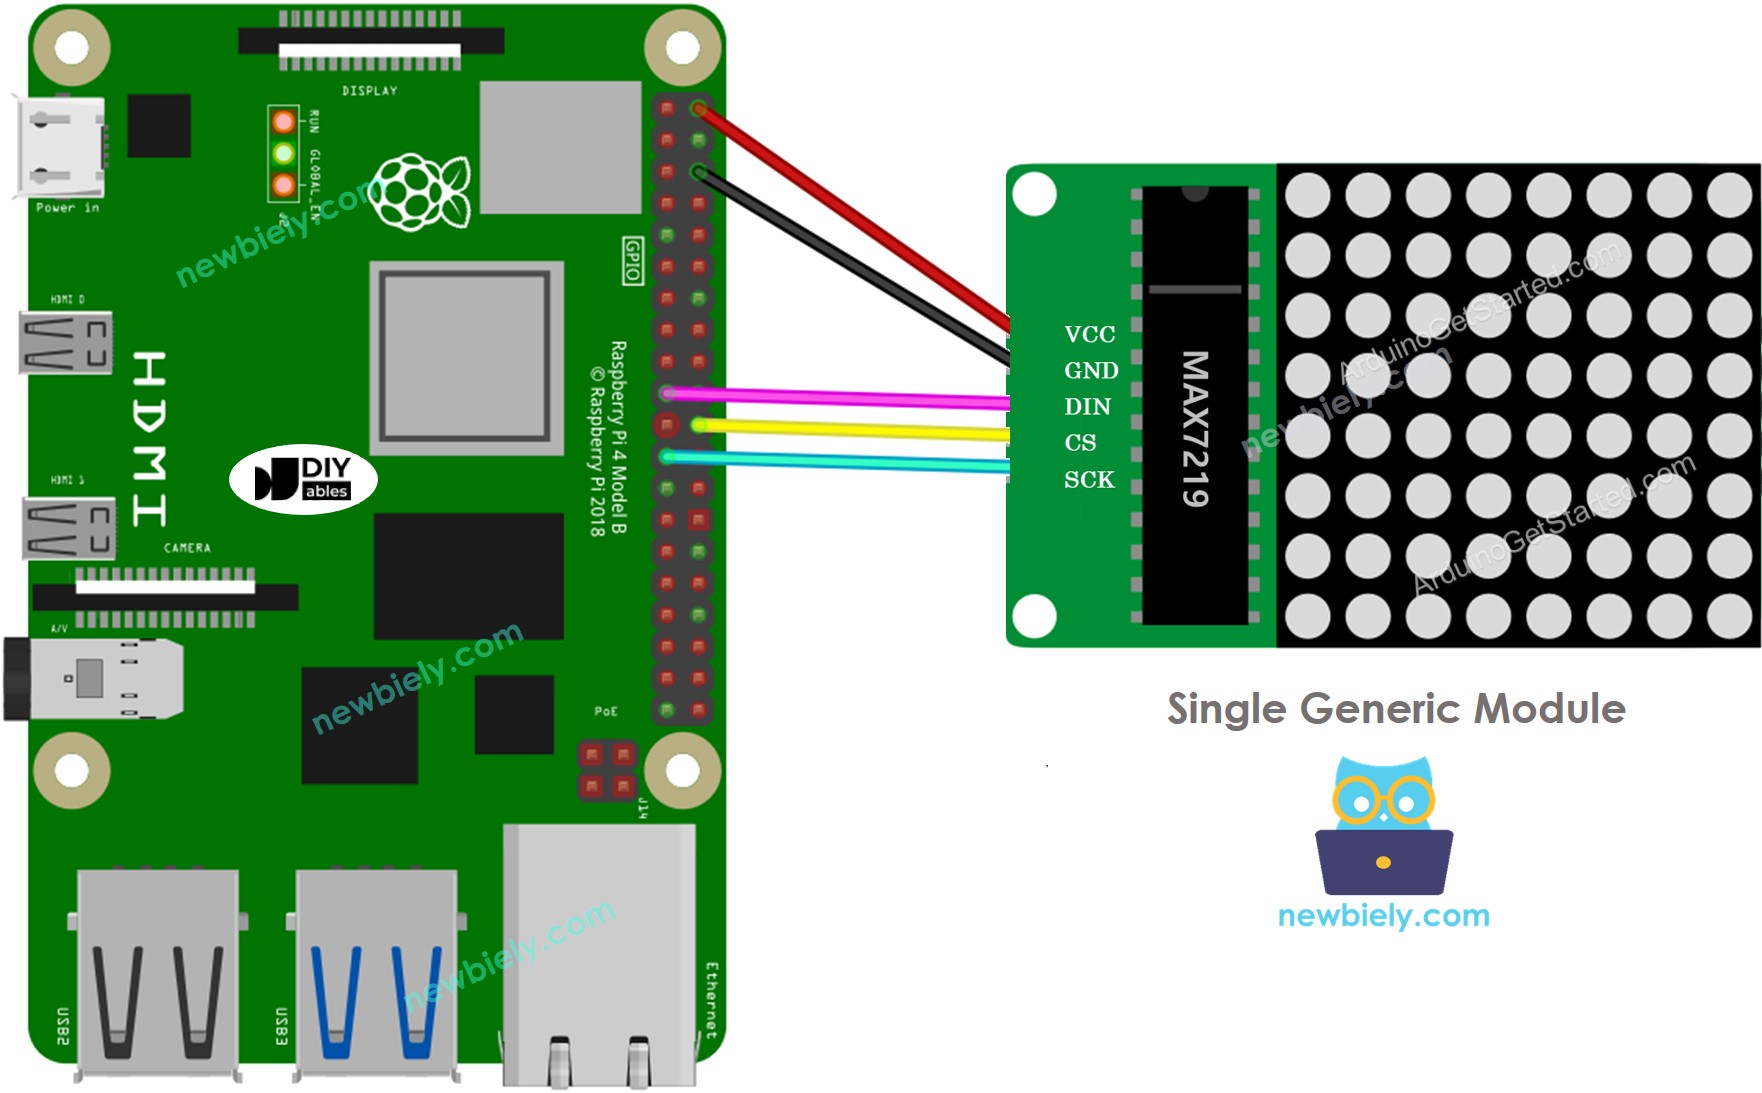
If the LED matrix is composed of a single block:
- Connect the input pins group to Raspberry Pi
- Leave the output pins group unconnected
This image is created using Fritzing. Click to enlarge image
This image is created using Fritzing. Click to enlarge image
If the LED matrix is pre-built of multiple blocks:
- Connect the input pins group to Raspberry Pi
- Leave the output pins group unconnected
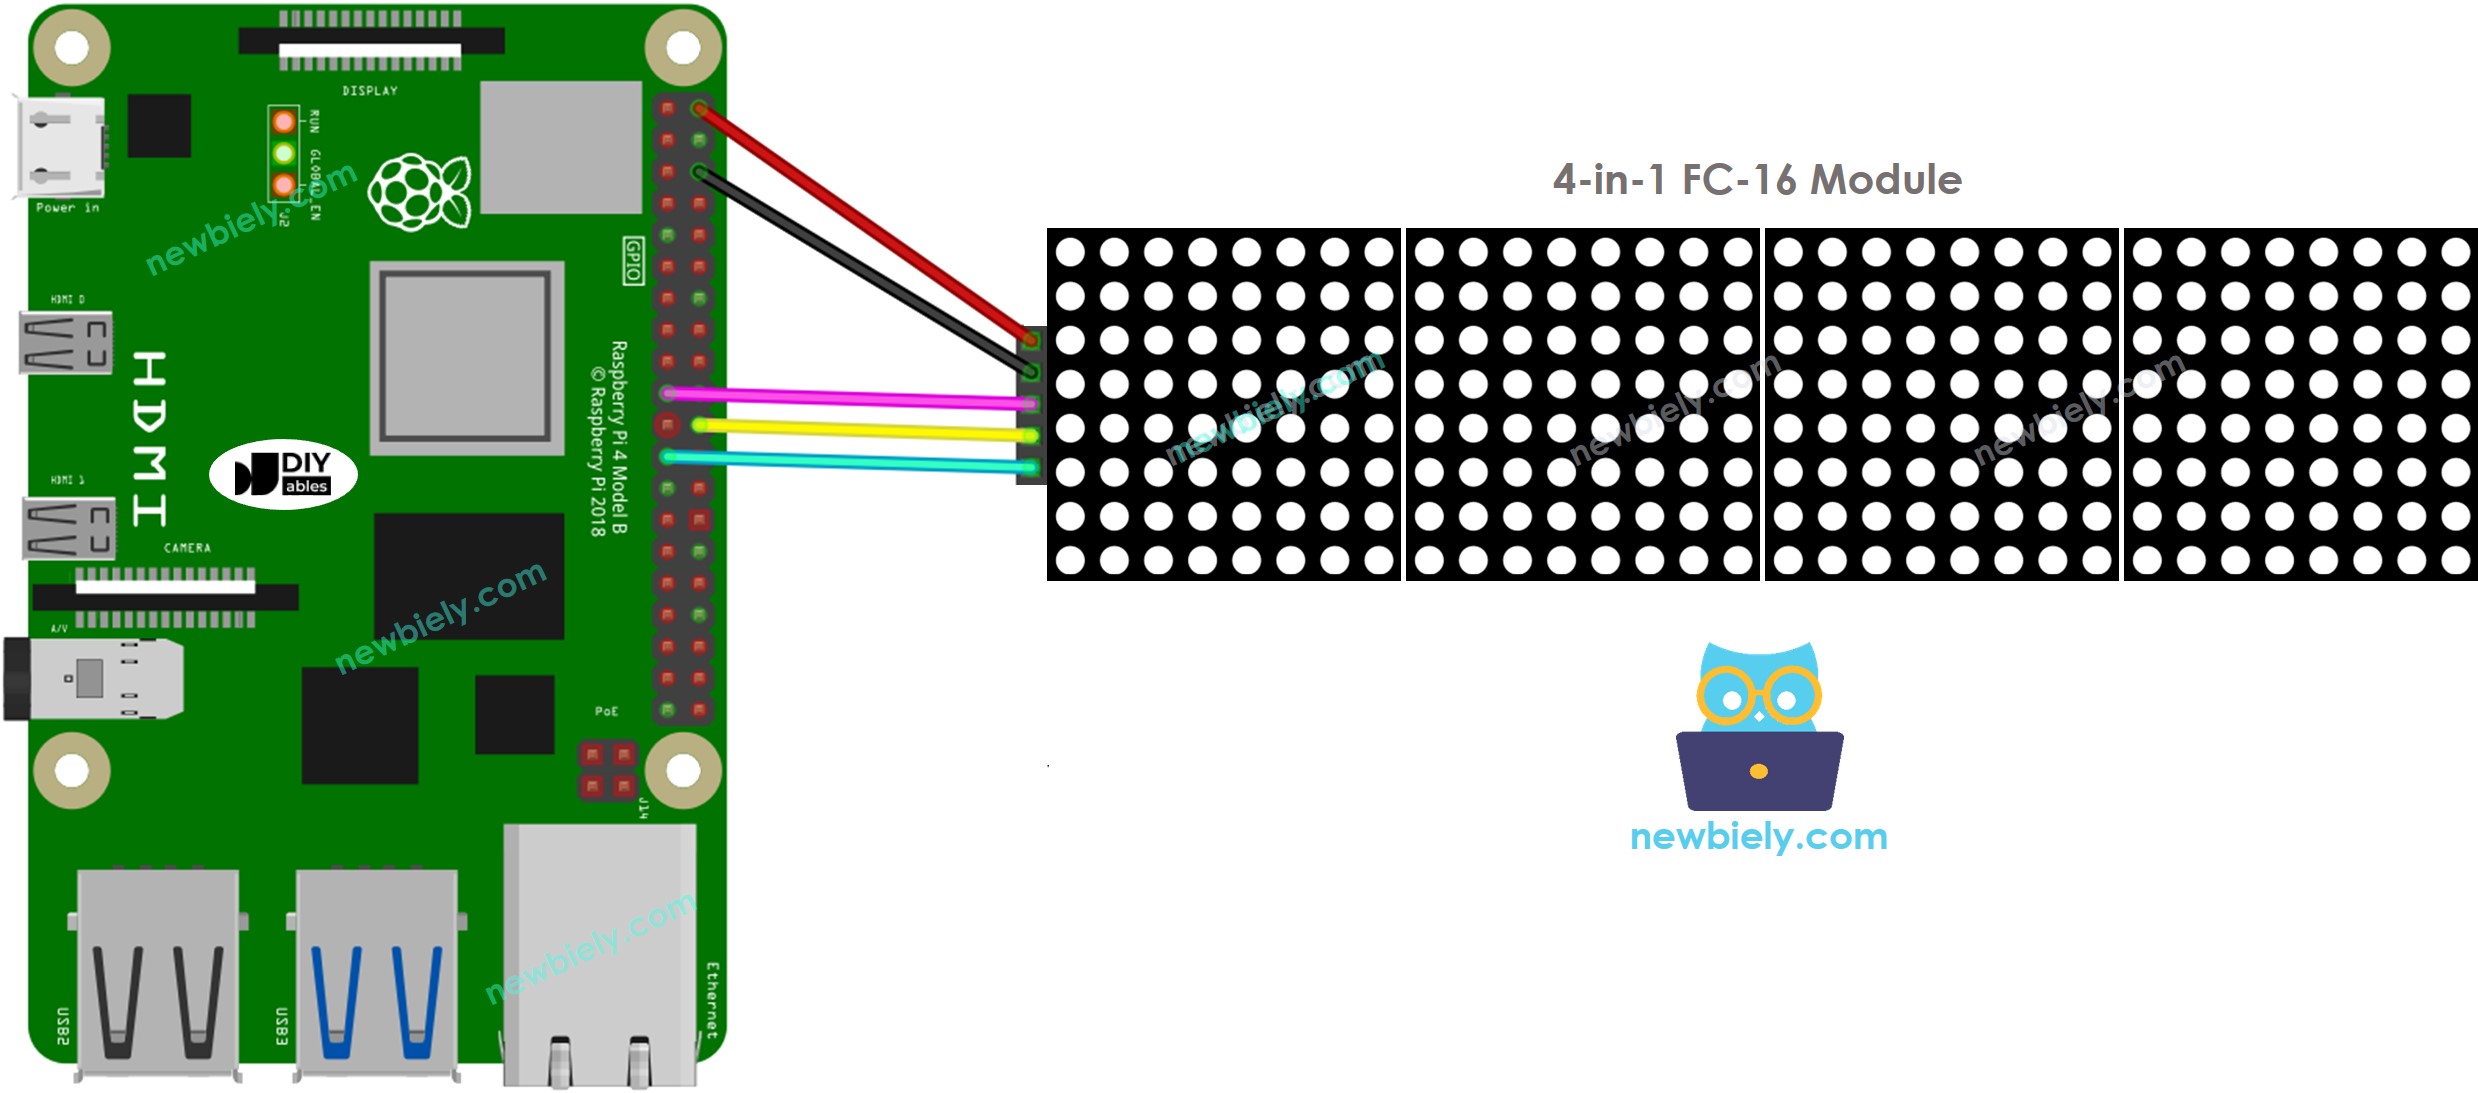
This image is created using Fritzing. Click to enlarge image
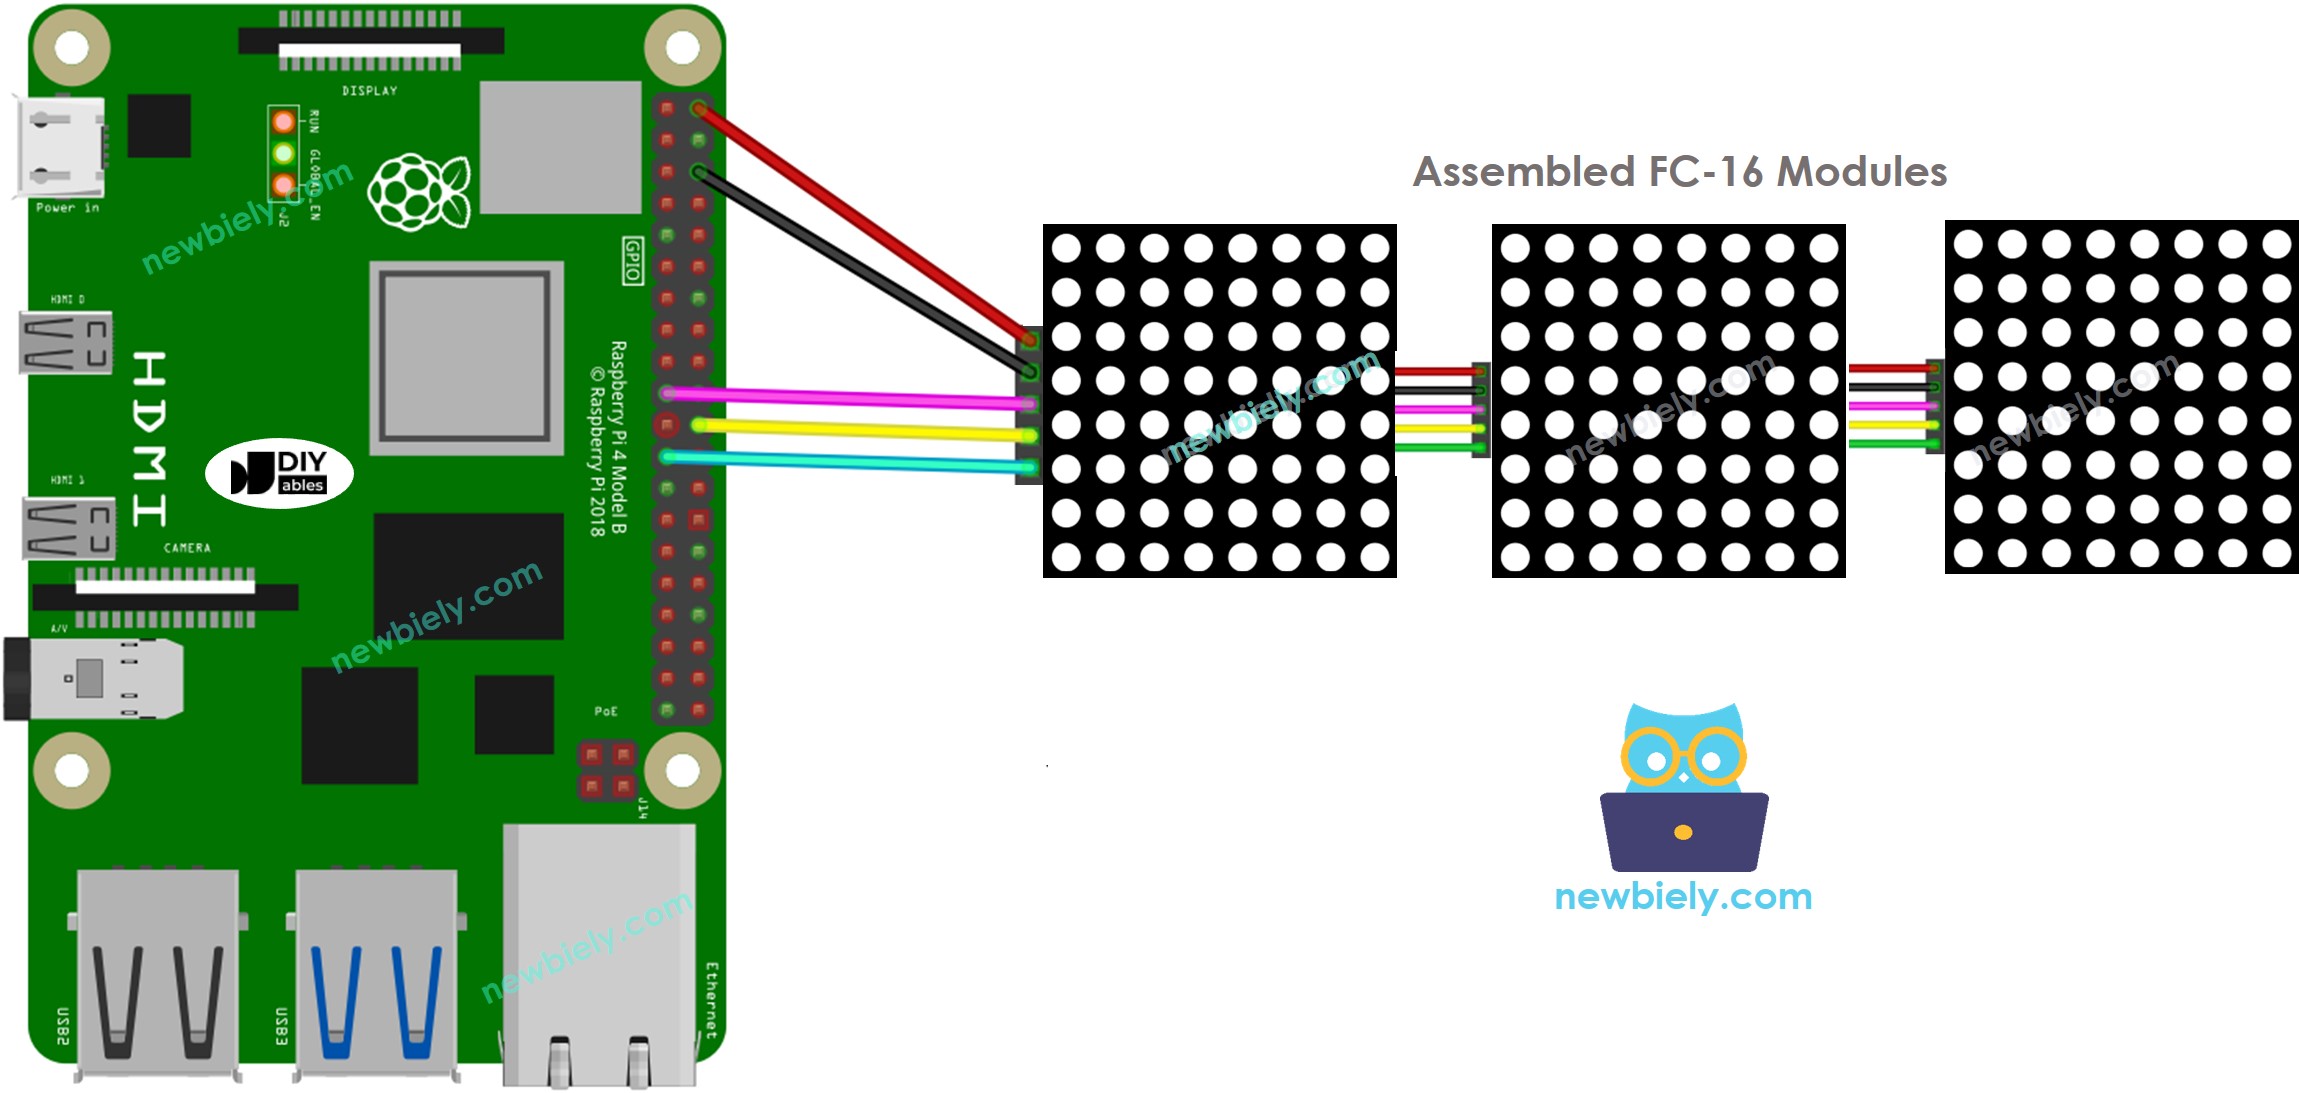
If the LED matrix is made of multiple blocks by yourself:
- Attach the input pins groups of the first block to the Raspberry Pi
- Link the output pins groups of each block to the input pins groups of the subsequent block
- Leave the output pins group of the last block unconnected
This image is created using Fritzing. Click to enlarge image
To simplify and organize your wiring setup, we recommend using a Screw Terminal Block Shield for Raspberry Pi. This shield ensures more secure and manageable connections, as shown below:

Since Raspberry Pi is connected to LED matrix through SPI pins:
- Pin GPIO9 (SCK) and GPIO11 (MOSI) of the Raspberry Pi must be used. If you are using a different Raspberry Pi board, consult the official documentation for the equivalent SPI pins.
- Pin GPIO8 (CS) can be altered to any pin on the Raspberry Pi board. This tutorial uses the GPIO25 for CS pin.
Raspberry Pi - LED Matrix Code
This Raspberry Pi code is for a 32x8 FC-16 LED matrix display with four blocks. It can be easily adapted for 8x8, 16x8, 64x8... displays by changing the BLOCK_NUM constant in the code.
Detailed Instructions
- Make sure you have Raspbian or any other Raspberry Pi compatible operating system installed on your Pi.
- Make sure your Raspberry Pi is connected to the same local network as your PC.
- Make sure your Raspberry Pi is connected to the internet if you need to install some libraries.
- If this is the first time you use Raspberry Pi, See how to set up the Raspberry Pi
- Connect your PC to the Raspberry Pi via SSH using the built-in SSH client on Linux and macOS or PuTTY on Windows. See to how connect your PC to Raspberry Pi via SSH.
- Make sure you have the RPi.GPIO library installed. If not, install it using the following command:
- Enable the SPI interface on Raspberry Pi by following the instruction on Raspberry Pi - how to enable SPI inteface
- Install the luma.led_matrix library using the following command:
- Create a Python script file led_matrix.py and add the following code:
- Save the file and run the Python script by executing the following command in the terminal:
- Check out the LED matrix showing the text.
The script runs in an infinite loop continuously until you press Ctrl + C in the terminal.
Raspberry Pi LED Matrix Code – Scrolling Text
If a message is too lengthy to be displayed on a LED matrix display, the scroll text effect can be used to print it.
This Raspberry Pi code illustrates how to scroll a message across the LED matrix display.