Raspberry Pi - Keypad Door Lock
This tutorial instructs you how to create a password door lock system that utilizes Raspberry Pi, keypad and, solenoid lock or electromagnetic lock, and LCD display.
When an user inputs a correct password via keypad, Raspberry Pi deactivates the solenoid lock to unlock the door. The door remains unlocked for a specific time (e.g. 20 seconds) before automatically locking again. The Raspberry Pi code allows for multiple passwords to be used.
To make it easy, the tutorial is divided into multiple steps, from easy to difficult:
- Part 1: A simple keypad door lock system with Arduino Nano, keypad, solenoid lock or electromagnetic lock.
- Part 2: Adding multiple password supports
Hardware Preparation
Or you can buy the following kits:
| 1 | × | DIYables Sensor Kit (18 sensors/displays) |
Additionally, some of these links are for products from our own brand, DIYables .
Overview of Keypad, Solenoid Lock, and Electromagnetic Lock
Both the solenoid lock and electromagnetic lock are used to lock/unlock the door. They primarily differ from each other in term of machanical design. Their wiring to Raspberry Pi are similar. The Raspberry Pi code for controlling them are the same.
If you are not familiar with keypad, solenoid lock, and electromagnetic lock (pinout, how it works, how to program ...), the following tutorials can help you learn:
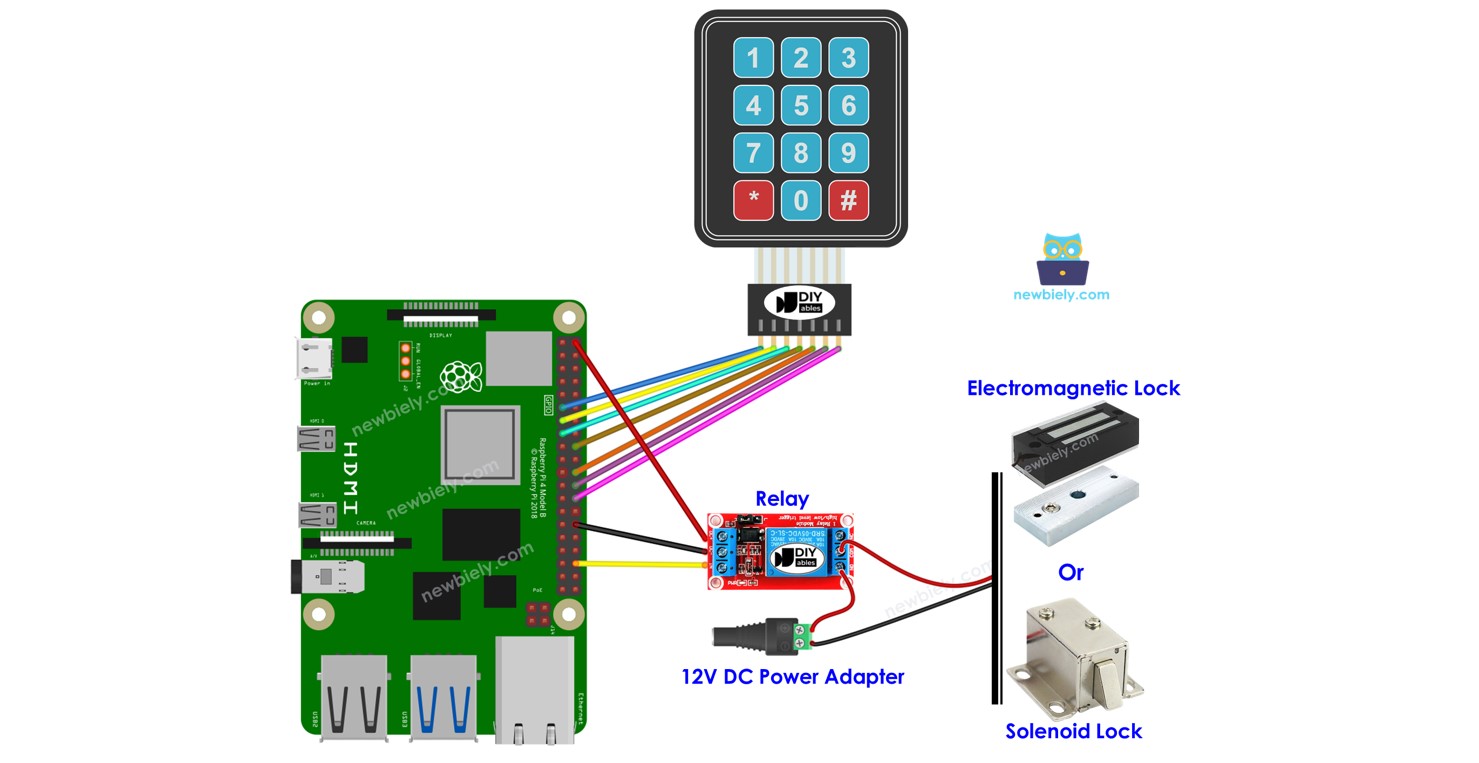
Wiring Diagram
- Wiring Diagram with Raspberry Pi, keypad and solenoid lock
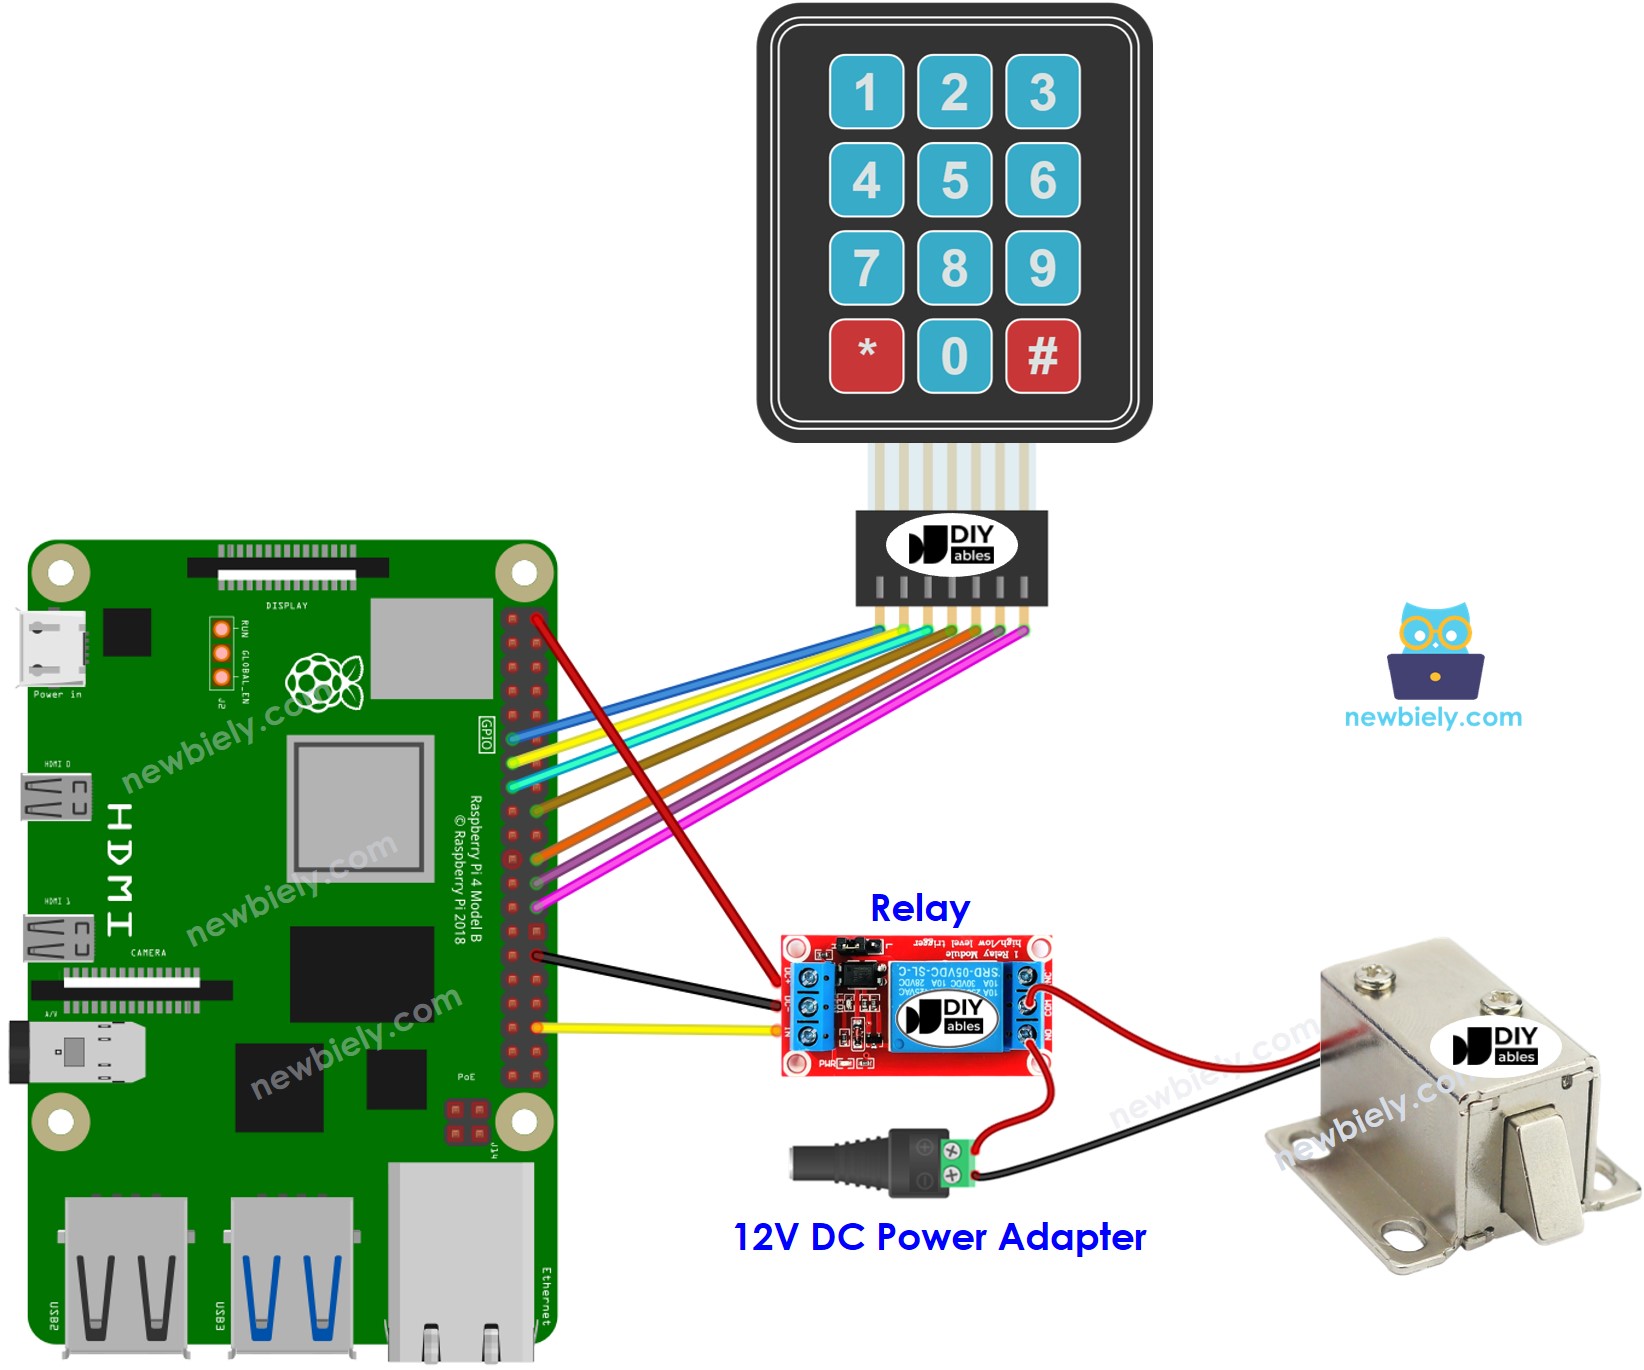
This image is created using Fritzing. Click to enlarge image
- Wiring Diagram with Raspberry Pi, keypad and electromagnetic lock
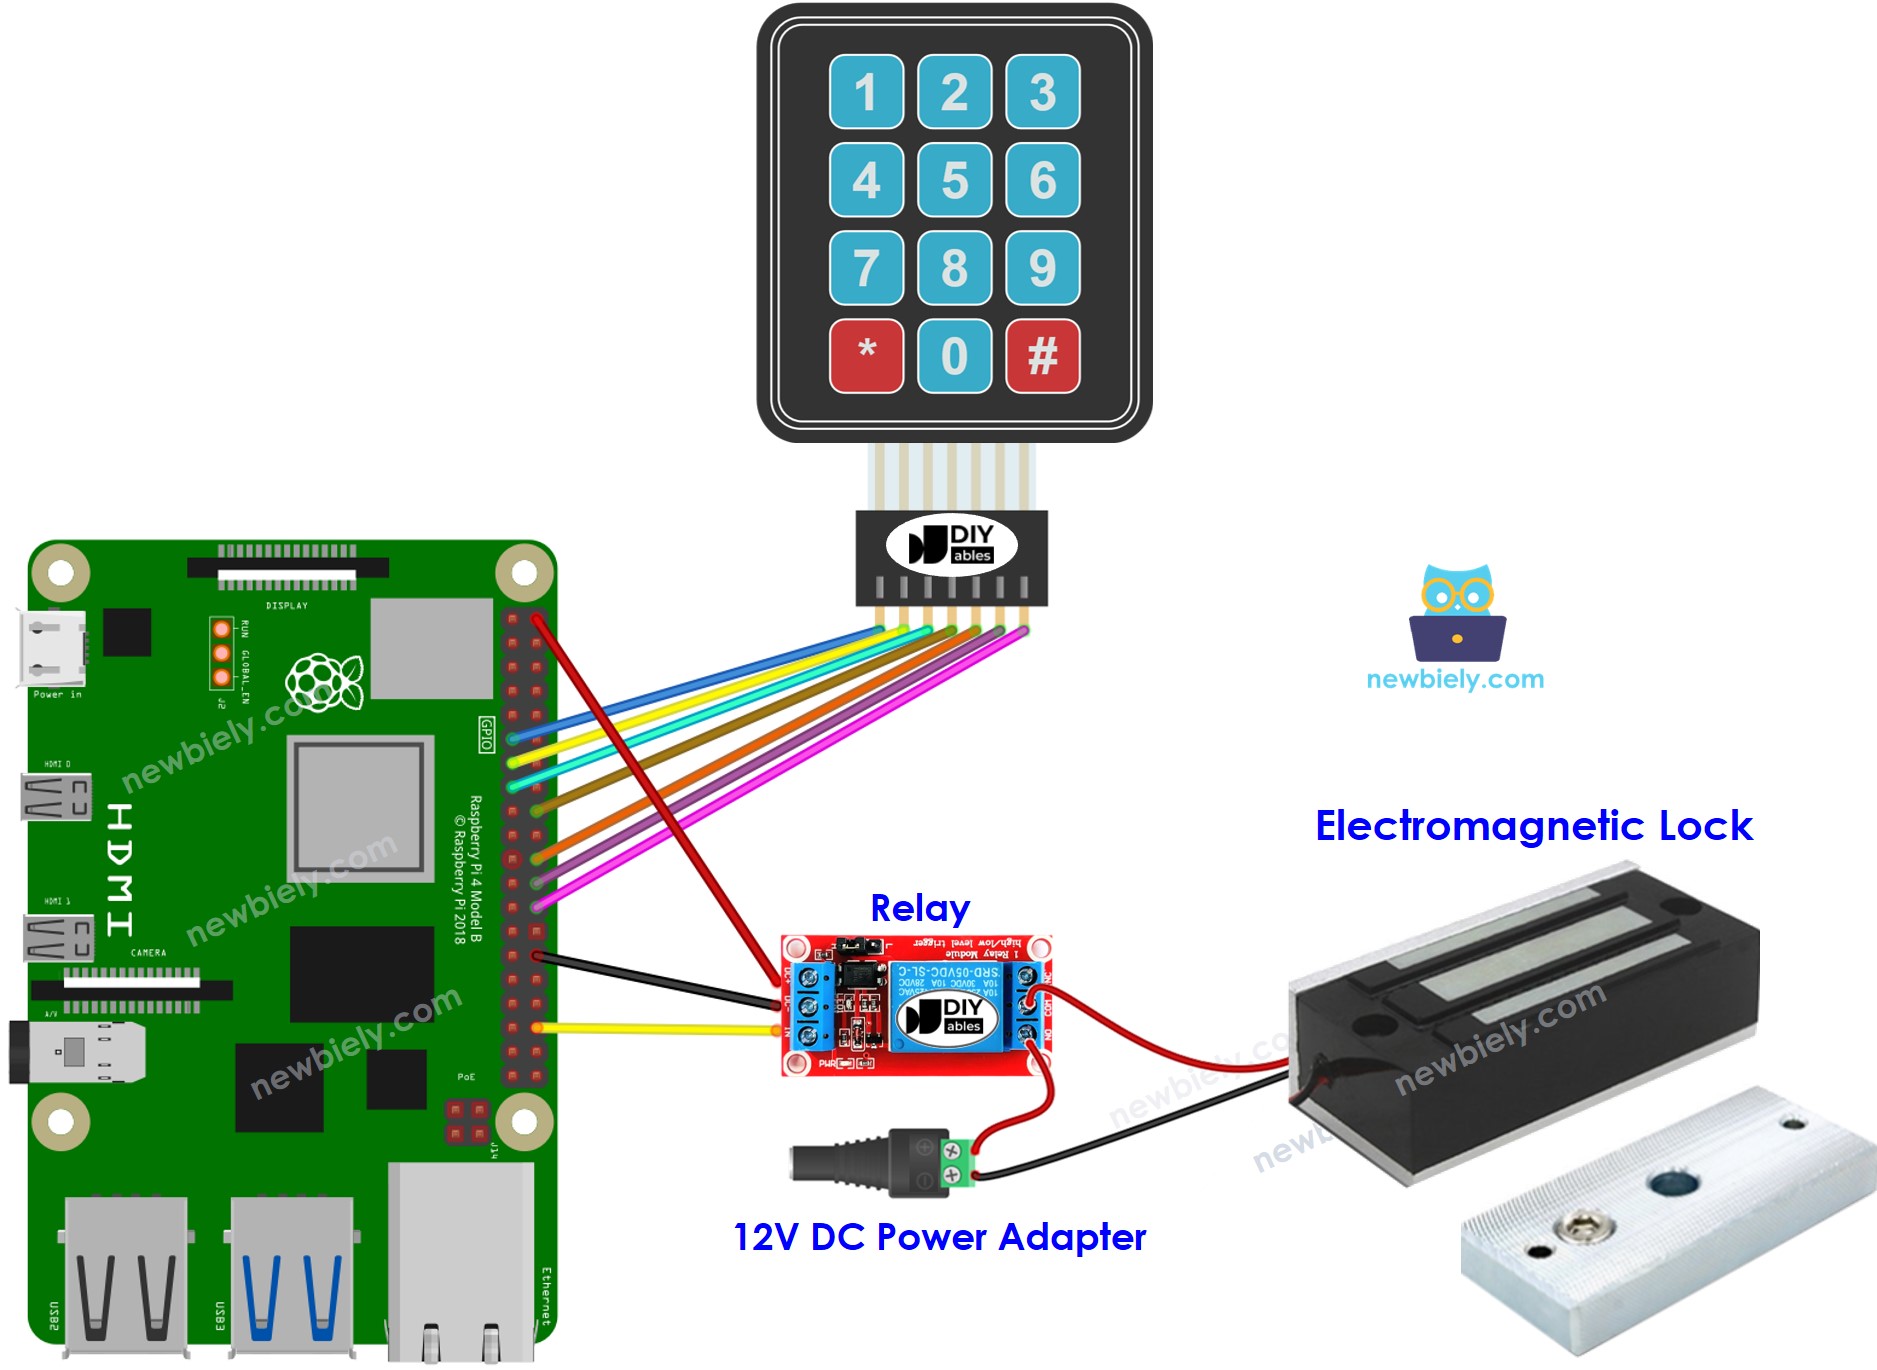
This image is created using Fritzing. Click to enlarge image
To simplify and organize your wiring setup, we recommend using a Screw Terminal Block Shield for Raspberry Pi. This shield ensures more secure and manageable connections, as shown below:

Raspberry Pi Code - Keypad Door Lock
Detailed Instructions
- Make sure you have Raspbian or any other Raspberry Pi compatible operating system installed on your Pi.
- Make sure your Raspberry Pi is connected to the same local network as your PC.
- Make sure your Raspberry Pi is connected to the internet if you need to install some libraries.
- If this is the first time you use Raspberry Pi, See how to set up the Raspberry Pi
- Connect your PC to the Raspberry Pi via SSH using the built-in SSH client on Linux and macOS or PuTTY on Windows. See to how connect your PC to Raspberry Pi via SSH.
- Make sure you have the RPi.GPIO library installed. If not, install it using the following command:
- Create a Python script file keypad_lock.py and add the following code:
- Save the file and run the Python script by executing the following command in the terminal:
- Type in 1111 and press #.
- Then type in 1234 and press #.
- Check out the lock tongue's state for 20 seconds.
- Check out the result on the Serial Monitor.
The script runs in an infinite loop continuously until you press Ctrl + C in the terminal.
Code Explanation
The valid passwords are pre-defined in the Raspberry Pi code. A string is utilized to store the password inputted by users, referred to as input string. On the keypad, two keys (* and #) are used for special functions: clearing the password and ending the password. The system works in the following way:
- Apart from the two special keys, if any other key is pressed, it is added to the input string.
- If * is pressed, the input string is cleared. This can be used to start or restart entering the password.
- If # is pressed:
- Raspberry Pi compares the input string to the pre-defined passwords. If it matches one of the pre-defined passwords, Raspberry Pi deactivates the relay to unlock the door.
- Regardless of whether the password is correct or not, Raspberry Pi clears the input string for the next input.
Raspberry Pi Code - Multiple Keys
Adding a door sensor to the keypad door lock
In the previously mentioned code, the Raspberry Pi locks the door after a timeout since unlocking. However, in practical applications, a door sensor is usually added to the system. If the Raspberry Pi detects that the door is closed, it locks the door immediately instead of waiting for the timeout.
To avoid overwhelming you, we didn't include the door sensor in the wiring diagram and code. Instead, we're leaving this part up to your creativity. You can check out the Raspberry Pi - Door Sensor and Raspberry Pi - Door Sensor control Relay tutorials for more guidance.