Raspberry Pi - LED - Fade
This tutorial instructs you how to program Raspberry Pi to fade LED. We will go through three examples and compare the differences between them:
- How to program an Raspberry Pi to fade LED using the time.sleep() function
- How to program an Raspberry Pi to fade LED using the millis() function
Hardware Preparation
Or you can buy the following kits:
| 1 | × | DIYables Sensor Kit (30 sensors/displays) | |
| 1 | × | DIYables Sensor Kit (18 sensors/displays) |
Additionally, some of these links are for products from our own brand, DIYables .
Buy Note: Use the LED Module for easier wiring. It includes an integrated resistor.
Overview of LED
The LED Pinout
LED has two pins:
- The Cathode(-) pin needs to be connected to GND (0V)
- The Anode(+) pin is used to control the LED's state

How It Works
Once the cathode(-) is connected to GND:
- Connecting GND to the anode(+) will cause the LED to be OFF.
- Connecting VCC to the anode(+) will cause the LED to be ON.
- Generating a PWM signal to the anode(+) will adjust the brightness of the LED according to the PWM value. This value ranges from 0 to 255, with higher values causing the LED to be brighter and lower values causing it to be darker.
- If the PWM value is 0, this is equivalent to GND and the LED will be OFF.
- If the PWM value is 255, this is equivalent to VCC and the LED will be fully ON.

※ NOTE THAT:
For most LED, a resistor must be placed between the anode (+) and VCC. The value of the resistor is determined by the LED's specifications.
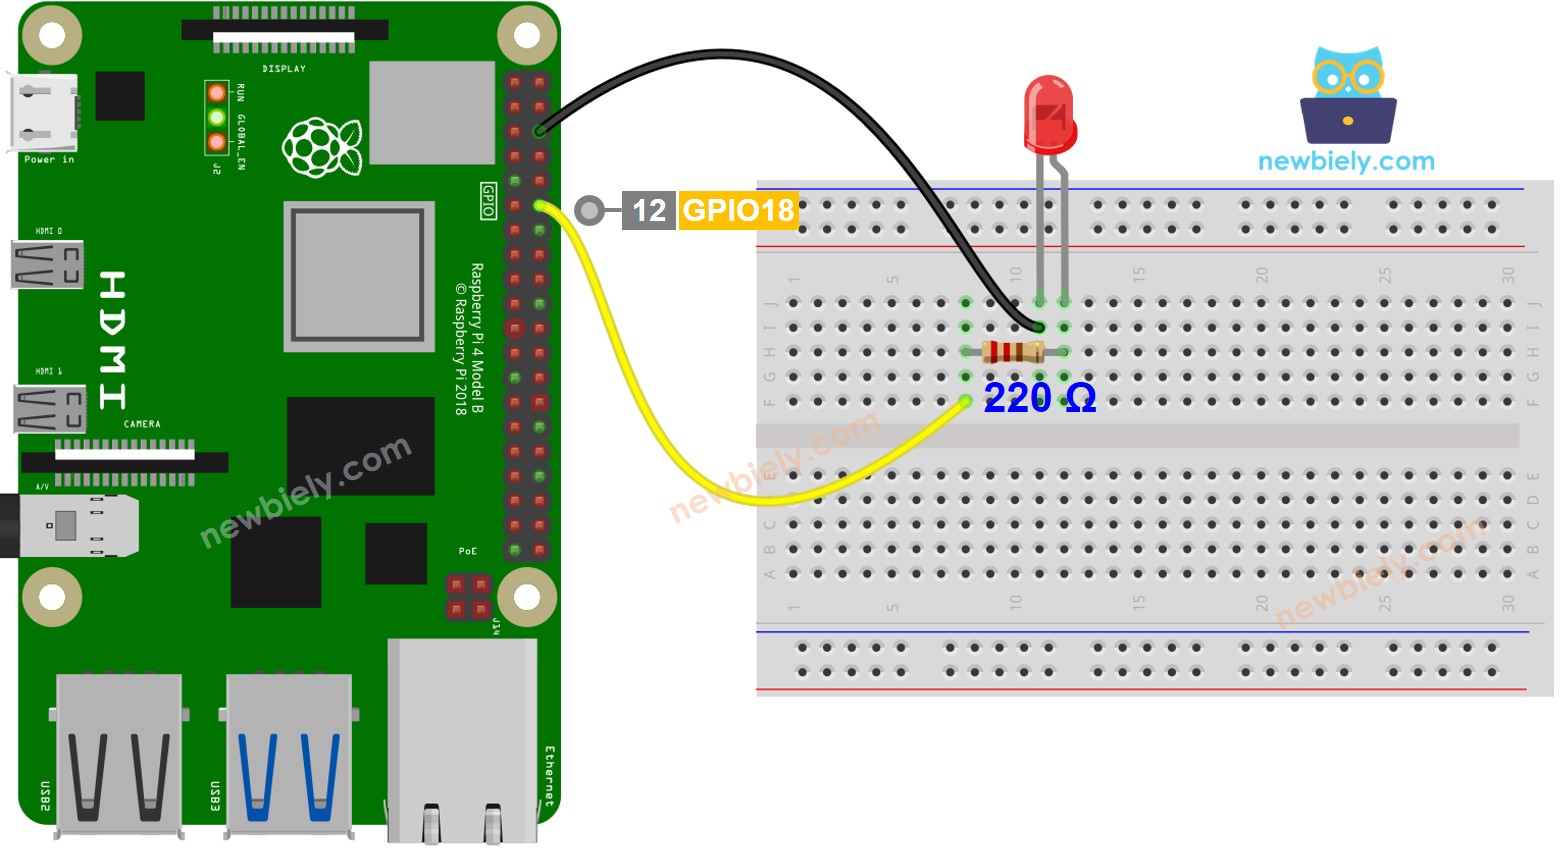
Raspberry Pi - fade LED
Some of the pins on a Raspberry Pi can be programmed to produce a PWM signal. To fade an LED, we can connect the anode (+) pin of the LED to a pin on the Raspberry Pi, the cathode (-) to ground, and program the Raspberry Pi to generate a PWM on the pin.
Wiring Diagram

This image is created using Fritzing. Click to enlarge image
To simplify and organize your wiring setup, we recommend using a Screw Terminal Block Shield for Raspberry Pi. This shield ensures more secure and manageable connections, as shown below:

How To Program
- Set up a digital output on a Raspberry Pi's pin by using the GPIO.setup() function.
- For instance, pin GPIO18:
- Adjust the brightness of the LED by creating a PWM signal using the pwm.ChangeDutyCycle() function.
The brightness can range from 0 to 100.
Raspberry Pi Code fades LED
Detailed Instructions
- Make sure you have Raspbian or any other Raspberry Pi compatible operating system installed on your Pi.
- Make sure your Raspberry Pi is connected to the same local network as your PC.
- Make sure your Raspberry Pi is connected to the internet if you need to install some libraries.
- If this is the first time you use Raspberry Pi, See how to set up the Raspberry Pi
- Connect your PC to the Raspberry Pi via SSH using the built-in SSH client on Linux and macOS or PuTTY on Windows. See to how connect your PC to Raspberry Pi via SSH.
- Make sure you have the RPi.GPIO library installed. If not, install it using the following command:
- Create a Python script file led_fade.py and add the following code:
- Save the file and run the Python script by executing the following command in the terminal:
- Check out the brightness of the LED.
The script runs in an infinite loop continuously until you press Ctrl + C in the terminal.
Code Explanation
Check out the line-by-line explanation contained in the comments of the source code!
※ NOTE THAT:
The example above uses the time.sleep() function to create a fade-in and fade-out effect. The time.sleep() function, however, makes the LED fade in an unsmooth manner and blocks other code from running. In the upcoming sections, we will learn how to fade-in and fade-out smoothly without blocking other code by using the millis() function.
How to fade in/out LED in a period without using time.sleep()
Detailed Instructions
- Create a Python script file led_fade.py and add the following code:
- Save the file and run the Python script by executing the following command in the terminal:
- Check out the brightness of the LED.
