Raspberry Pi - RFID Door Lock
This tutorial instructs you how to build a door lock system using Raspberry Pi, RFID/NFC RC522 module, a relay, solenoid lock or electromagnetic lock, and optionally LCD display. To make it easy for you, the tutorial instructs you to build the RFID door lock from simple to complex steps. In detail, we will do:
- Part 1: A simple RFID door lock system with Raspberry Pi, keypad, solenoid lock or electromagnetic lock, supports a single RFID key
- Part 2: (Optionally) Adding multiple RFID keys supports
- Part 3: (Optionally) Adding LCD display to the RFID door lock.
- Part 4: (Optionally) Adding a door sensor to the RFID door lock.
- Part 5: (Optionally) Managing and storing the valid RFID keys to Raspberry Pi's internal EEPROM
- Part 6: (Optionally) Storing the access history to SD Card
You can modify this to add passwords for the door lock by combining with Raspberry Pi - Keypad Door Lock.
Hardware Preparation
Or you can buy the following kits:
| 1 | × | DIYables Sensor Kit (30 sensors/displays) | |
| 1 | × | DIYables Sensor Kit (18 sensors/displays) |
Additionally, some of these links are for products from our own brand, DIYables .
Overview of RFID/NFC RC522 Module and Electromagnetic Lock
If you are unfamiliar with the RFID/NFC RC522 Module, electromagnetic lock, solenoid lock (including pinout, functionality, and programming), the following tutorials can provide more information:
Door Lock System Components
The door lock system consists of two main components:
- Door Lock: An Raspberry Pi, a relay, an RFID/NFC reader, and an solenoid lock.
- Door Key: RFID/NFC tags.
How RFID/NFC Door Lock Works
- The user taps an RFID/NFC tag on the RFID/NFC reader, which reads the UID from the tag.
- Raspberry Pi then takes this UID and compares it to the UIDs set in the code.
- If the UID matches one of the authorized keys, Raspberry Pi will deactivate the electromagnetic lock, thus unlocking the door.
- After a certain period of time, the Raspberry Pi will activate the relay to lock the door.
Wiring Diagram
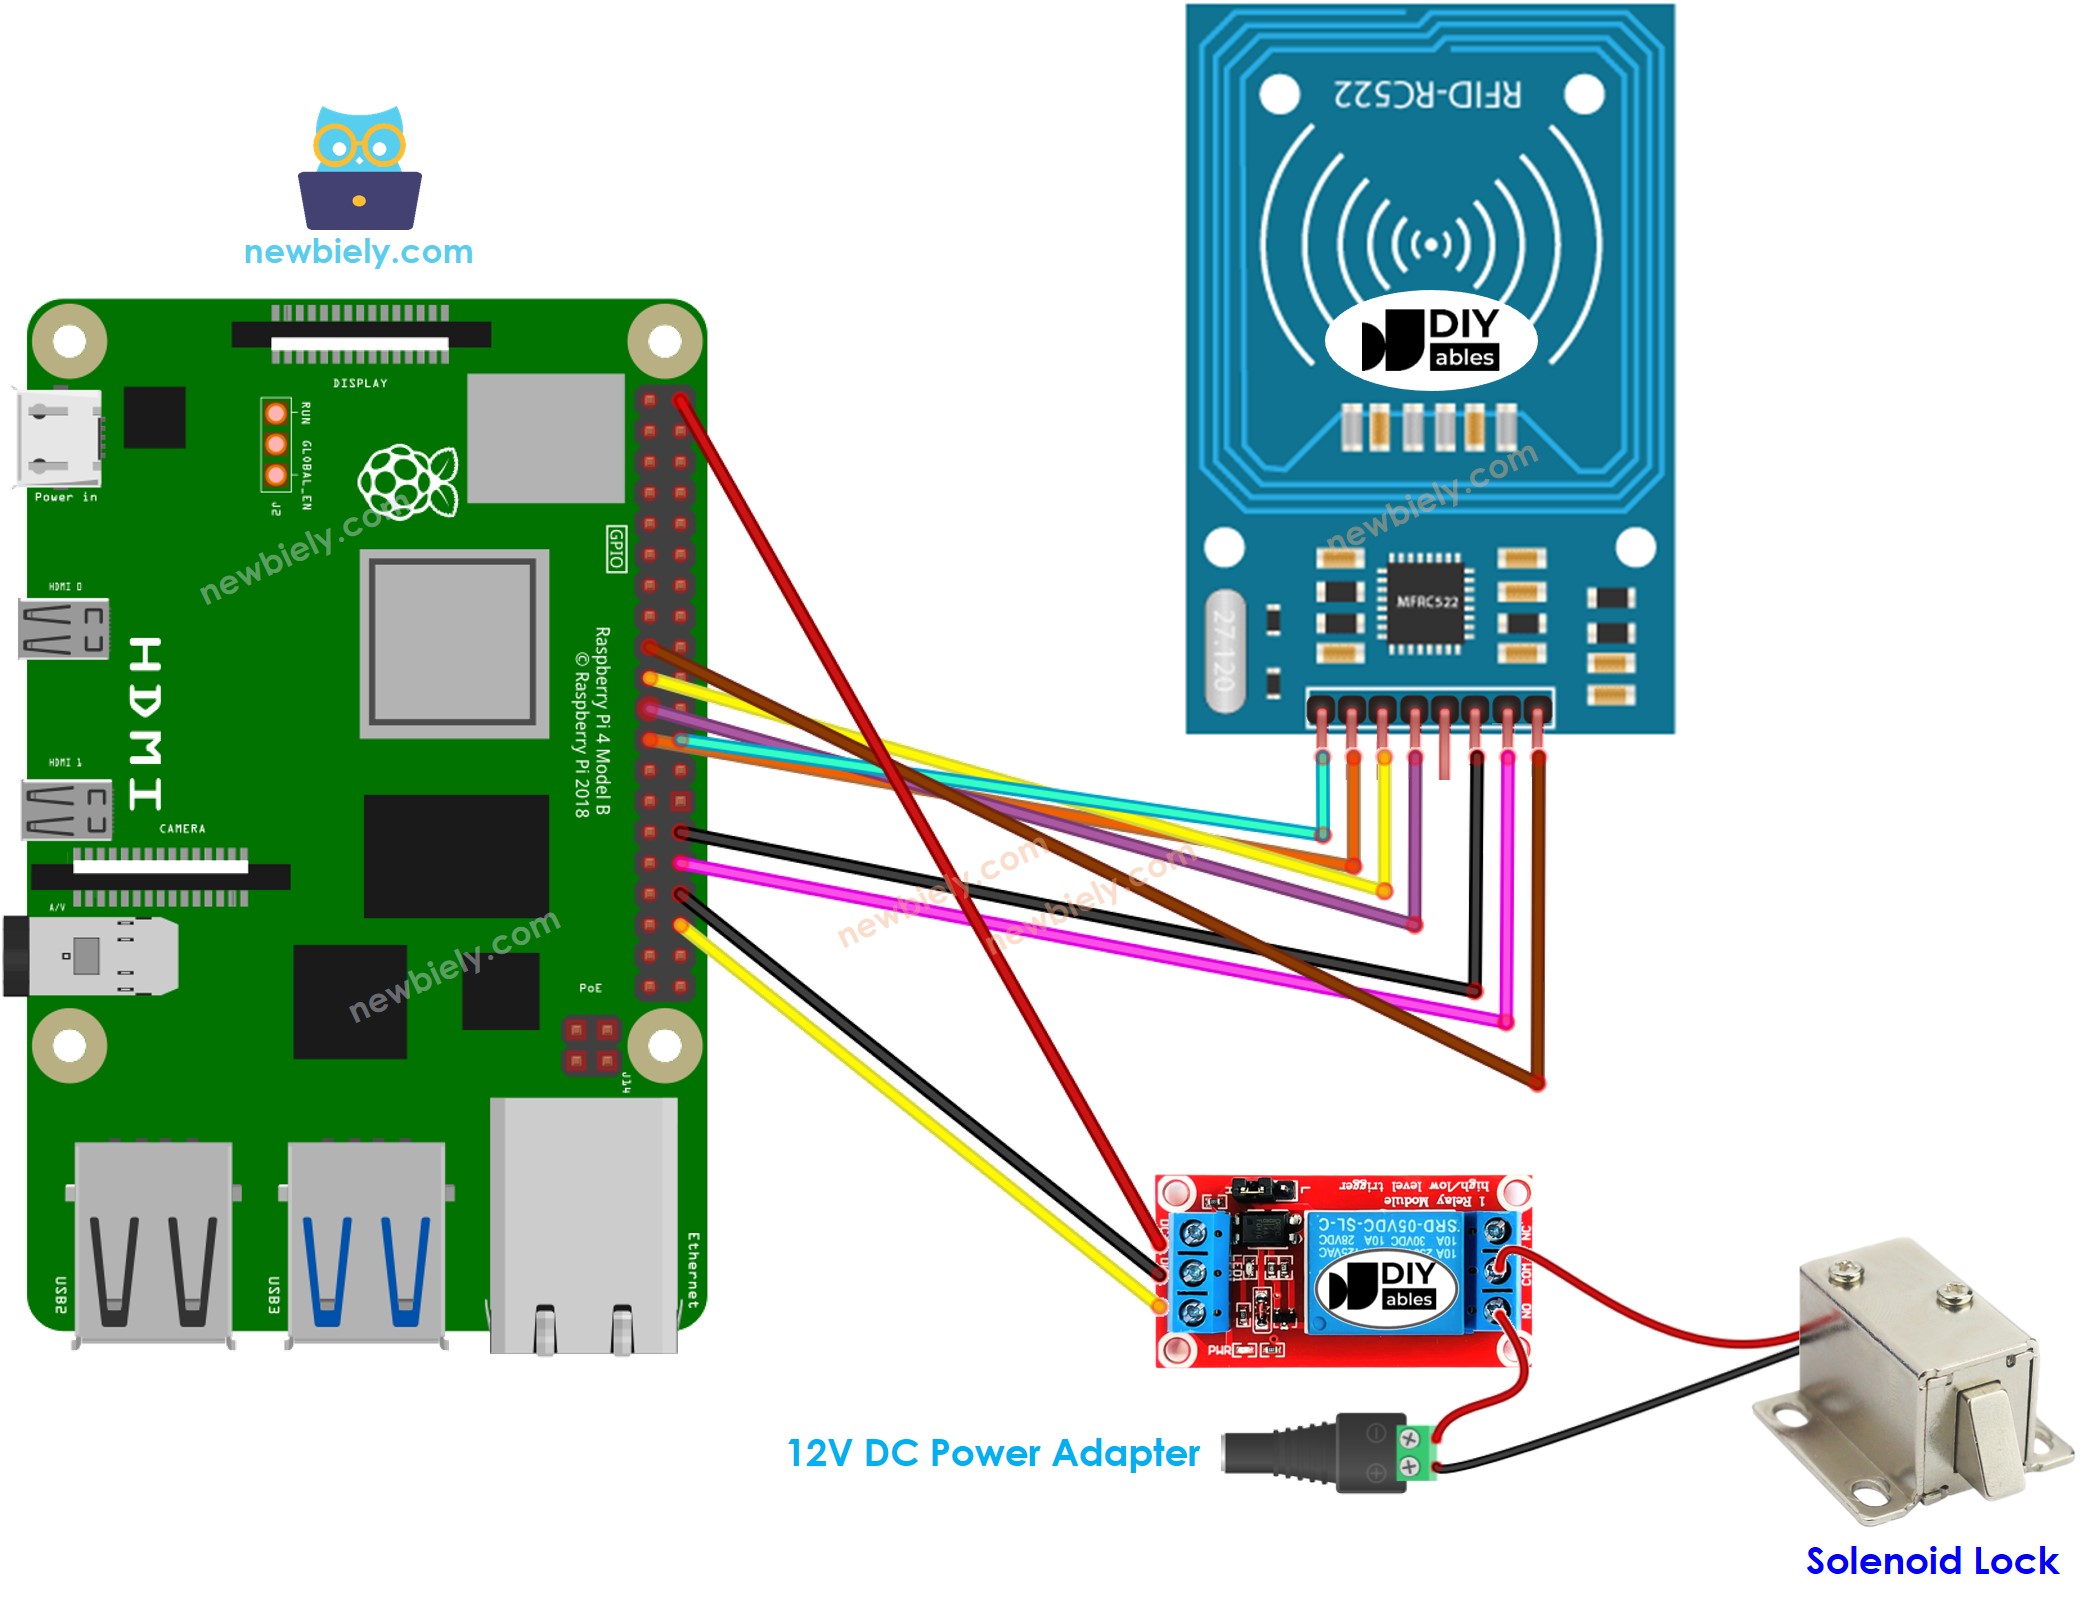
- RFID RC522 Door Lock with Solenoid Lock

This image is created using Fritzing. Click to enlarge image
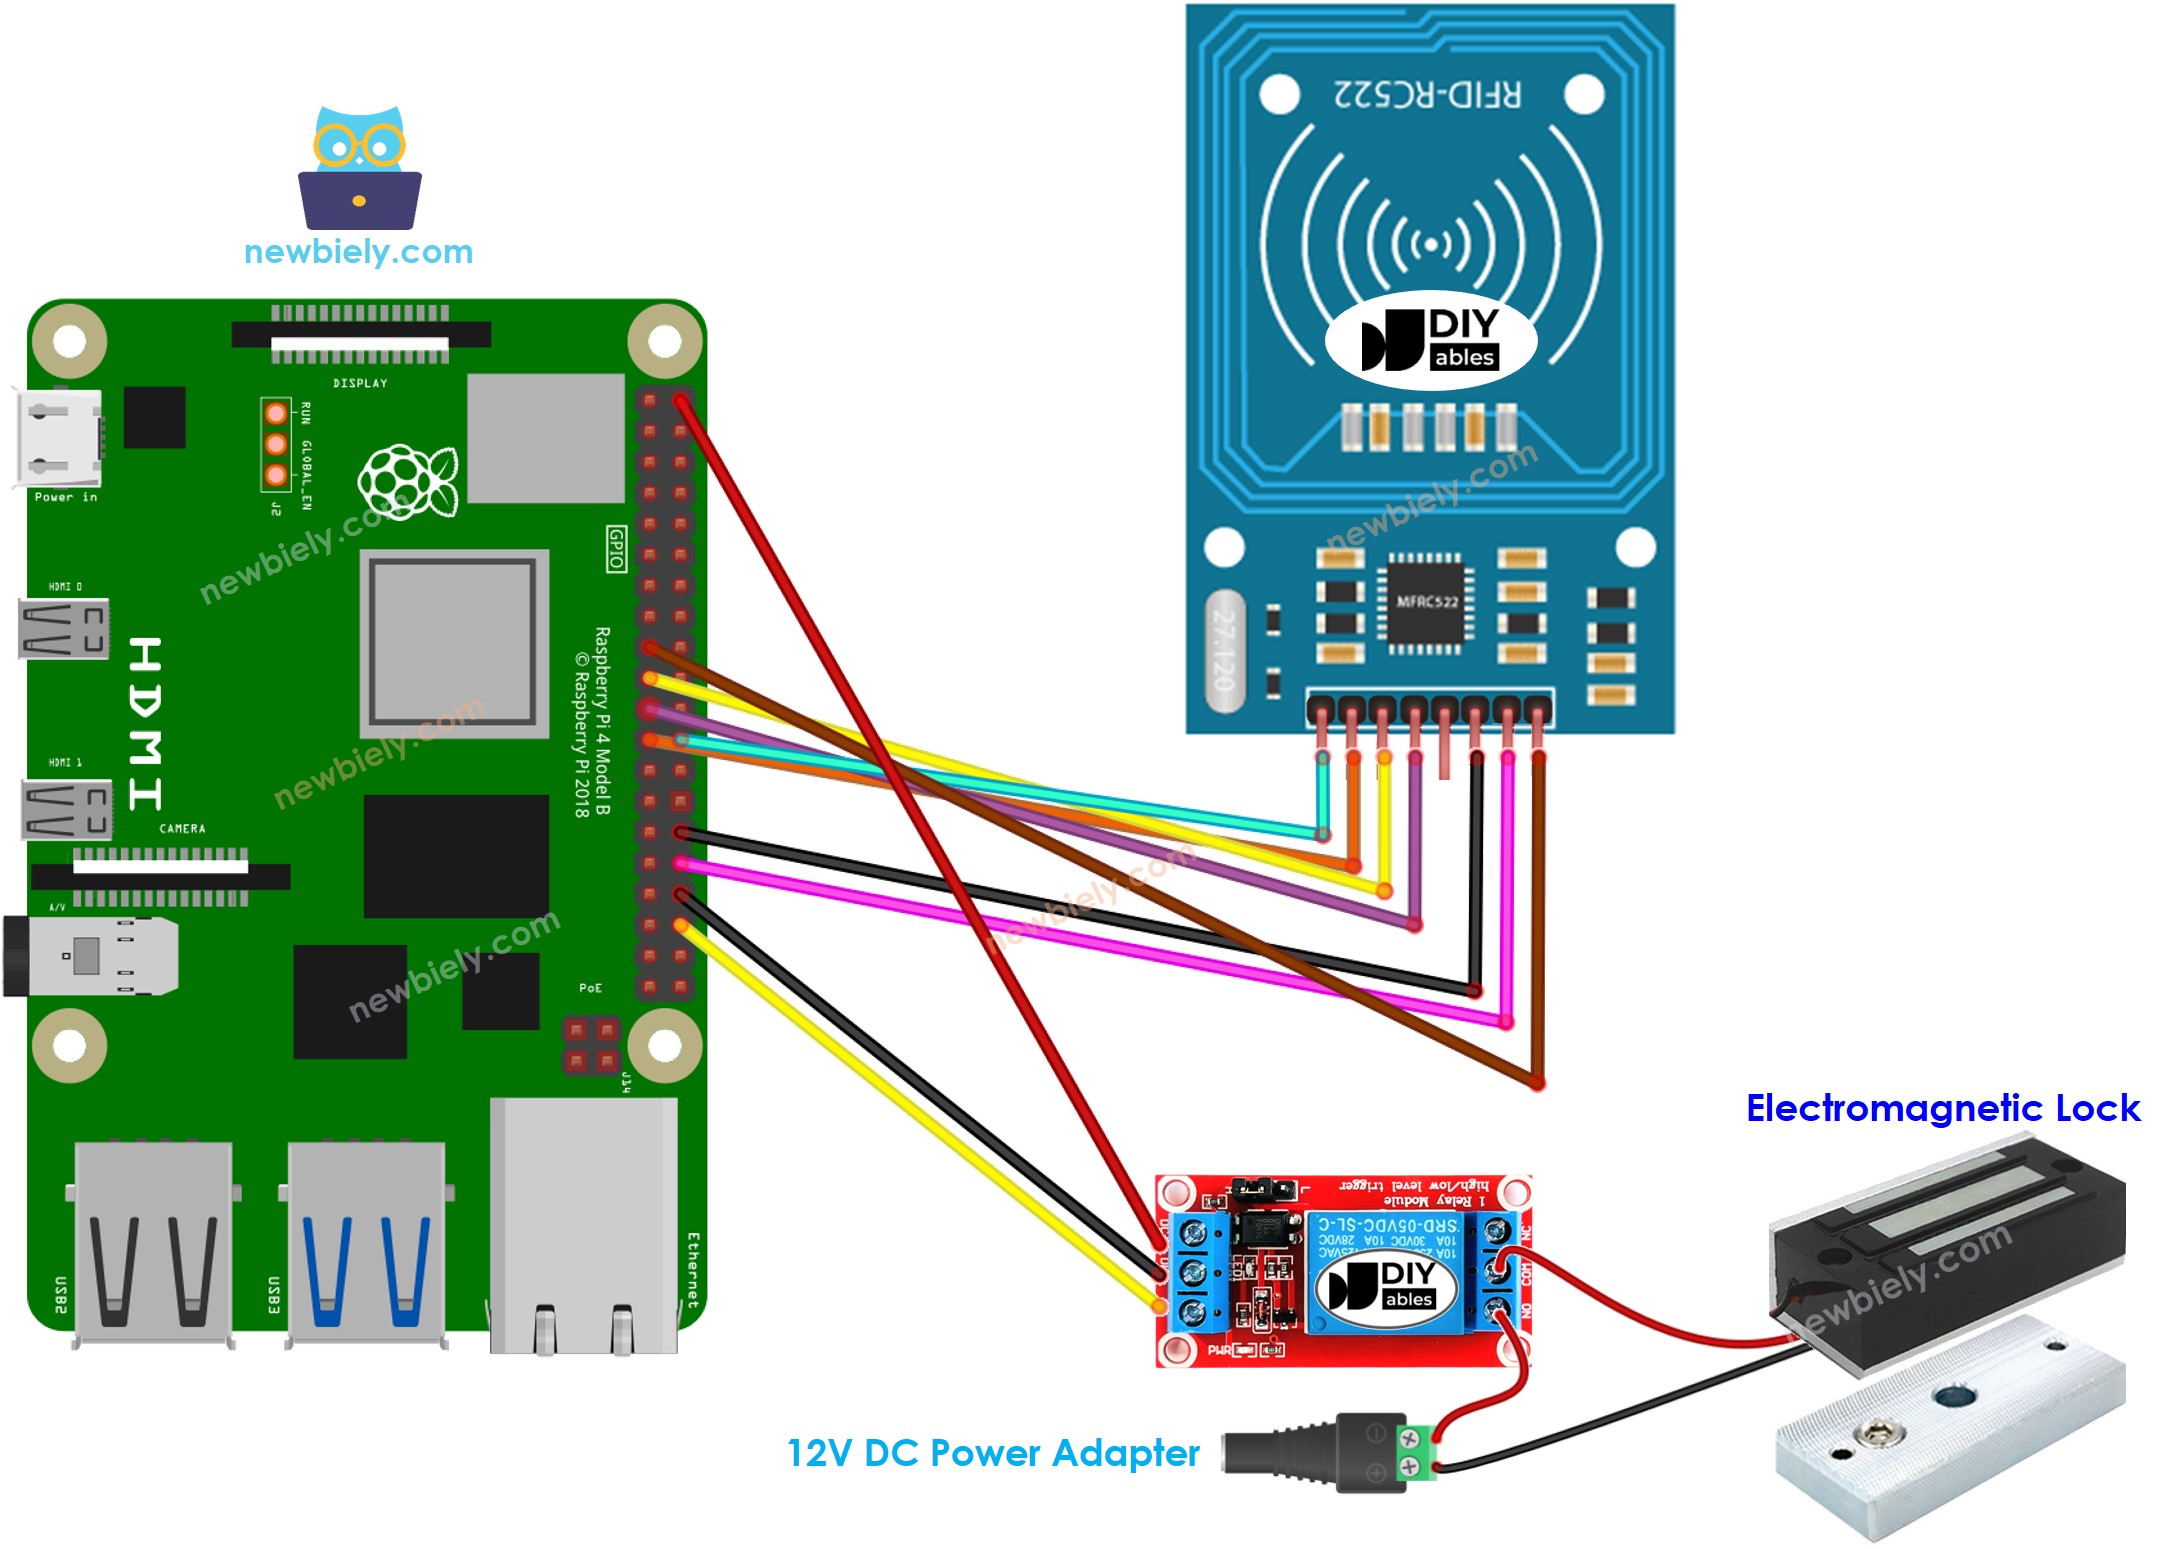
- RFID RC522 Door Lock with Electromagnetic Lock

This image is created using Fritzing. Click to enlarge image
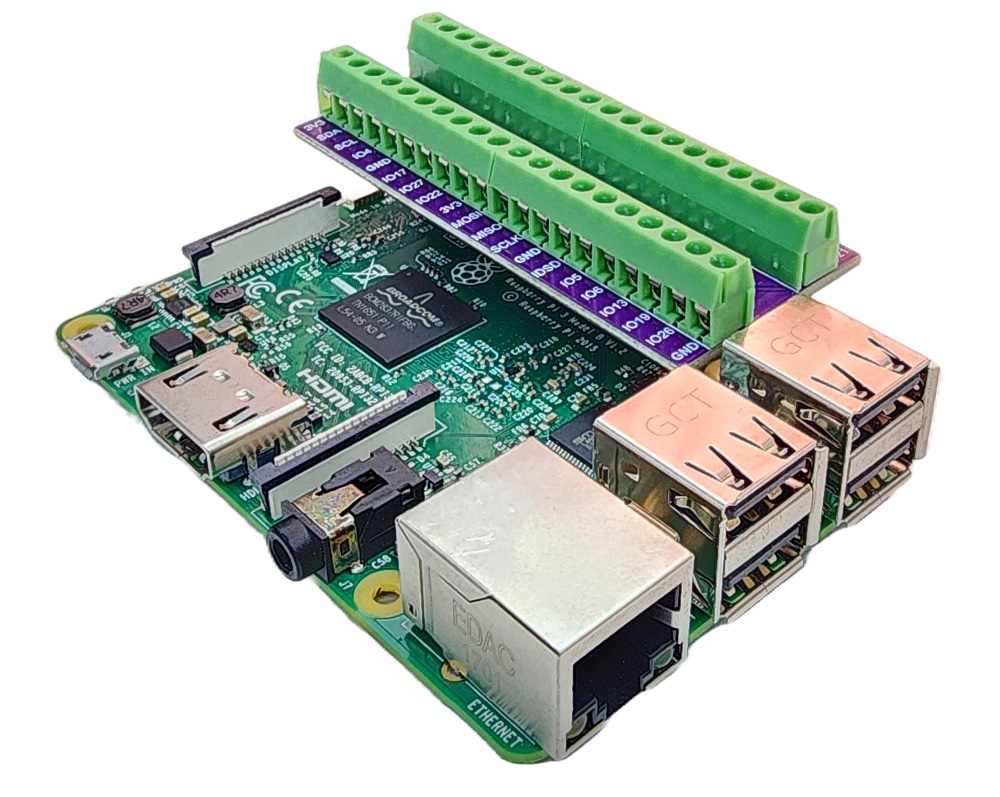
To simplify and organize your wiring setup, we recommend using a Screw Terminal Block Shield for Raspberry Pi. This shield ensures more secure and manageable connections, as shown below:

※ NOTE THAT:
Manufacturers may arrange the order of pins differently, so it is important to rely on the labels printed on the module. The pinout diagram depicted above displays the pin arrangement for modules produced by the manufacturer DIYables.
Raspberry Pi Code - Single Key
Detailed Instructions
- Make sure you have Raspbian or any other Raspberry Pi compatible operating system installed on your Pi.
- Make sure your Raspberry Pi is connected to the same local network as your PC.
- Make sure your Raspberry Pi is connected to the internet if you need to install some libraries.
- If this is the first time you use Raspberry Pi, See how to set up the Raspberry Pi
- Connect your PC to the Raspberry Pi via SSH using the built-in SSH client on Linux and macOS or PuTTY on Windows. See to how connect your PC to Raspberry Pi via SSH.
- Make sure you have the RPi.GPIO library installed. If not, install it using the following command:
- Enable the SPI interface on Raspberry Pi by following the instruction on Raspberry Pi - how to enable SPI inteface
- Make sure you have the spidev library installed. If not, install it using the following command:
- Make sure you have the mfrc522 library installed. If not, install it using the following command:
- Create a Python script file rfid_lock.py and add the following code:
- Save the file and run the Python script by executing the following command in the terminal:
The script runs in an infinite loop continuously until you press Ctrl + C in the terminal.
In order to determine the UID of an RFID/NFC tag, tap the RFID/NFC tag onto the RFID-RC522 module, the UID will be displayed on the Terminal.
Once you have your UID:
- Amend line 18 of the code above by replacing byte keytagUID[4] = {0xFF, 0xFF, 0xFF, 0xFF}; with your UID, for example byte keytagUID[4] = {0x3A, 0xC9, 0x6A, 0xCB};
- Upload the revised code to your Raspberry Pi
- Place an RFID/NFC tag on the RFID-RC522 module
- Check out the output on the Terminal
- Examine the electromagnetic lock to make sure it is not secured.
- Tap a different RFID/NFC tag onto the RFID-RC522 module.
- Check out the output on the Terminal
※ NOTE THAT:
- For testing purposes, the unlock time has been set to 2 seconds; however, this should be increased when using it in practice or for demonstrations.
- Installation of the MFRC522 library is required. For more information, please refer to the Raspberry Pi - RFID/NFC RC522 tutorial.
Raspberry Pi Code - Multiple Keys
The below code allows multiple authorized cards.
Repeat the same steps as above and then press each tag on the RFID-RC522 module. The output on the Terminal should appear as follows:
You can expand the code mentioned above for four, or more RFID tags.
