Raspberry Pi - Traffic Light

In this tutorial, we are going to learn how to use Raspberry Pi control the traffic light module. In detail, we will learn:

Hardware Preparation

1×Raspberry Pi 4 Model B
1×Traffic Light Module
1×Jumper Wires
1×(Optional) Screw Terminal Adapter for Raspberry Pi

Or you can buy the following sensor kits:

1×DIYables Sensor Kit (30 sensors/displays)
1×DIYables Sensor Kit (18 sensors/displays)
Disclosure: Some of the links provided in this section are Amazon affiliate links. We may receive a commission for any purchases made through these links at no additional cost to you. We appreciate your support.

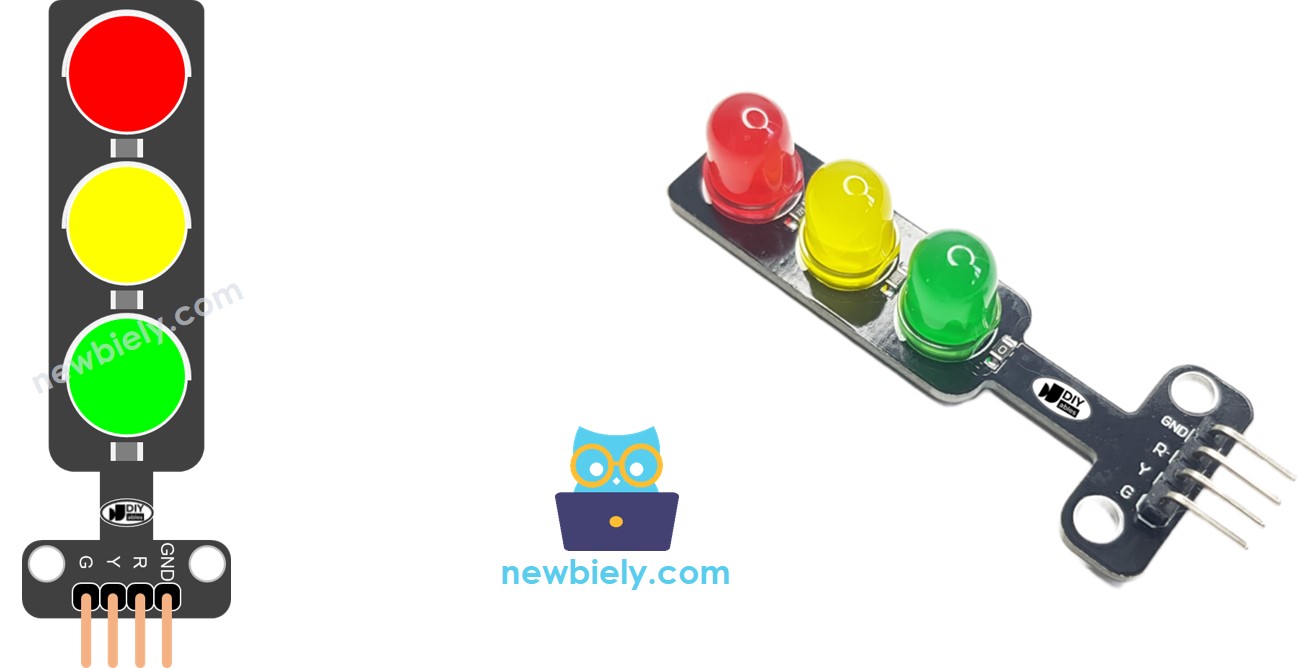
Overview of Traffic Light Module

Pinout

A traffic light module includes 4 pins:

  • GND pin: The ground pin, connect this pin to GND of Raspberry Pi.
  • R pin: The pin to control the red light, connect this pin to a digital output of Raspberry Pi.
  • Y pin: The pin to control the yellow light, connect this pin to a digital output of Raspberry Pi.
  • G pin: The pin to control the green light, connect this pin to a digital output of Raspberry Pi.
Traffic Light Pinout

How It Works

Wiring Diagram

The wiring diagram between Raspberry Pi and traffic light

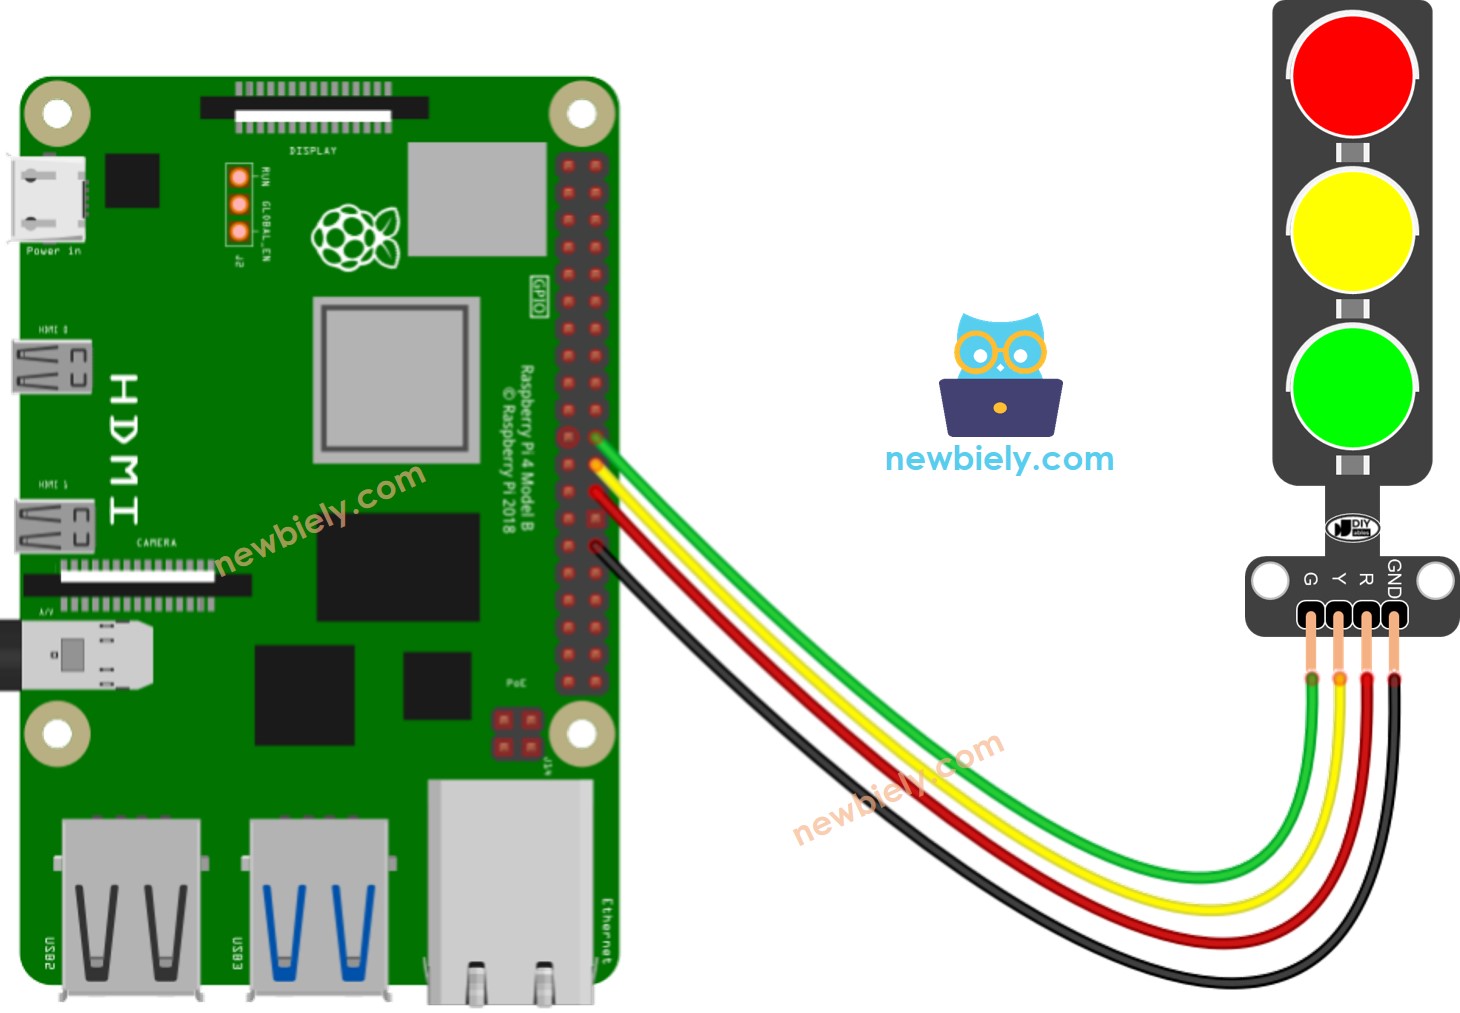
This image is created using Fritzing. Click to enlarge image

Raspberry Pi Code

# This Raspberry Pi code was developed by newbiely.com # This Raspberry Pi code is made available for public use without any restriction # For comprehensive instructions and wiring diagrams, please visit: # https://newbiely.com/tutorials/raspberry-pi/raspberry-pi-traffic-light import RPi.GPIO as GPIO import time # Define GPIO pins PIN_RED = 7 # The Raspberry Pi GPIO pin connected to the R pin of the traffic light module PIN_YELLOW = 8 # The Raspberry Pi GPIO pin connected to the Y pin of the traffic light module PIN_GREEN = 25 # The Raspberry Pi GPIO pin connected to the G pin of the traffic light module # Define time durations RED_TIME = 4 # RED time in seconds YELLOW_TIME = 4 # YELLOW time in seconds GREEN_TIME = 4 # GREEN time in seconds # Set up GPIO GPIO.setmode(GPIO.BCM) GPIO.setup(PIN_RED, GPIO.OUT) GPIO.setup(PIN_YELLOW, GPIO.OUT) GPIO.setup(PIN_GREEN, GPIO.OUT) try: while True: # Red light on GPIO.output(PIN_RED, GPIO.HIGH) GPIO.output(PIN_YELLOW, GPIO.LOW) GPIO.output(PIN_GREEN, GPIO.LOW) time.sleep(RED_TIME) # Yellow light on GPIO.output(PIN_RED, GPIO.LOW) GPIO.output(PIN_YELLOW, GPIO.HIGH) GPIO.output(PIN_GREEN, GPIO.LOW) time.sleep(YELLOW_TIME) # Green light on GPIO.output(PIN_RED, GPIO.LOW) GPIO.output(PIN_YELLOW, GPIO.LOW) GPIO.output(PIN_GREEN, GPIO.HIGH) time.sleep(GREEN_TIME) except KeyboardInterrupt: # Clean up GPIO on exit GPIO.cleanup()

Detailed Instructions

  • Make sure you have Raspbian or any other Raspberry Pi compatible operating system installed on your Pi.
  • Make sure your Raspberry Pi is connected to the same local network as your PC.
  • Make sure your Raspberry Pi is connected to the internet if you need to install some libraries.
  • If this is the first time you use Raspberry Pi, See how to set up the Raspberry Pi
  • Connect your PC to the Raspberry Pi via SSH using the built-in SSH client on Linux and macOS or PuTTY on Windows. See to how connect your PC to Raspberry Pi via SSH.
  • Make sure you have the RPi.GPIO library installed. If not, install it using the following command:
sudo apt-get update sudo apt-get install python3-rpi.gpio
  • Create a Python script file traffic_light.py and add the following code:
# This Raspberry Pi code was developed by newbiely.com # This Raspberry Pi code is made available for public use without any restriction # For comprehensive instructions and wiring diagrams, please visit: # https://newbiely.com/tutorials/raspberry-pi/raspberry-pi-traffic-light import RPi.GPIO as GPIO import time # Define GPIO pins PIN_RED = 7 # The Raspberry Pi GPIO pin connected to the R pin of the traffic light module PIN_YELLOW = 8 # The Raspberry Pi GPIO pin connected to the Y pin of the traffic light module PIN_GREEN = 25 # The Raspberry Pi GPIO pin connected to the G pin of the traffic light module # Define time durations RED_TIME = 4 # RED time in seconds YELLOW_TIME = 4 # YELLOW time in seconds GREEN_TIME = 4 # GREEN time in seconds # Set up GPIO GPIO.setmode(GPIO.BCM) GPIO.setup(PIN_RED, GPIO.OUT) GPIO.setup(PIN_YELLOW, GPIO.OUT) GPIO.setup(PIN_GREEN, GPIO.OUT) try: while True: # Red light on GPIO.output(PIN_RED, GPIO.HIGH) GPIO.output(PIN_YELLOW, GPIO.LOW) GPIO.output(PIN_GREEN, GPIO.LOW) time.sleep(RED_TIME) # Yellow light on GPIO.output(PIN_RED, GPIO.LOW) GPIO.output(PIN_YELLOW, GPIO.HIGH) GPIO.output(PIN_GREEN, GPIO.LOW) time.sleep(YELLOW_TIME) # Green light on GPIO.output(PIN_RED, GPIO.LOW) GPIO.output(PIN_YELLOW, GPIO.LOW) GPIO.output(PIN_GREEN, GPIO.HIGH) time.sleep(GREEN_TIME) except KeyboardInterrupt: # Clean up GPIO on exit GPIO.cleanup()
  • Save the file and run the Python script by executing the following command in the terminal:
python3 traffic_light.py

The script runs in an infinite loop continuously until you press Ctrl + C in the terminal.

  • Check out the traffic light module

It's important to note that the exact workings of a traffic light can vary depending on the specific design and technology used in different regions and intersections. The principles described above provide a general understanding of how traffic lights operate to manage traffic and enhance safety on the roads.

The code above demonstrates individual light control. Now, let's enhance the code for better optimization.

Raspberry Pi Code Optimization

  • Let's improve the code by implementing a function for light control.
# This Raspberry Pi code was developed by newbiely.com # This Raspberry Pi code is made available for public use without any restriction # For comprehensive instructions and wiring diagrams, please visit: # https://newbiely.com/tutorials/raspberry-pi/raspberry-pi-traffic-light import RPi.GPIO as GPIO import time # Define GPIO pins PIN_RED = 7 # The Raspberry Pi GPIO pin connected to the R pin of the traffic light module PIN_YELLOW = 8 # The Raspberry Pi GPIO pin connected to the Y pin of the traffic light module PIN_GREEN = 25 # The Raspberry Pi GPIO pin connected to the G pin of the traffic light module # Define time durations in seconds RED_TIME = 2 # RED time in seconds YELLOW_TIME = 1 # YELLOW time in seconds GREEN_TIME = 2 # GREEN time in seconds # Define indices for the light states RED = 0 YELLOW = 1 GREEN = 2 # Create lists for pins and times pins = [PIN_RED, PIN_YELLOW, PIN_GREEN] times = [RED_TIME, YELLOW_TIME, GREEN_TIME] # Set up GPIO GPIO.setmode(GPIO.BCM) GPIO.setup(PIN_RED, GPIO.OUT) GPIO.setup(PIN_YELLOW, GPIO.OUT) GPIO.setup(PIN_GREEN, GPIO.OUT) def traffic_light_on(light): for i in range(len(pins)): if i == light: GPIO.output(pins[i], GPIO.HIGH) # turn on else: GPIO.output(pins[i], GPIO.LOW) # turn off try: while True: # Red light on traffic_light_on(RED) time.sleep(times[RED]) # keep red light on during a period of time # Yellow light on traffic_light_on(YELLOW) time.sleep(times[YELLOW]) # keep yellow light on during a period of time # Green light on traffic_light_on(GREEN) time.sleep(times[GREEN]) # keep green light on during a period of time except KeyboardInterrupt: # Clean up GPIO on exit GPIO.cleanup()
  • Let's improve the code by using a for loop.
# This Raspberry Pi code was developed by newbiely.com # This Raspberry Pi code is made available for public use without any restriction # For comprehensive instructions and wiring diagrams, please visit: # https://newbiely.com/tutorials/raspberry-pi/raspberry-pi-traffic-light import RPi.GPIO as GPIO import time # Define GPIO pins PIN_RED = 7 # The Raspberry Pi GPIO pin connected to the R pin of the traffic light module PIN_YELLOW = 8 # The Raspberry Pi GPIO pin connected to the Y pin of the traffic light module PIN_GREEN = 25 # The Raspberry Pi GPIO pin connected to the G pin of the traffic light module # Define time durations in seconds RED_TIME = 2 # RED time in seconds YELLOW_TIME = 1 # YELLOW time in seconds GREEN_TIME = 2 # GREEN time in seconds # Define indices for the light states RED = 0 YELLOW = 1 GREEN = 2 # Create lists for pins and times pins = [PIN_RED, PIN_YELLOW, PIN_GREEN] times = [RED_TIME, YELLOW_TIME, GREEN_TIME] # Set up GPIO GPIO.setmode(GPIO.BCM) GPIO.setup(PIN_RED, GPIO.OUT) GPIO.setup(PIN_YELLOW, GPIO.OUT) GPIO.setup(PIN_GREEN, GPIO.OUT) def traffic_light_on(light): for i in range(len(pins)): if i == light: GPIO.output(pins[i], GPIO.HIGH) # turn on else: GPIO.output(pins[i], GPIO.LOW) # turn off try: while True: for light in range(RED, GREEN + 1): traffic_light_on(light) time.sleep(times[light]) # keep light on during a period of time except KeyboardInterrupt: # Clean up GPIO on exit GPIO.cleanup()
  • Let's improve the code by using millis() function intead of delay().
# This Raspberry Pi code was developed by newbiely.com # This Raspberry Pi code is made available for public use without any restriction # For comprehensive instructions and wiring diagrams, please visit: # https://newbiely.com/tutorials/raspberry-pi/raspberry-pi-traffic-light import RPi.GPIO as GPIO import time # Define GPIO pins PIN_RED = 7 # The Raspberry Pi GPIO pin connected to the R pin of the traffic light module PIN_YELLOW = 8 # The Raspberry Pi GPIO pin connected to the Y pin of the traffic light module PIN_GREEN = 25 # The Raspberry Pi GPIO pin connected to the G pin of the traffic light module # Define time durations in seconds RED_TIME = 2 # RED time in seconds YELLOW_TIME = 1 # YELLOW time in seconds GREEN_TIME = 2 # GREEN time in seconds # Define indices for the light states RED = 0 YELLOW = 1 GREEN = 2 # Create lists for pins and times pins = [PIN_RED, PIN_YELLOW, PIN_GREEN] times = [RED_TIME, YELLOW_TIME, GREEN_TIME] # Set up GPIO GPIO.setmode(GPIO.BCM) GPIO.setup(PIN_RED, GPIO.OUT) GPIO.setup(PIN_YELLOW, GPIO.OUT) GPIO.setup(PIN_GREEN, GPIO.OUT) light = RED # start with RED light last_time = time.time() def traffic_light_on(light): for i in range(len(pins)): if i == light: GPIO.output(pins[i], GPIO.HIGH) # turn on else: GPIO.output(pins[i], GPIO.LOW) # turn off try: while True: if (time.time() - last_time) > times[light]: light += 1 if light >= 3: light = RED # new circle traffic_light_on(light) last_time = time.time() # TO DO: your other code except KeyboardInterrupt: # Clean up GPIO on exit GPIO.cleanup()

Video Tutorial

※ OUR MESSAGES

  • As freelancers, We are AVAILABLE for HIRE. See how to outsource your project to us
  • Please feel free to share the link of this tutorial. However, Please do not use our content on any other websites. We invested a lot of effort and time to create the content, please respect our work!