Raspberry Pi - NeoPixel LED Strip
The NeoPixel RGB LED strip is a collection of LEDs whose color and brightness can be individually adjusted. This tutorial instructs you how to use a Raspberry Pi to control the NeoPixel RGB LED strip. In detail, we will learn:
- How to connect the NeoPixel LED strip to Raspberry Pi
- How to program Raspberry Pi to control the color of each individual LED on the NeoPixel LED strip.
- How to program Raspberry Pi to control the brightness of each individual LED on the NeoPixel LED strip.
We only need to use one digital pin of the Raspberry Pi to control all the LEDs on the strip.
Hardware Preparation
Or you can buy the following kits:
| 1 | × | DIYables Sensor Kit (18 sensors/displays) |
Additionally, some of these links are for products from our own brand, DIYables .
Overview of NeoPixel RGB LED Strip
The NeoPixel LED Strip Pinout
The NeoPixel RGB LED Strip has three pins that require connection:
- GND pin: This must be connected to GND (0V)
- VCC pin: This must be connected to 5V of an external power supply
- Din pin: This is the pin that receives the control signal and should be connected to a Raspberry Pi pin.
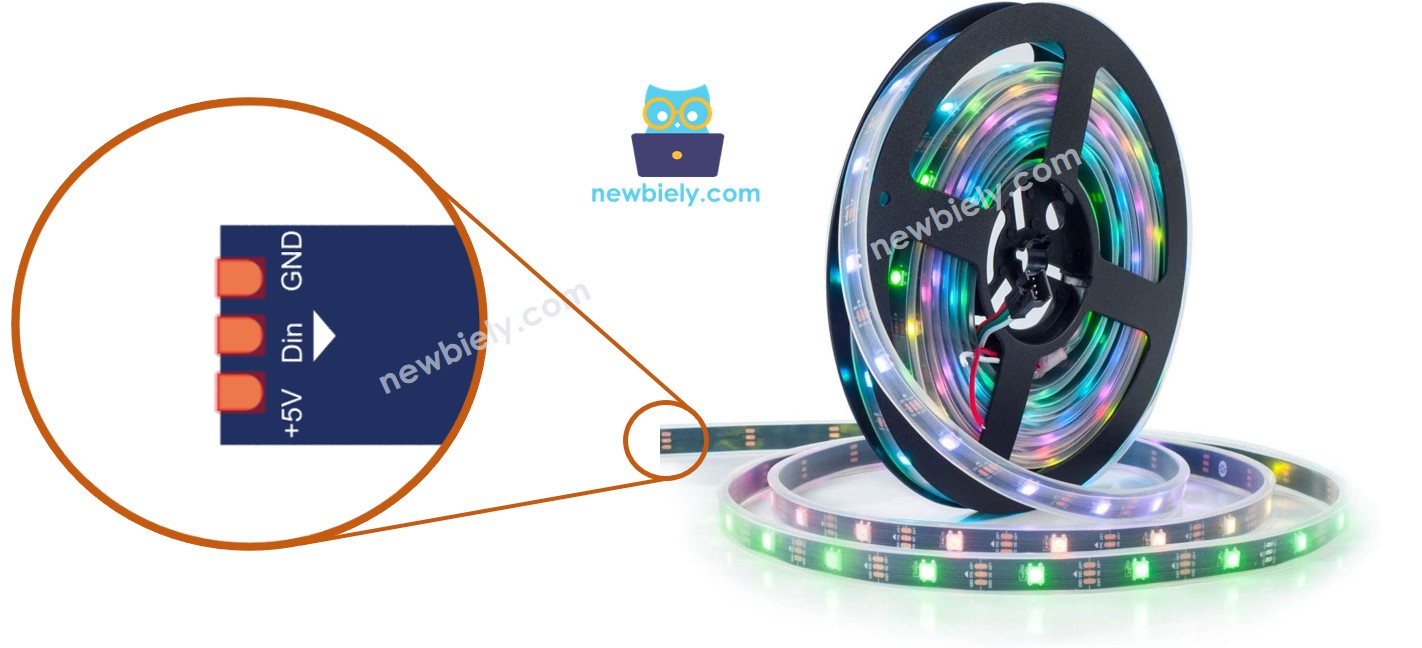
※ NOTE THAT:
The order of pins may differ among manufacturers. It is IMPERATIVE to always utilize the labels printed on the LED Strip.
Wiring Diagram
This image is created using Fritzing. Click to enlarge image
To simplify and organize your wiring setup, we recommend using a Screw Terminal Block Shield for Raspberry Pi. This shield ensures more secure and manageable connections, as shown below:

How To Program For NeoPixel RGB LED Strip
- Create a NeoPixel object.
- Initializes the library for NeoPixel.
- Specify the color of each individual LED (known as a pixel).
- Adjust the brightness of all the strips.
※ NOTE THAT:
- NeoPixel.setBrightness() is used for adjusting the brightness of all pixels on the LED strip. To set the brightness for each individual pixel, we can scale the color values (R,G, B) with the same ratio.
- The values set by NeoPixel.setBrightness() and NeoPixel.setPixelColor() will only be applied when NeoPixel.show() is executed.
Raspberry Pi Code
The code below:
- Changes each pixel to green in succession, with a pause between each one
- Switches off all pixels for two seconds
- Lights up all pixels red simultaneously for two seconds
- Repeats the cycle indefinitely
Detailed Instructions
- Make sure you have Raspbian or any other Raspberry Pi compatible operating system installed on your Pi.
- Make sure your Raspberry Pi is connected to the same local network as your PC.
- Make sure your Raspberry Pi is connected to the internet if you need to install some libraries.
- If this is the first time you use Raspberry Pi, See how to set up the Raspberry Pi
- Connect your PC to the Raspberry Pi via SSH using the built-in SSH client on Linux and macOS or PuTTY on Windows. See to how connect your PC to Raspberry Pi via SSH.
- Make sure you have the RPi.GPIO library installed. If not, install it using the following command:
- Prior to utilizing the NeoPixel with a Raspberry Pi, we need to SPI interface on Raspberry Pi. Enable the SPI interface on Raspberry Pi by following the instruction on Raspberry Pi - how to enable SPI inteface
- Install the NeoPixel library by running the following command:
- Create a Python script file NeoPixel.py and add the following code:
- Save the file and run the Python script by executing the following command in the terminal:
- Check out the LED effect.
The script runs in an infinite loop continuously until you press Ctrl + C in the terminal.
※ NOTE THAT:
For any intricate LED effect, we provide the paid programming service