Raspberry Pi - RFID - Relay

This tutorial instructs you how to use a Raspberry Pi and an RFID/NFC RC522 reader control a relay. You can also take this tutorial further and use the relay to control door lock, light bulb, motors, actuators, and so on.

Hardware Preparation

1×Raspberry Pi 4 Model B
1×RFID/NFC RC522 Kit (reader + tags)
1×RFID Key Fob
1×Relay
10×Jumper Wires
1×(Optional) Screw Terminal Adapter for Raspberry Pi

Or you can buy the following sensor kits:

1×DIYables Sensor Kit (30 sensors/displays)
1×DIYables Sensor Kit (18 sensors/displays)
Disclosure: Some of the links provided in this section are Amazon affiliate links. We may receive a commission for any purchases made through these links at no additional cost to you. We appreciate your support.

Overview of RFID/NFC RC522 Module and Relay

If you are unfamiliar with RFID/NFC RC522 Module and relay (pinout, how it works, how to program ...), the following tutorials can help you gain knowledge:

How It Works

  • Some RFID/NFC tags have their UIDs pre-defined in the Raspberry Pi code.
  • When a user taps an RFID/NFC tag on the RFID/NFC reader, the reader reads the UID from the tag.
  • The Raspberry Pi then receives the UID from the reader and compares it with the pre-defined UIDs.
  • If the UID matches one of the pre-defined UIDs, the Raspberry Pi will activate the relay.

Wiring Diagram

The wiring diagram between Raspberry Pi and RFID RC522 relay

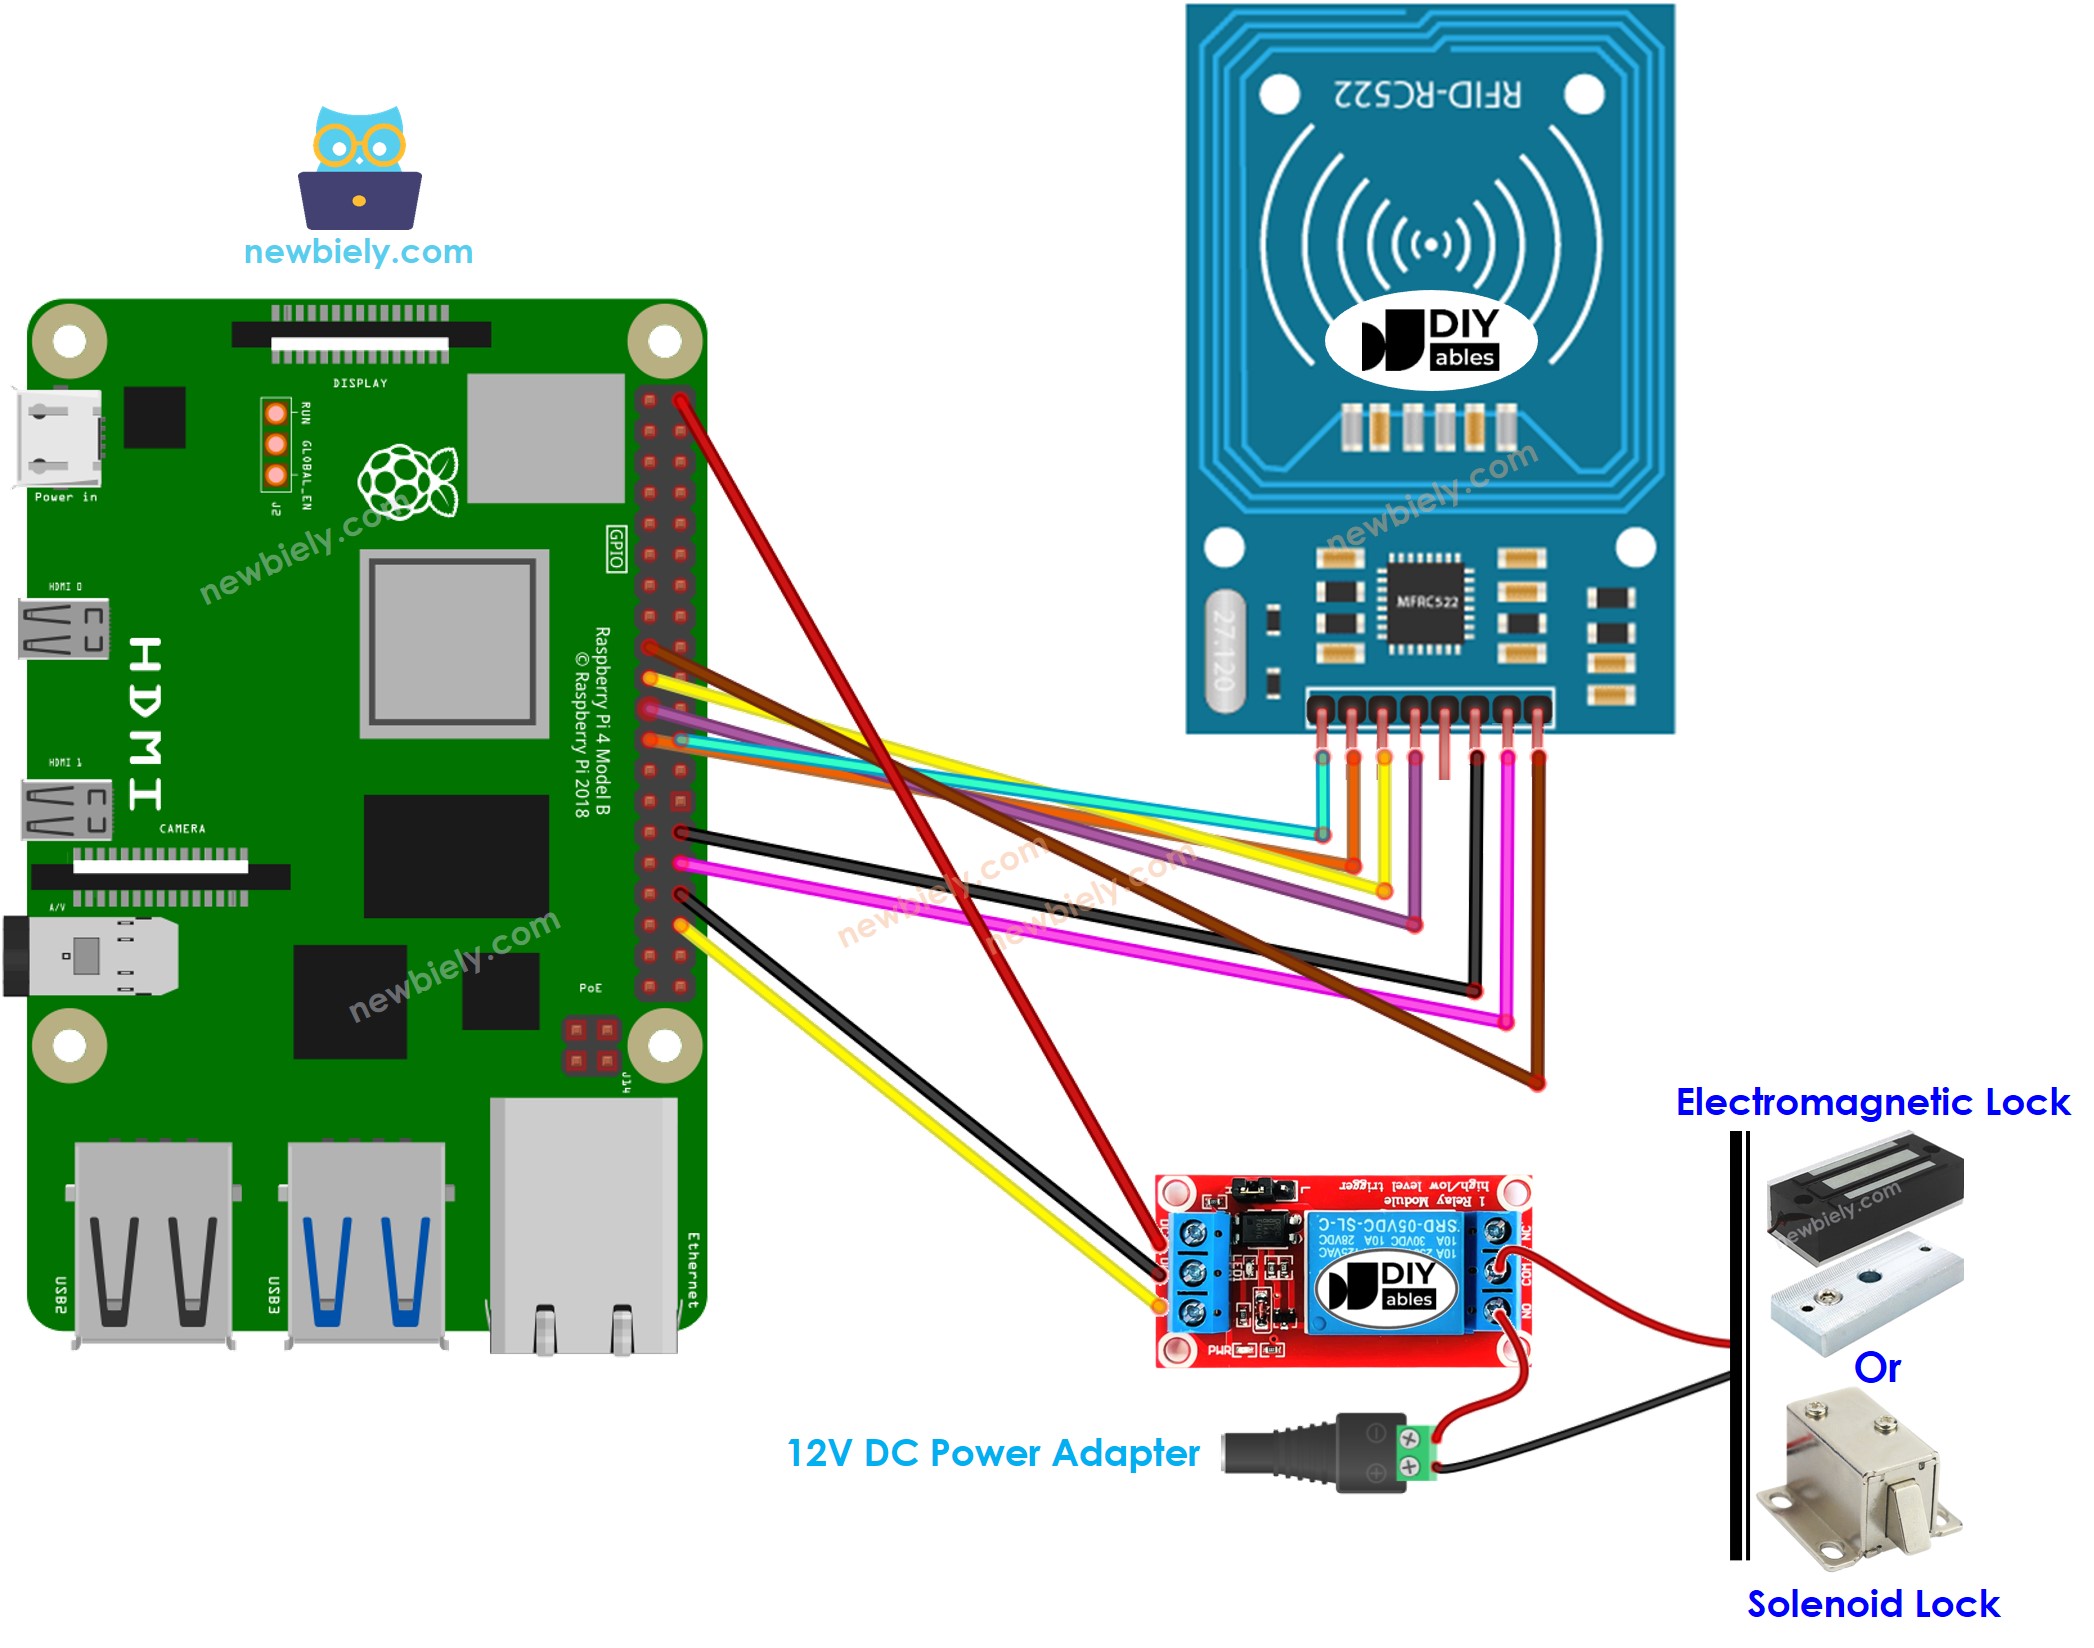
This image is created using Fritzing. Click to enlarge image

※ NOTE THAT:

The arrangement of pins may differ depending on the manufacturer. ALWAYS utilize the labels printed on the module. The image above displays the pinout of the modules from DIYables maker.

Raspberry Pi Code - Single RFID/NFC Tag

Detailed Instructions

  • Make sure you have Raspbian or any other Raspberry Pi compatible operating system installed on your Pi.
  • Make sure your Raspberry Pi is connected to the same local network as your PC.
  • Make sure your Raspberry Pi is connected to the internet if you need to install some libraries.
  • If this is the first time you use Raspberry Pi, See how to set up the Raspberry Pi
  • Connect your PC to the Raspberry Pi via SSH using the built-in SSH client on Linux and macOS or PuTTY on Windows. See to how connect your PC to Raspberry Pi via SSH.
  • Make sure you have the RPi.GPIO library installed. If not, install it using the following command:
sudo apt-get update sudo apt-get install python3-rpi.gpio
  • Enable the SPI interface on Raspberry Pi by following the instruction on Raspberry Pi - how to enable SPI inteface
  • Make sure you have the spidev library installed. If not, install it using the following command:
sudo apt-get install python3-pip python3-dev git sudo pip3 install spidev
  • Make sure you have the mfrc522 library installed. If not, install it using the following command:
sudo pip3 install mfrc522
  • Create a Python script file rfid_relay.py and add the following code:
# This Raspberry Pi code was developed by newbiely.com # This Raspberry Pi code is made available for public use without any restriction # For comprehensive instructions and wiring diagrams, please visit: # https://newbiely.com/tutorials/raspberry-pi/raspberry-pi-rfid-relay import RPi.GPIO as GPIO import MFRC522 import time # Define GPIO pins RC522_RST_PIN = 12 # GPIO pin connected to RC522's RST pin RELAY_PIN = 16 # GPIO pin connected to relay # Set up GPIO GPIO.setmode(GPIO.BOARD) GPIO.setup(RELAY_PIN, GPIO.OUT, initial=GPIO.LOW) # Create an instance of the RFID reader reader = MFRC522.MFRC522() authorized_uid = [0xFF, 0xFF, 0xFF, 0xFF] try: print("Tap RFID/NFC Tag on reader") while True: (status, TagType) = reader.MFRC522_Request(reader.PICC_REQIDL) if status == reader.MI_OK: (status, uid) = reader.MFRC522_Anticoll() if status == reader.MI_OK: if uid == authorized_uid: print("Authorized Tag") GPIO.output(RELAY_PIN, GPIO.HIGH) # activate the relay for 2 seconds time.sleep(2) GPIO.output(RELAY_PIN, GPIO.LOW) # deactivate the relay else: print(f"Unauthorized Tag with UID: {' '.join(format(b, '02x') for b in uid)}") except KeyboardInterrupt: GPIO.cleanup()
  • Save the file and run the Python script by executing the following command in the terminal:
python3 rfid_relay.py

The script runs in an infinite loop continuously until you press Ctrl + C in the terminal.

In order to identify the UID of an RFID/NFC tag:

  • Run the above code and tap the tag on the RFID-RC522 module.
  • The UID will be displayed on the Serial Monitor.
PuTTY - Raspberry Pi
Tap RFID/NFC tag on reader Unauthorized Tag with UID: 3A C9 6A CB

After obtaining the UID:

  • Alter line 18 of the code to reflect the UID, for example changing byte authorizedUID[4] = {0xFF, 0xFF, 0xFF, 0xFF}; to byte authorizedUID[4] = {0x3A, 0xC9, 0x6A, 0xCB};
  • Upload the code to the Raspberry Pi
  • Place an RFID/NFC tag on the RFID-RC522 module
  • Check out the output on the Serial Monitor
PuTTY - Raspberry Pi
Tap RFID/NFC tag on reader Authorized Tag
  • Tap a different RFID/NFC tag onto the RFID-RC522 module.
  • Check the output on the Serial Monitor.
PuTTY - Raspberry Pi
Tap RFID/NFC tag on reader Authorized Tag Unauthorized Tag with UID: BD 1E 1D 00

※ NOTE THAT:

  • To facilitate testing, the active time has been set to two seconds; however, it should be increased for practical use or demonstration.
  • Installation of the MFRC522 library is necessary. For more information, please refer to the Raspberry Pi - RFID/NFC RC522 tutorial.

Raspberry Pi Code - Multiple RFID/NFC Tags

It is possible to enable the relay through multiple RFID/NFC tags. The code below provides an illustration of three RFID tags.

# This Raspberry Pi code was developed by newbiely.com # This Raspberry Pi code is made available for public use without any restriction # For comprehensive instructions and wiring diagrams, please visit: # https://newbiely.com/tutorials/raspberry-pi/raspberry-pi-rfid-relay import RPi.GPIO as GPIO import MFRC522 import time # Define GPIO pins RC522_RST_PIN = 12 # GPIO pin connected to RC522's RST pin RELAY_PIN = 16 # GPIO pin connected to relay # Set up GPIO GPIO.setmode(GPIO.BOARD) GPIO.setup(RELAY_PIN, GPIO.OUT, initial=GPIO.LOW) # Create an instance of the RFID reader reader = MFRC522.MFRC522() # List of authorized UIDs authorized_uids = [ [0xAA, 0xBB, 0xCC, 0xDD], [0x11, 0x22, 0x33, 0x44], [0xFF, 0xFF, 0xFF, 0xFF] ] def is_authorized(uid): for auth_uid in authorized_uids: if uid == auth_uid: return True return False try: print("Tap RFID/NFC Tag on reader") while True: (status, TagType) = reader.MFRC522_Request(reader.PICC_REQIDL) if status == reader.MI_OK: (status, uid) = reader.MFRC522_Anticoll() if status == reader.MI_OK: if is_authorized(uid): print("Authorized Tag") GPIO.output(RELAY_PIN, GPIO.HIGH) # activate the relay for 2 seconds time.sleep(2) GPIO.output(RELAY_PIN, GPIO.LOW) # deactivate the relay else: print(f"Unauthorized Tag with UID: {' '.join(format(b, '02x') for b in uid)}") except KeyboardInterrupt: GPIO.cleanup()

Repeat the same steps as before, and then tap each tag on the RFID-RC522 module. The results seen on the Serial Monitor will be similar to those below:

PuTTY - Raspberry Pi
Tap RFID/NFC tag on reader Authorized Tag Authorized Tag

You can expand the code mentioned above to include four, or more RFID tags.

Video Tutorial

※ OUR MESSAGES

  • As freelancers, We are AVAILABLE for HIRE. See how to outsource your project to us
  • Please feel free to share the link of this tutorial. However, Please do not use our content on any other websites. We invested a lot of effort and time to create the content, please respect our work!