Arduino UNO Q - OpenClaw
Want to control your Arduino UNO Q by typing plain English messages instead of fixed bot commands? This tutorial shows you how to use OpenClaw with Arduino UNO Q so you can send messages like "turn the LED on" or "what is the MCU status?" from Telegram, WhatsApp, Discord, or any messaging app you already use.
In this tutorial, you will learn:
- What OpenClaw is and how it works with Arduino UNO Q
- How to install OpenClaw on the Arduino UNO Q Linux side (Debian)
- How to create a custom Arduino UNO Q skill for OpenClaw
- How to connect OpenClaw to Telegram
- How to write the MCU Bridge sketch for OpenClaw to control
- How to control Arduino UNO Q hardware with natural language messages
Hardware Preparation
Or you can buy the following kits:
| 1 | × | DIYables Sensor Kit (18 sensors/displays) |
Additionally, some of these links are for products from our own brand, DIYables .
What is OpenClaw?
OpenClaw is a personal AI assistant you run on your own device. It connects to messaging apps you already use (Telegram, WhatsApp, Discord, Slack, and many more) and uses an AI model (Anthropic Claude, OpenAI, etc.) to understand what you say and act on it.
On Arduino UNO Q, OpenClaw runs on the Linux side (the Qualcomm MPU, which runs Debian Linux). You create a custom skill that teaches OpenClaw how to call MCU functions via the Bridge. After that, you can send natural language messages and OpenClaw handles the rest.
Key features:
- Natural language — no fixed commands; say the same thing many ways and OpenClaw understands
- Multi-channel — works on Telegram, WhatsApp, Discord, Slack, and more, all at once
- Extensible — add more Bridge functions and update the skill to teach OpenClaw about them
- Self-hosted — runs on the Arduino UNO Q Linux side; your data stays on your device
OpenClaw vs. Telegram Bot
Both OpenClaw and the Telegram bot (covered in other tutorials) let you control Arduino UNO Q remotely. The key difference is how commands work:
| Feature | Telegram Bot | OpenClaw |
|---|---|---|
| Command style | Fixed (e.g. /led_on) | Natural language ("turn the LED on") |
| Understanding | Exact command match | AI-powered intent detection |
| Messaging channels | Telegram only | Telegram, WhatsApp, Discord, Slack, and more |
| AI model required | No | Yes (API key from Anthropic, OpenAI, etc.) |
| Setup complexity | Simple | Moderate |
Prerequisites
Before starting, make sure you have:
- Arduino UNO Q up and running: follow the Getting Started with Arduino UNO Q tutorial first
- Arduino App Lab: installed and working
- Familiarity with the Bridge: see the Communication Between Linux and MCU tutorial
- A messaging account: this tutorial uses Telegram, but OpenClaw also supports WhatsApp, Discord, Slack, iMessage, and more. The setup for other channels is similar.
- A Telegram bot token: you will create this in the Connect OpenClaw to Telegram section below using @BotFather
- An AI provider API key: this tutorial uses Anthropic (Claude). You can also use OpenAI or other supported providers; the setup steps are similar. Sign up at console.anthropic.com, create an API key, and copy it; you will paste it during the OpenClaw onboarding step.
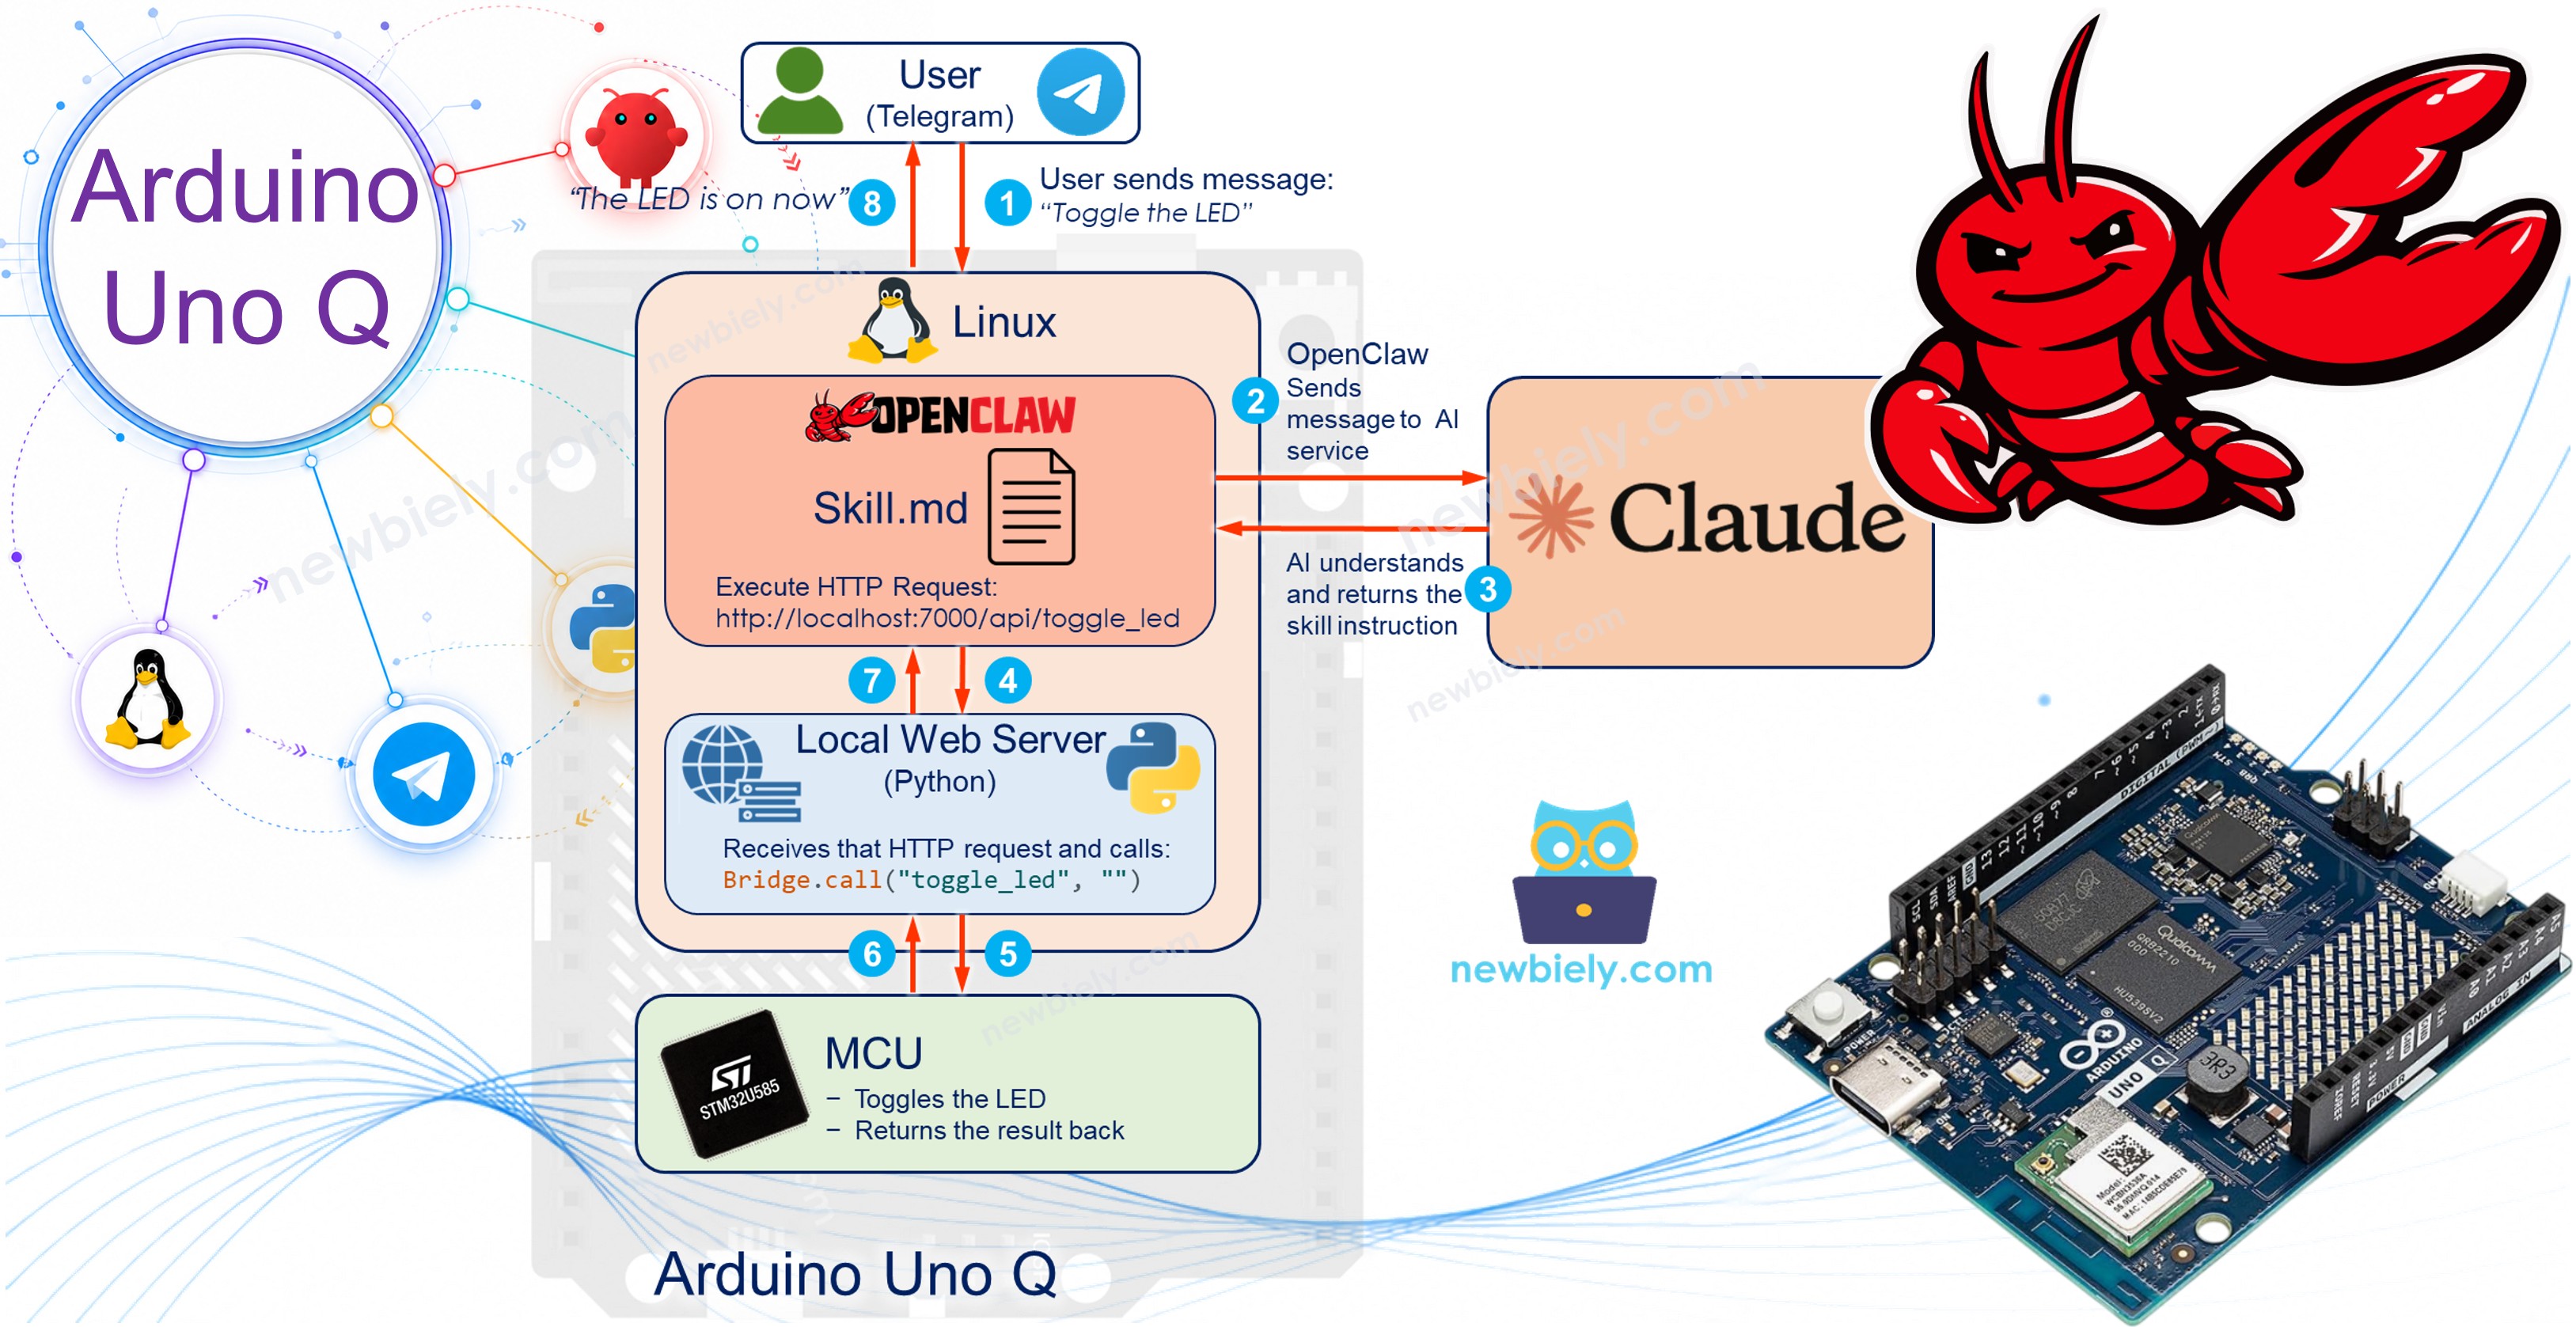
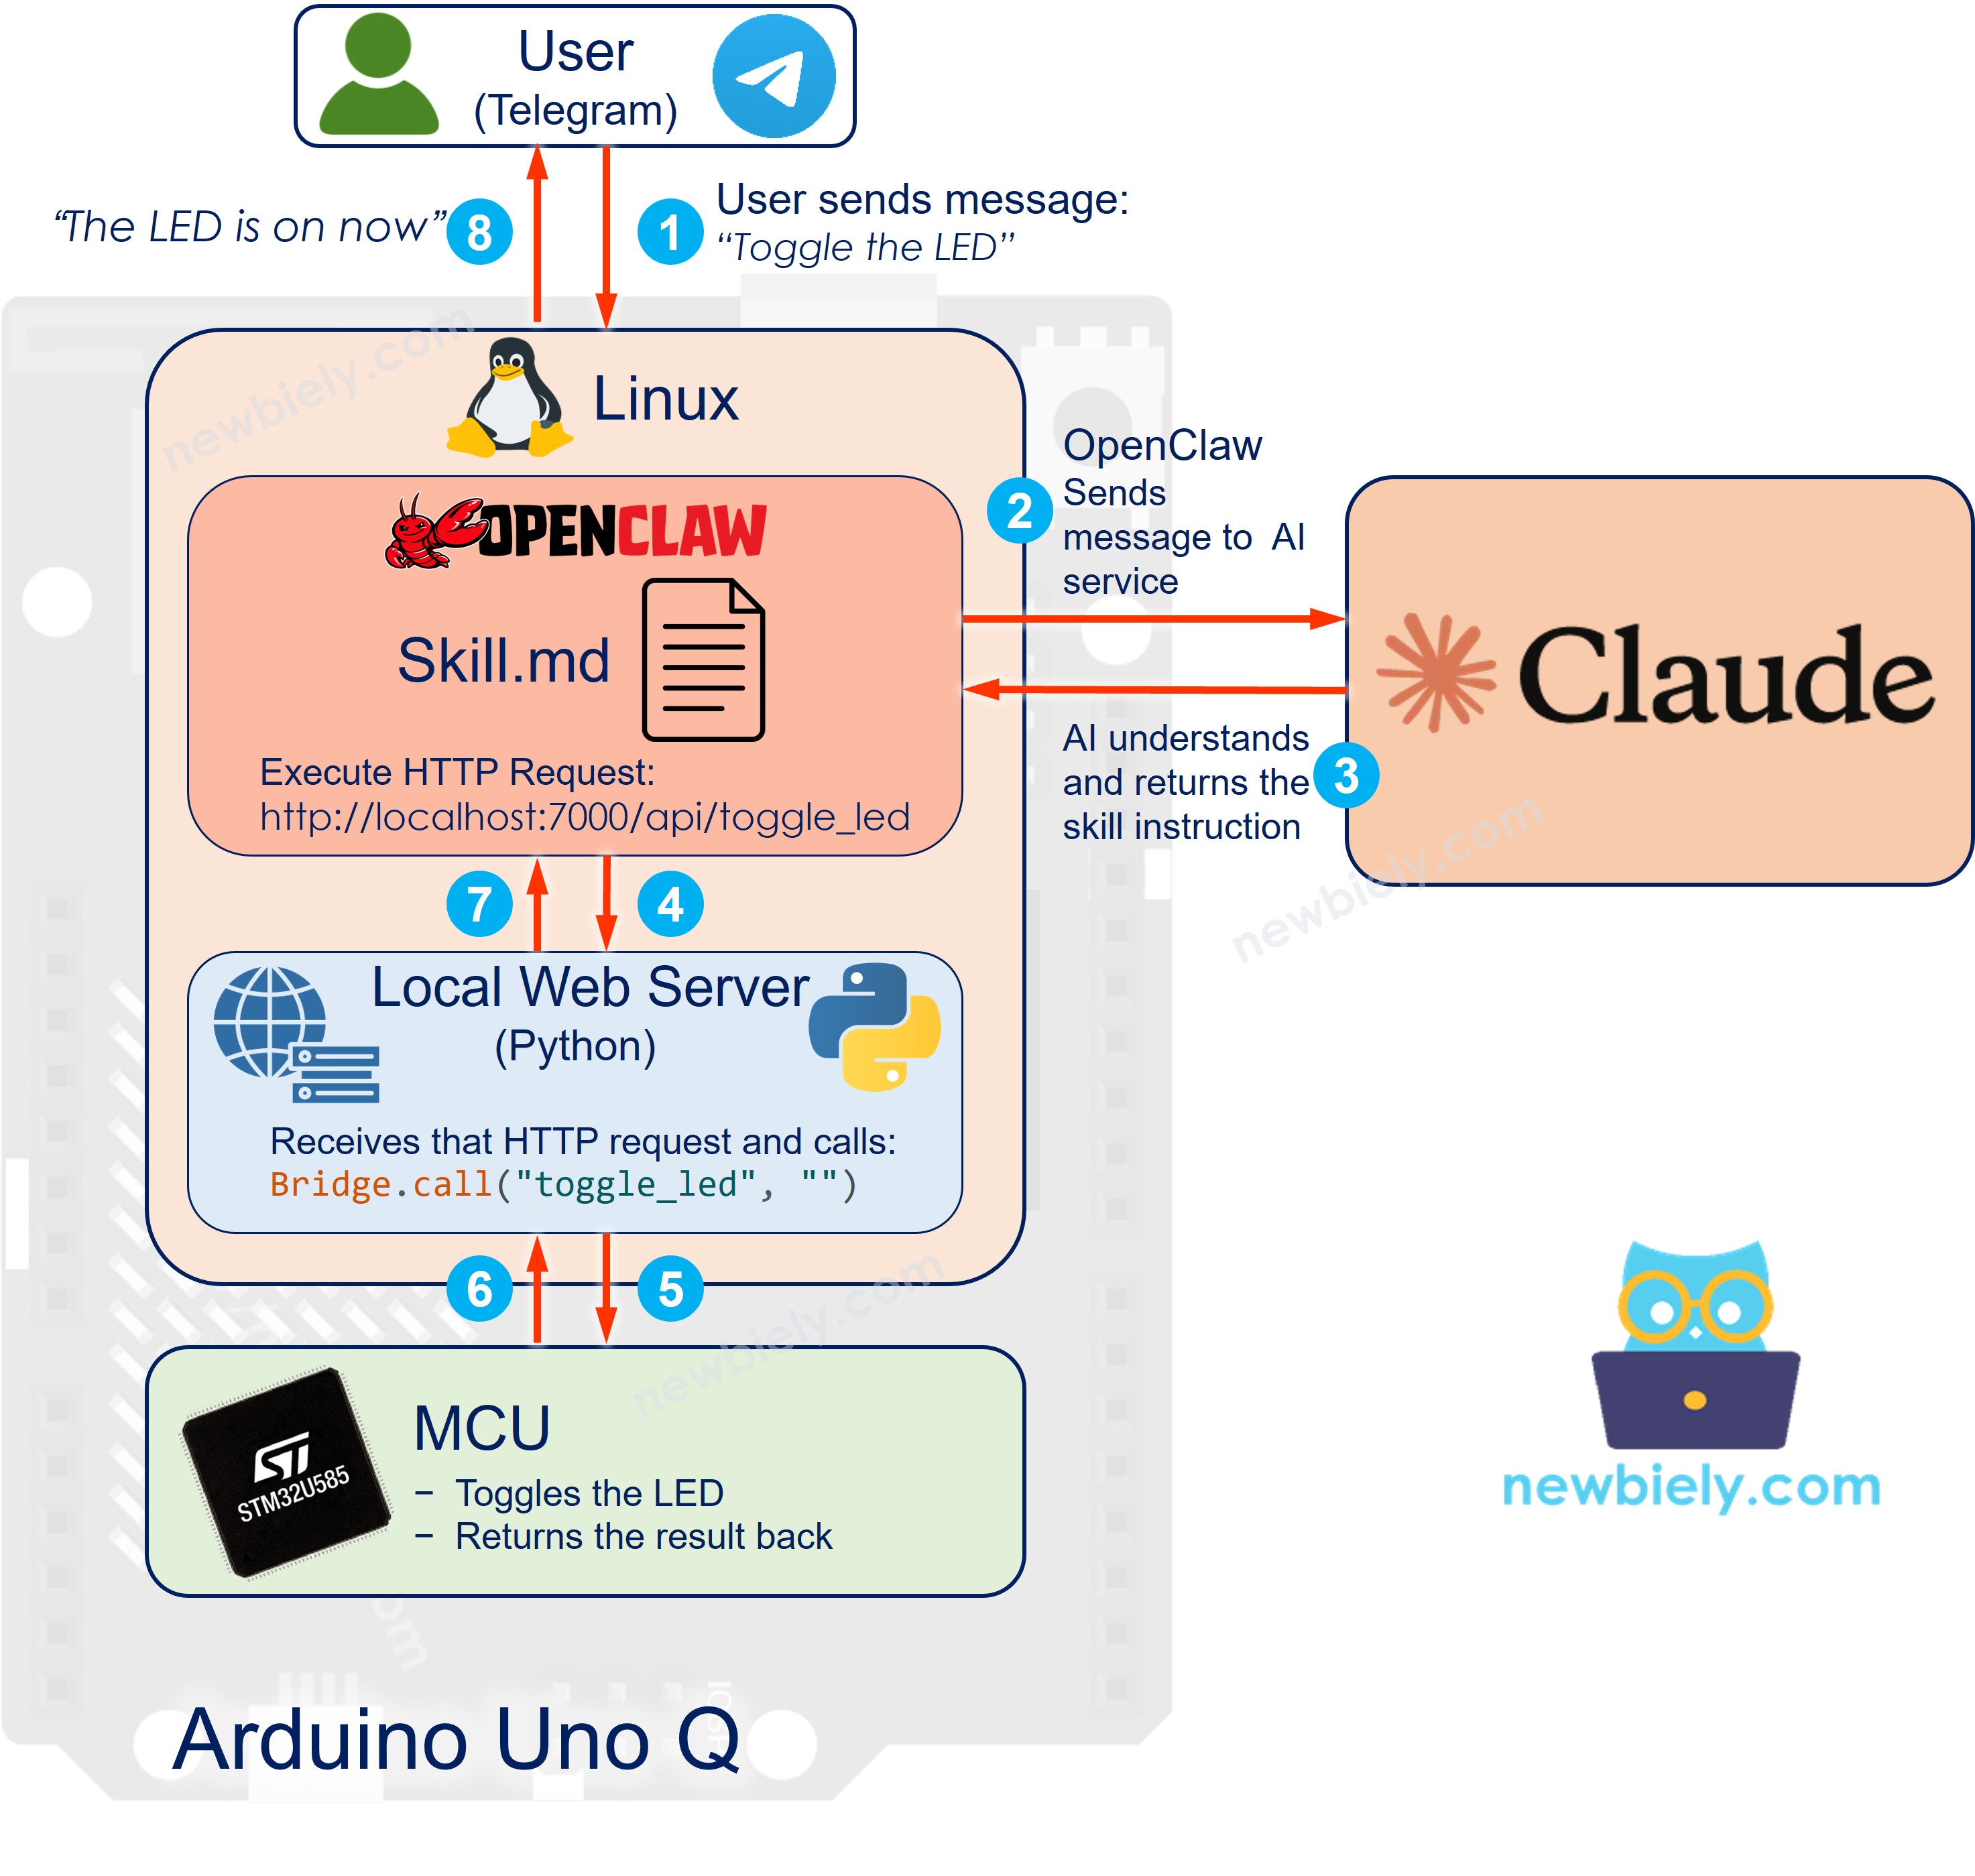
How OpenClaw + Arduino UNO Q Work Together
※ NOTE THAT:
OpenClaw runs on the Qualcomm MPU (Linux side). The MCU exposes hardware control functions via the Arduino Bridge, exactly as in other Bridge tutorials. OpenClaw calls those functions through a WebUI HTTP bridge that runs on the Arduino UNO Q Linux side.
Here is the flow for each user message:
- User sends a message via Telegram (or another connected channel): *"Toggle the LED"*
- OpenClaw receives the message on Telegram (or another channel), sends it to the Anthropic Claude AI model, which understands the intent, and selects the matching Arduino UNO Q skill
- Skill instructs OpenClaw to execute: curl http://localhost:7000/api/toggle_led
- WebUI bridge — a Python script running as a web server on the Arduino UNO Q Linux side — receives that HTTP request and calls Bridge.call("toggle_led", "") to reach the MCU
- MCU (STM32) toggles the LED and returns the result back through the Bridge to the Python web server
- OpenClaw receives the result and sends the reply back to the user: *"LED is now ON"*
Install OpenClaw
Installing OpenClaw is not straightforward at the time of writing this tutorial. You may run into issues such as infinite loops during the onboarding wizard, prompts that do not advance, or steps that behave differently depending on the version of OpenClaw you install. This section gives you the main steps that worked at the time of writing — the exact steps may differ based on the version you install. If something gets stuck, exit (Ctrl+C), check the OpenClaw documentation, and try again.
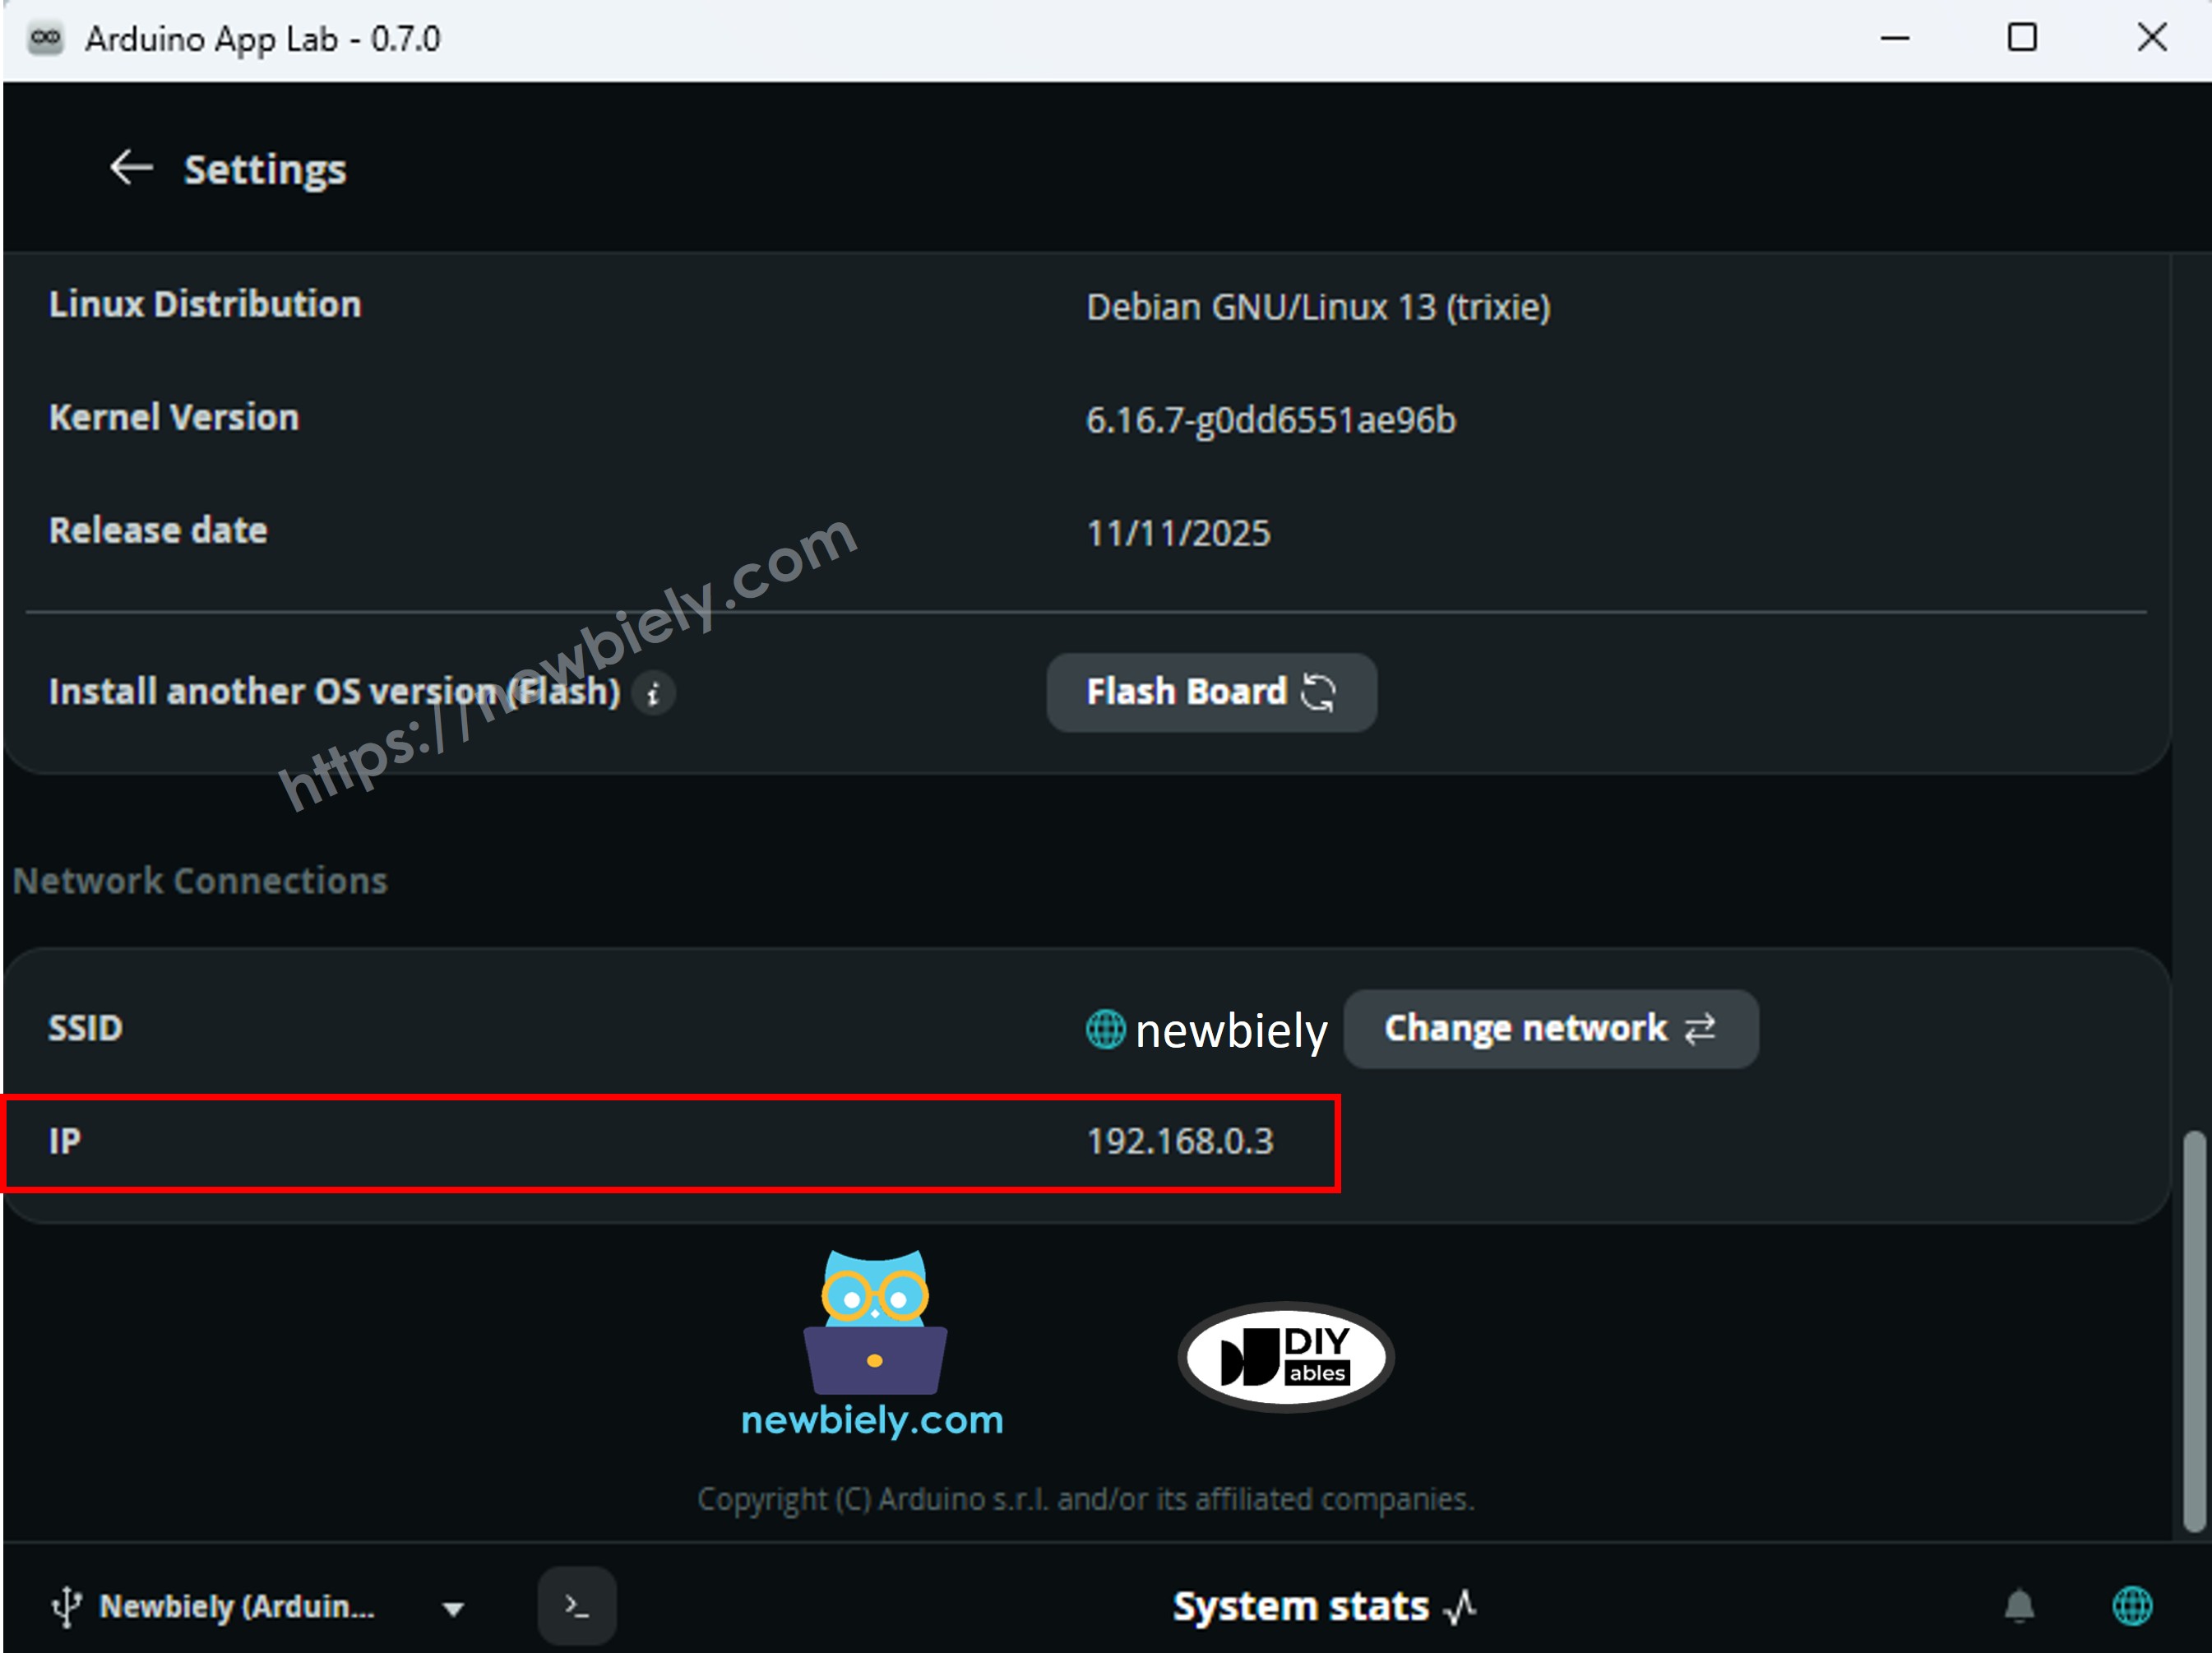
To SSH into the Arduino UNO Q, you need its IP address. Open Arduino App Lab, go to Settings, and look for the IP Address field.
Install Node.js
OpenClaw requires Node.js 22 or later. The Arduino UNO Q Linux side runs Debian, so you install it via the NodeSource package.
Do not use the SSH terminal inside Arduino App Lab (at least version 0.7.0) — it is unstable, times out frequently, and may inject unexpected input. Use an external SSH client instead.
- On Windows, open PowerShell or Windows Terminal and run:
- You will be asked to input the Linux password that you set when you first setup Arduino Uno Q.
- Then the SSH terminal will look like this:
- Run these commands in the SSH terminal:
- You will see output ending with Repository configured successfully.. Then run:
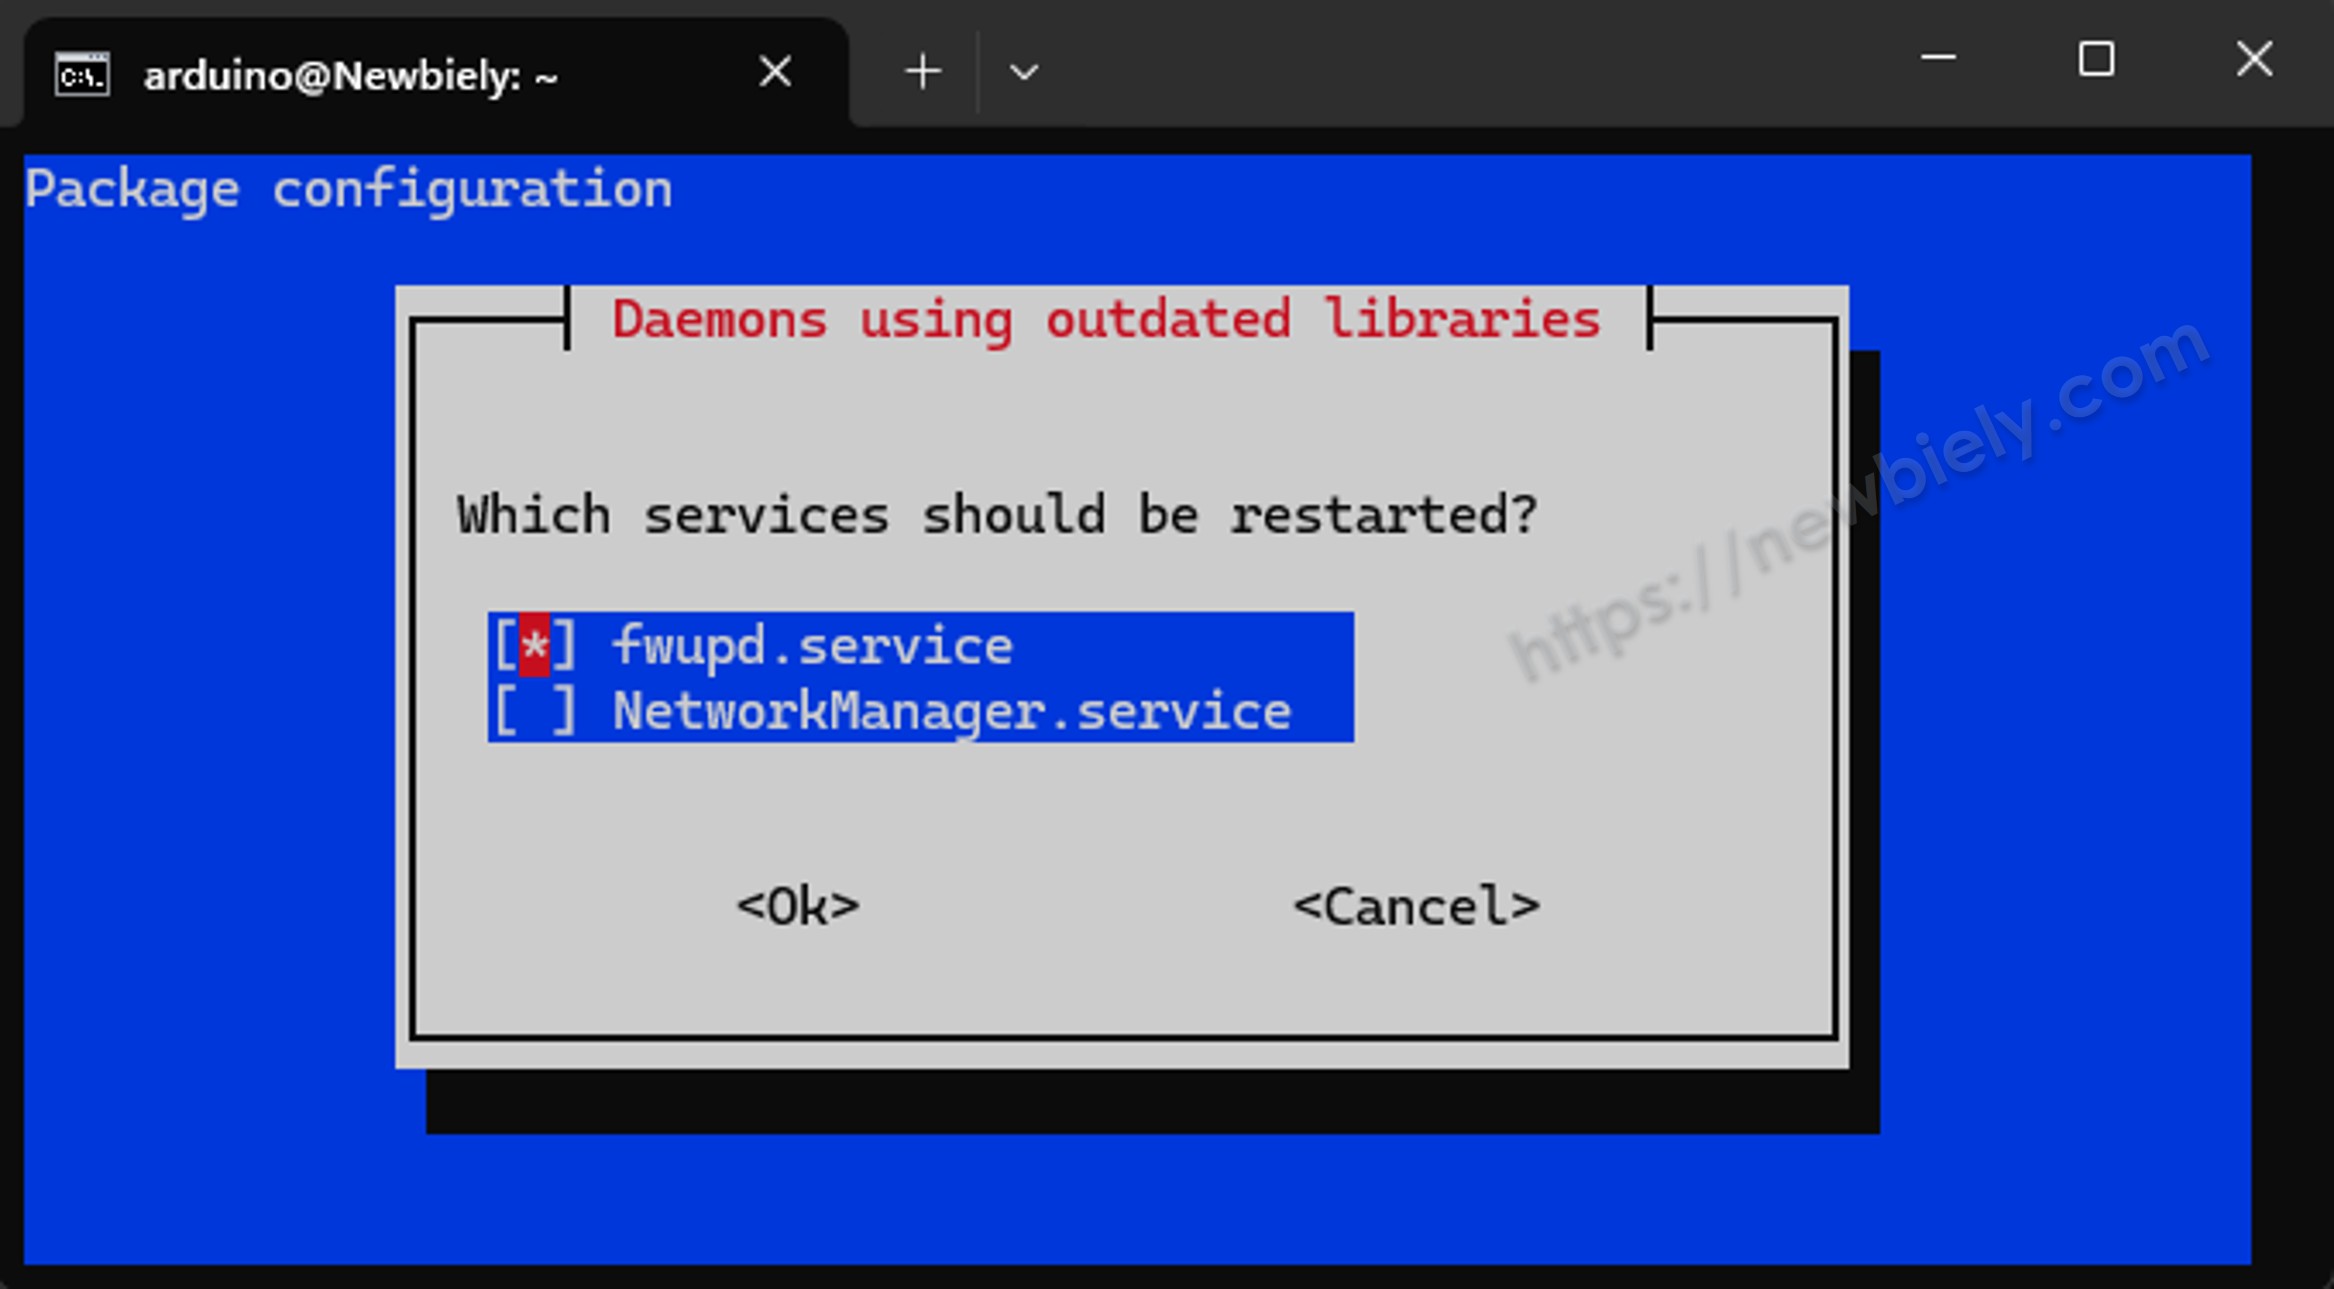
During installation, a "Which services should be restarted?" dialog may appear. Leave the default selection and press Enter to continue.
Then run:
The last command should print v22.x.x or higher. If it does, Node.js is ready.
Install OpenClaw
- Install OpenClaw globally:
- Create the config directories:
You should see Setup complete: local config, workspace, and session directories are ready.
- Run the onboarding wizard — this is the most reliable way to store your Anthropic API key:
The wizard walks you through a short series of prompts:
- Select Yes to begin setup
- Select QuickStart
- Select Anthropic as the model provider
- Select Anthropic API key
- Paste your Anthropic API key and press Enter
- Select Keep current for the model (Claude 3.5 Sonnet is the default and works well)
If the SSH session drops after the wizard, reconnect and continue from the next step.
- Start the Gateway in the background:
You will see output like:
This is normal. The number after [1] is the job number and 35925 is the process ID. Press Enter once to get the prompt back.
- Verify the Gateway is running:
Look for these two lines in the output:
You may also see Connectivity probe: failed — this is normal when running via nohup instead of systemd. The gateway is still working as long as you see Gateway already running locally and a PID listed next to port 18789.
Connect OpenClaw to Telegram
Step 1 — Get a Telegram Bot Token
If you do not have a Telegram bot yet, see How to Create a Telegram Bot to get your bot token before continuing. After completing that tutorial, you will have a bot token in this format:
Step 2 — Add the Bot Token to OpenClaw
On the Arduino UNO Q Linux side (via SSH), open the OpenClaw config file:
Find the "channels" section and replace it with:
Replace YOUR_BOT_TOKEN_HERE with the token copied from BotFather. Save and exit nano (Ctrl+O, Enter, Ctrl+X).
Step 3 — Restart the Gateway
Press Enter once to get the prompt back after the nohup output appears.
Step 4 — Approve Yourself
Open Telegram, find your bot by its username, and send any message (e.g. hello).
The first time, OpenClaw will reply with an "access not configured" message containing a pairing code:

ArduinoBot
Copy the pairing code from that Telegram message, then run this command on the Arduino UNO Q Linux side (replace MWS8F4WK with your actual code):
Step 5 — Test the Connection
Send another message to your bot in Telegram. OpenClaw should now reply normally.
ArduinoBot
※ NOTE THAT:
Why does OpenClaw require approval when a regular Telegram bot does not?
A standard Telegram bot responds to anyone who messages it — access control is only added if you code it yourself. OpenClaw is different: it is a personal AI assistant running on your own hardware with your own API key. Every message triggers a paid AI API call, and the skill can run shell commands on your Linux side. To protect both your wallet and your device, OpenClaw locks down access by default and requires the owner to explicitly approve each user before they can interact with it.
※ NOTE THAT:
OpenClaw also supports WhatsApp, Discord, Slack, iMessage, and many more. See the OpenClaw channel documentation for setup guides for other channels.
At this point, OpenClaw is running on your Arduino UNO Q and connected to Telegram. You can already chat with it, but it does not know about your hardware yet.
The next steps build that connection:
- MCU Bridge Sketch — an Arduino sketch that exposes hardware control functions (LED, sensors, etc.) via the Bridge
- Python WebUI Bridge — a Python script running in Arduino App Lab that receives HTTP requests from OpenClaw and forwards them to the MCU via the Bridge
- Arduino UNO Q Skill — a small configuration file that teaches OpenClaw which commands to run and when to use them
Once all three are in place, you can control your hardware with plain language messages.
Arduino UNO Q Code
Arduino UNO Q code includes two parts:
- Python code on Linux side — runs on the Qualcomm MPU (Debian Linux); starts a WebUI HTTP server that receives requests from OpenClaw and forwards them to the MCU via the Bridge
- Arduino C/C++ sketch on MCU — runs on the STM32; exposes hardware control functions (LED, sensors, etc.) through the Bridge so the Python script can call them
MCU Bridge Sketch
The MCU exposes hardware control functions via the Bridge. OpenClaw calls these functions through the WebUI bridge (next section).
Detailed Instructions
First time with Arduino UNO Q? Follow the Getting Started with Arduino UNO Q tutorial to get your development environment ready before proceeding.
- Connect: Plug the Arduino UNO Q into your computer with a USB-C cable.
- Open Arduino App Lab: Launch Arduino App Lab and wait until it detects your Arduino UNO Q. This can take a few minutes on first launch.
- Create a new App: Click the Create New App button.

- Name the App: OpenClawBridge
- Click Create to confirm.
- You will see a set of folders and files generated inside your new App.

- Find the sketch/sketch.ino file — this is where you will paste the MCU sketch.
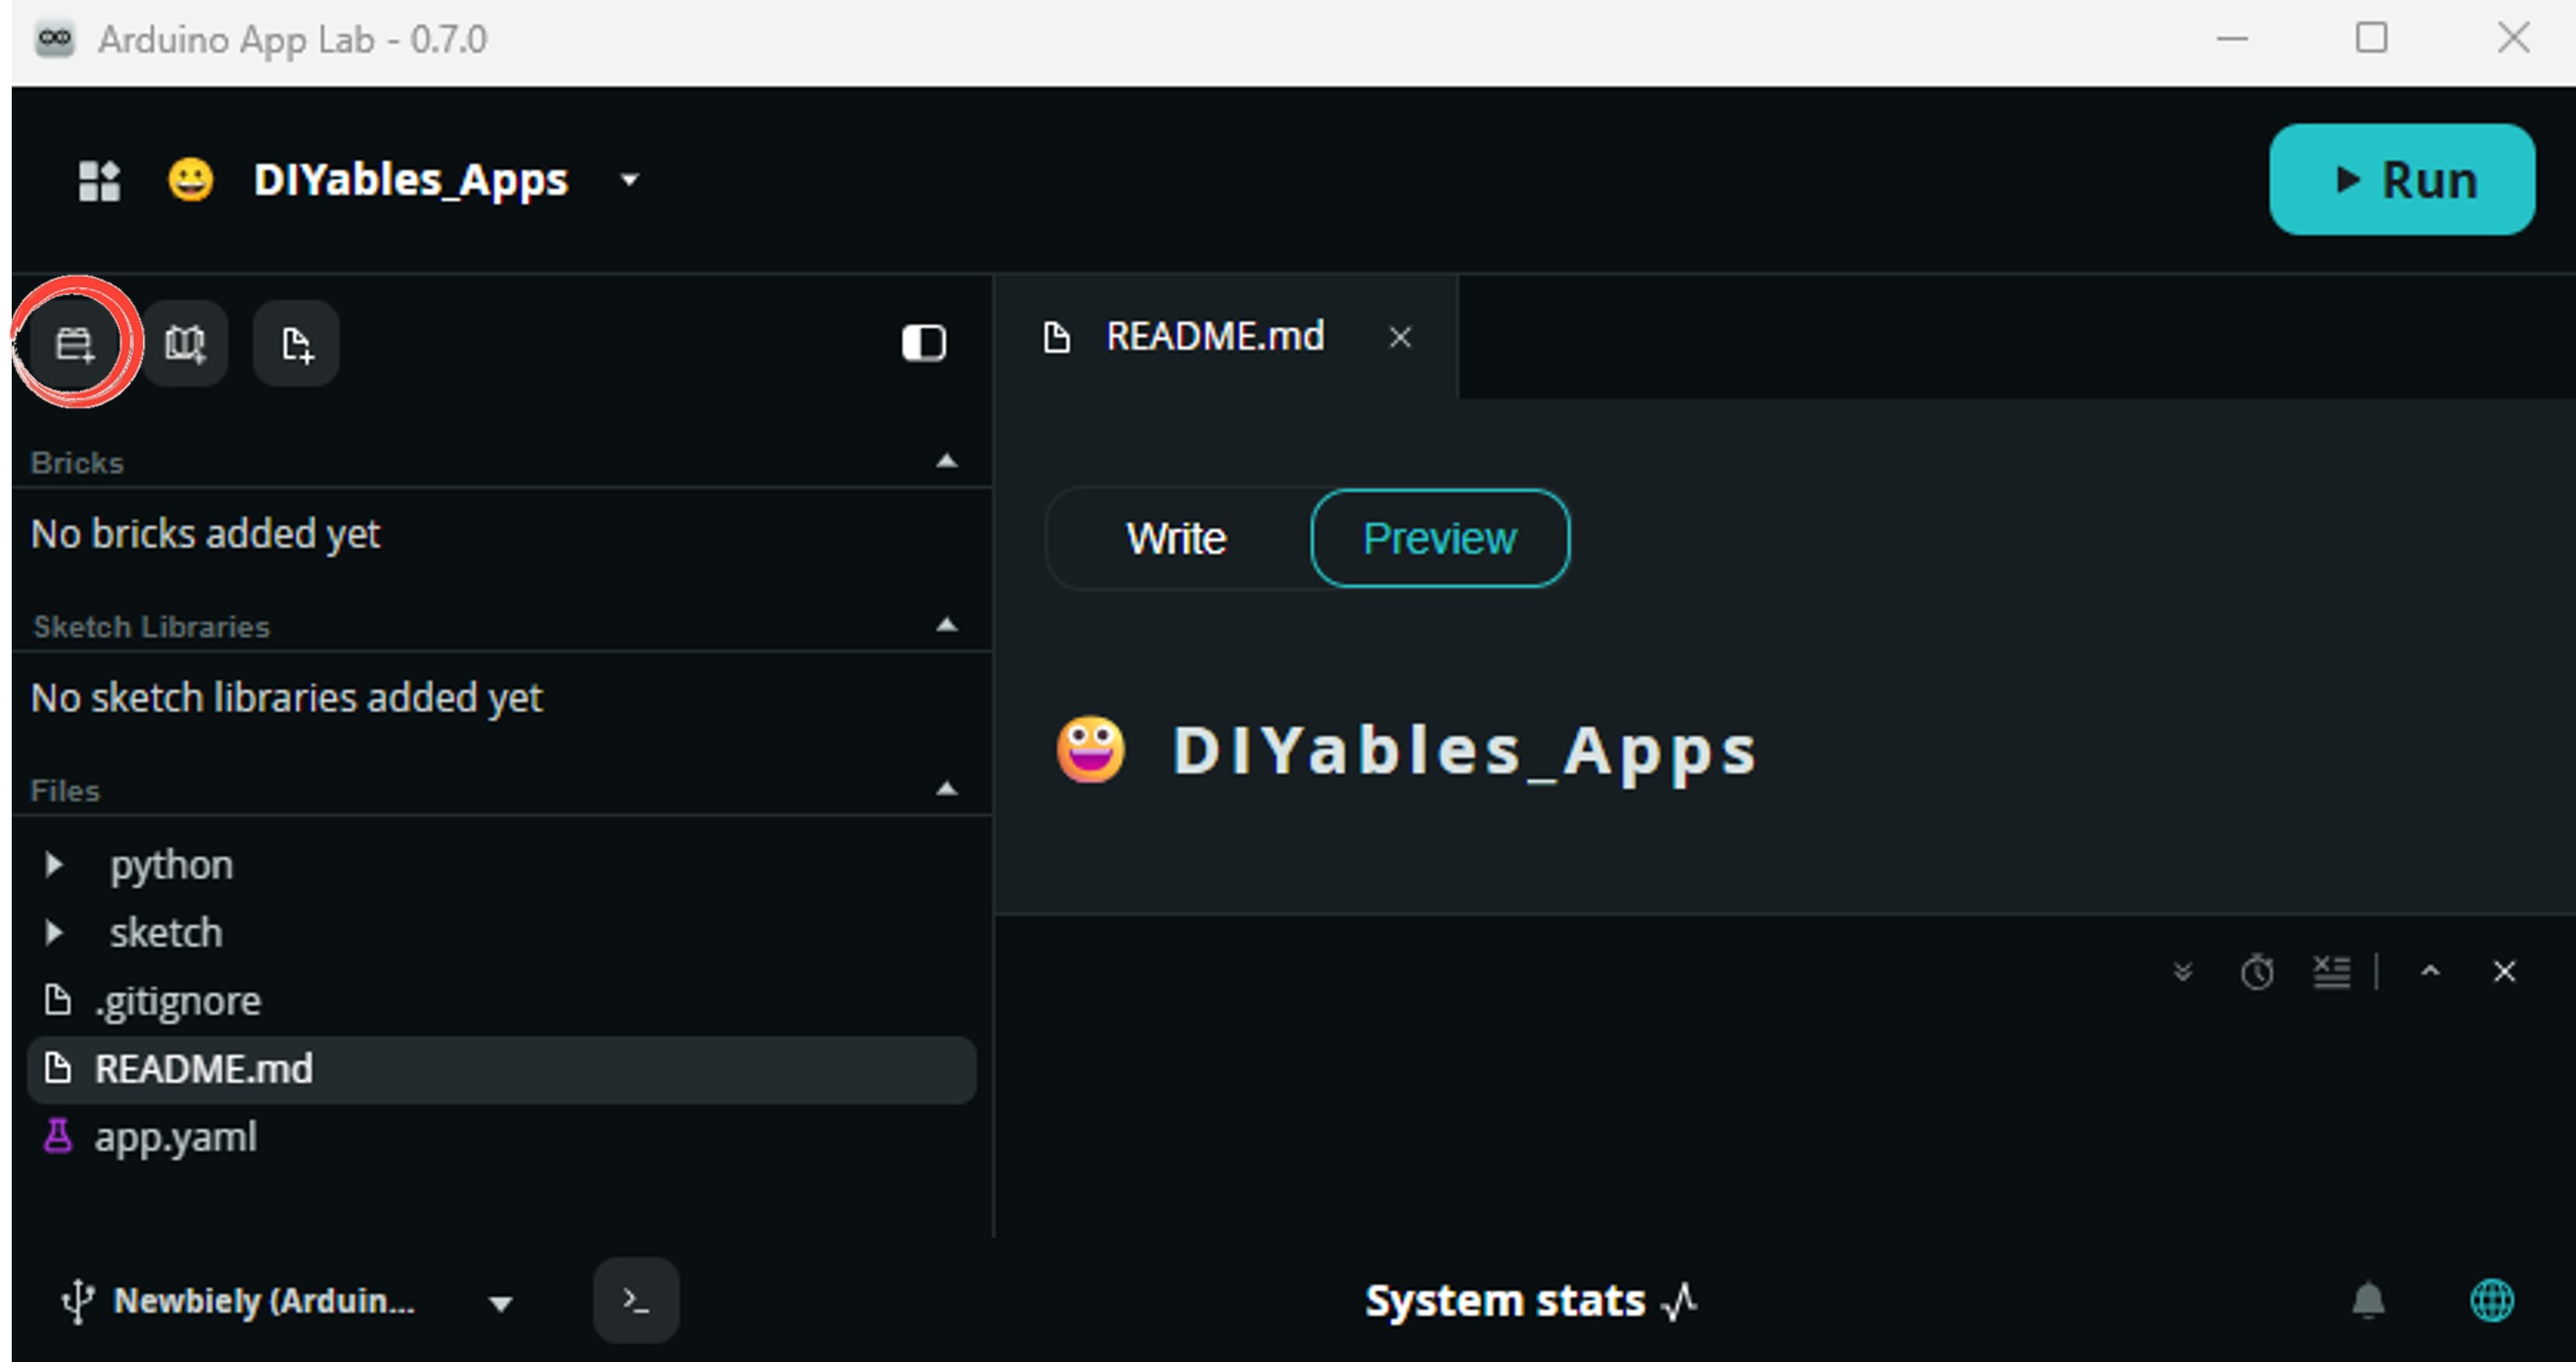
- Install the library: Click the Add sketch library button (the open book icon with a + sign) in the left sidebar.

- Search for Arduino_RouterBridge created by Arduino and click the Install button.
- Upload: Click the Run button in Arduino App Lab to compile and upload to the STM32.

- Pro Tip: Keep Arduino App Lab running in the background. The Python WebUI bridge must be running for OpenClaw to reach the MCU.
App Lab Console Output
Python WebUI Bridge
The Python script runs on the Arduino UNO Q Linux side. It starts a WebUI HTTP server on port 7000. OpenClaw calls this server via curl; the server forwards each request to the MCU via Bridge.call().
Add the WebUI Brick
The Python script requires the WebUI - HTML Brick — a pre-built service that runs as a Docker container on the Arduino UNO Q Linux side and provides the HTTP server infrastructure. You must add it to your App in Arduino App Lab before running the script.
- In Arduino App Lab, open your OpenClawBridge App.
- Click the Add Brick button in the Editor sidebar to open the Bricks catalog.
- Find and select WebUI - HTML from the list, then follow any configuration prompts.
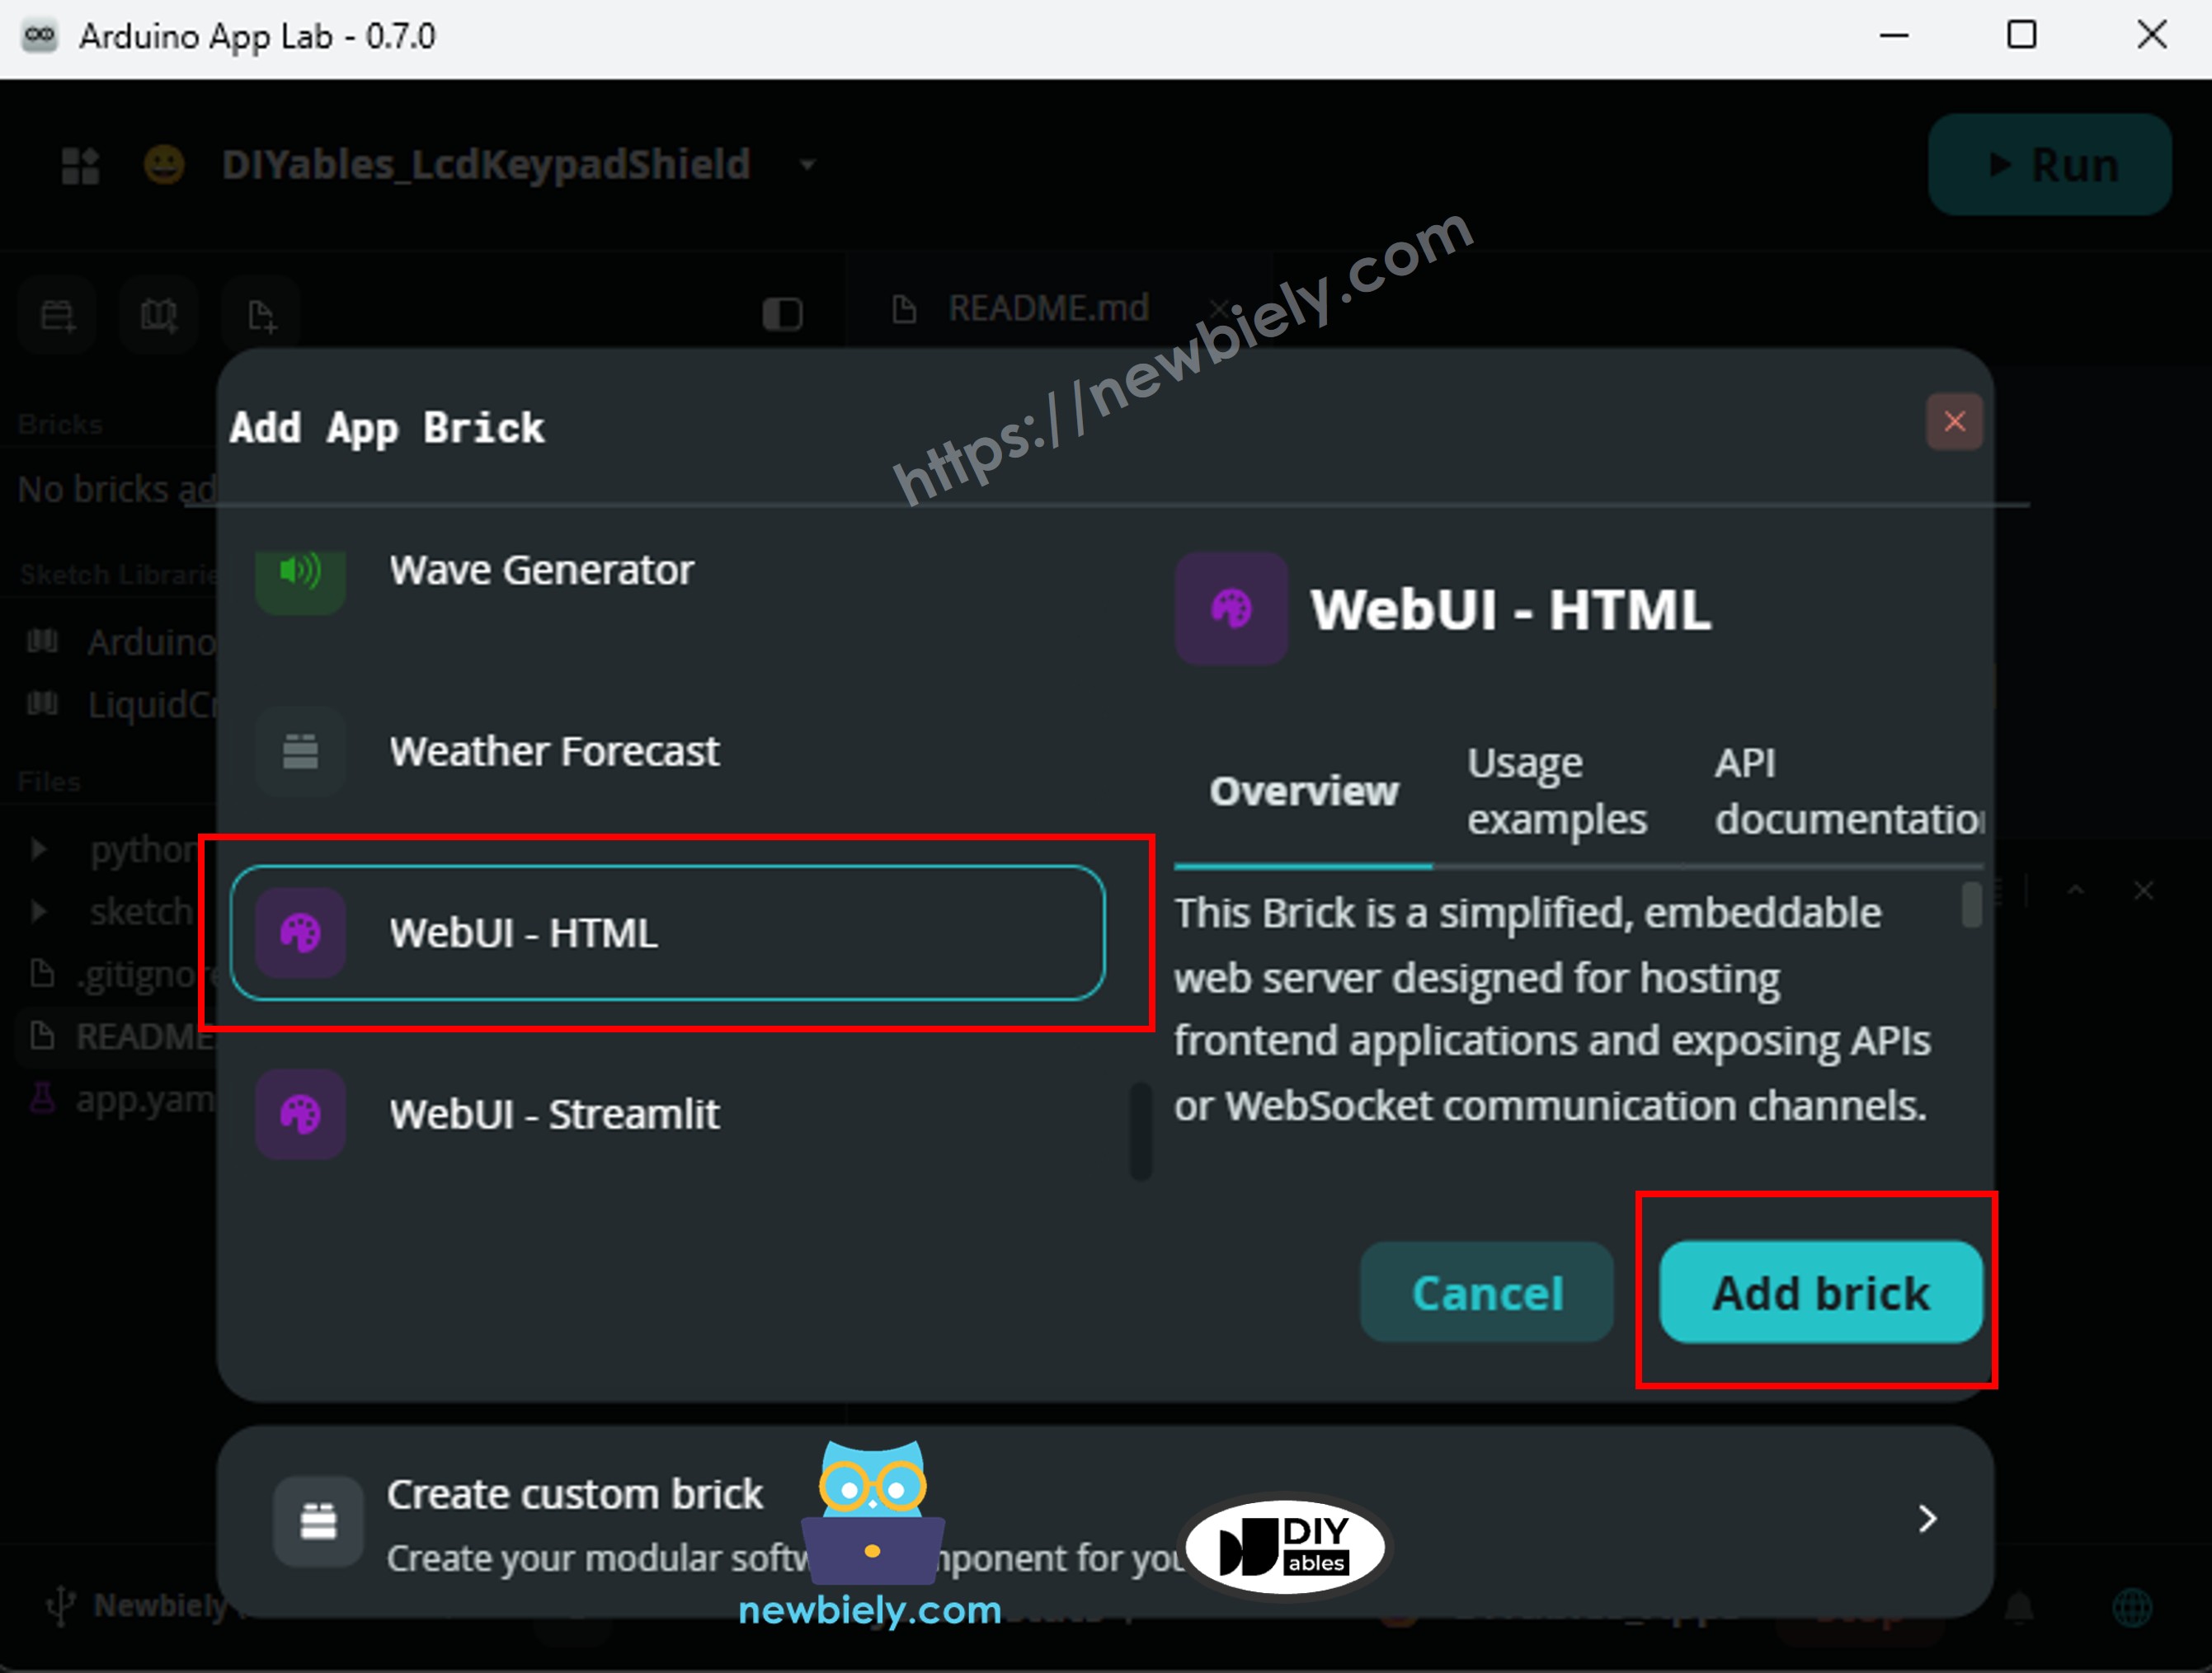
- Arduino App Lab automatically adds the Brick entry to your app.yaml file — do not edit that entry manually.
※ NOTE THAT:
A Brick is a pre-built, plug-and-play service that runs on the Arduino UNO Q Linux side. The WebUI - HTML Brick handles the HTTP server so you do not need to install Flask or any other web framework manually. See About Bricks for more details.
Python Code
Run
- Upload and run: Click the Run button in Arduino App Lab. This single button does both: it compiles and uploads the Arduino sketch to the STM32 MCU, and at the same time starts the Python WebUI bridge on the Linux side.
- Check the Python console — you should see WebUI started on http://0.0.0.0:7000, which confirms the HTTP server is running and ready for OpenClaw to call.
- Pro Tip: Keep Arduino App Lab running in the background. The Python WebUI bridge must be running for OpenClaw to reach the MCU.
Create the Arduino UNO Q Skill
A skill is a small folder with a SKILL.md file that teaches OpenClaw how and when to use your Arduino UNO Q.
- Create the skill folder:
- Create SKILL.md:
Paste this content:
Save and exit nano (Ctrl+O, Enter, Ctrl+X).
- Reload OpenClaw:
- Verify the skill loaded:
You should see arduino-uno-q in the list.
Test It
Make sure the MCU Bridge sketch is uploaded and the Python WebUI bridge is running on the Arduino UNO Q Linux side. Then open Telegram (or your chosen channel) and send messages to your OpenClaw bot:
- "Toggle the LED" — OpenClaw should toggle the LED and reply "LED is now ON" or "LED is now OFF"
- "What is the MCU status?" — OpenClaw should reply "MCU is running. LED: ON"
- "Turn on the LED" — same as toggle; OpenClaw understands different phrasings
- "Is the Arduino running?" — OpenClaw maps this to the status check
If OpenClaw replies that it cannot reach the MCU, check that Arduino App Lab is open and the Python bridge script is running.
Updating the Skill
Whenever you change the skill content (for example, after adding a new Bridge command), you need to update SKILL.md on the Arduino UNO Q and reload the OpenClaw Gateway.
SSH into the Arduino UNO Q Linux side:
Open the skill file in nano:
Edit the content — paste or type your changes — then save and exit (Ctrl+O, Enter, Ctrl+X).
Restart the Gateway to load the updated skill:
Verify the skill is still listed:
※ NOTE THAT:
You can also copy the file directly from your computer using scp:
scp SKILL.md arduino@<IP_ADDRESS>:~/.openclaw/workspace/skills/arduino-uno-q/SKILL.md
Then restart the Gateway as above.
Extending the Skill
To add more hardware controls, follow these steps:
- MCU side: Add a new Bridge.provide_safe() call in the MCU sketch for the new function.
- WebUI bridge: Add a new expose_api call in the Python script for the new endpoint.
- SKILL.md: Add a line describing the new curl command and when to use it.
- Reload OpenClaw: Run openclaw gateway restart to pick up the skill change.
Example: to add a temperature sensor reading, expose get_temperature on the MCU, add it to the WebUI bridge, and add this to SKILL.md:
Troubleshooting
Nothing works after rebooting the Arduino UNO Q
After a reboot, neither the Arduino App Lab (Python WebUI bridge) nor the OpenClaw Gateway starts automatically. You need to start them manually each time, or configure them to start on boot.
To start them manually after a reboot:
- Open Arduino App Lab on your PC and click Run to restart the App (this restarts both the MCU sketch and the Python WebUI bridge).
- SSH into the Arduino UNO Q Linux side and restart the OpenClaw Gateway:
To make the OpenClaw Gateway start automatically on boot, create a systemd service. SSH into the Arduino UNO Q Linux side and run:
Paste this content (replace arduino with your Linux username if different):
Save and exit (Ctrl+O, Enter, Ctrl+X), then enable and start the service:
Verify it is running:
You should see Active: active (running). The OpenClaw Gateway will now start automatically every time the Arduino UNO Q boots.
※ NOTE THAT:
The Arduino App Lab (Python WebUI bridge) does not currently have a built-in autostart option. If you need the WebUI bridge to start on boot without Arduino App Lab open, you can create a second systemd service in the same way, pointing to the Python script directly. Alternatively, keep Arduino App Lab open on your PC when you need remote control.
Project Ideas
You can extend this to any hardware connected to the Arduino UNO Q MCU:
- Smart home dashboard: Ask OpenClaw "Is anyone home?" (motion sensor), "What is the temperature?", or "Close the valve" — all from one chat window
- Remote equipment monitor: Get sensor readings from a remote Arduino UNO Q over Telegram without writing a custom bot
- Multi-channel control: Use the same OpenClaw skill on Telegram, WhatsApp, and Discord simultaneously — one skill, all channels
- Voice-controlled Arduino: Pair OpenClaw with its iOS or Android node and control Arduino UNO Q by speaking
- Automated alerts: Ask OpenClaw to report sensor values periodically and alert you when a threshold is crossed
Challenge Yourself
Ready to go further with OpenClaw and Arduino UNO Q?
- Easy: Add a blink_led Bridge function to the MCU sketch that blinks the LED three times. Update the WebUI bridge and SKILL.md so you can trigger it by saying "blink the LED".
- Medium: Add a second messaging channel (Discord or WhatsApp) to OpenClaw and verify that the same natural language commands work there too.
- Advanced: Connect a temperature or motion sensor to the MCU, expose it via the Bridge, add it to the WebUI bridge and skill, and ask OpenClaw to send you a Telegram alert automatically when motion is detected or temperature exceeds a threshold.