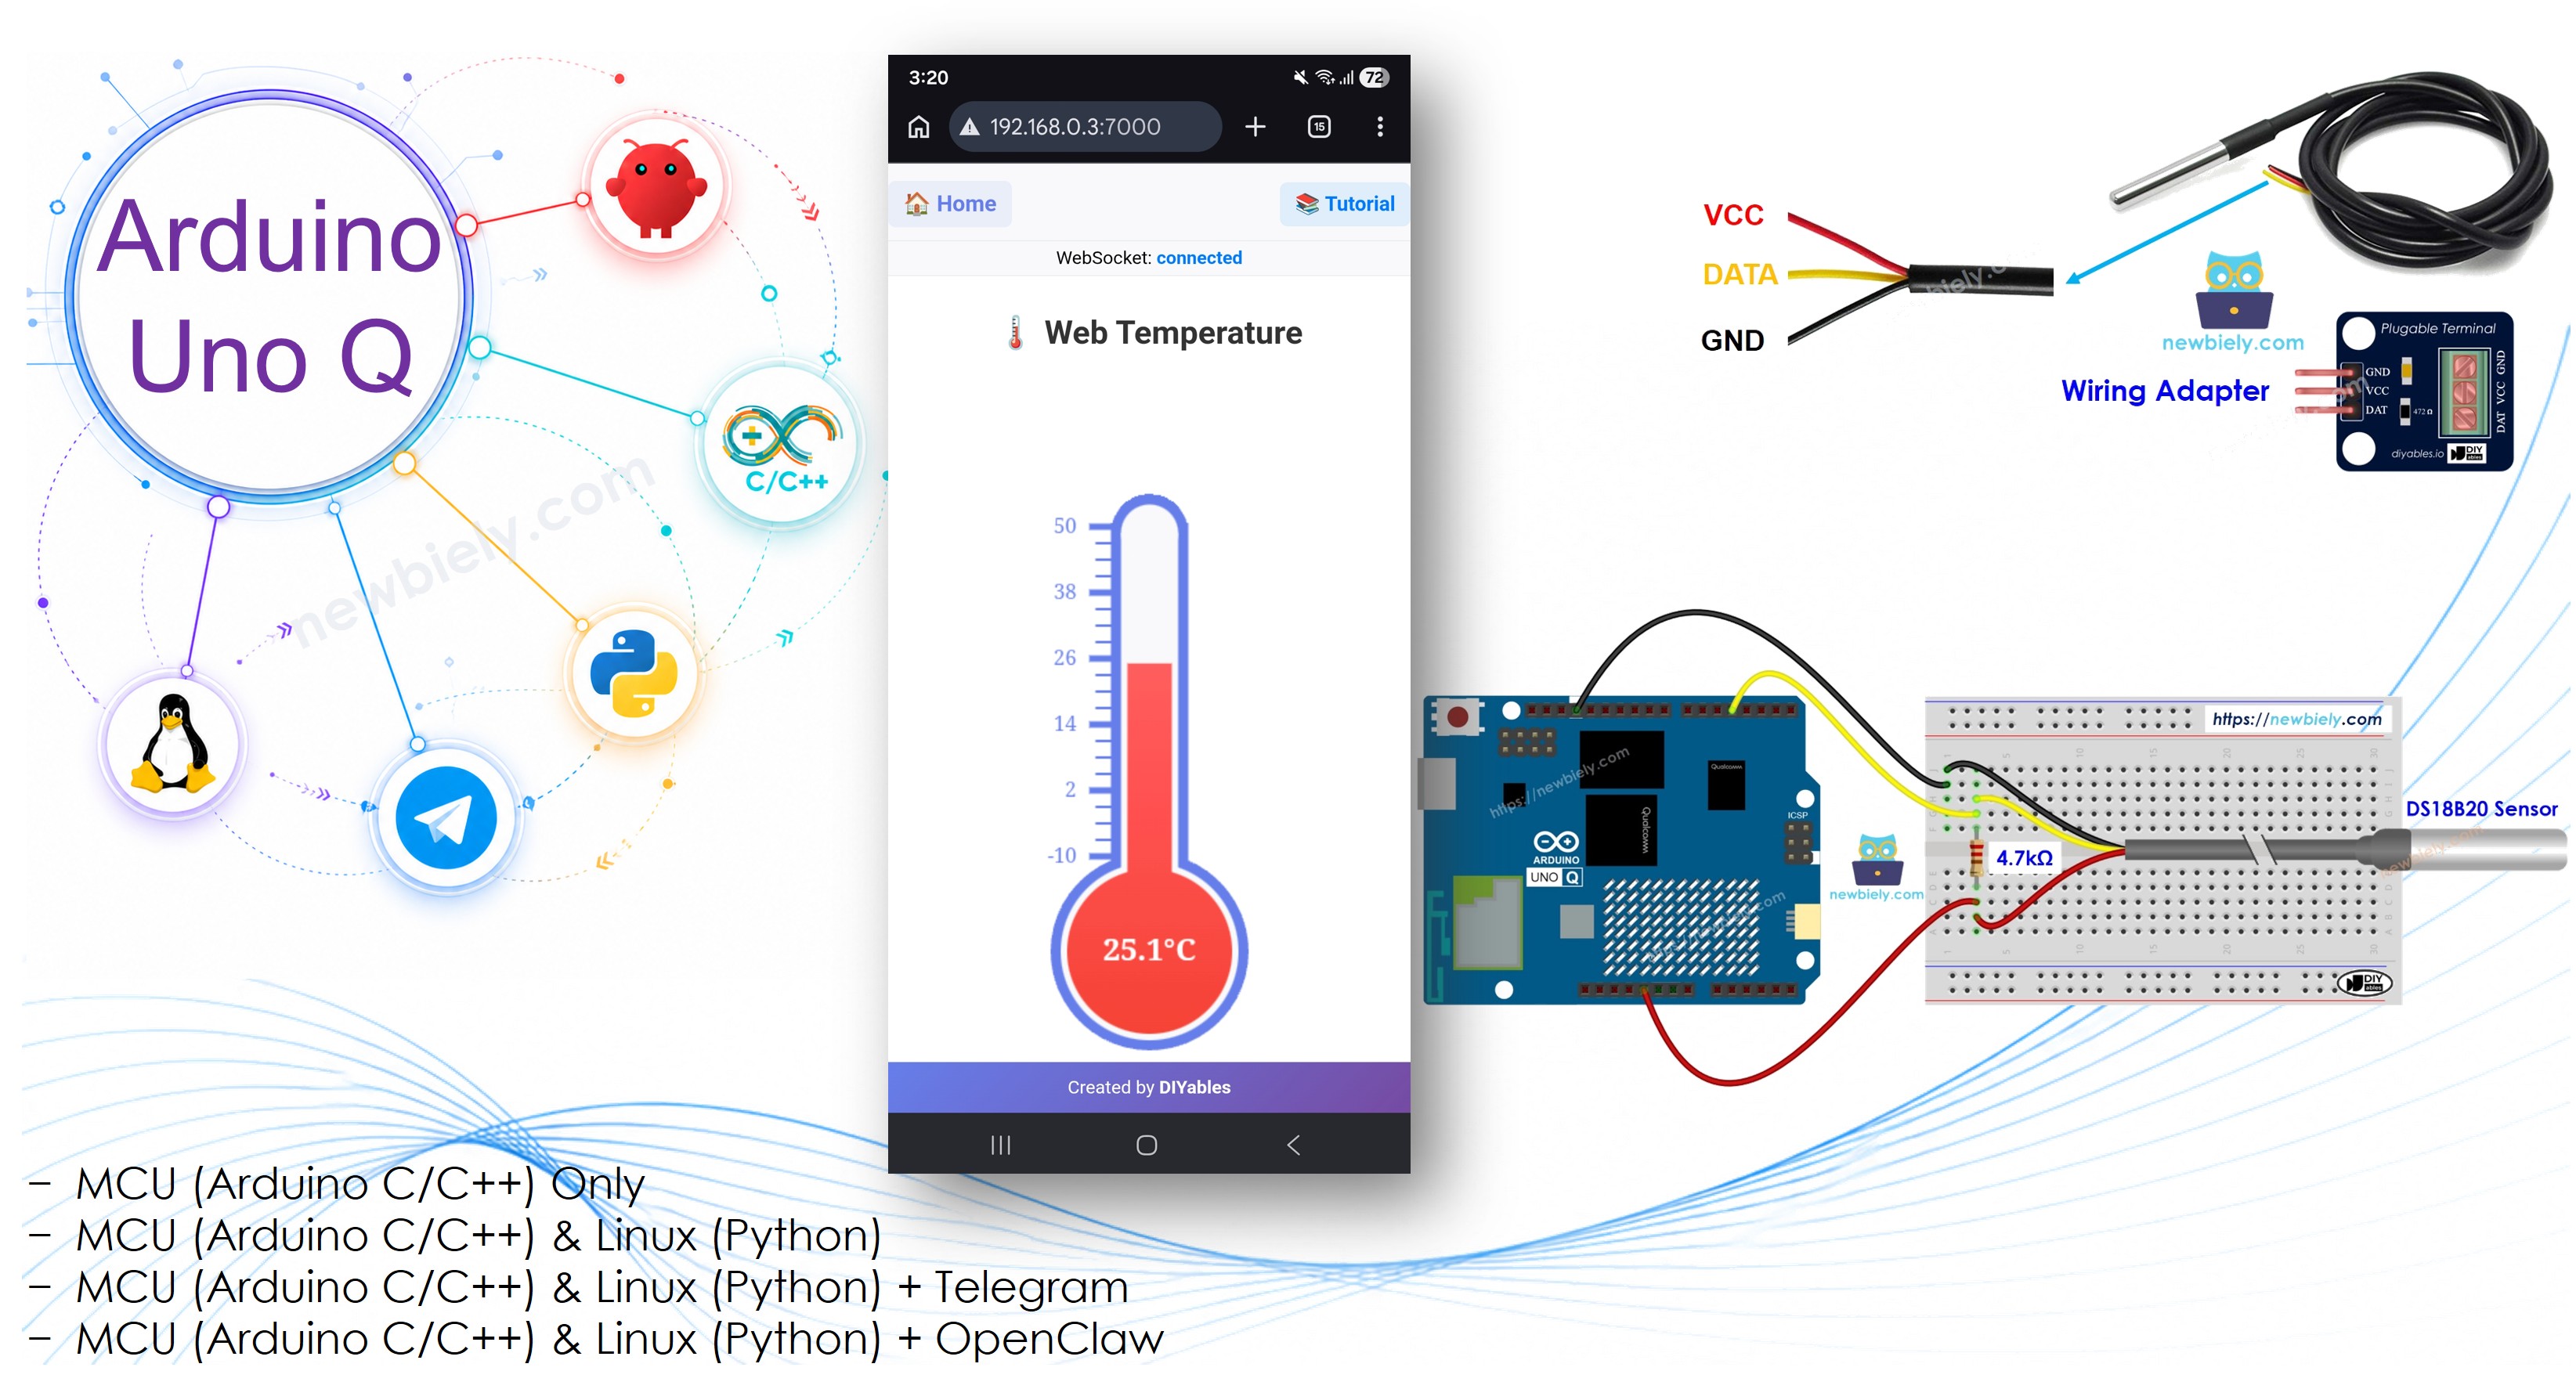
Arduino UNO Q - Real-Time Temperature Monitor on Web Browser
The Arduino UNO Q can push live temperature readings to any browser in real time using WebSocket — no polling, no page refresh. The STM32 MCU reads the DS18B20 sensor every second and shares the value via Bridge. The Qualcomm Linux MPU runs a Python app that uses the WebUI Brick's built-in Socket.IO server to broadcast a new reading to every connected browser the moment it arrives. No extra hardware or cloud service required.
In this tutorial, you will learn:
- How to wire the DS18B20 1-Wire temperature sensor to the Arduino UNO Q MCU
- How to expose real-time temperature data from the MCU to the Linux MPU via Bridge
- How to serve a thermometer web page from the Arduino UNO Q Linux MPU using the WebUI Brick
- How to use ui.on_message() and ui.send_message() to push live temperature updates to the browser via WebSocket
- How to receive WebSocket messages in the browser with Socket.IO and update the canvas thermometer without reloading
- How to access the live temperature page from any device on the same Wi-Fi network
Hardware Preparation
Or you can buy the following kits:
| 1 | × | DIYables Sensor Kit (18 sensors/displays) |
Additionally, some of these links are for products from our own brand, DIYables .
Buy Note: Many DS18B20 sensors available in the market are unreliable. We strongly recommend buying the sensor from the DIYables brand using the link provided above. We tested it, and it worked reliably.
Overview of DS18B20 and the Web Server
DS18B20 sensor: A 1-Wire digital temperature sensor (−55 °C to +125 °C, ±0.5 °C accuracy). Requires a 4.7 kΩ pull-up resistor between DATA and VCC — sensors with adapters include it. See the Arduino UNO Q DS18B20 Temperature Sensor tutorial for wiring and library details.
WebUI Brick: The WebUI - HTML Brick runs a web server on port 7000 that serves your HTML files and handles Socket.IO WebSocket connections. Your Python code uses ui.on_message() to receive events from the browser and ui.send_message() to push data back. Any device on the same Wi-Fi can access the page at http://<board-ip>:7000/.
Real-time flow: The browser connects via Socket.IO and requests the temperature config and first reading. A Python background thread reads the sensor every second via Bridge and broadcasts each update to all connected browsers. The canvas thermometer redraws on every push — no polling, no refresh.
New to WebSocket? If you haven't used Socket.IO on the Arduino UNO Q before, start with the Arduino UNO Q - WebSocket tutorial — it teaches the same pattern using a simple LED control example with no sensor needed.
Wiring Diagram
- Breadboard wiring (with pull-up resistor):
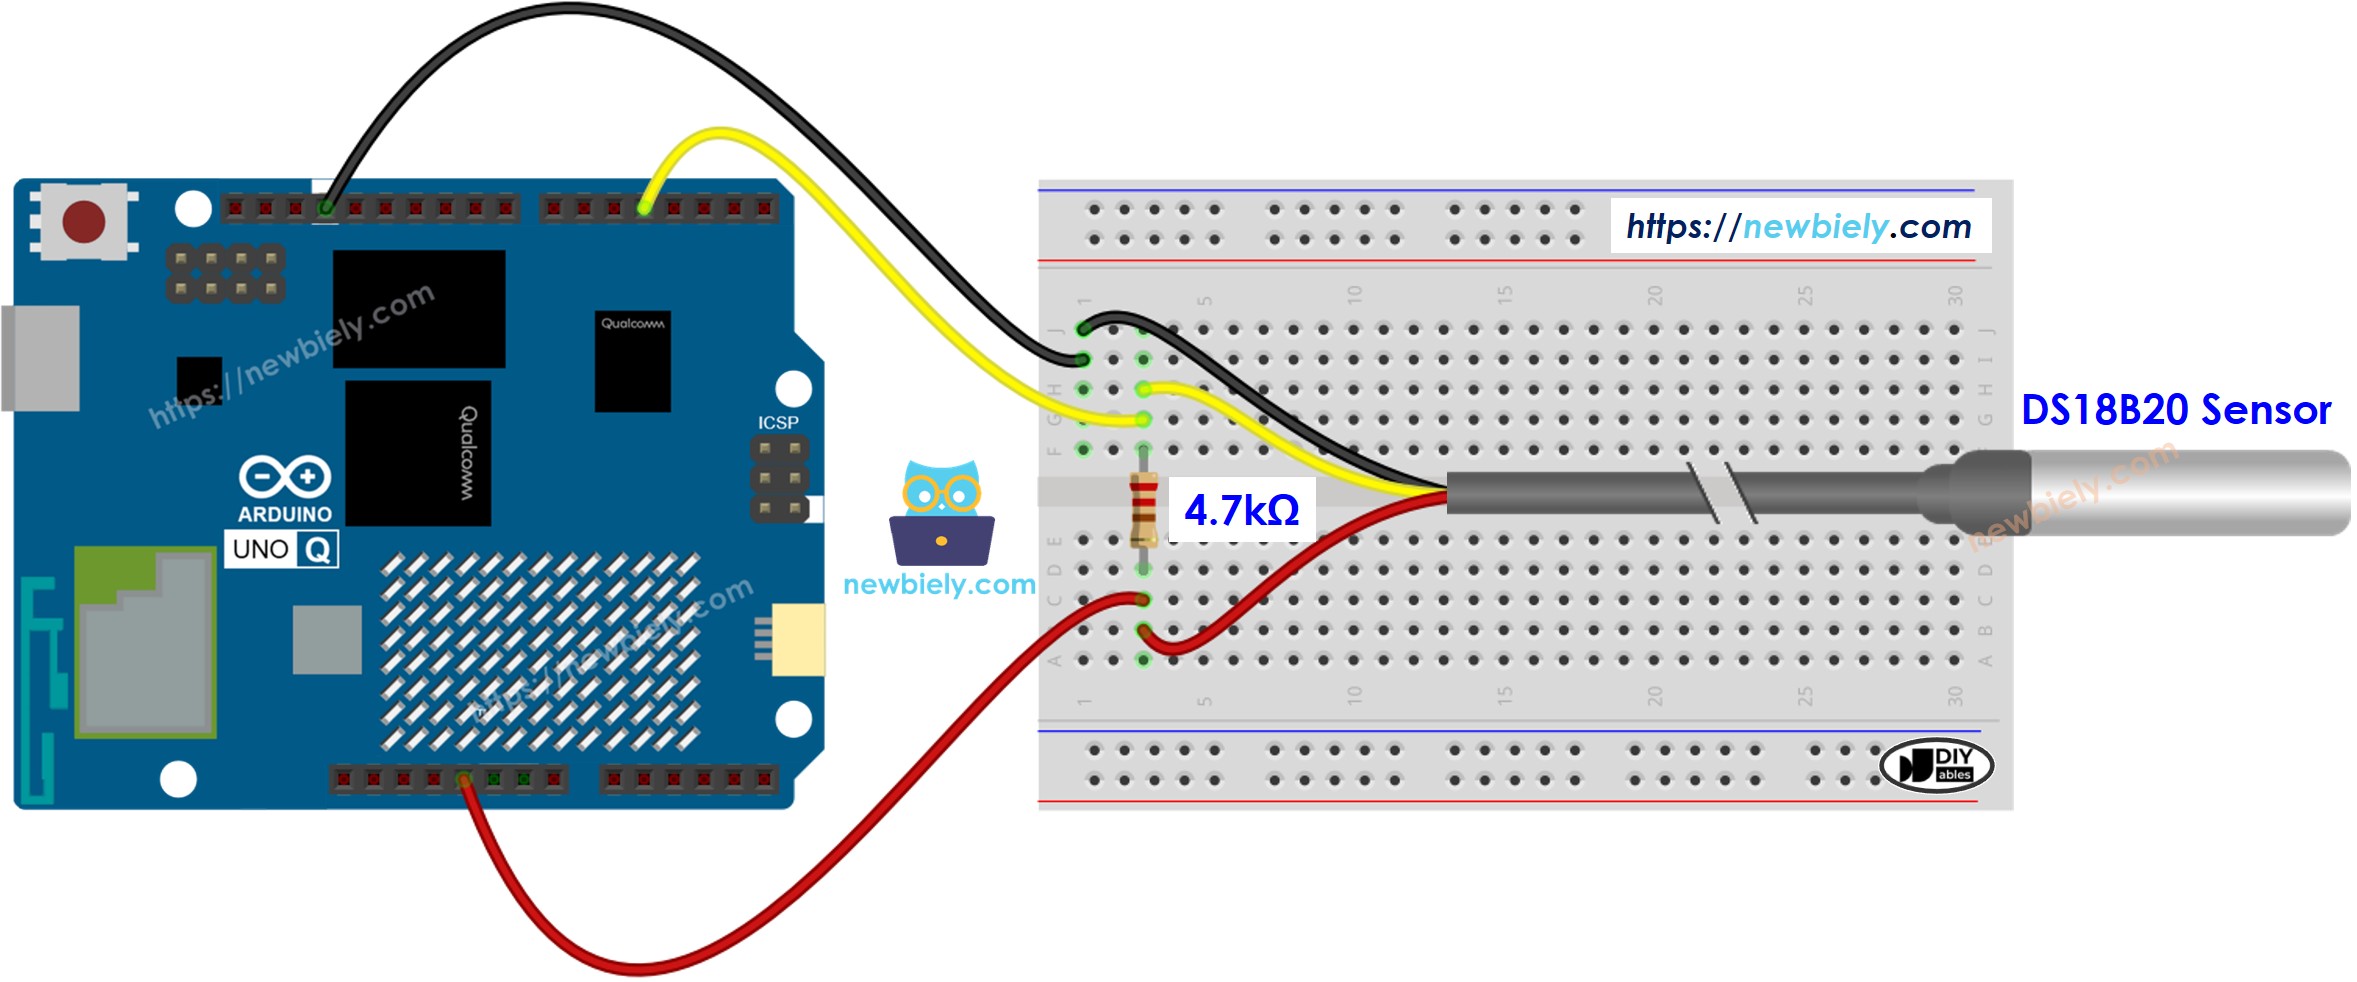
This image is created using Fritzing. Click to enlarge image
- Wiring diagram with adapter (no extra resistor needed):
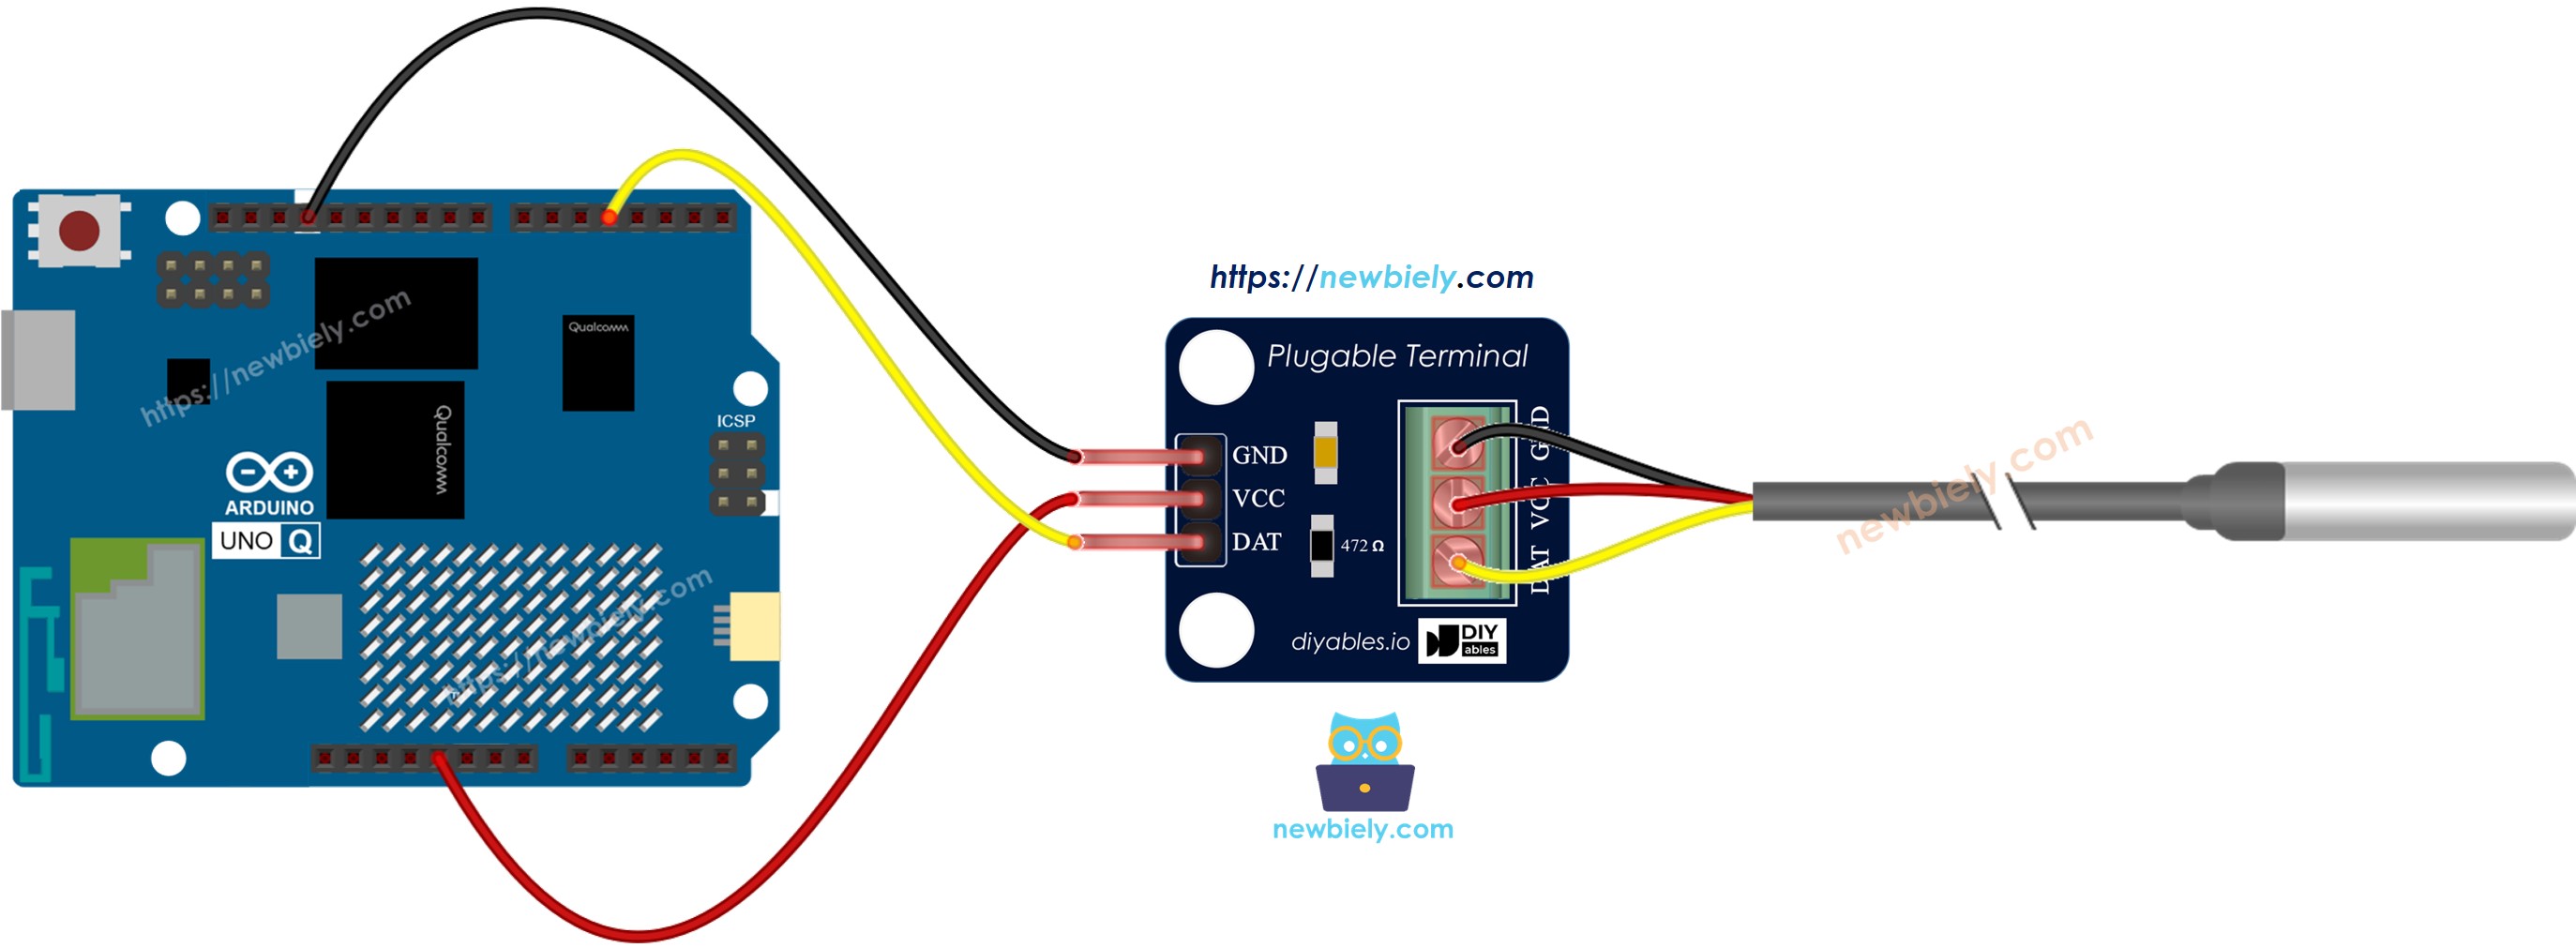
This image is created using Fritzing. Click to enlarge image
We recommend buying a DS18B20 sensor with a wiring adapter. This adapter makes it simple to connect because it includes a resistor, so you do not need an extra one.
| DS18B20 Pin | Arduino UNO Q Pin |
|---|---|
| GND | GND |
| VCC | 5V |
| DATA | D4 |
Arduino UNO Q Code
The Arduino UNO Q has two processors working together:
- The STM32 MCU reads the DS18B20 sensor every second and exposes the value through a Bridge function called get_temperature.
- The Qualcomm MPU runs a Python app that uses the WebUI Brick to serve the thermometer page on port 7000 and push live temperature updates to every browser via WebSocket.
MCU Code
Python Code
HTML (assets/index.html)
Place this file in the assets/ folder of your App. It loads the Socket.IO client from assets/libs/socket.io.min.js and draws a live canvas thermometer that redraws on every server push:
Detailed Instructions
- Wire the sensor: Connect the DS18B20 to the Arduino UNO Q as shown in the Wiring Diagram section.
- Connect to Wi-Fi: Make sure the Arduino UNO Q is connected to your Wi-Fi network. Use the network icon in Arduino App Lab to connect first.
- Open Arduino App Lab: Launch Arduino App Lab and wait until it detects your Arduino UNO Q.
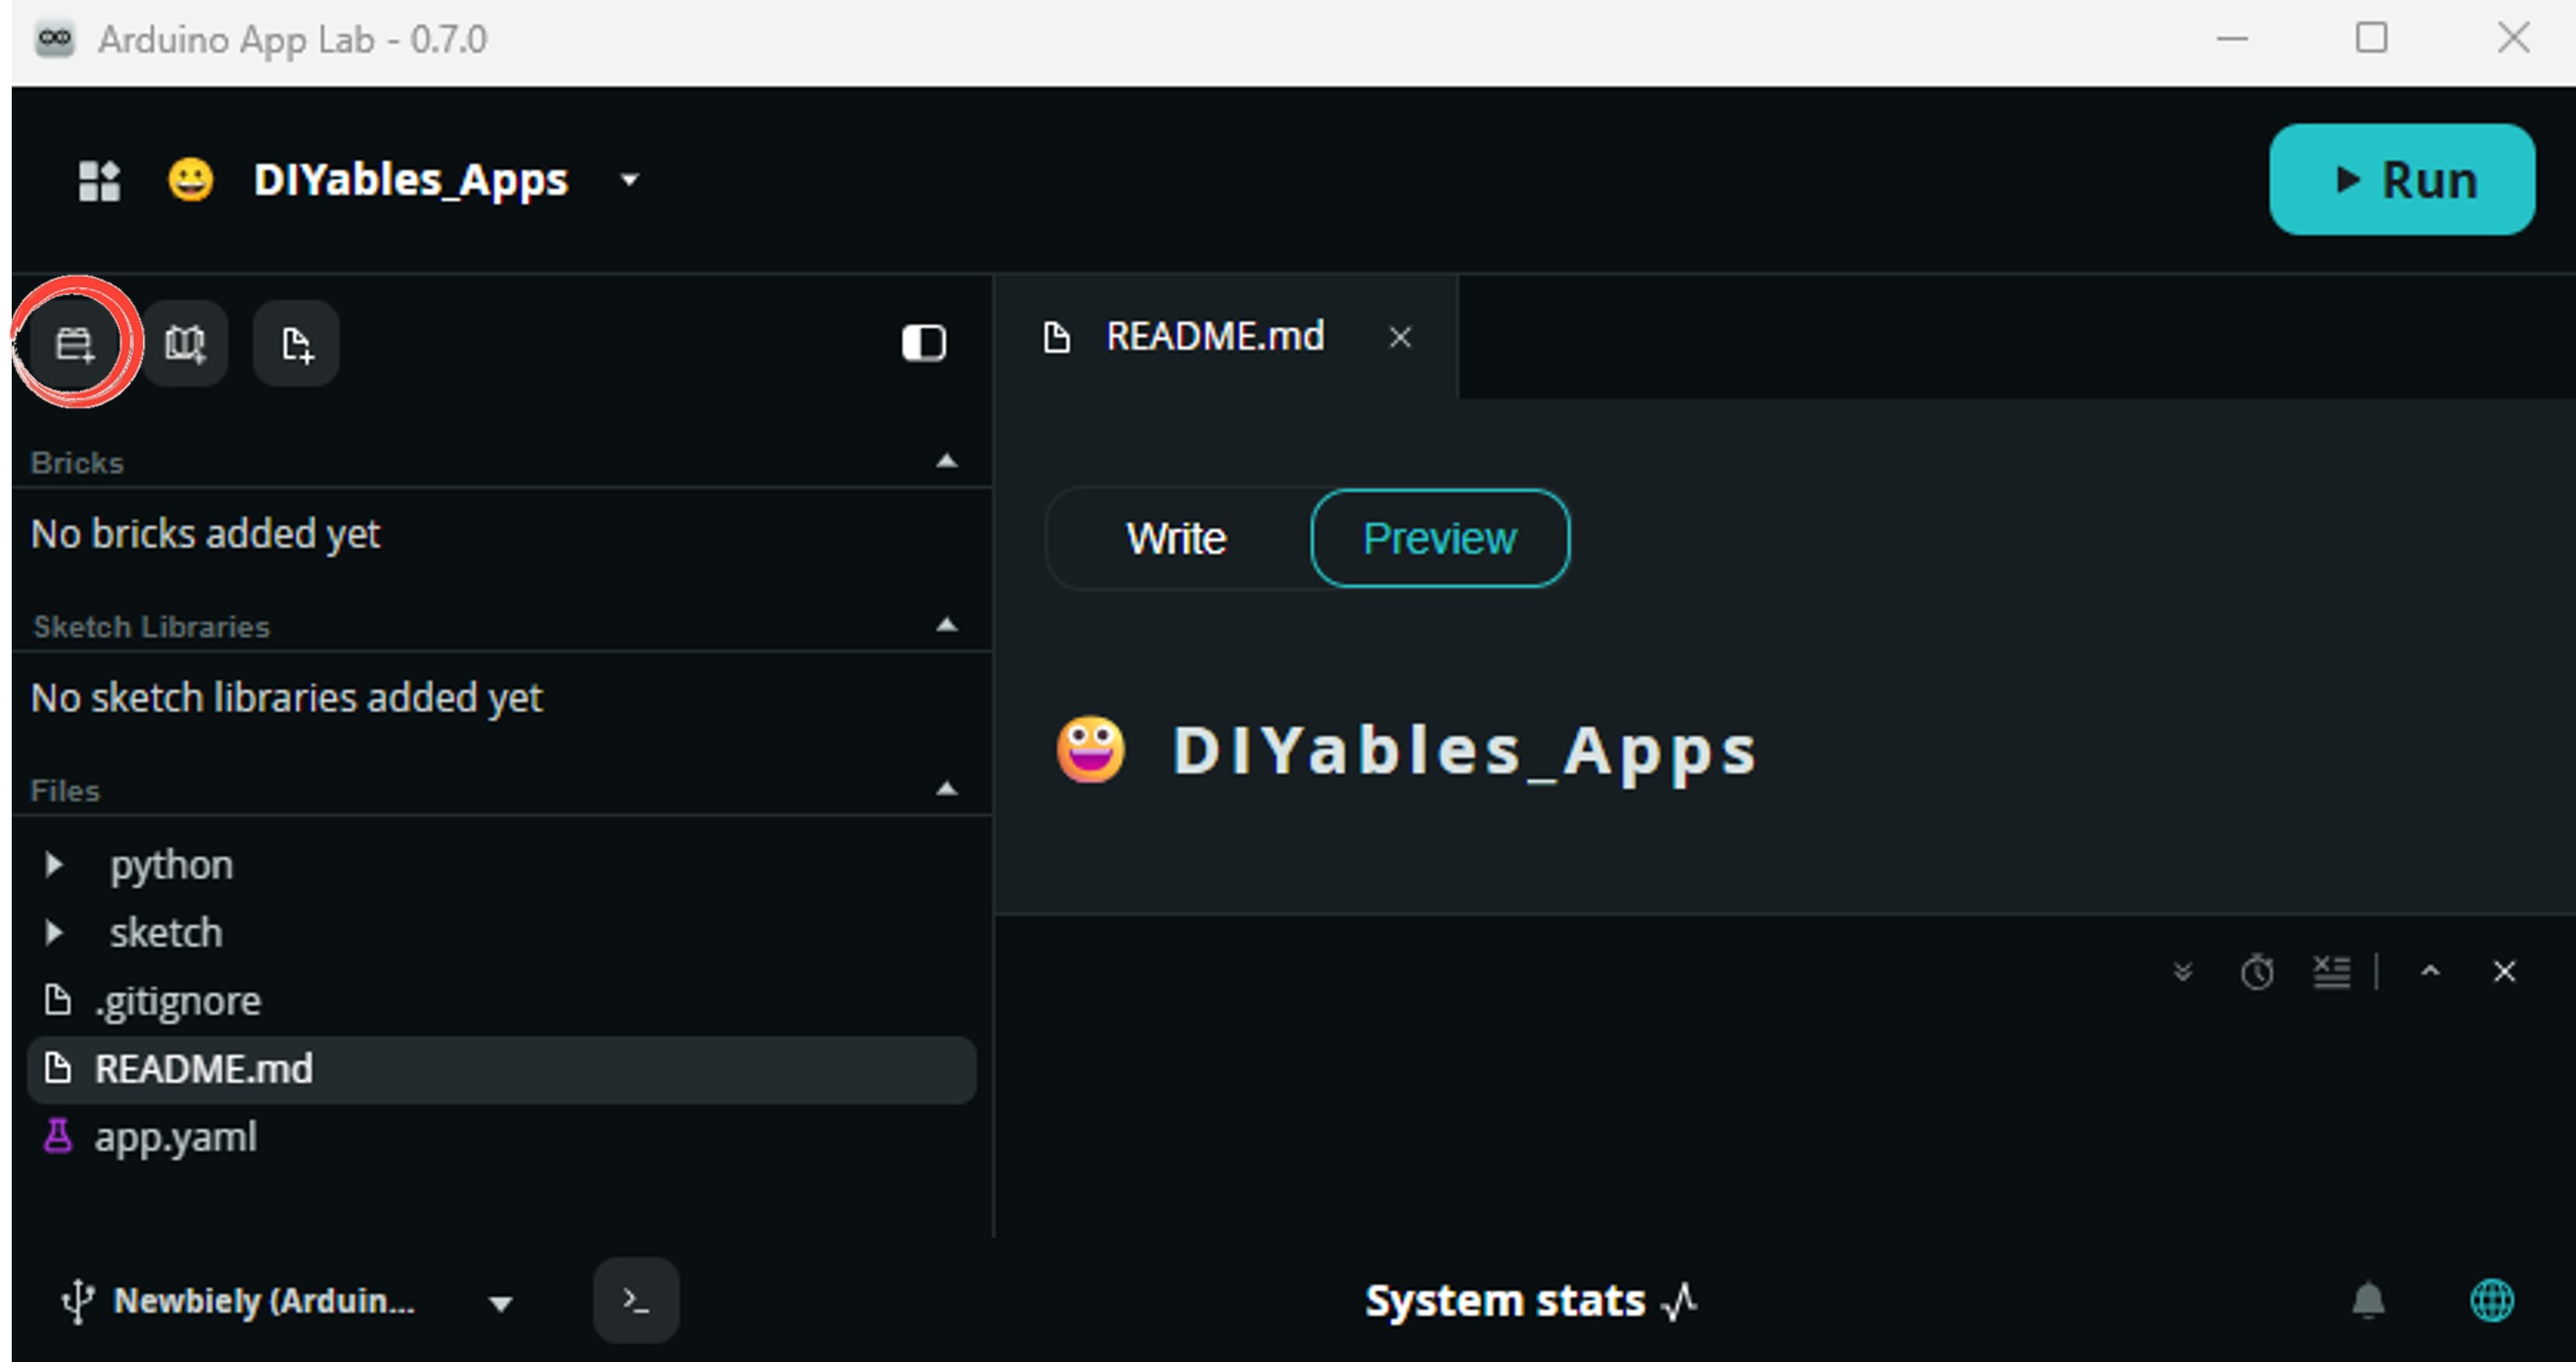
- Create a new App: Click the Create New App button.

- Give the App a name, for example: TemperatureWS
- Click Create to confirm.

- Paste the MCU sketch: Copy the MCU code above and paste it into sketch/sketch.ino.
- Paste the Python code: Open python/main.py. Select all existing content and delete it, then paste the Python code above.
- Add the HTML file: In the assets/ folder, open (or create) index.html and paste the HTML code above.
- Add the Socket.IO client: In the assets/ folder, create a libs/ subfolder. Download socket.io.min.js and save it as assets/libs/socket.io.min.js.
- Install the library: Click the Add sketch library button (the open book icon with a + sign) in the left sidebar.

- Search for DallasTemperature created by Miles Burton
- Search for OneWire created by Jim Studt, Tom Pollard, Robin James, Glenn Trewitt, Jason Dangel, Guillermo Lovato, Paul Stoffregen, Scott Roberts, Bertrik Sikken, Mark Tillotson, Ken Butcher, Roger Clark, Love Nystrom and click the Install button.
- Search for Arduino_RouterBridge created by Arduino and click the Install button.
- Add the WebUI Brick: Click the Add Brick button in the Editor sidebar to open the Bricks catalog.
Find and select WebUI - HTML from the list, then follow any configuration prompts.
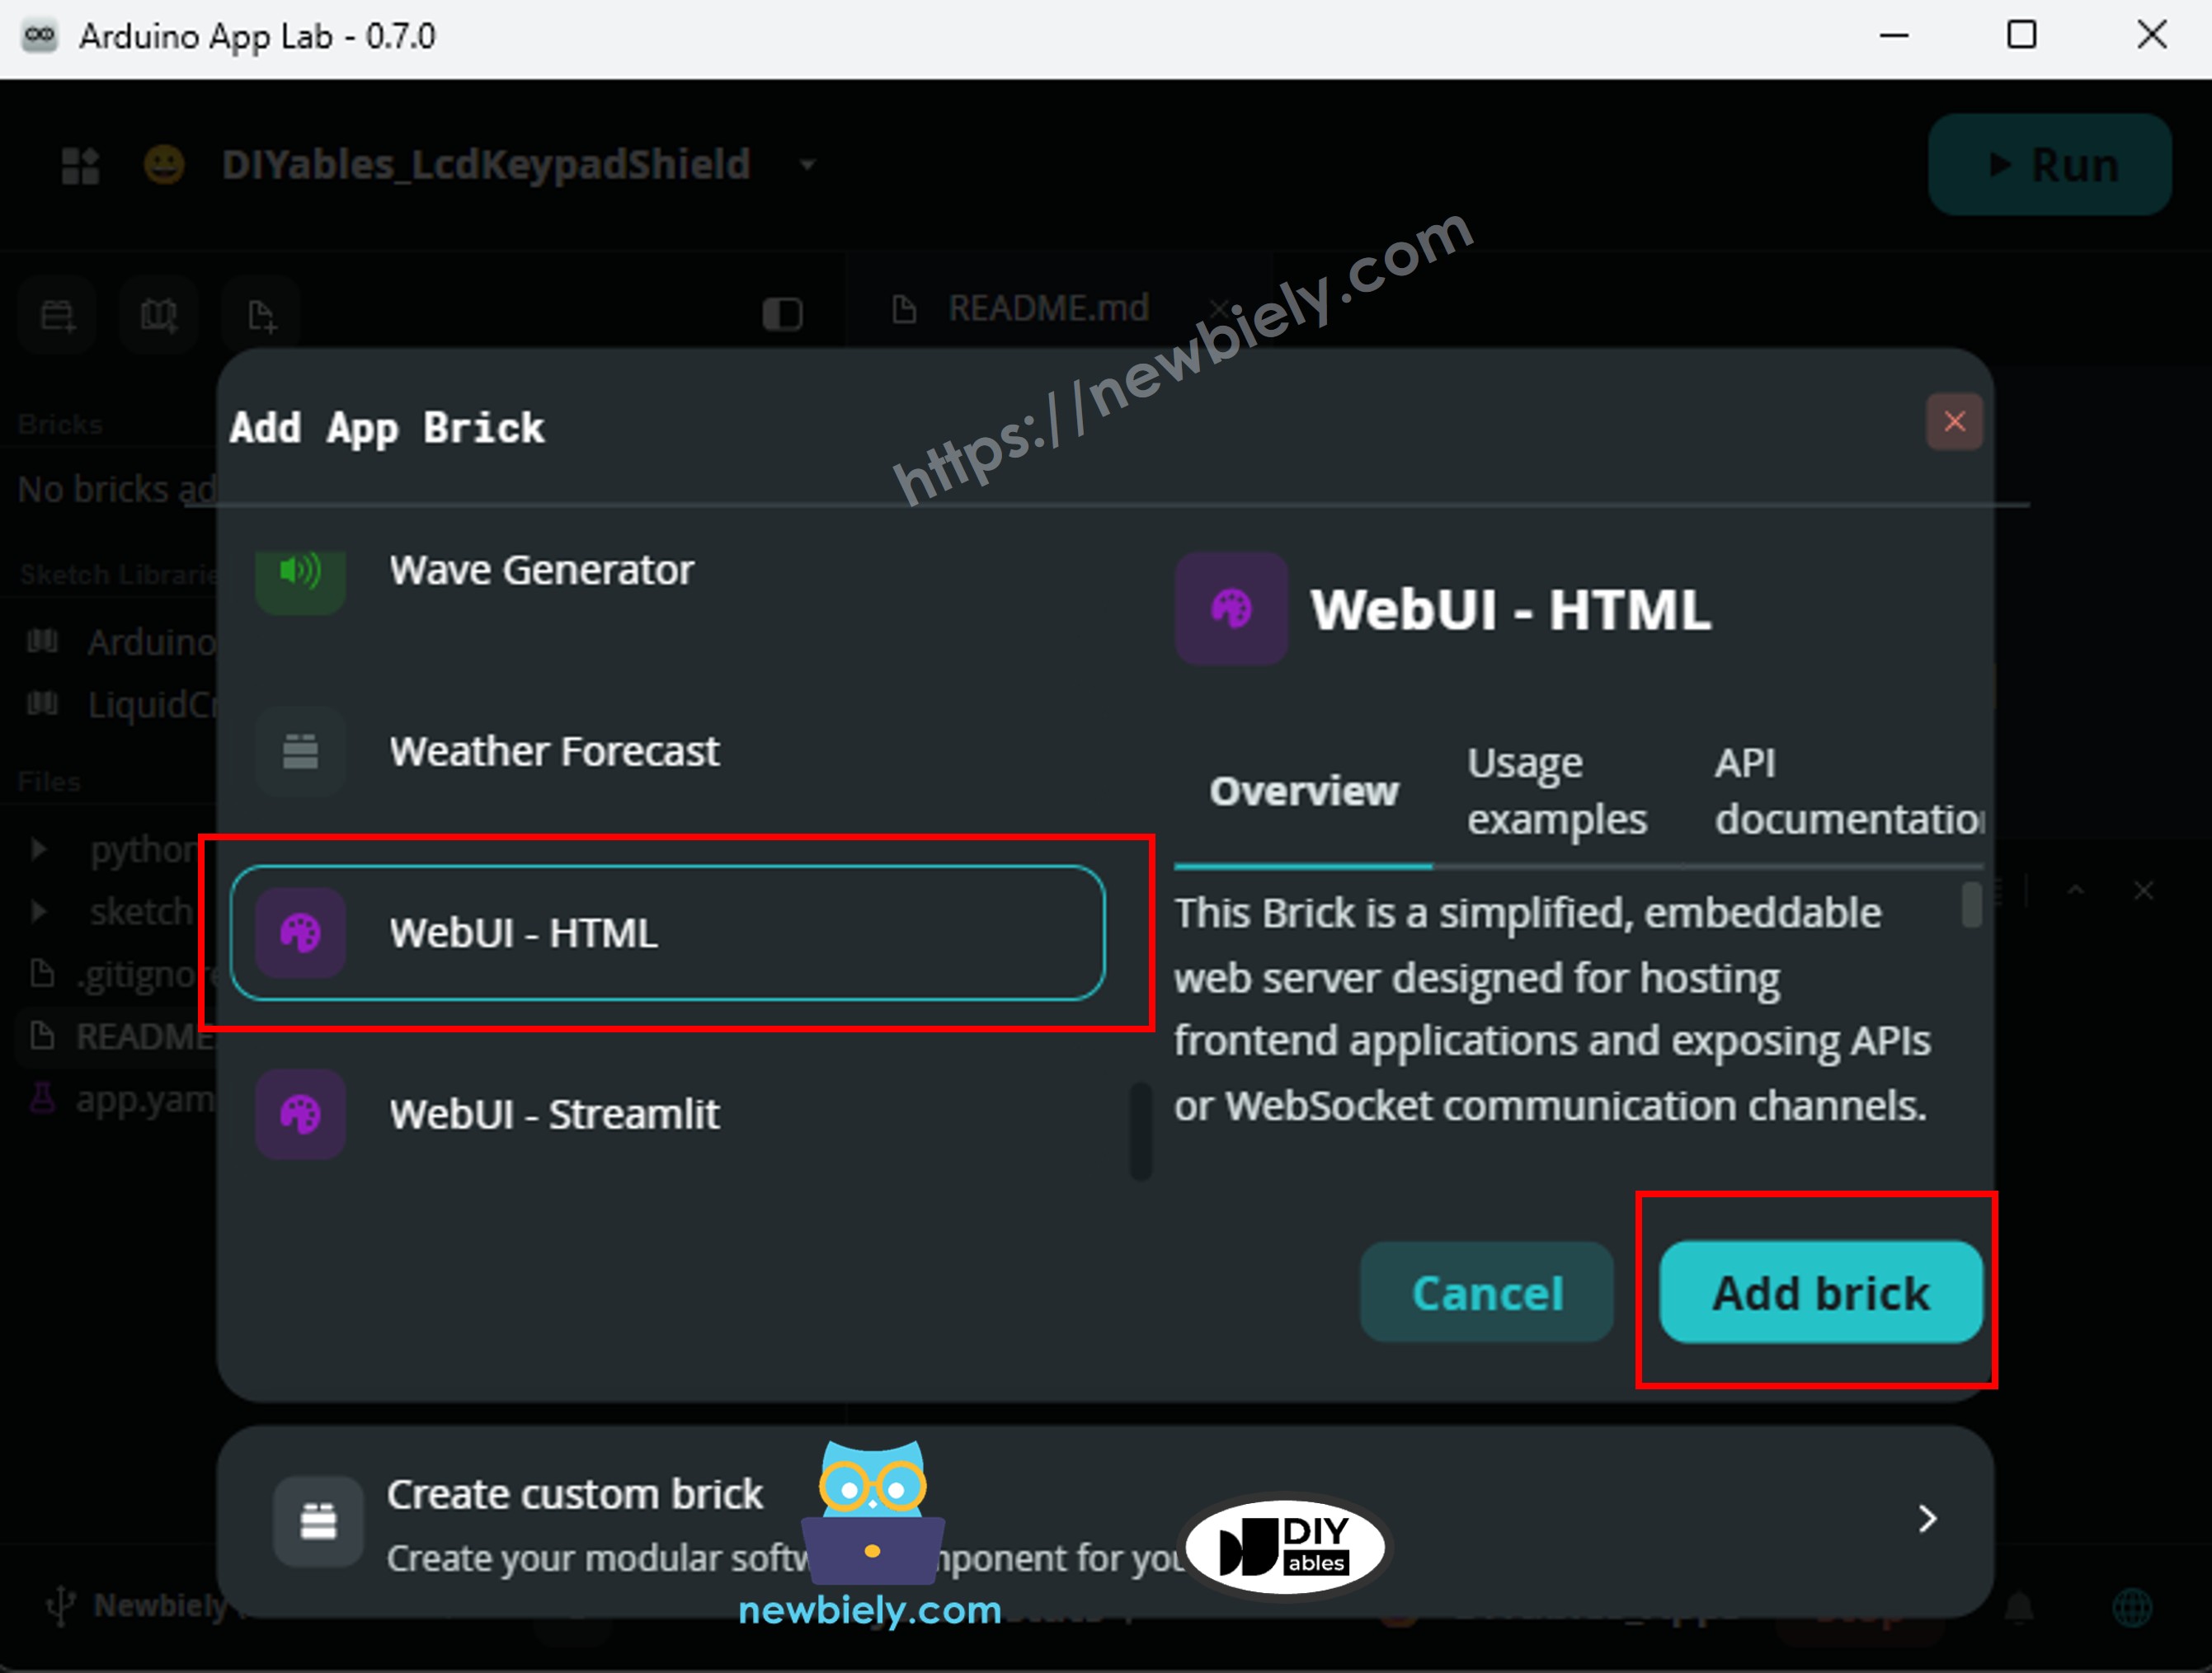
Arduino App Lab automatically adds the Brick entry to your app.yaml file — do not edit that entry manually.
※ NOTE THAT:
The WebUI - HTML Brick handles both HTTP file serving and Socket.IO WebSocket in a single service on port 7000. The Socket.IO client script must be placed in assets/libs/socket.io.min.js — the brick does not serve a compatible version automatically. See About Bricks for details.
- Upload: Click the Run button in Arduino App Lab to compile and upload.

- Open a web browser on your phone or PC and navigate to:
Replace <ARDUINO_UNO_Q_IP> with the IP address shown in the Python console.
App Lab Console Output
Browser Output
Open http://<ARDUINO_UNO_Q_IP>:7000/ in any browser on the same network. You will see a live thermometer page with a WebSocket connection status bar at the top:
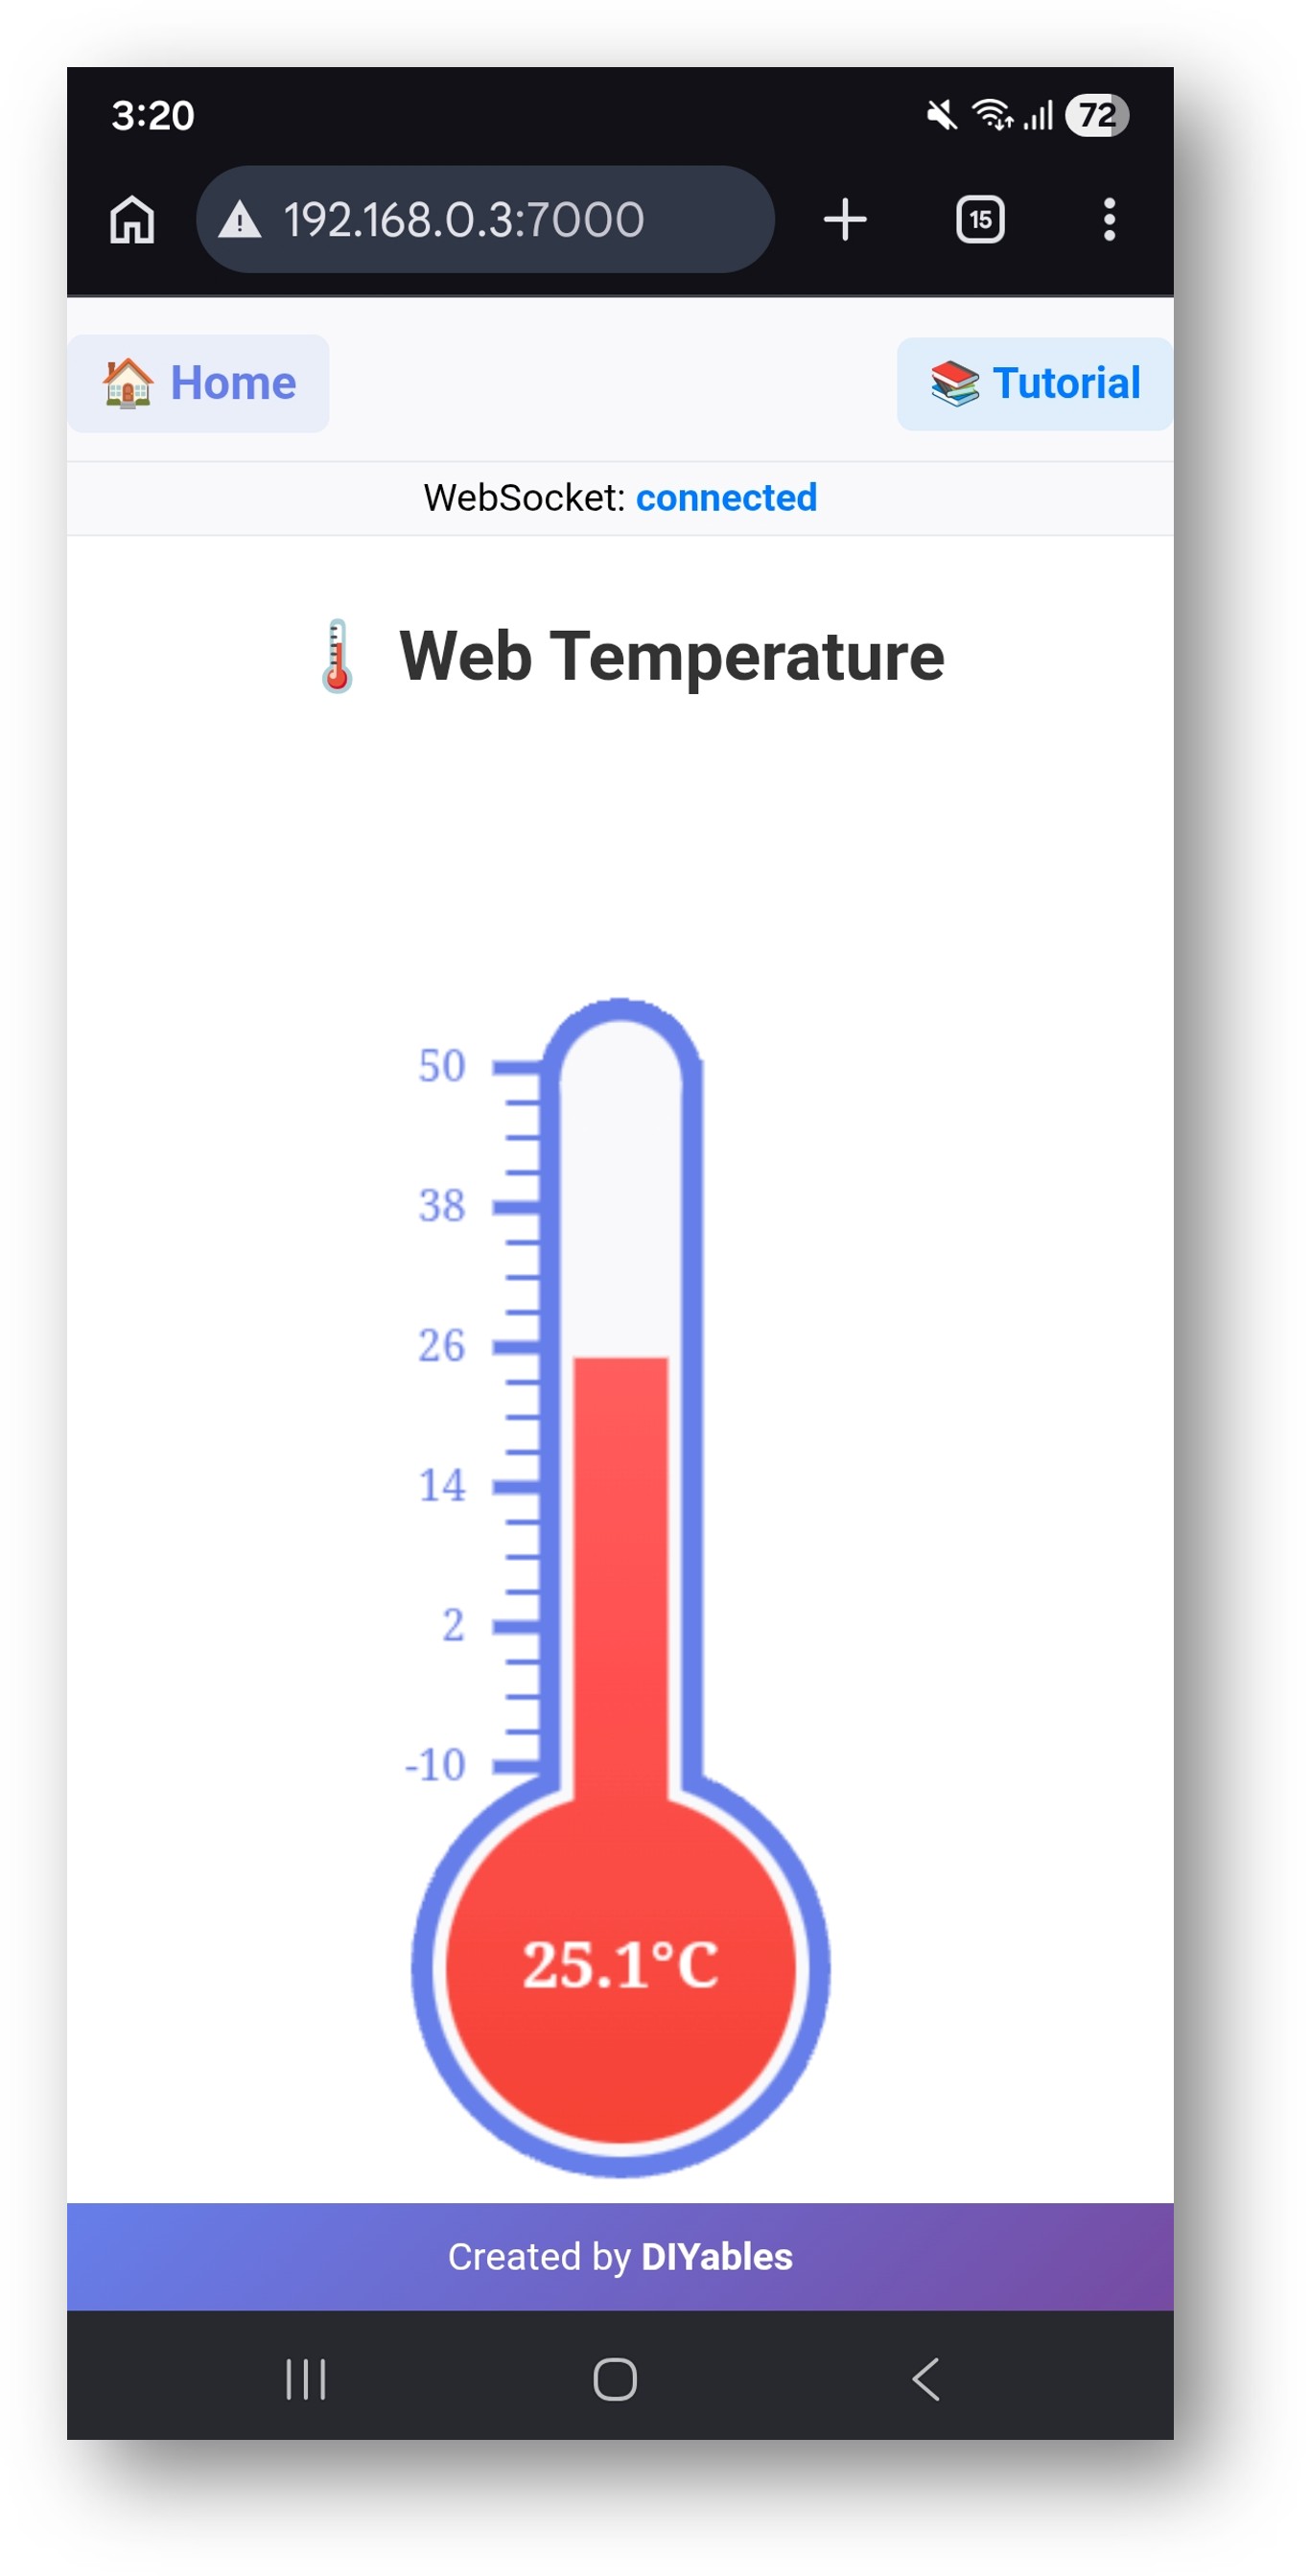
The page displays:
- A canvas thermometer with a mercury level that rises and falls in real time via WebSocket push
- The current temperature value and unit (°C) in the bulb, updated on every server push (every 1 s)
- Scale markings from −10 °C to 50 °C (configurable via MIN_TEMP and MAX_TEMP in the Python code)
- A connection status bar — the thermometer mercury turns grey when WebSocket is disconnected
WebSocket Events
The browser and the Python server communicate using the following Socket.IO events:
| Direction | Event | Payload | |||
|---|---|---|---|---|---|
| Browser → Server | get_config | {} | |||
| Server → Browser | temperature_config | {"minValue" | -10, "maxValue" | 50, "unit" | "°C"} |
| Browser → Server | subscribe | {} | |||
| Server → Browser | temperature_update | {"value" | 24.6} |
OpenClaw
You can adapt the OpenClaw to this tutorial by refering the instruction on Arduino Uno Q - OpenClaw Tutorial
Project Ideas
The live temperature web page is a foundation for many practical projects on Arduino UNO Q:
- Room Climate Monitor: Add a DHT22 or BMP280 to the MCU and extend the Python API with a /api/humidity endpoint — the web page shows both temperature and humidity side by side, updating every second
- Fridge or Freezer Alert: Set a threshold in the Python script — if get_temperature returns a value above the threshold, the script sends a Telegram message alerting you the fridge door may be open
- Temperature Data Logger: Append each reading to a CSV file on the Linux side — add a /api/history endpoint that returns the last 100 rows, and display them as a chart using Chart.js on a second tab
- Greenhouse Monitor: Mount the Arduino UNO Q in a greenhouse with two DS18B20 sensors (inside and outside) and expose both via separate Bridge functions — the web page shows both readings on a split thermometer layout
- Server Room Monitor: Mount the board in a server rack — a simple web page with a red/green status banner lets IT staff check the temperature from any device on the network without installing any app
Challenge Yourself
Ready to go further with the temperature web monitor on Arduino UNO Q? Try these challenges:
- Easy: Change the thermometer range and color scheme in index.html — set the range to 0–100 °C and make the mercury gradient go from blue (cold) to red (hot) based on the current reading.
- Medium: Add a second chart panel to the web page using Chart.js — plot the temperature history as a line graph that fills in over the first minute, using readings stored in a JavaScript array that grows on every temperature_update WebSocket event.
- Advanced: Add a set_threshold Socket.IO event to the Python script that the browser emits with { "min": 18, "max": 28 } — store the range in Python and check it in the push loop; emit a temperature_alert event when the reading goes outside the range so the web page shows a warning banner that changes from green to red automatically.