
ESP32 S3 - OLED 128x64 Display

Introduction

The OLED 128x64 display is one of the most popular choices for adding a visual output to embedded projects — it is compact, sharp, and easy to drive over I2C with just two signal wires. This tutorial shows you how to connect an SSD1306 OLED 128x64 display to your ESP32 S3 and write Arduino code to show text, numbers, graphics, and custom images.

What you'll build:

  1. A working OLED display connected to the ESP32 S3 over I2C
  2. A text and number display program running on the ESP32 S3
  3. A shape-drawing sketch that renders lines, circles, and rectangles on the OLED
  4. A bitmap image viewer that loads and shows custom graphics on the 128x64 screen
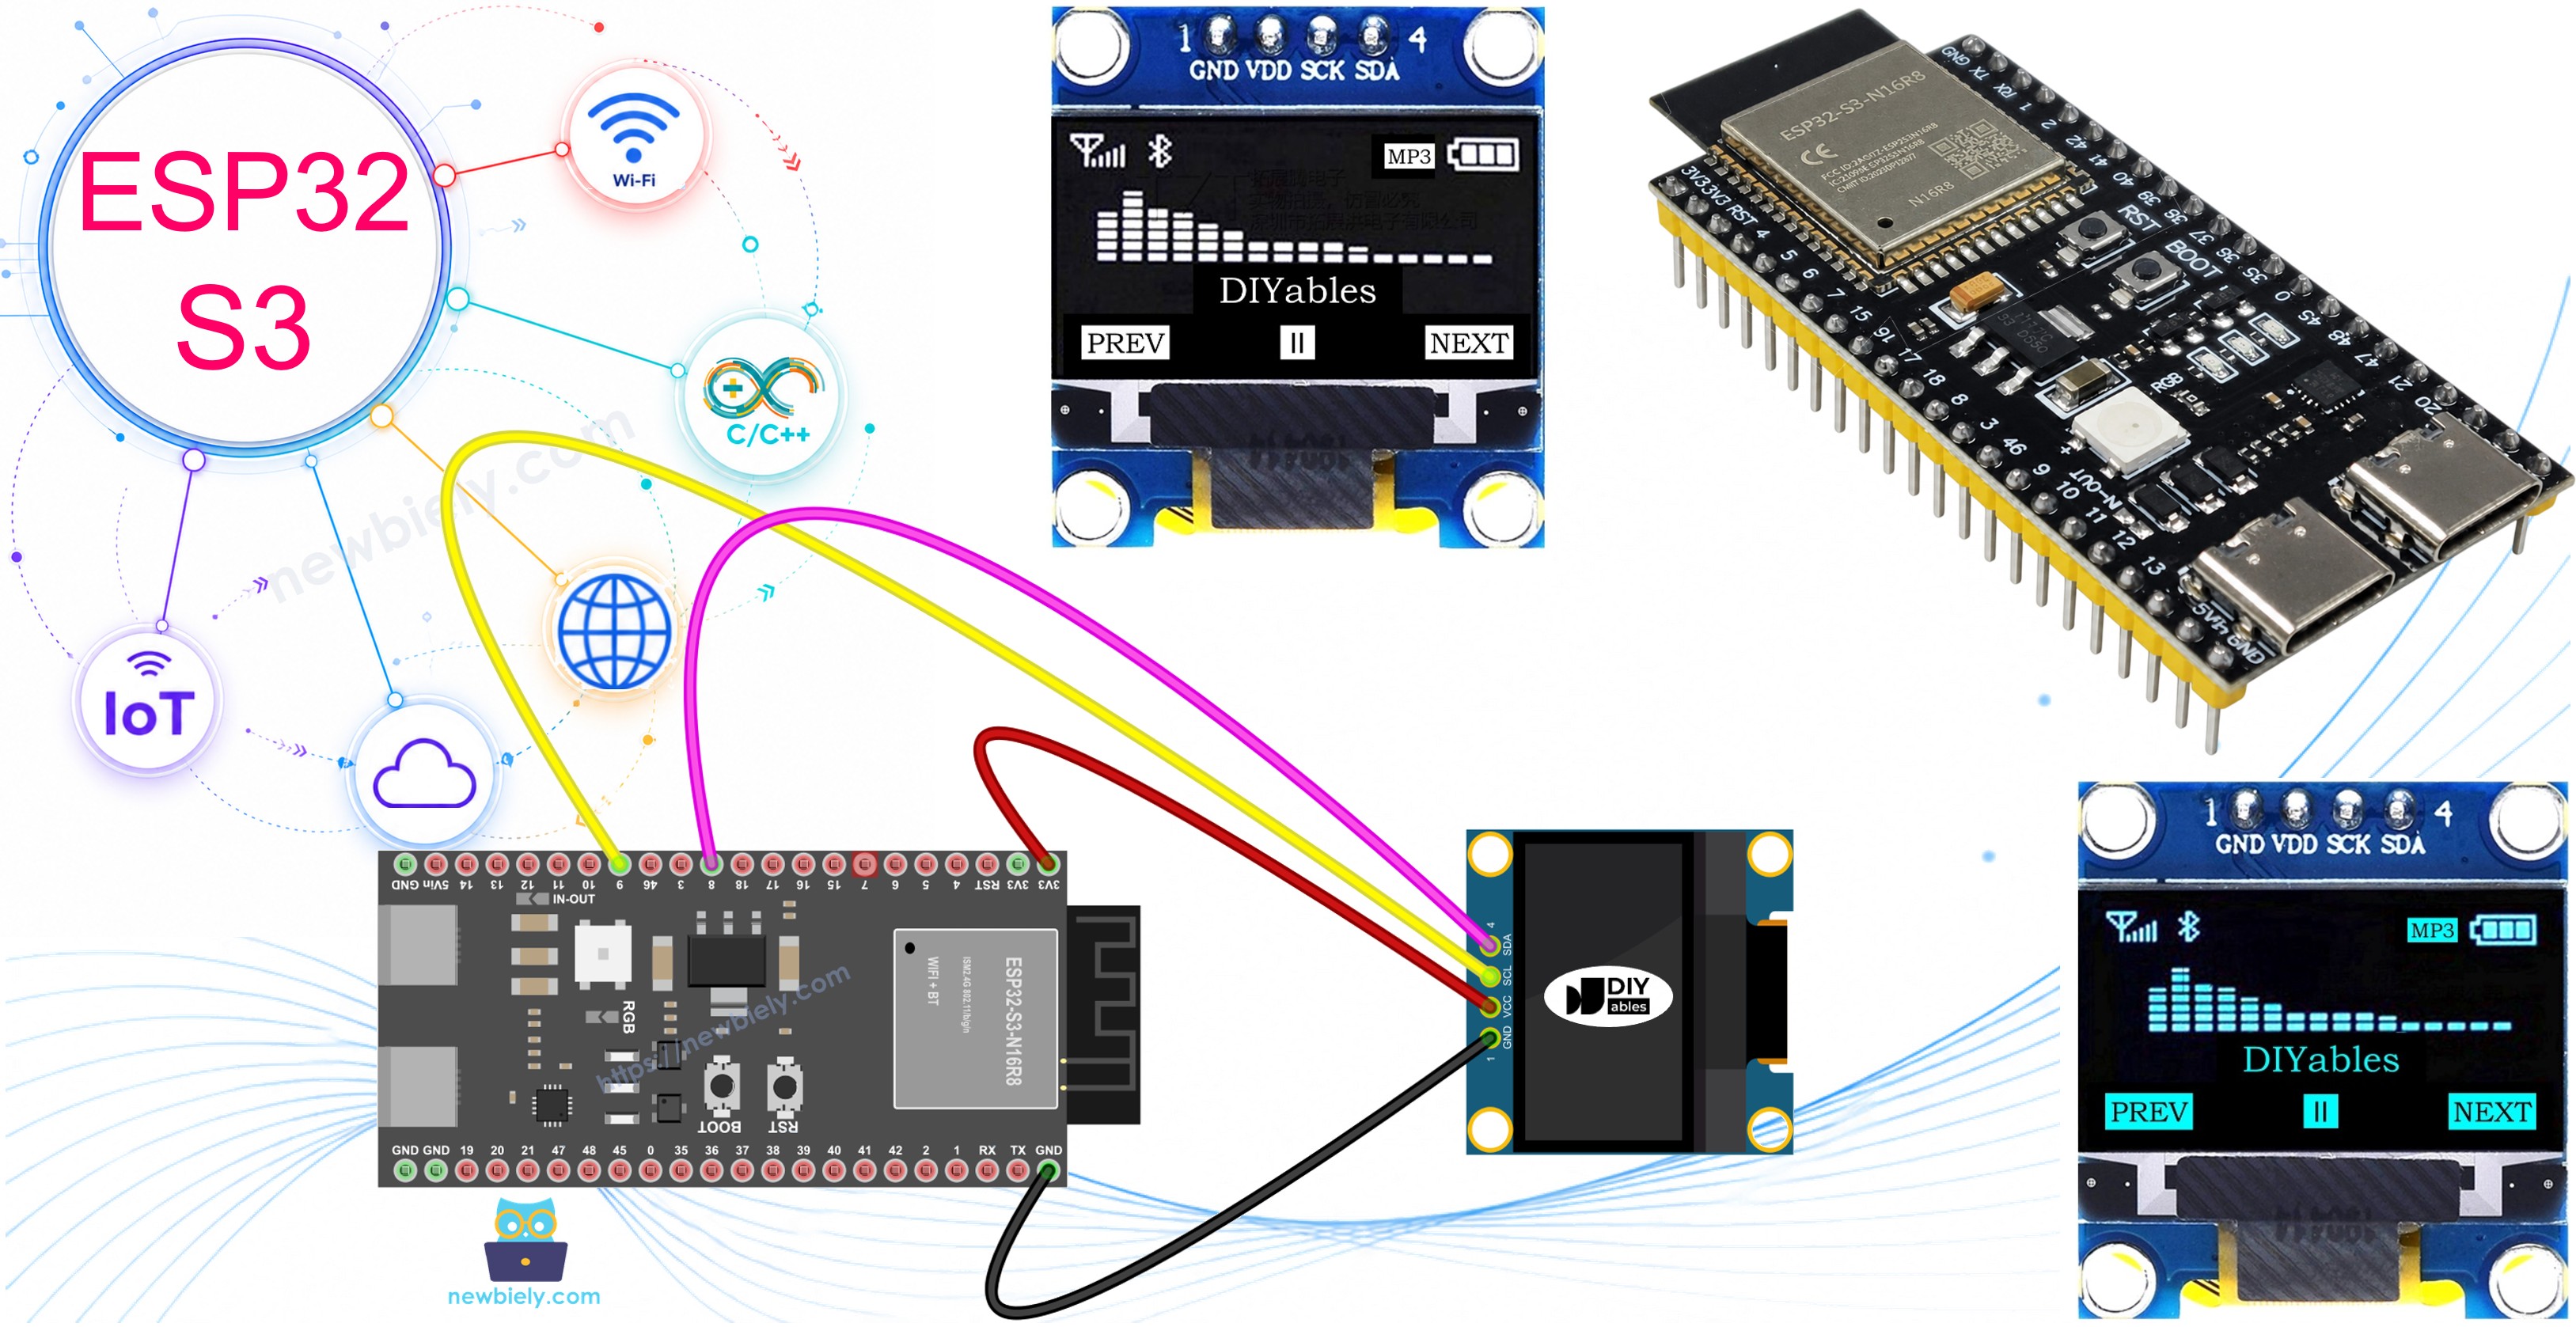
ESP32 S3 OLED 128x64 display

Hardware Preparation

1×ESP32 S3 WROOM N16R8
1×USB Type-C Cable
1×SSD1306 I2C OLED Display 128x64
1×Jumper Wires

Or you can buy the following kits:

1×DIYables Sensor Kit (18 sensors/displays)
Disclosure: Some of the links provided in this section are Amazon affiliate links. We may receive a commission for any purchases made through these links at no additional cost to you.
Additionally, some of these links are for products from our own brand, DIYables .

Buy Note: If you want a bigger OLED display, use the 2.42 inch OLED Display 128x64 .

About OLED Displays

An OLED (Organic Light-Emitting Diode) display is a screen technology where every pixel emits its own light, eliminating the need for a backlight entirely. This gives OLED panels perfect blacks, extremely high contrast, and wide viewing angles that make them easy to read from almost any position. For ESP32 S3 projects the SSD1306-based 128x64 module is particularly popular because it communicates over I2C using only two signal pins, leaves most GPIO free for other peripherals, and runs comfortably from the 3.3 V supply the ESP32 S3 provides.

Key Specifications

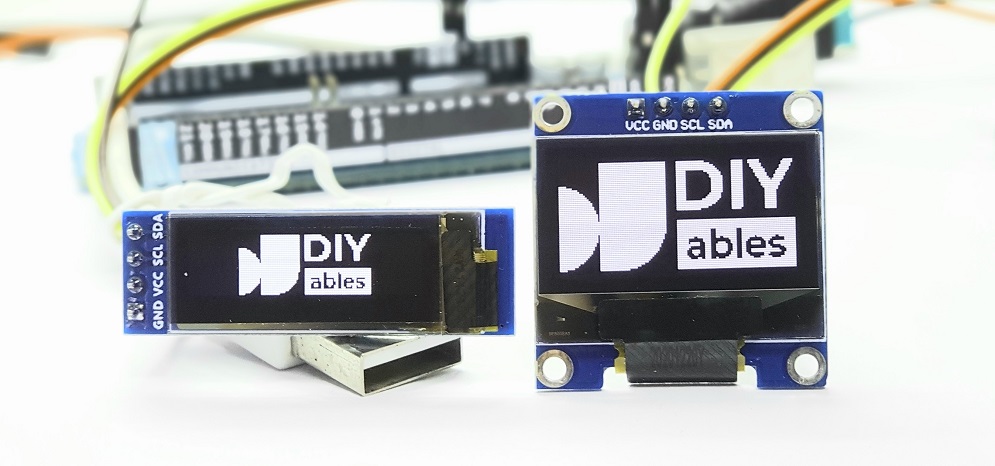
The SSD1306 I2C OLED 128x64 has a resolution of 128 horizontal by 64 vertical pixels, giving a total of 8,192 individually addressable dots. It operates from a 3.3 V supply (some modules accept 3.3 V to 5 V) and communicates over the I2C bus at the default address 0x3C, though some modules are factory-configured to 0x3D. The display requires no backlight, draws only a few milliamps at typical brightness, and the SSD1306 driver chip is directly supported by the Adafruit SSD1306 and Adafruit GFX Arduino libraries.
OLED display

I2C OLED Display Pinout

The SSD1306 OLED module exposes four pins that connect directly to the ESP32 S3:

  1. GND pin: Connect to ground (GND) on ESP32 S3
  2. VCC pin: Power supply — connect to 3.3 V on ESP32 S3 (some modules accept up to 5 V)
  3. SCL pin: Serial Clock Line for I2C communication with ESP32 S3
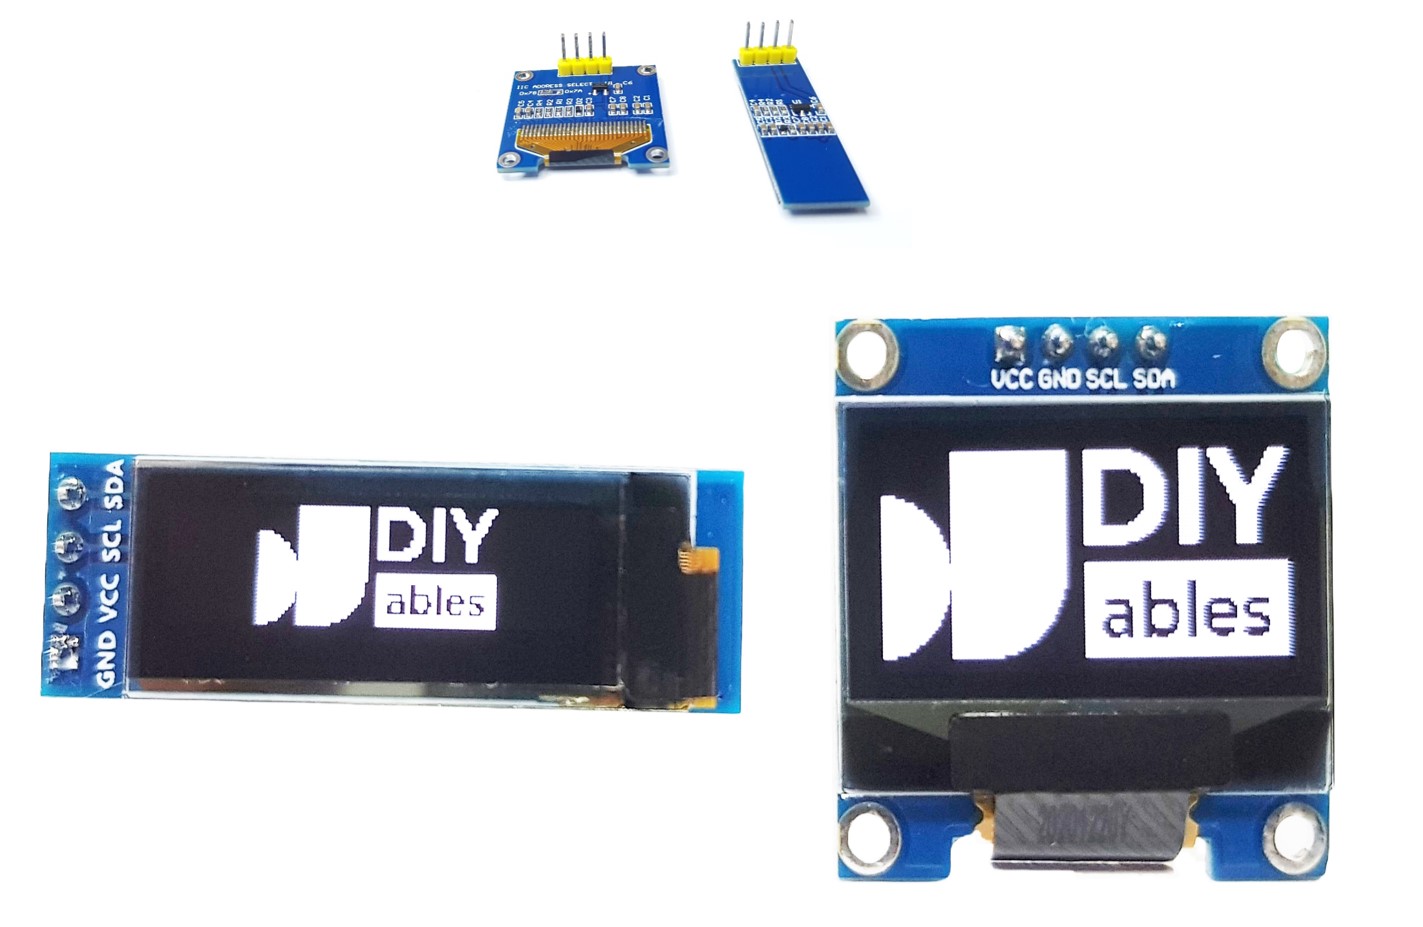
  4. SDA pin: Serial Data Line for I2C communication with ESP32 S3
OLED pinout

※ NOTE THAT:

  • Pin labels may vary by manufacturer - always check the markings on your specific OLED module
  • This tutorial uses an SSD1306 I2C OLED display - tested with the DIYables OLED module

Wiring Diagram

Connect the OLED 128x64 display to the ESP32 S3 over the I2C bus using the four-wire connection described below. Double-check polarity before powering the board — reversing VCC and GND can damage the OLED module.

Safety Notes

Always power the OLED from the 3.3 V pin of the ESP32 S3 rather than 5 V unless your specific module's datasheet confirms 5 V tolerance. Keep I2C wire lengths short (under 30 cm) to avoid signal integrity issues at higher bus speeds.
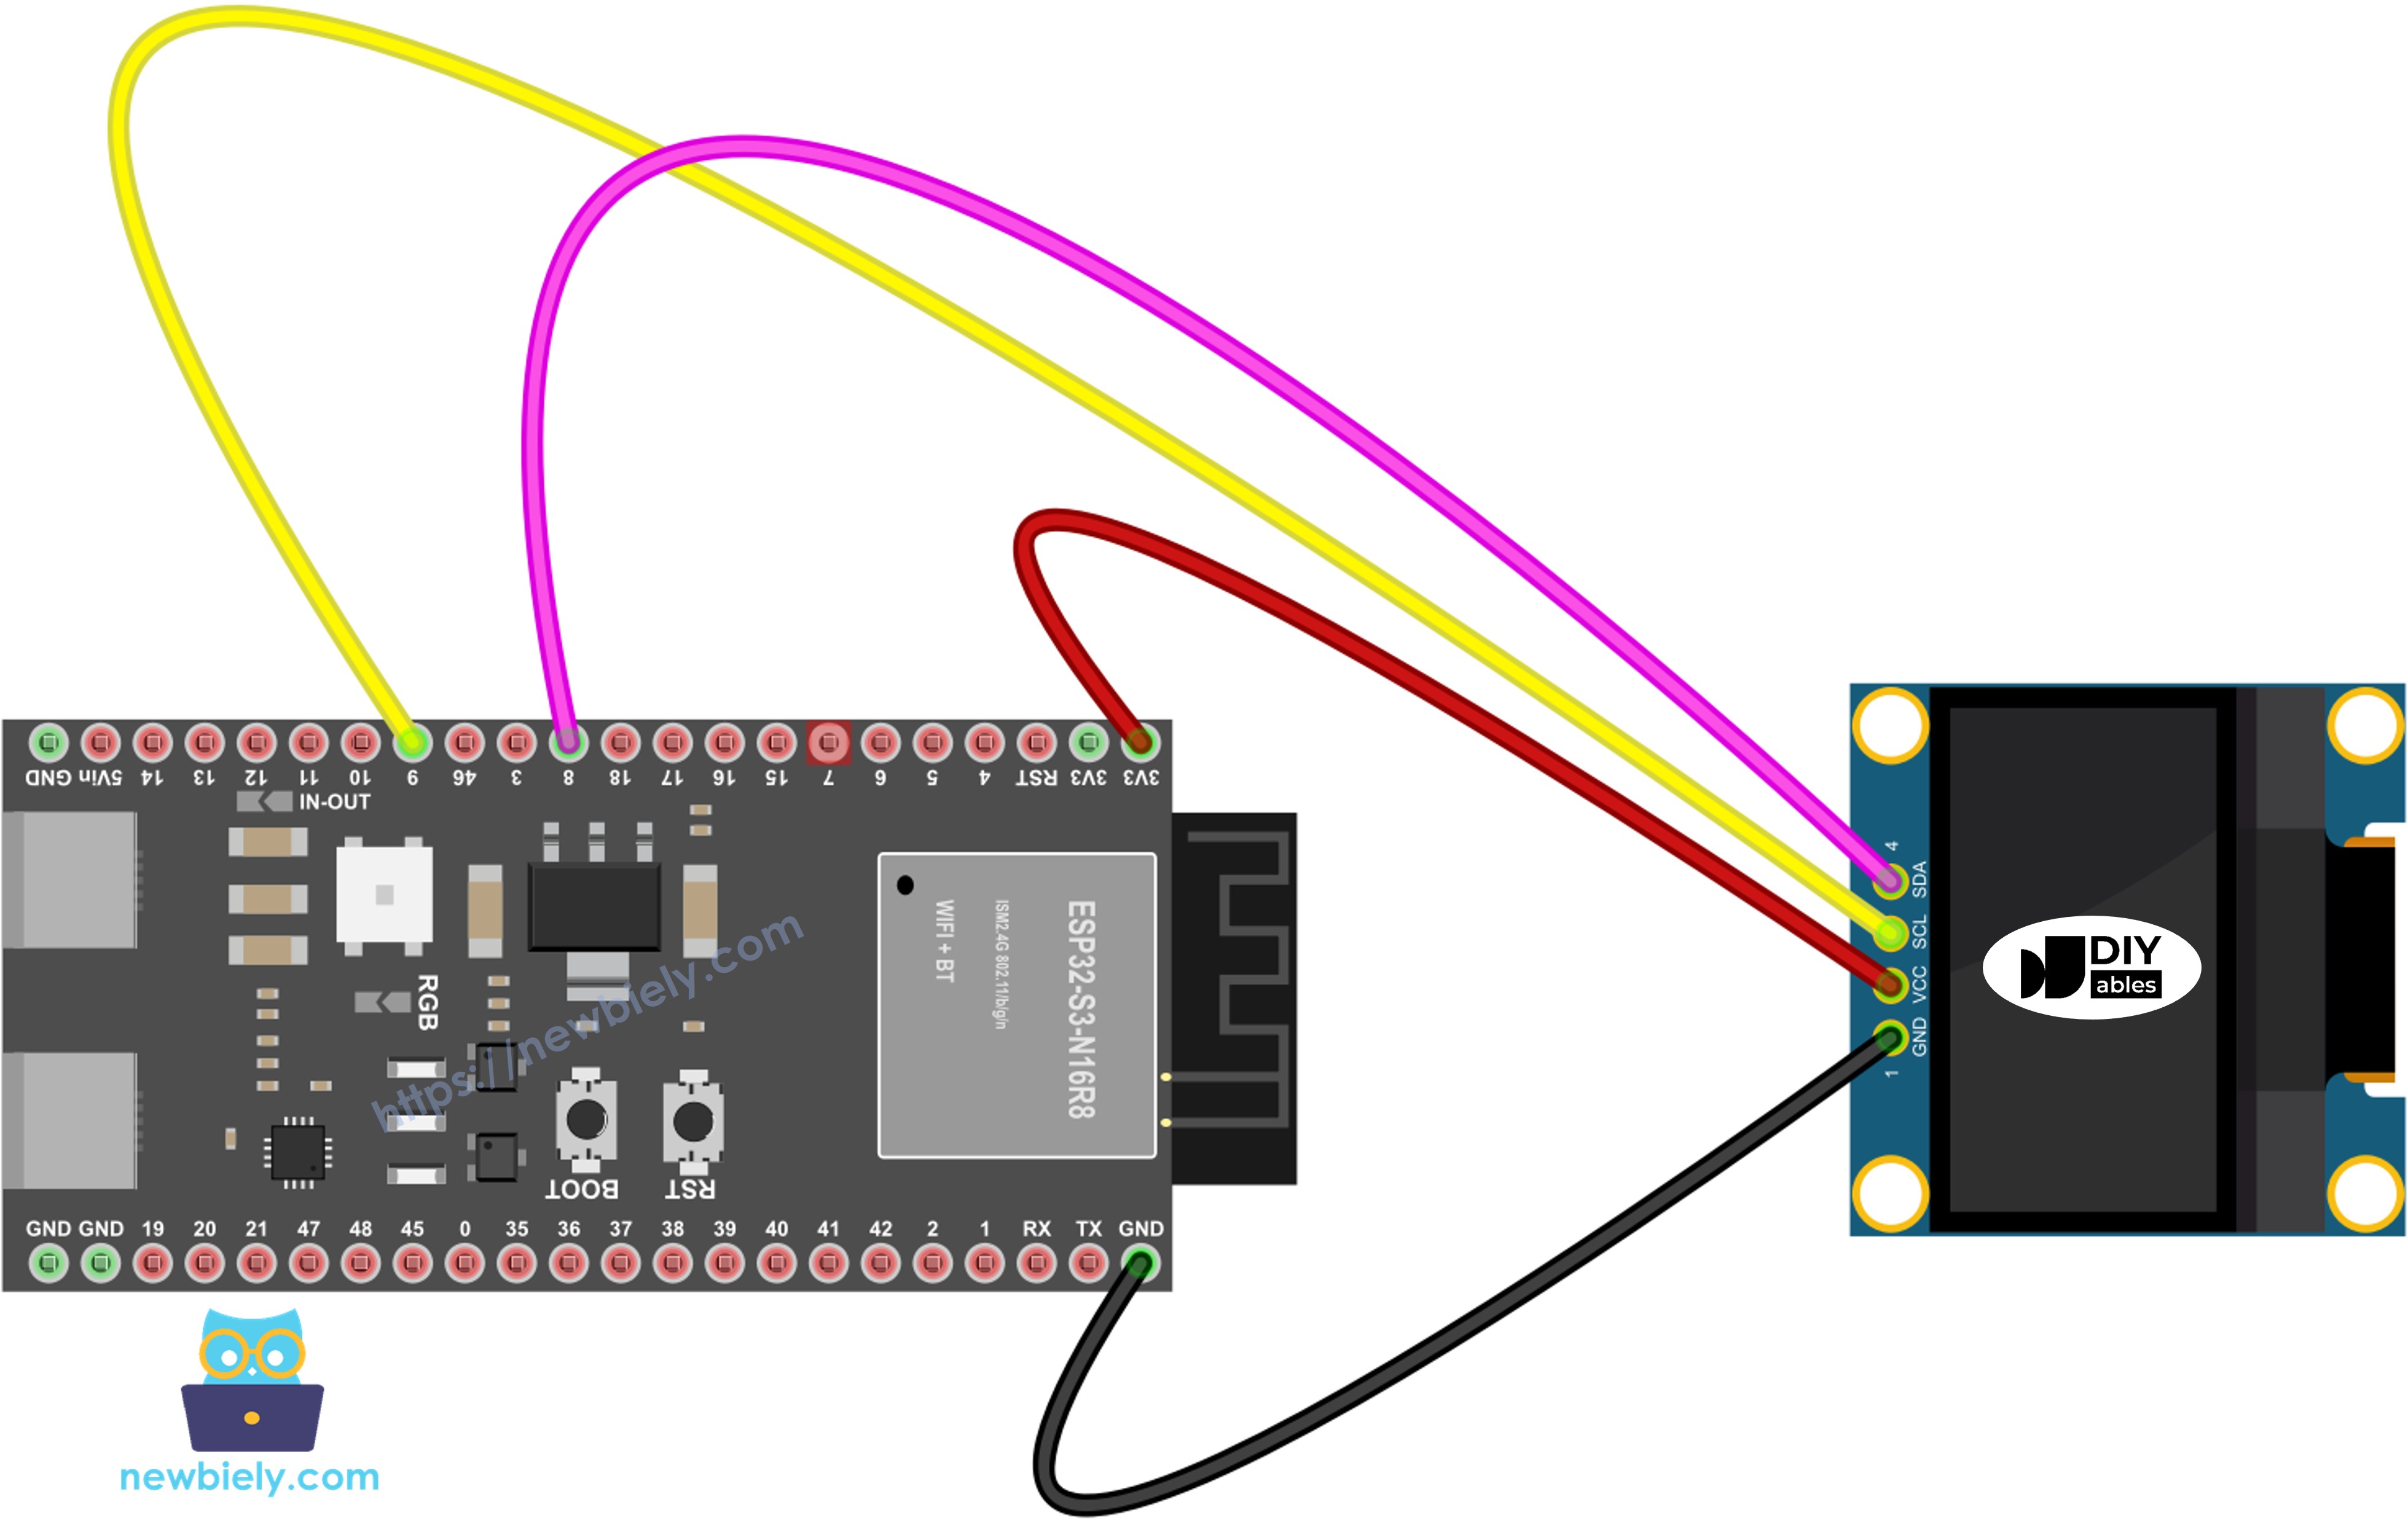
The wiring diagram between ESP32 S3 OLED

This image is created using Fritzing. Click to enlarge image

OLED Module ESP32 S3
Vin 3.3V
GND GND
SDA SDA
SCL SCL

How To Use OLED with ESP32 S3

Install SSD1306 OLED Library

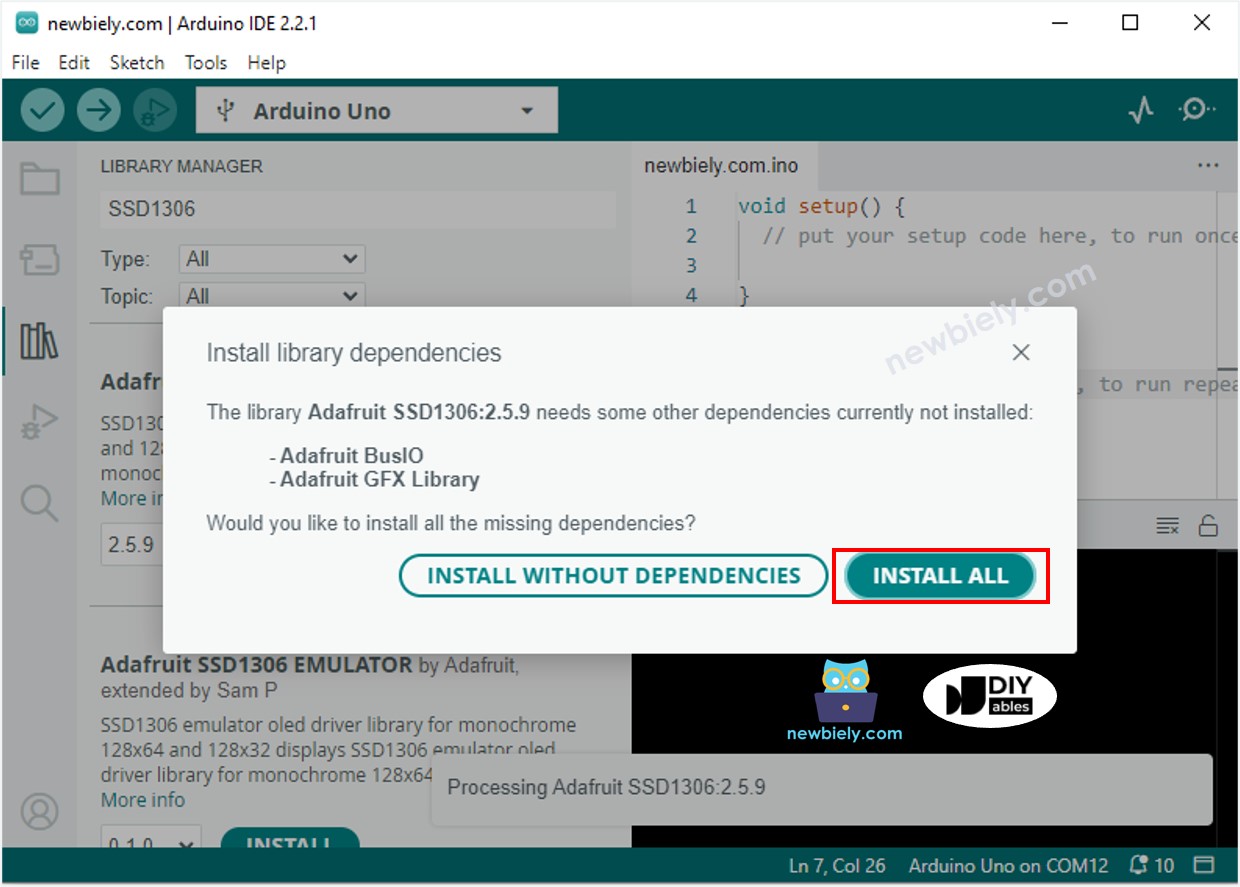
Before writing code, you need to install two libraries through the Arduino IDE Library Manager. Open the Library Manager by clicking the Libraries icon in the left sidebar, search for "SSD1306", locate the Adafruit SSD1306 entry, and click Install. When prompted, click "Install All" to also pull in the required Adafruit GFX dependency. The Adafruit_SSD1306 library handles low-level communication with the OLED driver chip on the ESP32 S3, while Adafruit_GFX provides the higher-level drawing primitives such as lines, circles, and text rendering.

  • Search for Adafruit SSD1306 created by Adafruit and click the Install button.
Newbiely | Arduino IDE 2.3.8
──
File
Edit
Sketch
Tools
Help
ESP32S3 Dev Module
Library Manager
Type:
All
Topic:
All
Adafruit SSD1306 by Adafruit
SSD1306 oled driver library for monochrome 128x64 and 128x32 displays More info
2.5.9
INSTALL
Newbiely.ino
···
1 void setup() {
Output
Serial Monitor
Ln 1, Col 1
ESP32S3 Dev Module on COM15
1
ESP32 S3 Adafruit GFX sensor library

Programming Your ESP32 S3 OLED Display

The following code snippets illustrate the essential building blocks for driving the OLED from your ESP32 S3 sketch. Every OLED program starts by including the three required headers, defining the pixel dimensions, and constructing the display object before the I2C bus is initialised.

Include libraries:

#include <Wire.h> #include <Adafruit_GFX.h> #include <Adafruit_SSD1306.h>

Define OLED dimensions:

#define OLED_WIDTH 128 // OLED display width in pixels #define OLED_HEIGHT 64 // OLED display height in pixels

Create OLED object:

// Create SSD1306 display object for I2C communication Adafruit_SSD1306 oled(OLED_WIDTH, OLED_HEIGHT, &Wire, -1);

Initialize OLED in setup():

// Initialize OLED display at I2C address 0x3C if (!oled.begin(SSD1306_SWITCHCAPVCC, 0x3C)) { Serial.println(F("SSD1306 allocation failed")); while (true); }

The SSD1306_SWITCHCAPVCC flag tells the driver to use its internal charge pump for the display voltage, making external power supplies unnecessary. The address 0x3C matches most SSD1306 modules; if your scanner reports a different address, substitute it here. The while (true) halt ensures the program stops cleanly rather than proceeding with a non-functional display.

ESP32 S3 Code - Display Text on OLED

The following code demonstrates how to display text and numbers on the OLED screen with your ESP32 S3. It shows multiple text sizes, cursor positioning, and the essential oled.display() call that pushes the frame buffer to the physical screen.

/* * This ESP32 S3 code was developed by newbiely.com * * This ESP32 S3 code is made available for public use without any restriction * * For comprehensive instructions and wiring diagrams, please visit: * https://newbiely.com/tutorials/esp32-s3/esp32-s3-oled-128x64-display */ #include <Wire.h> #include <Adafruit_GFX.h> #include <Adafruit_SSD1306.h> #define OLED_WIDTH 128 // OLED width, in pixels #define OLED_HEIGHT 64 // OLED height, in pixels // create an OLED display object connected to I2C Adafruit_SSD1306 oled(OLED_WIDTH, OLED_HEIGHT, &Wire, -1); void setup() { Serial.begin(115200); // initialize OLED display with I2C address 0x3C if (!oled.begin(SSD1306_SWITCHCAPVCC, 0x3C)) { Serial.println(F("failed to start SSD1306 OLED")); while (1); } delay(2000); // wait two seconds for initializing oled.clearDisplay(); // clear display oled.setTextSize(1); // set text size oled.setTextColor(WHITE); // set text color oled.setCursor(0, 10); // set position to display oled.println("esp32io.com"); // set text oled.display(); // display on OLED } void loop() { }

Essential OLED Text Functions

The Adafruit SSD1306 and GFX libraries expose a rich set of text and drawing functions for your ESP32 S3 sketches. oled.clearDisplay() wipes all pixels before each new frame. oled.setTextSize(n) scales the built-in font from size 1 (smallest, 6×8 px per character) up to size 8. oled.setCursor(x, y) positions the text insertion point in pixel coordinates. oled.setTextColor(WHITE) renders light text on a dark background, while oled.setTextColor(BLACK, WHITE) inverts to dark text on a light background. oled.println("message") and oled.println(number) write content to the buffer, and oled.display() commits that buffer to the screen. For animated text the library also provides oled.startscrollright(), oled.startscrollleft(), oled.startscrolldiagright(), oled.startscrolldiagleft(), and oled.stopscroll() to drive the SSD1306's built-in hardware scroll engine.

Centering Text on Your OLED Display

Centering text on an OLED 128x64 display requires measuring the rendered dimensions of your string before positioning it. Use getTextBounds() to retrieve the pixel width and height of your text at the chosen size, then compute the starting X as (OLED_WIDTH - textWidth) / 2 and Y as (OLED_HEIGHT - textHeight) / 2. For a complete worked example covering both horizontal and vertical centering, visit our guide: How to vertical/horizontal center on OLED.

ESP32 S3 Code - Drawing Shapes on OLED

The following code shows how to draw geometric shapes on the OLED display with your ESP32 S3, using the Adafruit GFX drawing primitives to render lines, rectangles, circles, and triangles.

/* * This ESP32 S3 code was developed by newbiely.com * * This ESP32 S3 code is made available for public use without any restriction * * For comprehensive instructions and wiring diagrams, please visit: * https://newbiely.com/tutorials/esp32-s3/esp32-s3-oled-128x64-display */ #include <Wire.h> #include <Adafruit_GFX.h> #include <Adafruit_SSD1306.h> #define OLED_WIDTH 128 // OLED width, in pixels #define OLED_HEIGHT 64 // OLED height, in pixels // create an OLED display object connected to I2C Adafruit_SSD1306 oled(OLED_WIDTH, OLED_HEIGHT, &Wire, -1); void setup() { Serial.begin(115200); // initialize OLED display with I2C address 0x3C if (!oled.begin(SSD1306_SWITCHCAPVCC, 0x3C)) { Serial.println(F("failed to start SSD1306 OLED")); while (1); } delay(2000); // wait two seconds for initializing oled.setCursor(0, 0); } void loop() { // draw a circle oled.clearDisplay(); oled.drawCircle(20, 35, 20, WHITE); oled.display(); delay(1000); // fill a circle oled.clearDisplay(); oled.fillCircle(20, 35, 20, WHITE); oled.display(); delay(1000); // draw a triangle oled.clearDisplay(); oled.drawTriangle(30, 15, 0, 60, 60, 60, WHITE); oled.display(); delay(1000); // fill a triangle oled.clearDisplay(); oled.fillTriangle(30, 15, 0, 60, 60, 60, WHITE); oled.display(); delay(1000); // draw a rectangle oled.clearDisplay(); oled.drawRect(0, 15, 60, 40, WHITE); oled.display(); delay(1000); // fill a rectangle oled.clearDisplay(); oled.fillRect(0, 15, 60, 40, WHITE); oled.display(); delay(1000); // draw a round rectangle oled.clearDisplay(); oled.drawRoundRect(0, 15, 60, 40, 8, WHITE); oled.display(); delay(1000); // fill a round rectangle oled.clearDisplay(); oled.fillRoundRect(0, 15, 60, 40, 8, WHITE); oled.display(); delay(1000); }

The Adafruit GFX library provides both outline and filled variants for the most common shapes. drawLine(x1, y1, x2, y2, color) draws a straight line between two pixel coordinates. drawRect and fillRect render rectangle outlines and solid rectangles respectively, while drawRoundRect and fillRoundRect add rounded corners. drawCircle and fillCircle take a centre point and radius, and drawTriangle and fillTriangle accept three vertex coordinates. All drawing functions accept WHITE or BLACK as the color parameter, letting you mix light and dark elements on the same frame.

ESP32 S3 Code - Display Images on OLED

The OLED's frame buffer can hold any 128×64 monochrome bitmap, making it straightforward to display custom logos, icons, or illustrations on your ESP32 S3 project.

Converting Images to Bitmap Arrays

To display a custom image you first need to convert it to a C byte array that the Adafruit library can render.

  1. Choose your image file (JPG, PNG, GIF, etc.)
  2. Open the online converter: image2cpp
  3. Set canvas size to 128x64 to match your OLED resolution
  4. Select "Arduino code" as the output format
  5. Choose "Vertical - 1 bit per pixel" for the drawing mode
  6. Click Generate and copy the resulting bitmap array into your sketch
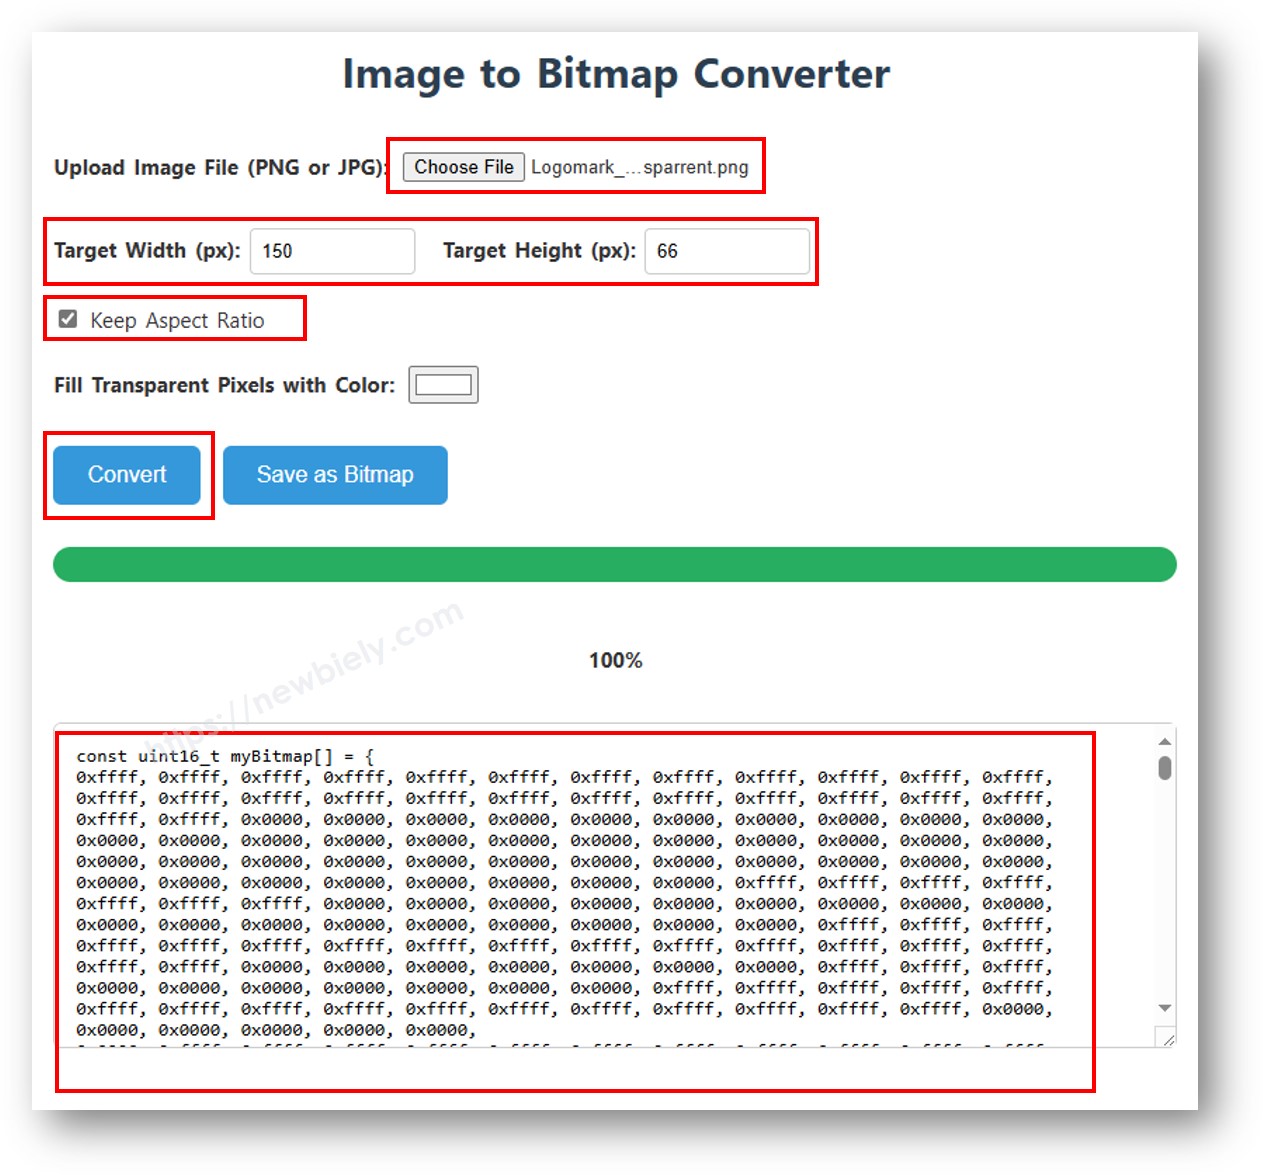
image to bitmap array

Using Bitmap in ESP32 S3 Code

The following code loads a bitmap array and renders it on the OLED display connected to your ESP32 S3. Replace the ArduinoIcon array with the one generated from your own image.

/* * This ESP32 S3 code was developed by newbiely.com * * This ESP32 S3 code is made available for public use without any restriction * * For comprehensive instructions and wiring diagrams, please visit: * https://newbiely.com/tutorials/esp32-s3/esp32-s3-oled-128x64-display */ #include <Wire.h> #include <Adafruit_GFX.h> #include <Adafruit_SSD1306.h> #define OLED_WIDTH 128 // OLED width, in pixels #define OLED_HEIGHT 64 // OLED height, in pixels // create an OLED display object connected to I2C Adafruit_SSD1306 oled(OLED_WIDTH, OLED_HEIGHT, &Wire, -1); // bitmap of arduino-icon image const unsigned char arduino_icon [] PROGMEM = { // 'arduino-icon', 128x64px 0xff, 0xff, 0xff, 0xff, 0xff, 0xff, 0xff, 0xff, 0xff, 0xff, 0xff, 0xff, 0xff, 0xff, 0xff, 0xff, 0xff, 0xff, 0xff, 0xff, 0xff, 0xff, 0xff, 0xff, 0xff, 0xff, 0xff, 0xff, 0xff, 0xff, 0xff, 0xff, 0xff, 0xff, 0xfe, 0x00, 0x07, 0xff, 0xff, 0xff, 0xff, 0xff, 0xff, 0x80, 0x01, 0xff, 0xff, 0xff, 0xff, 0xff, 0xe0, 0x00, 0x00, 0xff, 0xff, 0xff, 0xff, 0xff, 0xfc, 0x00, 0x00, 0x3f, 0xff, 0xff, 0xff, 0xff, 0x80, 0x00, 0x00, 0x1f, 0xff, 0xff, 0xff, 0xff, 0xe0, 0x00, 0x00, 0x07, 0xff, 0xff, 0xff, 0xfe, 0x00, 0x00, 0x00, 0x07, 0xff, 0xff, 0xff, 0xff, 0x80, 0x00, 0x00, 0x01, 0xff, 0xff, 0xff, 0xfc, 0x00, 0x00, 0x00, 0x03, 0xff, 0xff, 0xff, 0xff, 0x00, 0x00, 0x00, 0x00, 0xff, 0xff, 0xff, 0xf0, 0x00, 0x00, 0x00, 0x00, 0xff, 0xff, 0xff, 0xfc, 0x00, 0x00, 0x00, 0x00, 0x3f, 0xff, 0xff, 0xe0, 0x00, 0x00, 0x00, 0x00, 0x3f, 0xff, 0xff, 0xf0, 0x00, 0x00, 0x00, 0x00, 0x1f, 0xff, 0xff, 0xc0, 0x00, 0x00, 0x00, 0x00, 0x1f, 0xff, 0xff, 0xe0, 0x00, 0x00, 0x00, 0x00, 0x0f, 0xff, 0xff, 0x80, 0x00, 0x00, 0x00, 0x00, 0x0f, 0xff, 0xff, 0xc0, 0x00, 0x00, 0x00, 0x00, 0x07, 0xff, 0xff, 0x00, 0x00, 0x00, 0x00, 0x00, 0x03, 0xff, 0xff, 0x80, 0x00, 0x00, 0x00, 0x00, 0x03, 0xff, 0xfe, 0x00, 0x00, 0x00, 0x00, 0x00, 0x01, 0xff, 0xfe, 0x00, 0x00, 0x00, 0x00, 0x00, 0x01, 0xff, 0xfc, 0x00, 0x00, 0xff, 0xf0, 0x00, 0x00, 0xff, 0xfc, 0x00, 0x00, 0x3f, 0xfc, 0x00, 0x00, 0xff, 0xfc, 0x00, 0x03, 0xff, 0xfc, 0x00, 0x00, 0x7f, 0xf8, 0x00, 0x00, 0xff, 0xff, 0x00, 0x00, 0xff, 0xf8, 0x00, 0x0f, 0xff, 0xff, 0x00, 0x00, 0x3f, 0xf0, 0x00, 0x03, 0xff, 0xff, 0xc0, 0x00, 0x7f, 0xf0, 0x00, 0x1f, 0xff, 0xff, 0xc0, 0x00, 0x1f, 0xe0, 0x00, 0x0f, 0xff, 0xff, 0xe0, 0x00, 0x7f, 0xf0, 0x00, 0x7f, 0xff, 0xff, 0xe0, 0x00, 0x0f, 0xc0, 0x00, 0x1f, 0xff, 0xff, 0xf8, 0x00, 0x3f, 0xe0, 0x00, 0xff, 0xff, 0xff, 0xf8, 0x00, 0x07, 0x80, 0x00, 0x7f, 0xff, 0xff, 0xfc, 0x00, 0x1f, 0xe0, 0x00, 0xff, 0xff, 0xff, 0xfc, 0x00, 0x03, 0x80, 0x00, 0xff, 0xff, 0xff, 0xfc, 0x00, 0x1f, 0xc0, 0x01, 0xff, 0xff, 0xff, 0xfe, 0x00, 0x03, 0x00, 0x01, 0xff, 0xff, 0xff, 0xfe, 0x00, 0x1f, 0xc0, 0x03, 0xff, 0xff, 0xff, 0xff, 0x00, 0x00, 0x00, 0x03, 0xff, 0xff, 0xff, 0xff, 0x00, 0x0f, 0xc0, 0x03, 0xff, 0xff, 0xff, 0xff, 0x80, 0x00, 0x00, 0x07, 0xff, 0xf0, 0x7f, 0xff, 0x00, 0x0f, 0xc0, 0x07, 0xff, 0xff, 0xff, 0xff, 0xc0, 0x00, 0x00, 0x0f, 0xff, 0xf0, 0x7f, 0xff, 0x80, 0x0f, 0x80, 0x07, 0xff, 0xff, 0xff, 0xff, 0xe0, 0x00, 0x00, 0x1f, 0xff, 0xf0, 0x7f, 0xff, 0x80, 0x07, 0x80, 0x0f, 0xff, 0xff, 0xff, 0xff, 0xf0, 0x00, 0x00, 0x3f, 0xff, 0xf0, 0x7f, 0xff, 0xc0, 0x07, 0x80, 0x0f, 0xff, 0xff, 0xff, 0xff, 0xf8, 0x00, 0x00, 0x7f, 0xff, 0xf0, 0x7f, 0xff, 0xc0, 0x07, 0x80, 0x0f, 0xfe, 0x00, 0x00, 0xff, 0xfc, 0x00, 0x00, 0xff, 0xfc, 0x00, 0x03, 0xff, 0xc0, 0x07, 0x80, 0x0f, 0xfe, 0x00, 0x00, 0xff, 0xfe, 0x00, 0x01, 0xff, 0xfc, 0x00, 0x01, 0xff, 0xc0, 0x07, 0x80, 0x0f, 0xfe, 0x00, 0x00, 0xff, 0xff, 0x00, 0x03, 0xff, 0xfc, 0x00, 0x01, 0xff, 0xc0, 0x07, 0x80, 0x0f, 0xfe, 0x00, 0x00, 0xff, 0xff, 0x00, 0x03, 0xff, 0xfc, 0x00, 0x01, 0xff, 0xc0, 0x07, 0x80, 0x0f, 0xfe, 0x00, 0x00, 0xff, 0xff, 0x00, 0x03, 0xff, 0xfc, 0x00, 0x01, 0xff, 0xc0, 0x07, 0x80, 0x0f, 0xff, 0xff, 0xff, 0xff, 0xfe, 0x00, 0x01, 0xff, 0xff, 0xe0, 0x7f, 0xff, 0xc0, 0x07, 0x80, 0x0f, 0xff, 0xff, 0xff, 0xff, 0xfc, 0x00, 0x00, 0xff, 0xff, 0xf0, 0x7f, 0xff, 0xc0, 0x07, 0x80, 0x0f, 0xff, 0xff, 0xff, 0xff, 0xfc, 0x00, 0x00, 0xff, 0xff, 0xf0, 0x7f, 0xff, 0xc0, 0x07, 0x80, 0x0f, 0xff, 0xff, 0xff, 0xff, 0xf8, 0x00, 0x00, 0x7f, 0xff, 0xf0, 0x7f, 0xff, 0xc0, 0x07, 0x80, 0x0f, 0xff, 0xff, 0xff, 0xff, 0xf0, 0x00, 0x00, 0x3f, 0xff, 0xf0, 0x7f, 0xff, 0x80, 0x07, 0x80, 0x07, 0xff, 0xff, 0xff, 0xff, 0xe0, 0x00, 0x00, 0x1f, 0xff, 0xf0, 0x7f, 0xff, 0x80, 0x07, 0xc0, 0x07, 0xff, 0xff, 0xff, 0xff, 0xc0, 0x00, 0x00, 0x0f, 0xff, 0xff, 0xff, 0xff, 0x80, 0x0f, 0xc0, 0x03, 0xff, 0xff, 0xff, 0xff, 0x80, 0x00, 0x00, 0x07, 0xff, 0xff, 0xff, 0xff, 0x00, 0x0f, 0xc0, 0x03, 0xff, 0xff, 0xff, 0xff, 0x00, 0x00, 0x00, 0x03, 0xff, 0xff, 0xff, 0xff, 0x00, 0x0f, 0xe0, 0x01, 0xff, 0xff, 0xff, 0xfe, 0x00, 0x03, 0x00, 0x01, 0xff, 0xff, 0xff, 0xfe, 0x00, 0x1f, 0xe0, 0x00, 0xff, 0xff, 0xff, 0xfc, 0x00, 0x07, 0x80, 0x00, 0xff, 0xff, 0xff, 0xfc, 0x00, 0x1f, 0xe0, 0x00, 0x7f, 0xff, 0xff, 0xf0, 0x00, 0x0f, 0xc0, 0x00, 0x3f, 0xff, 0xff, 0xf8, 0x00, 0x3f, 0xf0, 0x00, 0x3f, 0xff, 0xff, 0xe0, 0x00, 0x1f, 0xe0, 0x00, 0x1f, 0xff, 0xff, 0xf0, 0x00, 0x3f, 0xf8, 0x00, 0x1f, 0xff, 0xff, 0x80, 0x00, 0x3f, 0xe0, 0x00, 0x07, 0xff, 0xff, 0xe0, 0x00, 0x7f, 0xf8, 0x00, 0x0f, 0xff, 0xff, 0x00, 0x00, 0x7f, 0xf8, 0x00, 0x03, 0xff, 0xff, 0xc0, 0x00, 0x7f, 0xfc, 0x00, 0x03, 0xff, 0xf8, 0x00, 0x00, 0xff, 0xfc, 0x00, 0x00, 0xff, 0xff, 0x00, 0x00, 0xff, 0xfe, 0x00, 0x00, 0x7f, 0xe0, 0x00, 0x01, 0xff, 0xfe, 0x00, 0x00, 0x1f, 0xf8, 0x00, 0x01, 0xff, 0xfe, 0x00, 0x00, 0x00, 0x00, 0x00, 0x03, 0xff, 0xff, 0x00, 0x00, 0x00, 0x00, 0x00, 0x03, 0xff, 0xff, 0x00, 0x00, 0x00, 0x00, 0x00, 0x07, 0xff, 0xff, 0x80, 0x00, 0x00, 0x00, 0x00, 0x03, 0xff, 0xff, 0x80, 0x00, 0x00, 0x00, 0x00, 0x0f, 0xff, 0xff, 0xc0, 0x00, 0x00, 0x00, 0x00, 0x07, 0xff, 0xff, 0xc0, 0x00, 0x00, 0x00, 0x00, 0x1f, 0xff, 0xff, 0xe0, 0x00, 0x00, 0x00, 0x00, 0x0f, 0xff, 0xff, 0xe0, 0x00, 0x00, 0x00, 0x00, 0x7f, 0xff, 0xff, 0xf8, 0x00, 0x00, 0x00, 0x00, 0x3f, 0xff, 0xff, 0xf8, 0x00, 0x00, 0x00, 0x01, 0xff, 0xff, 0xff, 0xfe, 0x00, 0x00, 0x00, 0x00, 0x7f, 0xff, 0xff, 0xfc, 0x00, 0x00, 0x00, 0x03, 0xff, 0xff, 0xff, 0xff, 0x00, 0x00, 0x00, 0x00, 0xff, 0xff, 0xff, 0xff, 0x00, 0x00, 0x00, 0x0f, 0xff, 0xff, 0xff, 0xff, 0xc0, 0x00, 0x00, 0x03, 0xff, 0xff, 0xff, 0xff, 0xc0, 0x00, 0x00, 0x3f, 0xff, 0xff, 0xff, 0xff, 0xf0, 0x00, 0x00, 0x0f, 0xff, 0xff, 0xff, 0xff, 0xf0, 0x00, 0x01, 0xff, 0xff, 0xff, 0xff, 0xff, 0xfe, 0x00, 0x00, 0x3f, 0xff, 0xff, 0xff, 0xff, 0xff, 0x00, 0x0f, 0xff, 0xff, 0xff, 0xff, 0xff, 0xff, 0xc0, 0x03, 0xff, 0xff, 0xff, 0xff, 0xff, 0xff, 0xff, 0xff, 0xff, 0xff, 0xff, 0xff, 0xff, 0xff, 0xff, 0xff, 0xff, 0xff, 0xff, 0xff, 0xff, 0xff, 0xff, 0xff, 0xff, 0xff, 0xff, 0xff, 0xff, 0xff, 0xff, 0xff, 0xff, 0xff, 0xff, 0xff, 0xff, 0xff, 0xff, 0xff, 0xff, 0xff, 0xff, 0xff, 0xff, 0xff, 0xff, 0xff, 0xff, 0xff, 0xff, 0xff, 0xff, 0xff, 0xff, 0xff, 0xff, 0xff, 0xff, 0xff, 0xff, 0xff, 0xff, 0xff, 0xff, 0xff, 0xff }; void setup() { Serial.begin(115200); // initialize OLED display with I2C address 0x3C if (!oled.begin(SSD1306_SWITCHCAPVCC, 0x3C)) { Serial.println(F("failed to start SSD1306 OLED")); while (1); } delay(2000); // wait two seconds for initializing oled.setCursor(0, 0); } void loop() { oled.clearDisplay(); // display bitmap oled.drawBitmap(0, 0, arduino_icon, 128, 64, WHITE); oled.display(); delay(1000); // invert display oled.invertDisplay(1); delay(1000); }

For best results use high-contrast black-and-white source images, resize them to 128×64 before converting, and favour simple graphics over complex photographs. Smaller images also consume less of the ESP32 S3's RAM, leaving more headroom for the rest of your application.

OLED Troubleshooting Guide

If your OLED display is not working with the ESP32 S3, work through the checks below systematically before replacing any hardware.

Display Not Turning On

Start by verifying every wire in your wiring diagram. VCC must connect to 3.3 V on the ESP32 S3, GND to GND, SDA to the SDA pin, and SCL to the SCL pin. A single loose jumper wire is the most common cause of a blank screen. Also confirm that your module uses the SSD1306 driver — some visually identical modules use the SH1106 chip and require a different library.

Finding Your OLED's I2C Address

Most OLED displays use I2C address 0x3C, but some are configured to 0x3D. The following I2C scanner sketch will detect the address automatically on your ESP32 S3.

// I2C address scanner program #include <Wire.h> void setup() { Wire.begin(); Serial.begin(9600); Serial.println("I2C Scanner"); } void loop() { byte error, address; int nDevices; Serial.println("Scanning..."); nDevices = 0; for (address = 1; address < 127; address++ ) { Wire.beginTransmission(address); error = Wire.endTransmission(); if (error == 0) { Serial.print("I2C device found at address 0x"); if (address < 16) Serial.print("0"); Serial.print(address, HEX); Serial.println(" !"); nDevices++; } else if (error == 4) { Serial.print("Unknown error at address 0x"); if (address < 16) Serial.print("0"); Serial.println(address, HEX); } } if (nDevices == 0) Serial.println("No I2C devices found"); else Serial.println("done"); delay(5000); // wait 5 seconds for next scan }

Upload and open the Serial Monitor — you should see output similar to the following:

Newbiely | Arduino IDE 2.3.8
──
File
Edit
Sketch
Tools
Help
ESP32S3 Dev Module
Newbiely.ino
···
8 Serial.println("Hello World!");
Output
Serial Monitor
Message (Enter to send message to 'ESP32S3 Dev Module' on 'COM15')
New Line
9600 baud
Scanning for I2C devices... I2C device found at address 0x3C Scan complete. 1 device(s) found. Scanning for I2C devices... I2C device found at address 0x3C Scan complete. 1 device(s) found. Scanning for I2C devices... I2C device found at address 0x3C Scan complete. 1 device(s) found.
Ln 11, Col 1
ESP32S3 Dev Module on COM15
2

If your address differs, update your sketch accordingly:

// Change 0x3C to your detected address (e.g., 0x3D) if (!oled.begin(SSD1306_SWITCHCAPVCC, 0x3D)) {

Common Issues and Solutions

"SSD1306 allocation failed" error: The most likely causes are a wrong I2C address, incorrect wiring to the ESP32 S3, or a faulty OLED module. Run the scanner sketch first to confirm the address before swapping hardware.

Random pixels on screen: Add oled.clearDisplay() at the start of your loop function and always follow drawing calls with oled.display() to commit the frame buffer.

Text too small or large: Adjust with oled.setTextSize(2) or higher. The valid range is 1 (smallest, approximately 6×8 px) through 8 (largest).

Display upside down: Physically rotate the OLED module, or call oled.setRotation(2) immediately after initialisation to rotate the frame buffer in software.

Screen not updating: Ensure every drawing sequence ends with a call to oled.display(). Without it the frame buffer is never pushed to the physical screen.

Detailed Instructions

  1. New to ESP32 S3? Complete our Getting Started with ESP32 S3 guide first.
  2. Wire the OLED: Connect the OLED to the ESP32 S3 (VCC→3.3V, GND→GND, SDA→SDA, SCL→SCL).
  3. Install libraries: Open Library Manager in Arduino IDE and install Adafruit SSD1306 and Adafruit GFX.
  4. Connect ESP32 S3: Plug your board into the computer via a USB Type-C cable.
  5. Select board: Choose "ESP32 S3" and the correct COM port in Arduino IDE.
  6. Upload code: Copy one of the example sketches above, paste it into Arduino IDE, and click Upload.
  7. Verify display: The OLED should light up and show your programmed content within a few seconds of upload.
  8. Pro Tip: Always call oled.display() after any drawing operation — without it the OLED screen will not reflect your changes.

Application Ideas

The OLED 128x64 display opens up a wide range of practical and creative uses for the ESP32 S3, from basic sensor readouts to interactive interfaces.

  1. Temperature monitor: Display DHT22 sensor readings on the OLED in real time with the ESP32 S3.
  2. WiFi status display: Show the current connection status and assigned IP address on the OLED screen.
  3. Smart doorbell: Render visitor notifications or a doorbell icon on the OLED 128x64 when the button is pressed.
  4. Weather station: Present temperature, humidity, and a simple forecast icon fetched from an online API.
  5. System monitor: Display ESP32 S3 uptime, free heap memory, and WiFi signal strength on the OLED.
  6. Countdown timer: Build a visual countdown with a large number centred on the OLED display.
  7. Music player interface: Show the current track name and playback progress bar on the 128x64 screen.
  8. Game display: Implement simple games such as Snake or Pong using the OLED's drawing primitives.

Video

Watch the step-by-step video walkthrough for this ESP32 S3 project below.

Challenge Yourself

Once you have the basics working there are plenty of ways to deepen your understanding of the OLED display and the ESP32 S3.

  1. Beginner: Display live temperature readings from a DHT11 sensor on the OLED, updating every second.
  2. Beginner: Create scrolling text that marquees a long message across the OLED screen using the hardware scroll engine.
  3. Intermediate: Build an animated bouncing ball that moves around the OLED display and bounces off all four edges.
  4. Intermediate: Design a multi-page menu system where button presses navigate between different OLED screens.
  5. Advanced: Plot a real-time graph of sensor data that scrolls across the full 128×64 pixel width.
  6. Advanced: Generate and display QR codes on the OLED using a QR-code library running on the ESP32 S3.

Language References

※ OUR MESSAGES

  • As freelancers, We are AVAILABLE for HIRE. See how to outsource your project to us
  • Please feel free to share the link of this tutorial. However, Please do not use our content on any other websites. We invested a lot of effort and time to create the content, please respect our work!