ESP32 S3 - Button - Debounce

Mechanical buttons are deceptively simple components, but they come with a quirk that can trip up your ESP32 S3 projects: chattering. This tutorial walks you through what chattering is, why it matters, and how to eliminate it using both raw Arduino code and the ezButton library.

What you'll build:

  1. A test sketch that demonstrates button chattering without debounce
  2. A debounced button sketch using manual timing with millis()
  3. A single-button debounce example using the ezButton library
  4. A multi-button debounce example handling three buttons simultaneously
ESP32 S3 - Button - Debounce

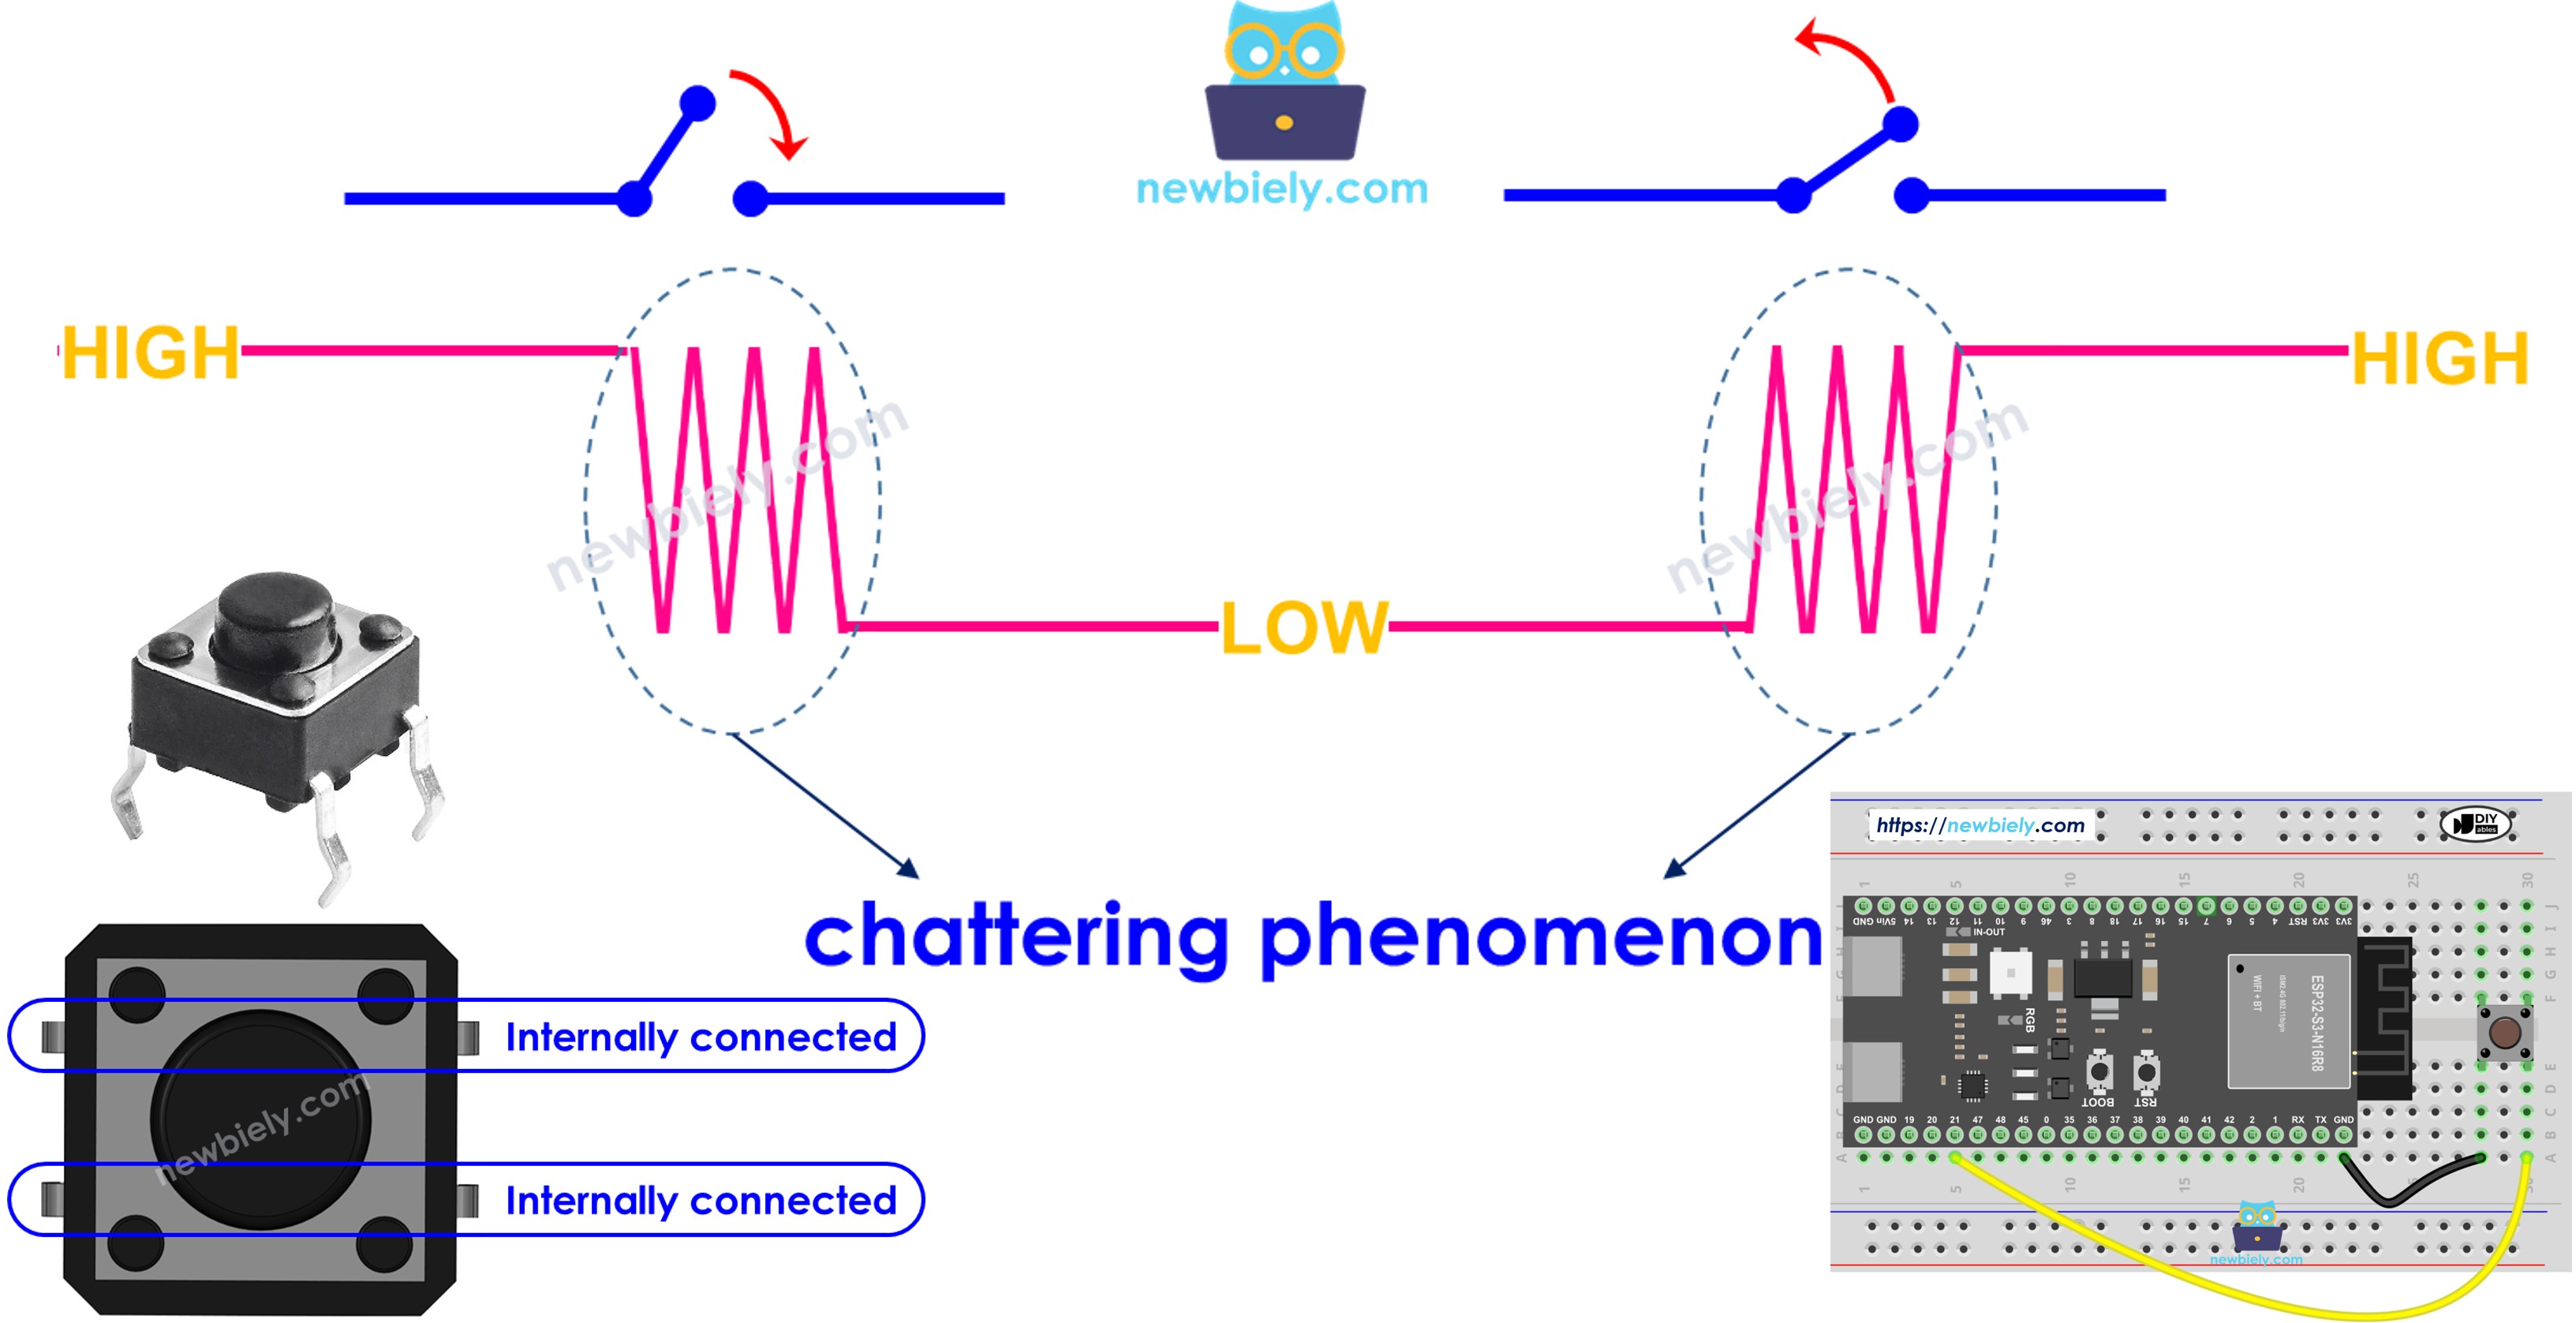
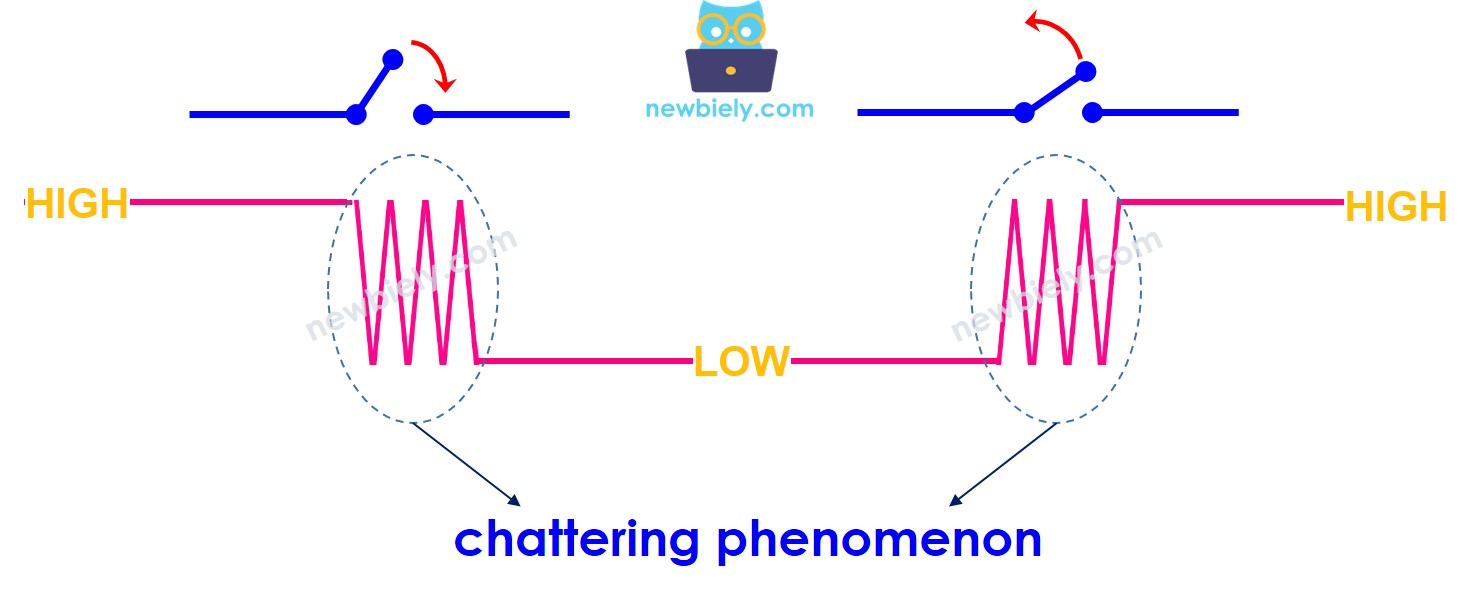
When you press a button, does its state change from LOW to HIGH (or HIGH to LOW) just once? Not quite! In the real world, a single button press causes the state to toggle between LOW and HIGH multiple times very quickly. This is a physical characteristic of mechanical buttons called chattering. The chattering phenomenon makes your ESP32 S3 read multiple button presses when you only pressed it once, causing errors in your projects. The solution to eliminate this issue is called button debounce.
ESP32 S3 chattering phenomenon

This tutorial covers:

Hardware Preparation

1×ESP32 S3 WROOM N16R8
1×USB Cable Type-A to Type-C (for USB-A PC)
1×USB Cable Type-C to Type-C (for USB-C PC)
1×Breadboard-mount Button with Cap
1×Breadboard-mount Button Kit
1×Panel-mount Push Button
1×Push Button Module
1×Breadboard
1×Jumper Wires
1×Optionally, DC Power Jack

Or you can buy the following kits:

1×DIYables Sensor Kit (18 sensors/displays)
Disclosure: Some of the links provided in this section are Amazon affiliate links. We may receive a commission for any purchases made through these links at no additional cost to you.
Additionally, some of these links are for products from our own brand, DIYables .

Overview of Button

Buttons are fundamental input devices that detect when they are pressed or released. Understanding how they behave electrically — including their tendency to chatter — is essential for building reliable ESP32 S3 projects.

We have a dedicated tutorial covering everything about buttons with ESP32 S3:

Key Specifications

The dedicated button tutorial includes complete pinout details, how buttons work electrically, step-by-step wiring connections, sample code examples, and troubleshooting tips for common issues.

Learn more: ESP32 S3 - Button tutorial

Wiring Diagram

Connect a single button to your ESP32 S3 by wiring one pin to GPIO7 and the other pin to GND. The ESP32 S3's internal pull-up resistor handles the rest, so no external resistor is required.
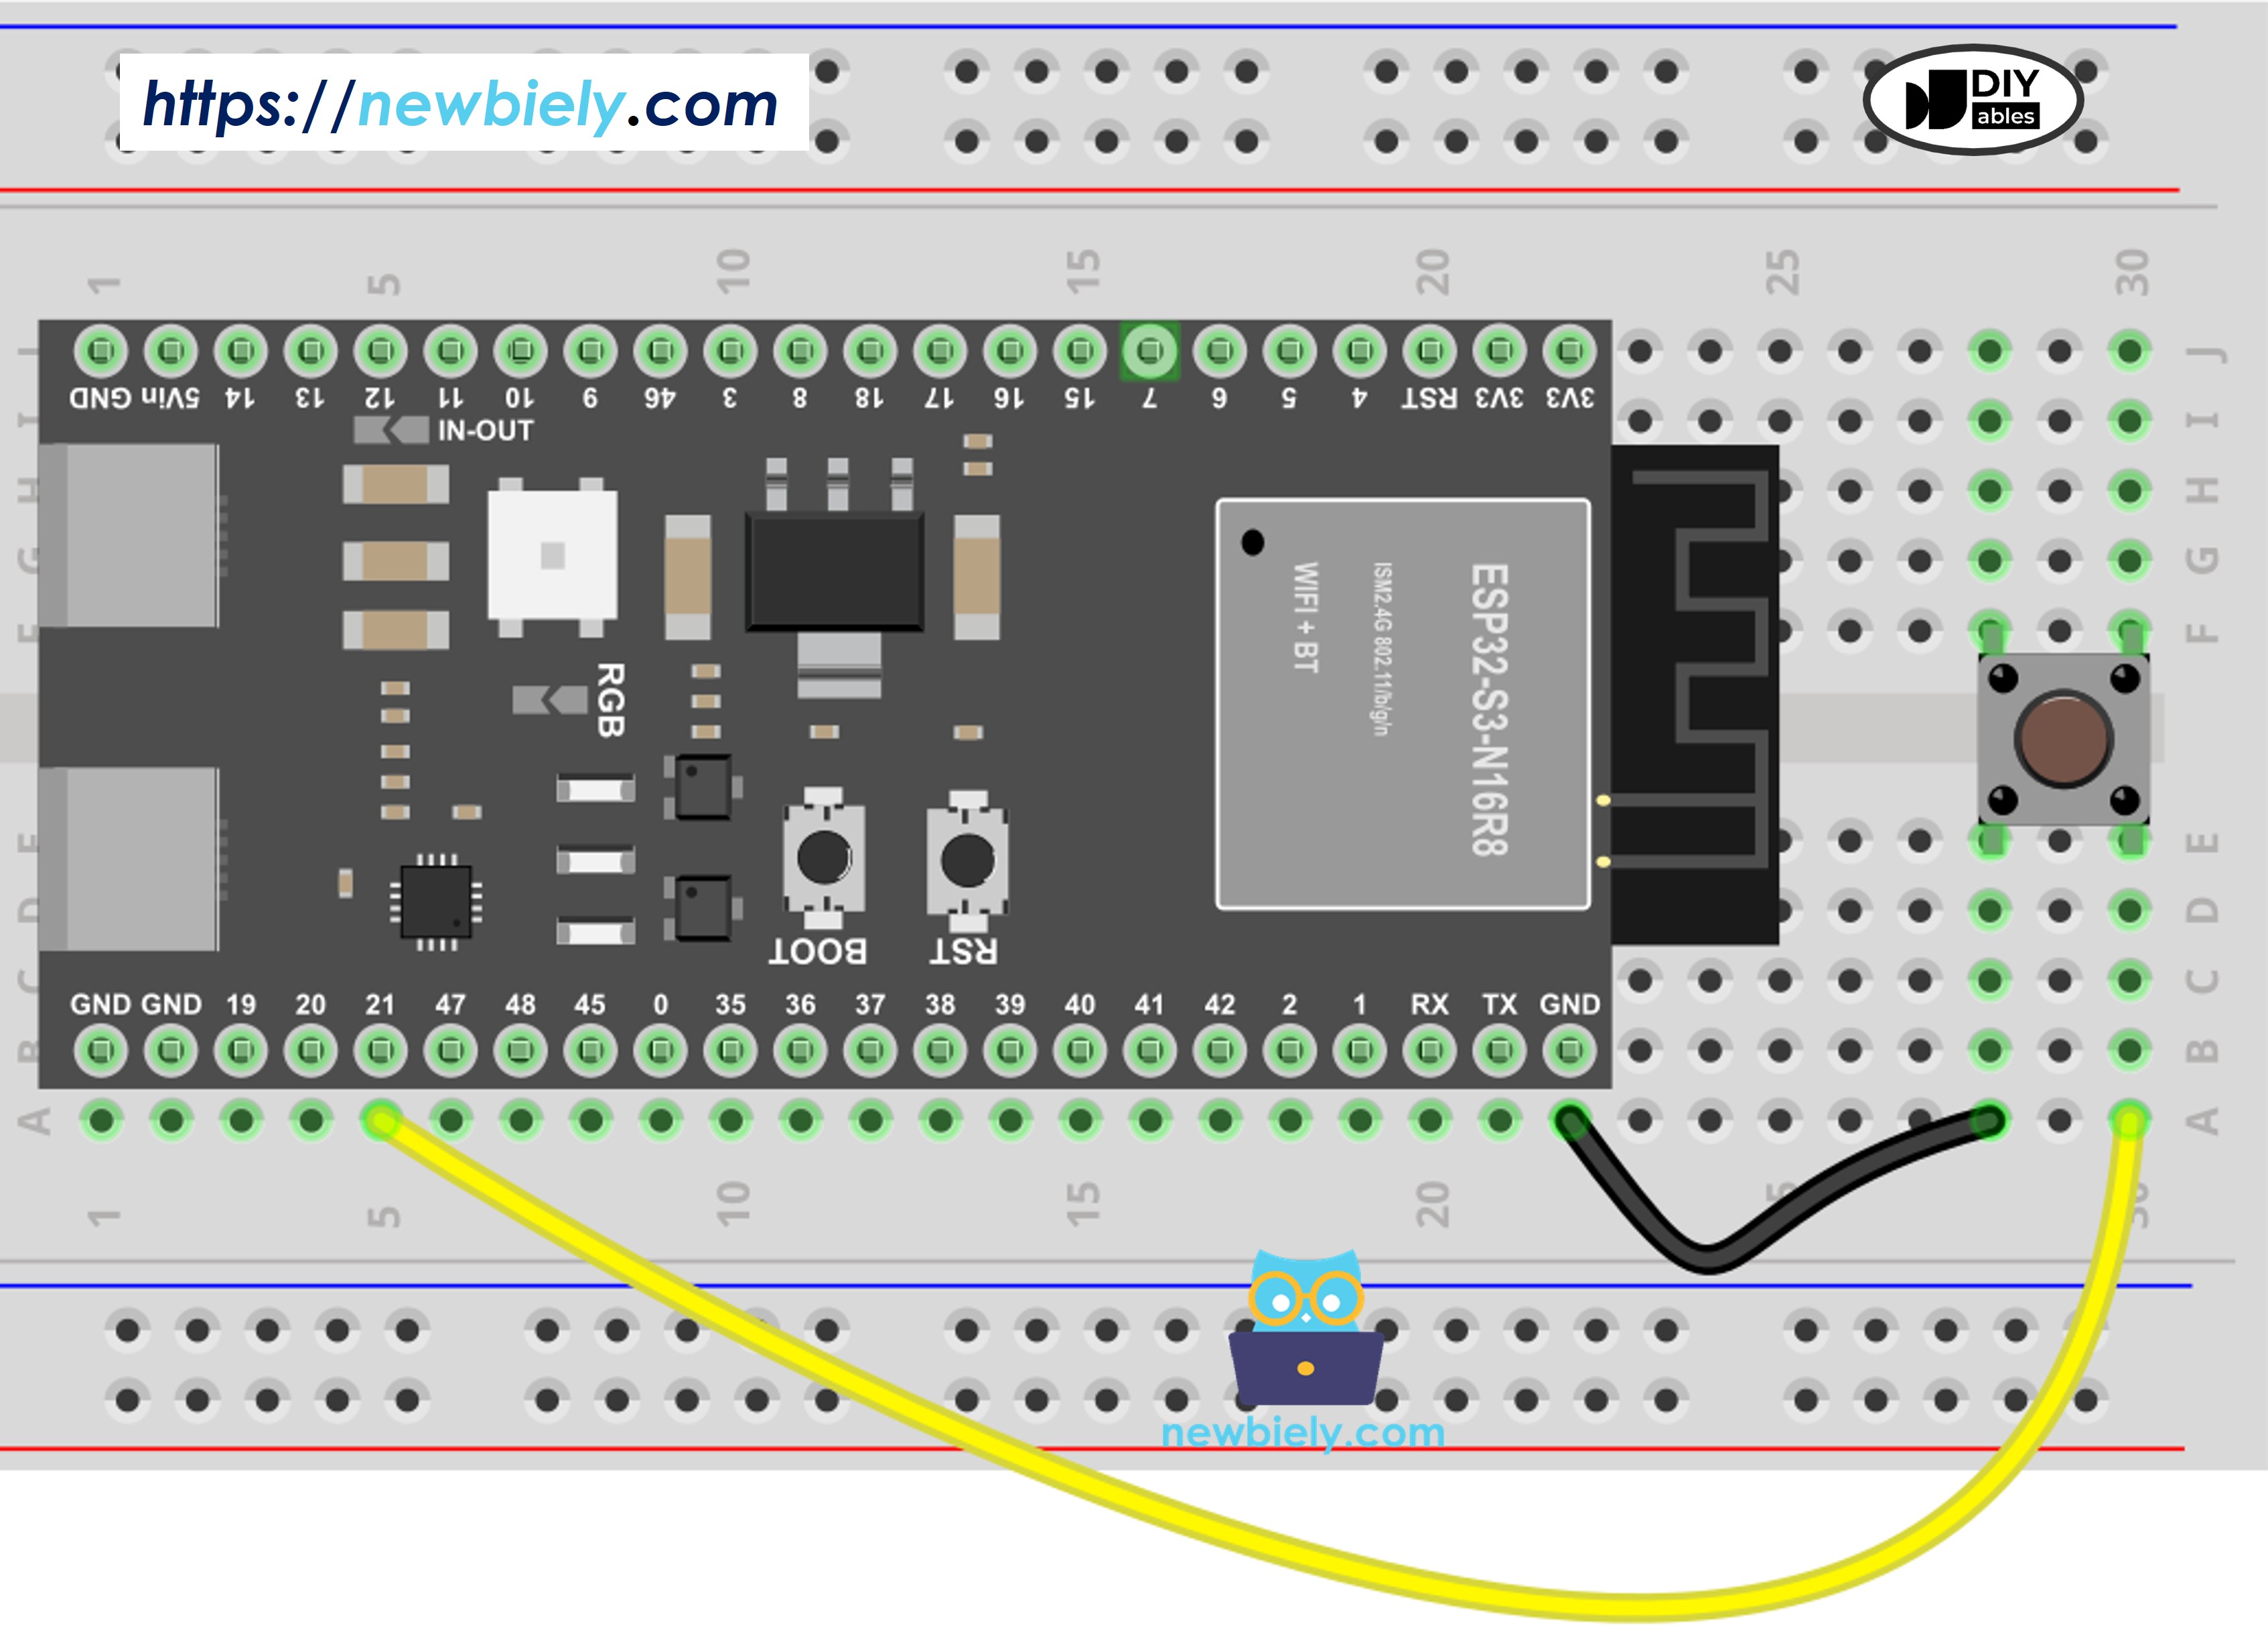
The wiring diagram between ESP32 S3 Button

This image is created using Fritzing. Click to enlarge image

Safety Notes

Always connect the button between a GPIO pin and GND rather than directly to 3.3V, since the code relies on the internal pull-up configuration. Avoid connecting buttons to GPIO0 during development, as it is used by the bootloader on the ESP32 S3.

Button Pin ESP32 S3 Pin
One pin GPIO7
Other pin GND

To see the difference clearly, we'll run ESP32 S3 code WITHOUT debounce first, then WITH debounce, and compare the results.

Reading Button without Debounce

Detailed Instructions

  1. New to ESP32 S3? Complete our Getting Started with ESP32 S3 guide first.
  2. Wire the components: Follow the wiring diagram shown above to connect the button to pin GPIO7.
  3. Connect the board: Plug your ESP32 S3 into your computer using a USB Type-C cable.
  4. Open Arduino IDE: Launch the Arduino IDE on your computer.
  5. Select your board: Choose "ESP32S3 Dev Module" and the correct COM port from the Tools menu.
  6. Upload the code: Copy the code below and upload it to your ESP32 S3 board.
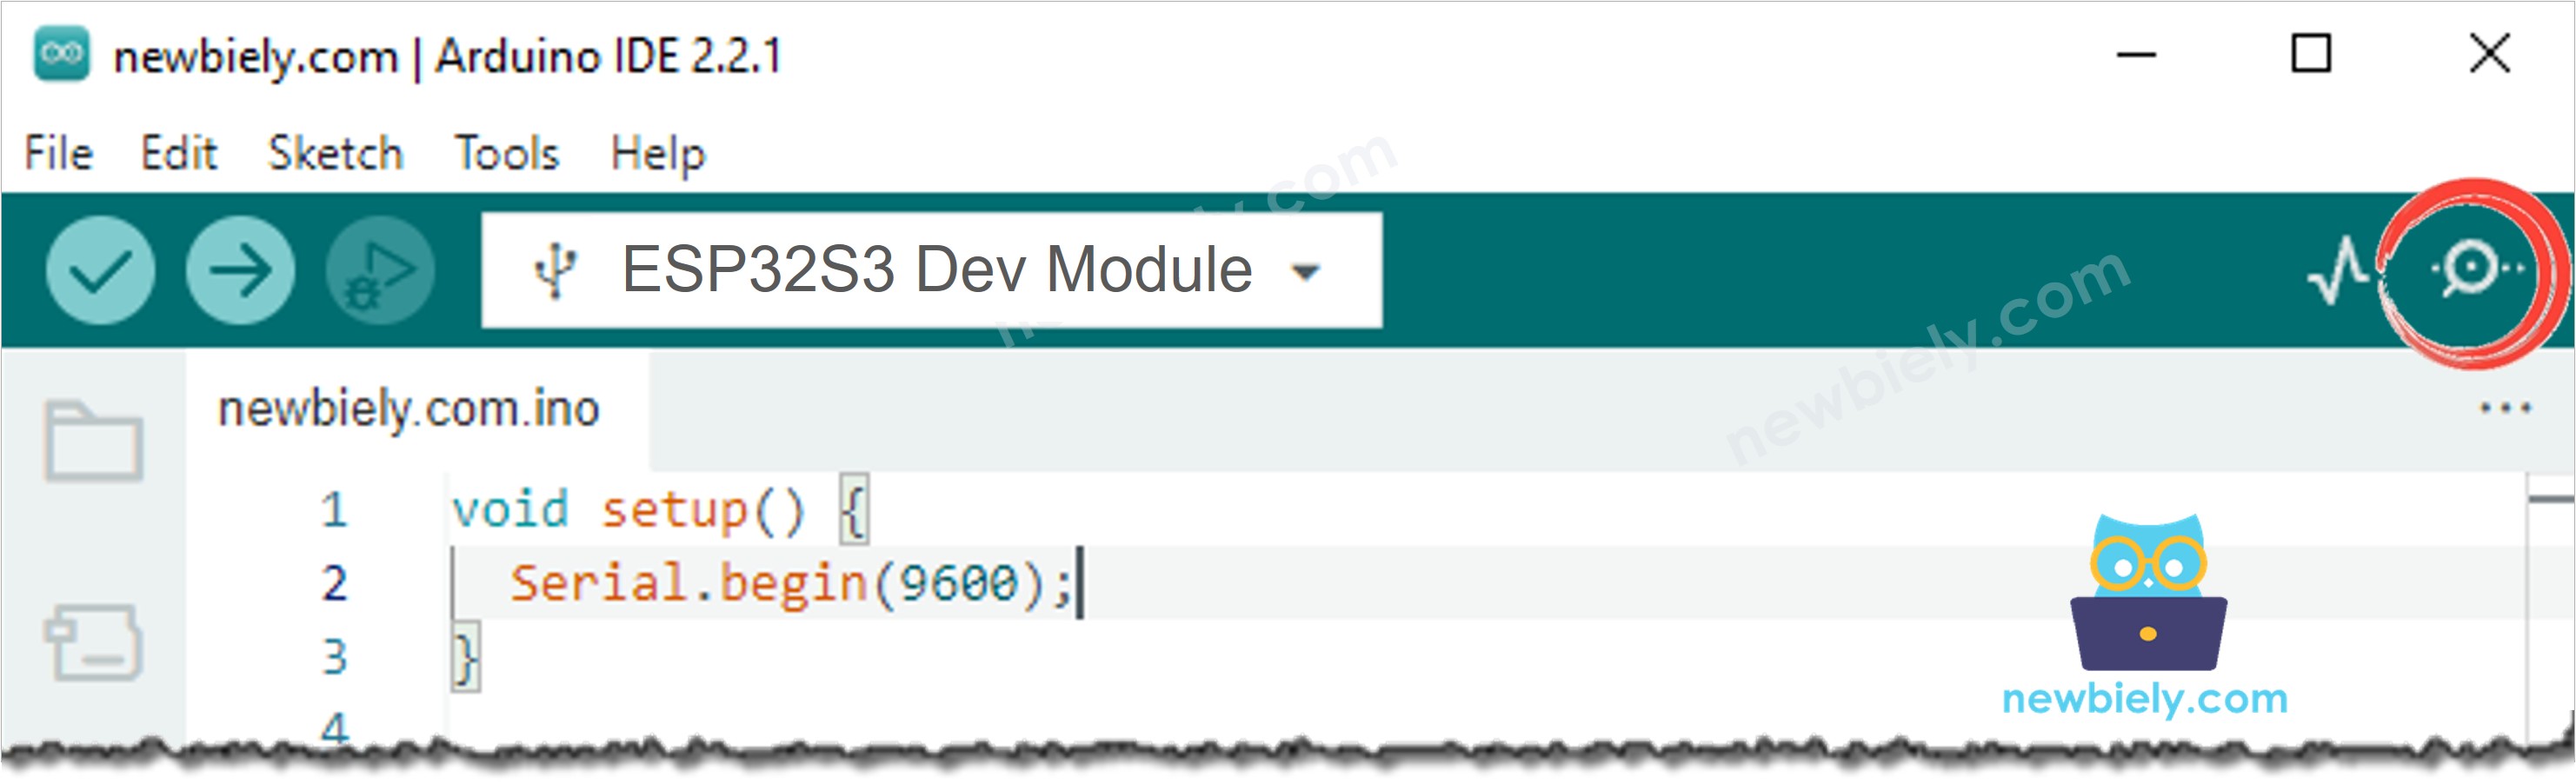
  7. Open Serial Monitor: Click the Serial Monitor icon to view the output.
  8. Test the button: Press the button once and hold it for several seconds, then release it.
  9. Observe the results: Watch the Serial Monitor output showing multiple press/release events.
  10. Pro Tip: If you don't see chattering immediately, try pressing the button several times — it's a random phenomenon that appears intermittently.

/* * This ESP32 S3 code was developed by newbiely.com * * This ESP32 S3 code is made available for public use without any restriction * * For comprehensive instructions and wiring diagrams, please visit: * https://newbiely.com/tutorials/esp32-s3/esp32-s3-button-debounce */ #define BUTTON_PIN 21 // The ESP32 S3 pin GPIO21 pin connected to button int prev_state = LOW; // The previous state from the input pin int button_state; // The current reading from the input pin void setup() { // Initialize the Serial to communicate with the Serial Monitor. Serial.begin(115200); // initialize the button pin as an pull-up input (HIGH when the switch is open and LOW when the switch is closed) pinMode(BUTTON_PIN, INPUT_PULLUP); } void loop() { // read the state of the switch/button: button_state = digitalRead(BUTTON_PIN); if (prev_state == HIGH && button_state == LOW) Serial.println("The button is pressed"); else if (prev_state == LOW && button_state == HIGH) Serial.println("The button is released"); // save the the last state prev_state = button_state; }
Arduino IDE Upload Code
How to open serial monitor on Arduino IDE

Serial Monitor Output:

Newbiely | Arduino IDE 2.3.8
──
File
Edit
Sketch
Tools
Help
ESP32S3 Dev Module
Newbiely.ino
···
8 Serial.println("Hello World!");
Output
Serial Monitor
Message (Enter to send message to 'ESP32S3 Dev Module' on 'COM15')
New Line
9600 baud
[2026-06-16 10:23:41] The button is pressed [2026-06-16 10:23:41] The button is pressed [2026-06-16 10:23:41] The button is pressed [2026-06-16 10:23:41] The button is pressed [2026-06-16 10:23:44] The button is released [2026-06-16 10:23:44] The button is released [2026-06-16 10:23:44] The button is released
Ln 11, Col 1
ESP32S3 Dev Module on COM15
2

⇒ As you can see, you pressed the button only once and released it once, but the ESP32 S3 detected multiple presses and releases due to chattering.

※ NOTE THAT:

The chattering phenomenon does not happen all the time. If it does not happen, please try the above test several times to observe it.

Reading Button with Debounce

This sketch eliminates chattering by implementing button debounce on your ESP32 S3. It records the timestamp when the button state first changes, then waits for a short configurable delay before confirming the new state — discarding any rapid oscillations that occur during that window. The result is that only stable, intentional button presses and releases are reported to your application.

Detailed Instructions

  1. New to ESP32 S3? Complete our Getting Started with ESP32 S3 guide first.
  2. Copy the code: Copy the debounce code below into Arduino IDE.
  3. Upload the code: Click the Upload button to program your ESP32 S3.
  4. Open Serial Monitor: Click the Serial Monitor icon to view the output.
  5. Test the button: Press the button and hold it for several seconds, then release it.
  6. Observe the results: Notice that you now see only one press and one release event.
  7. Pro Tip: If you still see chattering, try increasing the DEBOUNCE_TIME value from 50 to 100 milliseconds.
/* * This ESP32 S3 code was developed by newbiely.com * * This ESP32 S3 code is made available for public use without any restriction * * For comprehensive instructions and wiring diagrams, please visit: * https://newbiely.com/tutorials/esp32-s3/esp32-s3-button-debounce */ #define BUTTON_PIN 21 // The ESP32 S3 pin GPIO21 pin connected to button #define DEBOUNCE_TIME 50 // The debounce time in millisecond, increase this time if it still chatters int prev_state_steady = LOW; // The previous steady state from the input pin int prev_state_flick = LOW; // The previous flickerable state from the input pin int button_state; // The current reading from the input pin unsigned long last_debounce_time = 0; // The last time the output pin was toggled void setup() { // Initialize the Serial to communicate with the Serial Monitor. Serial.begin(115200); // initialize the button pin as an pull-up input (HIGH when the switch is open and LOW when the switch is closed) pinMode(BUTTON_PIN, INPUT_PULLUP); } void loop() { // read the state of the switch/button: button_state = digitalRead(BUTTON_PIN); // check to see if you just pressed the button // (i.e. the input went from LOW to HIGH), and you've waited long enough // since the last press to ignore any noise: // If the switch/button changed, due to noise or pressing: if (button_state != prev_state_flick) { // reset the debouncing timer last_debounce_time = millis(); // save the the last flickerable state prev_state_flick = button_state; } if ((millis() - last_debounce_time) > DEBOUNCE_TIME) { // whatever the reading is at, it's been there for longer than the debounce // delay, so take it as the actual current state: // if the button state has changed: if(prev_state_steady == HIGH && button_state == LOW) Serial.println("The button is pressed"); else if(prev_state_steady == LOW && button_state == HIGH) Serial.println("The button is released"); // save the the last steady state prev_state_steady = button_state; } }

Serial Monitor Output:

Newbiely | Arduino IDE 2.3.8
──
File
Edit
Sketch
Tools
Help
ESP32S3 Dev Module
Newbiely.ino
···
8 Serial.println("Hello World!");
Output
Serial Monitor
Message (Enter to send message to 'ESP32S3 Dev Module' on 'COM15')
New Line
9600 baud
[2026-06-16 10:25:10] The button is pressed [2026-06-16 10:25:13] The button is released
Ln 11, Col 1
ESP32S3 Dev Module on COM15
2

⇒ Perfect! You pressed once and released once, and the ESP32 S3 correctly read one press and one release. The chattering has been eliminated with proper button debounce.

We Made It Simple - ESP32 S3 Button Debounce Code with Library

We created the ezButton library to make button debouncing much easier, especially when working with multiple buttons on your ESP32 S3. Instead of managing timing variables manually, the library handles all debounce logic internally, giving you clean and readable code regardless of how many buttons you are managing.

Learn more: ezButton library documentation

ESP32 S3 Button Debounce Code for A Single Button

The following sketch shows how to debounce a single button using the ezButton library on ESP32 S3. After including the library and setting the debounce time, detecting a press or release is as simple as calling isPressed() or isReleased() inside the main loop.

/* * This ESP32 S3 code was developed by newbiely.com * * This ESP32 S3 code is made available for public use without any restriction * * For comprehensive instructions and wiring diagrams, please visit: * https://newbiely.com/tutorials/esp32-s3/esp32-s3-button-debounce */ #include <ezButton.h> #define DEBOUNCE_TIME 50 // the debounce time in millisecond, increase this time if it still chatters ezButton button(D7); // create ezButton object for pin GPIO7 void setup() { Serial.begin(115200); button.setDebounceTime(DEBOUNCE_TIME); // set debounce time to 50 milliseconds } void loop() { button.loop(); // MUST call the loop() function first if (button.isPressed()) Serial.println("The button is pressed"); if (button.isReleased()) Serial.println("The button is released"); }

ESP32 S3 Button Debounce Code for Multiple Buttons

This sketch demonstrates how to debounce three buttons simultaneously on your ESP32 S3 using the ezButton library. Each button gets its own ezButton object, and calling .loop() on all three inside the main loop keeps every button's debounce state up to date independently.

The wiring diagram

Connect three buttons to your ESP32 S3 as shown below.
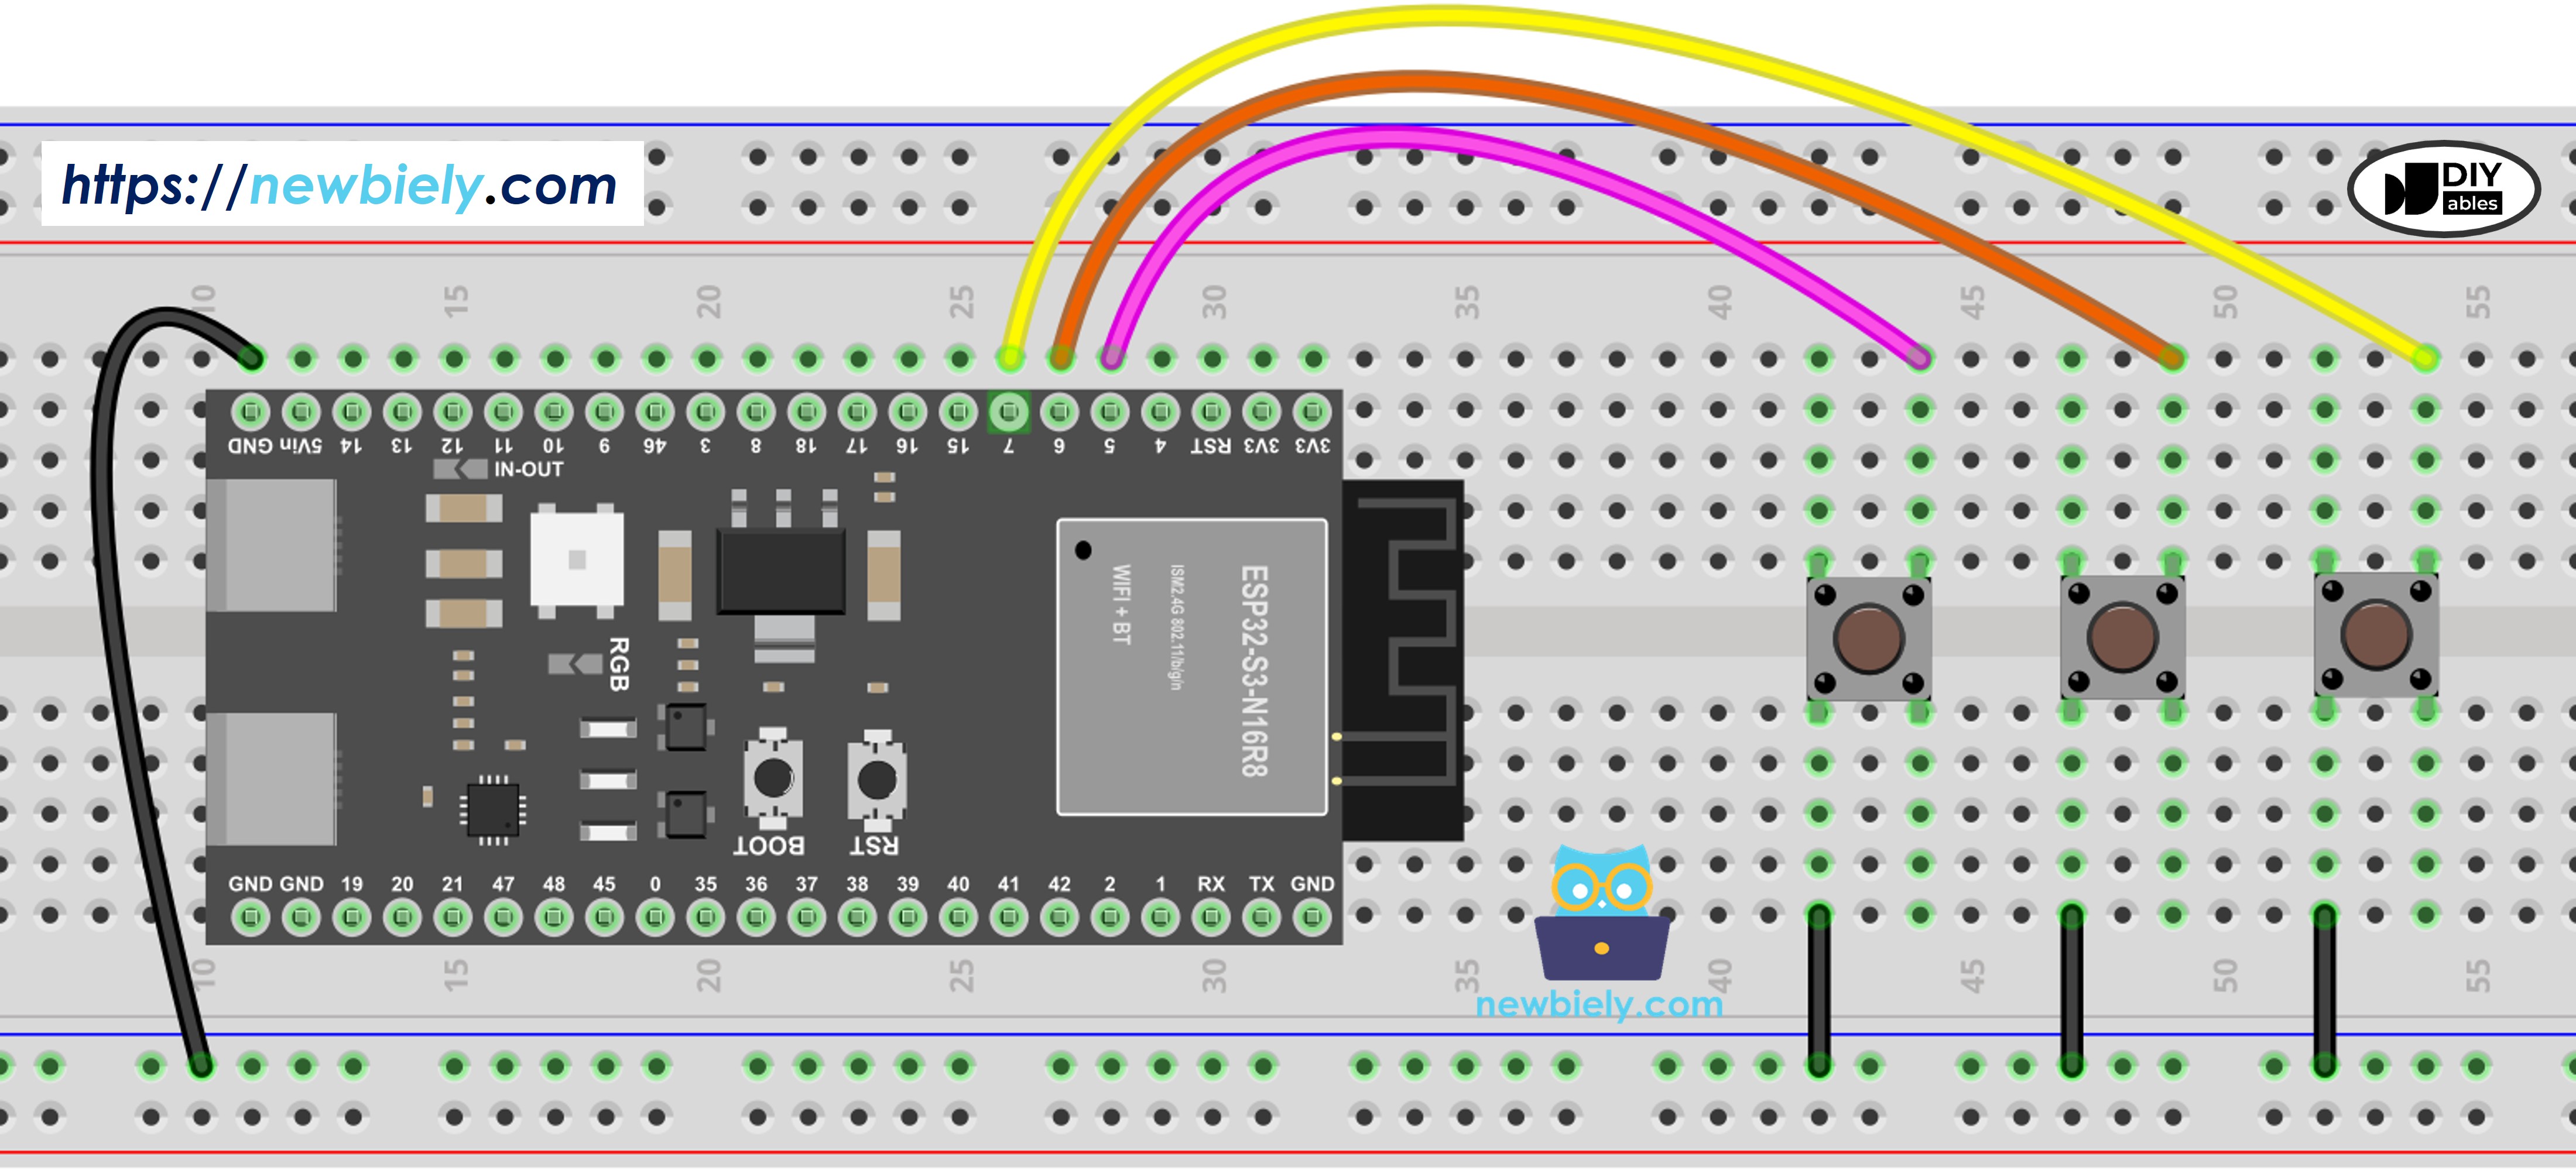
The wiring diagram between ESP32 S3 Button Library

This image is created using Fritzing. Click to enlarge image

Button ESP32 S3 Pin
Button 1 D5 and GND
Button 2 D6 and GND
Button 3 D7 and GND
/* * This ESP32 S3 code was developed by newbiely.com * * This ESP32 S3 code is made available for public use without any restriction * * For comprehensive instructions and wiring diagrams, please visit: * https://newbiely.com/tutorials/esp32-s3/esp32-s3-button-debounce */ #include <ezButton.h> #define DEBOUNCE_TIME 50 // the debounce time in millisecond, increase this time if it still chatters ezButton button1(D5); // create ezButton object for pin D5 ezButton button2(D6); // create ezButton object for pin D6 ezButton button3(D7); // create ezButton object for pin D7 void setup() { Serial.begin(115200); button1.setDebounceTime(DEBOUNCE_TIME); // set debounce time to 50 milliseconds button2.setDebounceTime(DEBOUNCE_TIME); // set debounce time to 50 milliseconds button3.setDebounceTime(DEBOUNCE_TIME); // set debounce time to 50 milliseconds } void loop() { button1.loop(); // MUST call the loop() function first button2.loop(); // MUST call the loop() function first button3.loop(); // MUST call the loop() function first if (button1.isPressed()) Serial.println("The button 1 is pressed"); if (button1.isReleased()) Serial.println("The button 1 is released"); if (button2.isPressed()) Serial.println("The button 2 is pressed"); if (button2.isReleased()) Serial.println("The button 2 is released"); if (button3.isPressed()) Serial.println("The button 3 is pressed"); if (button3.isReleased()) Serial.println("The button 3 is released"); }

Serial Monitor Output:

Newbiely | Arduino IDE 2.3.8
──
File
Edit
Sketch
Tools
Help
ESP32S3 Dev Module
Newbiely.ino
···
8 Serial.println("Hello World!");
Output
Serial Monitor
Message (Enter to send message to 'ESP32S3 Dev Module' on 'COM15')
New Line
9600 baud
[2026-06-16 10:27:05] The button 1 is pressed [2026-06-16 10:27:06] The button 2 is pressed [2026-06-16 10:27:07] The button 1 is released [2026-06-16 10:27:08] The button 3 is pressed [2026-06-16 10:27:09] The button 2 is released [2026-06-16 10:27:10] The button 3 is released
Ln 11, Col 1
ESP32S3 Dev Module on COM15
2

Application Ideas

Button debounce is a foundational technique that unlocks reliable input handling across a wide range of ESP32 S3 projects. Here are some practical applications where accurate button press detection is essential:

  1. Door lock systems: Keypad entry systems where each button press must register exactly once.
  2. Game controllers: Responsive button input for DIY gaming peripherals built on the ESP32 S3.
  3. Home automation remotes: Reliable control of lights, fans, or appliances from custom remote panels.
  4. Menu navigation: Multi-button navigation for OLED or TFT display menus on ESP32 S3 devices.
  5. Event counters: Counting circuits that increment precisely once per physical press.
  6. Security keypads: Alarm or access control systems requiring dependable input detection.

Video Tutorial

Watch the step-by-step video walkthrough for this ESP32 S3 project below.

Challenge Yourself

Practicing debounce with progressively complex scenarios is the best way to build confidence with ESP32 S3 input handling. Try these challenges to deepen your understanding:

  1. Beginner: Change the DEBOUNCE_TIME value to 20ms, 50ms, and 100ms and observe how each value affects button response on your ESP32 S3.
  2. Intermediate: Add an LED that toggles on and off with each debounced button press, demonstrating clean state management.
  3. Intermediate: Build a press counter that increments only once per button press and displays the running total on the Serial Monitor.
  4. Advanced: Implement a 4-button menu system where each debounced button performs a distinct action on the ESP32 S3.
  5. Advanced: Add long-press detection so a short press and a hold trigger different behaviors using a single button.

Additional Knowledge

Important debounce tips for ESP32 S3:

  • The DEBOUNCE_TIME value depends on your specific button hardware
  • Different buttons may require different debounce times (typically 20-100ms)
  • Start with 50ms and adjust if you still see chattering
  • Debounce techniques also work for switches, limit switches, reed switches, and touch sensors
  • Hardware debounce (using capacitors) can complement software debounce for critical applications

※ OUR MESSAGES

  • As freelancers, We are AVAILABLE for HIRE. See how to outsource your project to us
  • Please feel free to share the link of this tutorial. However, Please do not use our content on any other websites. We invested a lot of effort and time to create the content, please respect our work!