
ESP32 S3 - Button LED

This tutorial shows you how to use the ESP32 S3 with a button to control an LED. You will learn two practical control methods — synchronizing the LED directly to button state and toggling it with each press — both implemented with clear, well-commented code.

What you'll build:

  1. An ESP32 S3 circuit with a button and LED wired to the board
  2. Application 1: LED turns ON while button is held and OFF when released
  3. Application 2: LED toggles state on each button press (without debouncing, then with)
  4. A reliable, debounce-free toggle using the ezButton library
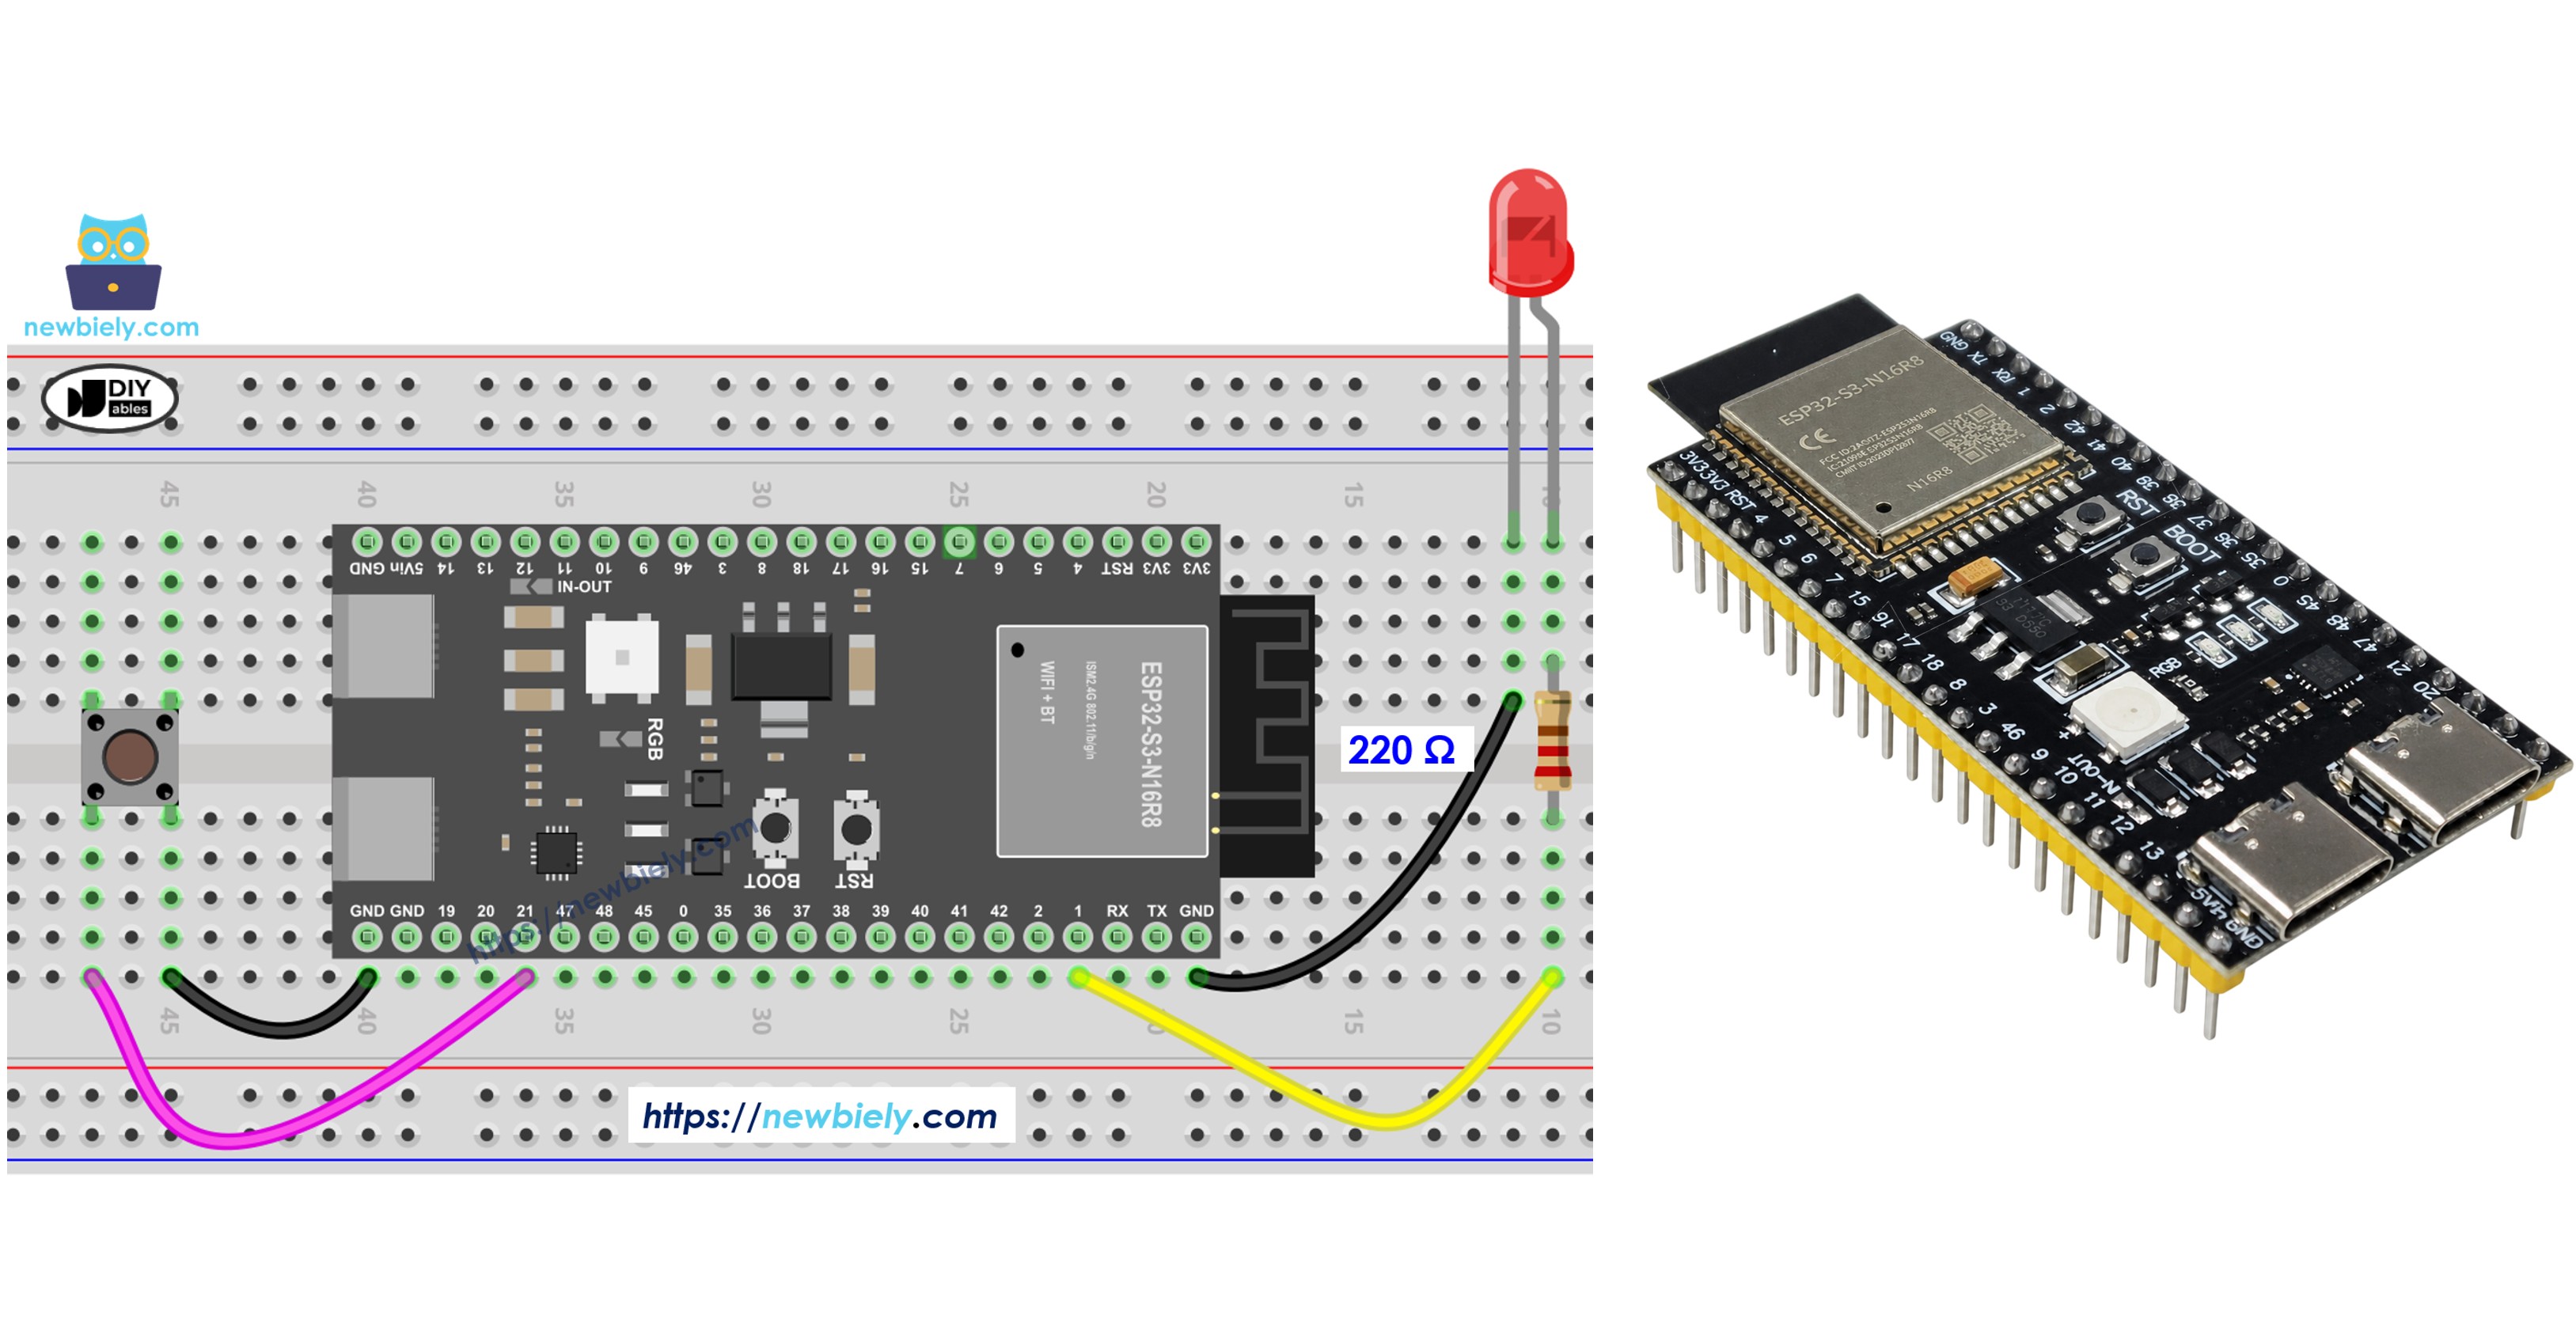
ESP32 S3 - Button LED

We'll cover two distinct use cases for ESP32 S3 button LED control:

Use-Case 1 - Synchronized LED and button states:

Use-Case 2 - Toggle LED state with button presses:

In Use-Case 2, button debouncing is critical. We'll demonstrate the difference between ESP32 S3 code with and without debouncing so you can see why it matters.

Hardware Preparation

1×ESP32 S3 WROOM N16R8
1×USB Cable Type-A to Type-C (for USB-A PC)
1×USB Cable Type-C to Type-C (for USB-C PC)
1×Breadboard-mount Button with Cap
1×Breadboard-mount Button Kit
1×Panel-mount Push Button
1×Push Button Module
1×LED Kit
1×LED (red)
1×LED Module
1×Alternatively, Button and LED Kit
1×220Ω Resistor
1×Breadboard
1×Jumper Wires
1×Optionally, 5V Power Adapter for ESP32 S3

Or you can buy the following kits:

1×DIYables Sensor Kit (18 sensors/displays)
Disclosure: Some of the links provided in this section are Amazon affiliate links. We may receive a commission for any purchases made through these links at no additional cost to you.
Additionally, some of these links are for products from our own brand, DIYables .

Buy Note: Use the LED Module for easier wiring. It includes an integrated resistor.

Overview of LED and Button

LEDs and buttons are two of the most essential building blocks for interactive ESP32 S3 projects. A button provides digital input that the microcontroller reads, while an LED gives instant visual feedback based on the program's logic. Combining them on the ESP32 S3 teaches you the core input/output workflow used in virtually every embedded project.

Key Specifications

For complete background on each component, refer to these dedicated tutorials:

A few important points to keep in mind. LEDs require a current-limiting resistor (220 ohm recommended) to prevent damage. Buttons can rely on the ESP32 S3's built-in internal pull-up resistors, removing the need for external components. The ESP32 S3 handles both digital input (button) and digital output (LED) simultaneously, making it straightforward to build interactive circuits even as a beginner.

Wiring Diagram

Connect the button and LED to your ESP32 S3 by following the diagram below. Double-check each connection before powering the board to avoid accidental short circuits.
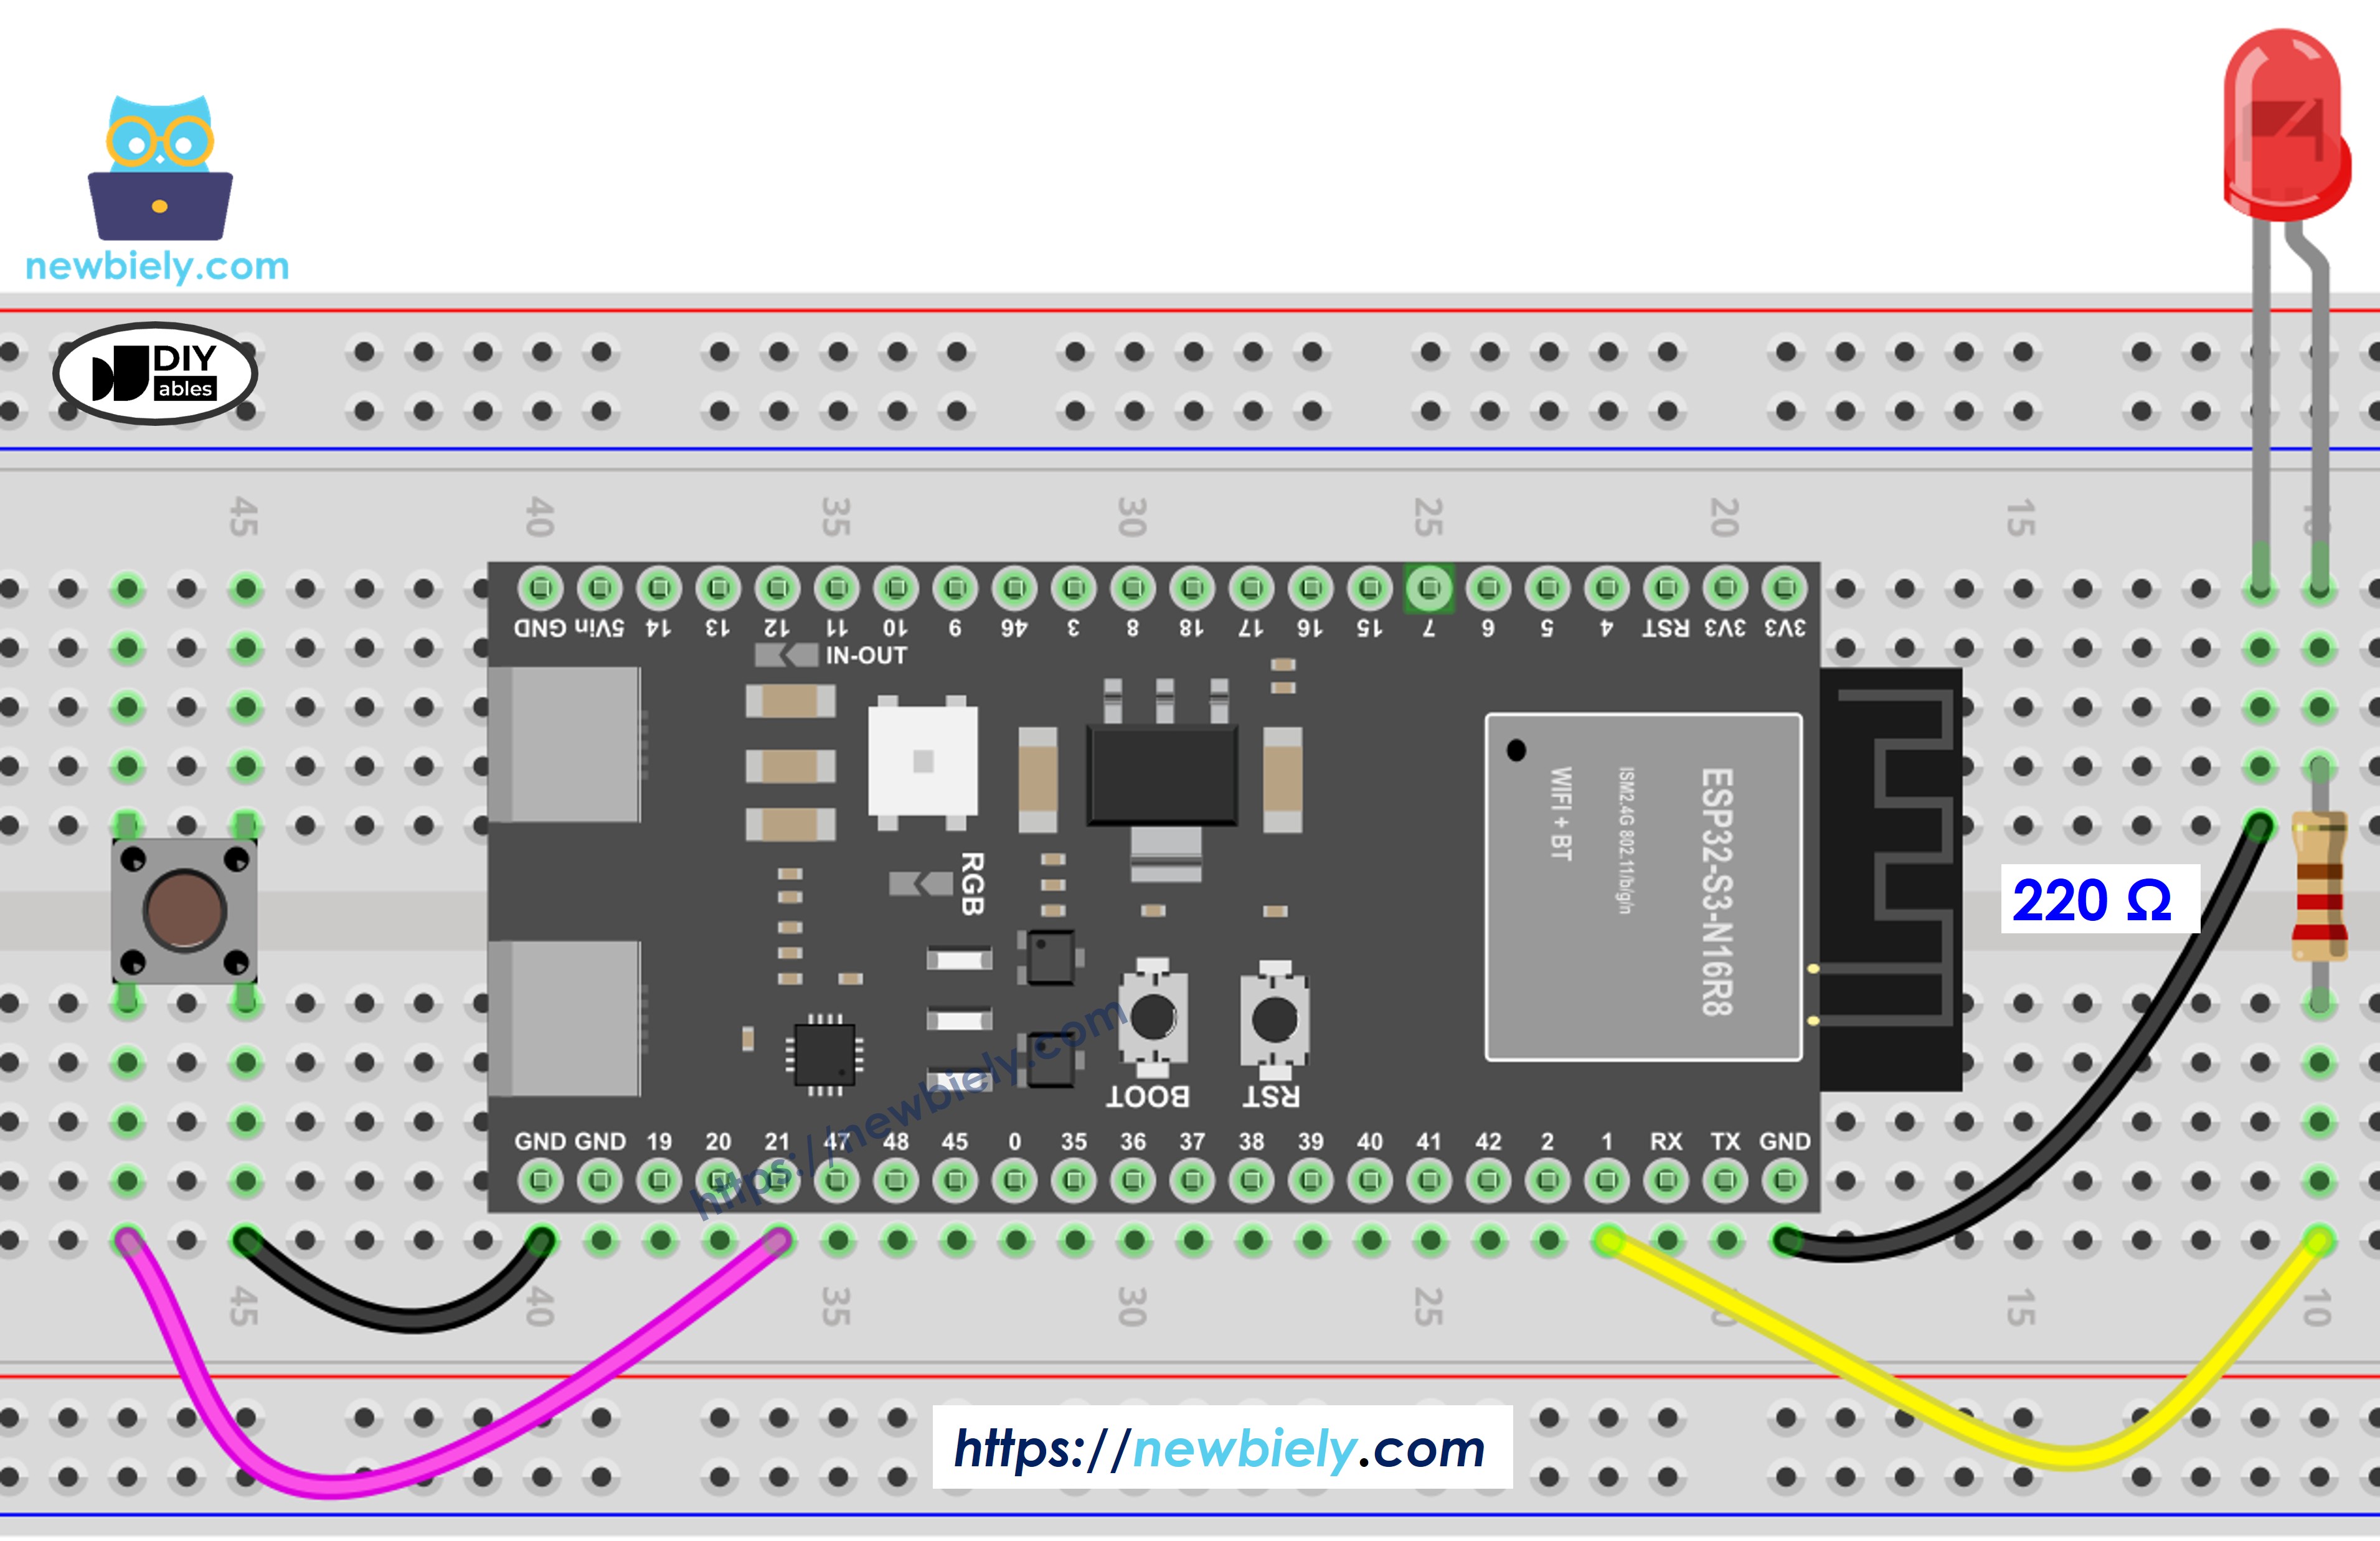
The wiring diagram between ESP32 S3 Button LED

This image is created using Fritzing. Click to enlarge image

Safety Notes

Always connect the LED through the 220 ohm resistor to limit current and protect both the LED and the ESP32 S3 GPIO pin. The button is wired to GND on one terminal and to the GPIO pin on the other; the sketch enables the internal pull-up resistor so no external resistor is needed for the button.

Component Pin ESP32 S3 Pin
Button One terminal GPIO21
Button Other terminal GND
LED Anode (long leg) GPIO1
LED Cathode (short leg) 220Ω resistor to GND

Application 1 - The LED state is in sync with the button state

This ESP32 S3 application demonstrates the simplest form of button-to-LED control: the LED mirrors the button state in real time. When you press and hold the button, the LED lights up immediately; when you release, it turns off. This sketch reads the GPIO pin connected to the button on every loop iteration and writes the inverted state directly to the LED pin, creating a tight, responsive feedback loop with no additional logic required.

ESP32 S3 Code

/* * This ESP32 S3 code was developed by newbiely.com * * This ESP32 S3 code is made available for public use without any restriction * * For comprehensive instructions and wiring diagrams, please visit: * https://newbiely.com/tutorials/esp32-s3/esp32-s3-button-led */ /* * This ESP32-S3 code is created by esp32io.com * * This ESP32-S3 code is released in the public domain * * For more detail (instruction and wiring diagram), visit https://esp32io.com/tutorials/esp32-s3-button-led */ #define BUTTON_PIN 21 // ESP32-S3 pin GPIO21, which connected to button #define LED_PIN 1 // ESP32-S3 pin GPIO1, which connected to led // variables will change: int button_state = 0; // variable for reading the button status void setup() { // initialize the LED pin as an output: pinMode(LED_PIN, OUTPUT); // initialize the button pin as an pull-up input: // the pull-up input pin will be HIGH when the button is open and LOW when the button is pressed. pinMode(BUTTON_PIN, INPUT_PULLUP); } void loop() { // read the state of the button value: button_state = digitalRead(BUTTON_PIN); // control LED according to the state of button if (button_state == LOW) // if button is pressed digitalWrite(LED_PIN, HIGH); // turn on LED else // otherwise, button is not pressing digitalWrite(LED_PIN, LOW); // turn off LED }

Detailed Instructions

  1. New to ESP32 S3? Complete our Getting Started with ESP32 S3 guide first.
  2. Wire the components: Follow the wiring diagram shown above.
  3. Connect ESP32 S3: Use a USB Type-C cable to connect to your computer.
  4. Setup Arduino IDE: If this is the first time you use ESP32 S3, see how to setup environment for ESP32 S3 on Arduino IDE.
  5. Select your board: Choose the ESP32 S3 board and its COM port in Arduino IDE.
  6. Upload the code: Copy the code above and upload it to your ESP32 S3.

Arduino IDE Upload Code
  1. Test the button: Press and hold the button for a few seconds.
  2. Observe the LED: Watch the LED turn ON and OFF with button presses.
  3. Pro Tip: If the LED behavior seems reversed, check that you've correctly identified the button pressed state.

You will see that the LED state is in sync with the button state on your ESP32 S3.

Code Explanation

Check out the line-by-line explanation contained in the comments of the source code!

Application 2 - Button toggles LED

This ESP32 S3 application demonstrates toggle behavior: each button press flips the LED between ON and OFF rather than holding it in a state while the button is held down. The first press turns the LED on; the second press turns it off; and so on indefinitely. Because the LED state is stored in a variable and only changes on a LOW-to-HIGH button edge, releasing the button has no effect on the LED.

Toggle behavior on ESP32 S3:

  • First button press turns LED ON
  • Second button press turns LED OFF
  • Each press switches to the opposite state
  • Requires debouncing for reliable operation

ESP32 S3 Code - Button Toggles LED Without Debouncing

This first example demonstrates the problem with button toggling on ESP32 S3 without debouncing.

/* * This ESP32 S3 code was developed by newbiely.com * * This ESP32 S3 code is made available for public use without any restriction * * For comprehensive instructions and wiring diagrams, please visit: * https://newbiely.com/tutorials/esp32-s3/esp32-s3-button-led */

Code Explanation

You can locate the explanation in the comment lines of the ESP32 S3 code above.

Understanding the toggle logic:

In the code, the expression led_state = !led_state is equal to the following code:

if(led_state == LOW) led_state = HIGH; else led_state = LOW;

The ! operator inverts the boolean value in a single, compact expression. This is a common pattern in ESP32 S3 toggle applications and is equivalent to the longer if/else block shown above — both produce identical behavior.

Detailed Instructions

  1. New to ESP32 S3? Complete our Getting Started with ESP32 S3 guide first.
  2. Upload the code: Copy the code above and upload it to your ESP32 S3.
  3. Test multiple presses: Press and release the button several times.
  4. Observe erratic behavior: Notice the LED may toggle inconsistently.
  5. Understand the problem: Single presses might toggle the LED multiple times or not at all.
  6. Pro Tip: This inconsistency happens because buttons "bounce" electrically when pressed, creating multiple signals.

You may observe that the LED state is toggled every time the button is pressed. However, this behavior may not always be consistent. At times, the LED state may be rapidly toggled multiple times within a single button press, or it may not toggle at all (toggling twice in quick succession which can be difficult to see with the naked eye).

⇒ To solve this problem, we need to debounce for the button.

ESP32 S3 Code - Button Toggles LED With Debouncing

Now we'll use proper debouncing to make the ESP32 S3 button LED toggle reliable. The ezButton library handles all debouncing internally, so your sketch stays concise while the library filters out electrical noise from the button contacts. This produces consistent, single-toggle behavior on every press — a noticeable improvement over the non-debounced version.

Debouncing a button can be challenging for beginners. Fortunately, the ezButton library makes it easy.

Why is debouncing necessary? See the ESP32 S3 - Button Debounce tutorial for more information.

/* * This ESP32 S3 code was developed by newbiely.com * * This ESP32 S3 code is made available for public use without any restriction * * For comprehensive instructions and wiring diagrams, please visit: * https://newbiely.com/tutorials/esp32-s3/esp32-s3-button-led */

Detailed Instructions

  1. New to ESP32 S3? Complete our Getting Started with ESP32 S3 guide first.
  2. Install ezButton library: Install the ezButton library. Refer to How To for instructions.
  3. Upload debounced code: Copy the code above and upload it to your ESP32 S3.
  4. Test button presses: Press and release the button multiple times.
  5. Observe reliable toggling: Notice the LED toggles exactly once per press.
  6. Compare behaviors: Notice how much more reliable this is compared to the non-debounced version.
  7. Pro Tip: The ezButton library works with all ESP32 S3 projects requiring button input.

You will see that the LED state is toggled exactly once each time the button is pressed on your ESP32 S3.

Application Ideas

The ESP32 S3 button-LED combination is a foundation you can extend into many practical and creative projects. Here are some ideas to spark your imagination:

  1. Desk lamp control: Build a simple ESP32 S3 desk lamp with manual ON/OFF toggle control.
  2. Doorbell indicator: Create a doorbell indicator that lights up when the button is pressed.
  3. Game buzzer: Design a game buzzer system with visual LED feedback using ESP32 S3.
  4. Status indicator: Make a status indicator for equipment (ON/OFF state) with ESP32 S3.
  5. Lock indicator: Build a simple lock indicator showing locked/unlocked status with button control.
  6. Reaction time game: Create a reaction time game measuring how fast you can toggle the LED.

Video Section

Watch the step-by-step video walkthrough for this ESP32 S3 project below.

Challenge Yourself

Now that you have a working ESP32 S3 button LED circuit, push your skills further with these challenges ranked by difficulty:

  1. Beginner: Modify the code to control two LEDs with a single button (one ON when pressed, one OFF).
  2. Beginner: Change the LED to blink three times when the button is pressed instead of staying solid.
  3. Intermediate: Add a second button to your ESP32 S3 to control LED brightness (dim/bright toggle).
  4. Intermediate: Create a traffic light sequence that advances to the next state with each button press.
  5. Advanced: Implement a long-press detection that behaves differently than a short press on ESP32 S3.
  6. Advanced: Build a combination lock using multiple buttons where the LED only turns ON with the correct sequence.

※ OUR MESSAGES

  • As freelancers, We are AVAILABLE for HIRE. See how to outsource your project to us
  • Please feel free to share the link of this tutorial. However, Please do not use our content on any other websites. We invested a lot of effort and time to create the content, please respect our work!