
ESP32 S3 - NeoPixel LED Strip
The NeoPixel strip is a chain of individually addressable RGB LEDs that lets you control each LED's color and brightness independently. In this guide, you will learn how to use an ESP32 S3 to control a NeoPixel RGB LED strip — and remarkably, you only need a single GPIO pin to command every LED on the entire strip.
What you'll build:
- A sequential green pixel sweep across the entire strip with a pause between each LED.
- A full strip blackout (all LEDs off) lasting two seconds.
- A simultaneous all-red flash held for one second.
- A continuously looping animation combining all three effects.
Hardware Preparation
Or you can buy the following kits:
| 1 | × | DIYables ESP32 S3 Starter Kit (ESP32 S3 included) | |
| 1 | × | DIYables Sensor Kit (18 sensors/displays) |
Additionally, some of these links are for products from our own brand, DIYables .
Overview of NeoPixel RGB LED Strip
The NeoPixel RGB LED strip (also known as WS2812B) contains a built-in driver IC inside each LED that enables a single-wire communication protocol, making it easy to chain dozens or even hundreds of LEDs using only one data line. Each LED can display any of over 16 million colors by mixing red, green, and blue channels from 0 to 255, and the entire strip can be updated simultaneously with a single call from your microcontroller.
Key Specifications
Pinout
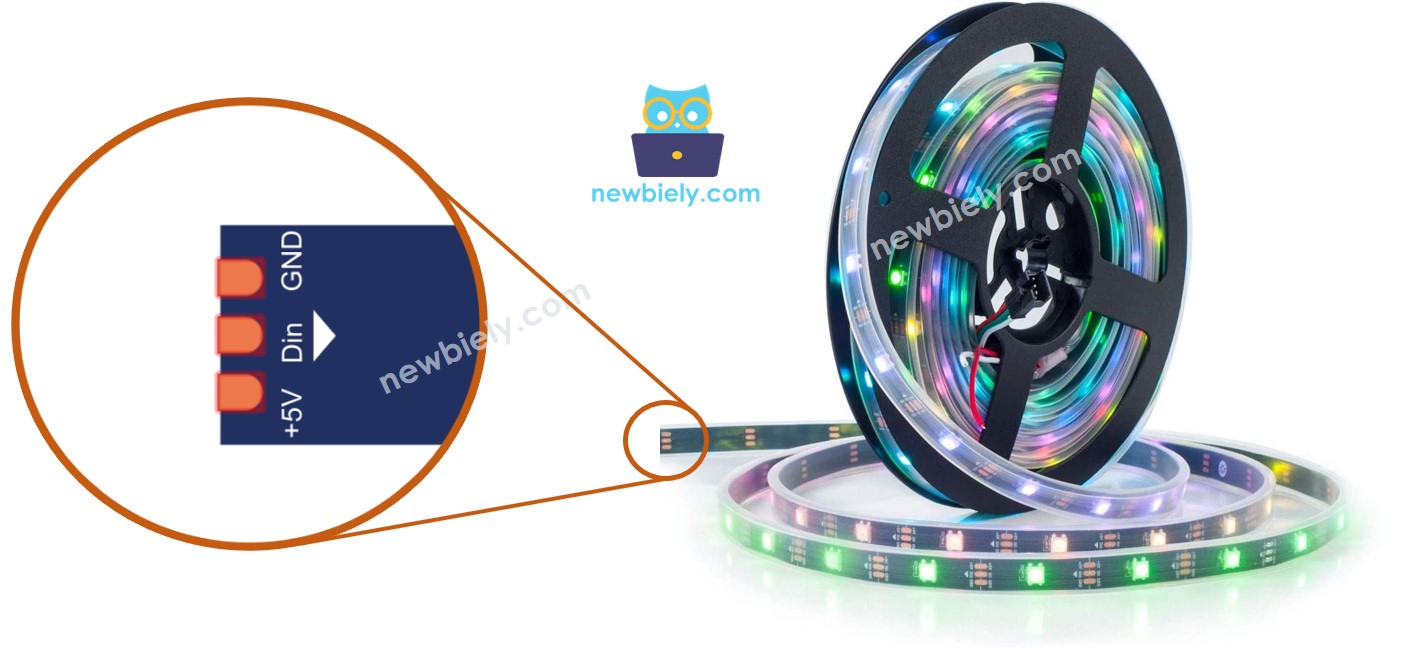
The NeoPixel RGB LED strip has three pins:
- GND pin: needs to be connected to GND (0V)
- VCC pin: needs to be connected to 5V of external power supply
- Din pin: receives the control signal and should be connected to an ESP32 S3 GPIO pin
Wiring Diagram
Connect the NeoPixel strip to the ESP32 S3 by wiring the Din data line through a 470Ω series resistor to a GPIO pin, and supply power to VCC and GND from a dedicated 5V external power adapter — place the 1000uF capacitor across the VCC and GND rails close to the strip to suppress power surges.
Safety Notes
Always power the NeoPixel strip from an external 5V source rather than the ESP32 S3's onboard 3.3V or USB 5V rail, as a full strip drawing peak current can exceed what the board's regulator can safely supply. The 470Ω series resistor on the data line protects against signal reflections and ringing, while the 1000uF bulk capacitor absorbs the inrush current spike when the strip first powers on.
| NeoPixel Strip | ESP32 S3 / External Supply |
|:---|:---|
| GND | GND (shared with ESP32 S3 GND) |
| VCC | 5V External Power Adapter |
| Din | GPIO16 (via 470Ω resistor) |
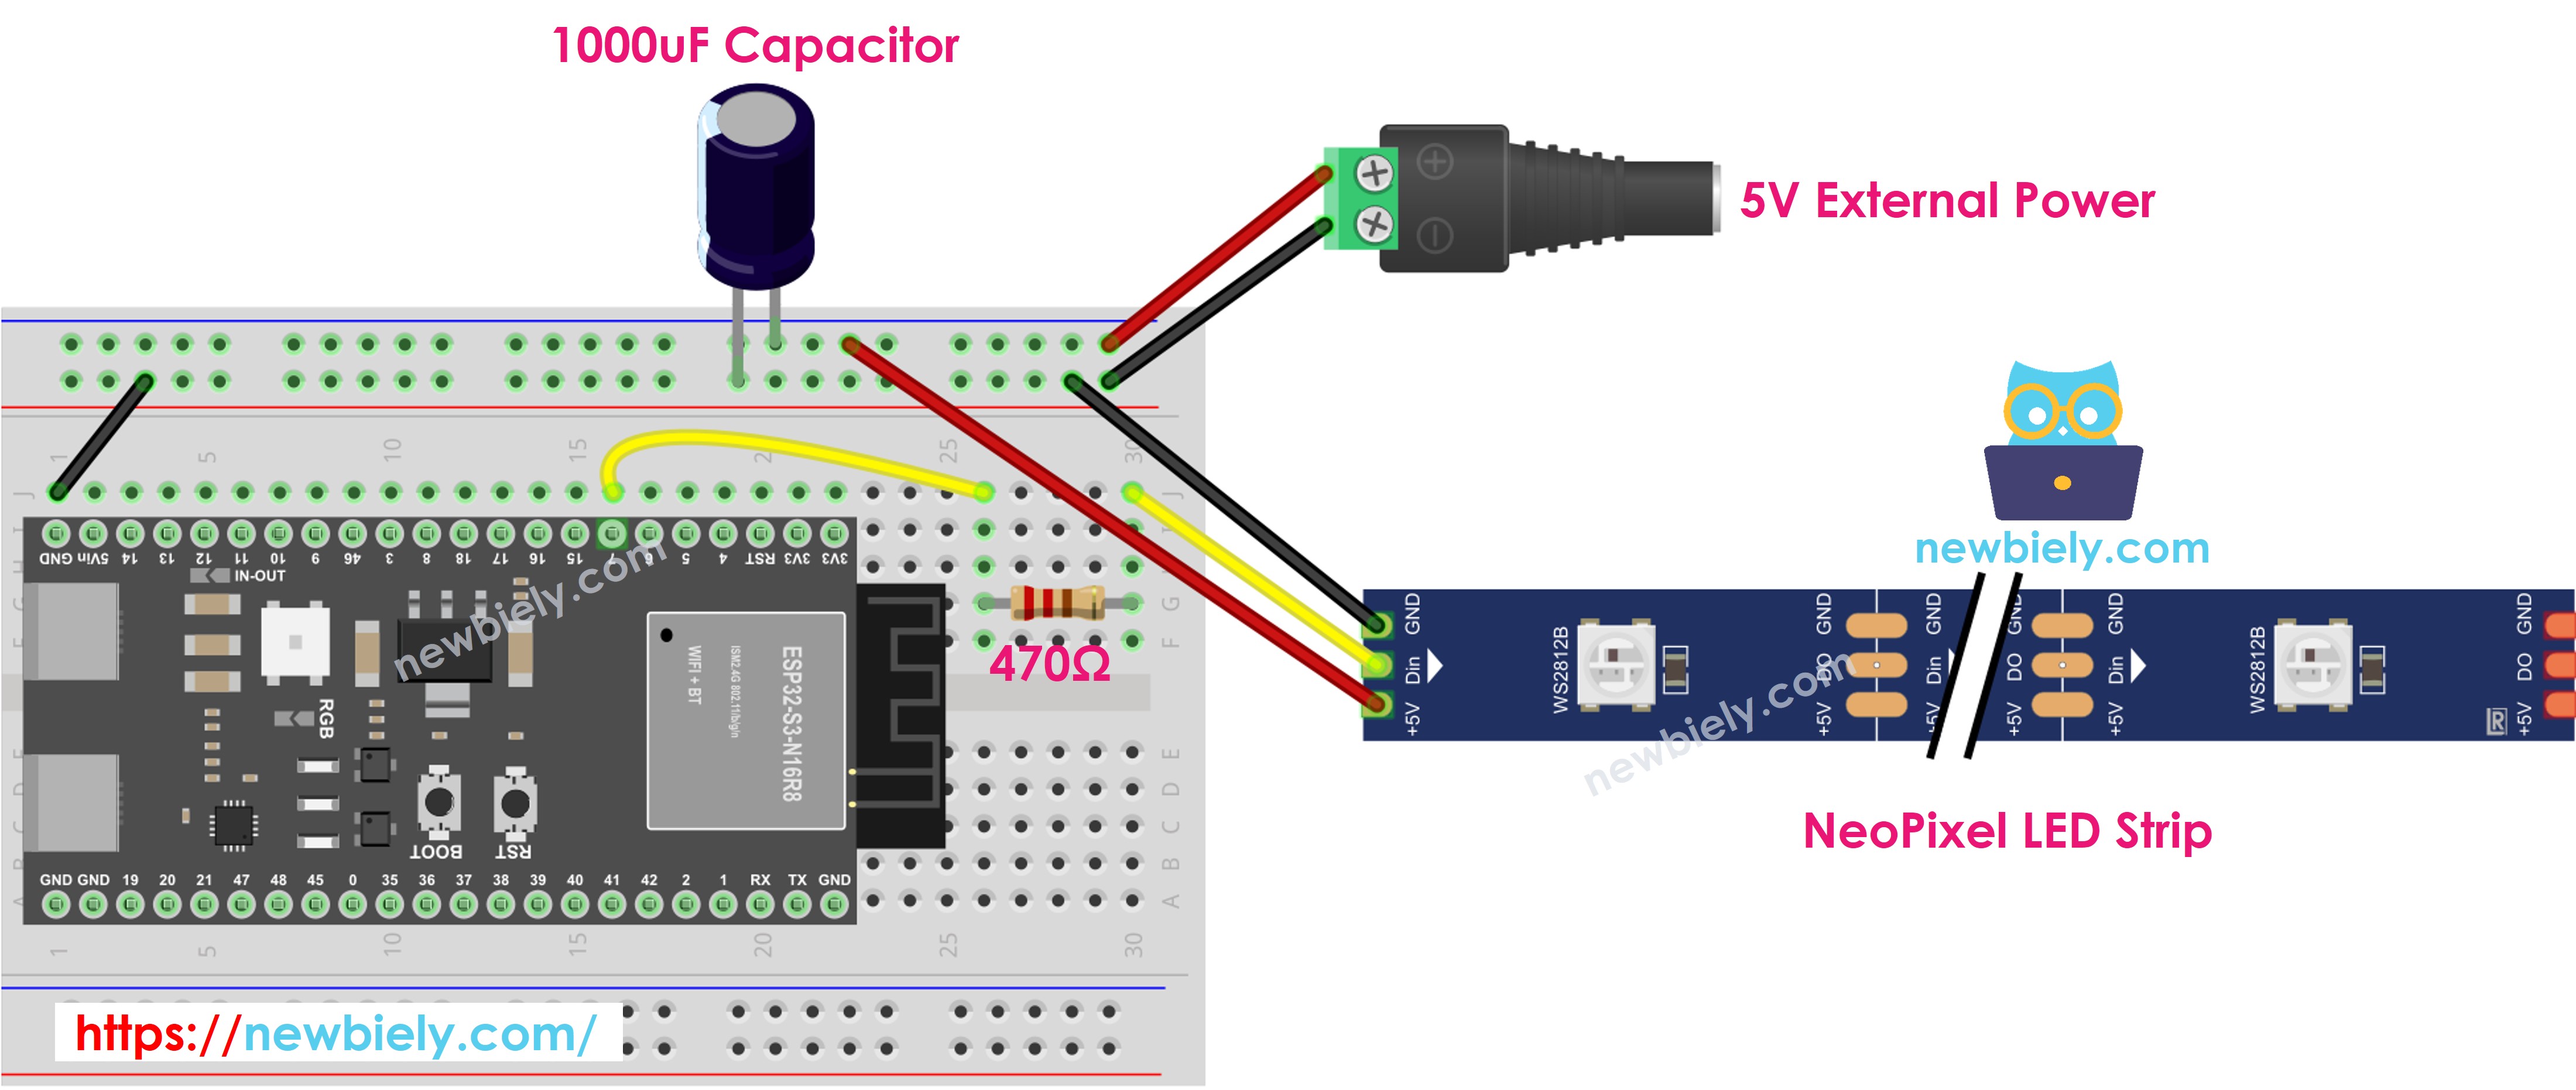
This image is created using Fritzing. Click to enlarge image
How To Program For NeoPixel RGB LED Strip
The Adafruit NeoPixel library provides a straightforward API for controlling WS2812B strips on the ESP32 S3. The three core operations you need are creating the NeoPixel object, initializing it, and then setting pixel colors and brightness before calling show() to push the updates to the hardware.
- Declare a NeoPixel object
- Initialize the NeoPixel strip in setup()
- Set the color of each individual LED (called a pixel)
- Set the brightness of the entire strip
※ NOTE THAT:
- NeoPixel.setBrightness() applies a global brightness scale to all pixels on the strip. To set brightness for each individual pixel independently, scale the color values directly.
- The values set by NeoPixel.setBrightness() and NeoPixel.setPixelColor() only take effect when NeoPixel.show() is called.
ESP32 S3 Code
The following code demonstrates all three animation effects in a continuous loop on the ESP32 S3. It sequentially lights each LED green with a short pause, then turns all LEDs off for two seconds, then lights the entire strip red for one second — repeating indefinitely. Upload the sketch, then watch the strip cycle through each effect automatically.
Detailed Instructions
- New to ESP32 S3? Complete our Getting Started with ESP32 S3 guide first.
- Wire the components as shown in the wiring diagram above.
- Connect the ESP32 S3 board to your PC via a USB Type-C cable.
- Open Arduino IDE on your PC.
- Select the right ESP32 S3 board (e.g. ESP32S3 Dev Module) and the correct COM port.
- Click the Libraries icon on the left bar of the Arduino IDE.
- Search "Adafruit NeoPixel", then find the NeoPixel library by Adafruit.
- Click Install button to install the NeoPixel library.
- Search for Adafruit NeoPixel created by Adafruit and click the Install button.
- Copy the above code and open it with Arduino IDE.
- Click Upload button on Arduino IDE to upload the code to the ESP32 S3.
- Observe the LED strip cycling through the green sweep, blackout, and red flash effects.
- Pro Tip: Increase NUM_PIXELS to match the exact LED count on your strip, and experiment with NeoPixel.setBrightness() values (50–150) for indoor use to reduce power draw and heat.
Serial Monitor Output
Open the Serial Monitor at 9600 baud to observe status messages printed by the ESP32 S3 during the animation loop. The following readings show a typical session with timestamps:
Applications
NeoPixel LED strips controlled by the ESP32 S3 can be used in a wide range of creative and practical projects, from ambient lighting to interactive displays.
- Ambient room lighting: Create dynamic mood lighting that changes color based on time of day or sensor input.
- Notification indicator: Flash specific colors to signal events such as new messages, alerts, or system status.
- Wearable costume lighting: Embed a short NeoPixel strip into clothing or props for eye-catching visual effects.
- Interactive art installation: Drive generative color patterns that respond to sound, motion, or touch input.
- Retail display accent: Use animated light sequences to draw attention to products or signage.
Video Tutorial
Watch the step-by-step video walkthrough for this ESP32 S3 project below.
Challenges
These challenges are designed to push your understanding of NeoPixel control on the ESP32 S3 beyond the basics.
- Beginner: Modify the code to sweep through blue pixels instead of green, then change the all-on color from red to white.
- Beginner: Add a rainbow sweep that cycles each pixel through red → orange → yellow → green → blue → violet in sequence.
- Intermediate: Use a potentiometer connected to an ADC pin on the ESP32 S3 to dynamically control the strip's brightness in real time.
- Intermediate: Implement a "theater chase" animation where every third LED lights up and the lit group marches forward around the strip.
- Advanced: Build a sound-reactive visualizer by reading a microphone's analog output and mapping the audio amplitude to the number of lit pixels and their color intensity.