
ESP32 S3 - Control Fan
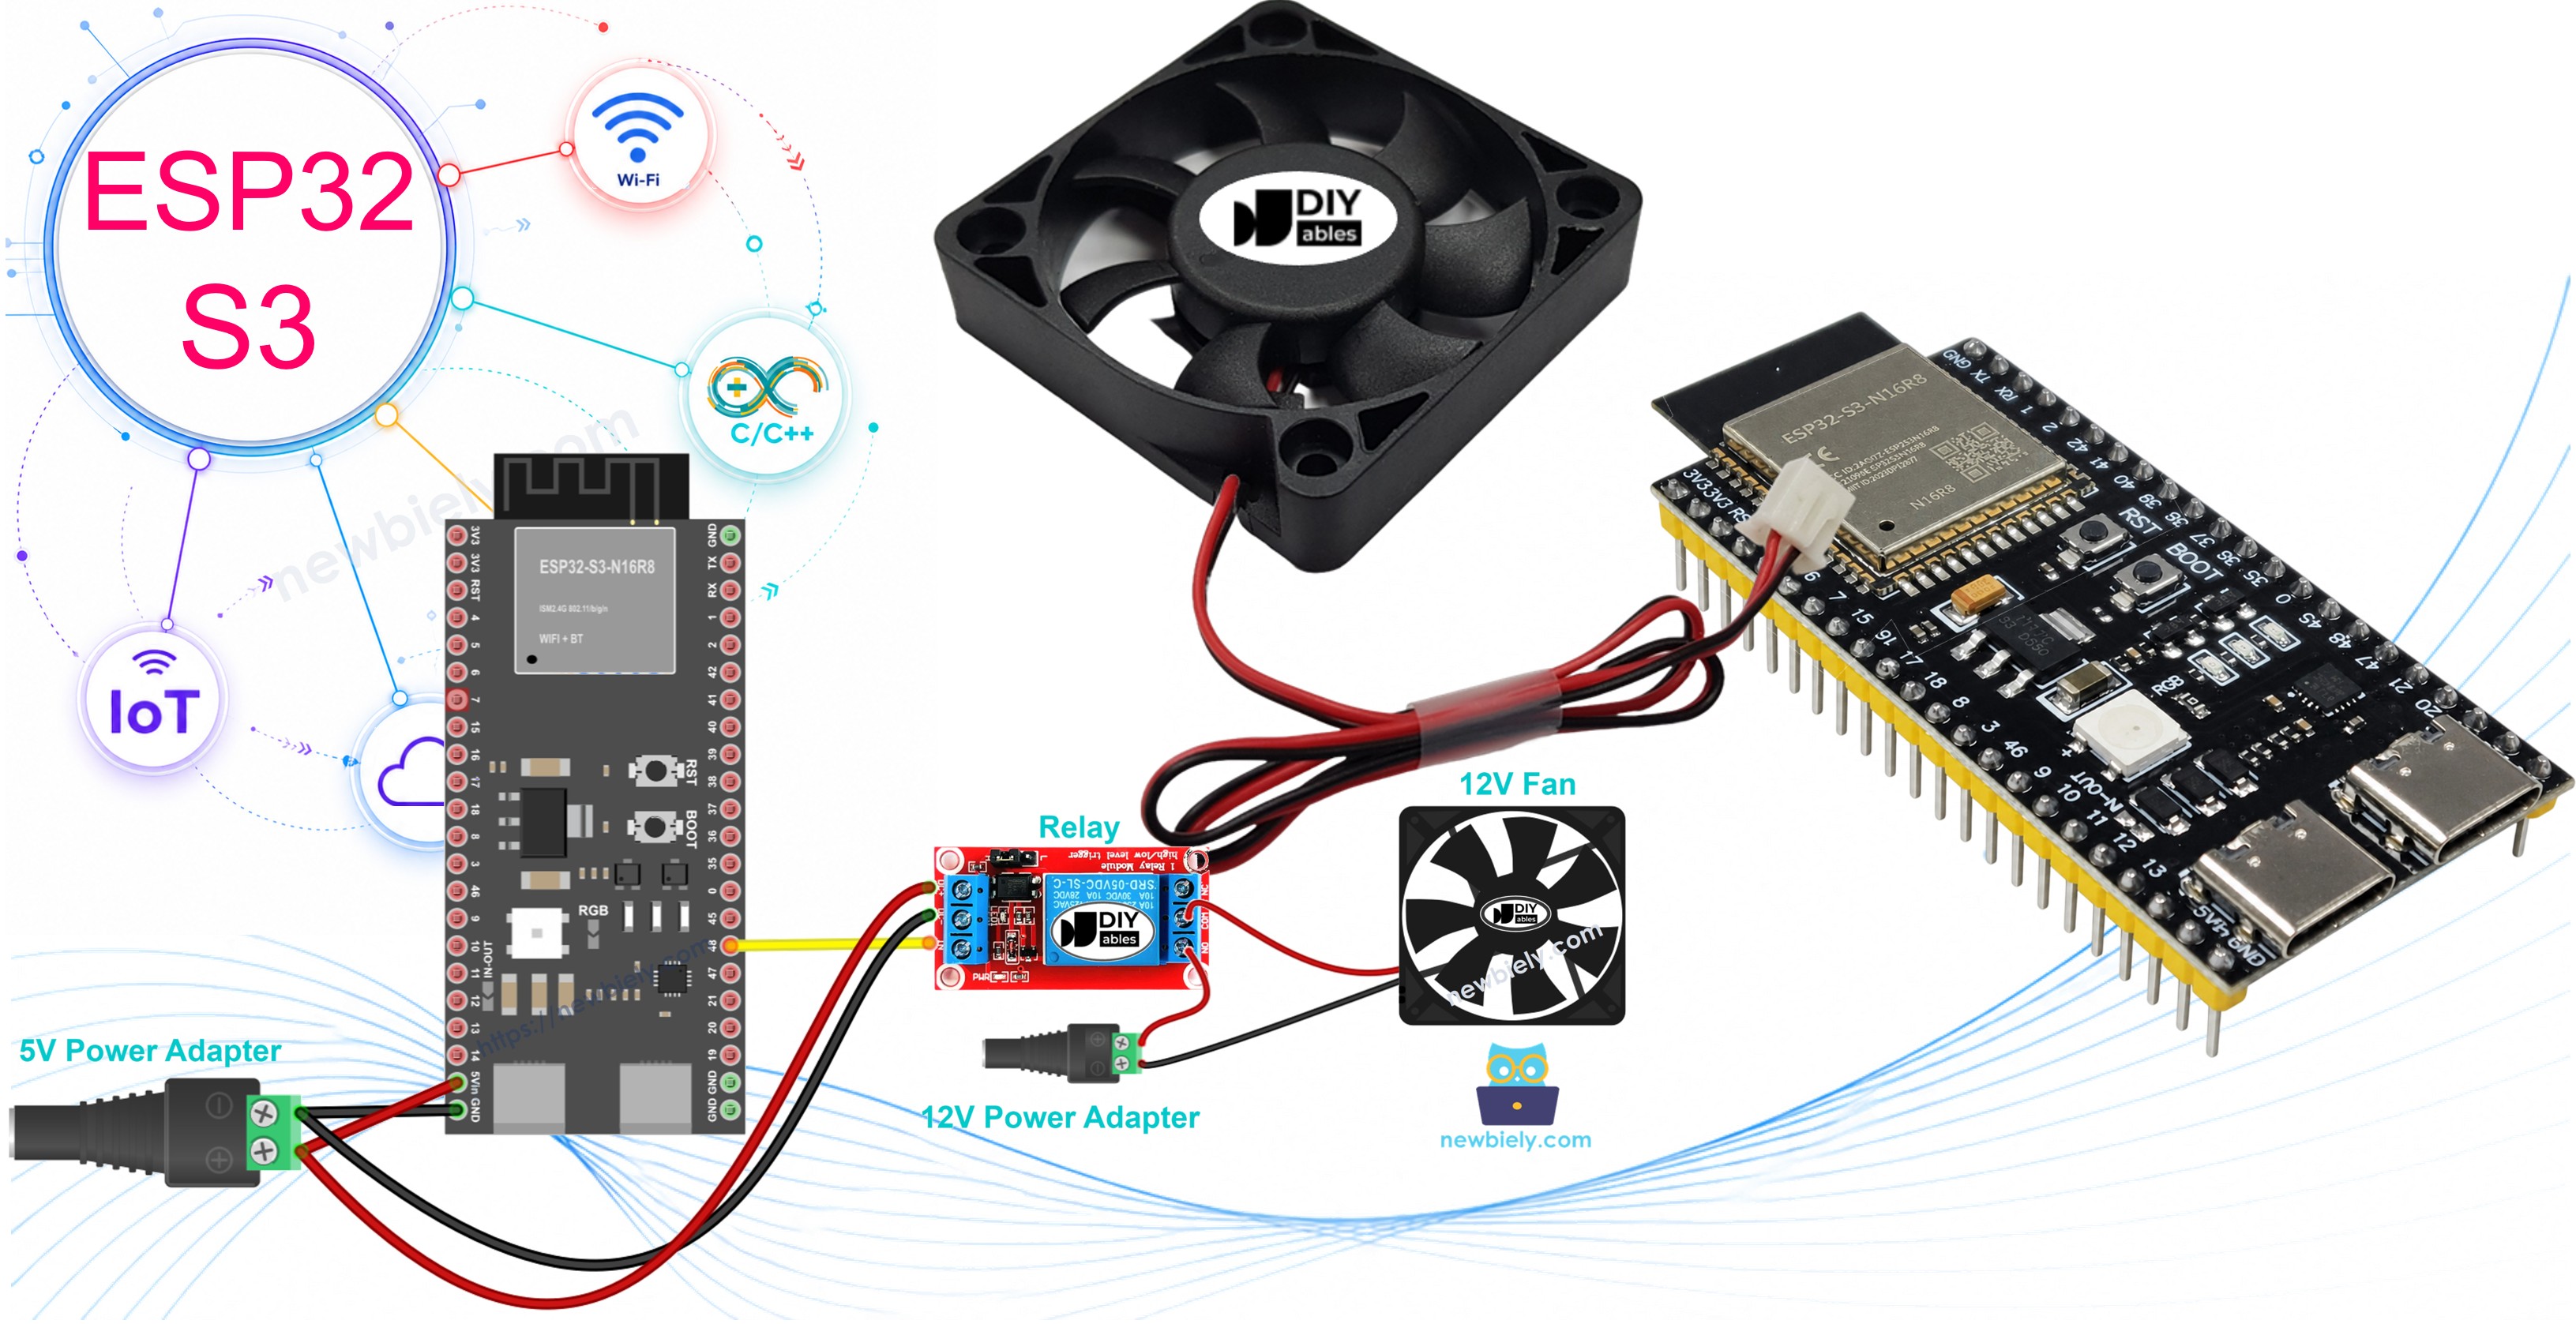
Learn how to control a DC cooling fan with your ESP32 S3 using a relay module. This beginner-friendly project walks you through wiring, coding, and testing a fan that turns on and off automatically with simple Arduino code.
There are two ways to switch the fan: a relay or a MOSFET module. A relay gives you only two states, fan ON or fan OFF. A MOSFET module does that too, and it can also set how fast the fan spins, without any click. This page shows you both ways.
What you'll build:
- A relay-controlled fan circuit driven by the ESP32 S3
- Arduino code that cycles the fan on and off every 10 seconds
- Serial Monitor output showing real-time fan status
- A foundation for building temperature-triggered cooling systems
- A second circuit with a MOSFET module that speeds the fan up and slows it down with PWM
Hardware Preparation
Or you can buy the following kits:
| 1 | × | DIYables ESP32 S3 Starter Kit (ESP32 S3 included) | |
| 1 | × | DIYables Sensor Kit (18 sensors/displays) |
Additionally, some of these links are for products from our own brand, DIYables .
Overview of DC Fan
A DC fan is an electric cooling device that runs on direct current power and moves air for ventilation or temperature regulation. These fans are widely used in electronics projects because they operate on standard voltages and are easy to integrate with microcontrollers like the ESP32 S3.
Key Specifications
DC fans commonly run on 5V, 12V, or 24V DC and connect via two wires: a positive (red) lead and a negative (black) lead. When supplied with a steady voltage they spin at constant speed, and when driven with a PWM signal the speed becomes variable. They draw relatively little current, operate quietly, and are available at low cost, making them an ideal choice for beginner cooling and ventilation projects.
Pinout
A DC fan has two connection wires for power:
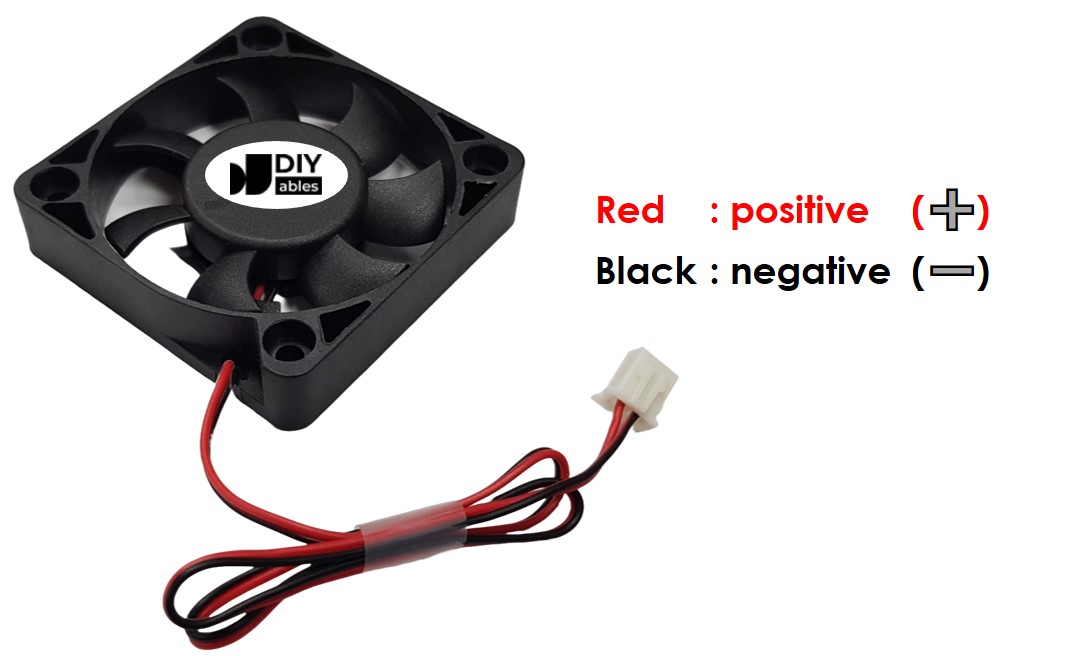
- Negative (-) pin (black wire): Connect to the negative/ground of your DC power supply
- Positive (+) pin (red wire): Connect to the positive of your DC power supply
How to Control Fan
There are several ways to control a DC fan from a microcontroller. Running the fan at full speed simply requires connecting it directly to its rated voltage. Speed control is achieved with a PWM signal that varies the average power delivered to the motor. On/off control — the method covered in this tutorial — uses a relay to switch the fan's power supply on and off, which keeps the high-voltage fan circuit completely isolated from the ESP32 S3's GPIO pins. Learn more about relays in our ESP32 S3 - Relay tutorial. For the speed control part, this page uses a MOSFET module; the ESP32 S3 - MOSFET Module tutorial explains its pins and how it works inside.
Relay or MOSFET Module for a Fan?
| Relay | MOSFET Module | |
|---|---|---|
| What you can do | turn the fan ON or OFF | turn it ON or OFF and change its speed (PWM) |
| Noise | a click at each switch | no sound |
| How fast it switches | slow, a few milliseconds | very fast |
| Life | contacts wear out after many switches | nothing moves, so nothing wears out |
| Supply type | AC or DC fans | DC fans only |
| Fan supply voltage | anything the relay is rated for | about 6V or more |
| Isolation from the ESP32 S3 | yes, coil and contacts are separate | yes, through a PC817 optocoupler |
| Good choice for | AC fans, plain ON/OFF | 12V DC fans that need speed control |
For a 12V DC cooling fan, the MOSFET module is usually the better pick, because you can run the fan slow and quiet when the room is only a bit warm. Keep the relay if your fan runs on AC or needs less than about 6V.
Wiring Diagram
Connect your ESP32 S3, relay, fan, and power supply following the diagram below. The relay sits between the ESP32 S3 and the fan, protecting the microcontroller from the fan's operating voltage.
Safety Notes
Always match your power supply voltage to your fan's rated voltage — using 12V on a 5V fan or vice versa can damage the component. Never connect the fan's power wires directly to ESP32 S3 GPIO pins; the relay is essential for safe isolation. Double-check all connections before powering the circuit.
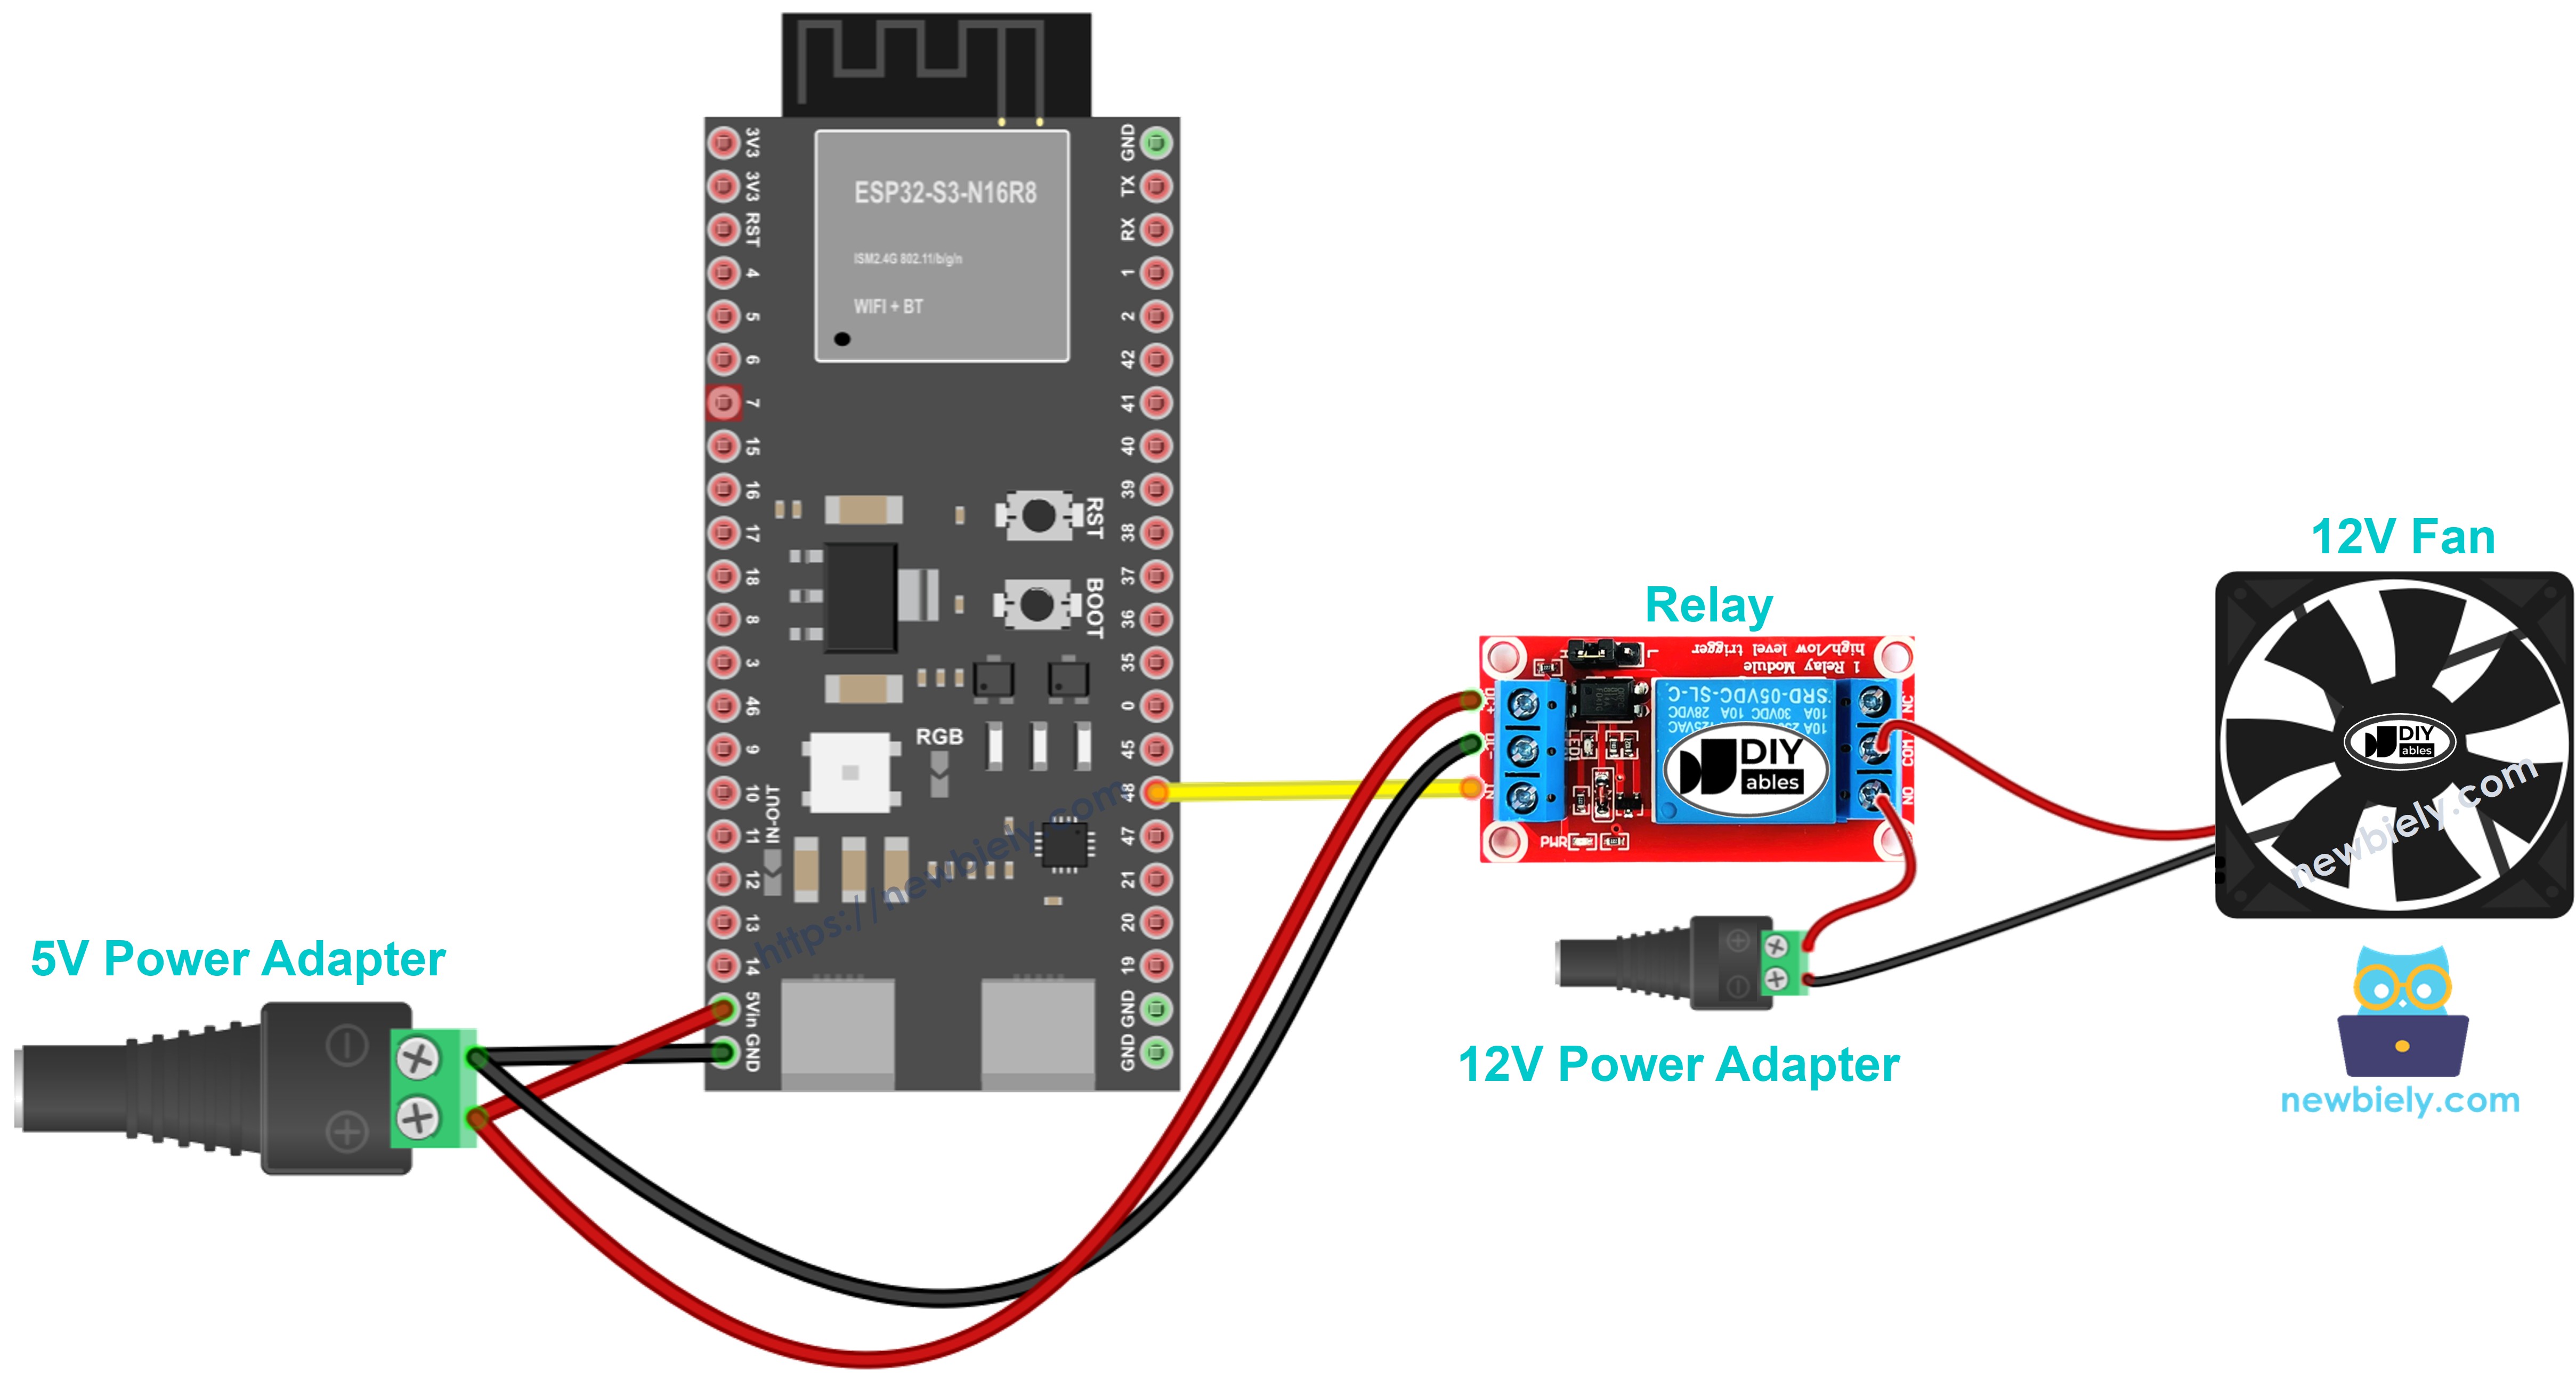
This image is created using Fritzing. Click to enlarge image
| Component Pin | ESP32 S3 Pin |
|---|---|
| Relay Signal (IN) | D7 |
| Relay VCC | 5V |
| Relay GND | GND |
| Fan Positive (+) | Relay COM (Common) |
| Fan Negative (-) | Power Supply Negative (-) |
| Relay NO (Normally Open) | Power Supply Positive (+) |
ESP32 S3 Code
The following code demonstrates on/off fan control using the ESP32 S3 and a relay. It uses a simple timed loop to cycle the fan on for 10 seconds and off for 10 seconds, printing the current status to the Serial Monitor so you can verify the relay is switching correctly without needing to watch the fan itself.
Detailed Instructions
- New to ESP32 S3? Complete our Getting Started with ESP32 S3 guide first.
- Wire the relay, fan, and power supply to the ESP32 S3 following the wiring diagram above.
- Connect the ESP32 S3 to your computer using the USB Type-C cable.
- Open the Arduino IDE on your computer.
- Select ESP32 S3 and its COM port from the Arduino IDE board selector.
- Copy the code above and paste it into a new Arduino IDE sketch.
- Click the Upload button to compile and flash the code to your ESP32 S3.
- Watch the fan turn on and off automatically in 10-second intervals.
- Open the Serial Monitor (set to 115200 baud) to view the fan status messages in real time.
- Pro Tip: Add an LED in parallel with the relay coil indicator to visually confirm switching even when the fan is disconnected.
Line-by-line Code Explanation
The above ESP32 S3 code contains line-by-line explanation. Please read the comments in the code!
Serial Monitor Output
Open the Serial Monitor in Arduino IDE to see the fan control status:
Applications and Project Ideas
Fan control with the ESP32 S3 opens the door to a wide range of practical cooling and automation projects across home, greenhouse, and industrial settings.
- Temperature-controlled cooling system: Automatically turn the fan on when temperature exceeds a set threshold using a DHT or DS18B20 sensor.
- Humidity ventilation system: Activate the fan when humidity climbs too high in a room or enclosure.
- Computer case cooling: Build a smart cooling solution that reacts to measured component temperatures.
- Greenhouse climate control: Regulate air circulation to maintain optimal growing conditions for plants.
- Bathroom exhaust timer: Run the fan automatically for a fixed duration after detecting elevated humidity.
- IoT smart ventilation: Control the fan remotely over WiFi using the ESP32 S3's built-in wireless connectivity.
How to Control Fan Speed with MOSFET Module
Now let's swap the relay for a MOSFET module. The fan still turns ON and OFF, but the ESP32 S3 can also choose any speed in between.
Wiring Diagram for Fan and MOSFET Module
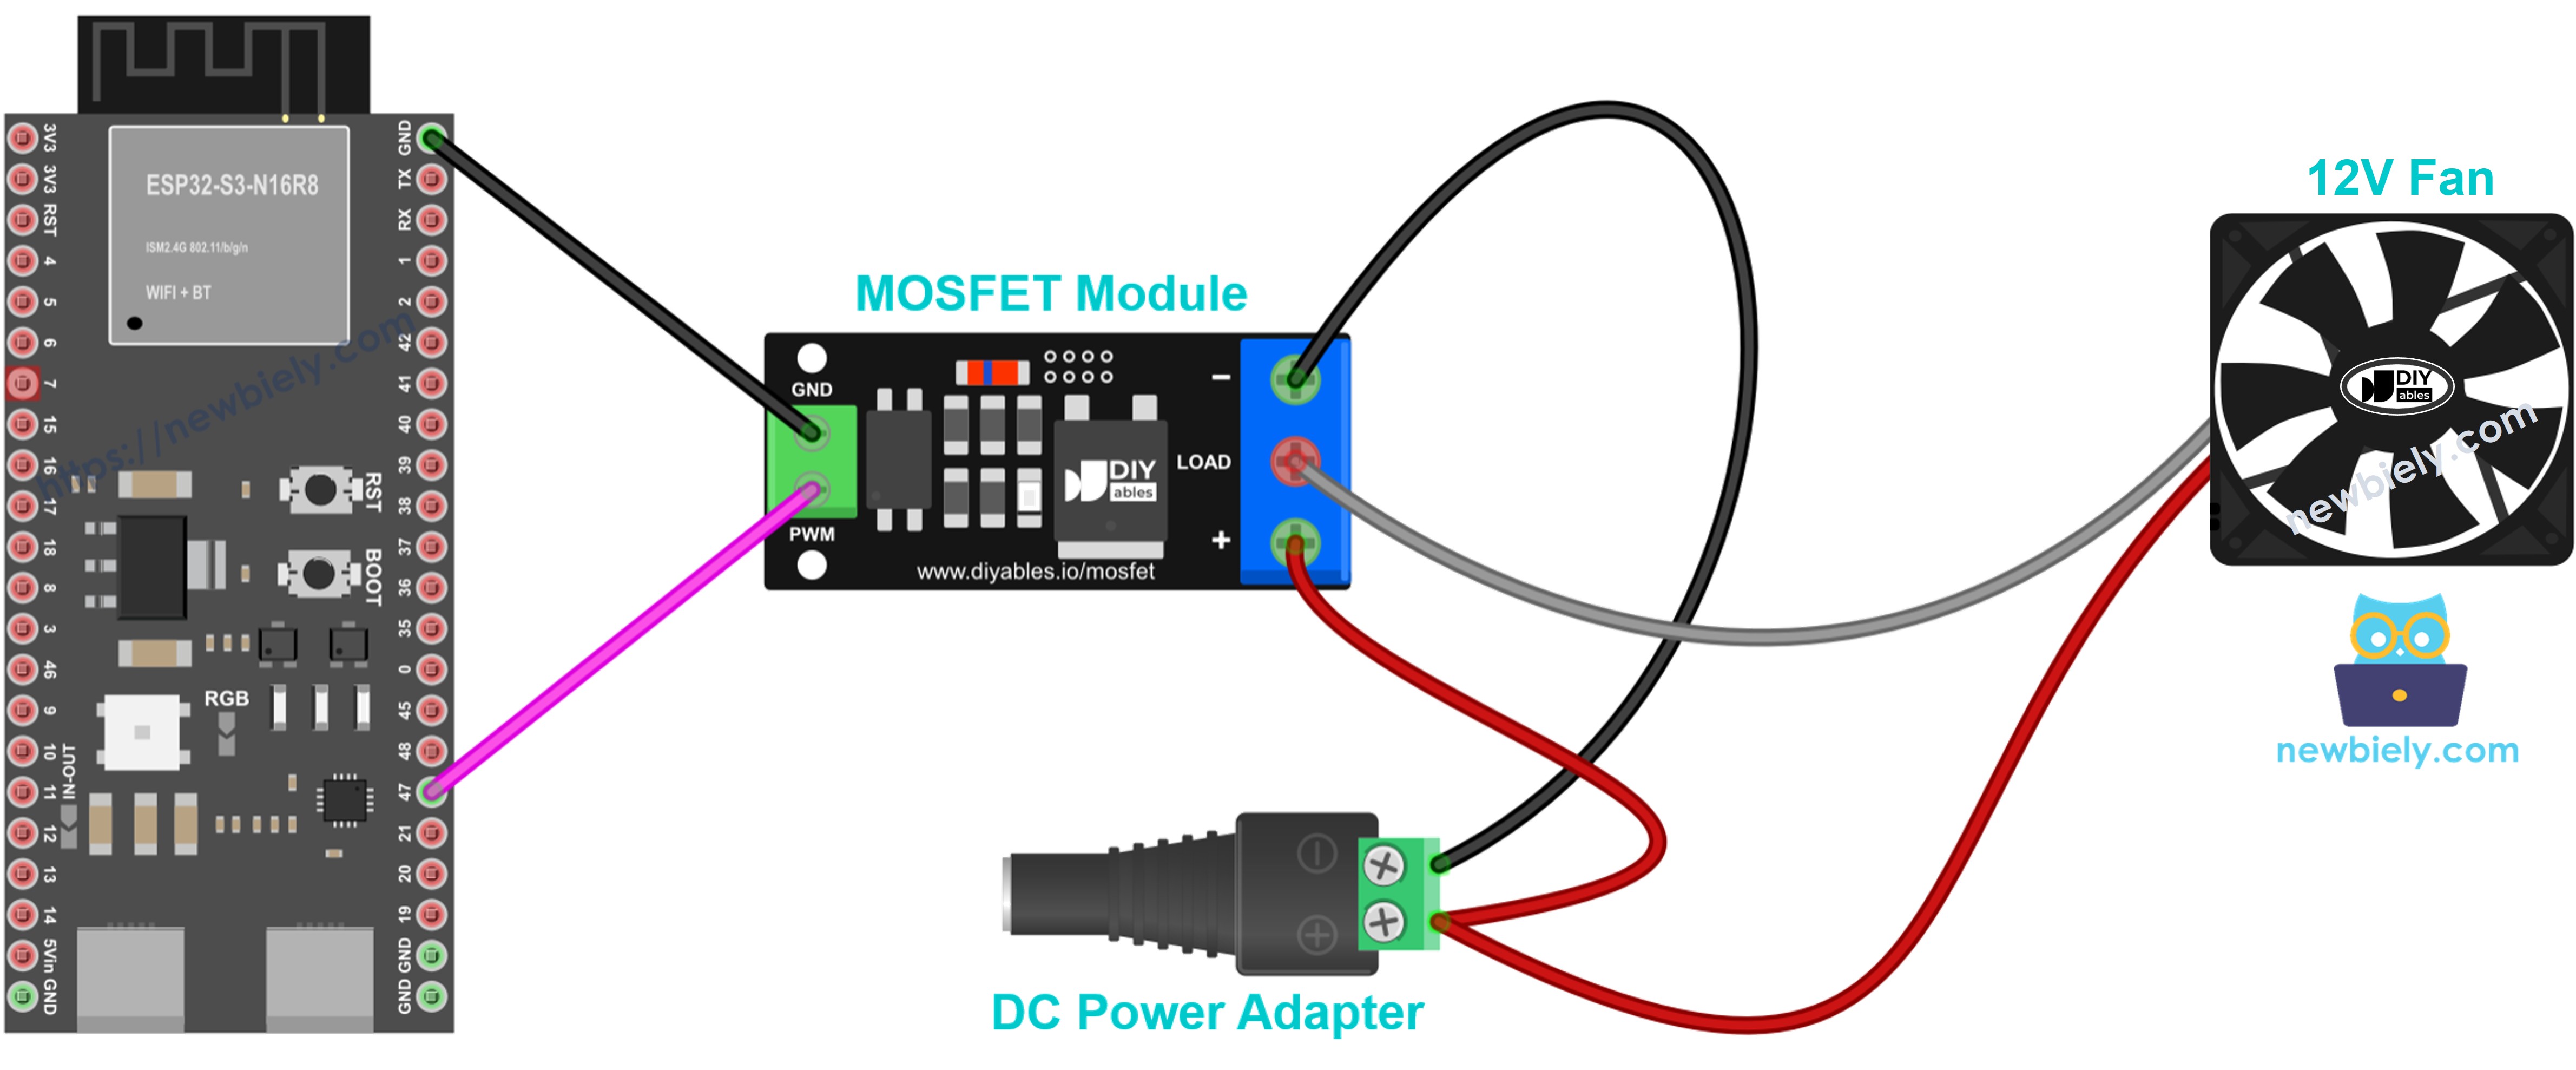
This image is created using Fritzing. Click to enlarge image
| From | To |
|---|---|
| ESP32 S3 GPIO47 | Module PWM |
| ESP32 S3 GND | Module GND |
| 12V adapter + | Module + |
| Fan + (red wire) | Module + (shares the terminal with the adapter +) |
| Fan − (black wire) | Module LOAD |
| 12V adapter − | Module − |
A fan has a small motor inside, so put a flyback diode (1N4007 or 1N5819) across the two fan wires. The stripe (cathode) goes to fan +.
ESP32 S3 Code - Fan Speed with MOSFET Module
The fan runs at full speed for 2 seconds and stops for 2 seconds. Then it speeds up from 10% to 100% in small steps and slows back down to 0%. Many fans stall below about 30%, so do not worry if it stands still at the lowest steps.
Detailed Instructions
- Set up the board and Arduino IDE in the same way as in the relay Quick Steps above.
- Wire the fan and MOSFET module as shown in the diagram. Leave the 12V adapter unplugged for now.
- Upload the code to the ESP32 S3.
- Plug in the 12V adapter.
- Open the Serial Monitor at 9600 baud and listen to the fan change speed.
Tip: The MOSFET module works with DC only and needs a fan supply of about 6V or more. A 5V fan or an AC fan should stay on the relay.
Video Tutorial
Watch the step-by-step video walkthrough for this ESP32 S3 project below.
Challenge Yourself
These hands-on challenges will help you deepen your understanding of fan control and relay-based switching on the ESP32 S3.
- Beginner: Change the on/off timing from 10 seconds to 5 seconds and observe the difference.
- Beginner: Add a push button so you can manually toggle the fan on and off instead of relying on automatic timing.
- Intermediate: Connect a DHT11 sensor and turn the fan on only when the temperature exceeds 25°C.
- Intermediate: Control two fans independently using two separate relays and two different GPIO pins.
- Advanced: Implement PWM speed control to vary the fan speed smoothly from 0 to 100%.
- Advanced: Build a web interface hosted on the ESP32 S3 to control fan speed and monitor temperature remotely.