ESP32 S3 - SSD1309 OLED Display

Learn how to use the SSD1309 OLED 128×64 display (2.42-inch) with your ESP32 S3 over the I2C interface. This guide walks you through everything from initial wiring to advanced features like bitmap images, hardware scrolling, and custom fonts.

What you'll build:

  1. A working SSD1309 OLED display connected to your ESP32 S3 via I2C
  2. Sketches that display text, numbers, and geometric shapes on the 128×64 screen
  3. Bitmap image rendering and hardware-accelerated scrolling demonstrations
  4. A contrast and custom-font example that showcases the full display capabilities
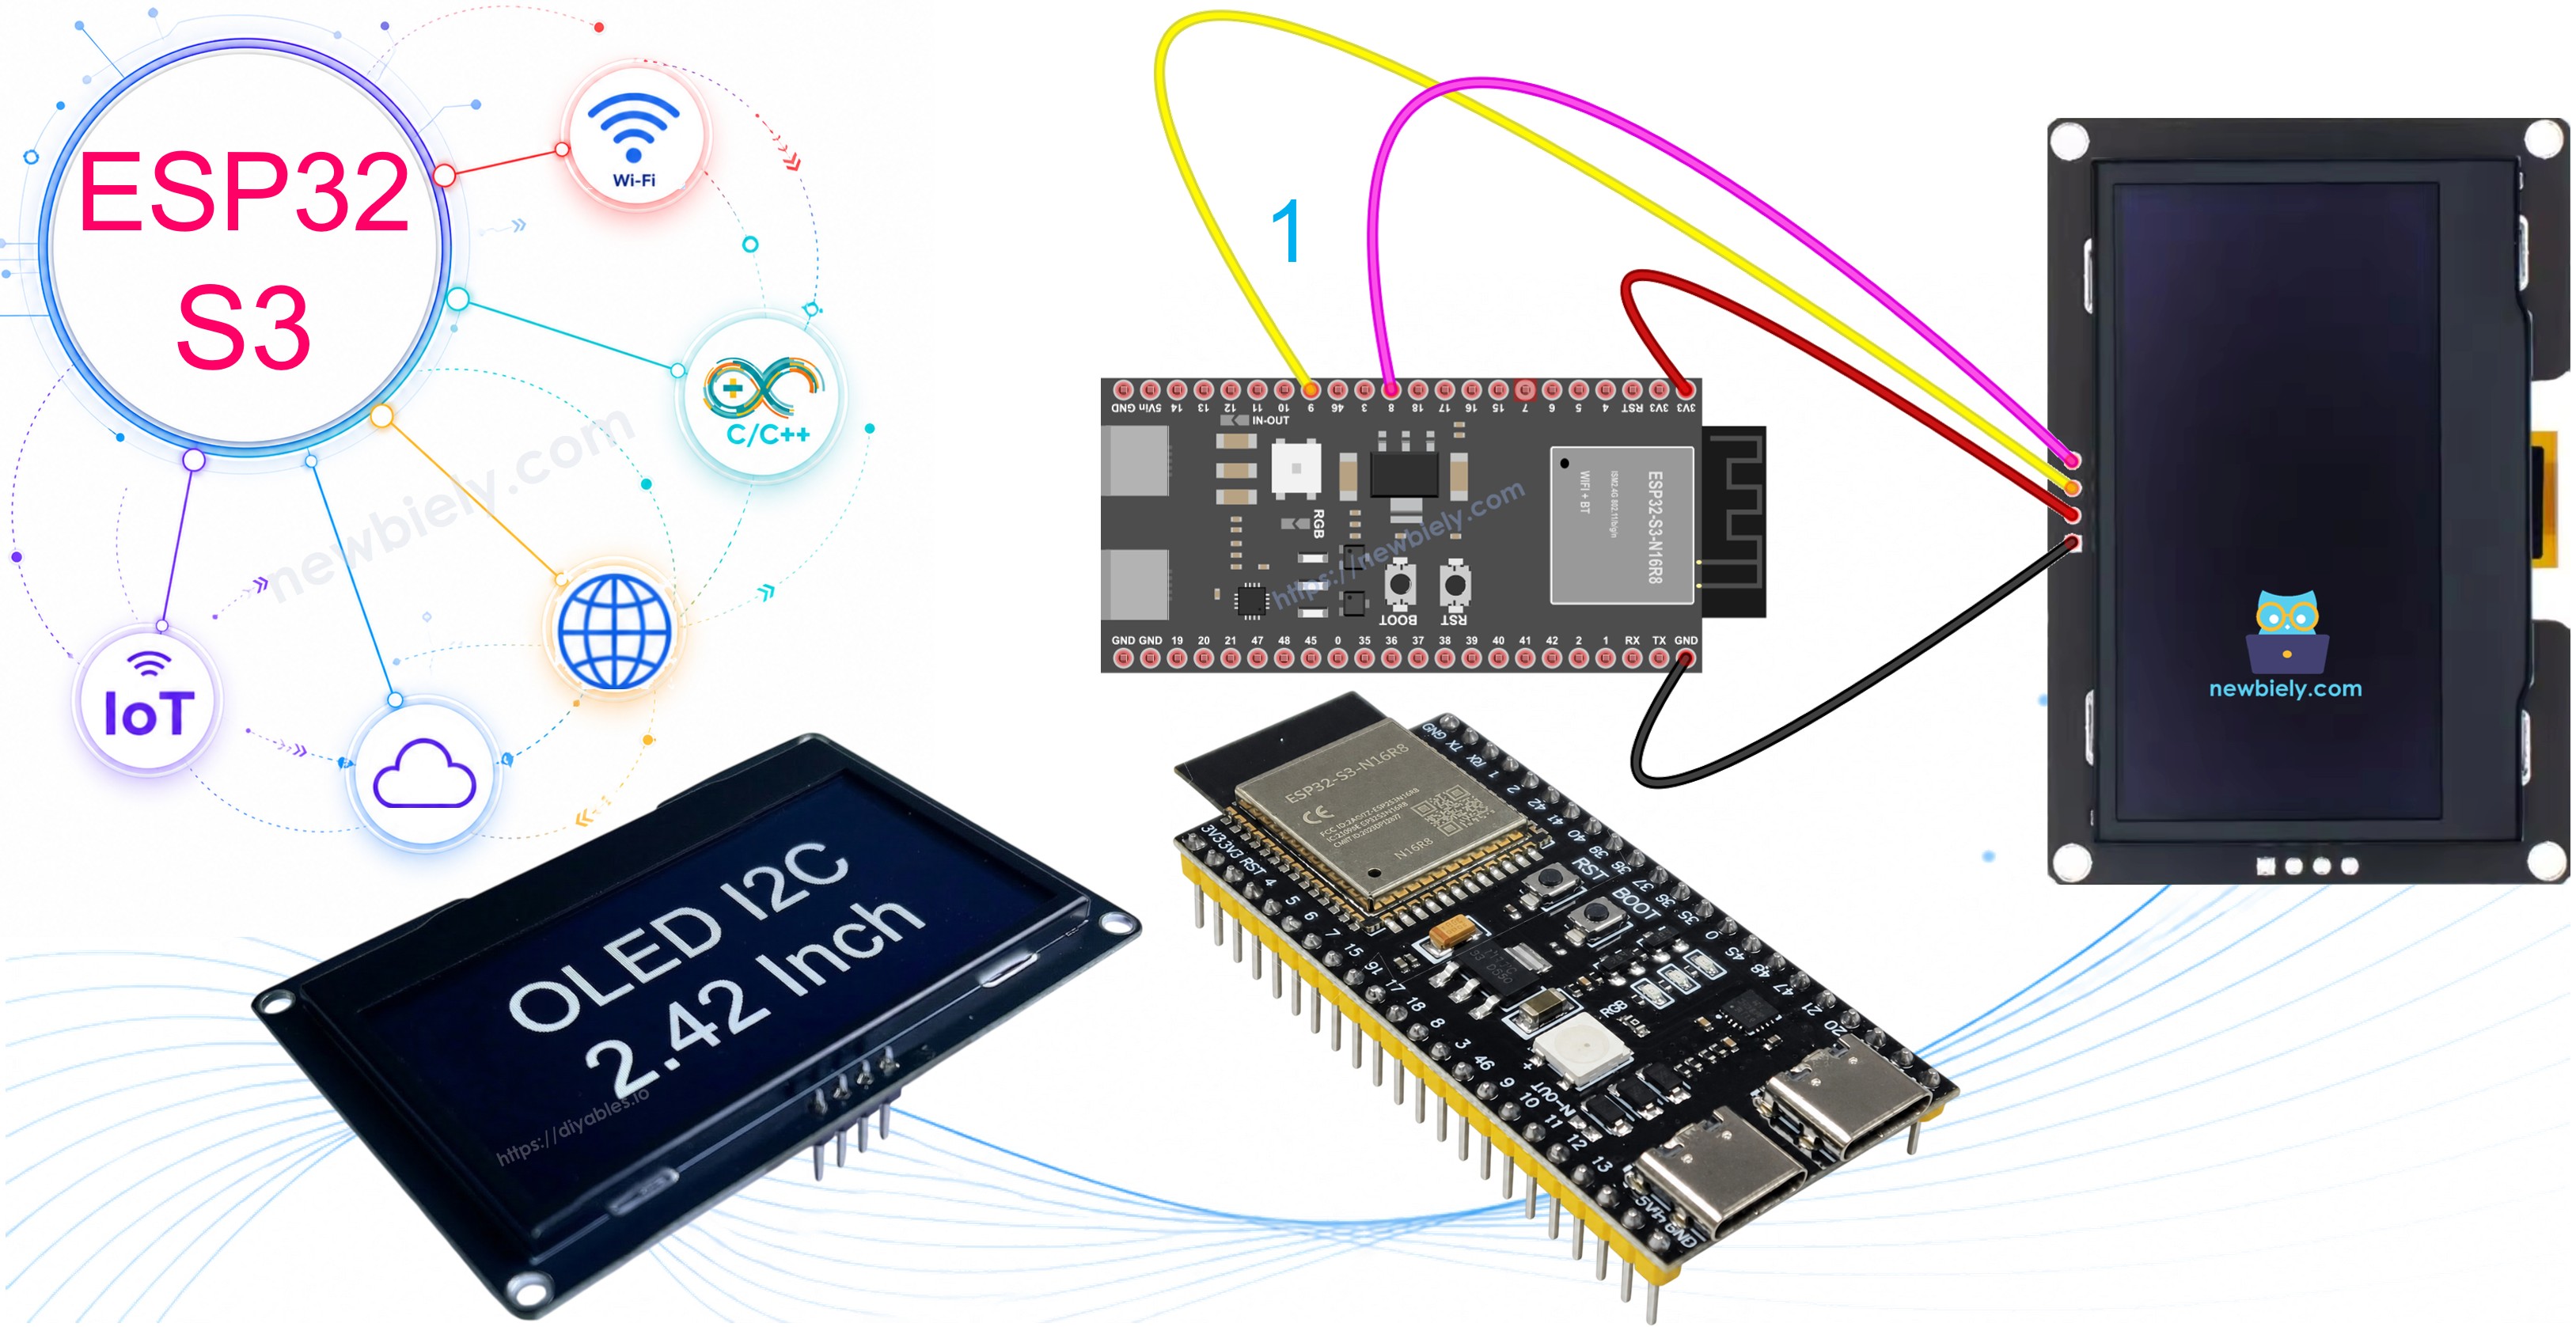
ESP32 S3 SSD1309 OLED 128x64 display

Hardware Preparation

1×ESP32 S3 WROOM N16R8
1×USB Cable Type-A to Type-C (for USB-A PC)
1×USB Cable Type-C to Type-C (for USB-C PC)
1×SSD1309 I2C OLED Display 128x64 (2.42 inch)
1×Jumper Wires

Or you can buy the following kits:

1×DIYables Sensor Kit (18 sensors/displays)
Disclosure: Some of the links provided in this section are Amazon affiliate links. We may receive a commission for any purchases made through these links at no additional cost to you.
Additionally, some of these links are for products from our own brand, DIYables .

Overview of the SSD1309 2.42-Inch OLED Display

The SSD1309 is a CMOS OLED driver chip designed for 128×64 dot-matrix displays that communicates with a host microcontroller over the two-wire I2C bus. It is register-compatible with the popular SSD1306, yet accepts a higher VCC voltage (up to 16 V) and includes a built-in boost converter on most breakout modules, making it more forgiving in mixed-voltage designs. Current draw sits between 20 mA and 40 mA at full brightness, and all pixels are monochrome — white on a black background — which keeps the graphics library simple and memory-efficient.

Key Specifications

The SSD1309 OLED module offers a 128×64 pixel resolution across a 2.42-inch diagonal screen. It uses the I2C interface, requiring only two signal wires (SDA and SCL) in addition to power. The module operates at 3.3 V VCC and draws 20–40 mA at full brightness. It is register-compatible with the SSD1306, supports hardware scrolling in four directions, and allows contrast adjustment from 0 to 255.

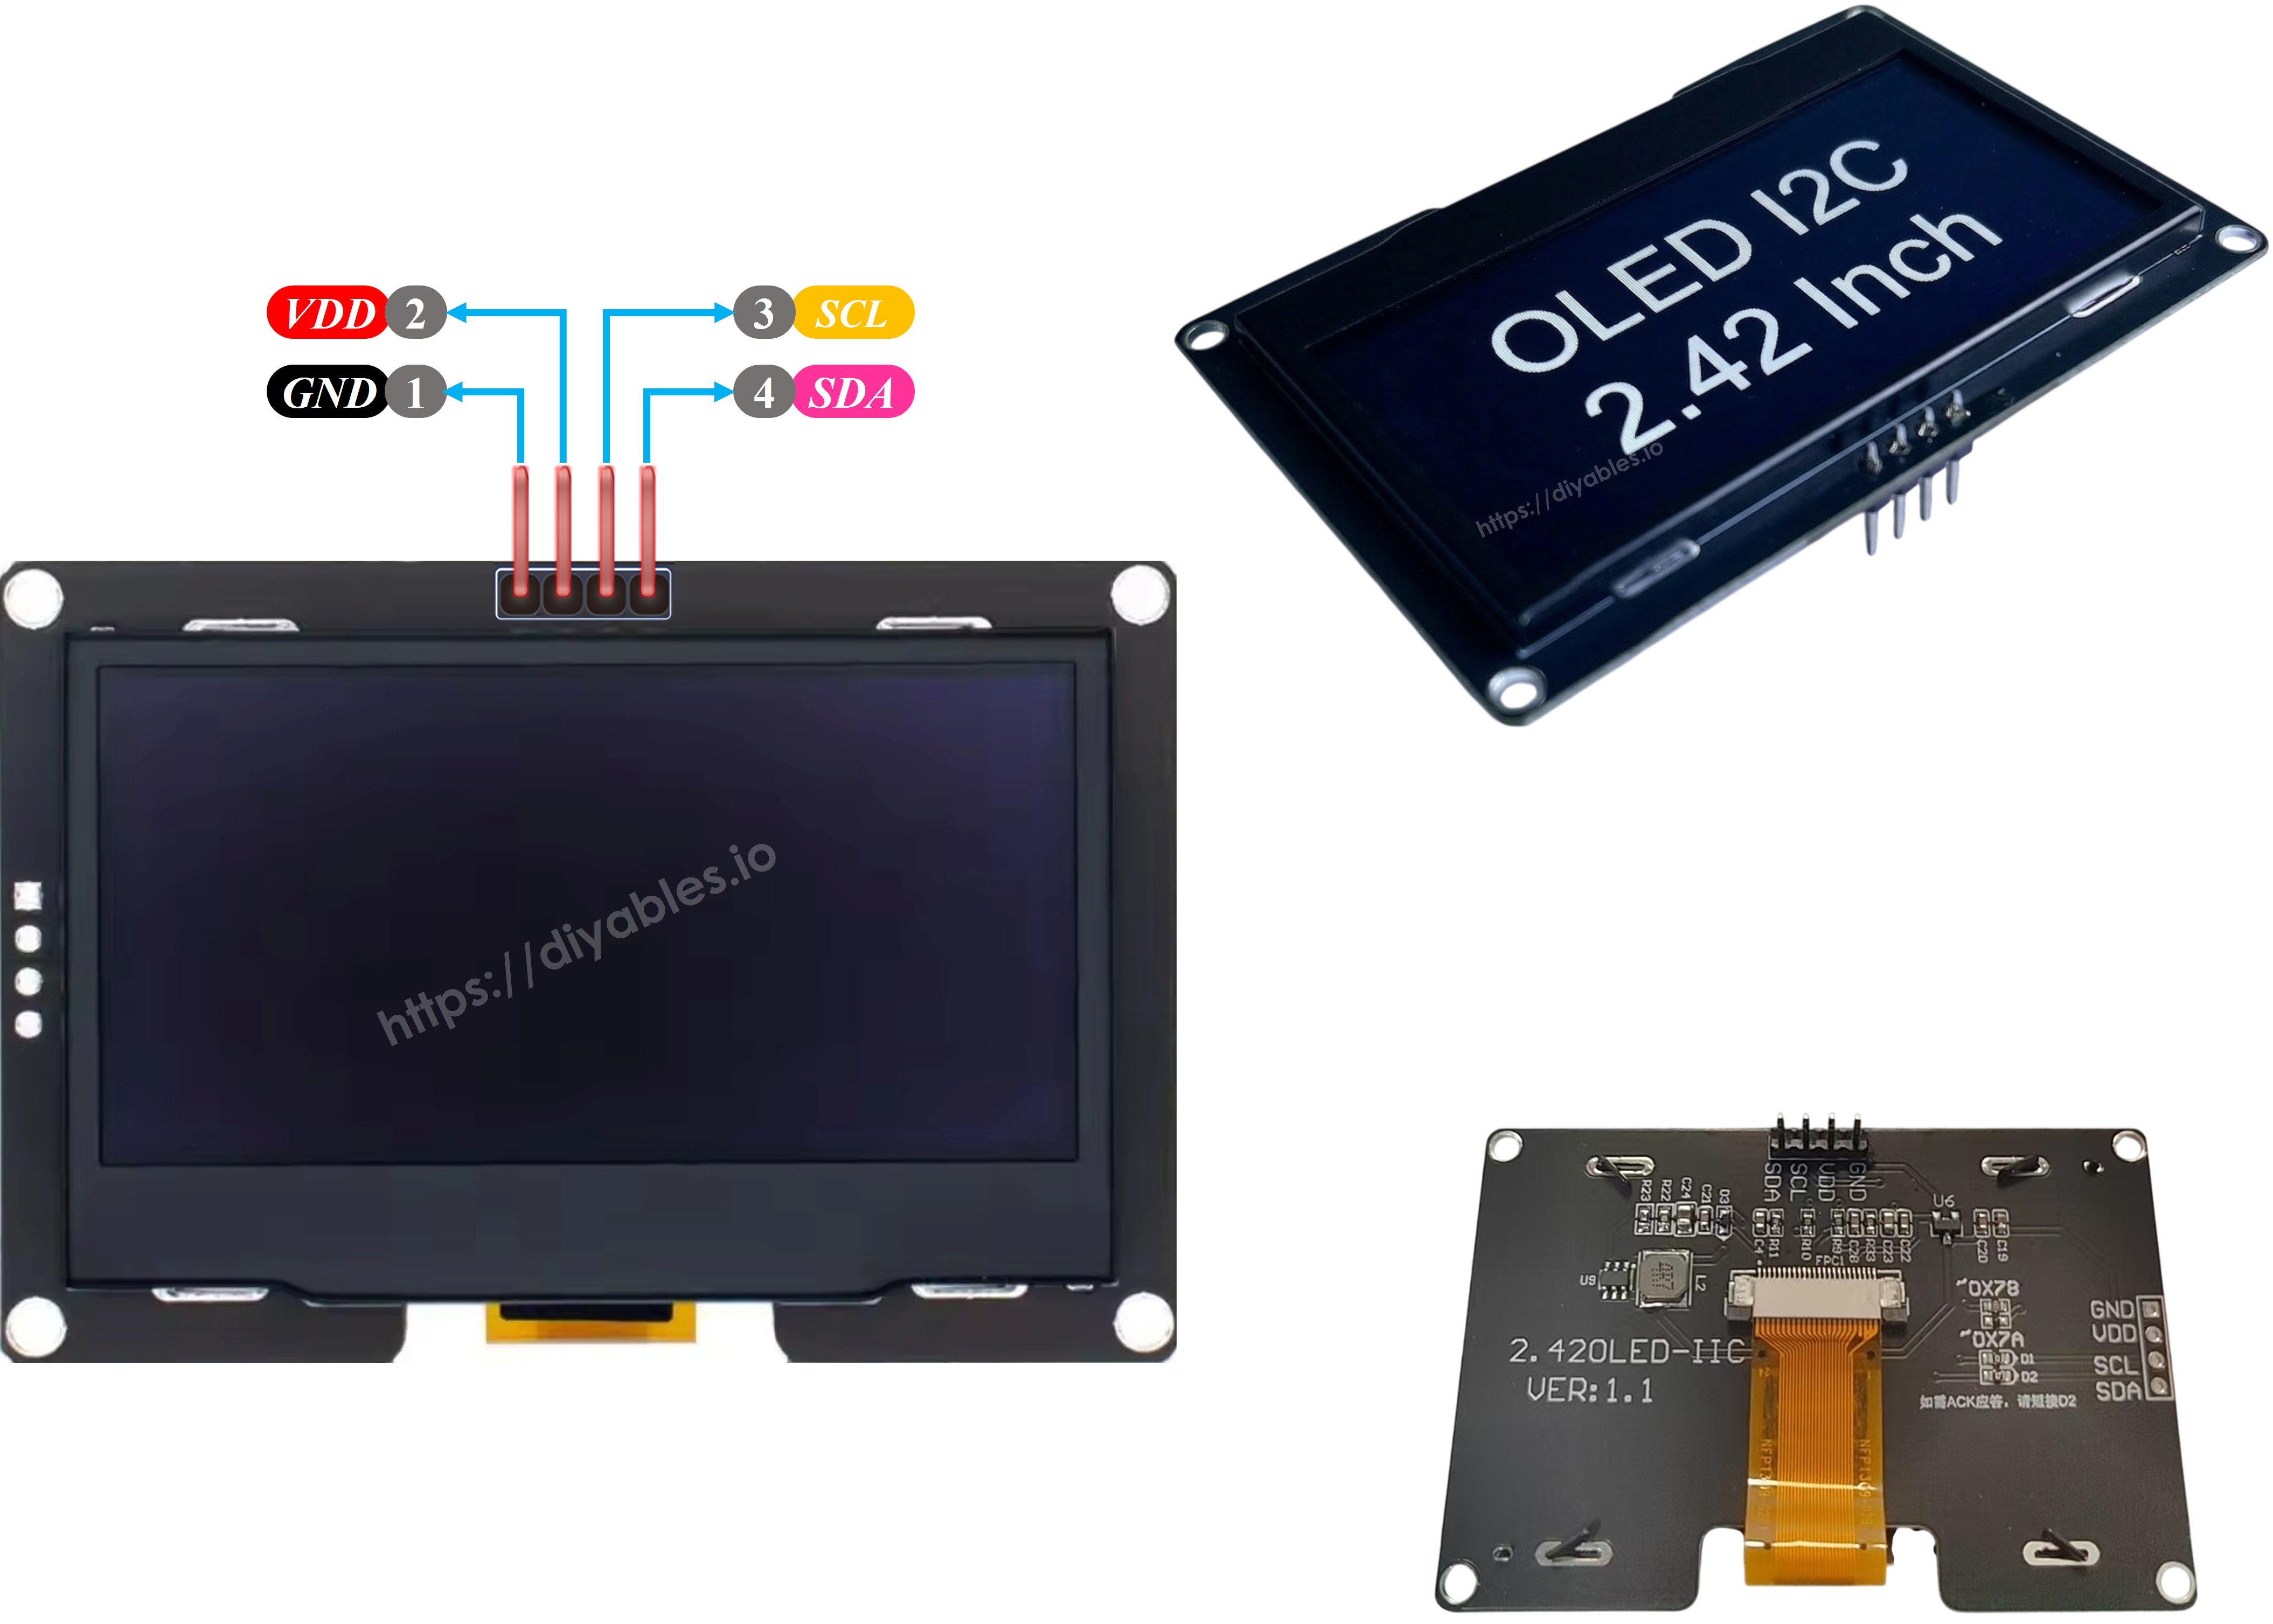
SSD1309 OLED Pinout (I2C Module)

The 2.42-inch SSD1309 OLED module exposes four pins arranged as follows:

  1. GND: Ground connection
  2. VCC: Power supply (3.3 V)
  3. SCL: I2C clock line
  4. SDA: I2C data line
SSD1309 OLED Pinout

※ NOTE THAT:

  • The pin layout of the OLED module can differ depending on the manufacturer. Always use the labels printed on the module itself.
  • This tutorial uses the SSD1309 I2C OLED from DIYables, which has been tested and confirmed to work.

Wiring Diagram

Connect the SSD1309 OLED 128×64 display to your ESP32 S3 using the four-wire I2C connection described below, making sure power is off before inserting or removing any wires. Double-check every connection against the table before applying power, as reversed VCC/GND can permanently damage the OLED module.

Safety Notes

Always power the SSD1309 from the 3.3 V rail of your ESP32 S3 rather than the 5 V pin. Although the SSD1309 tolerates higher supply voltages, the I2C signal lines are not 5 V tolerant on most ESP32 S3 boards, so keeping the entire circuit at 3.3 V prevents logic-level conflicts. The I2C bus (SDA/SCL) can be shared with other I2C peripherals without additional hardware.
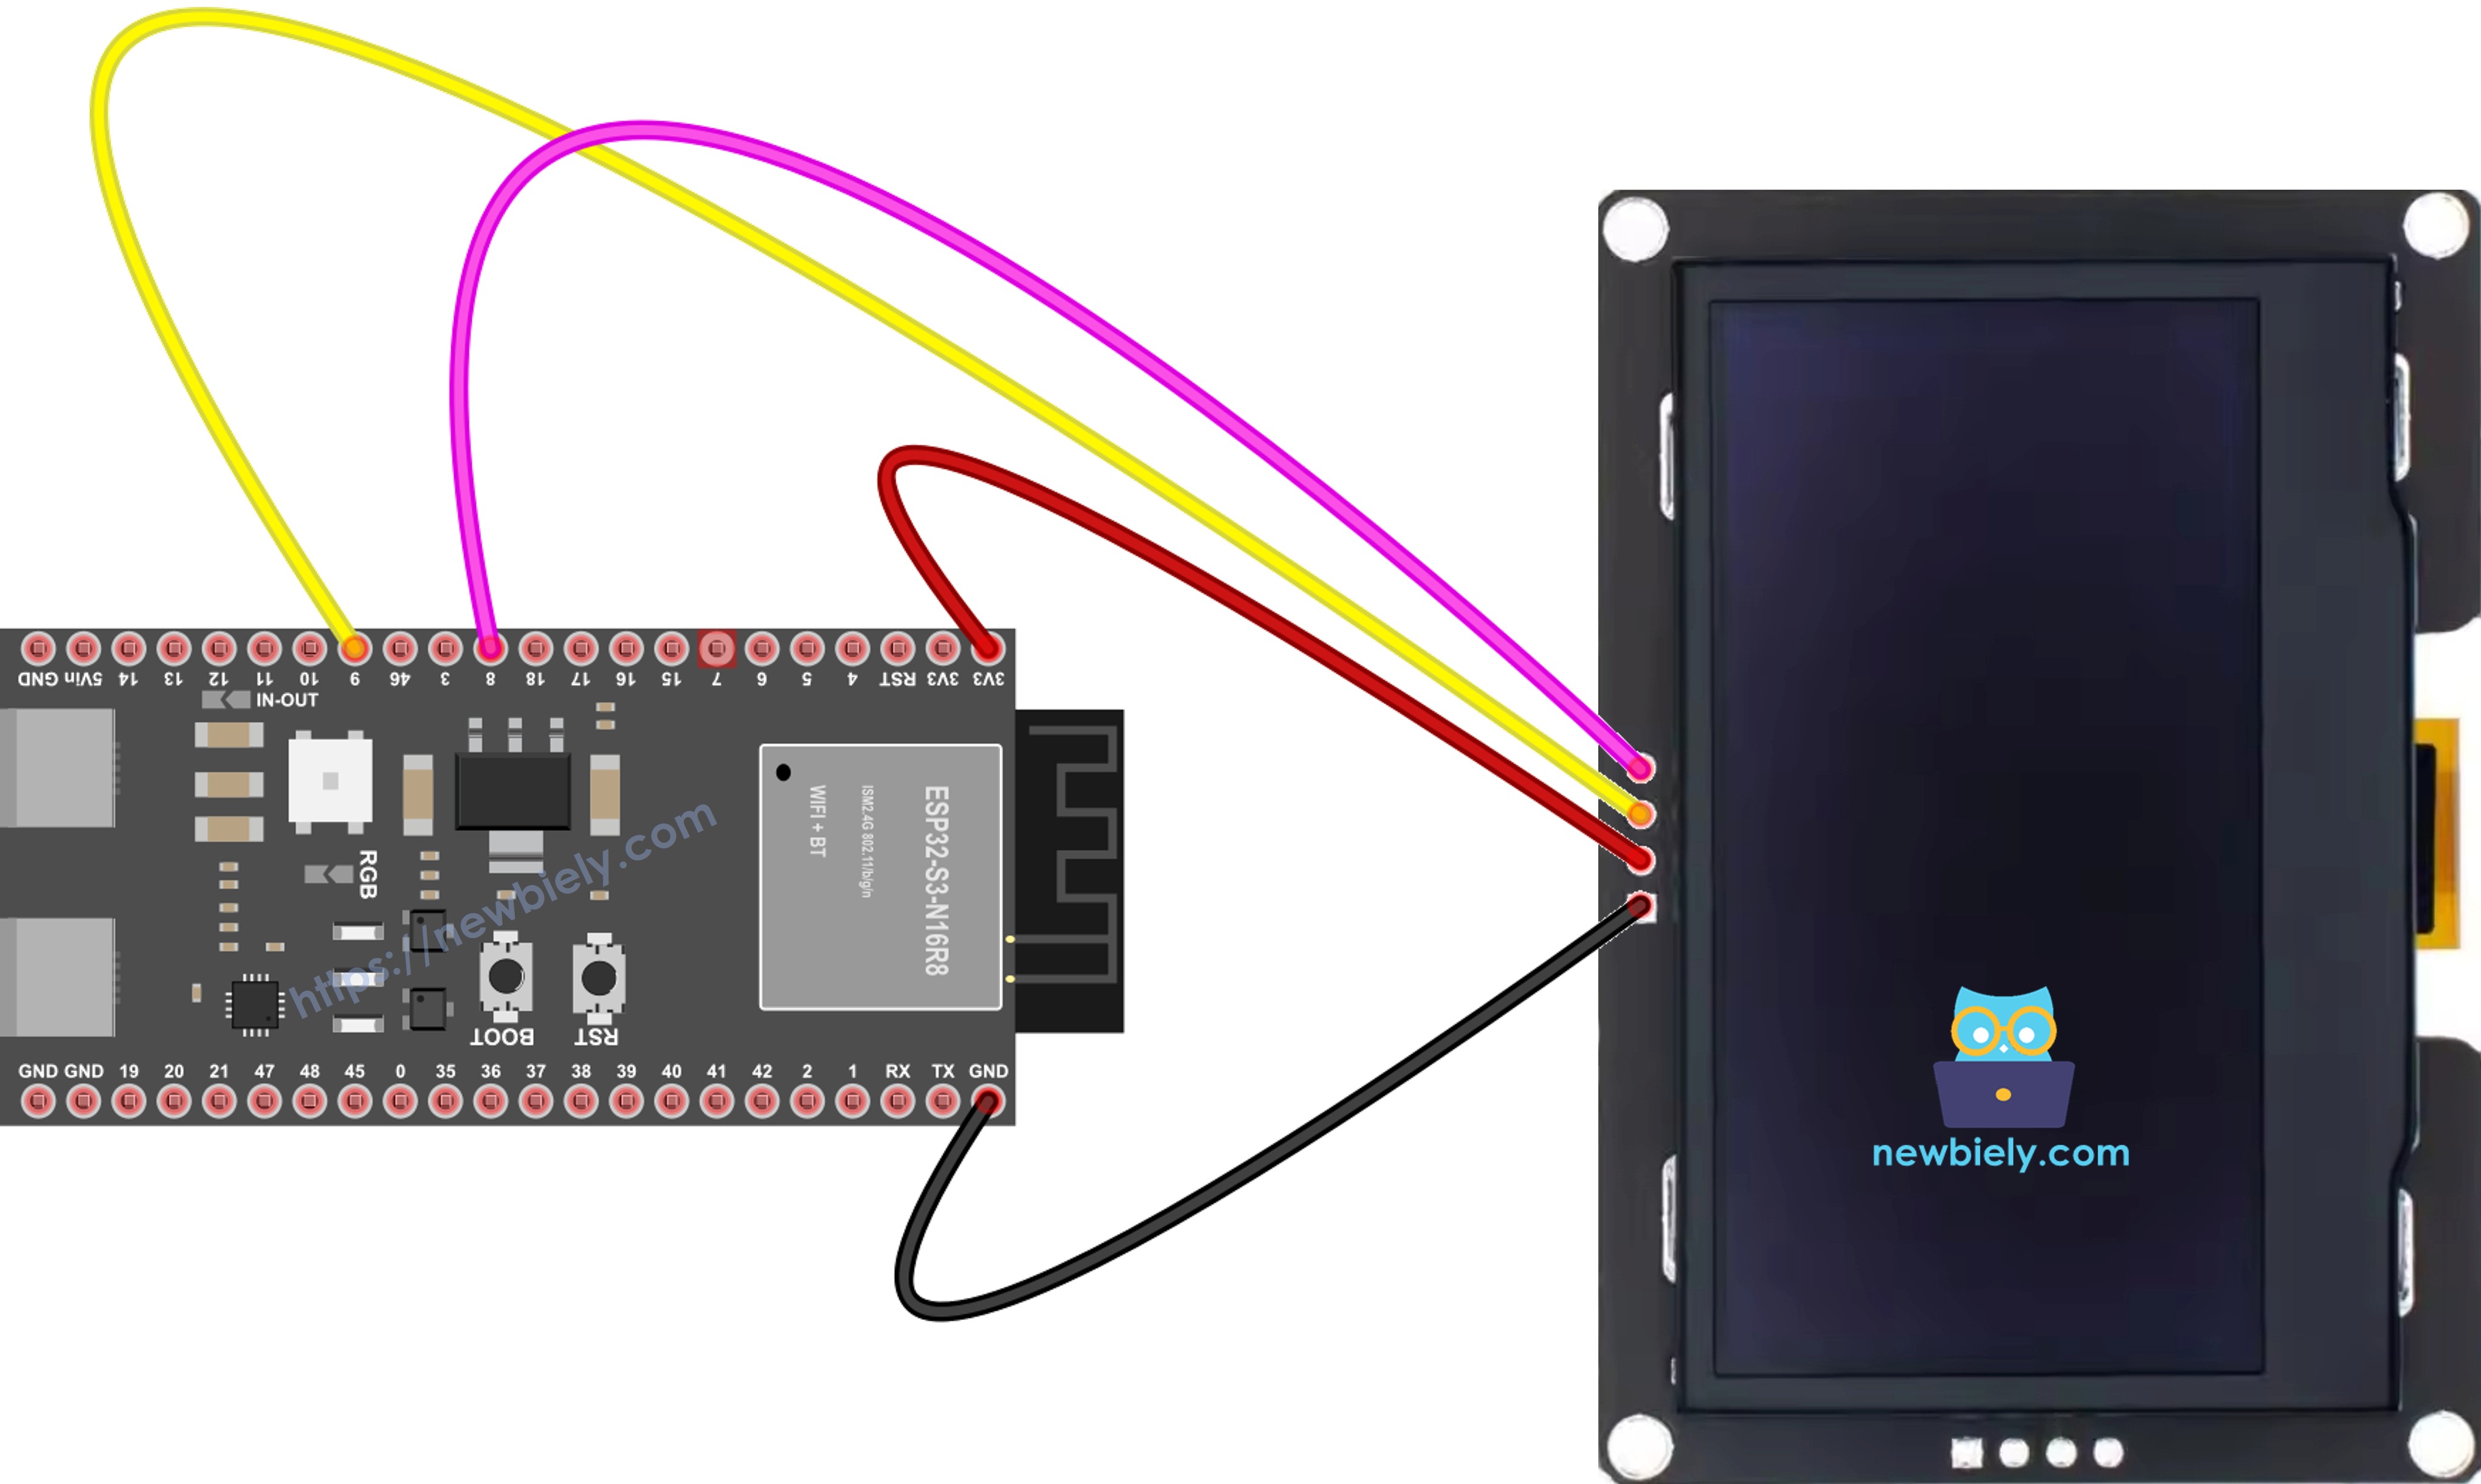
The wiring diagram between ESP32 S3 SSD1309 OLED

This image is created using Fritzing. Click to enlarge image

OLED Module ESP32 S3
VCC 3.3V
GND GND
SDA A4
SCL A5

※ NOTE THAT:

  • Note: Make sure connections are secure before powering on
  • Note: The I2C pins (A4/A5) can be shared with other I2C devices

How to Program ESP32 S3 for SSD1309 OLED

Programming the ESP32 S3 for the SSD1309 OLED involves installing the DIYables_OLED_SSD1309 library, which builds on the Adafruit GFX framework and exposes a straightforward API for text, shapes, bitmaps, and hardware scrolling. Once the library is in place, every sketch follows the same pattern: include headers, declare the display object, call begin() in setup(), draw into the frame buffer, then call display() to push the buffer to the physical screen.

Install the DIYables_OLED_SSD1309 Library

  • Click to the Libraries icon on the left bar of the Arduino IDE.
  • Search for DIYables_OLED_SSD1309, then find the DIYables OLED SSD1309 library by DIYables.
  • Click Install to install the DIYables_OLED_SSD1309 library.
  • Search for DIYables_OLED_SSD1309 created by DIYables and click the Install button.
Newbiely | Arduino IDE 2.3.8
──
File
Edit
Sketch
Tools
Help
ESP32S3 Dev Module
Library Manager
Type:
All
Topic:
All
DIYables_OLED_SSD1309 by DIYables
Supports 128x64 and 128x32 SSD1309-based monochrome OLED displays over I2C. API compatible with Adafruit_SSD1306. Extends Adafruit_GFX for full graphics support. Works with all Arduino-compatible boards. More info
1.0.2
INSTALL
Newbiely.ino
···
1 void setup() {
Output
Serial Monitor
Ln 1, Col 1
ESP32S3 Dev Module on COM15
1
  • You will be asked to install dependencies for the library.
  • Click Install All to install all required dependencies.

Programming Steps

1. Include the required libraries

#include <Wire.h> #include <Adafruit_GFX.h> #include <DIYables_OLED_SSD1309.h>

2. Define the screen dimensions

#define SCREEN_WIDTH 128 #define SCREEN_HEIGHT 64

3. Declare the display object

#define OLED_RESET -1 // Reset pin not used on most I2C modules #define SCREEN_ADDRESS 0x3C DIYables_OLED_SSD1309 display(SCREEN_WIDTH, SCREEN_HEIGHT, &Wire, OLED_RESET);

4. Initialize the OLED in setup()

if (!display.begin(SSD1309_SWITCHCAPVCC, SCREEN_ADDRESS)) { Serial.println(F("SSD1309 allocation failed")); for (;;); // halt }

5. Display content

display.clearDisplay(); display.setTextSize(2); display.setTextColor(SSD1309_PIXEL_ON); display.setCursor(0, 20); display.println(F("Hello ESP32")); display.display(); // push buffer to screen

ESP32 S3 Code — Hello World on SSD1309 OLED

The following code demonstrates the simplest possible use of the SSD1309 OLED: initializing the display, writing "Hello World" to the frame buffer, and calling display() to render it on screen. It is the ideal starting point for confirming that your wiring and library installation are both correct before moving on to more complex sketches.

/* * This ESP32 S3 code was developed by newbiely.com * * This ESP32 S3 code is made available for public use without any restriction * * For comprehensive instructions and wiring diagrams, please visit: * https://newbiely.com/tutorials/esp32-s3/esp32-s3-ssd1309-oled-display */ /* * DIYables OLED SSD1309 – Hello World * Prints text in two sizes on the 2.42 inch 128x64 I2C OLED with Arduino Nano. */ #include <Wire.h> #include <Adafruit_GFX.h> #include <DIYables_OLED_SSD1309.h> #define SCREEN_WIDTH 128 #define SCREEN_HEIGHT 64 #define OLED_RESET -1 #define SCREEN_ADDRESS 0x3C DIYables_OLED_SSD1309 display(SCREEN_WIDTH, SCREEN_HEIGHT, &Wire, OLED_RESET); void setup() { Serial.begin(115200); if (!display.begin(SSD1309_SWITCHCAPVCC, SCREEN_ADDRESS)) { Serial.println(F("SSD1309 allocation failed")); for (;;); } display.clearDisplay(); display.setTextSize(1); // 6x8 pixels per character display.setTextColor(SSD1309_PIXEL_ON); // turn pixels on display.setCursor(0, 0); display.println(F("Hello, World!")); display.println(); display.setTextSize(2); // 12x16 pixels per character display.println(F("DIYables")); display.setTextSize(1); display.println(); display.println(F("SSD1309 OLED 128x64")); display.display(); // push buffer to screen } void loop() { }

ESP32 S3 Code — Display Text on SSD1309 OLED

The following code demonstrates advanced text features of the SSD1309 library, including rendering strings at multiple sizes, printing integers and floating-point numbers, and using the F() macro to keep string literals in flash rather than RAM. Understanding these fundamentals makes it straightforward to build any text-based interface on the 128×64 screen.

/* * This ESP32 S3 code was developed by newbiely.com * * This ESP32 S3 code is made available for public use without any restriction * * For comprehensive instructions and wiring diagrams, please visit: * https://newbiely.com/tutorials/esp32-s3/esp32-s3-ssd1309-oled-display */ /* * DIYables OLED SSD1309 – Display Text * Displays text in various sizes and formats on the 2.42" SSD1309 OLED with Arduino Nano. */ #include <Wire.h> #include <Adafruit_GFX.h> #include <DIYables_OLED_SSD1309.h> #define SCREEN_WIDTH 128 #define SCREEN_HEIGHT 64 #define OLED_RESET -1 #define SCREEN_ADDRESS 0x3C DIYables_OLED_SSD1309 display(SCREEN_WIDTH, SCREEN_HEIGHT, &Wire, OLED_RESET); void setup() { Serial.begin(115200); if (!display.begin(SSD1309_SWITCHCAPVCC, SCREEN_ADDRESS)) { Serial.println(F("SSD1309 allocation failed")); for (;;); } display.clearDisplay(); // Various text sizes display.setTextSize(1); display.setTextColor(SSD1309_PIXEL_ON); display.setCursor(0, 0); display.println(F("Size 1 - DIYables")); display.setTextSize(2); display.println(F("Size 2")); display.setTextSize(3); display.println(F("Sz3")); display.display(); delay(3000); // Number formatting display.clearDisplay(); display.setTextSize(1); display.setCursor(0, 0); int value = 42; float pi = 3.14159; display.print(F("Integer: ")); display.println(value); display.print(F("Float: ")); display.println(pi, 2); // 2 decimal places display.print(F("Hex: 0x")); display.println(value, HEX); display.print(F("Binary: 0b")); display.println(value, BIN); display.display(); } void loop() { }

Useful Display Functions Reference

Basic display control:

  • oled.clearDisplay() — wipe the frame buffer (all pixels off)
  • oled.display() — transfer the buffer to the OLED so changes become visible
  • oled.drawPixel(x, y, color) — set or clear an individual pixel

Text functions:

  • oled.setTextSize(n) — scale the font by factor *n* (1 = 6×8, 2 = 12×16, etc.)
  • oled.setCursor(x, y) — move the text cursor to pixel coordinates *(x, y)*
  • oled.setTextColor(SSD1309_PIXEL_ON) — text foreground only (transparent background)
  • oled.setTextColor(SSD1309_PIXEL_OFF, SSD1309_PIXEL_ON) — text with explicit background color
  • oled.println("message") — print a string and advance to the next line
  • oled.println(number) — print an integer in decimal
  • oled.println(number, HEX) — print an integer in hexadecimal

Hardware scrolling:

  • oled.startscrollright(start, stop) — hardware-scroll right between page *start* and *stop*
  • oled.startscrollleft(start, stop) — hardware-scroll left
  • oled.startscrolldiagright(start, stop) — hardware-scroll diagonally right
  • oled.startscrolldiagleft(start, stop) — hardware-scroll diagonally left
  • oled.stopscroll() — halt any active hardware scroll

Display settings:

  • oled.setContrast(value) — adjust display brightness (0–255)
  • oled.dim(true/false) — quickly dim or restore the display
  • oled.invertDisplay(true/false) — hardware-level color inversion

How to Vertically and Horizontally Center Text on the SSD1309 OLED

Centering text on your ESP32 S3 OLED display creates professional-looking interfaces.

See How to vertical/horizontal center on OLED

ESP32 S3 Code — Draw Shapes on SSD1309 OLED

The DIYables_OLED_SSD1309 library provides a full set of Adafruit GFX drawing primitives, so you can render pixels, lines, rectangles, circles, triangles, and rounded rectangles with a single function call each. The following code walks through all of these primitives in sequence, showing both outlined and filled variants so you can see the difference and choose the right one for your project.

/* * This ESP32 S3 code was developed by newbiely.com * * This ESP32 S3 code is made available for public use without any restriction * * For comprehensive instructions and wiring diagrams, please visit: * https://newbiely.com/tutorials/esp32-s3/esp32-s3-ssd1309-oled-display */ /* * DIYables OLED SSD1309 – Draw Shapes * Demonstrates drawing pixels, lines, rectangles, circles, and triangles on the 2.42" OLED with Arduino Nano. */ #include <Wire.h> #include <Adafruit_GFX.h> #include <DIYables_OLED_SSD1309.h> #define SCREEN_WIDTH 128 #define SCREEN_HEIGHT 64 #define OLED_RESET -1 #define SCREEN_ADDRESS 0x3C DIYables_OLED_SSD1309 display(SCREEN_WIDTH, SCREEN_HEIGHT, &Wire, OLED_RESET); void setup() { Serial.begin(115200); if (!display.begin(SSD1309_SWITCHCAPVCC, SCREEN_ADDRESS)) { Serial.println(F("SSD1309 allocation failed")); for (;;); } display.clearDisplay(); display.display(); } void loop() { // Draw pixels display.clearDisplay(); for (int i = 0; i < 20; i++) { display.drawPixel(random(SCREEN_WIDTH), random(SCREEN_HEIGHT), SSD1309_PIXEL_ON); } display.display(); delay(2000); // Draw lines display.clearDisplay(); for (int y = 0; y < SCREEN_HEIGHT; y += 8) { display.drawLine(0, 0, SCREEN_WIDTH - 1, y, SSD1309_PIXEL_ON); } display.display(); delay(2000); // Draw rectangles display.clearDisplay(); display.drawRect(10, 10, 40, 30, SSD1309_PIXEL_ON); // outline display.fillRect(60, 10, 40, 30, SSD1309_PIXEL_ON); // filled display.drawRoundRect(10, 45, 40, 15, 5, SSD1309_PIXEL_ON); // rounded corners display.display(); delay(2000); // Draw circles display.clearDisplay(); display.drawCircle(32, 32, 20, SSD1309_PIXEL_ON); // outline display.fillCircle(96, 32, 20, SSD1309_PIXEL_ON); // filled display.display(); delay(2000); // Draw triangles display.clearDisplay(); display.drawTriangle(20, 10, 10, 50, 30, 50, SSD1309_PIXEL_ON); // outline display.fillTriangle(90, 10, 70, 50, 110, 50, SSD1309_PIXEL_ON); // filled display.display(); delay(2000); }

ESP32 S3 Code — Hardware Scrolling on SSD1309 OLED

The SSD1309 OLED includes built-in hardware scrolling that moves content smoothly without consuming CPU cycles during the scroll operation. The following code demonstrates all four scroll directions — right, left, diagonal-right, and diagonal-left — and shows how to stop scrolling cleanly before drawing new content.

※ NOTE THAT:

Call display() to push your content to the OLED before starting a scroll. Stop scrolling with stopscroll() before drawing new content.

/* * This ESP32 S3 code was developed by newbiely.com * * This ESP32 S3 code is made available for public use without any restriction * * For comprehensive instructions and wiring diagrams, please visit: * https://newbiely.com/tutorials/esp32-s3/esp32-s3-ssd1309-oled-display */ /* * DIYables OLED SSD1309 – Scroll Text * Demonstrates all four hardware scroll directions on the 2.42" OLED with Arduino Nano. */ #include <Wire.h> #include <Adafruit_GFX.h> #include <DIYables_OLED_SSD1309.h> #define SCREEN_WIDTH 128 #define SCREEN_HEIGHT 64 #define OLED_RESET -1 #define SCREEN_ADDRESS 0x3C DIYables_OLED_SSD1309 display(SCREEN_WIDTH, SCREEN_HEIGHT, &Wire, OLED_RESET); void setup() { Serial.begin(115200); if (!display.begin(SSD1309_SWITCHCAPVCC, SCREEN_ADDRESS)) { Serial.println(F("SSD1309 allocation failed")); for (;;); } display.clearDisplay(); display.setTextSize(2); display.setTextColor(SSD1309_PIXEL_ON); display.setCursor(10, 24); display.println(F("DIYables")); display.display(); delay(2000); } void loop() { // Scroll right across all pages display.startscrollright(0x00, 0x07); delay(3000); display.stopscroll(); delay(500); // Scroll left display.startscrollleft(0x00, 0x07); delay(3000); display.stopscroll(); delay(500); // Diagonal scroll right display.startscrolldiagright(0x00, 0x07); delay(3000); display.stopscroll(); delay(500); // Diagonal scroll left display.startscrolldiagleft(0x00, 0x07); delay(3000); display.stopscroll(); delay(500); }

ESP32 S3 Code — Display Bitmap Image on SSD1309 OLED

You can render custom images on the SSD1309 OLED by converting them to monochrome byte arrays and storing those arrays in PROGMEM. The following code shows how to declare a bitmap and draw it at a specified position on the 128×64 screen.

How to convert images:

  1. Upload your image (PNG, JPG, BMP, etc.)
  2. Set canvas size to 128×64 (or smaller)
  3. Choose Arduino code as output format
  4. Copy the generated array into your sketch
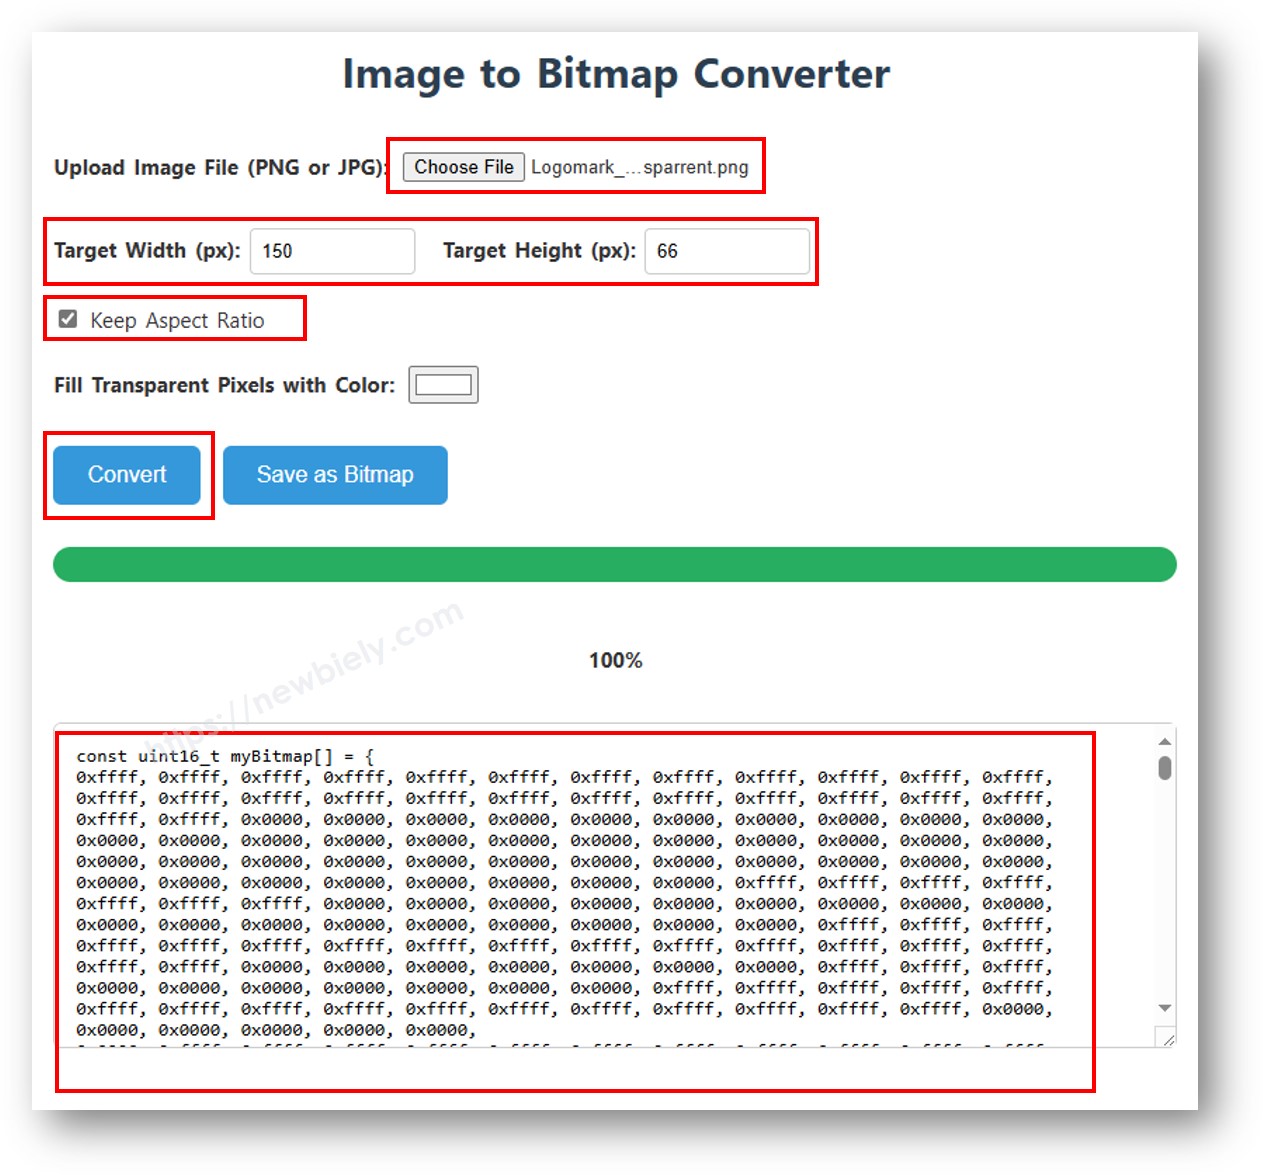
image to bitmap array
/* * This ESP32 S3 code was developed by newbiely.com * * This ESP32 S3 code is made available for public use without any restriction * * For comprehensive instructions and wiring diagrams, please visit: * https://newbiely.com/tutorials/esp32-s3/esp32-s3-ssd1309-oled-display */ /* * DIYables OLED SSD1309 – Display Bitmap Image * Shows a 16x16 heart icon and 128x64 DIYables logo on the 2.42" OLED with Arduino Nano. */ #include <Wire.h> #include <Adafruit_GFX.h> #include <DIYables_OLED_SSD1309.h> #define SCREEN_WIDTH 128 #define SCREEN_HEIGHT 64 #define OLED_RESET -1 #define SCREEN_ADDRESS 0x3C DIYables_OLED_SSD1309 display(SCREEN_WIDTH, SCREEN_HEIGHT, &Wire, OLED_RESET); // 16x16 heart icon bitmap const unsigned char heart_icon[] PROGMEM = { 0x00, 0x00, 0x0c, 0x30, 0x1e, 0x78, 0x3f, 0xfc, 0x7f, 0xfe, 0xff, 0xff, 0xff, 0xff, 0xff, 0xff, 0xff, 0xff, 0xff, 0xff, 0x7f, 0xfe, 0x3f, 0xfc, 0x1f, 0xf8, 0x0f, 0xf0, 0x03, 0xc0, 0x00, 0x00 }; // 128x64 DIYables logo bitmap const unsigned char diyables_logo[] PROGMEM = { 0xff, 0xff, 0xff, 0xff, 0xff, 0xff, 0xff, 0xff, 0xff, 0xff, 0xff, 0xff, 0xff, 0xff, 0xff, 0xff, 0xff, 0xff, 0xff, 0xff, 0xff, 0xff, 0xff, 0xff, 0xff, 0xff, 0xff, 0xff, 0xff, 0xff, 0xff, 0xff, 0xff, 0xff, 0xff, 0xff, 0xff, 0xff, 0xff, 0xff, 0xff, 0xff, 0xff, 0xff, 0xff, 0xff, 0xff, 0xff, 0xff, 0xff, 0xff, 0xff, 0xff, 0xff, 0xff, 0xff, 0xff, 0xff, 0xff, 0xff, 0xff, 0xff, 0xff, 0xff, 0xff, 0xff, 0xff, 0xff, 0xff, 0xff, 0xff, 0xff, 0xff, 0xff, 0xff, 0xff, 0xff, 0xff, 0xff, 0xff, 0xff, 0xff, 0xff, 0xff, 0xff, 0xff, 0xff, 0xff, 0xff, 0xff, 0xff, 0xff, 0xff, 0xff, 0xff, 0xff, 0xff, 0xff, 0xff, 0xff, 0xff, 0xff, 0xff, 0xff, 0xff, 0xff, 0xff, 0xff, 0xff, 0xff, 0xff, 0xff, 0xff, 0xff, 0xff, 0xff, 0xff, 0xff, 0xff, 0xff, 0xff, 0xff, 0xff, 0xff, 0xff, 0xff, 0xff, 0xff, 0xff, 0xff, 0xff, 0xff, 0xff, 0xff, 0xff, 0xff, 0xff, 0xff, 0xff, 0xff, 0xff, 0xff, 0xff, 0xff, 0xff, 0xff, 0xff, 0xff, 0xff, 0xff, 0xff, 0xff, 0xff, 0xff, 0xff, 0xff, 0xff, 0xff, 0xff, 0xff, 0xff, 0xff, 0xff, 0xff, 0xff, 0xff, 0xff, 0xff, 0xff, 0xff, 0xff, 0xff, 0xff, 0xff, 0xff, 0xff, 0xff, 0xff, 0xff, 0xff, 0xff, 0xff, 0xff, 0xff, 0xff, 0xff, 0xff, 0xff, 0xff, 0xff, 0xff, 0xff, 0xff, 0xff, 0xff, 0xff, 0xff, 0xff, 0xff, 0xff, 0xff, 0xff, 0xff, 0xff, 0xff, 0xff, 0xff, 0xff, 0xff, 0xff, 0xff, 0xff, 0xff, 0xff, 0xff, 0xff, 0xff, 0xff, 0xff, 0xff, 0xff, 0xff, 0xff, 0xff, 0xff, 0xff, 0xff, 0xff, 0xff, 0xff, 0xff, 0xff, 0xff, 0xff, 0xff, 0xff, 0xff, 0xff, 0xff, 0xff, 0xff, 0xff, 0xff, 0xff, 0xff, 0xff, 0xff, 0xff, 0xff, 0xff, 0xff, 0xff, 0xff, 0xff, 0xff, 0xff, 0xff, 0xff, 0xff, 0xf0, 0x00, 0x00, 0x00, 0x00, 0x00, 0x00, 0x00, 0x00, 0x00, 0x00, 0x0f, 0xff, 0xff, 0xff, 0xff, 0x80, 0x00, 0x00, 0x00, 0x00, 0x00, 0x00, 0x00, 0x00, 0x00, 0x00, 0x01, 0xff, 0xff, 0xff, 0xff, 0x00, 0x00, 0x00, 0x00, 0x00, 0x00, 0x00, 0x00, 0x00, 0x00, 0x00, 0x00, 0xff, 0xff, 0xff, 0xfe, 0x00, 0x07, 0xff, 0xc1, 0xff, 0xe0, 0x7f, 0xf0, 0x1f, 0xfc, 0x03, 0x00, 0x7f, 0xff, 0xff, 0xfc, 0x00, 0x1f, 0xff, 0xf7, 0xff, 0xf9, 0xff, 0xfc, 0x7f, 0xff, 0x0f, 0x80, 0x3f, 0xff, 0xff, 0xf8, 0x00, 0x3f, 0xff, 0xff, 0xff, 0xfd, 0xff, 0xfe, 0xff, 0xff, 0x9f, 0xc0, 0x1f, 0xff, 0xff, 0xf8, 0x00, 0x7f, 0x80, 0xff, 0x00, 0x7f, 0xc0, 0x3f, 0xf0, 0x0f, 0xfc, 0x00, 0x1f, 0xff, 0xff, 0xf0, 0x00, 0xfe, 0x00, 0x7f, 0x00, 0x3f, 0x80, 0x1f, 0xe0, 0x07, 0xf8, 0x00, 0x0f, 0xff, 0xff, 0xe0, 0x01, 0xfc, 0x00, 0x3e, 0x00, 0x1f, 0x00, 0x0f, 0xc0, 0x03, 0xf0, 0x00, 0x0f, 0xff, 0xff, 0xe0, 0x03, 0xf8, 0x00, 0x3e, 0x00, 0x1f, 0x00, 0x0f, 0xc0, 0x03, 0xf0, 0x00, 0x07, 0xff, 0xff, 0xc0, 0x07, 0xf8, 0x00, 0x3e, 0x00, 0x1f, 0x00, 0x0f, 0xc0, 0x03, 0xf0, 0x00, 0x03, 0xff, 0xff, 0xc0, 0x0f, 0xf8, 0x00, 0x3e, 0x00, 0x1f, 0x00, 0x0f, 0xc0, 0x03, 0xf0, 0x00, 0x03, 0xff, 0xff, 0x80, 0x0f, 0xf8, 0x00, 0x3e, 0x00, 0x1f, 0x00, 0x0f, 0xc0, 0x03, 0xf0, 0x00, 0x01, 0xff, 0xff, 0x80, 0x1f, 0xf8, 0x00, 0x3e, 0x00, 0x1f, 0x00, 0x0f, 0xc0, 0x03, 0xf0, 0x00, 0x01, 0xff, 0xff, 0x00, 0x3f, 0xf8, 0x00, 0x3e, 0x00, 0x1f, 0x00, 0x0f, 0xc0, 0x03, 0xf0, 0x00, 0x00, 0xff, 0xff, 0x00, 0x3f, 0xf8, 0x00, 0x3e, 0x00, 0x1f, 0x00, 0x0f, 0xc0, 0x03, 0xf0, 0x00, 0x00, 0xff, 0xfe, 0x00, 0x7f, 0xf8, 0x00, 0x3e, 0x00, 0x1f, 0x00, 0x0f, 0xc0, 0x03, 0xf0, 0x00, 0x00, 0xff, 0xfe, 0x00, 0x7f, 0xf8, 0x00, 0x3e, 0x00, 0x1f, 0x00, 0x0f, 0xc0, 0x03, 0xf0, 0x00, 0x00, 0xff, 0xfc, 0x00, 0xff, 0xf8, 0x00, 0x3e, 0x00, 0x1f, 0x00, 0x0f, 0xc0, 0x03, 0xf0, 0x00, 0x00, 0xff, 0xfc, 0x00, 0xff, 0xf8, 0x00, 0x3e, 0x00, 0x1f, 0x00, 0x0f, 0xc0, 0x03, 0xf0, 0x00, 0x00, 0xff, 0xfc, 0x01, 0xff, 0xf8, 0x00, 0x3e, 0x00, 0x1f, 0x00, 0x0f, 0xc0, 0x03, 0xf0, 0x00, 0x00, 0xff, 0xf8, 0x01, 0xff, 0xf8, 0x00, 0x3e, 0x00, 0x1f, 0x00, 0x0f, 0xc0, 0x03, 0xf0, 0x00, 0x00, 0xff, 0xf8, 0x03, 0xff, 0xf8, 0x00, 0x3e, 0x00, 0x1f, 0x00, 0x0f, 0xc0, 0x03, 0xf0, 0x00, 0x00, 0xff, 0xf0, 0x03, 0xff, 0xfc, 0x00, 0x7e, 0x00, 0x1f, 0x80, 0x1f, 0xe0, 0x07, 0xf8, 0x00, 0x00, 0xff, 0xf0, 0x07, 0xff, 0x7f, 0x80, 0xff, 0x00, 0x7f, 0xc0, 0x3f, 0xf0, 0x0f, 0xfc, 0x00, 0x00, 0xff, 0xf0, 0x07, 0xfe, 0x3f, 0xff, 0xff, 0xff, 0xfd, 0xff, 0xfe, 0xff, 0xff, 0x9f, 0xc0, 0x00, 0xff, 0xe0, 0x0f, 0xfc, 0x1f, 0xff, 0xf7, 0xff, 0xf9, 0xff, 0xfc, 0x7f, 0xff, 0x0f, 0x80, 0x00, 0xff, 0xe0, 0x0f, 0xf8, 0x07, 0xff, 0xc1, 0xff, 0xe0, 0x7f, 0xf0, 0x1f, 0xfc, 0x03, 0x00, 0x00, 0xff, 0xe0, 0x1f, 0xf0, 0x00, 0x00, 0x00, 0x00, 0x00, 0x00, 0x00, 0x00, 0x00, 0x00, 0x00, 0x00, 0xff, 0xc0, 0x1f, 0xe0, 0x00, 0x00, 0x00, 0x00, 0x00, 0x00, 0x00, 0x00, 0x00, 0x00, 0x00, 0x00, 0xff, 0xc0, 0x3f, 0xc0, 0x00, 0x00, 0x00, 0x00, 0x00, 0x00, 0x00, 0x00, 0x00, 0x00, 0x00, 0x00, 0xff, 0xc0, 0x3f, 0x80, 0x00, 0x00, 0x00, 0x00, 0x00, 0x00, 0x00, 0x00, 0x00, 0x00, 0x00, 0x00, 0xff, 0x80, 0x7f, 0x00, 0xff, 0xff, 0xff, 0xff, 0xff, 0xff, 0xff, 0xff, 0xff, 0xff, 0xff, 0xff, 0xff, 0x80, 0x7f, 0x00, 0xff, 0xff, 0xff, 0xff, 0xff, 0xff, 0xff, 0xff, 0xff, 0xff, 0xff, 0xff, 0xff, 0x80, 0xfe, 0x00, 0xff, 0xff, 0xff, 0xff, 0xff, 0xff, 0xff, 0xff, 0xff, 0xff, 0xff, 0xff, 0xff, 0x00, 0xfc, 0x00, 0xff, 0xff, 0xff, 0xff, 0xff, 0xff, 0xff, 0xff, 0xff, 0xff, 0xff, 0xff, 0xff, 0x01, 0xf8, 0x00, 0xff, 0xff, 0xff, 0xff, 0xff, 0xff, 0xff, 0xff, 0xff, 0xff, 0xff, 0xff, 0xff, 0x01, 0xf0, 0x00, 0xff, 0xff, 0xff, 0xff, 0xff, 0xff, 0xff, 0xff, 0xff, 0xff, 0xff, 0xff, 0xfe, 0x03, 0xe0, 0x00, 0xff, 0xff, 0xff, 0xff, 0xff, 0xff, 0xff, 0xff, 0xff, 0xff, 0xff, 0xff, 0xfe, 0x07, 0xc0, 0x00, 0xff, 0xff, 0xff, 0xff, 0xff, 0xff, 0xff, 0xff, 0xff, 0xff, 0xff, 0xff, 0xfc, 0x0f, 0x80, 0x00, 0xff, 0xff, 0xff, 0xff, 0xff, 0xff, 0xff, 0xff, 0xff, 0xff, 0xff, 0xff, 0xf8, 0x1f, 0x00, 0x00, 0xff, 0xff, 0xff, 0xff, 0xff, 0xff, 0xff, 0xff, 0xff, 0xff, 0xff, 0xff, 0xf0, 0x3e, 0x00, 0x00, 0xff, 0xff, 0xff, 0xff, 0xff, 0xff, 0xff, 0xff, 0xff, 0xff, 0xff, 0xff, 0xe0, 0x7c, 0x00, 0x00, 0xff, 0xff, 0xff, 0xff, 0xff, 0xff, 0xff, 0xff, 0xff, 0xff, 0xff, 0xff, 0xc0, 0xf8, 0x00, 0x00, 0xff, 0xff, 0xff, 0xff, 0xff, 0xff, 0xff, 0xff, 0xff, 0xff, 0xff, 0xff, 0x81, 0xf0, 0x00, 0x00, 0xff, 0xff, 0xff, 0xff, 0xff, 0xff, 0xff, 0xff, 0xff, 0xff, 0xff, 0xff, 0x03, 0xe0, 0x00, 0x00, 0xff, 0xff, 0xff, 0xff, 0xff, 0xff, 0xff, 0xff, 0xff, 0xff, 0xff, 0xff }; void setup() { Serial.begin(115200); if (!display.begin(SSD1309_SWITCHCAPVCC, SCREEN_ADDRESS)) { Serial.println(F("SSD1309 allocation failed")); for (;;); } display.clearDisplay(); display.display(); } void loop() { // Display small heart icon centered display.clearDisplay(); display.drawBitmap((SCREEN_WIDTH - 16) / 2, (SCREEN_HEIGHT - 16) / 2, heart_icon, 16, 16, SSD1309_PIXEL_ON); display.display(); delay(3000); // Display full-screen DIYables logo display.clearDisplay(); display.drawBitmap(0, 0, diyables_logo, SCREEN_WIDTH, SCREEN_HEIGHT, SSD1309_PIXEL_ON); display.display(); delay(3000); // Invert display display.invertDisplay(true); delay(2000); display.invertDisplay(false); delay(1000); }

※ NOTE THAT:

  • Bitmap dimensions must not exceed 128×64 for this module
  • Images are automatically converted to monochrome (black and white)

ESP32 S3 Code — Contrast and Dim on SSD1309 OLED

The SSD1309 supports fine-grained brightness control through both a setContrast() function that accepts a value from 0 (minimum) to 255 (maximum) and a dim() toggle for quick brightness switching. The following code cycles through contrast levels and demonstrates the dim function so you can choose the approach that best fits your application.

/* * This ESP32 S3 code was developed by newbiely.com * * This ESP32 S3 code is made available for public use without any restriction * * For comprehensive instructions and wiring diagrams, please visit: * https://newbiely.com/tutorials/esp32-s3/esp32-s3-ssd1309-oled-display */ /* * DIYables OLED SSD1309 – Contrast & Dim * Sweeps contrast from 0→255→0 then toggles dim mode on the 2.42" OLED with Arduino Nano. */ #include <Wire.h> #include <Adafruit_GFX.h> #include <DIYables_OLED_SSD1309.h> #define SCREEN_WIDTH 128 #define SCREEN_HEIGHT 64 #define OLED_RESET -1 #define SCREEN_ADDRESS 0x3C DIYables_OLED_SSD1309 display(SCREEN_WIDTH, SCREEN_HEIGHT, &Wire, OLED_RESET); void setup() { Serial.begin(115200); if (!display.begin(SSD1309_SWITCHCAPVCC, SCREEN_ADDRESS)) { Serial.println(F("SSD1309 allocation failed")); for (;;); } // Draw a test pattern so the contrast changes are visible display.clearDisplay(); display.fillRect(0, 0, 64, 32, SSD1309_PIXEL_ON); display.fillRect(64, 32, 64, 32, SSD1309_PIXEL_ON); display.setTextSize(1); display.setTextColor(SSD1309_PIXEL_INVERSE); display.setCursor(16, 28); display.println(F("Contrast Demo")); display.display(); delay(2000); } void loop() { // Ramp up for (int c = 0; c <= 255; c += 5) { display.setContrast((uint8_t)c); delay(30); } delay(1000); // Ramp down for (int c = 255; c >= 0; c -= 5) { display.setContrast((uint8_t)c); delay(30); } delay(1000); // Quick dim toggle display.dim(true); // minimum brightness delay(2000); display.dim(false); // restore delay(2000); }

ESP32 S3 Code — Custom External Fonts on SSD1309 OLED

The Adafruit GFX library bundles dozens of professional FreeFont typefaces — Serif, Sans, and Mono families, each available in Regular, Bold, Italic, and four size variants — that you can load on your SSD1309 OLED with a single setFont() call. The following code demonstrates how to include a font header, switch between fonts, and display text in multiple styles on the same screen.

※ NOTE THAT:

  • When an external font is active, the cursor Y coordinate refers to the text baseline, not the top-left corner
  • External fonts are stored in flash (PROGMEM). Use them thoughtfully to stay within the ESP32 S3 flash budget
/* * This ESP32 S3 code was developed by newbiely.com * * This ESP32 S3 code is made available for public use without any restriction * * For comprehensive instructions and wiring diagrams, please visit: * https://newbiely.com/tutorials/esp32-s3/esp32-s3-ssd1309-oled-display */ /* * DIYables OLED SSD1309 – External Fonts * Cycles through three FreeFont typefaces on the 2.42" SSD1309 OLED with Arduino Nano. */ #include <Wire.h> #include <Adafruit_GFX.h> #include <DIYables_OLED_SSD1309.h> #include <Fonts/FreeSerif9pt7b.h> #include <Fonts/FreeSansBold12pt7b.h> #include <Fonts/FreeMono9pt7b.h> #define SCREEN_WIDTH 128 #define SCREEN_HEIGHT 64 #define OLED_RESET -1 #define SCREEN_ADDRESS 0x3C DIYables_OLED_SSD1309 display(SCREEN_WIDTH, SCREEN_HEIGHT, &Wire, OLED_RESET); void setup() { Serial.begin(115200); if (!display.begin(SSD1309_SWITCHCAPVCC, SCREEN_ADDRESS)) { Serial.println(F("SSD1309 allocation failed")); for (;;); } display.clearDisplay(); display.display(); } void loop() { // ── Built-in 5×7 font ── display.clearDisplay(); display.setFont(NULL); display.setTextSize(1); display.setTextColor(SSD1309_PIXEL_ON); display.setCursor(0, 0); display.println(F("Built-in 5x7 font")); display.println(); display.setTextSize(2); display.println(F("DIYables")); display.display(); delay(3000); // ── FreeSerif 9pt ── display.clearDisplay(); display.setFont(&FreeSerif9pt7b); display.setTextSize(1); display.setTextColor(SSD1309_PIXEL_ON); display.setCursor(0, 14); // Y = baseline display.println(F("FreeSerif 9pt")); display.setCursor(0, 38); display.println(F("DIYables OLED")); display.setCursor(0, 58); display.println(F("Hello World!")); display.display(); delay(3000); // ── FreeSansBold 12pt ── display.clearDisplay(); display.setFont(&FreeSansBold12pt7b); display.setTextSize(1); display.setTextColor(SSD1309_PIXEL_ON); display.setCursor(0, 20); display.println(F("SansBold")); display.setCursor(0, 52); display.println(F("DIYables")); display.display(); delay(3000); // ── FreeMono 9pt ── display.clearDisplay(); display.setFont(&FreeMono9pt7b); display.setTextSize(1); display.setTextColor(SSD1309_PIXEL_ON); display.setCursor(0, 14); display.println(F("FreeMono 9pt")); display.setCursor(0, 34); display.println(F("0123456789")); display.setCursor(0, 54); display.println(F("!@#$%^&*()")); display.display(); delay(3000); }

Detailed Instructions

  1. New to ESP32 S3? Complete our Getting Started with ESP32 S3 guide first.
  2. Wire the display: Connect the SSD1309 OLED to your ESP32 S3 using the wiring table above.
  3. Install library: Open the Arduino IDE Library Manager and install DIYables_OLED_SSD1309 along with all requested dependencies.
  4. Open example: Load one of the example sketches from the code sections above.
  5. Select board: Choose your ESP32 S3 board from Tools > Board menu.
  6. Upload code: Connect your ESP32 S3 and click Upload.
  7. Check display: The SSD1309 OLED should show the example output immediately after upload completes.
  8. Experiment: Try changing text content, cursor positions, or shape coordinates to see how the display responds.
  9. Pro Tip: Always call display.display() after drawing to update the screen — the SSD1309 uses a frame buffer that must be flushed to the physical display before any changes become visible.

SSD1309 OLED Troubleshooting with ESP32 S3

If nothing appears on your 2.42-inch SSD1309 OLED display, work through these troubleshooting steps in order to isolate the problem quickly.

Common issues and fixes:

  • Verify wiring: Confirm SDA→A4, SCL→A5, VCC→3.3V, and GNDGND are all correctly connected
  • Confirm driver chip: This library targets the SSD1309 controller — modules with SH1106 or other chips won't work
  • Check I2C address: Most SSD1309 modules use 0x3C, but some use 0x3D — run the scanner below to find yours
  • Call display(): The SSD1309 uses a frame buffer — nothing appears until you call oled.display()
  • Check power supply: The 2.42-inch OLED draws 20–40 mA — ensure the 3.3 V rail can provide enough current
  • Test connections: Try wiggling wires gently to check for loose connections
  • Use I2C scanner: Upload the code below to detect your OLED's I2C address

I2C scanner code:

// I2C address scanner — prints every detected device to the Serial Monitor #include <Wire.h> void setup() { Wire.begin(); Serial.begin(115200); Serial.println("I2C Scanner"); } void loop() { byte error, address; int nDevices = 0; Serial.println("Scanning..."); for (address = 1; address < 127; address++) { Wire.beginTransmission(address); error = Wire.endTransmission(); if (error == 0) { Serial.print("I2C device found at address 0x"); if (address < 16) Serial.print("0"); Serial.print(address, HEX); Serial.println(" !"); nDevices++; } else if (error == 4) { Serial.print("Unknown error at address 0x"); if (address < 16) Serial.print("0"); Serial.println(address, HEX); } } if (nDevices == 0) Serial.println("No I2C devices found"); else Serial.println("done"); delay(5000); }

Expected Serial Monitor output when the SSD1309 is detected:

Newbiely | Arduino IDE 2.3.8
──
File
Edit
Sketch
Tools
Help
ESP32S3 Dev Module
Newbiely.ino
···
8 Serial.println("Hello World!");
Output
Serial Monitor
Message (Enter to send message to 'ESP32S3 Dev Module' on 'COM15')
New Line
9600 baud
I2C Scanner Scanning... I2C device found at address 0x3C ! done Scanning... I2C device found at address 0x3C ! done Scanning... I2C device found at address 0x3C ! done
Ln 11, Col 1
ESP32S3 Dev Module on COM15
2

Application and Project Ideas

The ESP32 S3 paired with the SSD1309 OLED is a capable combination for any project that needs a compact, low-power display, from simple sensor readouts to interactive user interfaces.

  1. Weather station: Display temperature, humidity, and forecast icons fetched over Wi-Fi.
  2. Real-time clock: Show date, time, and custom alarm indicators synced via NTP.
  3. Wi-Fi signal monitor: Render a live bar graph of RSSI values from nearby networks.
  4. IoT sensor dashboard: Present multiple sensor readings in a tiled layout on the 128×64 screen.
  5. Music player interface: Show song title, artist name, and playback progress bar.
  6. System monitor: Display CPU usage, free heap memory, and network status in real time.
  7. Pixel game console: Run simple games like Snake or Pong using the bitmap drawing primitives.
  8. Scrolling message board: Cycle through notifications and alerts using hardware scrolling.

Video Tutorial

Watch the step-by-step video walkthrough for this ESP32 S3 project below.

...VIDEO 5yFyA1jrNuk

...VIDEO

Challenge Yourself

Mastering the SSD1309 OLED opens the door to a wide range of creative projects — here are some challenges to push your skills further, ordered by difficulty.

  1. Beginner: Modify the Hello World example to display your name in two different text sizes on separate lines.
  2. Beginner: Create a simple digital clock that shows hours, minutes, and seconds in large centered text.
  3. Intermediate: Build a temperature display that reads from a DHT11 sensor and draws a graphical thermometer bar.
  4. Intermediate: Design an animated loading bar that fills from left to right using fillRect() inside a loop.
  5. Advanced: Create a multi-page menu system that you can navigate with two push buttons.
  6. Advanced: Build a real-time scrolling graph that plots live sensor data across the full 128-pixel width.
  7. Advanced: Design a frame-by-frame bitmap animation that cycles through multiple stored images to create smooth motion.

※ OUR MESSAGES

  • As freelancers, We are AVAILABLE for HIRE. See how to outsource your project to us
  • Please feel free to share the link of this tutorial. However, Please do not use our content on any other websites. We invested a lot of effort and time to create the content, please respect our work!