ESP32 S3 - Mini Mp3 Player Module

The ESP32 S3 is a powerful 3.3V development board with dual-core processing and rich peripheral support, making it an excellent choice for audio projects. In this tutorial, you'll learn how to build a complete mp3 player system using the DIYables Mini Mp3 Player module with your ESP32 S3 board.

What you'll build:

  1. A working mp3 player that plays audio files from a micro SD card
  2. A volume control system using physical buttons
  3. A track navigation interface with next/previous controls
  4. A serial monitor control panel for testing all playback features
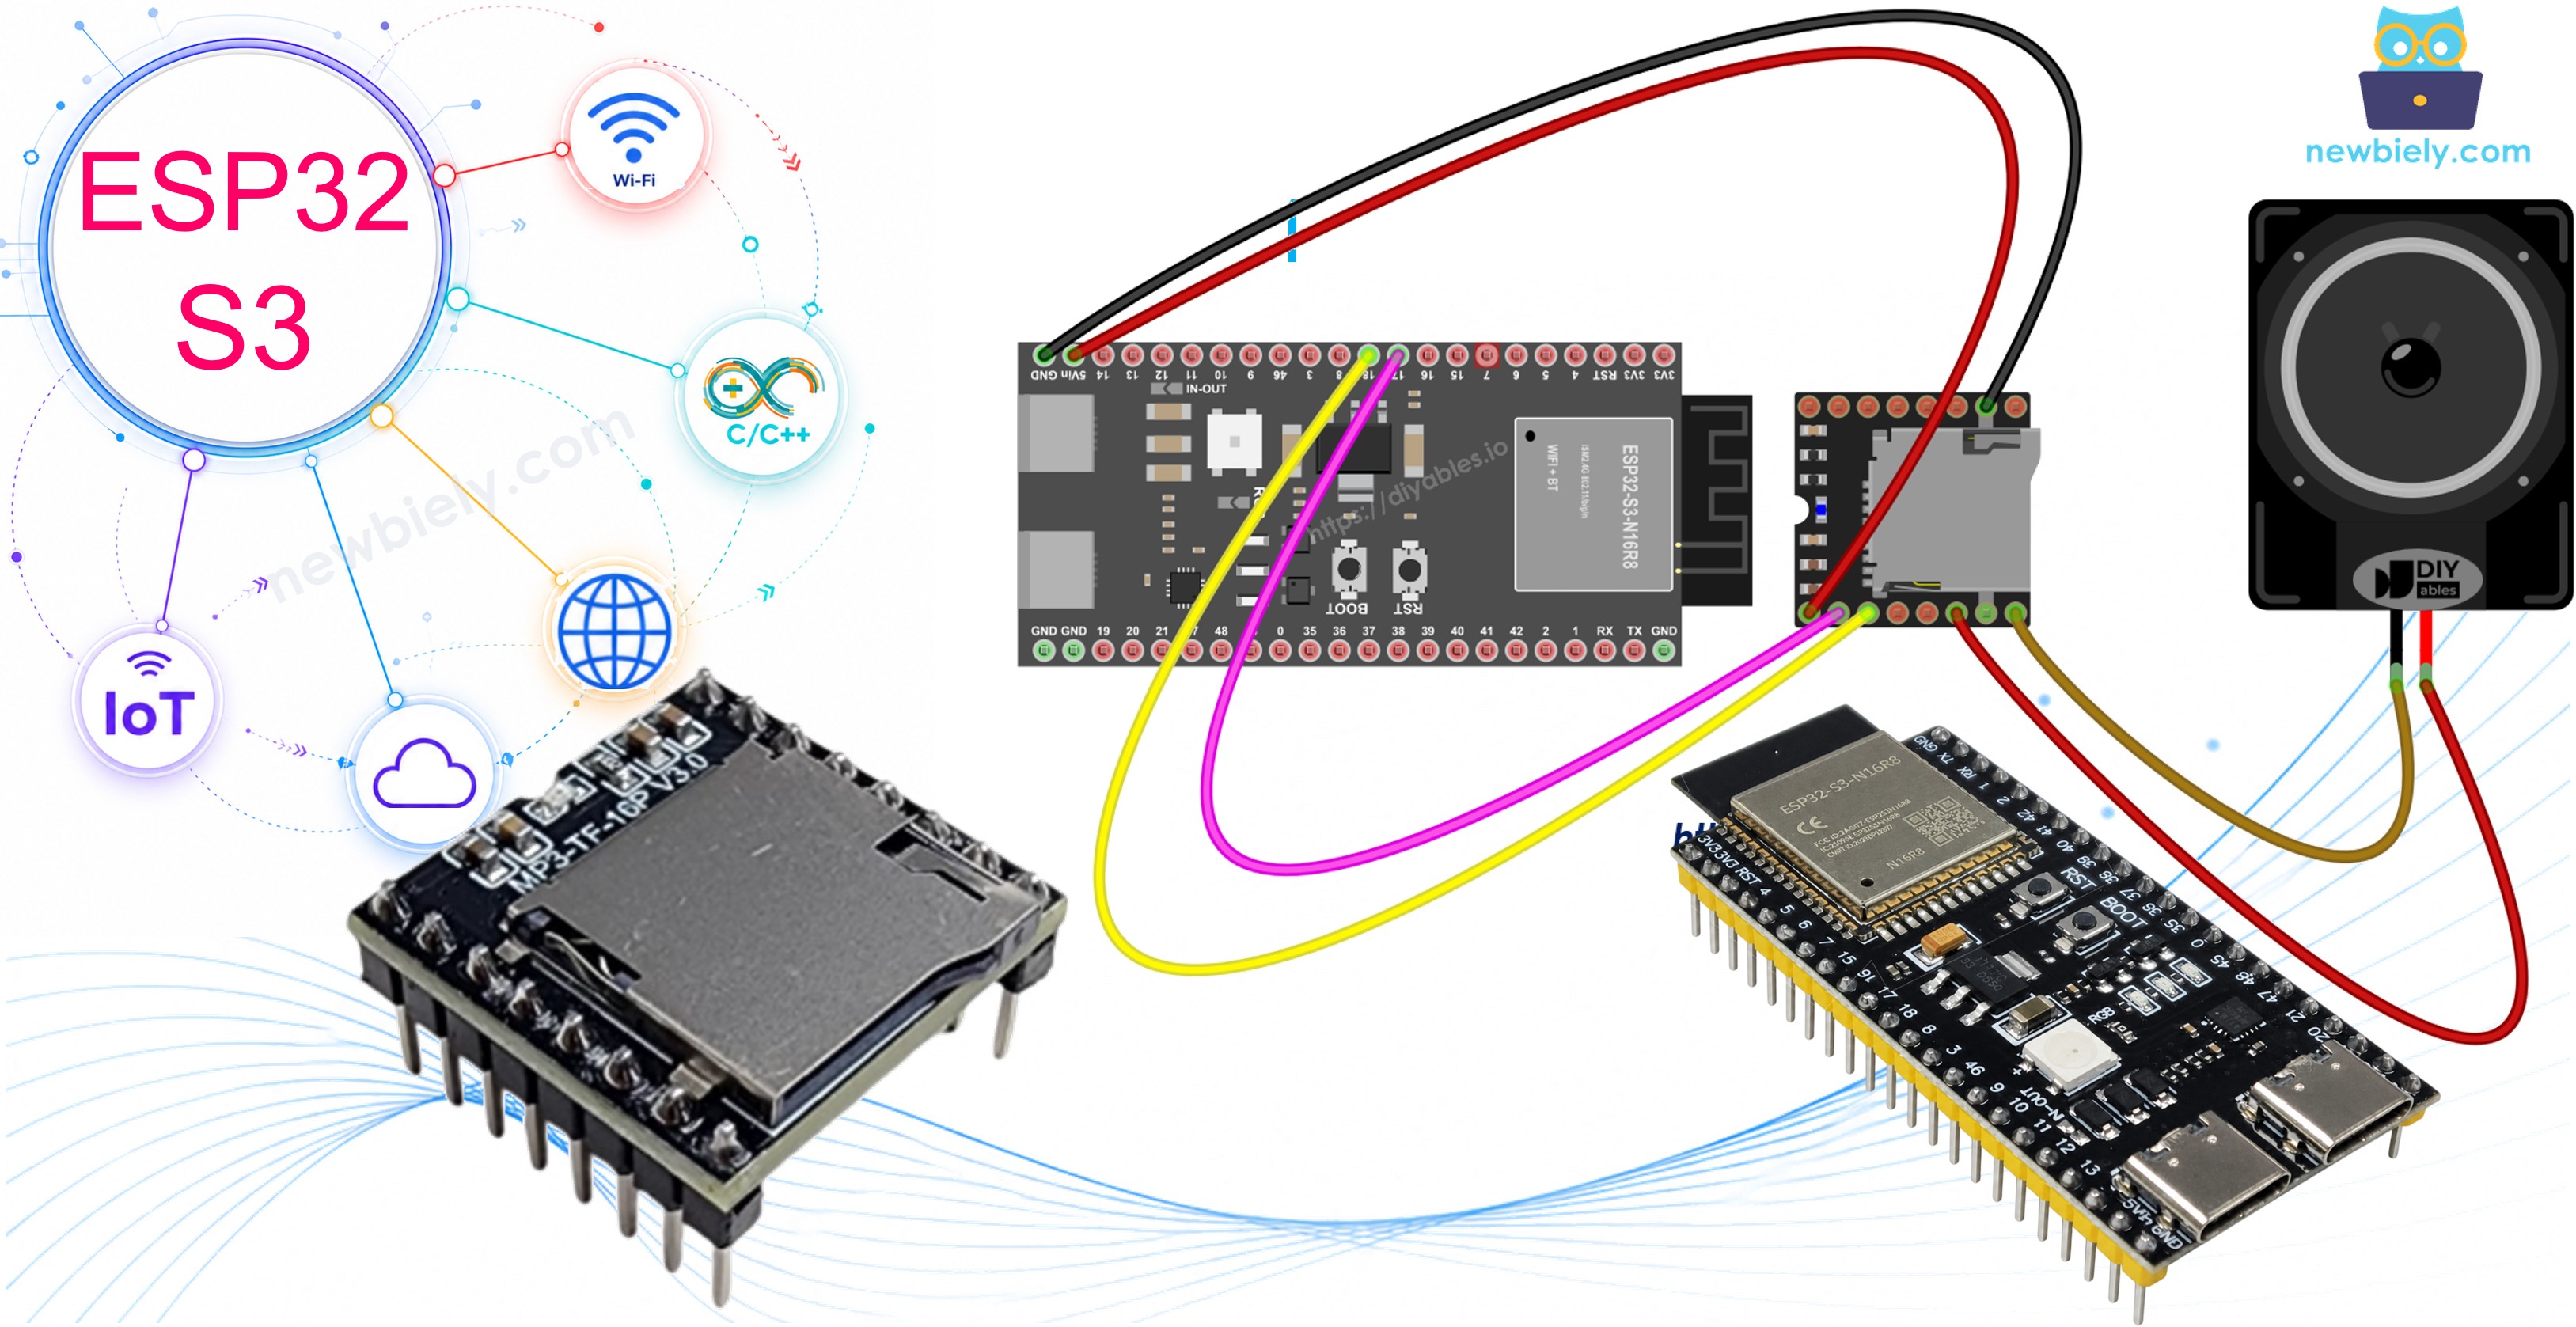
ESP32 S3 Mini Mp3 Player

Hardware Preparation

1×ESP32 S3 WROOM N16R8
1×USB Cable Type-A to Type-C (for USB-A PC)
1×USB Cable Type-C to Type-C (for USB-C PC)
1×DIYables Mini Mp3 Player module
1×Micro SD Card
1×Speaker
1×Breadboard
1×Jumper Wires

Or you can buy the following kits:

1×DIYables Sensor Kit (18 sensors/displays)
Disclosure: Some of the links provided in this section are Amazon affiliate links. We may receive a commission for any purchases made through these links at no additional cost to you.
Additionally, some of these links are for products from our own brand, DIYables .

Overview of the Mini Mp3 Player Module

The DIYables Mini Mp3 Player is a YX5200-24SS mp3 decoder module that plays audio files from a micro SD card through a built-in amplifier. It communicates over UART serial at 9600 baud and includes a 3W amplifier for direct speaker connection, making it a self-contained audio solution that requires no external decoder or amplifier IC.

Key Specifications

  • Operates at 3.3V–5V (perfect for ESP32 S3's 3.3V logic)
  • Controls via UART serial at 9600 baud
  • Built-in 3W amplifier for direct speaker connection
  • Supports up to 255 tracks and 99 folders
  • 31 volume levels (0–30)
  • 6 equalizer presets (Normal, Pop, Rock, Jazz, Classic, Bass)
  • Multiple repeat and shuffle modes
  • Status query capabilities for volume, track number, and playback state
  • No external decoder or amplifier IC required
  • Beginner-friendly with simple serial commands

Pinout

The Mini Mp3 Player module has 11 pins covering power, communication, audio output, and control functions.

  1. VCC: Power supply (3.2V–5.0V)
  2. GND: Ground connection
  3. RX: UART receive (connect to ESP32 S3 TX pin)
  4. TX: UART transmit (connect to ESP32 S3 RX pin)
  5. SPK_1: Speaker positive terminal (built-in 3W amplifier)
  6. SPK_2: Speaker negative terminal
  7. DAC_R: Right channel line-level audio output
  8. DAC_L: Left channel line-level audio output
  9. BUSY: Status pin (LOW when playing, HIGH when idle)
  10. IO_1: Button input (short press = previous, long press = volume down)
  11. IO_2: Button input (short press = next, long press = volume up)
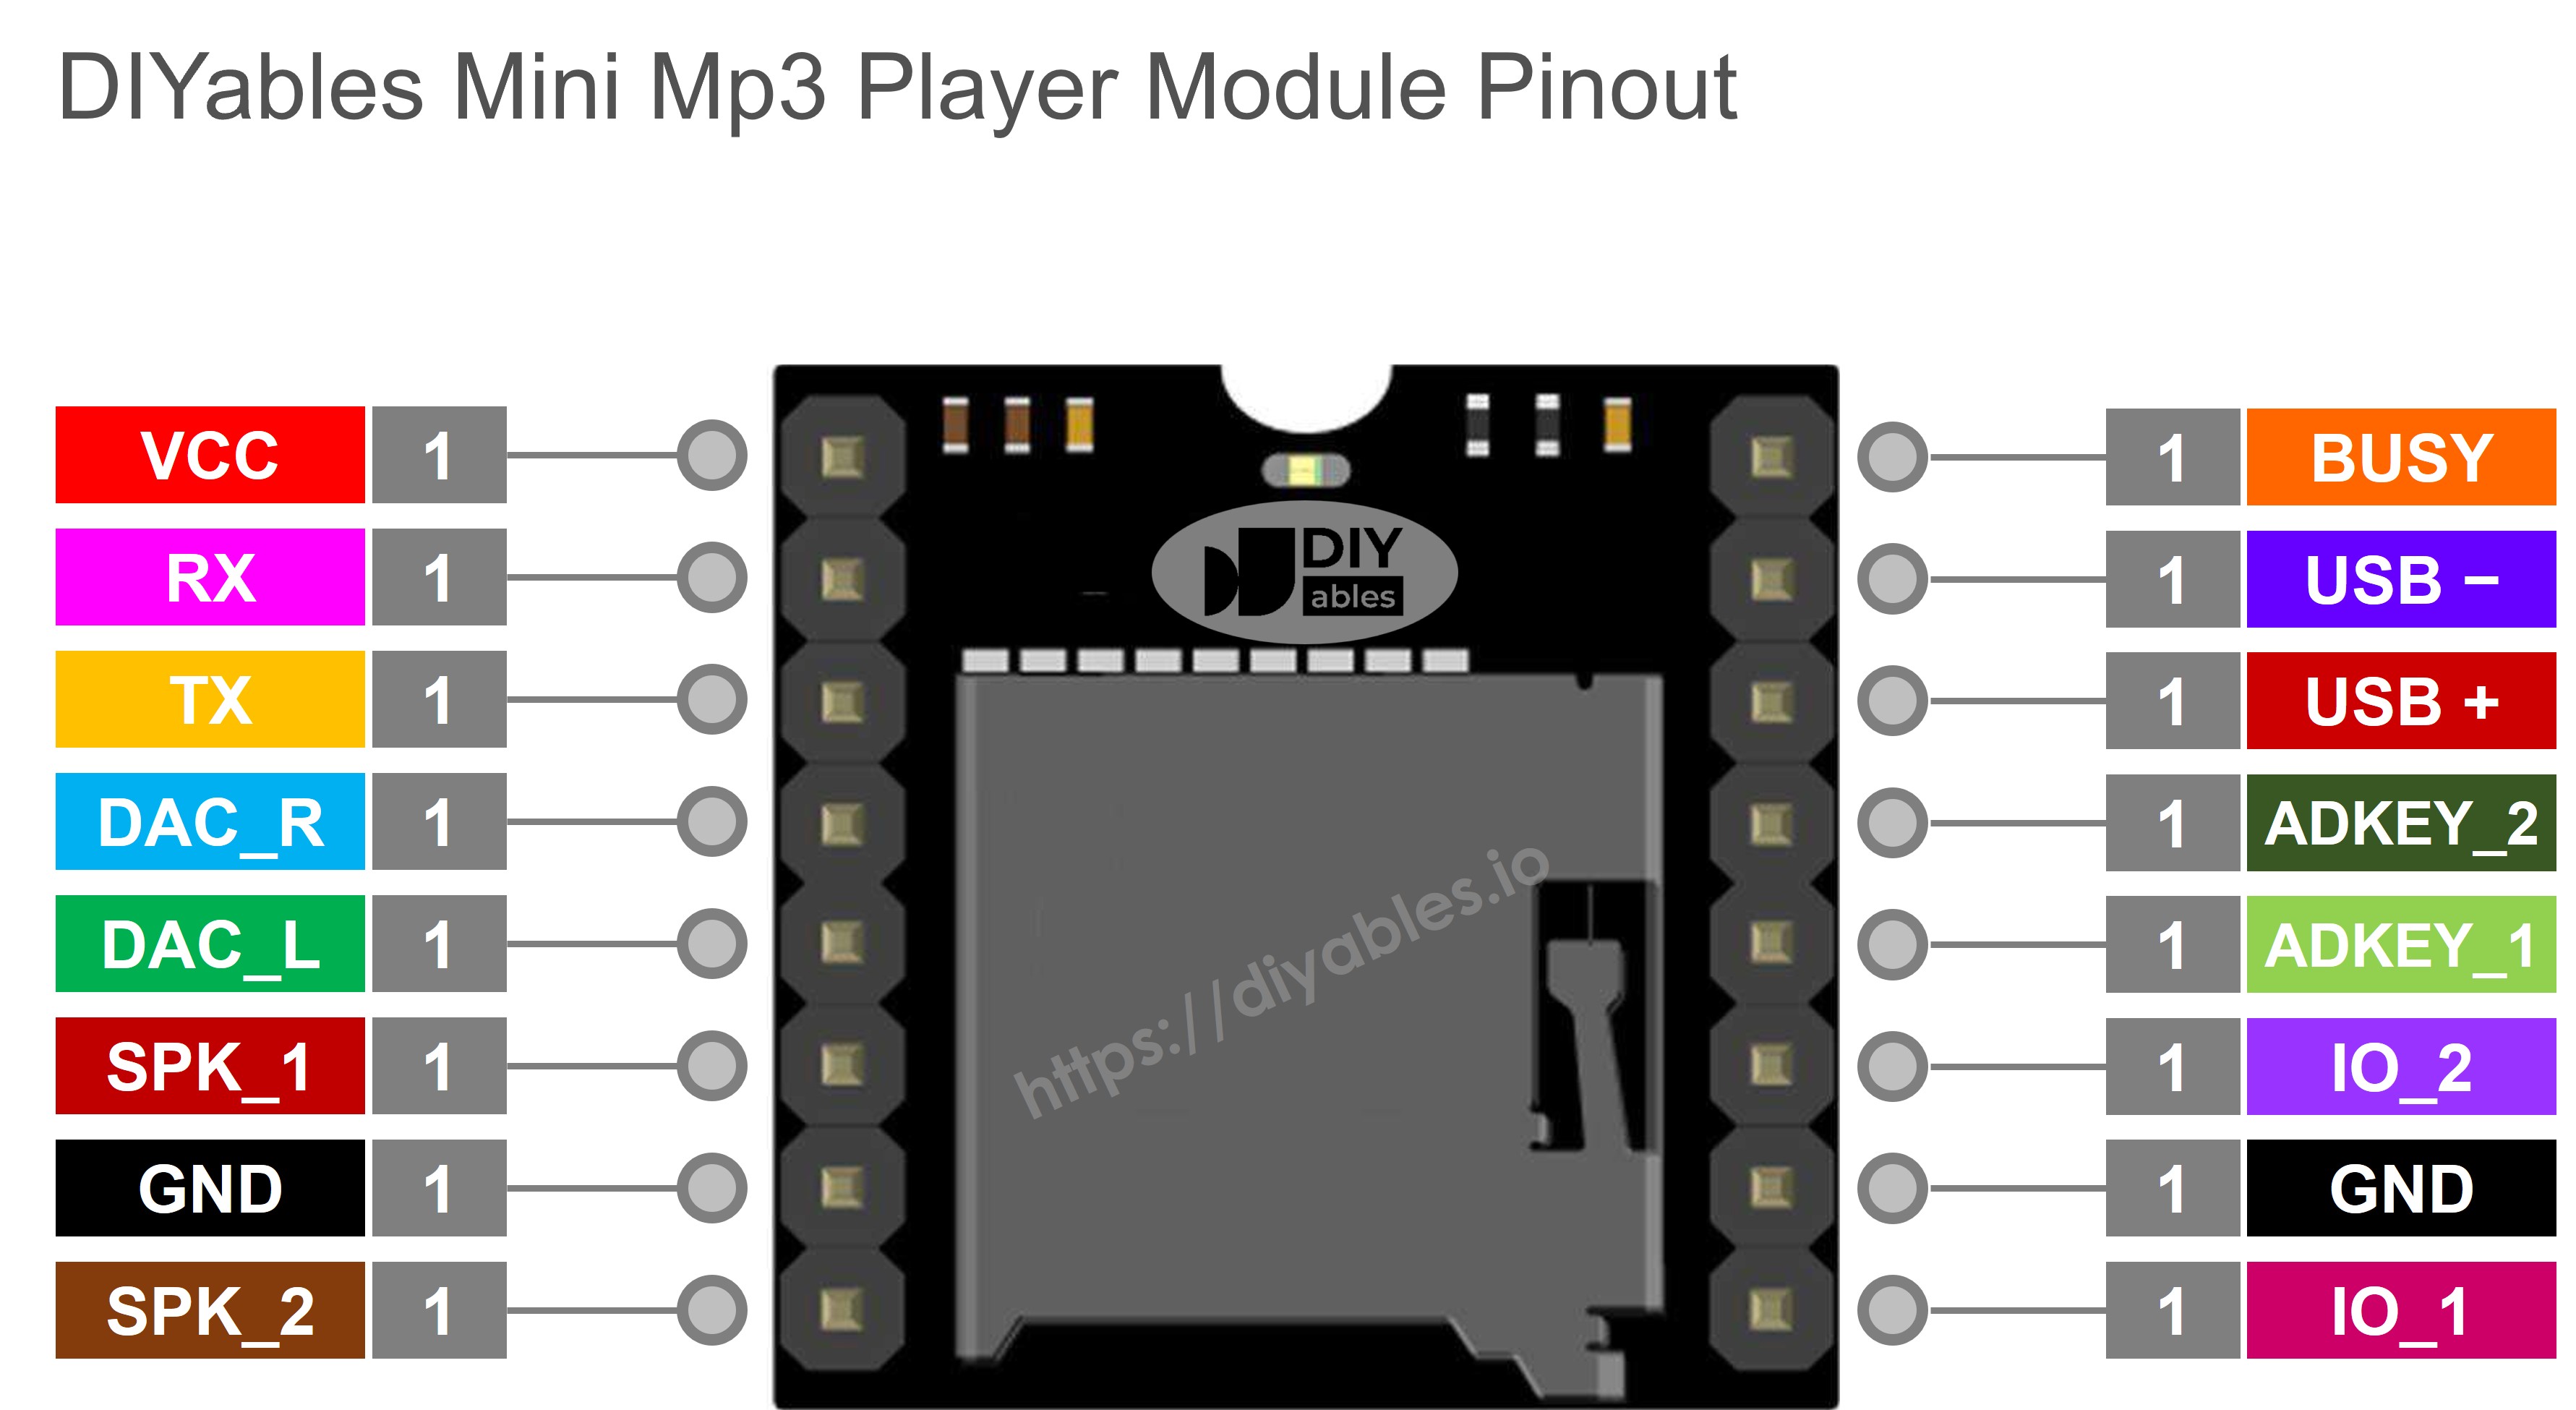
Mini Mp3 Player Pinout

Wiring Diagram

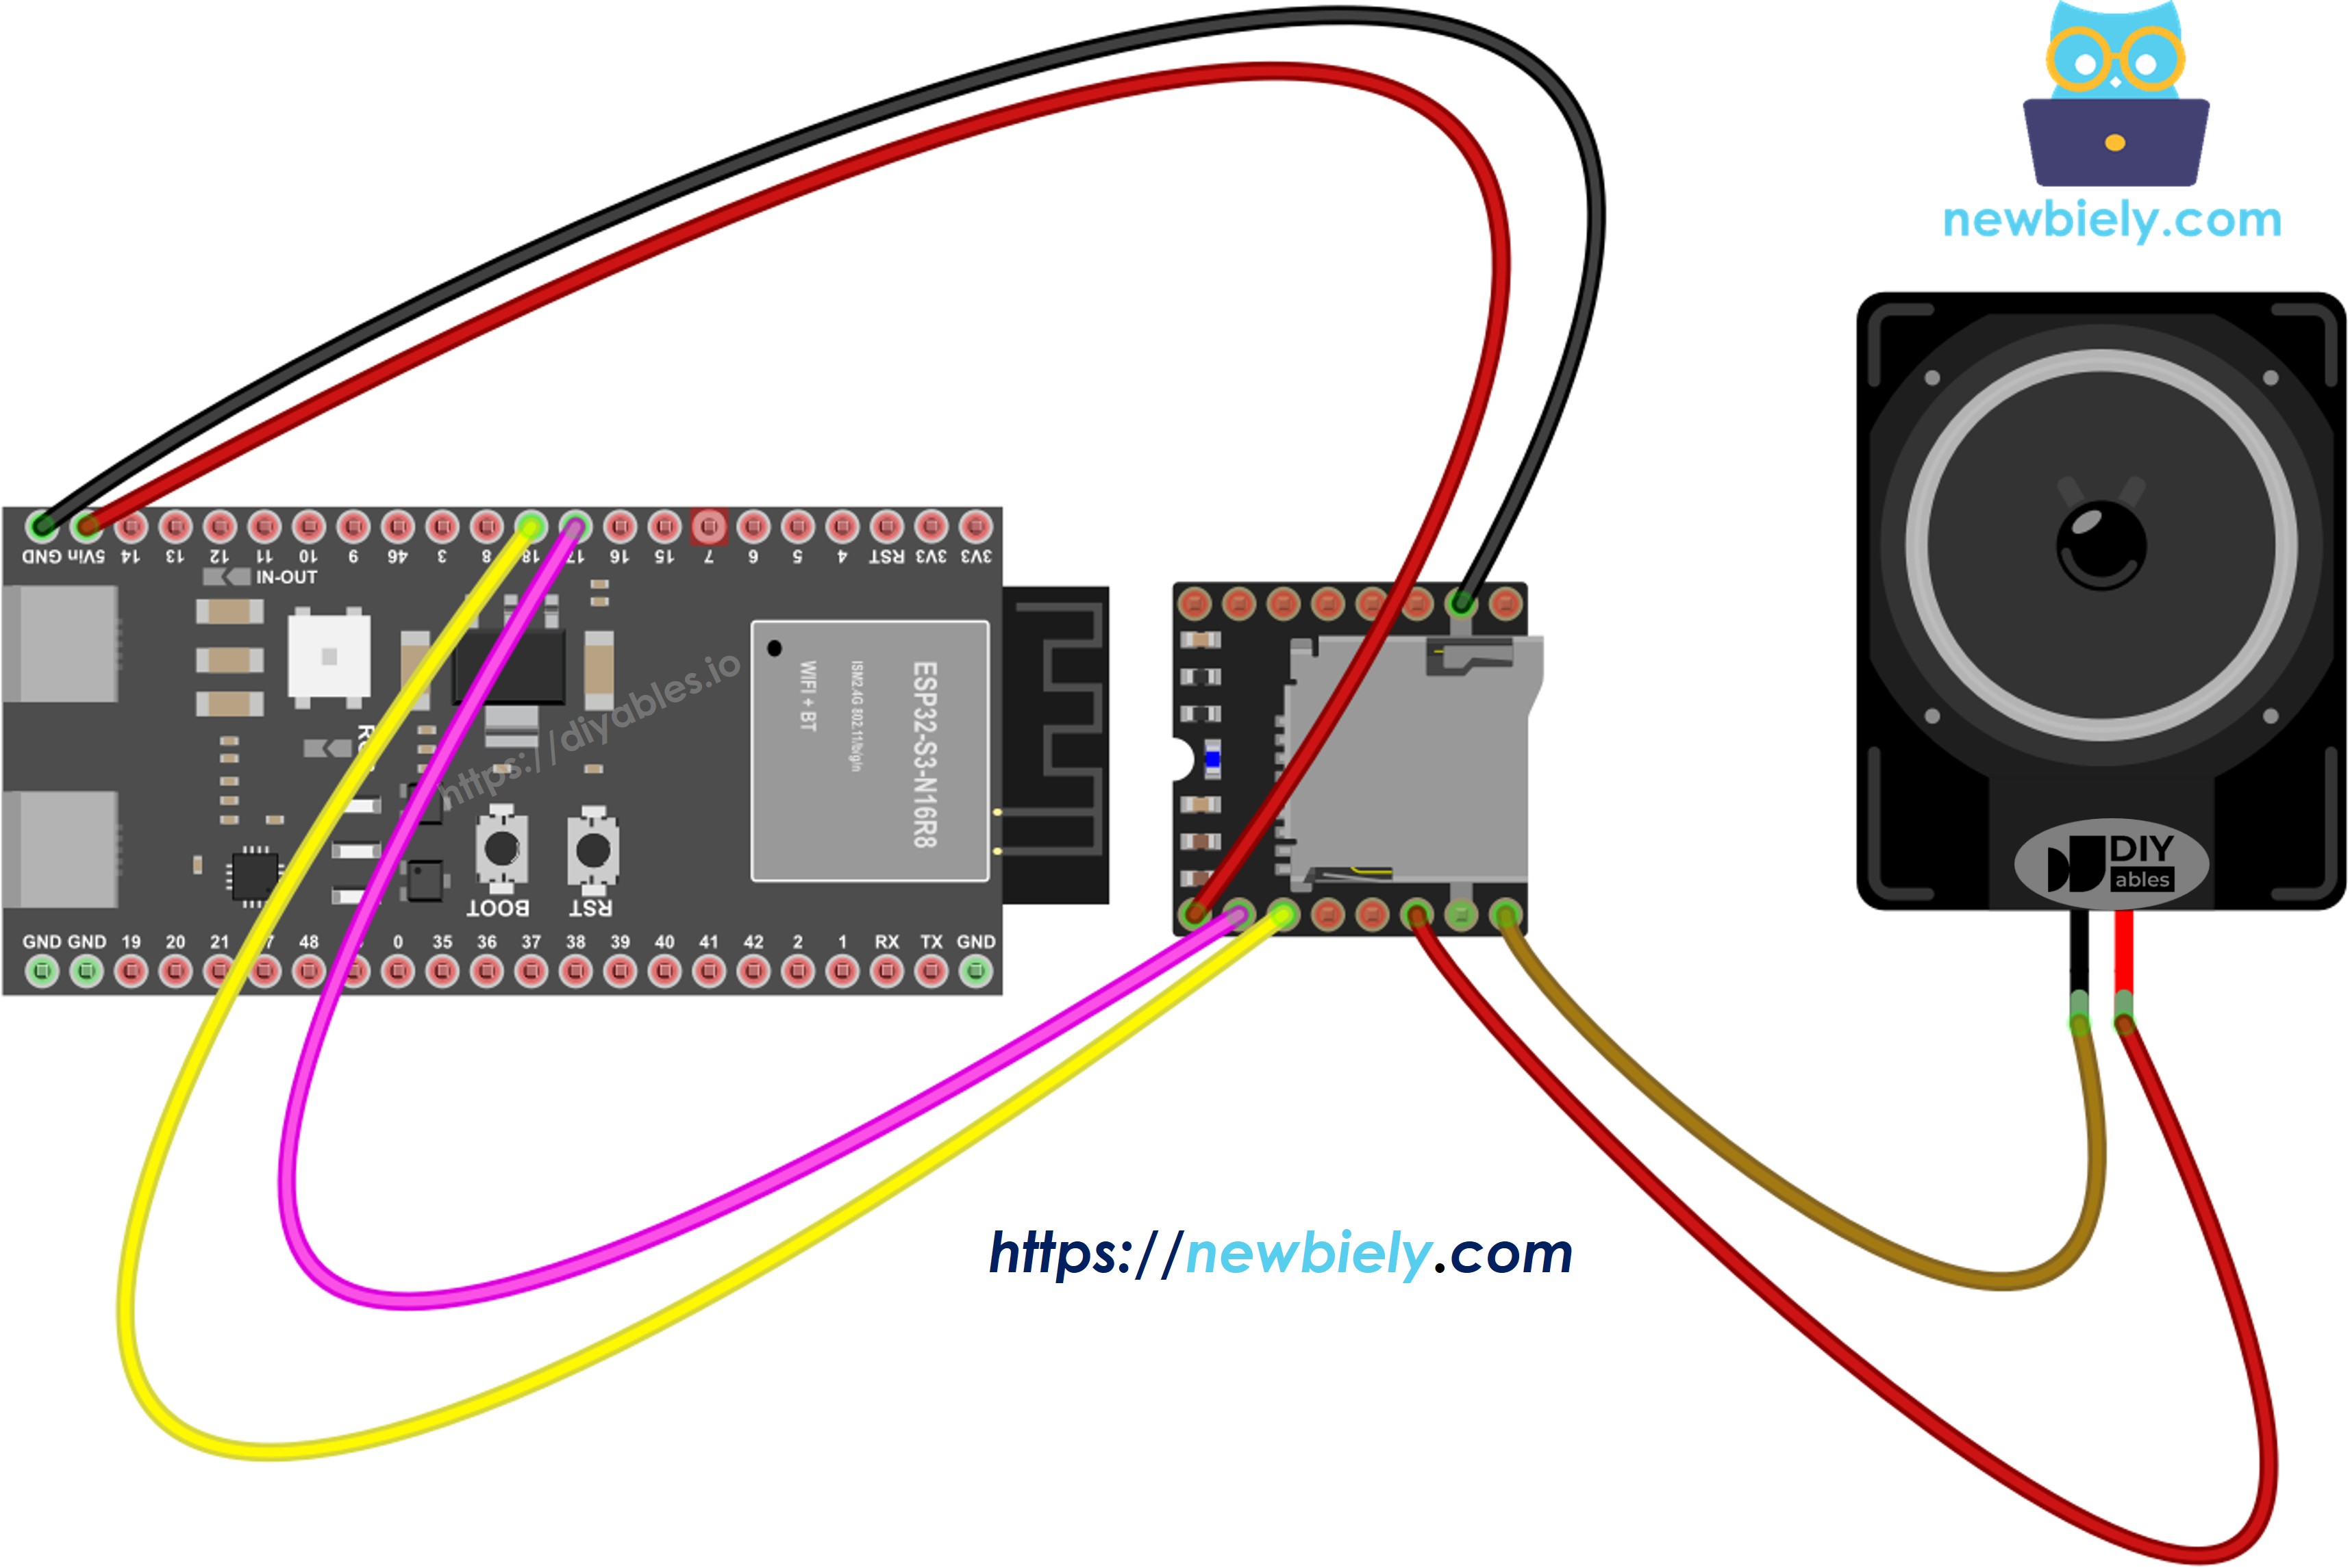
Connect the Mini Mp3 Player to your ESP32 S3 using hardware Serial1, which provides reliable UART communication at the required baud rate. The ESP32 S3 operates at 3.3V logic, matching the module's signaling levels perfectly so no level-shifting resistors are needed on the TX/RX lines.

Safety Notes

Power the module from the 3.3V pin for low-volume applications, or from 5V (VBUS) if you need maximum speaker volume—the built-in amplifier performs better with higher supply voltage. Always connect GND before applying power, and ensure your speaker impedance matches the module's 3W amplifier rating to avoid damage.

Mini Mp3 Player ESP32 S3 Notes
VCC 3.3V Module also accepts 5V from VBUS if needed
GND GND Common ground
RX TX1 (GPIO17) Direct connection — no resistor needed
TX RX1 (GPIO18) Direct connection — 3.3V logic compatible
SPK_1 Speaker + Amplified output
SPK_2 Speaker − Amplified output
The wiring diagram between ESP32 S3 Mini Mp3 Player

This image is created using Fritzing. Click to enlarge image

SD Card Setup

The Mini Mp3 Player requires properly formatted and named files on your micro SD card.

Formatting requirements:

  • File system: FAT16 or FAT32
  • Card size: Up to 32GB recommended

Basic file naming (root directory):

/001.mp3 /002.mp3 /003.mp3

Folder-based naming (organized playback):

/01/001.mp3 /01/002.mp3 /02/001.mp3

Critical naming rules:

  • Track numbering starts at 1 (not 0)
  • Root files: 3-digit zero-padded names (001–255)
  • Folder names: 2-digit zero-padded (01–99)
  • Files in folders: 3-digit zero-padded (001–255)
  • Copy order matters: The module determines playback order from the sequence files were copied, not alphabetical naming
  • Best practice: Format card first, then copy files one by one in your desired playback order

Library Installation

The DIYables_MiniMp3 library simplifies control of the mp3 module for ESP32 S3 projects. Install it directly from the Arduino IDE Library Manager before uploading any of the example sketches.

  • Connect your ESP32 S3 to your computer via USB-C cable
  • Open the Arduino IDE
  • Select ESP32 S3 as your board
  • Choose the correct COM port
  • Click the Libraries icon in the left sidebar
  • Search for "DIYables_MiniMp3"
  • Find the library by DIYables
  • Click Install
  • Search for DIYables_MiniMp3 created by DIYables and click the Install button.
Newbiely | Arduino IDE 2.3.8
──
File
Edit
Sketch
Tools
Help
ESP32S3 Dev Module
Library Manager
Type:
All
Topic:
All
DIYables_MiniMp3 by DIYables
Easy-to-use Arduino library for the DIYables Mini Mp3 Player module (YX5200-24SS). Communicates via UART. Works with all Arduino boards (Uno, Mega, Nano, Due, Giga), ESP32, ESP8266, and other compatible platforms. More info
1.0.0
INSTALL
Newbiely.ino
···
1 void setup() {
Output
Serial Monitor
Ln 1, Col 1
ESP32S3 Dev Module on COM15
1

Library benefits:

  • Zero external dependencies
  • Simple command functions for all playback features
  • Works perfectly with ESP32 S3 hardware serial

ESP32 S3 Code — Basic Setup

The following code shows the basic template for controlling the Mini Mp3 Player with ESP32 S3 using hardware Serial1. It initializes the serial interface, waits for the module to boot, and sets an initial volume level so you can verify the connection is working before adding playback logic.

What this code does:

  • Initializes Serial1 for mp3 module communication at 9600 baud
  • Sets up the mp3 player object
  • Waits for module boot-up
  • Sets initial volume to level 25
#include <DIYables_MiniMp3.h> DIYables_MiniMp3 mp3; void setup() { Serial.begin(115200); Serial1.begin(9600); // Hardware serial for the mp3 module mp3.begin(Serial1); delay(1000); // Wait for the module to boot mp3.setVolume(25); } void loop() { // Your code here }

Why hardware serial?

  • ESP32 S3 has dedicated UART hardware
  • More reliable than software serial
  • No timing issues at 9600 baud
  • Leaves USB serial free for debugging

ESP32 S3 Code — Play a Single Track

The following code demonstrates how to play a single track from your SD card using the ESP32 S3. It initializes the mp3 module and immediately begins playing track 001.mp3 so you can confirm the full hardware stack is working correctly.

/* * DIYables Mini Mp3 Player - Play One Track * * Product: DIYables Mini Mp3 Player Module * https://diyables.io/products/mini-mp3-player-module * * Plays track 001 once, then stops. * * Wiring Table: * Mini Mp3 RX -> GPIO17 (ESP32 S3 TX) * Mini Mp3 TX -> GPIO18 (ESP32 S3 RX) * Mini Mp3 VCC -> 3.3V * Mini Mp3 GND -> GND * Speaker connected to SPK_1 and SPK_2 pins * * SD Card: Put mp3 files in root, named 001.mp3, 002.mp3, etc. */ #include <DIYables_MiniMp3.h> #include <SoftwareSerial.h> SoftwareSerial mp3Serial (10, 11); // RX, TX DIYables_MiniMp3 mp3; void setup() { Serial.begin(115200); mp3Serial.begin(115200); mp3.begin(mp3Serial); delay(1000); // Wait for the module to initialize mp3.setVolume(25); // Set volume (0 to 30) Serial.println("Playing track 1..."); mp3.play(1); // Play track 001.mp3 } void loop() { // Nothing to do here }

Detailed Instructions

  1. New to ESP32 S3? Complete our Getting Started with ESP32 S3 guide first.
  2. Prepare SD card: Format as FAT32 and copy mp3 files with names 001.mp3, 002.mp3, etc.
  3. Insert SD card: Place the micro SD card into the module's slot.
  4. Connect wiring: Follow the wiring diagram above (VCC, GND, TX1, RX1, speaker).
  5. Connect speaker: Attach your speaker to SPK_1 and SPK_2 terminals.
  6. Open Arduino IDE: Launch the IDE on your computer.
  7. Select board: Choose ESP32 S3 from the board menu.
  8. Select port: Choose the correct COM port for your board.
  9. Upload code: Copy the code above and upload to your ESP32 S3.
  10. Listen: Track 001.mp3 should play through the speaker.
  11. Pro Tip: If you hear no sound, check the SD card format and file naming—the module is very sensitive to naming conventions.

Playback Commands

Method Purpose Example
play(trackNum) Start a specific track mp3.play(1)
playNext() Advance to the next track mp3.playNext()
playPrevious() Go to the previous track mp3.playPrevious()
pause() Pause the active track mp3.pause()
resume() Unpause the track mp3.resume()
stop() Halt playback mp3.stop()

ESP32 S3 Code — Play Multiple Tracks

The following code shows how to cycle through multiple tracks automatically, advancing to the next song every few seconds. This pattern is useful for background music systems or demo projects where you want continuous playback without user interaction.

/* * DIYables Mini Mp3 Player - Play Multiple Tracks * * Product: DIYables Mini Mp3 Player Module * https://diyables.io/products/mini-mp3-player-module * * Plays tracks one after another with a delay between them. * * Wiring Table: * Mini Mp3 RX -> GPIO17 (ESP32 S3 TX) * Mini Mp3 TX -> GPIO18 (ESP32 S3 RX) * Mini Mp3 VCC -> 3.3V * Mini Mp3 GND -> GND * Speaker connected to SPK_1 and SPK_2 pins * * SD Card: Put mp3 files in root, named 001.mp3, 002.mp3, 003.mp3 */ #include <DIYables_MiniMp3.h> #include <SoftwareSerial.h> SoftwareSerial mp3Serial (10, 11); // RX, TX DIYables_MiniMp3 mp3; int currentTrack = 1; int totalTracks = 3; // Change this to match your SD card unsigned long lastTrackTime = 0; unsigned long trackDuration = 5000; // Wait 5 seconds between tracks (adjust as needed) void setup() { Serial.begin(115200); mp3Serial.begin(115200); mp3.begin(mp3Serial); delay(1000); mp3.setVolume(20); Serial.println("Playing track 1..."); mp3.play(currentTrack); lastTrackTime = millis(); } void loop() { // After trackDuration, play the next track if (millis() - lastTrackTime >= trackDuration) { currentTrack++; if (currentTrack > totalTracks) currentTrack = 1; // Loop back to first track Serial.print("Playing track "); Serial.println(currentTrack); mp3.play(currentTrack); lastTrackTime = millis(); } }

Detailed Instructions

  1. New to ESP32 S3? Complete our Getting Started with ESP32 S3 guide first.
  2. Prepare SD card: Ensure you have at least 3 mp3 files named 001.mp3, 002.mp3, 003.mp3.
  3. Wire module: Use the same wiring from the previous example.
  4. Upload code: Copy and upload the sketch above.
  5. Listen: Tracks will rotate every 5 seconds automatically.
  6. Watch serial: Open Serial Monitor at 115200 baud to see track changes.
  7. Pro Tip: Adjust the delay(5000) value to change how long each track plays before advancing.

Serial Monitor Output

Newbiely | Arduino IDE 2.3.8
──
File
Edit
Sketch
Tools
Help
ESP32S3 Dev Module
Newbiely.ino
···
8 Serial.println("Hello World!");
Output
Serial Monitor
Message (Enter to send message to 'ESP32S3 Dev Module' on 'COM15')
New Line
9600 baud
[2026-01-15 09:12:01] Playing track: 1 [2026-01-15 09:12:06] Playing track: 2 [2026-01-15 09:12:11] Playing track: 3 [2026-01-15 09:12:16] Playing track: 1
Ln 11, Col 1
ESP32S3 Dev Module on COM15
2

ESP32 S3 Code — Volume Control

The following code adds two hardware buttons to your ESP32 S3 project so the user can raise or lower the mp3 player volume in real time. Each button press increments or decrements the volume by one step, and the current level is printed to the Serial Monitor for debugging.

/* * DIYables Mini Mp3 Player - Volume Control * * Product: DIYables Mini Mp3 Player Module * https://diyables.io/products/mini-mp3-player-module * * Use two buttons to increase/decrease the volume. * Press button on pin 2 to volume up, pin 3 to volume down. * * Wiring Table: * Mini Mp3 RX -> GPIO17 (ESP32 S3 TX) * Mini Mp3 TX -> GPIO18 (ESP32 S3 RX) * Mini Mp3 VCC -> 3.3V * Mini Mp3 GND -> GND * Speaker connected to SPK_1 and SPK_2 pins * Button UP -> Pin 2 (other leg to GND) * Button DOWN -> Pin 3 (other leg to GND) * * SD Card: Put mp3 files in root, named 001.mp3, 002.mp3, etc. */ #include <DIYables_MiniMp3.h> #include <SoftwareSerial.h> SoftwareSerial mp3Serial (10, 11); // RX, TX DIYables_MiniMp3 mp3; const int BUTTON_VOL_UP = 2; const int BUTTON_VOL_DOWN = 3; int volume = 15; // Start at half volume void setup() { Serial.begin(115200); mp3Serial.begin(115200); pinMode(BUTTON_VOL_UP, INPUT_PULLUP); pinMode(BUTTON_VOL_DOWN, INPUT_PULLUP); mp3.begin(mp3Serial); delay(1000); mp3.setVolume(volume); mp3.loopTrack(1); // Play track 1 on repeat Serial.print("Volume: "); Serial.println(volume); } void loop() { // Volume Up button (pressed = LOW because of INPUT_PULLUP) if (digitalRead(BUTTON_VOL_UP) == LOW) { if (volume < 30) { volume++; mp3.setVolume(volume); Serial.print("Volume: "); Serial.println(volume); } delay(200); // Simple debounce } // Volume Down button if (digitalRead(BUTTON_VOL_DOWN) == LOW) { if (volume > 0) { volume--; mp3.setVolume(volume); Serial.print("Volume: "); Serial.println(volume); } delay(200); // Simple debounce } }

Detailed Instructions

  1. New to ESP32 S3? Complete our Getting Started with ESP32 S3 guide first.
  2. Add buttons: Wire two buttons to GPIO4 and GPIO5 (plus GND).
  3. Upload code: Copy the sketch above to Arduino IDE and upload.
  4. Test buttons: Press the buttons while music plays to adjust volume.
  5. Watch serial: Serial Monitor displays current volume level.
  6. Pro Tip: Volume range is 0–30, with 15 being a good starting point for most speakers.

Volume Commands

Method Purpose Example
setVolume(v) Jump to a specific volume level mp3.setVolume(20)
volumeUp() Increase by 1 step mp3.volumeUp()
volumeDown() Decrease by 1 step mp3.volumeDown()
getVolume() Query the current level mp3.getVolume()

Serial Monitor Output

Newbiely | Arduino IDE 2.3.8
──
File
Edit
Sketch
Tools
Help
ESP32S3 Dev Module
Newbiely.ino
···
8 Serial.println("Hello World!");
Output
Serial Monitor
Message (Enter to send message to 'ESP32S3 Dev Module' on 'COM15')
New Line
9600 baud
[2026-01-15 09:15:03] Volume: 25 [2026-01-15 09:15:07] Volume: 26 [2026-01-15 09:15:11] Volume: 25 [2026-01-15 09:15:14] Volume: 24
Ln 11, Col 1
ESP32S3 Dev Module on COM15
2

ESP32 S3 Code — Next/Previous Buttons

The following code wires two buttons to your ESP32 S3 for manual track navigation, letting users skip forward or backward through the SD card playlist. The current track number is sent to the Serial Monitor each time a button is pressed.

/* * DIYables Mini Mp3 Player - Next/Previous with Buttons * * Product: DIYables Mini Mp3 Player Module * https://diyables.io/products/mini-mp3-player-module * * Use two buttons to play next/previous tracks. * Displays the current track number on the Serial Monitor. * * Wiring Table: * Mini Mp3 RX -> GPIO17 (ESP32 S3 TX) * Mini Mp3 TX -> GPIO18 (ESP32 S3 RX) * Mini Mp3 VCC -> 3.3V * Mini Mp3 GND -> GND * Speaker connected to SPK_1 and SPK_2 pins * Button NEXT -> Pin 2 (other leg to GND) * Button PREV -> Pin 3 (other leg to GND) * * SD Card: Put mp3 files in root, named 001.mp3, 002.mp3, etc. */ #include <DIYables_MiniMp3.h> #include <SoftwareSerial.h> SoftwareSerial mp3Serial (10, 11); // RX, TX DIYables_MiniMp3 mp3; const int BUTTON_NEXT = 2; const int BUTTON_PREV = 3; void setup() { Serial.begin(115200); mp3Serial.begin(115200); pinMode(BUTTON_NEXT, INPUT_PULLUP); pinMode(BUTTON_PREV, INPUT_PULLUP); mp3.begin(mp3Serial); delay(1000); mp3.setVolume(20); mp3.play(1); // Start with track 1 Serial.println("Press NEXT or PREV button to change track"); } void loop() { if (digitalRead(BUTTON_NEXT) == LOW) { Serial.println("Next track"); mp3.playNext(); delay(300); // Simple debounce } if (digitalRead(BUTTON_PREV) == LOW) { Serial.println("Previous track"); mp3.playPrevious(); delay(300); // Simple debounce } }

Detailed Instructions

  1. New to ESP32 S3? Complete our Getting Started with ESP32 S3 guide first.
  2. Wire buttons: Connect NEXT button to GPIO4 and PREV button to GPIO5.
  3. Connect ground: Wire the other button terminals to GND.
  4. Upload sketch: Load the code above to your ESP32 S3.
  5. Test navigation: Press buttons to skip forward or backward through tracks.
  6. Monitor output: Serial Monitor shows current track number.
  7. Pro Tip: Use pull-up resistors (10kΩ) for more reliable button operation in noisy environments.

Serial Monitor Output

Newbiely | Arduino IDE 2.3.8
──
File
Edit
Sketch
Tools
Help
ESP32S3 Dev Module
Newbiely.ino
···
8 Serial.println("Hello World!");
Output
Serial Monitor
Message (Enter to send message to 'ESP32S3 Dev Module' on 'COM15')
New Line
9600 baud
[2026-01-15 09:18:02] Current track: 1 [2026-01-15 09:18:05] Current track: 2 [2026-01-15 09:18:09] Current track: 3 [2026-01-15 09:18:13] Current track: 2
Ln 11, Col 1
ESP32S3 Dev Module on COM15
2

ESP32 S3 Code — Pause/Resume Toggle

The following code uses a single button on your ESP32 S3 to toggle between paused and playing states, giving users a simple way to pause music without stopping the track entirely. The playback state is printed to the Serial Monitor so you can follow the logic during testing.

/* * DIYables Mini Mp3 Player - Pause and Resume * * Product: DIYables Mini Mp3 Player Module * https://diyables.io/products/mini-mp3-player-module * * Demonstrates pausing and resuming playback using a single button. * Press the button to toggle between pause and resume. * * Wiring Table: * Mini Mp3 RX -> GPIO17 (ESP32 S3 TX) * Mini Mp3 TX -> GPIO18 (ESP32 S3 RX) * Mini Mp3 VCC -> 3.3V * Mini Mp3 GND -> GND * Speaker connected to SPK_1 and SPK_2 pins * Button -> Pin 2 (other leg to GND) * * SD Card: Put mp3 files in root, named 001.mp3, 002.mp3, etc. */ #include <DIYables_MiniMp3.h> #include <SoftwareSerial.h> SoftwareSerial mp3Serial (10, 11); // RX, TX DIYables_MiniMp3 mp3; const int BUTTON_PIN = 2; bool paused = false; void setup() { Serial.begin(115200); mp3Serial.begin(115200); pinMode(BUTTON_PIN, INPUT_PULLUP); mp3.begin(mp3Serial); delay(1000); mp3.setVolume(20); mp3.play(1); Serial.println("Playing. Press button to pause/resume."); } void loop() { if (digitalRead(BUTTON_PIN) == LOW) { if (paused) { mp3.resume(); Serial.println("Resumed"); } else { mp3.pause(); Serial.println("Paused"); } paused = !paused; delay(300); // Simple debounce } }

Detailed Instructions

  1. New to ESP32 S3? Complete our Getting Started with ESP32 S3 guide first.
  2. Wire button: Connect pause/resume button to GPIO4 and GND.
  3. Upload code: Load the sketch to your board.
  4. Start playback: Music begins automatically.
  5. Toggle pause: Press button to pause, press again to resume.
  6. Check status: Serial Monitor displays playback state.
  7. Pro Tip: The BUSY pin on the module can also indicate play/pause state for visual feedback with an LED.

Serial Monitor Output

Newbiely | Arduino IDE 2.3.8
──
File
Edit
Sketch
Tools
Help
ESP32S3 Dev Module
Newbiely.ino
···
8 Serial.println("Hello World!");
Output
Serial Monitor
Message (Enter to send message to 'ESP32S3 Dev Module' on 'COM15')
New Line
9600 baud
[2026-01-15 09:21:01] Playing track 1 [2026-01-15 09:21:08] Music paused [2026-01-15 09:21:14] Music resumed [2026-01-15 09:21:20] Music paused
Ln 11, Col 1
ESP32S3 Dev Module on COM15
2

ESP32 S3 Code — Loop a Track

The following code programs the Mini Mp3 Player to repeat a single track continuously, which is ideal for background music or alert sounds that should never stop. Once uploaded to your ESP32 S3, no further interaction is needed—playback loops automatically.

/* * DIYables Mini Mp3 Player - Loop Track * * Product: DIYables Mini Mp3 Player Module * https://diyables.io/products/mini-mp3-player-module * * Loops (repeats) a track continuously with EQ setting. * * Wiring Table: * Mini Mp3 RX -> GPIO17 (ESP32 S3 TX) * Mini Mp3 TX -> GPIO18 (ESP32 S3 RX) * Mini Mp3 VCC -> 3.3V * Mini Mp3 GND -> GND * Speaker connected to SPK_1 and SPK_2 pins * * SD Card file structure: * /001.mp3 * /002.mp3 * ... */ #include <DIYables_MiniMp3.h> #include <SoftwareSerial.h> SoftwareSerial mp3Serial (10, 11); // RX, TX DIYables_MiniMp3 mp3; void setup() { Serial.begin(115200); mp3Serial.begin(115200); mp3.begin(mp3Serial); delay(1000); // Wait for the module to initialize mp3.setVolume(25); // Volume: 0 to 30 mp3.setEQ(DIYables_MiniMp3::EQ_NORMAL); Serial.println("Playing track 1 on loop..."); mp3.loopTrack(1); } void loop() { // Your code here }

Detailed Instructions

  1. New to ESP32 S3? Complete our Getting Started with ESP32 S3 guide first.
  2. Upload sketch: Load the code above.
  3. Listen: Track 1 will repeat continuously.
  4. Pro Tip: Use loopAll() for background music projects that need continuous playback across all tracks.

Repeat & Shuffle Commands

Method Purpose Example
loopTrack(t) Keep replaying one track mp3.loopTrack(1)
loopFolder(f) Replay all tracks in a folder mp3.loopFolder(1)
loopAll() Replay everything on the card mp3.loopAll()
stopLoop() End the current repeat mode mp3.stopLoop()
shuffle() Randomize playback order mp3.shuffle()

ESP32 S3 Code — Play from Folder

The following code demonstrates how to play a specific track from a numbered folder on your SD card, enabling organized playback for projects with multiple audio categories such as sound effects, music genres, or language packs.

/* * DIYables Mini Mp3 Player - Play from Folder * * Product: DIYables Mini Mp3 Player Module * https://diyables.io/products/mini-mp3-player-module * * Plays tracks from specific folders on the SD card. * * Wiring Table: * Mini Mp3 RX -> GPIO17 (ESP32 S3 TX) * Mini Mp3 TX -> GPIO18 (ESP32 S3 RX) * Mini Mp3 VCC -> 3.3V * Mini Mp3 GND -> GND * Speaker connected to SPK_1 and SPK_2 pins * * SD Card file structure: * /01/001.mp3 <- playFolder(1, 1) * /01/002.mp3 <- playFolder(1, 2) * /02/001.mp3 <- playFolder(2, 1) * /02/002.mp3 <- playFolder(2, 2) * * IMPORTANT: * - Numbering starts from 1, NOT 0 * - Folder names must be 2-digit zero-padded (01-99) * - Track names must be 3-digit zero-padded (001-255) * - Format SD card as FAT32, then copy files one by one in order * - Track order is determined by the order files were copied, * NOT by filename. So copy them in the correct sequence. */ #include <DIYables_MiniMp3.h> #include <SoftwareSerial.h> SoftwareSerial mp3Serial (10, 11); // RX, TX DIYables_MiniMp3 mp3; void setup() { Serial.begin(115200); mp3Serial.begin(115200); mp3.begin(mp3Serial); delay(1000); mp3.setVolume(20); // Play track 1 from folder 01 Serial.println("Playing folder 01, track 001..."); mp3.playFolder(1, 1); delay(5000); // Play track 2 from folder 01 Serial.println("Playing folder 01, track 002..."); mp3.playFolder(1, 2); delay(5000); // Play track 1 from folder 02 Serial.println("Playing folder 02, track 001..."); mp3.playFolder(2, 1); } void loop() { // Nothing to do here }

Detailed Instructions

  1. New to ESP32 S3? Complete our Getting Started with ESP32 S3 guide first.
  2. Create folders: On your SD card, create folders named 01, 02, etc.
  3. Add files: Place mp3 files in each folder (001.mp3, 002.mp3, etc.).
  4. Upload code: Load the sketch to ESP32 S3.
  5. Test playback: Code plays the first track from folder 01.
  6. Pro Tip: Organize sound effects, music genres, or languages into separate folders for easy project organization.

Folder Methods

Method Purpose Example
playFolder(f, t) Select track t from folder f mp3.playFolder(1, 1)
playLargeFolder(f, t) Large folder mode (up to 3000 tracks) mp3.playLargeFolder(1, 1500)
playFromMP3Folder(t) Access the special /mp3 folder mp3.playFromMP3Folder(1)

ESP32 S3 Code — Serial Monitor Control

The following code turns the Arduino IDE Serial Monitor into a full control panel for your Mini Mp3 Player, letting you test every playback feature by typing single-character commands. This is the recommended first sketch to run after wiring your ESP32 S3, since it lets you verify all functions before building a physical interface.

/* * DIYables Mini Mp3 Player - Serial Command Control * * Product: DIYables Mini Mp3 Player Module * https://diyables.io/products/mini-mp3-player-module * * Control the Mp3 player by typing commands in the Serial Monitor. * Great for testing all functions without extra hardware. * * Commands (type in Serial Monitor, then press Enter): * 1-9 Play track 1 to 9 * + Volume up * - Volume down * p Pause * r Resume * s Stop * n Next track * b Previous track (back) * ? Show current status * * Wiring Table: * Mini Mp3 RX -> GPIO17 (ESP32 S3 TX) * Mini Mp3 TX -> GPIO18 (ESP32 S3 RX) * Mini Mp3 VCC -> 3.3V * Mini Mp3 GND -> GND * Speaker connected to SPK_1 and SPK_2 pins * * SD Card: Put mp3 files in root, named 001.mp3, 002.mp3, etc. */ #include <DIYables_MiniMp3.h> #include <SoftwareSerial.h> SoftwareSerial mp3Serial (10, 11); // RX, TX DIYables_MiniMp3 mp3; void setup() { Serial.begin(115200); mp3Serial.begin(115200); mp3.begin(mp3Serial); delay(1000); mp3.setVolume(20); Serial.println("=== DIYables Mini Mp3 Player ==="); Serial.println("Commands:"); Serial.println(" 1-9 Play track number"); Serial.println(" + Volume up"); Serial.println(" - Volume down"); Serial.println(" p Pause"); Serial.println(" r Resume"); Serial.println(" s Stop"); Serial.println(" n Next track"); Serial.println(" b Previous track"); Serial.println(" ? Show status"); Serial.println("================================"); } void loop() { if (Serial.available()) { char cmd = Serial.read(); switch (cmd) { case '1': case '2': case '3': case '4': case '5': case '6': case '7': case '8': case '9': Serial.print("Playing track "); Serial.println(cmd - '0'); mp3.play(cmd - '0'); break; case '+': Serial.println("Volume up"); mp3.volumeUp(); break; case '-': Serial.println("Volume down"); mp3.volumeDown(); break; case 'p': Serial.println("Paused"); mp3.pause(); break; case 'r': Serial.println("Resumed"); mp3.resume(); break; case 's': Serial.println("Stopped"); mp3.stop(); break; case 'n': Serial.println("Next track"); mp3.playNext(); break; case 'b': Serial.println("Previous track"); mp3.playPrevious(); break; case '?': { Serial.println("--- Status ---"); int16_t vol = mp3.getVolume(); Serial.print("Volume: "); Serial.println(vol); int16_t track = mp3.getCurrentTrack(); Serial.print("Current track: "); Serial.println(track); bool playing = mp3.isPlaying(); Serial.print("Playing: "); Serial.println(playing ? "Yes" : "No"); int16_t total = mp3.getTrackCount(); Serial.print("Total tracks: "); Serial.println(total); Serial.println("--------------"); break; } default: break; } } }

Detailed Instructions

  1. New to ESP32 S3? Complete our Getting Started with ESP32 S3 guide first.
  2. Upload code: Load the sketch to your ESP32 S3.
  3. Open Serial Monitor: Set baud rate to 115200.
  4. Send commands: Type commands from the table below.
  5. Control playback: Use keyboard to test all mp3 player features.
  6. Pro Tip: This is perfect for testing your mp3 module before building it into a larger project.

Serial Commands

Input Result
1–9 Play that track
+ / − Volume up / down
p Pause
r Resume
s Stop
n Next track
b Previous track
? Display status

Serial Monitor Output

Newbiely | Arduino IDE 2.3.8
──
File
Edit
Sketch
Tools
Help
ESP32S3 Dev Module
Newbiely.ino
···
8 Serial.println("Hello World!");
Output
Serial Monitor
Message (Enter to send message to 'ESP32S3 Dev Module' on 'COM15')
New Line
9600 baud
[2026-01-15 09:30:00] Mp3 Player Control Menu: [2026-01-15 09:30:00] 1-9: Play track, +/-: Volume, p: Pause, r: Resume, s: Stop, n: Next, b: Previous, ?: Status [2026-01-15 09:30:05] Command: 1 [2026-01-15 09:30:05] Playing track 1 [2026-01-15 09:30:10] Command: + [2026-01-15 09:30:10] Volume increased [2026-01-15 09:30:15] Command: n [2026-01-15 09:30:15] Next track
Ln 11, Col 1
ESP32S3 Dev Module on COM15
2

Equalizer Presets

The Mini Mp3 Player offers six built-in equalizer modes to enhance audio quality for different music genres.

Available EQ presets:

Constant ID Tone
DIYables_MiniMp3::EQ_NORMAL 0 Neutral
DIYables_MiniMp3::EQ_POP 1 Pop
DIYables_MiniMp3::EQ_ROCK 2 Rock
DIYables_MiniMp3::EQ_JAZZ 3 Jazz
DIYables_MiniMp3::EQ_CLASSIC 4 Classical
DIYables_MiniMp3::EQ_BASS 5 Bass boost

Example usage:

mp3.setEQ(DIYables_MiniMp3::EQ_POP);

Tips:

  • EQ_NORMAL works well for voice recordings and podcasts
  • EQ_BASS enhances small speakers with limited low-frequency response
  • Try different presets to match your speaker characteristics

Status Query Functions

The library provides functions to read the current state of the Mini Mp3 Player module in real-time.

Important notes:

  • Each query blocks execution for up to 100 milliseconds
  • Functions return −1 on timeout or communication error
  • Use these sparingly in time-critical applications

Available status functions:

Method Returns Info
isPlaying() bool Whether a track is active
getVolume() int16_t Volume (0–30)
getEQ() int16_t EQ preset (0–5)
getTrackCount() int16_t Total tracks on card
getCurrentTrack() int16_t Currently playing track
getFolderCount() int16_t Number of folders
getTrackCountInFolder(f) int16_t Tracks in folder f

Example code:

if (mp3.isPlaying()) { int currentTrack = mp3.getCurrentTrack(); int currentVolume = mp3.getVolume(); Serial.print("Playing track "); Serial.print(currentTrack); Serial.print(" at volume "); Serial.println(currentVolume); }

Application & Project Ideas

The ESP32 S3's dual-core processing and built-in WiFi make it especially well-suited for networked audio applications that go beyond simple local playback.

  1. WiFi Audio Player: Build a WiFi-controlled home audio player with a web interface for remote track selection.
  2. Talking Clock: Create a talking alarm clock with scheduled voice announcements for different times of day.
  3. Museum Guide: Design an exhibit guide that plays audio descriptions automatically when visitors approach.
  4. Interactive Toy: Make an interactive toy with sound effects triggered by motion or touch sensors.
  5. Language Trainer: Build a language learning device with folder-organized lessons for vocabulary and pronunciation.
  6. Smart Doorbell: Create a doorbell with customizable mp3 chimes selectable via a web interface.
  7. Meditation Timer: Design a meditation timer with background music and voice prompts at timed intervals.
  8. Retail Demo Unit: Build a product demo station with looping advertisement audio controlled remotely.

Video Tutorial

Watch the step-by-step video walkthrough for this ESP32 S3 project below.

Challenge Yourself

These projects build progressively on the skills you developed in this tutorial, taking your ESP32 S3 mp3 player from a simple demo to a polished, feature-rich device.

  1. Beginner: Add an LED that lights up when music is playing using the BUSY pin.
  2. Beginner: Create a 3-button jukebox that plays track 1, 2, or 3 on demand.
  3. Intermediate: Build a web interface to control playback over the ESP32 S3's WiFi connection.
  4. Intermediate: Add an LCD display showing the current track number and volume level.
  5. Advanced: Create a voice-activated mp3 player using a microphone module and the ESP32 S3's ADC.
  6. Advanced: Build a multi-room audio system with multiple ESP32 S3 boards synced over WiFi using UDP broadcasts.

※ OUR MESSAGES

  • As freelancers, We are AVAILABLE for HIRE. See how to outsource your project to us
  • Please feel free to share the link of this tutorial. However, Please do not use our content on any other websites. We invested a lot of effort and time to create the content, please respect our work!