
This tutorial guides you on programming an ESP32 S3 to utilize multiple buttons simultaneously without relying on the delay() function. By the end of this tutorial, you will understand two proven approaches for reading multiple buttons cleanly and efficiently on the ESP32 S3 platform.
What you'll build:
A multi-button circuit wired to the ESP32 S3 using a breadboard
Code that detects press and release events for each button independently
A debounced version that eliminates spurious button readings
An array-based version that scales cleanly to any number of buttons
Disclosure: Some of the links provided in this section are Amazon affiliate links. We may receive a commission for any purchases made through these links at no additional cost to you. Additionally, some of these links are for products from our own brand, DIYables .
Overview of Button
The ESP32 S3 handles digital input from buttons using its GPIO pins with built-in pull-up resistors, making wiring straightforward. We have specific tutorials about buttons that contain detailed information and step-by-step instructions about hardware pinout, working principle, wiring connection to ESP32 S3, and ESP32 S3 code. Learn more about them at the following links:
The buttons used in this tutorial are standard momentary tactile switches compatible with breadboards. They operate at 3.3 V logic levels, which matches the ESP32 S3's GPIO voltage, and draw negligible current when using the built-in pull-up resistors.
Wiring Diagram
Connect each button between a GPIO pin and GND on your breadboard, relying on the ESP32 S3's internal pull-up resistors to hold the pin HIGH when the button is not pressed.
Safety Notes
Always wire buttons to GND and enable internal pull-ups in code rather than connecting directly to 3.3 V, which prevents accidental short circuits. Double-check that each button shares a common GND rail on the breadboard before powering the ESP32 S3.
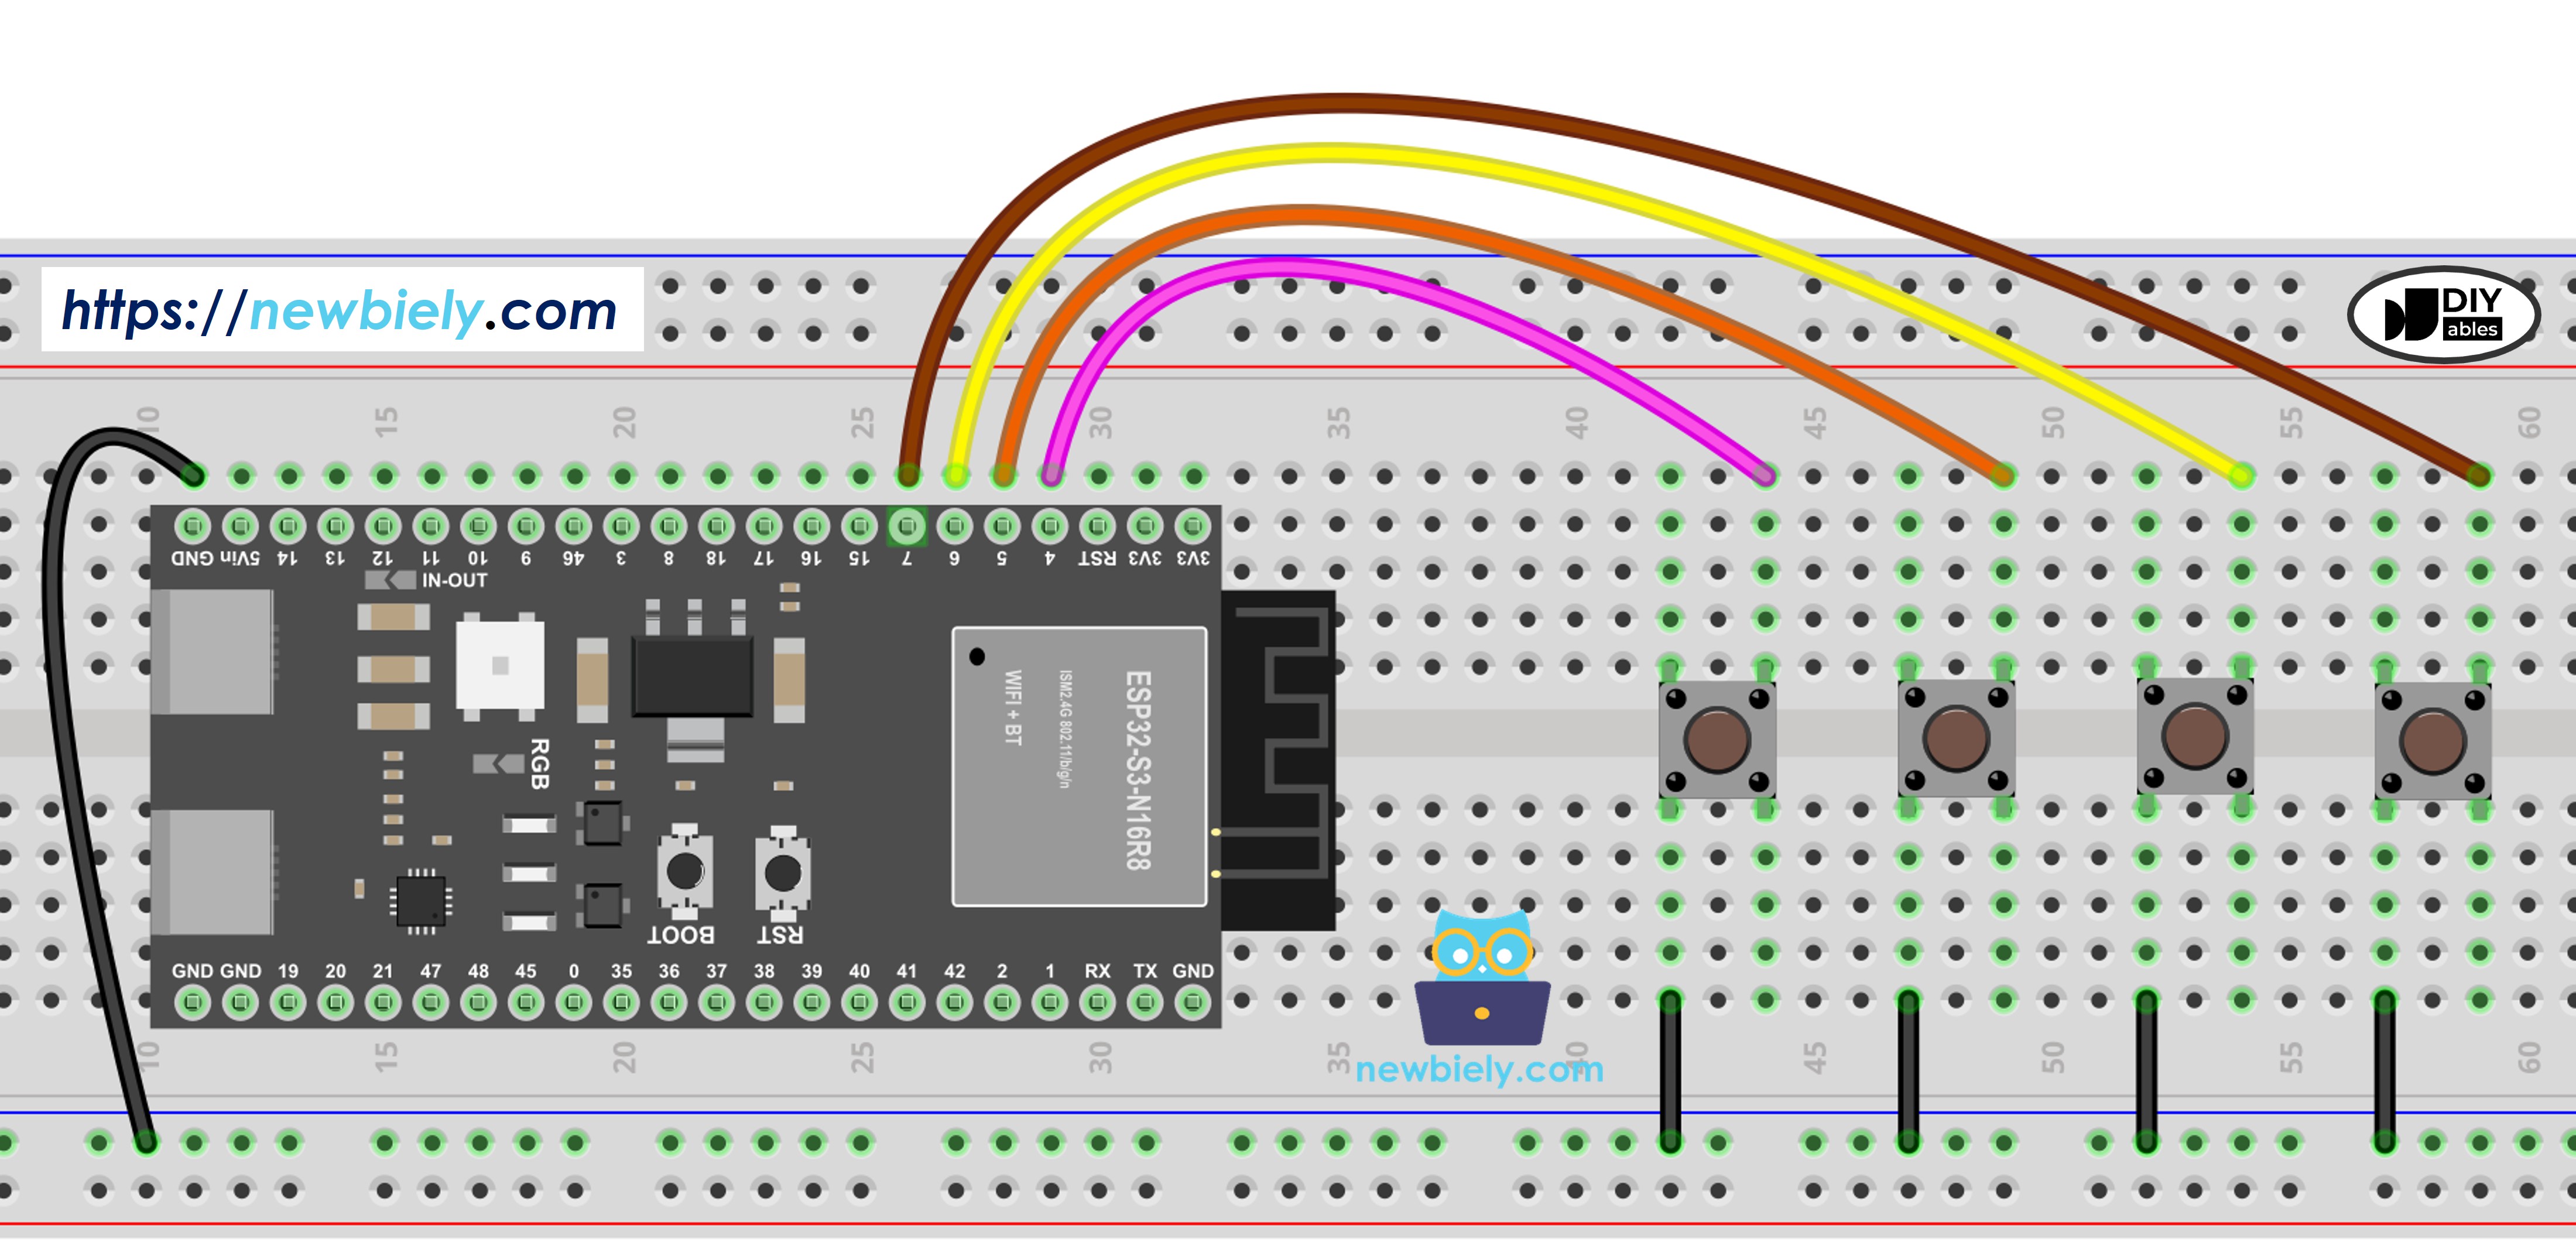
This image is created using Fritzing. Click to enlarge image
ESP32 S3 Code - Multiple Buttons with debounce
When dealing with multiple buttons, complexity can arise in specific situations where simultaneous presses, bounce noise, or state-change detection are required. The following code uses the ezButton library to handle debounce and button events internally, sparing you from manually managing timestamps and state variables for each button.
/* * This ESP32 S3 code was developed by newbiely.com * * This ESP32 S3 code is made available for public use without any restriction * * For comprehensive instructions and wiring diagrams, please visit: * https://newbiely.com/tutorials/esp32-s3/esp32-s3-multiple-button *//* * This ESP32-S3 code is created by esp32io.com * * This ESP32-S3 code is released in the public domain * * For more detail (instruction and wiring diagram), visit https://esp32io.com/tutorials/esp32-s3-multiple-button */#include <ezButton.h>#define BUTTON_PIN_1 4 // The ESP32-S3 pin GPIO4 connected to the button 1#define BUTTON_PIN_2 5 // The ESP32-S3 pin GPIO5 connected to the button 2#define BUTTON_PIN_3 6 // The ESP32-S3 pin GPIO6 connected to the button 3#define BUTTON_PIN_4 7 // The ESP32-S3 pin GPIO7 connected to the button 4ezButtonbutton1(BUTTON_PIN_1); // create ezButton object for button 1ezButtonbutton2(BUTTON_PIN_2); // create ezButton object for button 2ezButtonbutton3(BUTTON_PIN_3); // create ezButton object for button 3ezButton button4(BUTTON_PIN_4); // create ezButton object for button 4voidsetup() {Serial.begin(9600);button1.setDebounceTime(100); // set debounce time to 100 millisecondsbutton2.setDebounceTime(100); // set debounce time to 100 millisecondsbutton3.setDebounceTime(100); // set debounce time to 100 milliseconds button4.setDebounceTime(100); // set debounce time to 100 milliseconds}voidloop() {button1.loop(); // MUST call the loop() function firstbutton2.loop(); // MUST call the loop() function firstbutton3.loop(); // MUST call the loop() function first button4.loop(); // MUST call the loop() function first// get button state after debounceint button1_state = button1.getState(); // the state after debounceint button2_state = button2.getState(); // the state after debounceint button3_state = button3.getState(); // the state after debounceint button4_state = button4.getState(); // the state after debounce/* Serial.print("The button 1 state: "); Serial.println(button1_state); Serial.print("The button 2 state: "); Serial.println(button2_state); Serial.print("The button 3 state: "); Serial.println(button3_state); Serial.print("The button 4 state: "); Serial.println(button4_state); */if (button1.isPressed())Serial.println("The button 1 is pressed");if (button1.isReleased())Serial.println("The button 1 is released");if (button2.isPressed())Serial.println("The button 2 is pressed");if (button2.isReleased())Serial.println("The button 2 is released");if (button3.isPressed())Serial.println("The button 3 is pressed");if (button3.isReleased())Serial.println("The button 3 is released");if (button4.isPressed())Serial.println("The button 4 is pressed");if (button4.isReleased())Serial.println("The button 4 is released");}
Connect the ESP32 S3 board to your PC via a USB Type-C cable.
Open Arduino IDE on your PC.
Select the right ESP32 S3 board and COM port.
Click to the Libraries icon on the left bar of the Arduino IDE.
Search "ezButton", then find the button library by ArduinoGetStarted.
Click Install button to install the ezButton library.
Search for ezButton created by ArduinoGetStarted.com and click the Install button.
Newbiely | Arduino IDE 2.3.8
──
☐
✕
File
Edit
Sketch
Tools
Help
ESP32S3 Dev Module
Library Manager
ezButton
Type:
All
Topic:
All
ezButtonby ArduinoGetStarted.com
Button library supports debounce, pressed/released events and the press counting. It is easy to use with multiple buttons. The library can be used for push-button, momentary switches, toggle switch, magnetic contact switch (door sensor)... It is designed for not only beginners but also experienced users.
More info
1.0.6
INSTALL
Newbiely.ino
···
1
voidsetup() {
Output
Serial Monitor
Ln 1, Col 1
ESP32S3 Dev Module on COM15
1
Copy the above code and paste it to Arduino IDE.
Compile and upload code to the ESP32 S3 board by clicking Upload button on Arduino IDE.

Open Serial Monitor on Arduino IDE.
Press and release each button one by one to observe the output.
Newbiely | Arduino IDE 2.3.8
──
☐
✕
File
Edit
Sketch
Tools
Help
ESP32S3 Dev Module
Newbiely.ino
···
8Serial.println("Hello World!");
Output
Serial Monitor
Message (Enter to send message to 'ESP32S3 Dev Module' on 'COM15')
New Line
9600 baud
[2026-01-01 10:00:01] The button 1 is pressed
[2026-01-01 10:00:01] The button 1 is released
[2026-01-01 10:00:03] The button 2 is pressed
[2026-01-01 10:00:03] The button 2 is released
[2026-01-01 10:00:05] The button 3 is pressed
[2026-01-01 10:00:05] The button 3 is released
[2026-01-01 10:00:07] The button 4 is pressed
[2026-01-01 10:00:07] The button 4 is released
Ln 11, Col 1
ESP32S3 Dev Module on COM15
2
Pro Tip: If a button registers multiple presses with a single click, increase the debounce time in the ezButton settings to filter out mechanical bounce noise from your specific buttons.
ESP32 S3 Code - Multiple Buttons using array
We can enhance the provided code by utilizing an array of buttons, which makes adding or removing buttons as simple as changing a single constant. The following code demonstrates how this array manages button objects and loops through them uniformly on each iteration.
/* * This ESP32 S3 code was developed by newbiely.com * * This ESP32 S3 code is made available for public use without any restriction * * For comprehensive instructions and wiring diagrams, please visit: * https://newbiely.com/tutorials/esp32-s3/esp32-s3-multiple-button *//* * This ESP32-S3 code is created by esp32io.com * * This ESP32-S3 code is released in the public domain * * For more detail (instruction and wiring diagram), visit https://esp32io.com/tutorials/esp32-s3-multiple-button */#include <ezButton.h>#define BUTTON_NUM 4 // the number of buttons#define BUTTON_PIN_1 4 // The ESP32-S3 pin GPIO4 connected to the button 1#define BUTTON_PIN_2 5 // The ESP32-S3 pin GPIO5 connected to the button 2#define BUTTON_PIN_3 6 // The ESP32-S3 pin GPIO6 connected to the button 3#define BUTTON_PIN_4 7 // The ESP32-S3 pin GPIO7 connected to the button 4ezButtonbuttonArray[] = {ezButton(BUTTON_PIN_1),ezButton(BUTTON_PIN_2),ezButton(BUTTON_PIN_3),ezButton(BUTTON_PIN_4)};voidsetup() {Serial.begin(9600);for (byte i = 0; i < BUTTON_NUM; i++) {buttonArray[i].setDebounceTime(100); // set debounce time to 100 milliseconds }}voidloop() {for (byte i = 0; i < BUTTON_NUM; i++) buttonArray[i].loop(); // MUST call the loop() function firstfor (byte i = 0; i < BUTTON_NUM; i++) {// get button state after debounceint button_state = buttonArray[i].getState(); // the state after debounce/* Serial.print("The button "); Serial.print(i + 1); Serial.print(": "); Serial.println(button_state); */if (buttonArray[i].isPressed()) {Serial.print("The button ");Serial.print(i + 1);Serial.println(" is pressed"); }if (buttonArray[i].isReleased()) {Serial.print("The button ");Serial.print(i + 1);Serial.println(" is released"); } }}
Applications
Managing multiple buttons simultaneously on the ESP32 S3 opens up a wide range of practical use cases, from simple UI controls to complex menu navigation systems. Here are some common applications:
Menu Navigation: Use four buttons for up, down, select, and back actions in an OLED display menu.
Game Controller: Map buttons to directional or action inputs for simple embedded games.
Keypad Replacement: Replace a hardware keypad with discrete buttons for custom panel layouts.
Multi-mode Selector: Switch between operational modes in a device using dedicated mode buttons.
Emergency Stops: Wire multiple safety-stop buttons throughout a machine for redundant shutoff control.
Video Tutorial
Watch the step-by-step video walkthrough for this ESP32 S3 project below.
Challenges
Experimenting beyond the basic tutorial is the best way to deepen your understanding of multi-button handling on the ESP32 S3. Try these challenges to build confidence with more advanced techniques:
Beginner: Modify the code to control four individual LEDs, each toggled by its own button.
Intermediate: Implement a combination lock that unlocks only when buttons are pressed in a specific sequence.
Advanced: Create a rotary-encoder-style interface using two buttons for increment and decrement, with long-press detection for acceleration.
Please feel free to share the link of this tutorial. However, Please do not use our content on any other websites. We invested a lot of effort and time to create the content, please respect our work!