
ESP32 S3 - DHT11
This beginner-friendly tutorial shows you how to use the ESP32 S3 with a DHT11 temperature and humidity sensor to monitor environmental conditions. You'll learn to wire the DHT11 sensor to your ESP32 S3, program it to read data, and display real-time temperature and humidity readings on the Serial Monitor.
In this tutorial, you'll learn:
- What the DHT11 sensor is and how it measures temperature and humidity
- How to wire DHT11 sensor and module to ESP32 S3
- How to install the DHT library and write code to read sensor data
- How to display temperature in Celsius and Fahrenheit on Serial Monitor
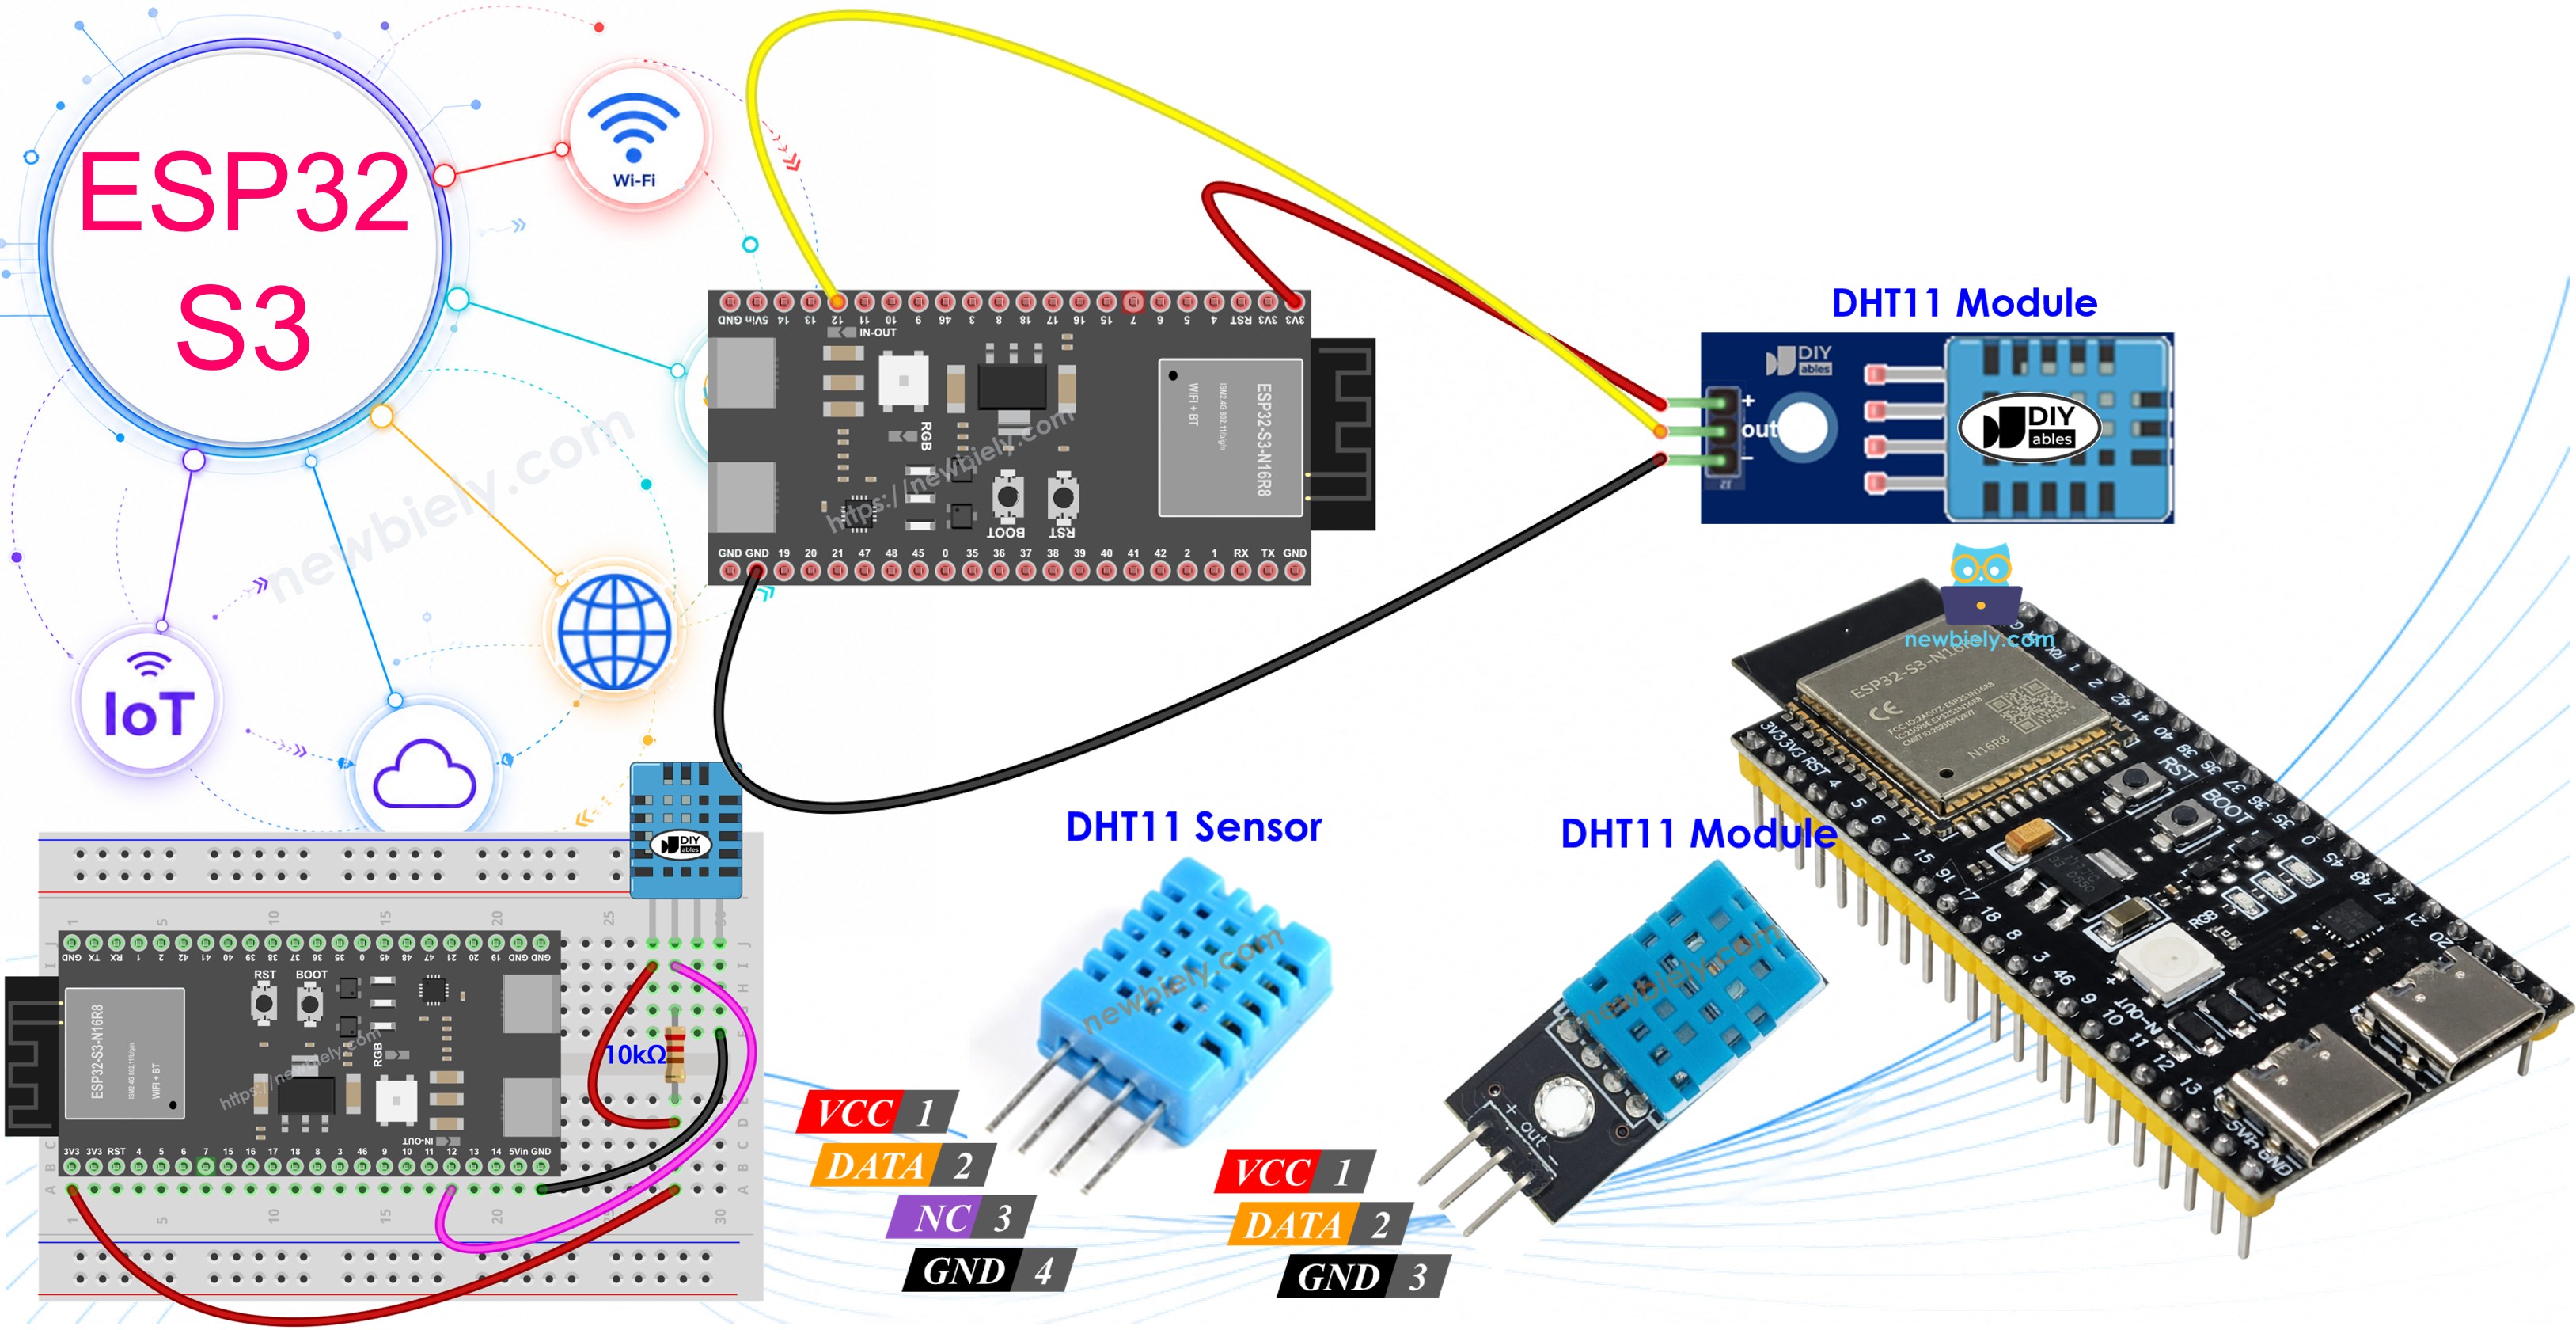
Hardware Preparation
Or you can buy the following kits:
| 1 | × | DIYables ESP32 S3 Starter Kit (ESP32 S3 included) | |
| 1 | × | DIYables Sensor Kit (18 sensors/displays) |
Additionally, some of these links are for products from our own brand, DIYables .
Overview of DHT11 Temperature and Humidity Sensor
The DHT11 is a low-cost digital sensor capable of measuring both temperature and humidity in its surrounding environment. It communicates over a single-wire digital interface, making it straightforward to integrate with microcontrollers like the ESP32 S3. Despite its modest specifications, it is an excellent starting point for environmental monitoring projects.
Key Specifications
The DHT11 measures humidity across a range of 20% to 80% with an accuracy of ±5%, and temperature from 0°C to 50°C with an accuracy of ±2°C. It operates on 3V to 5V and delivers one reading per second (1 Hz). The sensor is available in two forms: a raw 4-pin component and a convenient 3-pin module with a built-in pull-up resistor — the module version is recommended for easier wiring.
DHT11 Pinout
The DHT11 comes in two forms: a raw sensor with 4 pins and a convenient module with 3 pins.
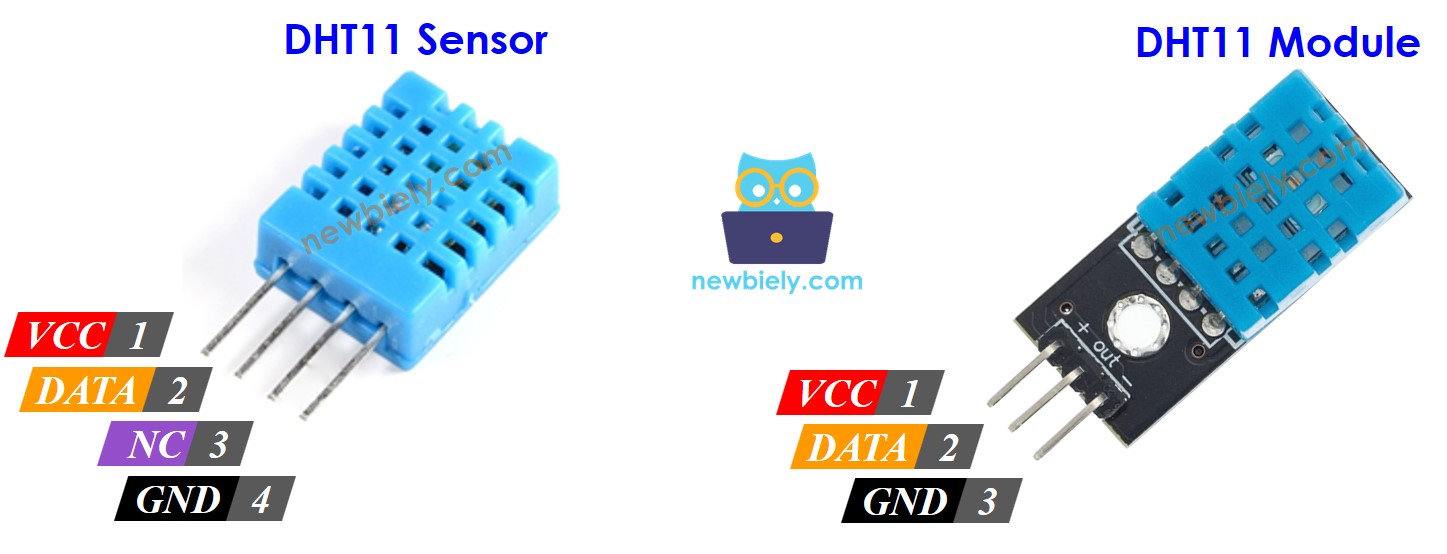
DHT11 Raw Sensor (4 pins):
- GND: Connect to ground (0V)
- VCC: Connect to power (3.3V or 5V)
- DATA: Communication pin to send readings to ESP32 S3
- NC: Not connected (leave unconnected)
DHT11 Module (3 pins):
- VCC (or +): Connect to power
- GND (or -): Connect to ground
- DATA (or OUT): Communication pin to ESP32 S3
Recommendation: Use the DHT11 module version as it has a built-in pull-up resistor, making wiring simpler and more reliable.
Wiring Diagram between DHT11 and ESP32 S3
Connect your DHT11 sensor to the ESP32 S3 by following the diagrams below for both the raw sensor and the module variants. If you are using the raw sensor, a 10 kΩ pull-up resistor between the DATA and VCC pins is required for reliable communication.
Safety Notes
Always power off or disconnect the ESP32 S3 before making or changing wiring connections to avoid accidental short circuits. Verify the VCC voltage of your DHT11 variant before connecting — the ESP32 S3 operates at 3.3V logic, and supplying 5V to the DATA pin without a level shifter may damage the board. Using the DHT11 module, which typically includes a built-in resistor and may include onboard regulation, is the safest and simplest option.
ESP32 S3 - DHT11 Sensor Wiring
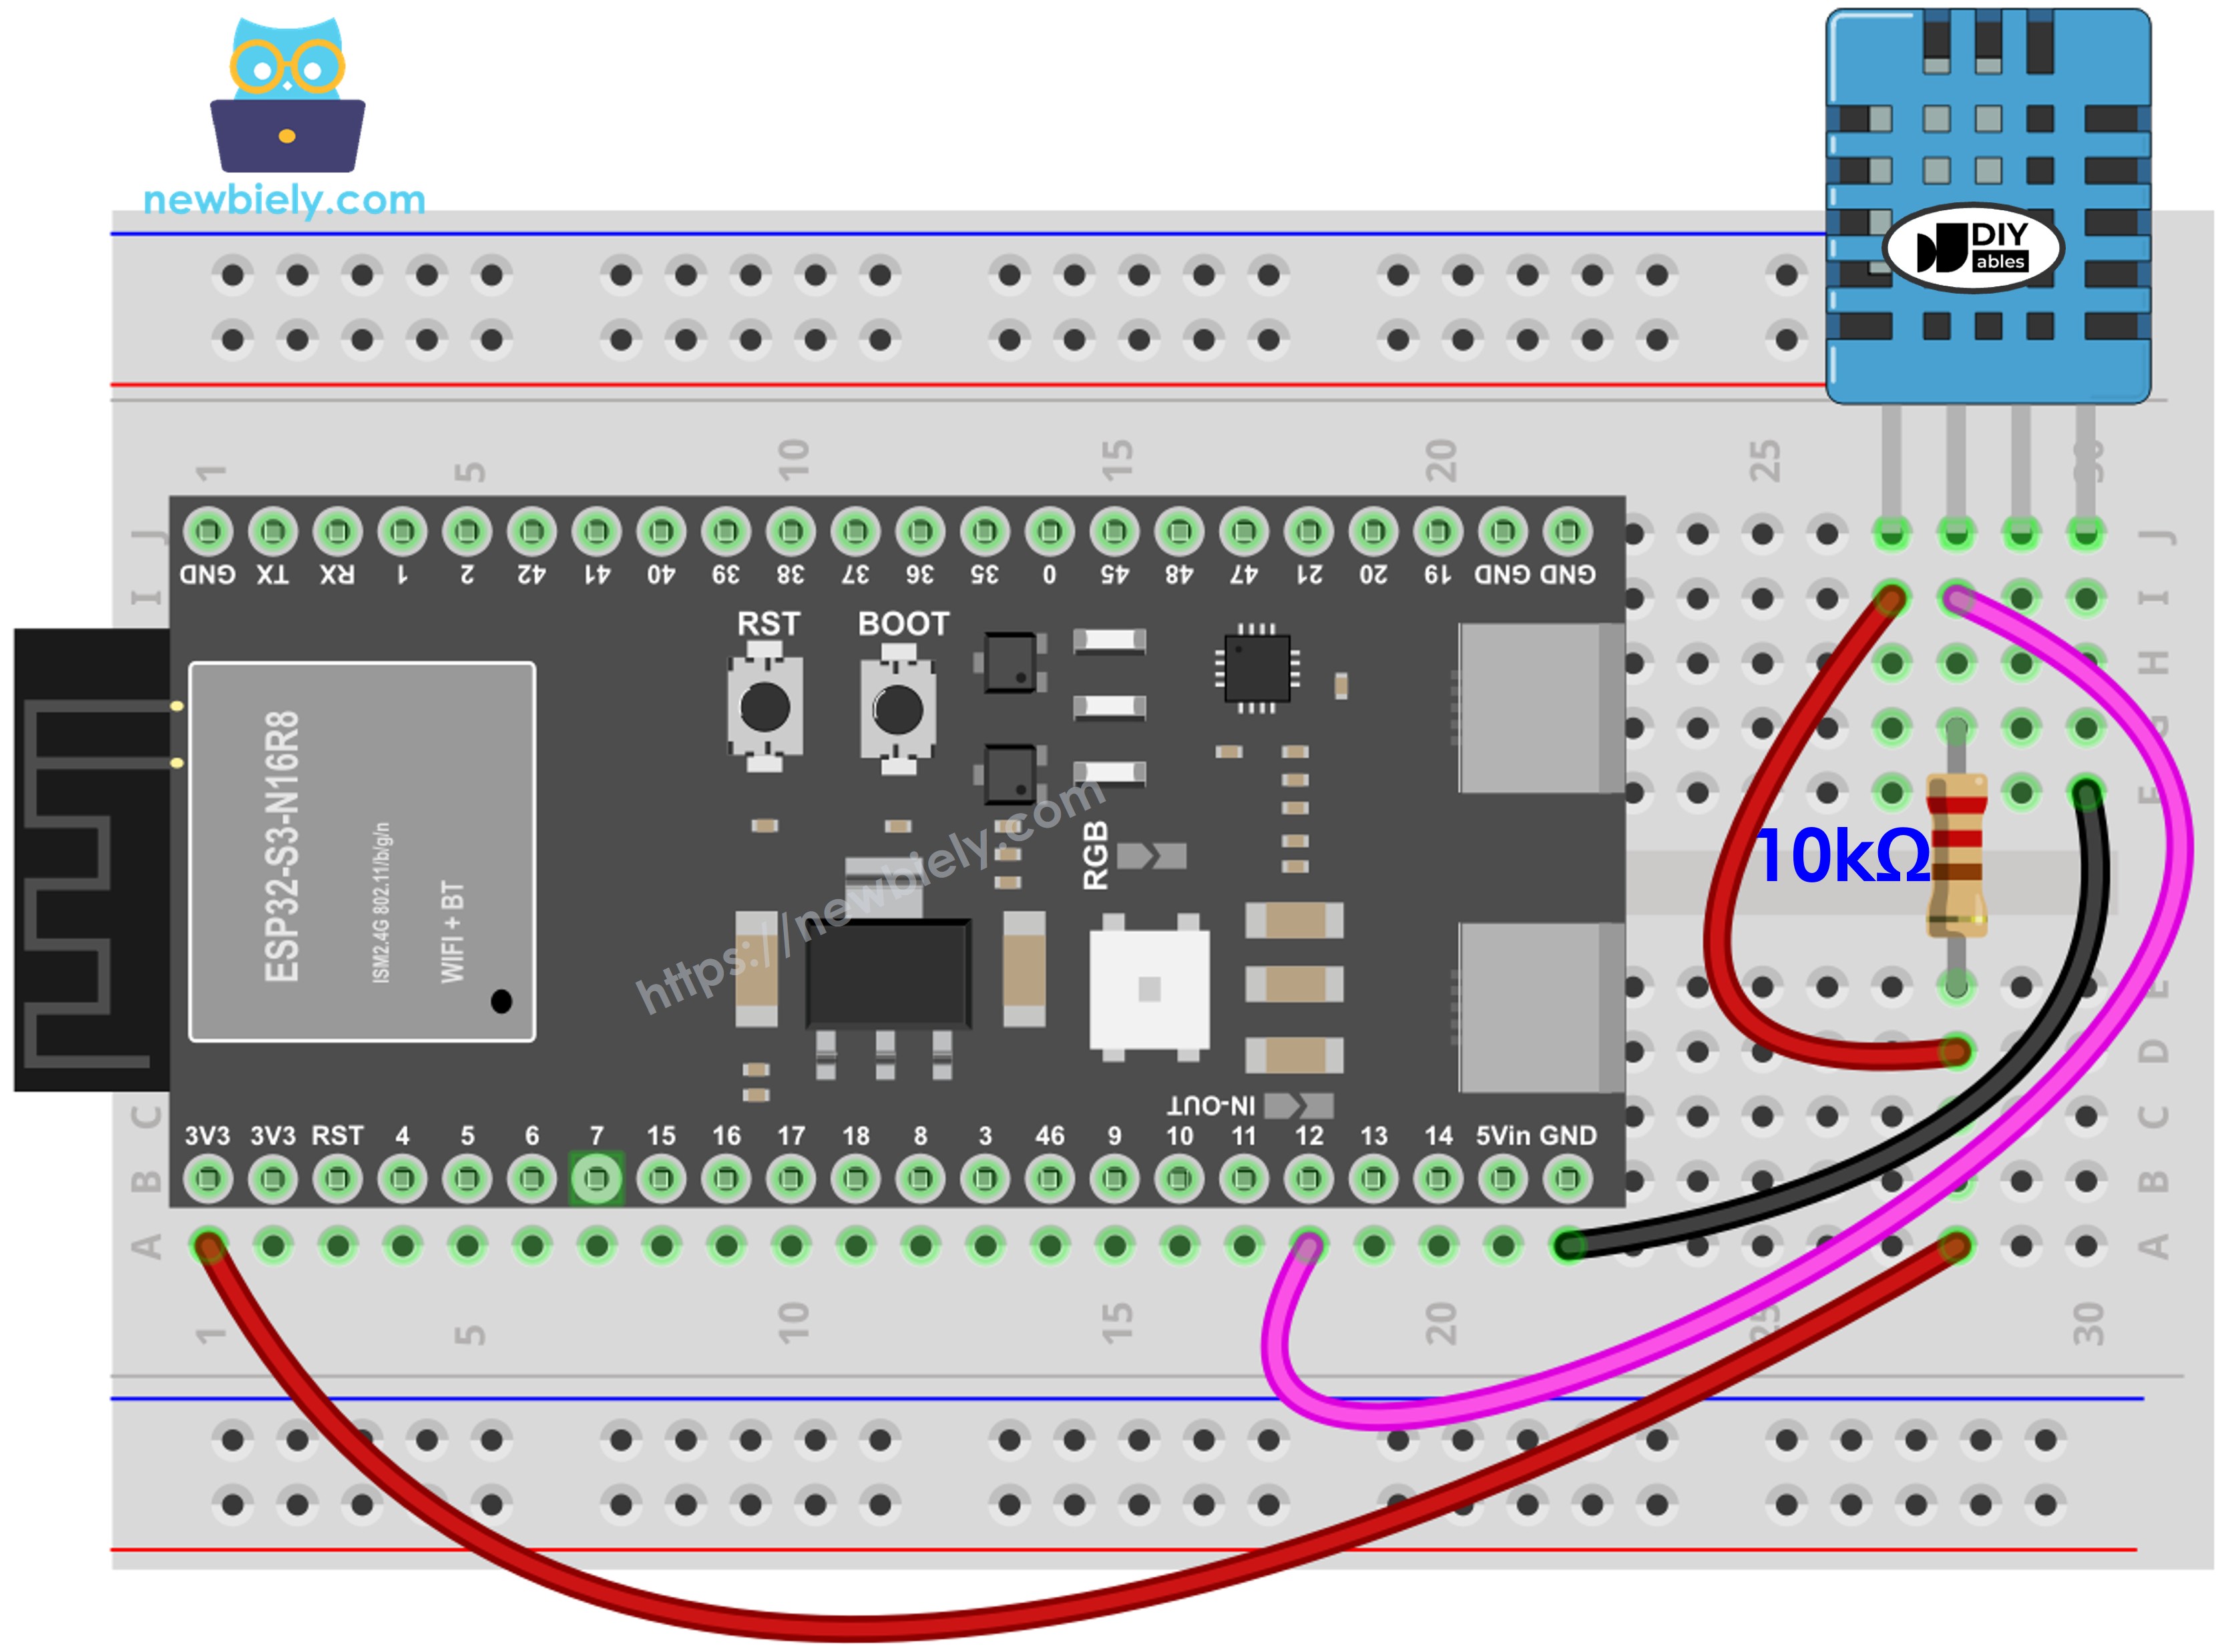
This image is created using Fritzing. Click to enlarge image
| DHT11 Sensor Pin | ESP32 S3 Pin |
|---|---|
| GND | GND |
| VCC | 3.3V |
| DATA | GPIO12 |
- Note: Connect a 10kΩ resistor between DATA and VCC pins.
ESP32 S3 - DHT11 Module Wiring
Most DHT11 modules have a built-in pull-up resistor, eliminating the need for external components.
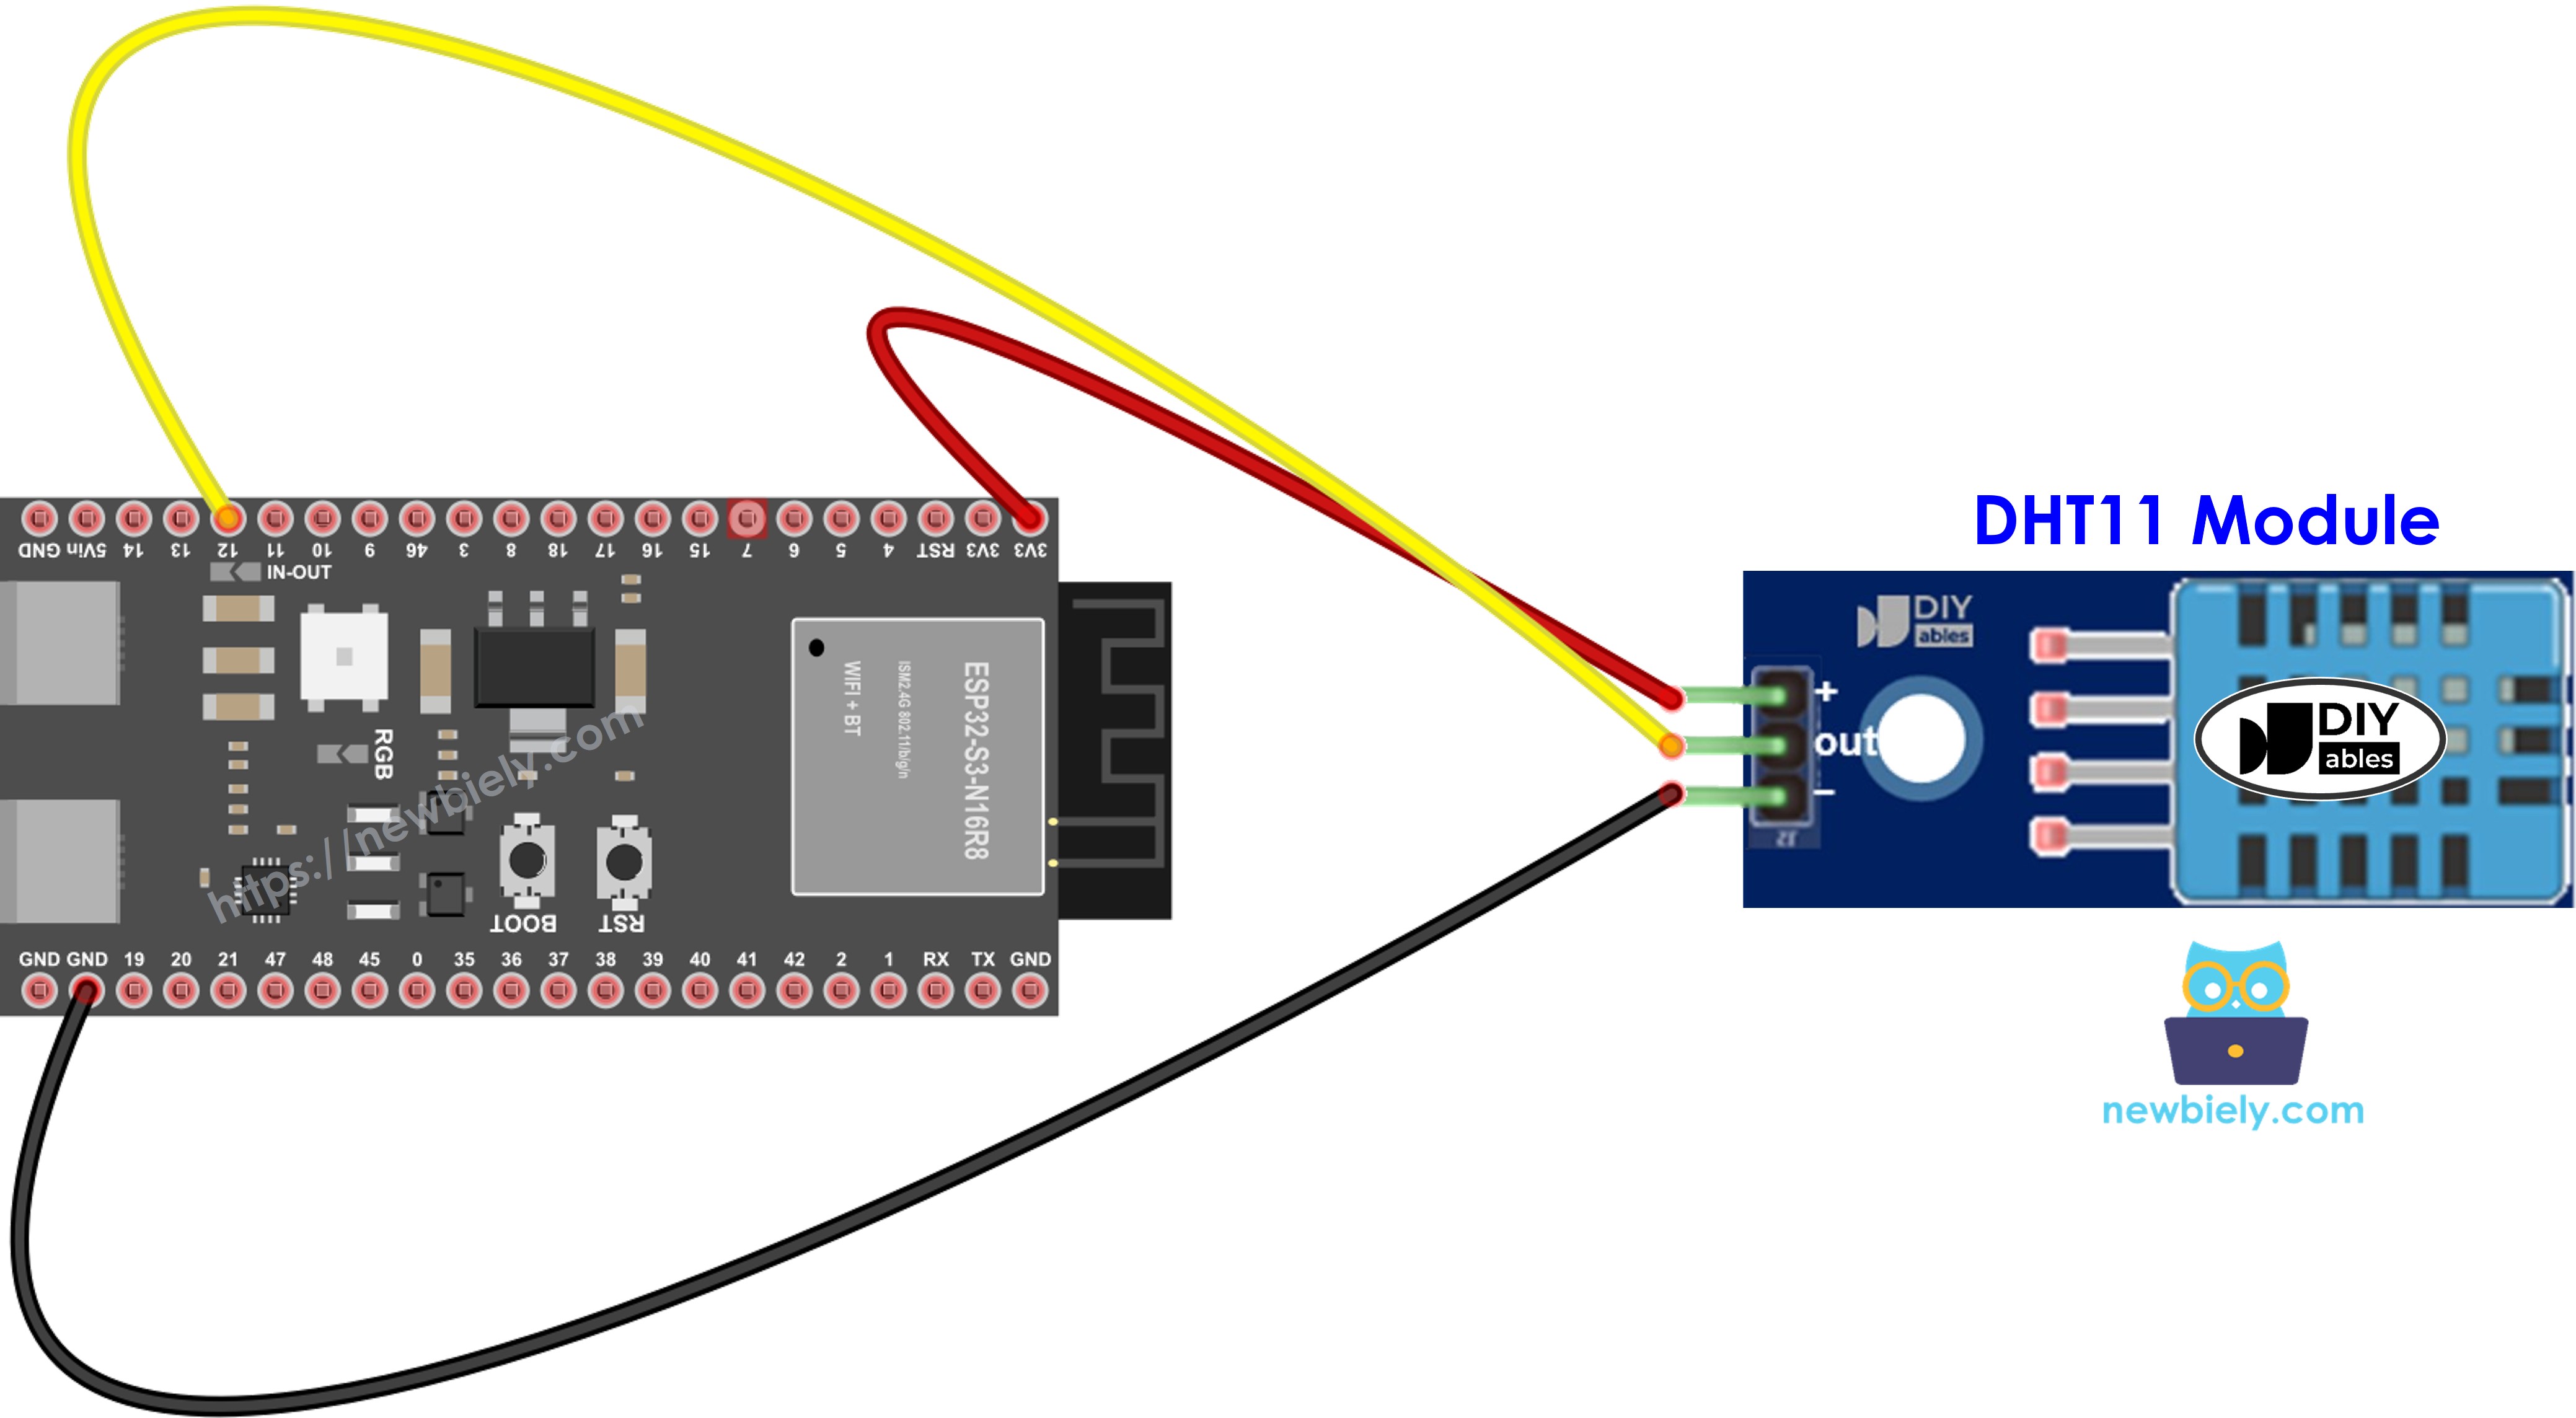
This image is created using Fritzing. Click to enlarge image
| DHT11 Module Pin | ESP32 S3 Pin |
|---|---|
| GND (or -) | GND |
| VCC (or +) | 3.3V |
| DATA (or OUT) | GPIO12 |
ESP32 S3 Code - DHT11
The following code reads temperature and humidity from the DHT11 sensor and displays the results on the Serial Monitor. It initializes the sensor on GPIO12, takes a reading every two seconds, and outputs humidity as a percentage alongside temperature in both Celsius and Fahrenheit. Any sensor communication errors are reported gracefully so you can diagnose wiring issues without guessing.
Detailed Instructions
- New to ESP32 S3? Complete our Getting Started with ESP32 S3 guide first.
- Set up your Arduino IDE: If this is your first time with ESP32 S3, follow the environment setup tutorial for Arduino IDE.
- Wire the components: Follow the wiring diagram above to connect DHT11 to ESP32 S3.
- Connect the board: Plug your ESP32 S3 into your computer using a USB Type-C cable.
- Open Arduino IDE: Launch the Arduino IDE on your computer.
- Select your board: Choose ESP32 S3 and select the correct COM port.
- Open Library Manager: Click the Library Manager icon on the left sidebar.
- Search for DHT library: Type "DHT" in the search box and find the DHT sensor library by Adafruit.
- Install the library: Click the Install button.
- Search for DHT sensor library created by Adafruit and click the Install button.
- Install dependencies: When prompted, click Install All to install required dependencies.
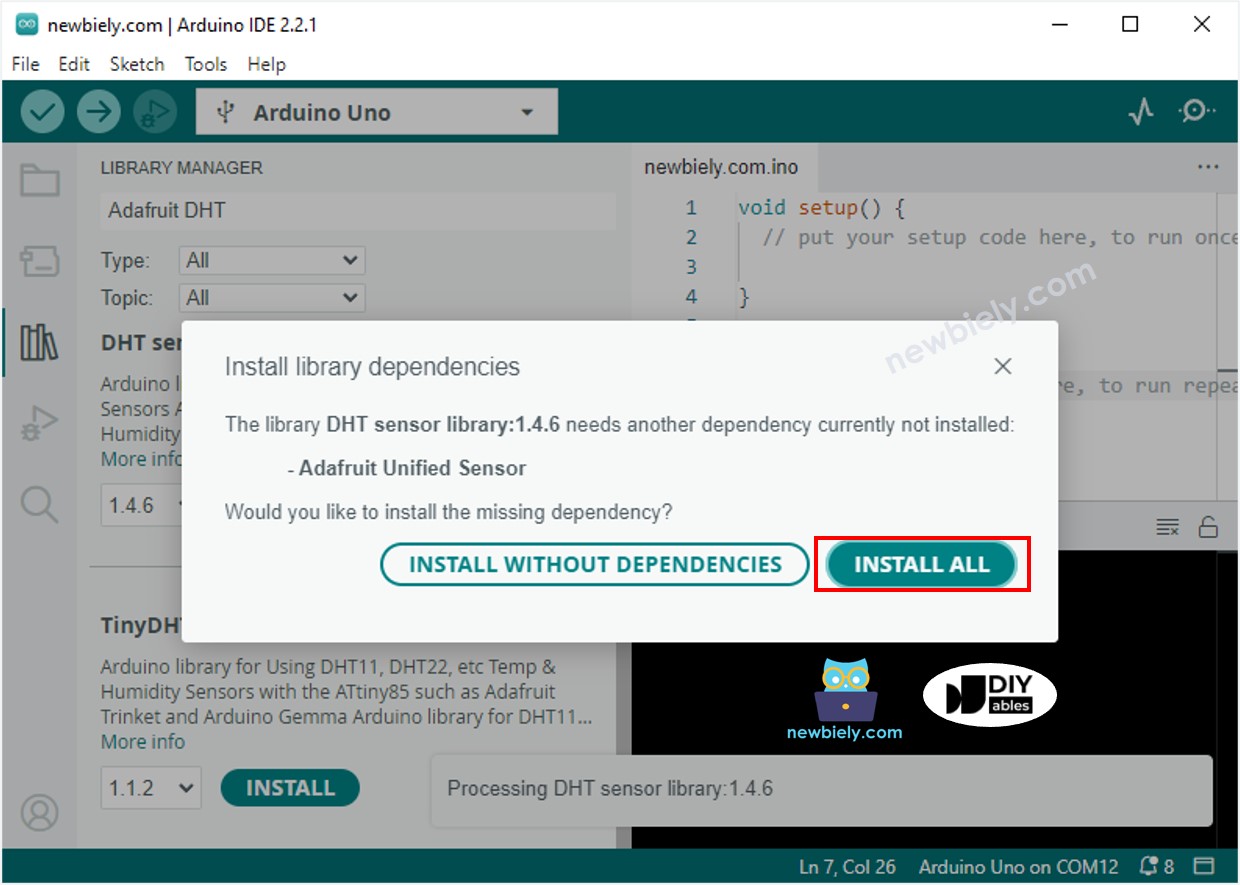
- Copy the code: Copy the code provided above and paste it into Arduino IDE.
- Upload the code: Click the Upload button to compile and upload to your ESP32 S3.
- Test the sensor: Try changing the temperature by placing the sensor near something warm (like a coffee cup) or cool.
- Open Serial Monitor: View your readings in the Serial Monitor at 115200 baud rate.
- Pro Tip: Wait at least 2 seconds after powering up before taking your first reading — the DHT11 needs a brief warm-up period to deliver accurate data.
Serial Monitor Output
Open the Serial Monitor and you will see temperature and humidity readings updating every 2 seconds. The following output is representative of readings taken in a typical indoor environment in 2026.
Application and Project Ideas
The ESP32 S3 paired with the DHT11 opens the door to a wide range of practical environmental monitoring projects, from simple room monitors to fully automated control systems. Consider starting with one of the following ideas and expanding from there.
- Smart home climate monitor: Track indoor temperature and humidity levels throughout the day.
- Greenhouse automation: Monitor and log environmental conditions to support healthy plant growth.
- Weather station: Build a basic weather monitoring system with data logging.
- Comfort level indicator: Create LED alerts when humidity or temperature goes outside comfortable ranges.
- Data logger: Record temperature and humidity readings to an SD card or cloud service.
- Terrarium controller: Monitor and maintain optimal conditions for reptiles or plants.
Video Tutorial
Watch the step-by-step video walkthrough for this ESP32 S3 project below.
Challenge Yourself
These challenges are designed to help you deepen your understanding of sensor integration and expand your ESP32 S3 project beyond the basics. Pick one that matches your current skill level and work your way up.
- Beginner: Add an LED that turns on when temperature exceeds 25°C.
- Beginner: Display "Comfortable" or "Uncomfortable" based on humidity levels (comfortable range: 30–60%).
- Intermediate: Add a push button to switch between Celsius and Fahrenheit display.
- Intermediate: Store the last 10 readings and display the minimum and maximum values on the Serial Monitor.
- Advanced: Send temperature and humidity data to a web server or IoT platform such as ThingSpeak.
- Advanced: Create a heat index calculator that combines temperature and humidity to compute a "feels like" temperature.