
ESP32 S3 - DHT22
Learn how to use the ESP32 S3 with a DHT22 sensor to measure temperature and humidity. This beginner-friendly tutorial covers both the raw DHT22 sensor and the convenient module version, with complete wiring diagrams and ready-to-upload code examples.
What you'll build:
- A working circuit connecting a DHT22 sensor or module to the ESP32 S3
- Firmware that reads temperature in both Celsius and Fahrenheit plus relative humidity
- A live Serial Monitor feed displaying real-time environmental readings
- A foundation you can extend into weather stations, smart home sensors, and more
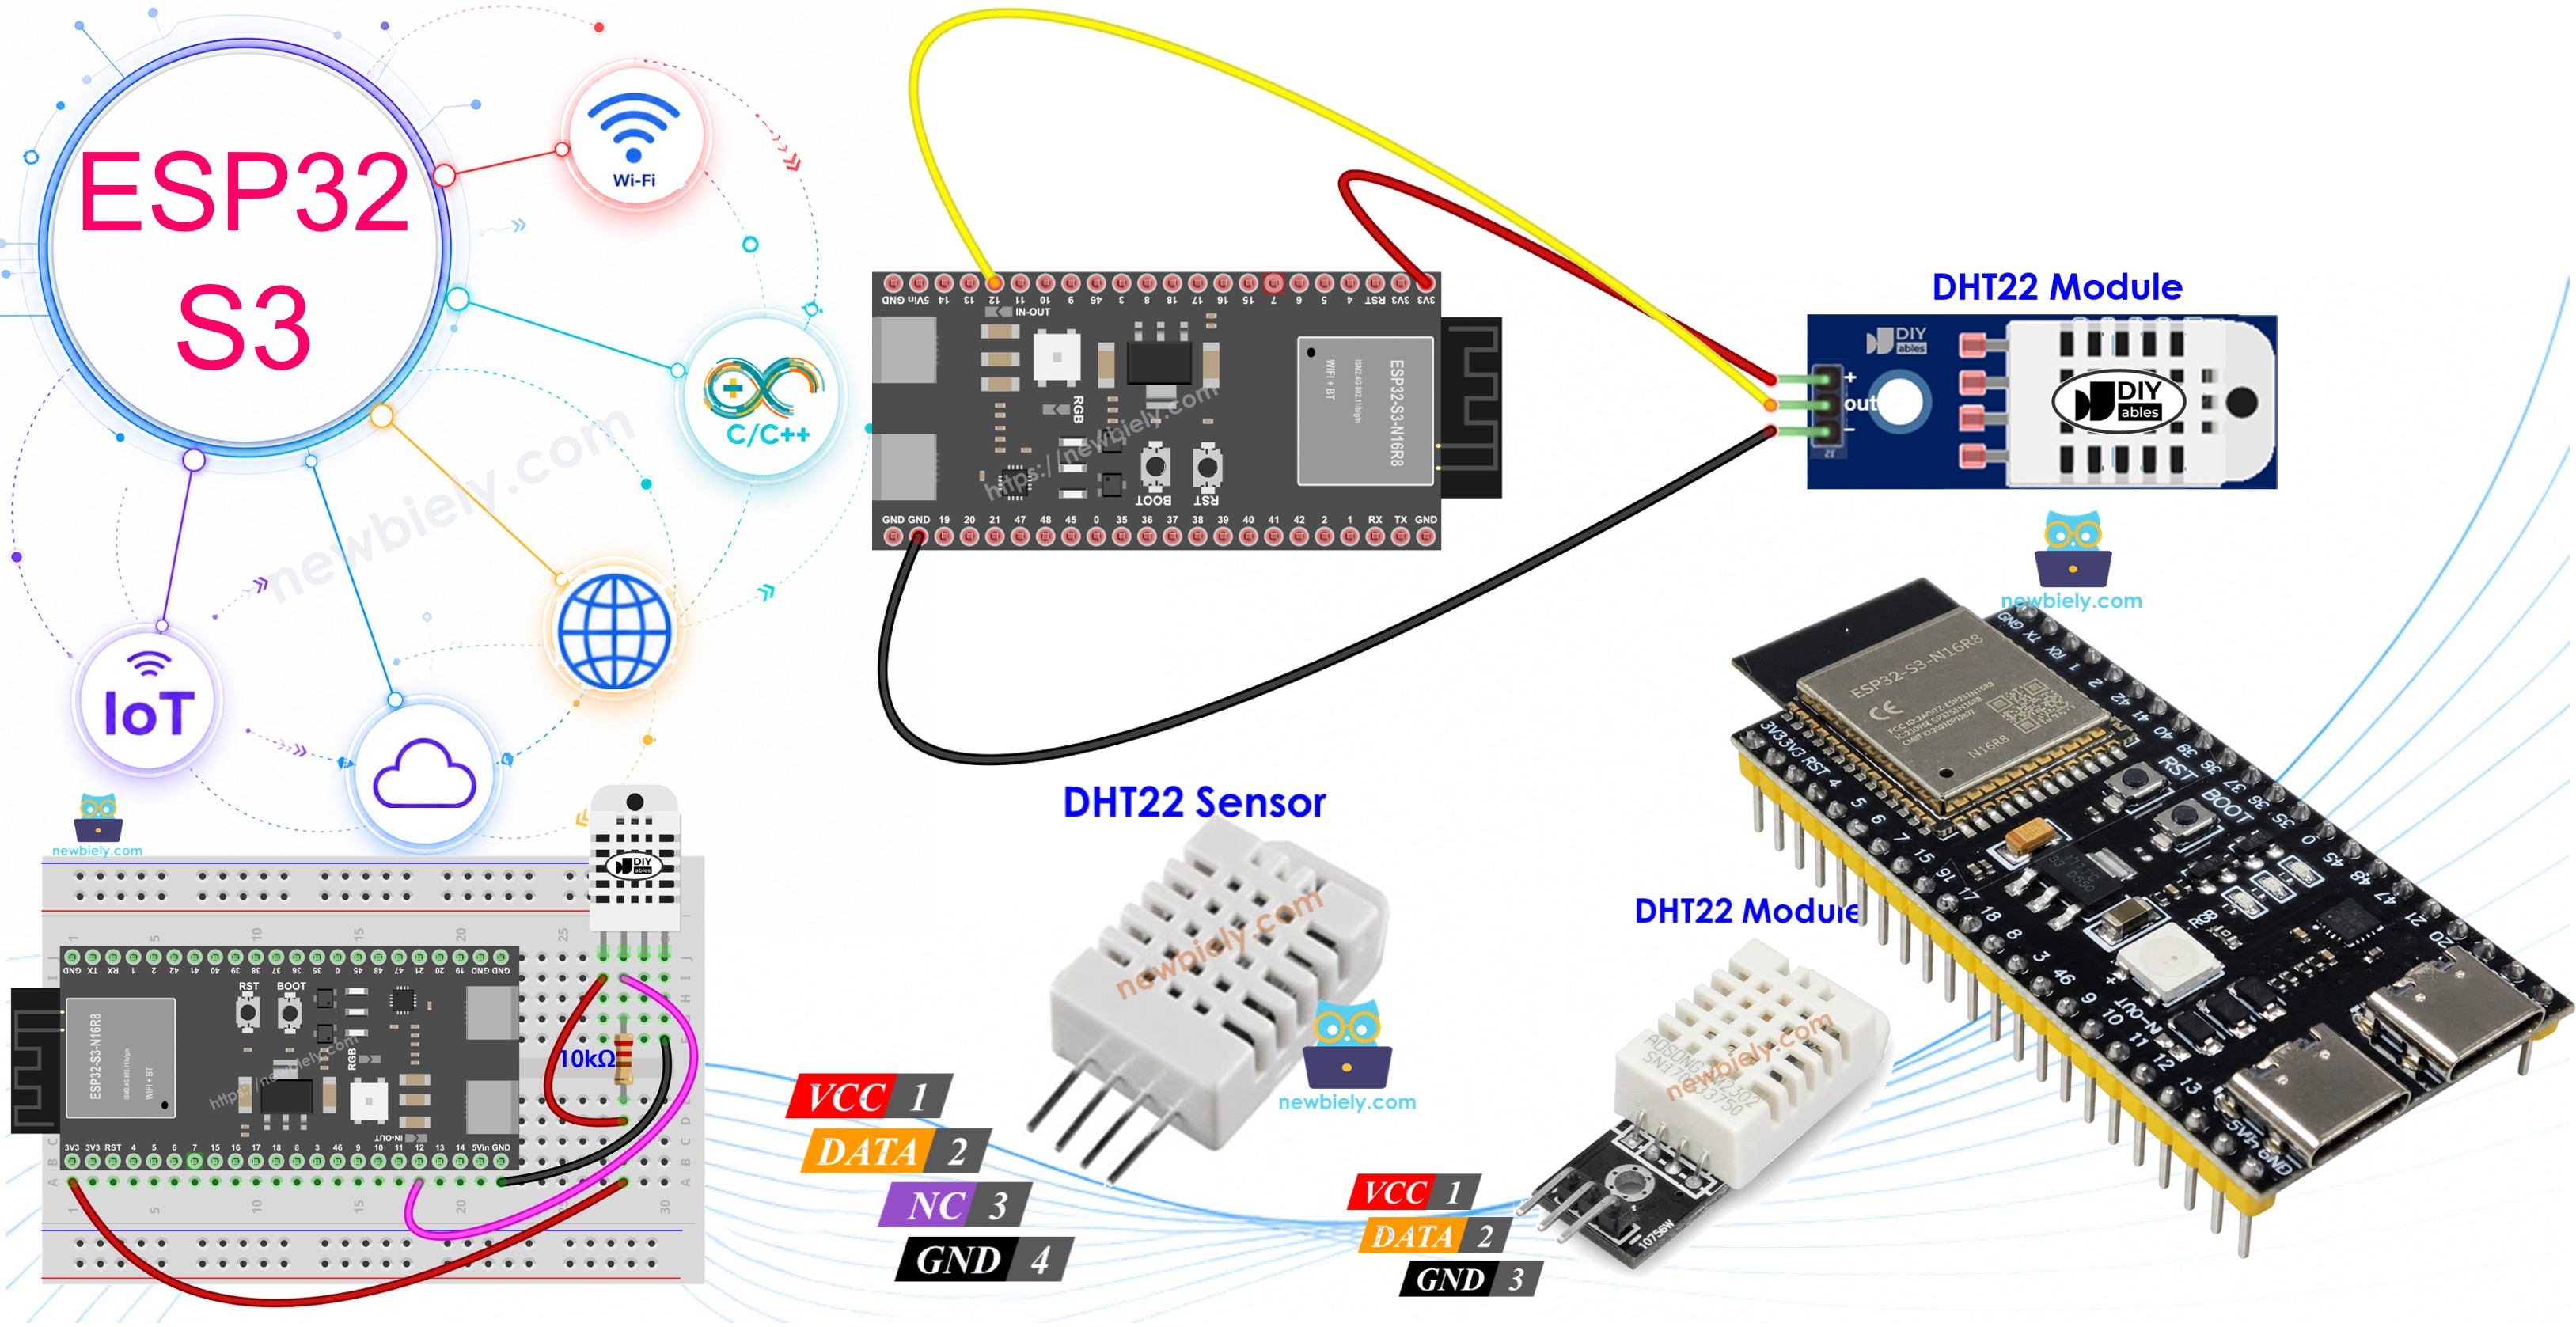
Hardware Preparation
Or you can buy the following kits:
| 1 | × | DIYables ESP32 S3 Starter Kit (ESP32 S3 included) | |
| 1 | × | DIYables Sensor Kit (18 sensors/displays) |
Additionally, some of these links are for products from our own brand, DIYables .
Overview of DHT22 Temperature and Humidity Sensor
The DHT22 is a digital temperature and humidity sensor that delivers reliable, calibrated environmental readings over a single-wire interface, making it one of the most popular choices for ESP32 S3 projects. It operates on 3.3 V to 5 V, so it integrates directly with the ESP32 S3 without a level shifter. The sensor samples its environment every two seconds and reports both values in a single read cycle.
Key Specifications
The DHT22 runs on a supply voltage of 3 V to 5 V, which makes it fully compatible with the ESP32 S3's 3.3 V rail. Humidity measurement spans 0 % to 100 % with an accuracy of ±2 % to 5 %. Temperature measurement covers −40 °C to 80 °C with an accuracy of ±0.5 °C. The sensor updates at a maximum rate of 0.5 Hz, meaning one new reading is available every two seconds.
| DHT22 | |
|---|---|
| Operating Voltage | 3 to 5V |
| The humidity range | 0% to 100% |
| The humidity accuracy | ± 2% to 5% |
| The temperature range | -40°C to 80°C |
| The temperature accuracy | ± 0.5°C |
| The reading rate | 0.5Hz (one time per 2 seconds) |
DHT22 Pinout
The DHT22 is available as a raw four-pin sensor and as a pre-built three-pin module that includes a built-in pull-up resistor.
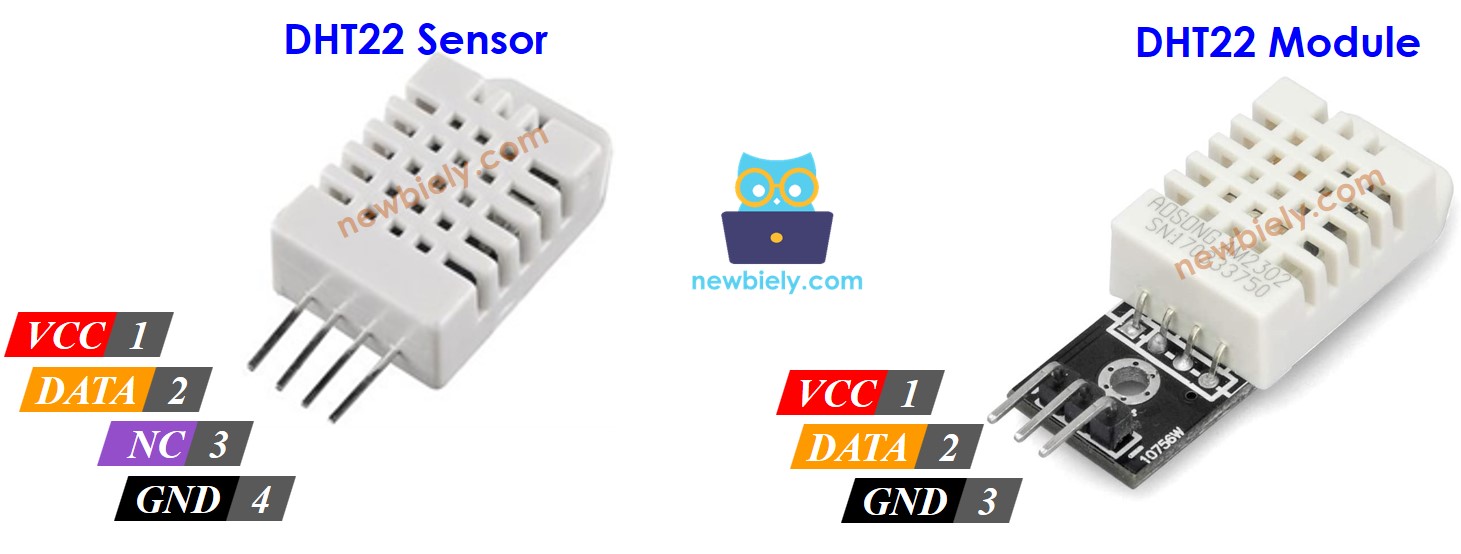
DHT22 raw sensor pins (4 pins):
- GND pin: Connect to GND (0 V)
- VCC pin: Connect to VCC (3.3 V or 5 V)
- DATA pin: Communication pin between the sensor and the ESP32 S3
- NC pin: Not connected — leave unconnected
DHT22 module pins (3 pins):
- VCC (or +): Connect to 3.3 V or 5 V
- GND (or -): Connect to GND
- DATA (or OUT): Communication pin to the ESP32 S3
Wiring Diagram between DHT22 and ESP32 S3
Connecting the DHT22 to your ESP32 S3 requires only a few wires and, if you are using the raw sensor, one external pull-up resistor. When using the module version the pull-up resistor is already built in, so the module is the simpler option for beginners.
Safety Notes
Always power the DHT22 from the 3.3 V pin on the ESP32 S3 rather than an external 5 V rail unless you have verified your specific module's level-shifting capability. Keep the DATA line trace or jumper wire short to avoid noise on the single-wire bus. When using the raw sensor, the 10 kΩ pull-up resistor between DATA and VCC is not optional — omitting it will produce failed readings or no data at all.
ESP32 S3 - DHT22 Sensor Wiring
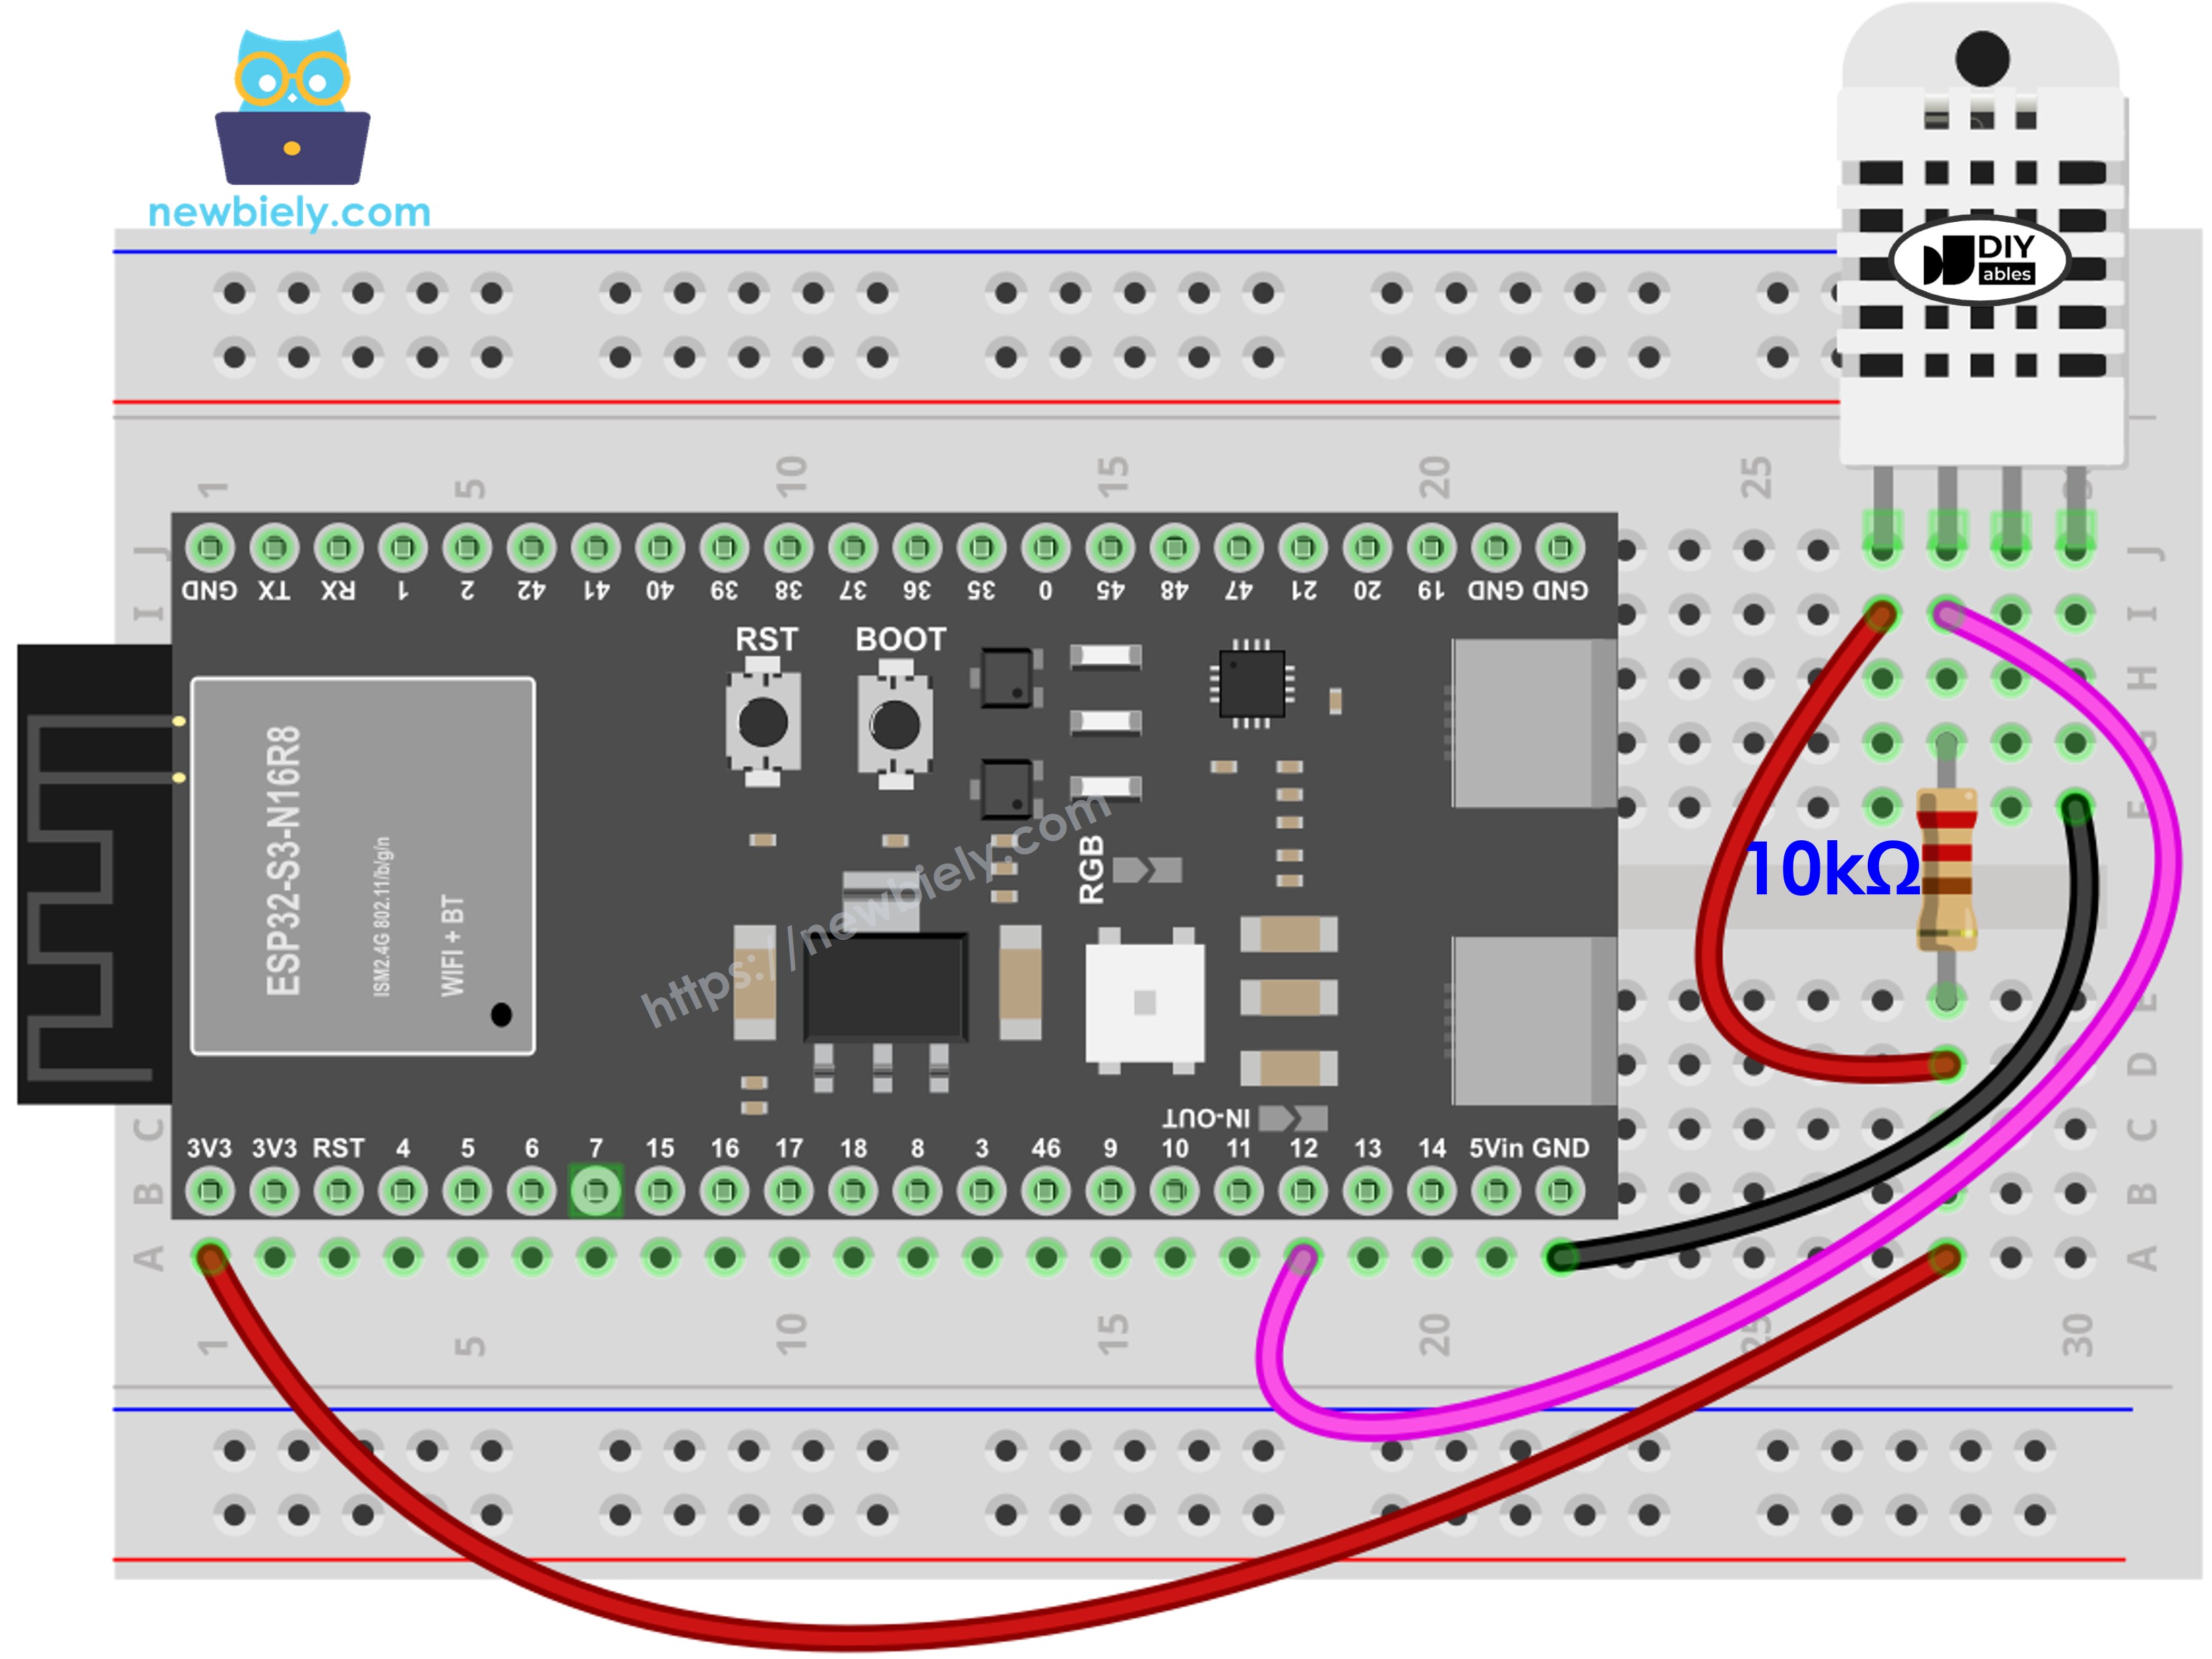
This image is created using Fritzing. Click to enlarge image
| DHT22 Sensor Pin | ESP32 S3 Pin |
|---|---|
| VCC | 3.3V or 5V |
| GND | GND |
| DATA | GPIO20 |
| 10kΩ Resistor | Between DATA and VCC |
ESP32 S3 - DHT22 Module Wiring
The DHT22 module simplifies wiring by including the pull-up resistor internally — no external resistor needed.
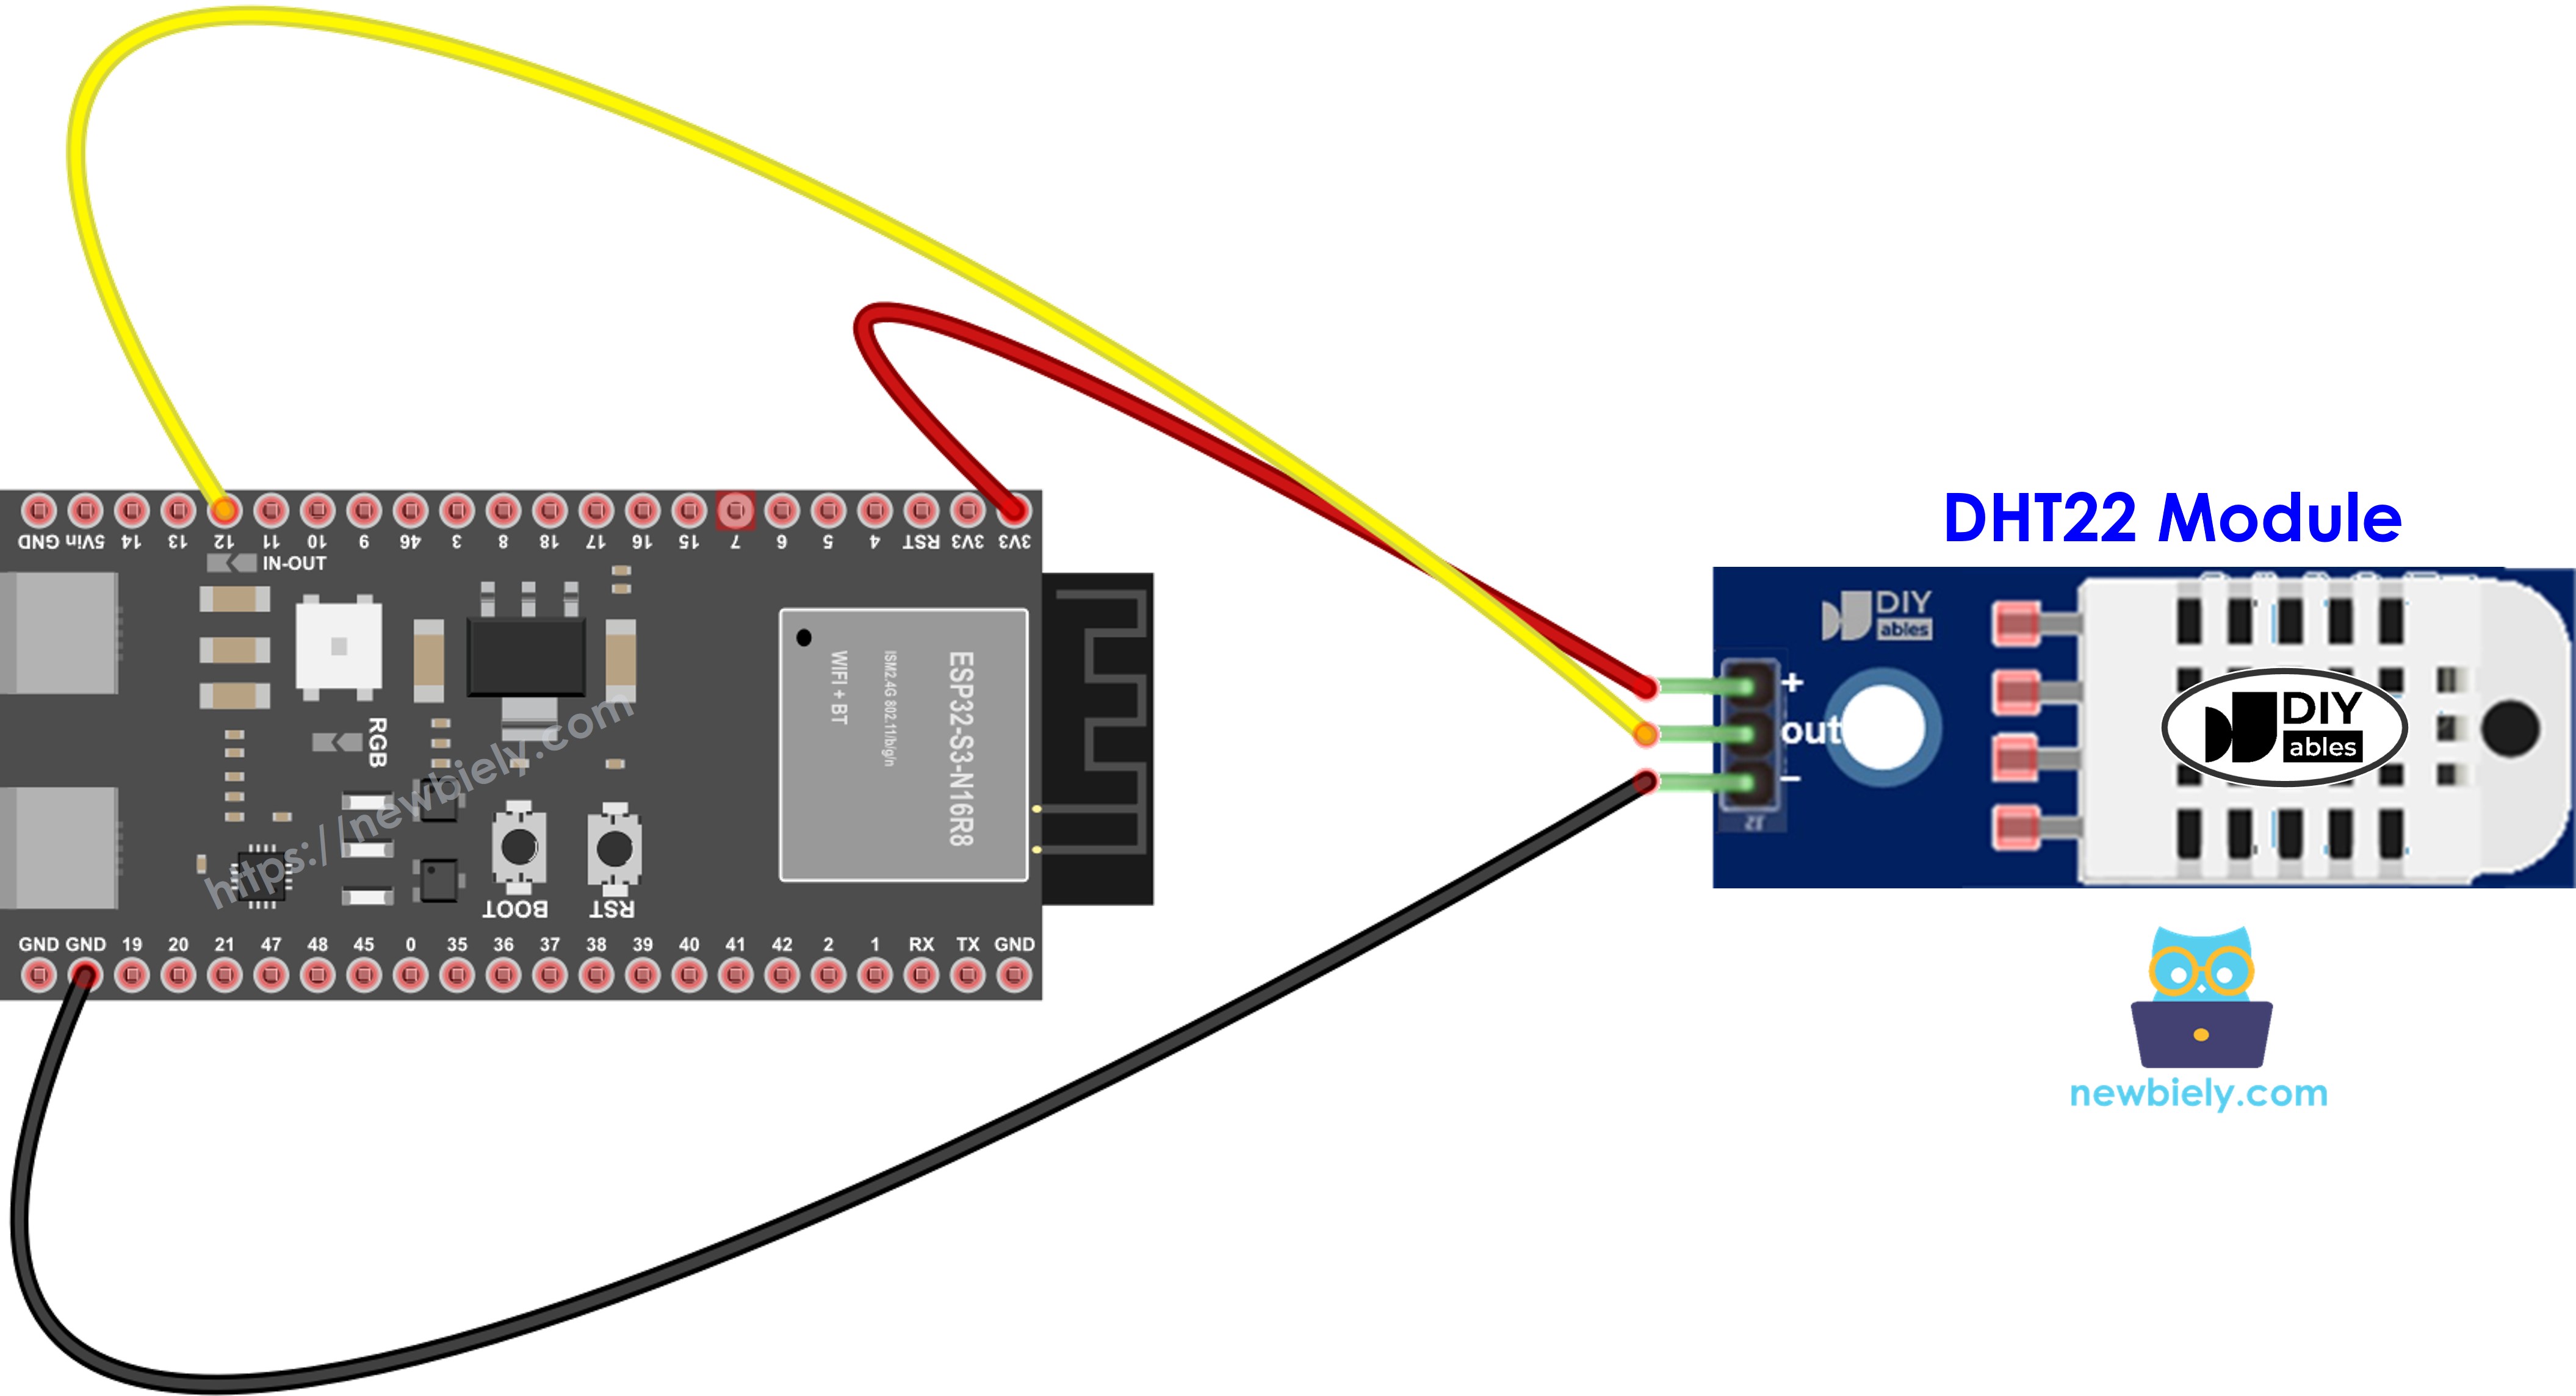
This image is created using Fritzing. Click to enlarge image
| DHT22 Module Pin | ESP32 S3 Pin |
|---|---|
| VCC (or +) | 3.3V or 5V |
| GND (or -) | GND |
| DATA (or OUT) | GPIO20 |
ESP32 S3 Code - DHT22
The following code initializes the DHT22 on GPIO20, then enters a loop that requests a fresh reading every two seconds, converts the raw temperature to both Celsius and Fahrenheit, and prints all three values to the Serial Monitor in a formatted line. Error checking is included so the program prints a clear failure message rather than silently outputting garbage values if the sensor is not responding.
Detailed Instructions
- New to ESP32 S3? Complete our Getting Started with ESP32 S3 guide first.
- Prepare the wiring: Connect the DHT22 sensor or module to your ESP32 S3 according to the wiring diagram above.
- Connect to computer: Plug the ESP32 S3 into your computer using a USB Type-C cable.
- Open Arduino IDE: Launch the Arduino IDE on your computer.
- Select your board: Choose ESP32 S3 from the board selector and select the correct COM port.
- Install DHT library: Click the Library Manager icon on the left sidebar of Arduino IDE.
- Search for library: Type "DHT" in the search box and find the DHT sensor library by Adafruit.
- Install the library: Click the Install button next to the Adafruit DHT library.
- Search for DHT sensor library created by Adafruit and click the Install button.
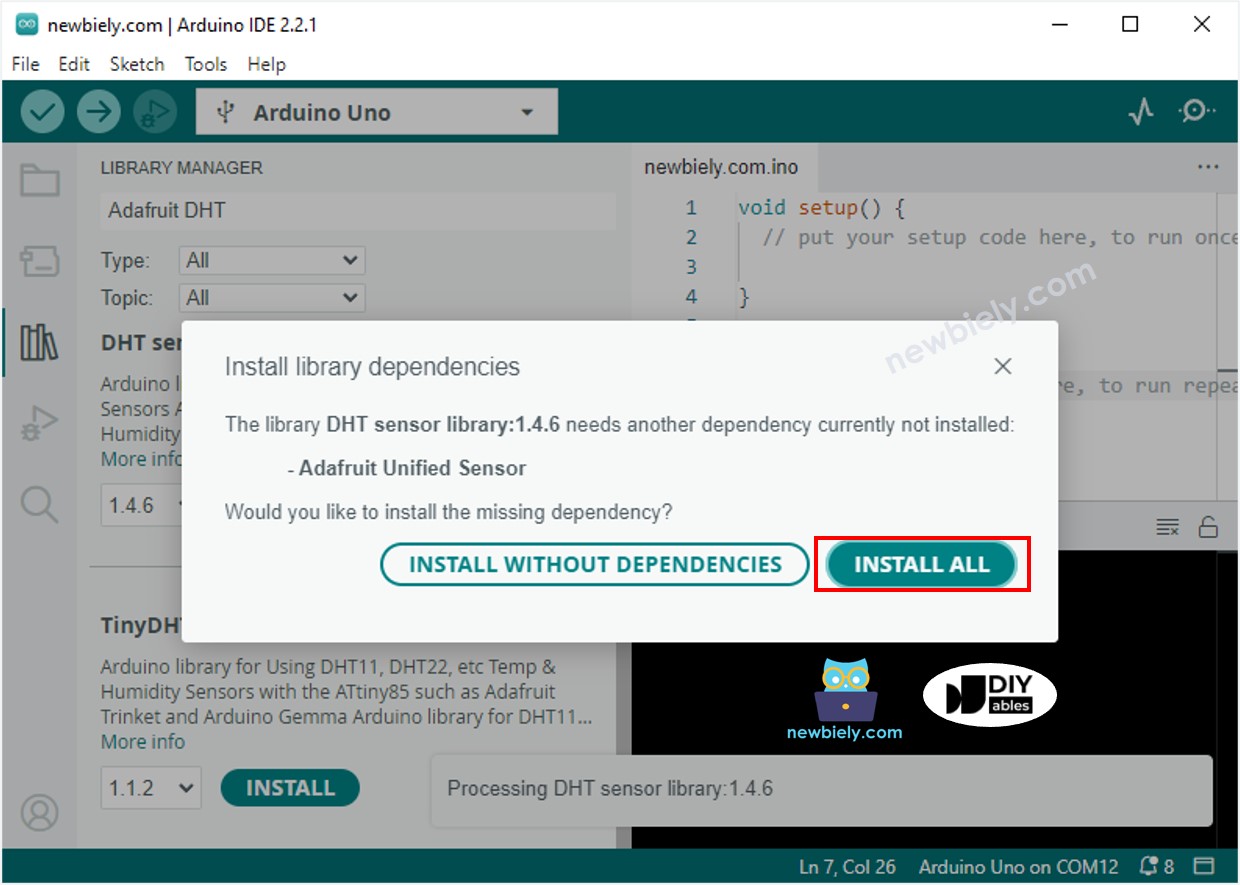
- Install dependencies: When prompted, click Install All to install all required dependencies (including Adafruit Unified Sensor library).
- Upload the code: Copy the code above, paste it into Arduino IDE, and click the Upload button.
- Test the sensor: Try changing the temperature around the DHT22 (place it near a warm cup or use a fan to cool it).
- View readings: Open the Serial Monitor (set to 115200 baud) to see live temperature and humidity readings.
- Pro Tip: Wait at least 2 seconds between readings — the DHT22 sensor updates at a maximum rate of 0.5 Hz, so polling it faster will simply return the same cached value or a read error.
Serial Monitor Output
Applications and Project Ideas
The ESP32 S3 and DHT22 make a powerful combination for any project that needs accurate, low-cost environmental sensing. Here are practical ways to put this circuit to work:
- Home weather station: Monitor indoor temperature and humidity with continuous data logging to a microSD card or cloud dashboard.
- Smart greenhouse controller: Automatically trigger ventilation fans or misters based on live humidity readings.
- Comfort monitor: Send a notification or sound a buzzer when room conditions drift outside a comfortable range.
- Server room monitoring: Track temperature continuously to catch overheating before equipment is damaged.
- DIY thermostat: Combine with a relay to build a smart temperature control system for any room.
- Pet habitat monitor: Ensure reptiles or other humidity-sensitive animals always have optimal conditions.
- Indoor air quality tracker: Pair with CO₂ or VOC sensors to build a comprehensive environmental monitor.
Video Tutorial
Watch the step-by-step video walkthrough for this ESP32 S3 project below.
Challenge Yourself
Now that your ESP32 S3 is reading temperature and humidity data reliably, push the project further with these progressively harder challenges:
- Beginner: Add an LED that turns on when temperature exceeds 25 °C and turns off when it drops below 23 °C, implementing a simple hysteresis band.
- Beginner: Display a "Too Humid" warning on the Serial Monitor when humidity rises above 70 %.
- Intermediate: Log temperature and humidity readings to an SD card with ISO 8601 timestamps obtained from an NTP server over Wi-Fi.
- Intermediate: Publish readings to an MQTT broker every 30 seconds so a Home Assistant dashboard can display live charts.
- Advanced: Build a web server on the ESP32 S3 that renders a real-time temperature and humidity graph in the browser using Chart.js.
- Advanced: Deploy two DHT22 sensors on different GPIO pins to monitor two rooms simultaneously and compare readings in a single Serial Monitor output stream.