
ESP32 S3 - Servo Motor
The ESP32 S3 is a capable microcontroller that makes controlling servo motors straightforward using PWM signals and the ESP32Servo library. This tutorial walks you through everything you need — from wiring to code — so you can have your servo sweeping between 0° and 180° in minutes.
What you'll build:
- A servo motor connected to your ESP32 S3 board
- A sweeping motion from 0° to 180° and back, driven by Arduino code
- A reliable power setup that protects your board from overcurrent
- A foundation for robotics, automation, and mechatronics projects
Hardware Preparation
Or you can buy the following kits:
| 1 | × | DIYables ESP32 S3 Starter Kit (ESP32 S3 included) | |
| 1 | × | DIYables Sensor Kit (18 sensors/displays) |
Additionally, some of these links are for products from our own brand, DIYables .
Buy Note: For controlling multiple servo motors, use the PCA9685 16 Channel PWM Servo Driver Module to save MCU pins and simplify wiring.
Overview of Servo Motor
A servo motor is a rotary actuator capable of rotating to a precise angular position between 0° and 180°, making it an ideal output device for robotics and automation. Unlike ordinary DC motors, a servo integrates a feedback mechanism internally so it holds the commanded angle without any extra circuitry. This combination of precision and simplicity is why servo motors pair so well with the ESP32 S3.
Key Specifications
Standard hobby servo motors operate on a 5 V supply and accept a PWM signal with a period of 20 ms. The pulse width determines the target angle: roughly 1 ms corresponds to 0° and 2 ms corresponds to 180°, with 1.5 ms centering the shaft at 90°. Most servos draw between 100 mA and 700 mA depending on load, which is why careful power planning matters.
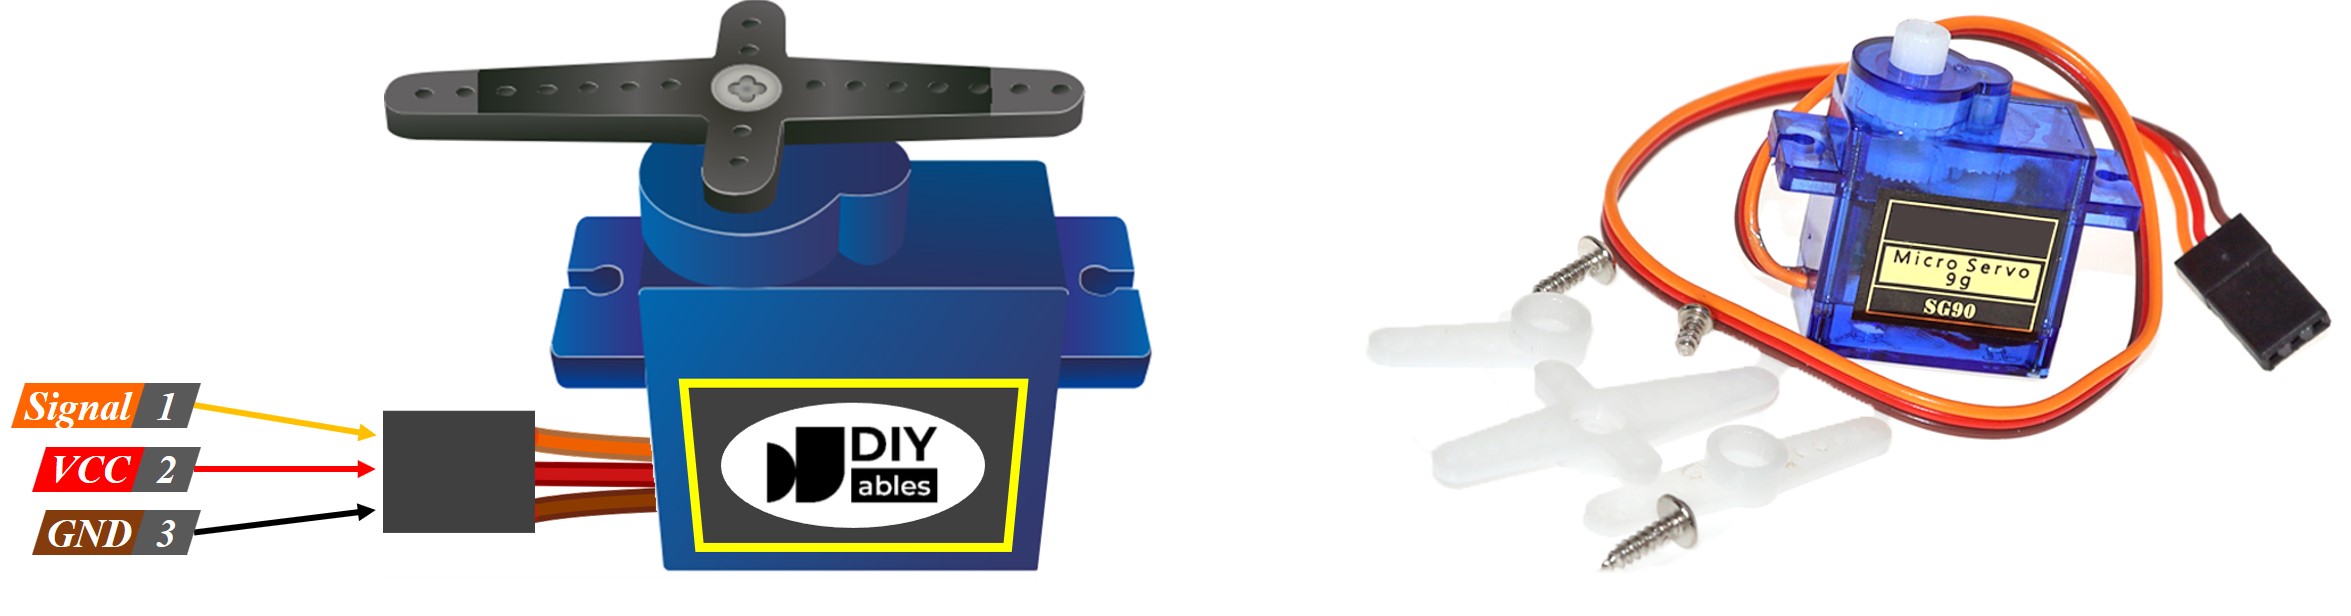
Servo Motor Pinout
The servo motor uses a simple three-wire interface that connects directly to the ESP32 S3 and a power source:
- GND pin (brown or black) — connects to GND (0 V)
- VCC pin (red) — connects to 5 V power
- Signal pin (yellow or orange) — receives the PWM control signal from an ESP32 S3 GPIO pin
How Servo Motor Works
Wiring Diagram between Servo Motor and ESP32 S3
Connect the servo motor to your ESP32 S3 board using the table below. The signal wire goes to GPIO pin GPIO9, which the ESP32 S3 drives with a standard 50 Hz PWM waveform generated by the ESP32Servo library.
Safety Notes
When powering the ESP32 S3 via USB, do not draw servo power from the Vin or VBUS pins — the USB port's current limit is too low for most servos under load and can permanently damage the board. For anything beyond light bench testing, use a dedicated 5 V external power supply for the servo and share only the GND rail with the ESP32 S3.
When powering via USB port:
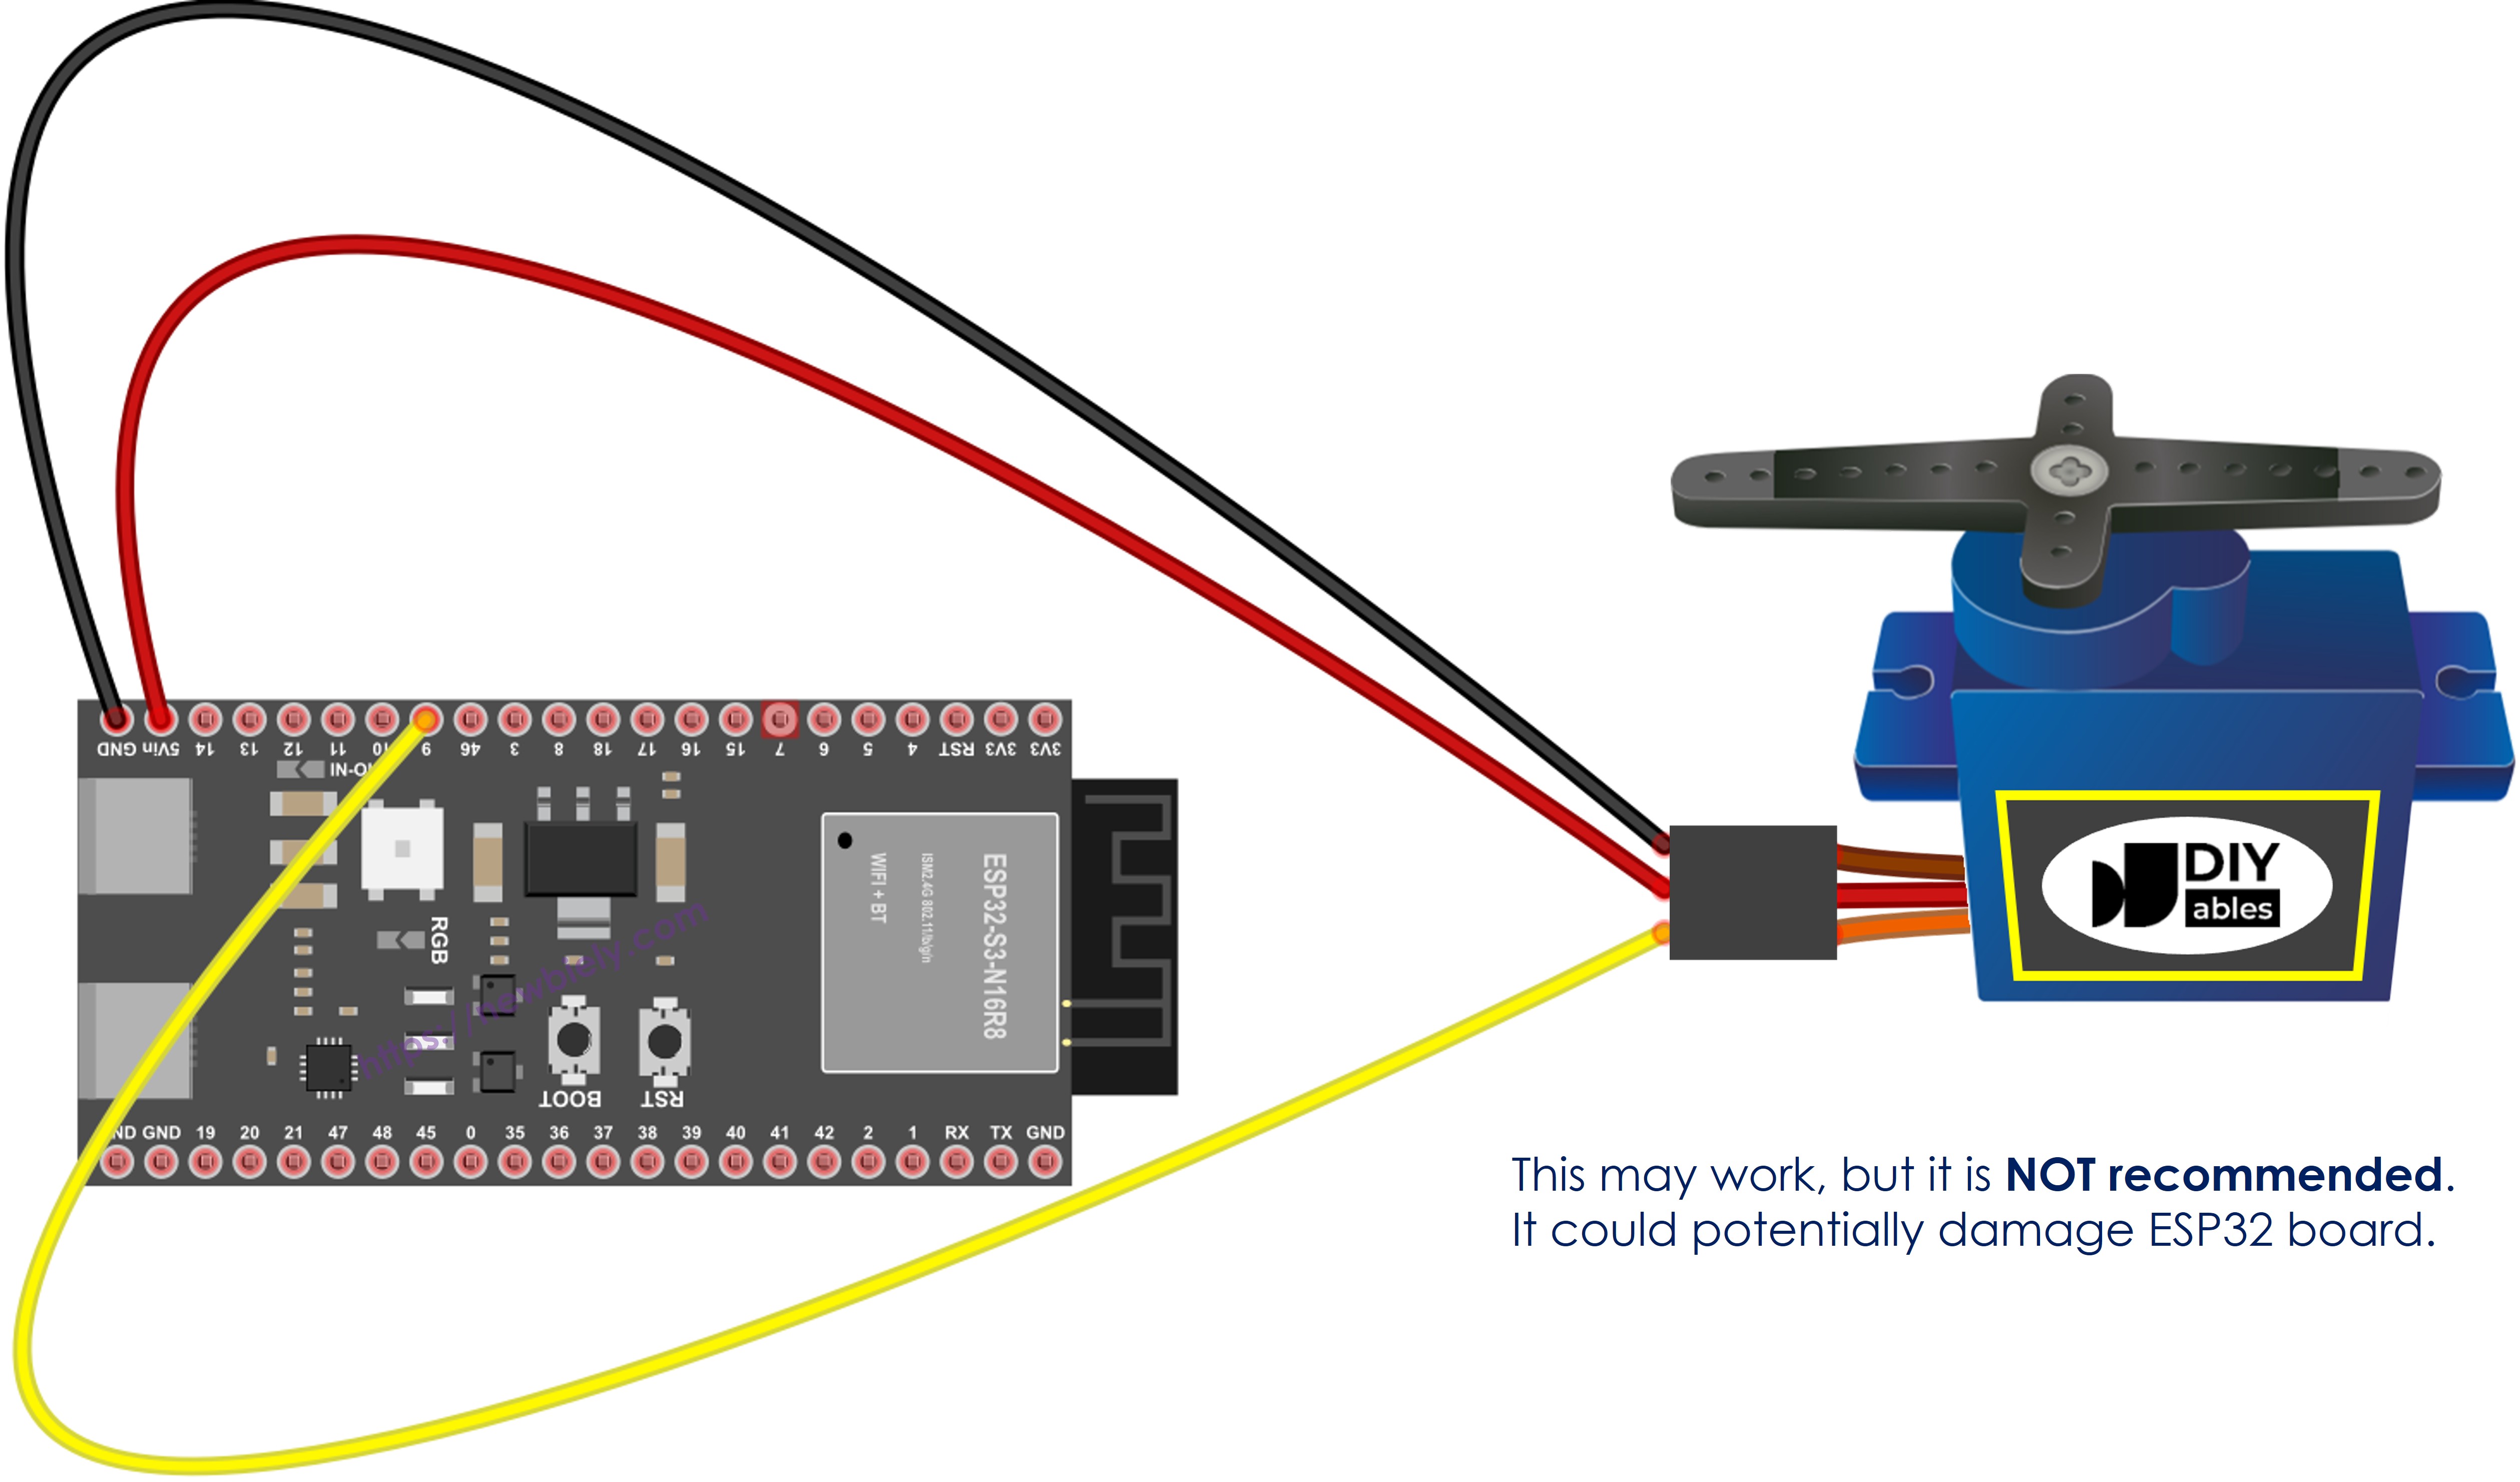
This image is created using Fritzing. Click to enlarge image
| Servo Motor Pin | ESP32 S3 Pin |
|---|---|
| GND (Brown/Black) | GND |
| VCC (Red) | 5V |
| Signal (Yellow/Orange) | GPIO9 |
When powering via Vin pin with external power supply:
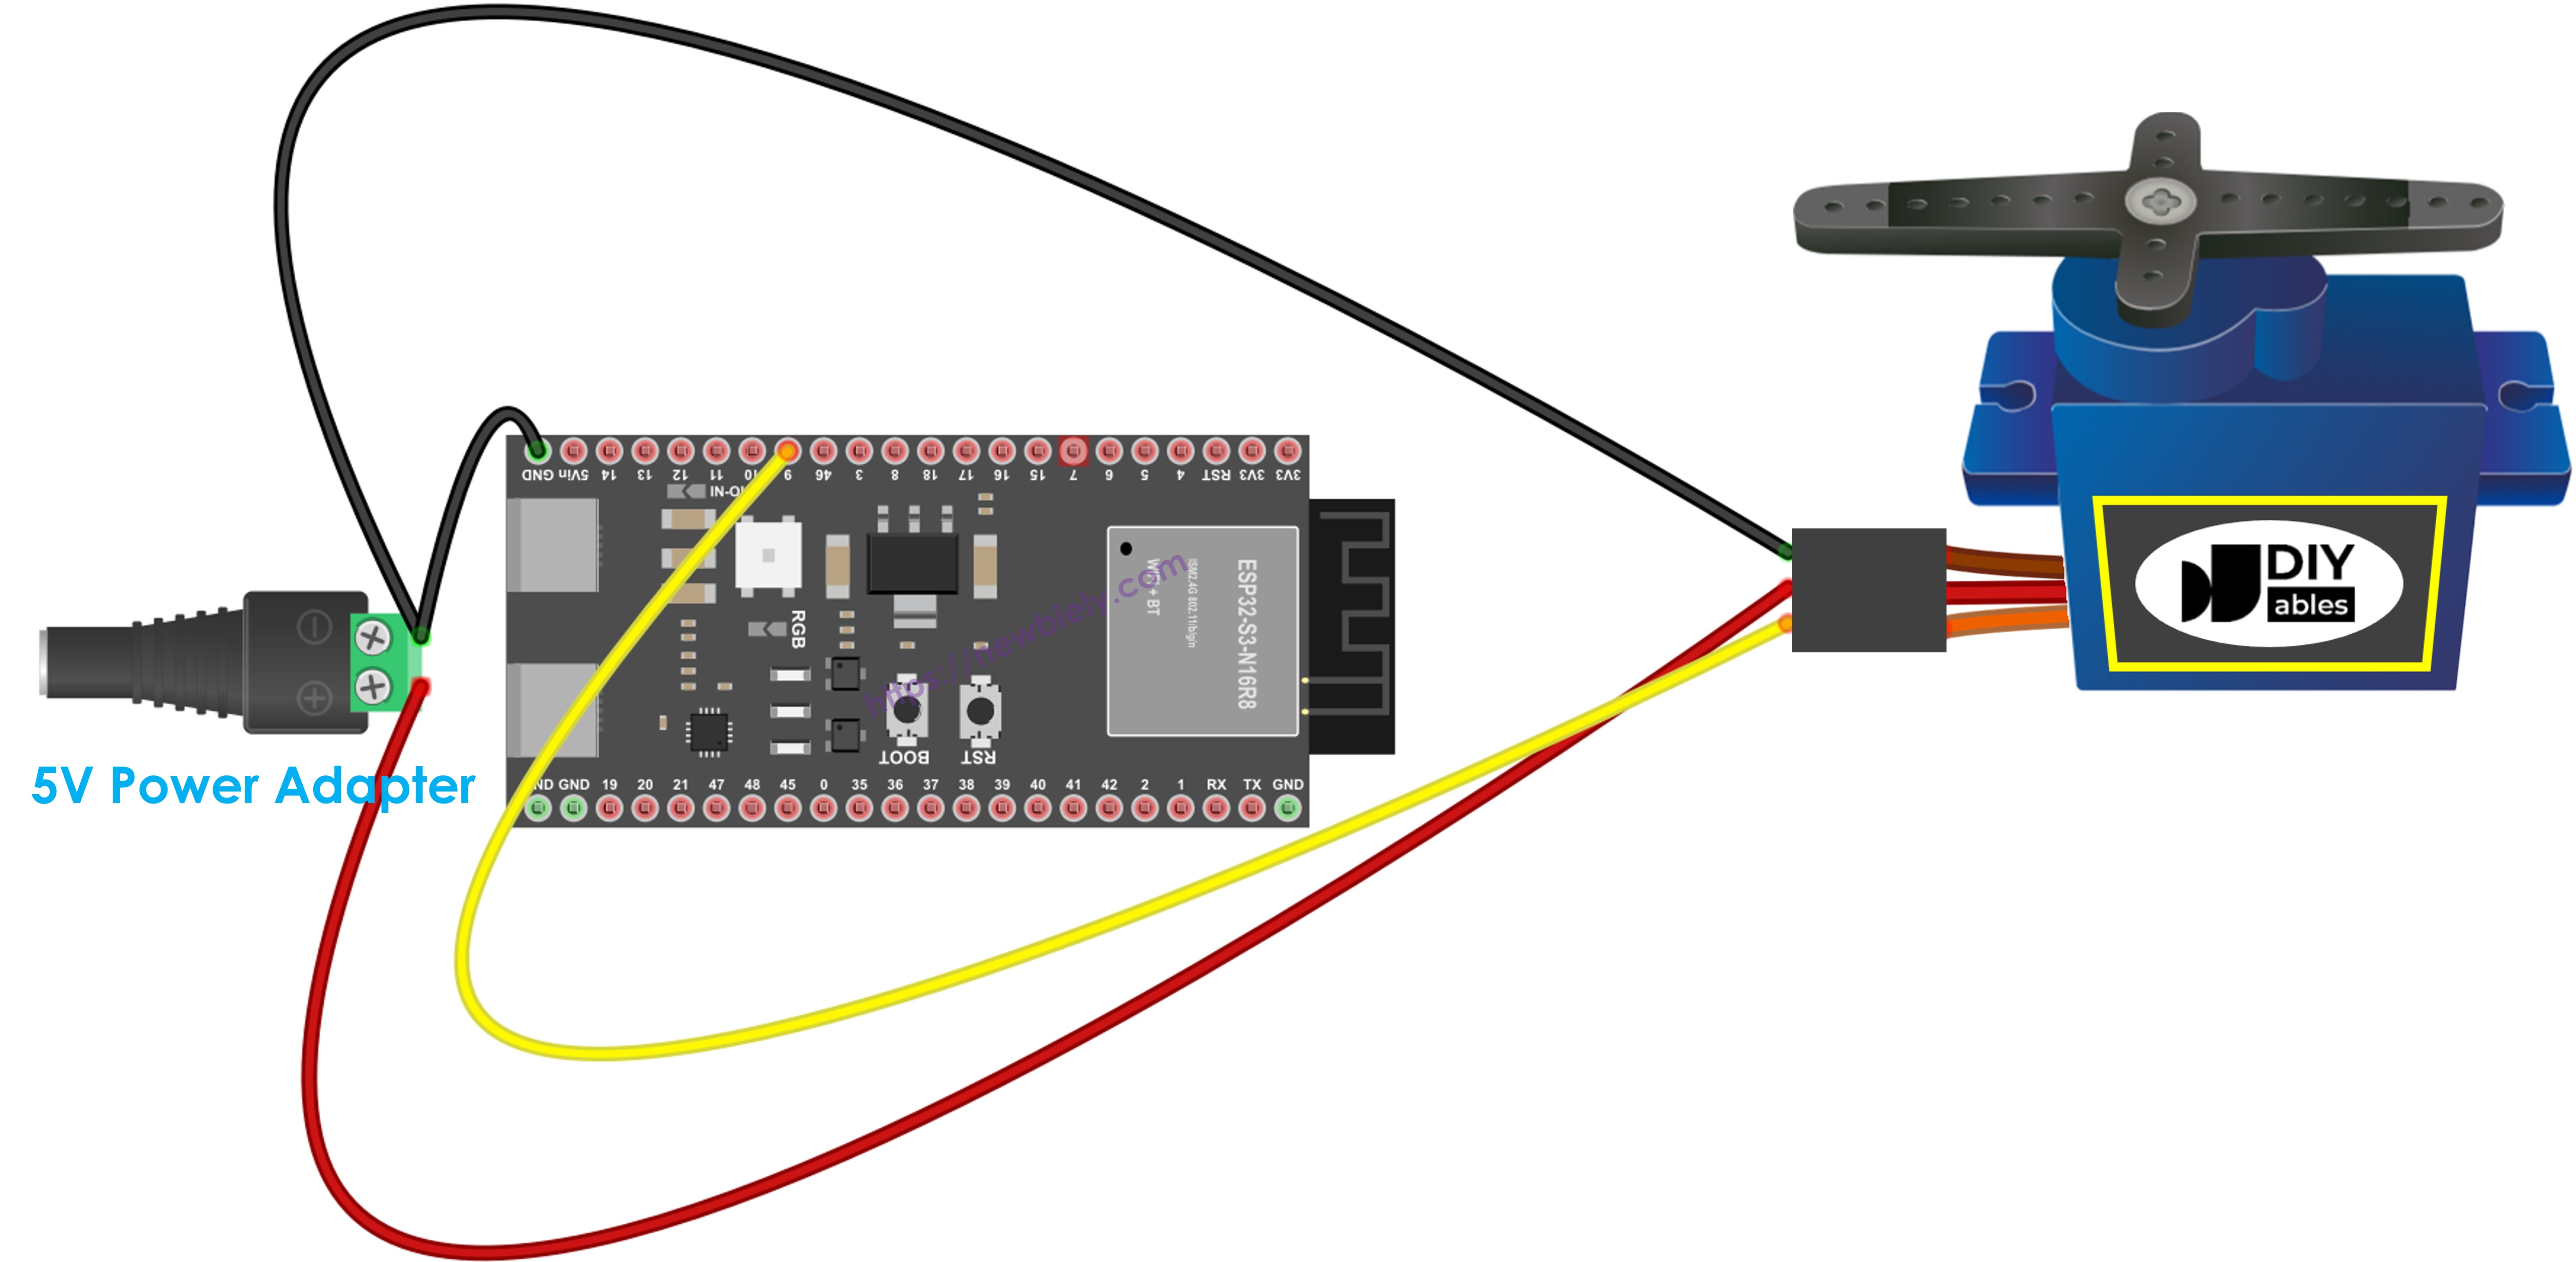
This image is created using Fritzing. Click to enlarge image
※ NOTE THAT:
IMPORTANT SAFETY WARNING: When powering the ESP32 S3 board via USB port, do NOT power the servo motor via Vin pin or VBUS pin. This can cause excessive current draw and may permanently damage your board. Use an external power supply for the servo motor if you need more power.
ESP32 S3 Code
The following sketch demonstrates continuous servo sweeping on the ESP32 S3. It uses the ESP32Servo library to attach the servo to pin GPIO9, then steps the angle from 0° to 180° in 1° increments before reversing back, creating a smooth back-and-forth motion that repeats indefinitely. Reading the inline comments in the code will give you a line-by-line explanation of how each part works.
Detailed Instructions
- New to ESP32 S3? Complete our Getting Started with ESP32 S3 guide first.
- Set up the Arduino IDE for ESP32 S3 by following the ESP32 S3 software installation guide.
- Wire the servo motor to the ESP32 S3 according to the wiring diagram above.
- Connect the ESP32 S3 board to your computer with a USB Type-C cable.
- Open the Arduino IDE on your computer.
- Select the ESP32 S3 board and its corresponding COM port under Tools.
- Open Library Manager by clicking the Libraries icon on the left sidebar.
- Type "ESP32Servo" in the search box.
- Install the servo library by Kevin Harrington and John K. Bennett.
- Search for ESP32Servo created by Kevin Harrington,John K. Bennett and click the Install button.
- Copy the code above and paste it into a new Arduino IDE sketch.
- Click the Upload button to compile and upload the code to the ESP32 S3.

- Observe the servo shaft rotating 180° clockwise, then reversing counter-clockwise, repeating continuously.
- Pro Tip: Start with slow sweep speeds when first testing a servo — it reduces mechanical stress and makes it easier to spot wiring or calibration issues before adding load.
Line-by-line Code Explanation
The above ESP32 S3 code contains line-by-line explanation. Please read the comments in the code!
How to Control Speed of Servo Motor
Applications and Project Ideas
The ESP32 S3 servo motor combination unlocks a wide range of practical builds, from simple classroom demonstrations to full mechatronics systems:
- Robotic arm: Build a multi-joint robotic arm using several servos for pick-and-place operations.
- Automatic pet feeder: Use a servo-controlled gate to dispense measured portions of food on a timer.
- Smart door lock: Design a WiFi-controlled locking mechanism driven by a servo on the ESP32 S3.
- Solar panel tracker: Mount a servo to tilt a panel toward the sun based on a light sensor reading.
- Camera pan-tilt: Build a two-axis mount for a small camera, ideal for surveillance or photography rigs.
- Automated plant watering: Use a servo valve to release water when a soil moisture sensor triggers it.
Watch the step-by-step video walkthrough for this ESP32 S3 project below.
The instruction and source code for the above video available at how to control servo motor via web tutorial
Challenge Yourself
Once your servo is sweeping reliably on the ESP32 S3, try these challenges to deepen your understanding of motor control and embedded programming:
- Beginner: Modify the sweep range to move between 45° and 135° instead of the full 0°–180° arc.
- Beginner: Adjust the delay values to make the servo sweep faster or slower and observe the effect on smoothness.
- Intermediate: Add a push button so the servo only sweeps while the button is held, then holds position when released.
- Intermediate: Drive two servo motors simultaneously from the same ESP32 S3 sketch using separate GPIO pins.
- Advanced: Build a web interface served by the ESP32 S3 that lets you set the servo angle remotely via WiFi.
- Advanced: Implement joystick control by reading an analog joystick and mapping its X/Y axes to servo angles in real time.