
ESP32 S3 - Control Heating Element
Learn how to control a heating element with your ESP32 S3 microcontroller using a relay module. This beginner-friendly tutorial gives you everything you need to start building heating control projects with ESP32 S3.
A heater can be driven by a relay or by a MOSFET module. The relay only knows two states: heat fully ON or fully OFF. The MOSFET module can switch it ON and OFF as well, but it can also give the heater part of its power, so you choose a low, medium or high heat level. It makes no sound, and its contacts do not wear out when it switches very often. We will go through both methods here.
What you'll build:
- A circuit connecting the ESP32 S3, relay module, and 12V heating element
- A program that cycles the heating element ON for five seconds and OFF for five seconds
- A foundation for real-world heating automation and temperature control systems
- A starting point for advanced projects like thermostats or incubators
- A MOSFET module version that sets the heat level step by step with PWM
Hardware Preparation
Or you can buy the following kits:
| 1 | × | DIYables ESP32 S3 Starter Kit (ESP32 S3 included) | |
| 1 | × | DIYables Sensor Kit (18 sensors/displays) |
Additionally, some of these links are for products from our own brand, DIYables .
Overview of Heating Element
A heating element is an electrical component that converts electrical energy into heat when current passes through it. It operates on a 12V DC power supply and is commonly used in warming, drying, and temperature control applications. Because the ESP32 S3 outputs only 3.3V logic signals, a relay module is required to safely switch the 12V heating circuit on and off.
Key Specifications
The heating element runs on a 12V DC power supply, generating heat as current flows through its resistive material. It connects to its power source via two terminals — a positive (+) pin marked in red and a negative (−) pin marked in black. Control is handled indirectly through a relay, which acts as an electronically operated switch between the power supply and the element, allowing the low-power ESP32 S3 to safely manage high-power loads.
Pinout
The heating element uses a simple two-wire interface for power connection.
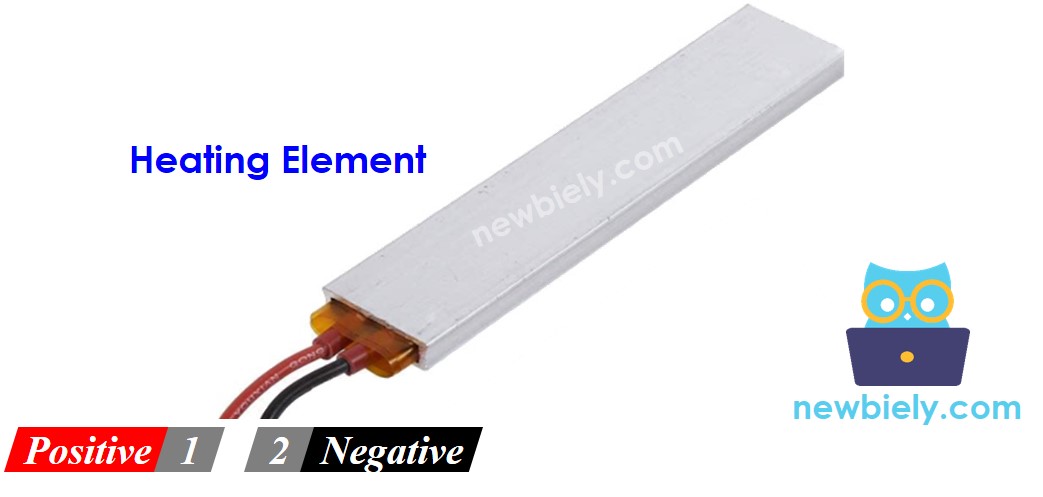
- Positive (+) pin (red): Connects to the 12V positive terminal of the DC power supply
- Negative (−) pin (black): Connects to the GND negative terminal of the DC power supply
How to Control Heating Element
The ESP32 S3 controls the heating element indirectly through a relay module. The ESP32 S3 cannot directly power 12V heating elements — a relay acts as an electronic switch between the power supply and the heating element, responding to digital HIGH/LOW signals from the ESP32 S3. This allows safe, reliable control of high-power devices using the low-power output of the microcontroller.
Important: If you are new to relays, check out our ESP32 S3 - Relay tutorial first to understand pinout, wiring, and programming basics.
The second method on this page uses a MOSFET module. To see its pinout and what happens inside it, read ESP32 S3 - MOSFET Module before you start.
Relay vs MOSFET Module for Heating Element
| Feature | Relay | MOSFET Module |
|---|---|---|
| Heat control | full heat or no heat | full heat, no heat, or any level between (PWM) |
| Sound | clicks every time it switches | completely quiet |
| Speed | slow (milliseconds) | very fast |
| Wear | contacts wear out, faster if you switch often | no moving parts, fine for frequent switching |
| Power type | AC or DC heaters | DC heaters only |
| Heater supply | any voltage the relay is rated for | at least about 6V |
| Isolation | yes, between coil and contacts | yes, by a PC817 optocoupler |
| Use it for | AC heaters and simple ON/OFF | 12V DC heaters, heat level control, thermostats that switch often |
A thermostat turns the heater ON and OFF many times a day. With a relay, that wears the contacts. For a 12V DC heating element, the MOSFET module handles this better and lets you hold a gentle heat level. For an AC heater, stay with the relay.
Wiring Diagram
Connect your ESP32 S3, relay module, and heating element carefully, following the diagram below. Ensure all connections are secure before applying power to avoid short circuits or accidental contact with the heating element.
WARNING
Please be careful. It can burn you and your house. This is a serious topic, and we want you to be safe. If you're NOT 100% sure what you are doing, do yourself a favor and don't touch anything. Ask someone who knows! We do NOT take any responsibility for your safety.
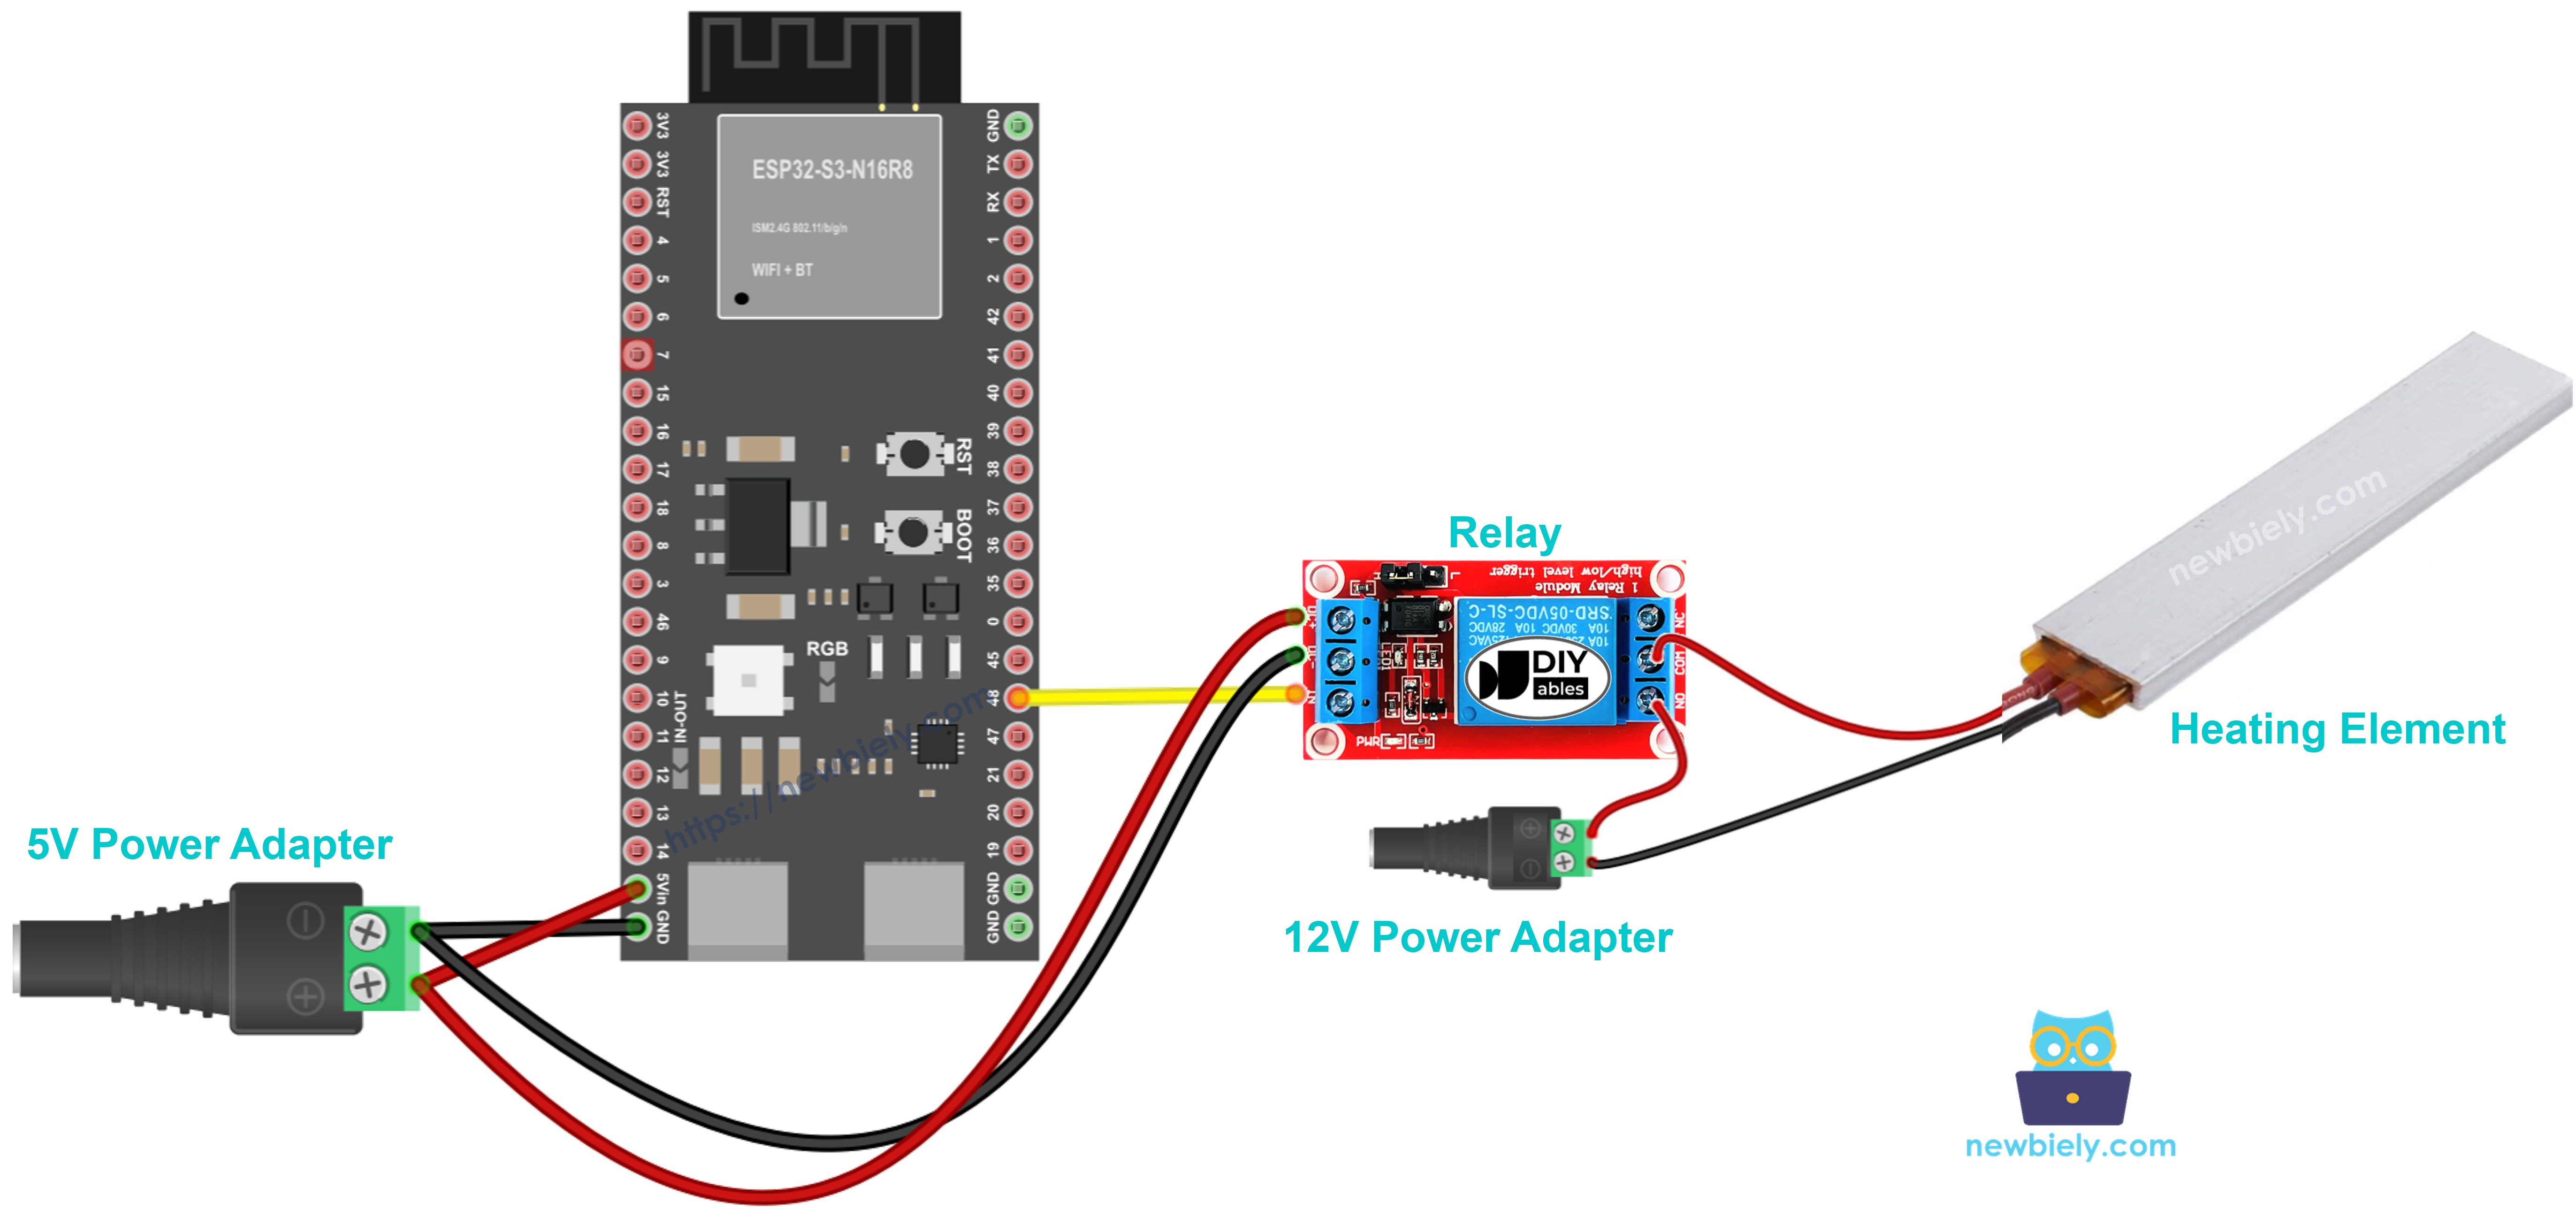
This image is created using Fritzing. Click to enlarge image
| ESP32 S3 | Relay | Heating Element / Power Supply |
|---|---|---|
| GND | GND | - |
| 3.3V | VCC | - |
| GPIO (signal pin) | IN | - |
| - | COM | 12V Power + |
| - | NO | Heating Element + (positive) |
| - | - | Heating Element − to 12V Power GND |
Safety Notes
Always double-check all connections before applying power, and never touch the heating element while it is powered on — it reaches temperatures that can cause serious burns. Ensure the work area has proper ventilation during operation, use wire gauge appropriate for 12V current loads, and keep all flammable materials well away from the heating element at all times.
ESP32 S3 Code
The following code demonstrates basic heating element control using the ESP32 S3. It configures a digital output pin connected to the relay, then continuously cycles the heating element ON for five seconds and OFF for five seconds, providing a clear foundation for more advanced temperature control projects.
Code Explanation
The above ESP32 S3 code contains a line-by-line explanation. Please read the comments in the code!
Detailed Instructions
- New to ESP32 S3? Complete our Getting Started with ESP32 S3 guide first.
- Wire the ESP32 S3, relay module, and heating element according to the wiring diagram above.
- Connect your ESP32 S3 to your computer using the USB Type-C cable.
- Launch the Arduino IDE on your computer.
- Select the correct ESP32 S3 board from the Tools menu.
- Choose the COM port your ESP32 S3 is connected to.
- Copy the complete code from the code section above.
- Paste it into a new Arduino IDE sketch window.
- Click the Upload button and wait for the process to complete.
- Observe the heating element turning on and off every 5 seconds.
- Carefully check for heat output (without touching the element) to verify correct operation.
- Pro Tip: Start with short ON times during initial testing to confirm your wiring is correct before running longer heating cycles.
Application Ideas
The ESP32 S3 heating element control setup serves as a solid foundation for a wide range of heating automation projects.
- Thermostat controller: Build a simple thermostat-controlled heating system that activates based on a temperature threshold.
- Pet enclosure heater: Create a temperature regulator to keep small animal or reptile enclosures warm.
- Plant propagation mat: Design a warming mat controller for seedling germination trays.
- Sous vide cooker: Make a DIY sous vide cooking temperature controller for precise water-bath cooking.
- Egg incubator: Develop a small-scale incubator with stable temperature control for hatching projects.
- Drying cabinet: Build a drying cabinet with automated heating cycles for food, herbs, or electronics components.
ESP32 S3 Code - Control Heating Element with MOSFET Module
In this part, the relay is replaced by a MOSFET module. This lets the ESP32 S3 set how much power reaches the heater, not just switch it.
Wiring Diagram with MOSFET Module
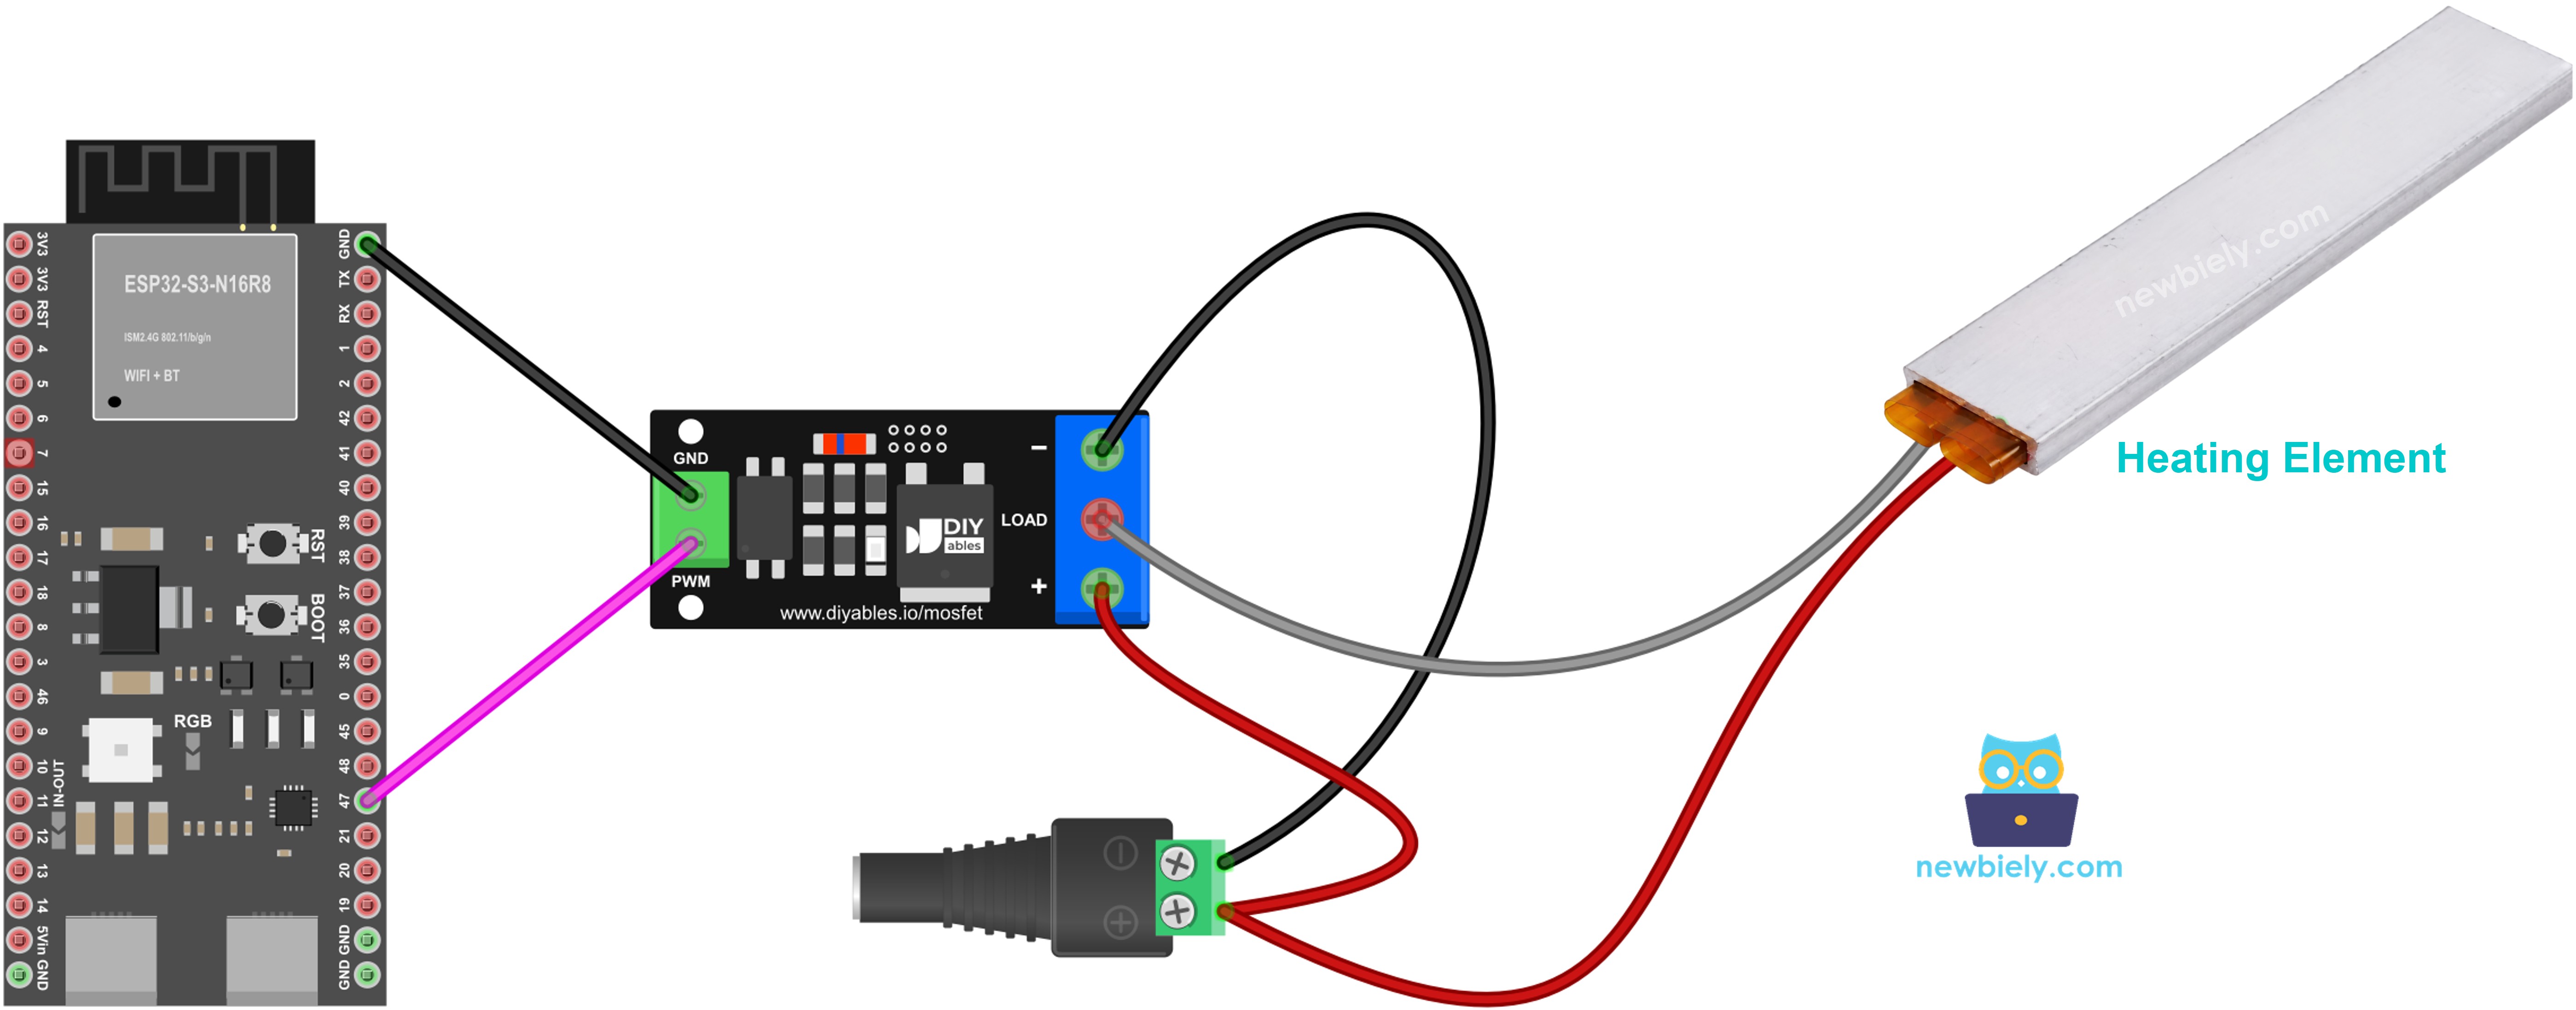
This image is created using Fritzing. Click to enlarge image
- ESP32 S3 GPIO47 → module PWM
- ESP32 S3 GND → module GND
- 12V power adapter + → module +
- Heating element + (red) → module +, on the same screw as the adapter +
- Heating element − (black) → module LOAD
- 12V power adapter − → module −
A heating element is a simple resistor, not a coil, so no flyback diode is needed.
Code
The heater gets full power for 2 seconds, then no power for 2 seconds. After that, the power goes up from 10% to 100% and comes back down to 0%. A heater warms up and cools down slowly, so you will notice the change in heat only after some time, not at every step.
Detailed Instructions
- Prepare the ESP32 S3 board and Arduino IDE as in the relay Quick Steps above.
- Connect the heating element and the MOSFET module as in the wiring list. Keep the 12V adapter off.
- Upload the code.
- Turn on the 12V adapter.
- Open the Serial Monitor at 9600 baud to see the power level. Do not touch the element.
Note: The MOSFET module is for DC heaters only, and the heater supply must be about 6V or higher. AC heating elements must use the relay.
Video Tutorial
Watch the step-by-step video walkthrough for this ESP32 S3 project below.
...VIDEO /videos/tutorial/KITS_ESP_HEATING_ELEMENT.mp4
...VIDEO
Challenge Yourself
These progressive challenges will help you deepen your understanding of heating control and build more capable projects with the ESP32 S3.
- Beginner: Modify the code to change the ON/OFF time intervals to 10 seconds each.
- Beginner: Add a status LED that lights up whenever the heating element is active.
- Intermediate: Integrate a temperature sensor (DS18B20) to display the current temperature on the Serial Monitor.
- Intermediate: Create a simple thermostat that turns heating on when the temperature drops below a configurable set point.
- Advanced: Build a PID temperature controller for precise heating control with minimal overshoot.