
ESP32 S3 - Temperature Sensor
Learn how to connect a DS18B20 temperature sensor to your ESP32 S3 and read accurate temperature data in both Celsius and Fahrenheit. This beginner-friendly tutorial walks you through everything from wiring to writing Arduino code.
What you'll build:
- A circuit connecting the DS18B20 sensor to your ESP32 S3
- Arduino code that reads temperature using the 1-Wire protocol
- Serial Monitor output showing live Celsius and Fahrenheit readings
- A foundation you can extend into weather stations, aquariums, or smart thermostats
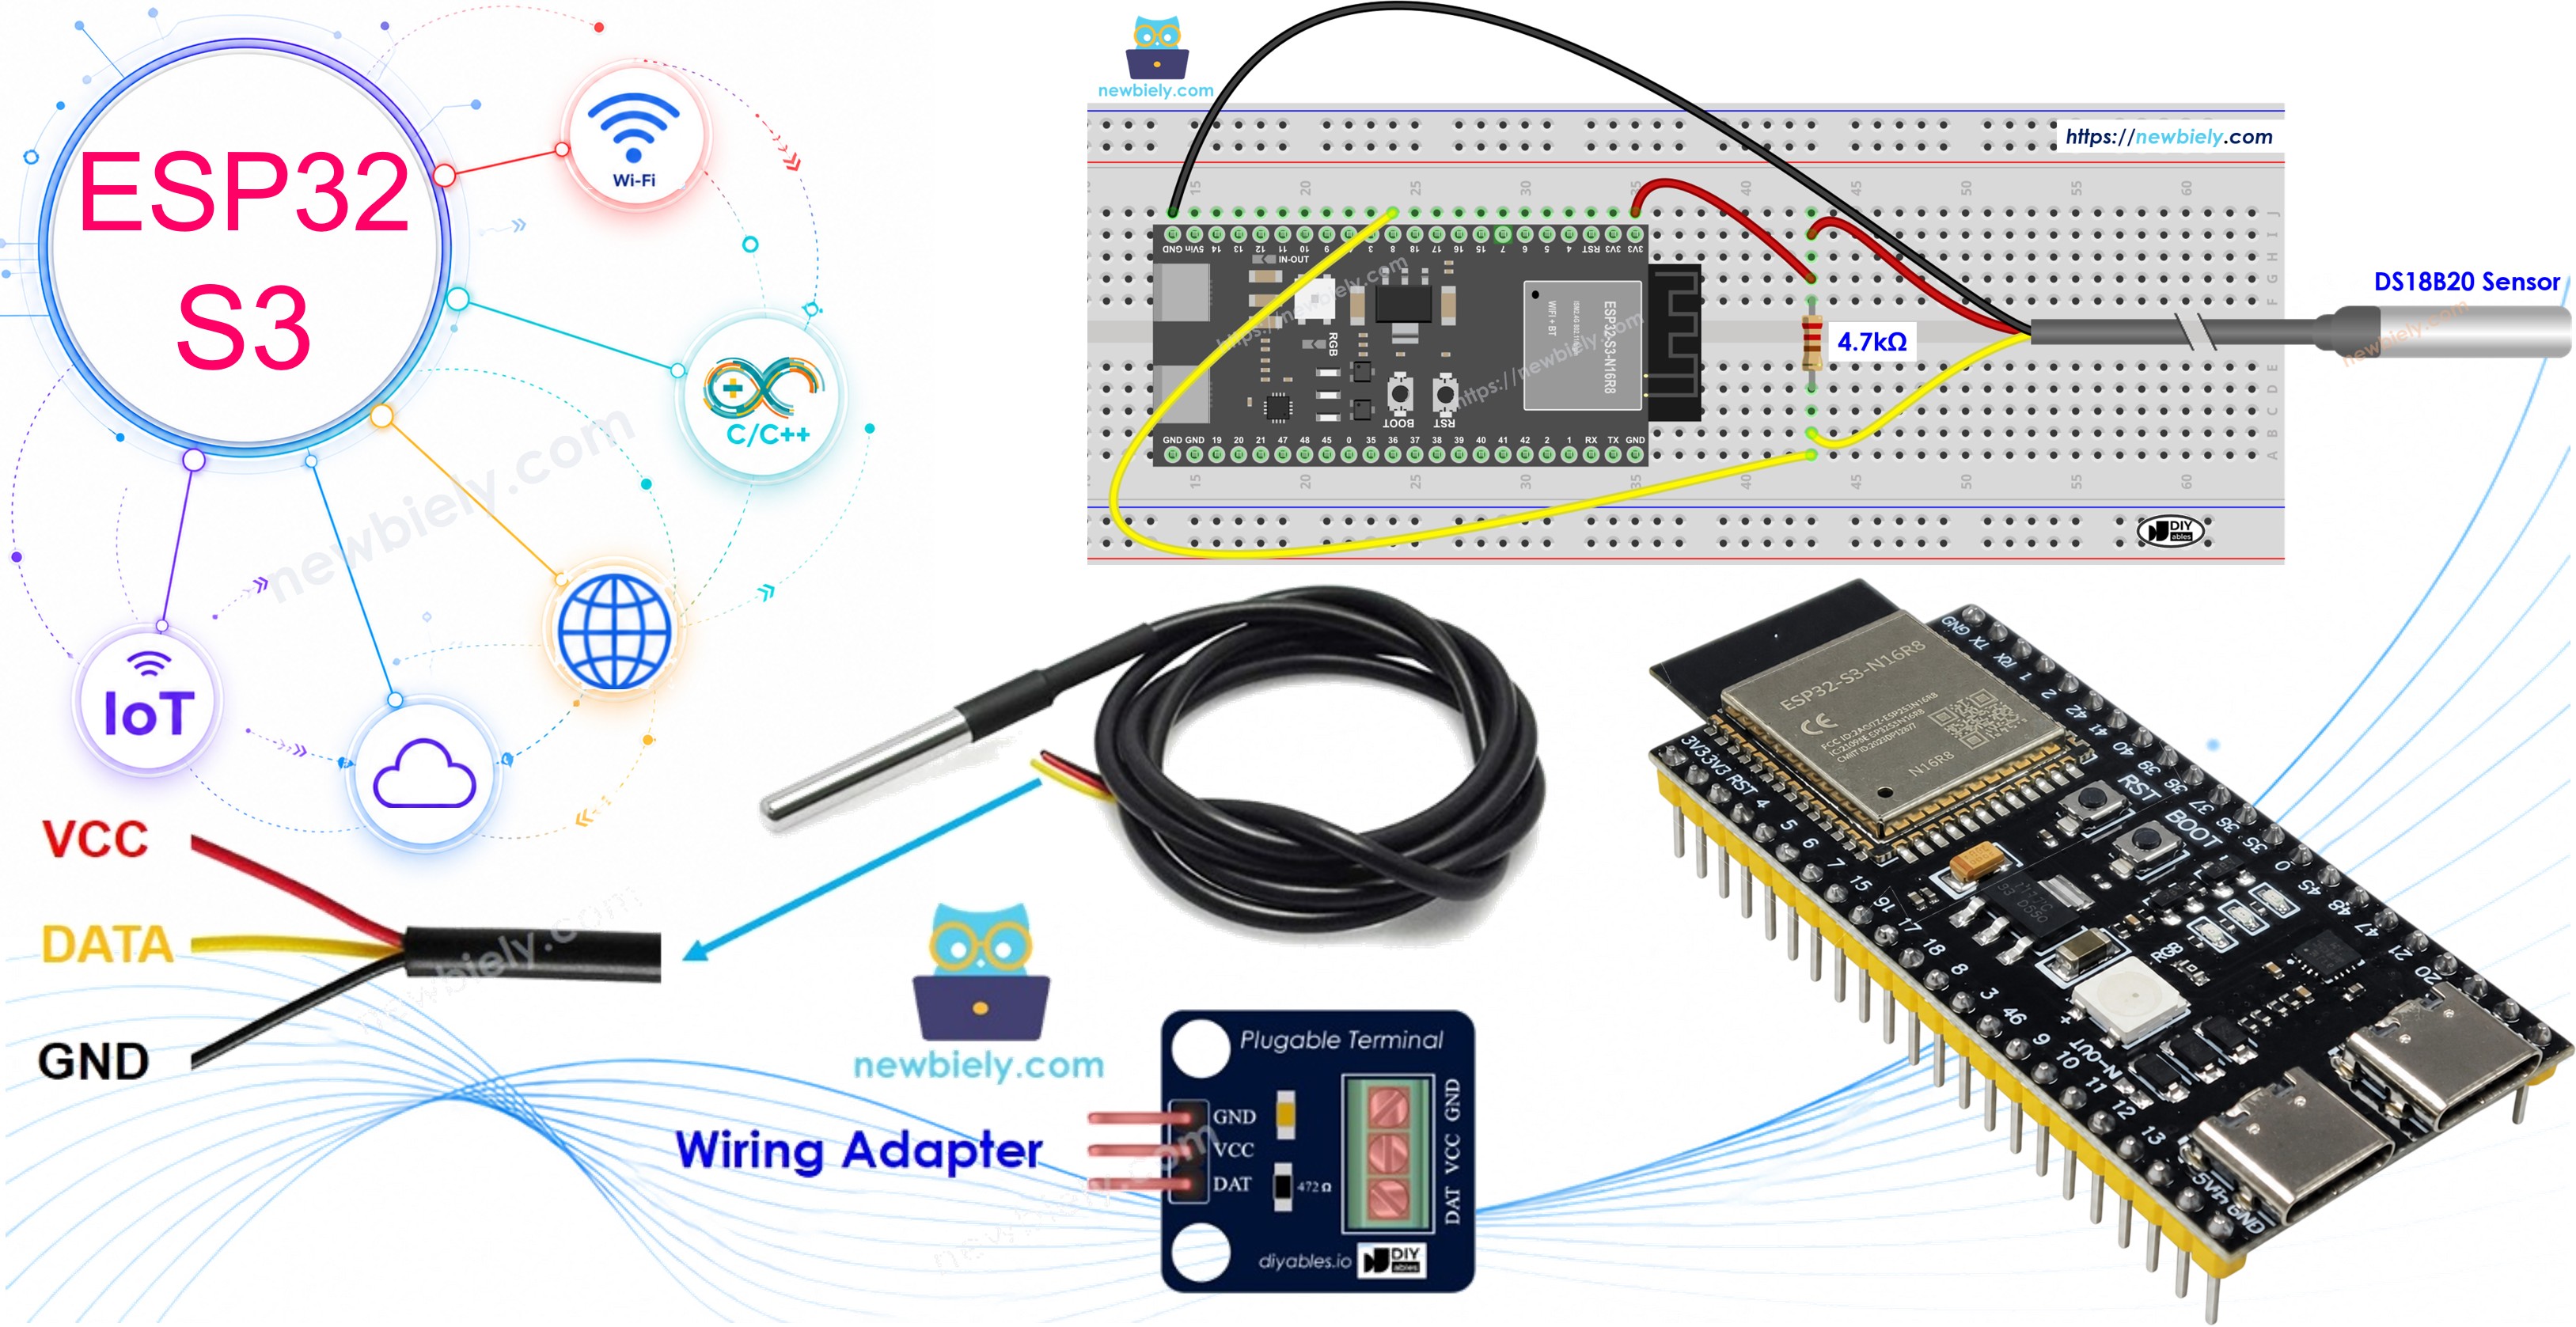
Hardware Preparation
Or you can buy the following kits:
| 1 | × | DIYables ESP32 S3 Starter Kit (ESP32 S3 included) | |
| 1 | × | DIYables Sensor Kit (18 sensors/displays) |
Additionally, some of these links are for products from our own brand, DIYables .
Buy Note: Many DS18B20 sensors available in the market are unreliable. We strongly recommend buying the sensor from the DIYables brand using the link provided above. We tested it, and it worked reliably.
Overview of DS18B20 Temperature Sensor
The DS18B20 is a digital temperature sensor that communicates using the 1-Wire protocol, making it simple to integrate with the ESP32 S3 using just a single data pin. Its wide operating range, good accuracy, and support for multiple sensors on one wire make it a popular choice for environmental monitoring projects.
Key Specifications
The DS18B20 operates on 3.0V to 5.5V, which makes it fully compatible with the ESP32 S3's 3.3V GPIO pins. It measures temperatures from -55°C to +125°C (-67°F to +257°F) with an accuracy of ±0.5°C between -10°C and +85°C. Resolution is adjustable from 9-bit to 12-bit, and the sensor communicates over a single data wire — meaning you can chain multiple DS18B20 sensors on the same pin. A waterproof probe version is also available, making it suitable for liquid temperature measurement. Long cable runs of up to 100 meters are supported, which is useful for remote monitoring installations.
DS18B20 Temperature Sensor Pinout
The DS18B20 sensor comes in two common forms: a TO-92 transistor-like package and a waterproof probe version. Both expose the same three connections.
- GND pin: Connect to ground (0V)
- VCC pin: Connect to power supply (3.3V or 5V)
- DATA pin: 1-Wire data bus — connect to any digital pin on the ESP32 S3
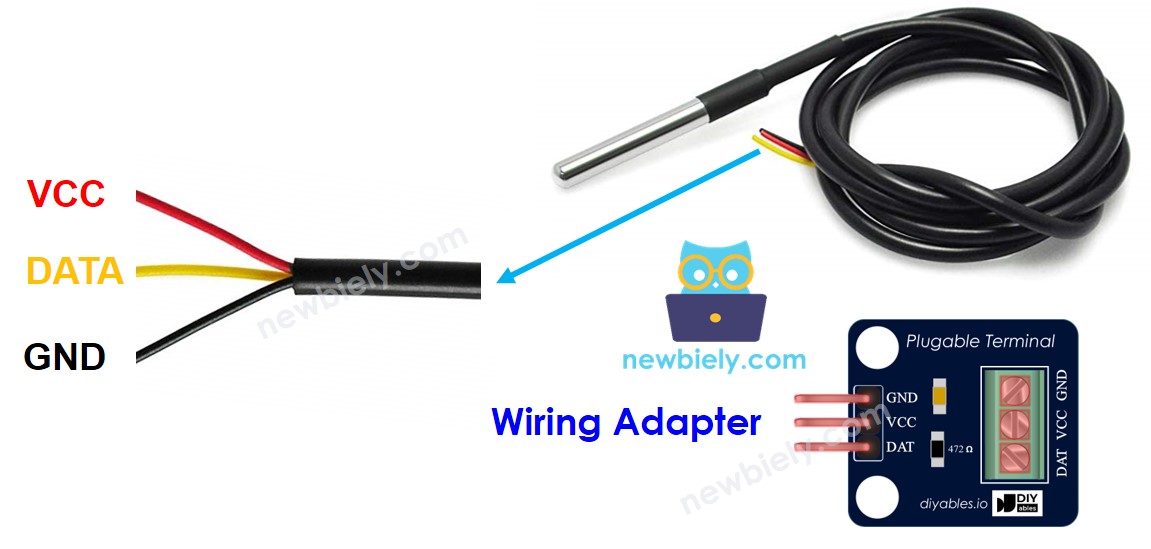
Traditional DS18B20 wiring requires a 4.7kΩ pull-up resistor between the DATA and VCC pins. Many DS18B20 adapter modules now include a built-in pull-up resistor and screw terminals, which simplifies wiring significantly. Using an adapter module is recommended for beginners.
Wiring Diagram
Connect your DS18B20 temperature sensor to the ESP32 S3 following the diagrams below. For beginners, using a DS18B20 adapter module with a built-in pull-up resistor is the easiest approach and reduces the chance of wiring errors.
Safety Notes
Always power the DS18B20 from the ESP32 S3's 3.3V pin rather than 5V unless you have confirmed your specific module is 5V-tolerant. Ensure your ground connections are solid — a floating ground is a common cause of -127°C error readings. If you are using the bare TO-92 package without an adapter, do not omit the 4.7kΩ pull-up resistor between DATA and VCC, as the 1-Wire protocol requires it for reliable communication.
Wiring with breadboard (without adapter):
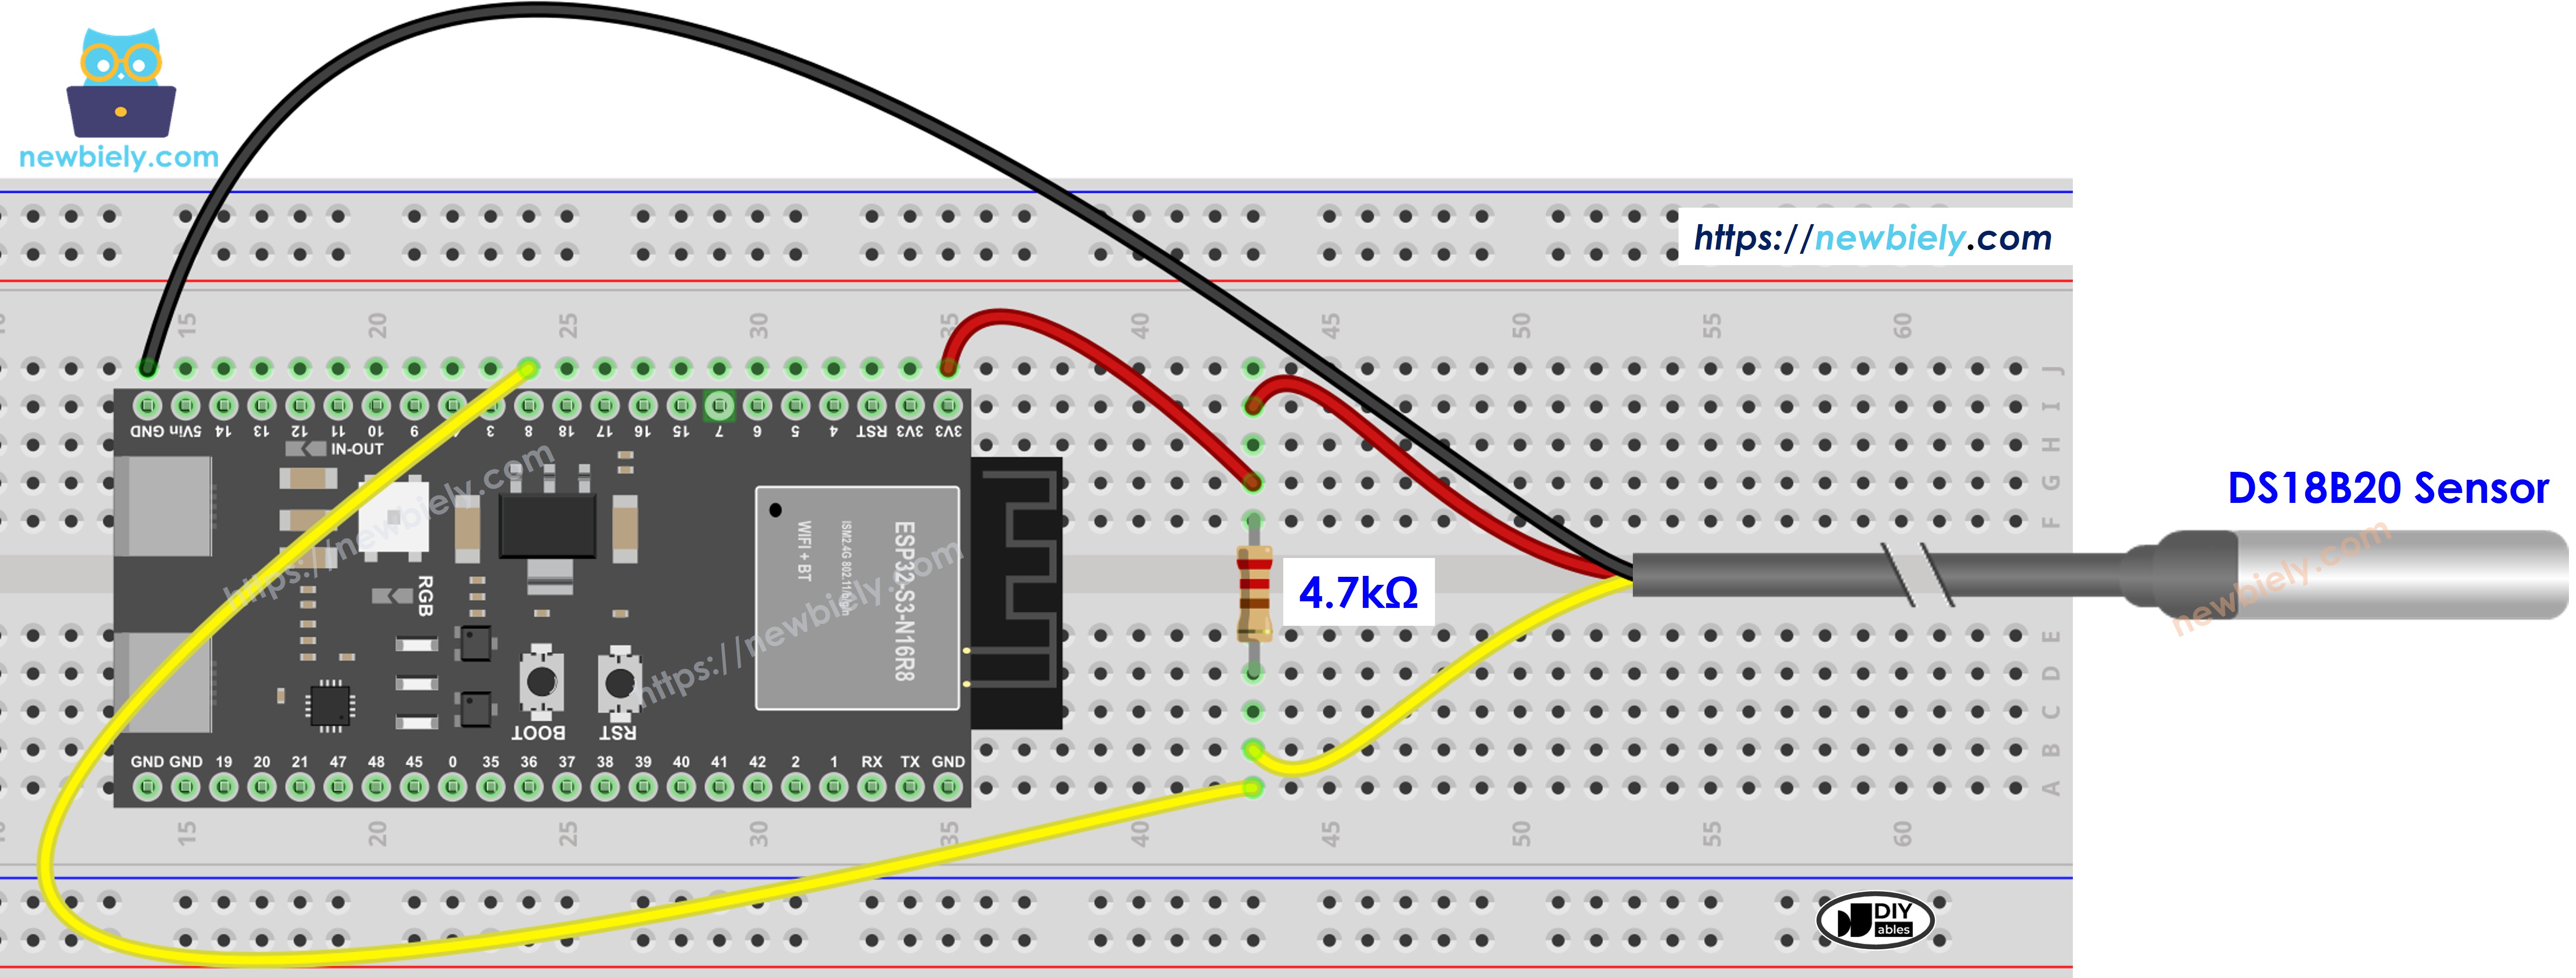
This image is created using Fritzing. Click to enlarge image
| DS18B20 Pin | ESP32 S3 Pin |
|---|---|
| GND | GND |
| VCC | 3.3V |
| DATA | GPIO8 (or any digital pin) |
| Pull-up Resistor | 4.7kΩ between DATA and VCC |
Wiring with adapter module (recommended):
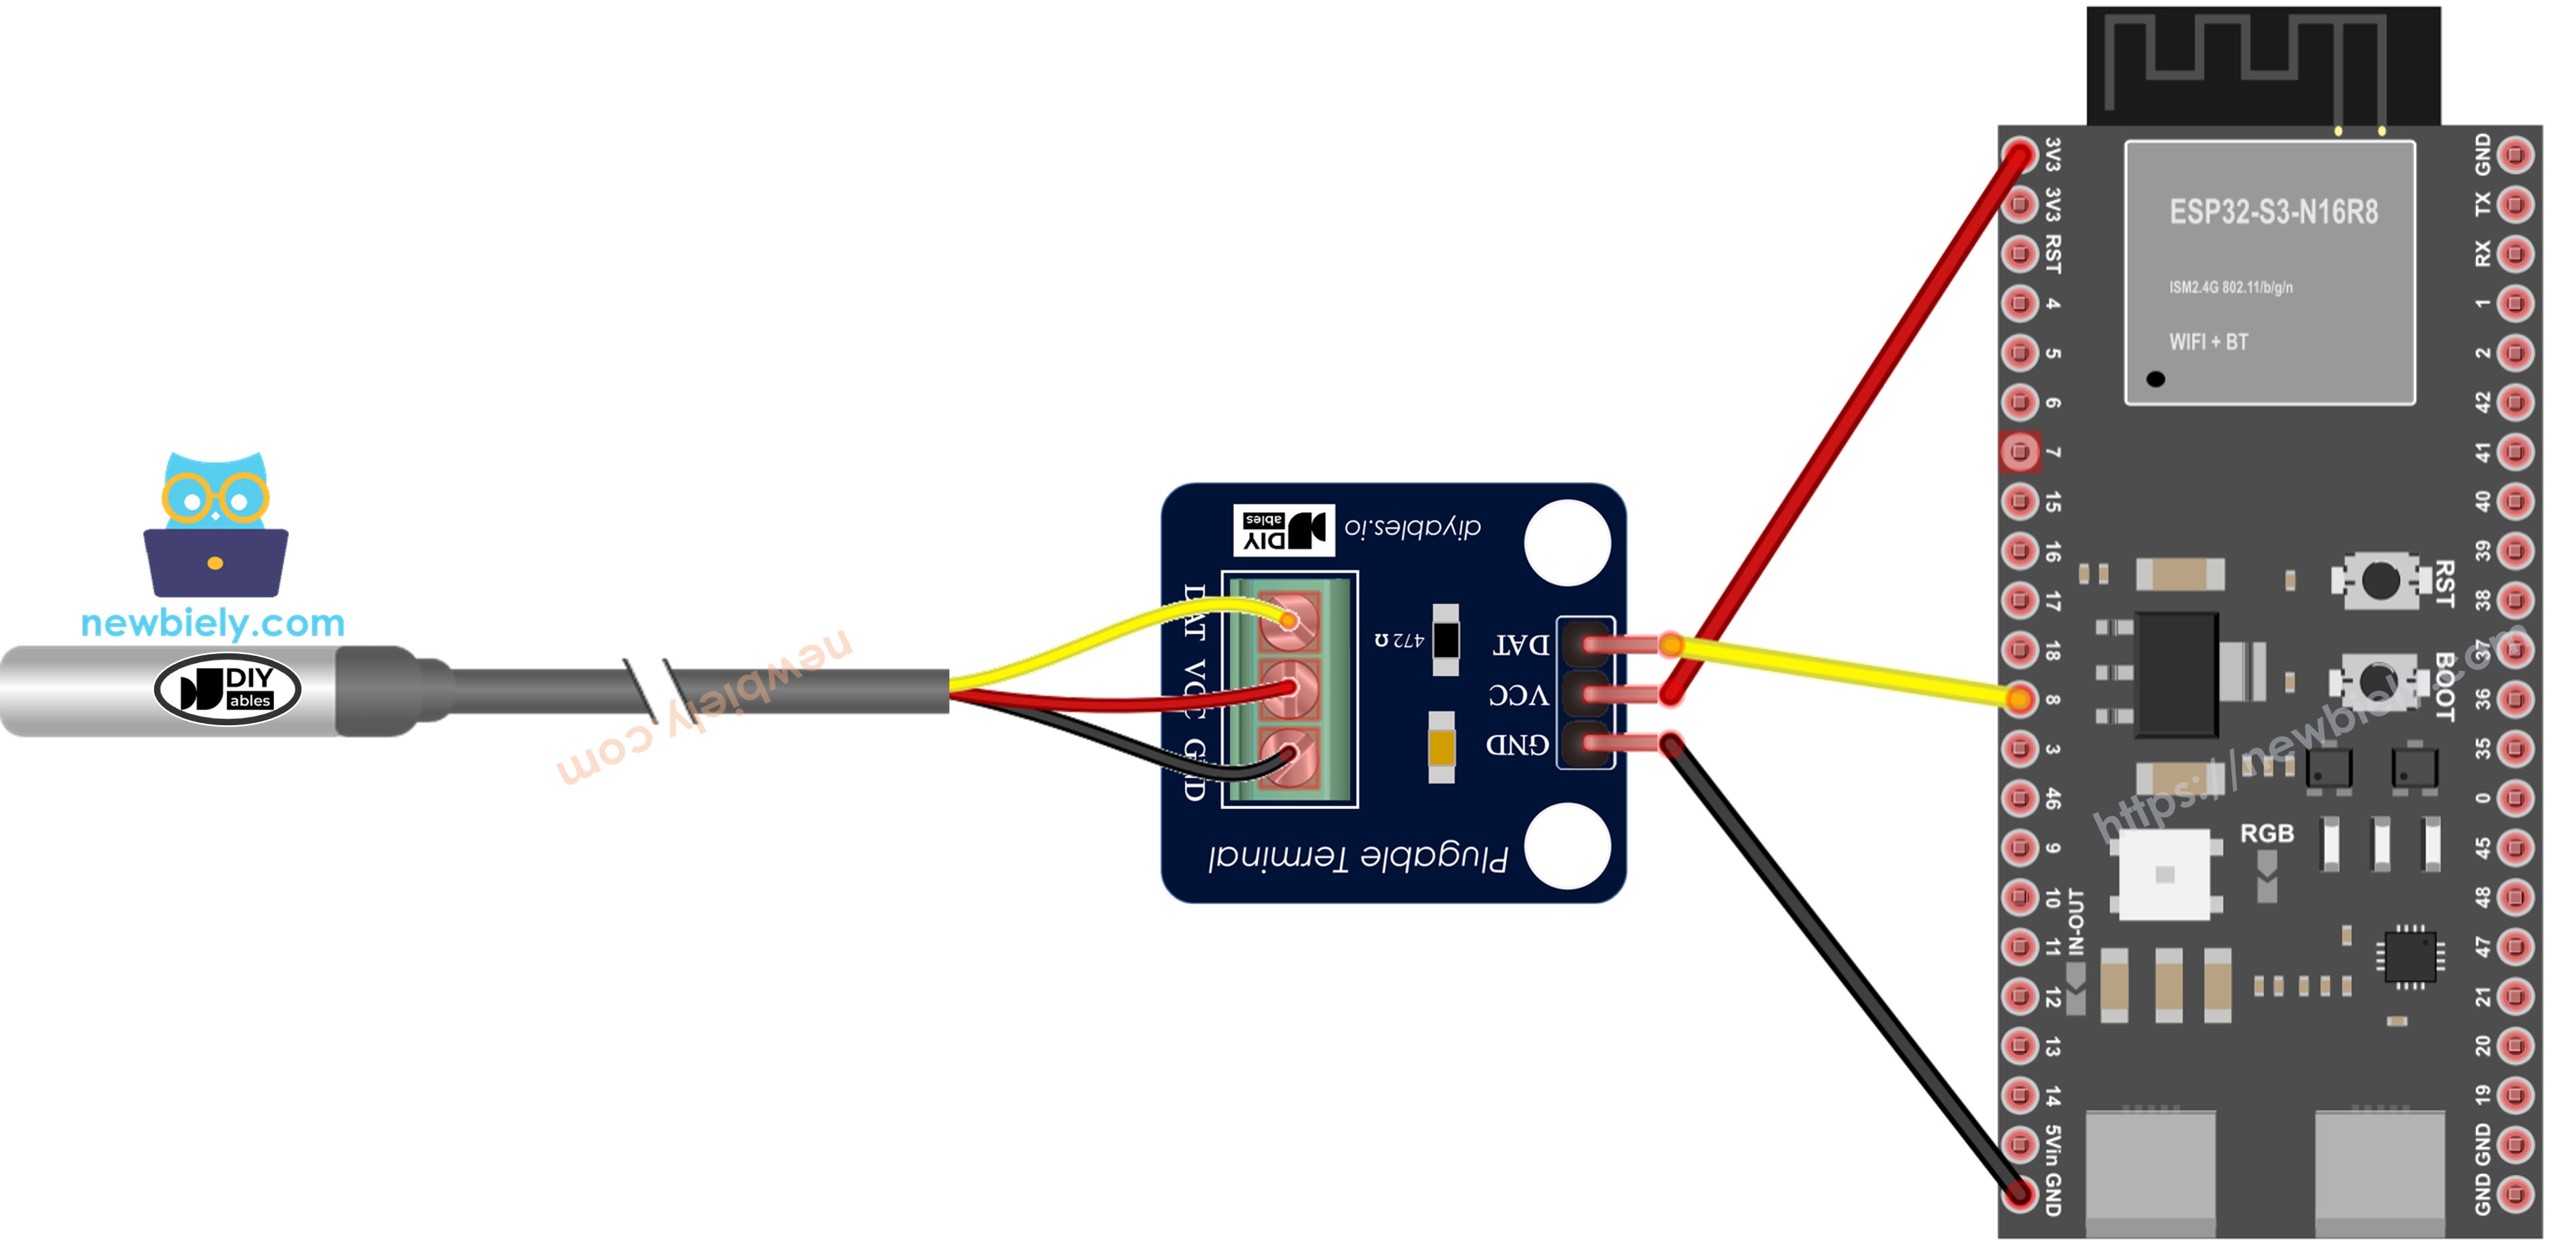
This image is created using Fritzing. Click to enlarge image
| DS18B20 Module Pin | ESP32 S3 Pin |
|---|---|
| GND (or -) | GND |
| VCC (or +) | 3.3V |
| DATA (or S) | GPIO8 (or any digital pin) |
For easier setup, purchase a DS18B20 sensor with a wiring adapter that includes the built-in resistor.
ESP32 S3 Code
The following code reads temperature data from the DS18B20 sensor using the DallasTemperature library and prints the results to the Serial Monitor every second. It initializes the 1-Wire bus on the configured data pin, requests a temperature conversion from the sensor, and then outputs the reading in both Celsius and Fahrenheit. The DallasTemperature library handles the low-level 1-Wire communication, so your sketch stays clean and readable.
Detailed Instructions
- New to ESP32 S3? Complete our Getting Started with ESP32 S3 guide first.
- Install required libraries: Open Library Manager in Arduino IDE (click the library icon on the left sidebar).
- Search for DallasTemperature: Type "DallasTemperature" in the search box.
- Install the library: Find the DallasTemperature library by Miles Burton and click Install.
- Search for DallasTemperature created by Miles Burton
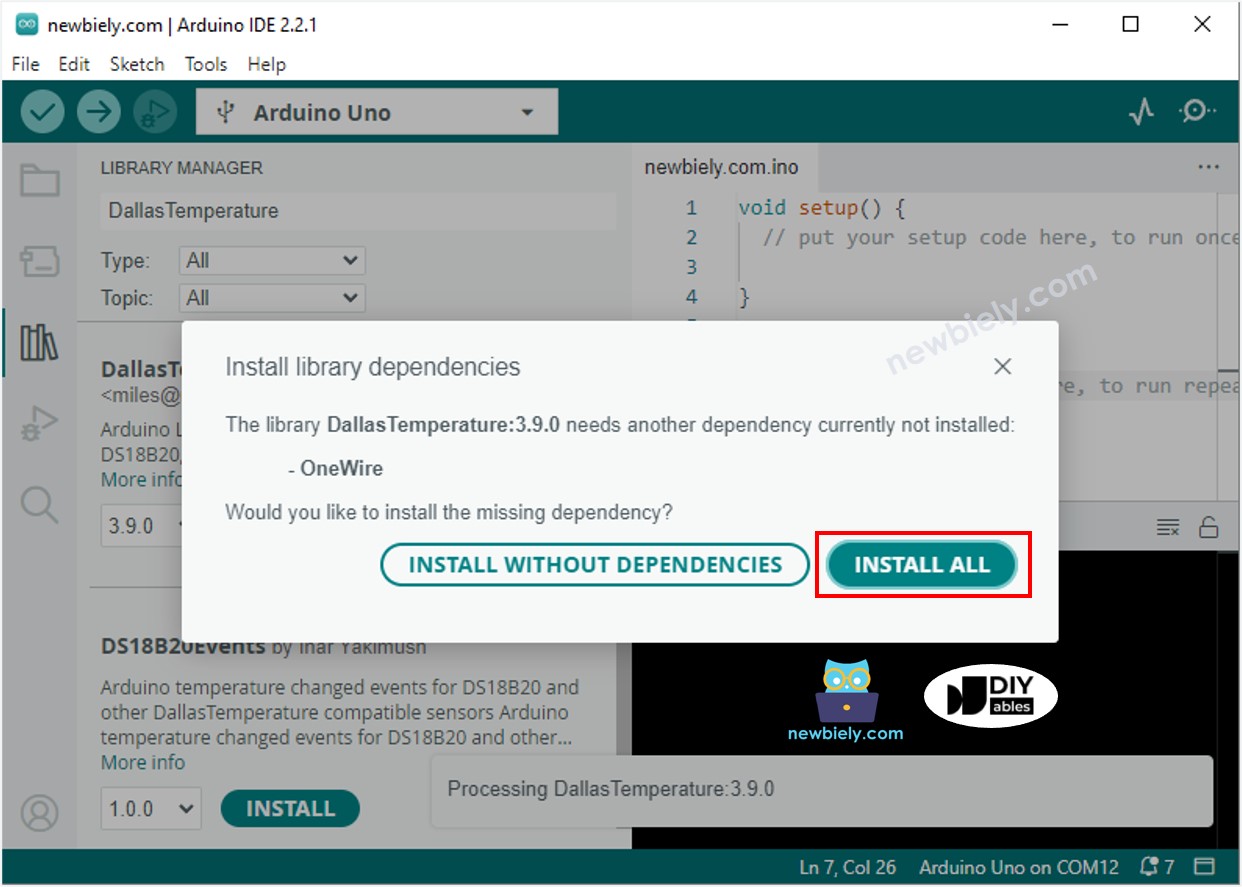
- Install dependency: When prompted, click Install All to also install the OneWire library.
- Wire the components: Follow the wiring diagram above to connect the DS18B20 sensor to your ESP32 S3.
- Connect your board: Plug the ESP32 S3 into your computer using a USB Type-C cable.
- Select your board: In Arduino IDE, choose ESP32 S3 and the correct COM port.
- Upload the code: Copy the code above, paste it into Arduino IDE, and click Upload.
- Open Serial Monitor: Set the baud rate to 115200 to view temperature readings.
- Test the sensor: Hold the DS18B20 probe in your hand to warm it up, or place it in hot or cold water to see temperature changes.
- Pro Tip: If readings show -127°C or 185°F, check your wiring connections — this almost always indicates a communication error with the sensor, often caused by a missing pull-up resistor or a loose DATA wire.
Serial Monitor Output
Once you upload the code and open the Serial Monitor, you will see continuous temperature readings updating every second. The output below shows a typical session starting at room temperature and gradually rising as the sensor warms up.
Applications and Project Ideas
The DS18B20 temperature sensor paired with the ESP32 S3's Wi-Fi and processing power opens the door to a wide range of practical monitoring and automation projects.
- Home weather station: Monitor indoor and outdoor temperatures with wireless connectivity and log data to the cloud.
- Aquarium temperature monitor: Keep track of water temperature for fish tanks and trigger alerts if values drift out of range.
- Smart thermostat: Create an automated heating or cooling control system that responds to real-time sensor readings.
- Refrigerator monitor: Receive alerts when your fridge temperature goes out of the safe range.
- Greenhouse automation: Monitor and log temperature for optimal plant growth and trigger ventilation fans automatically.
- Server room monitoring: Track temperature in computer or server rooms with remote alerts sent via email or push notification.
Video Tutorial
Watch the step-by-step video walkthrough for this ESP32 S3 project below.
Challenge Yourself
Once your temperature sensor is working, there are many directions you can take this project to deepen your ESP32 S3 skills.
- Beginner: Add an LED that turns on when the temperature exceeds a set threshold.
- Beginner: Display temperature data on an OLED screen instead of the Serial Monitor.
- Intermediate: Connect multiple DS18B20 sensors to one ESP32 S3 and read all of them simultaneously on the same data pin.
- Intermediate: Send temperature data to your smartphone over Wi-Fi using the ESP32 S3's built-in wireless radio.
- Advanced: Create a web server on the ESP32 S3 to display real-time temperature graphs accessible from any browser on your local network.
- Advanced: Log temperature data with timestamps to an SD card or cloud service for long-term monitoring and trend analysis.