
ESP32 S3 - 28BYJ-48 Stepper Motor ULN2003 Driver
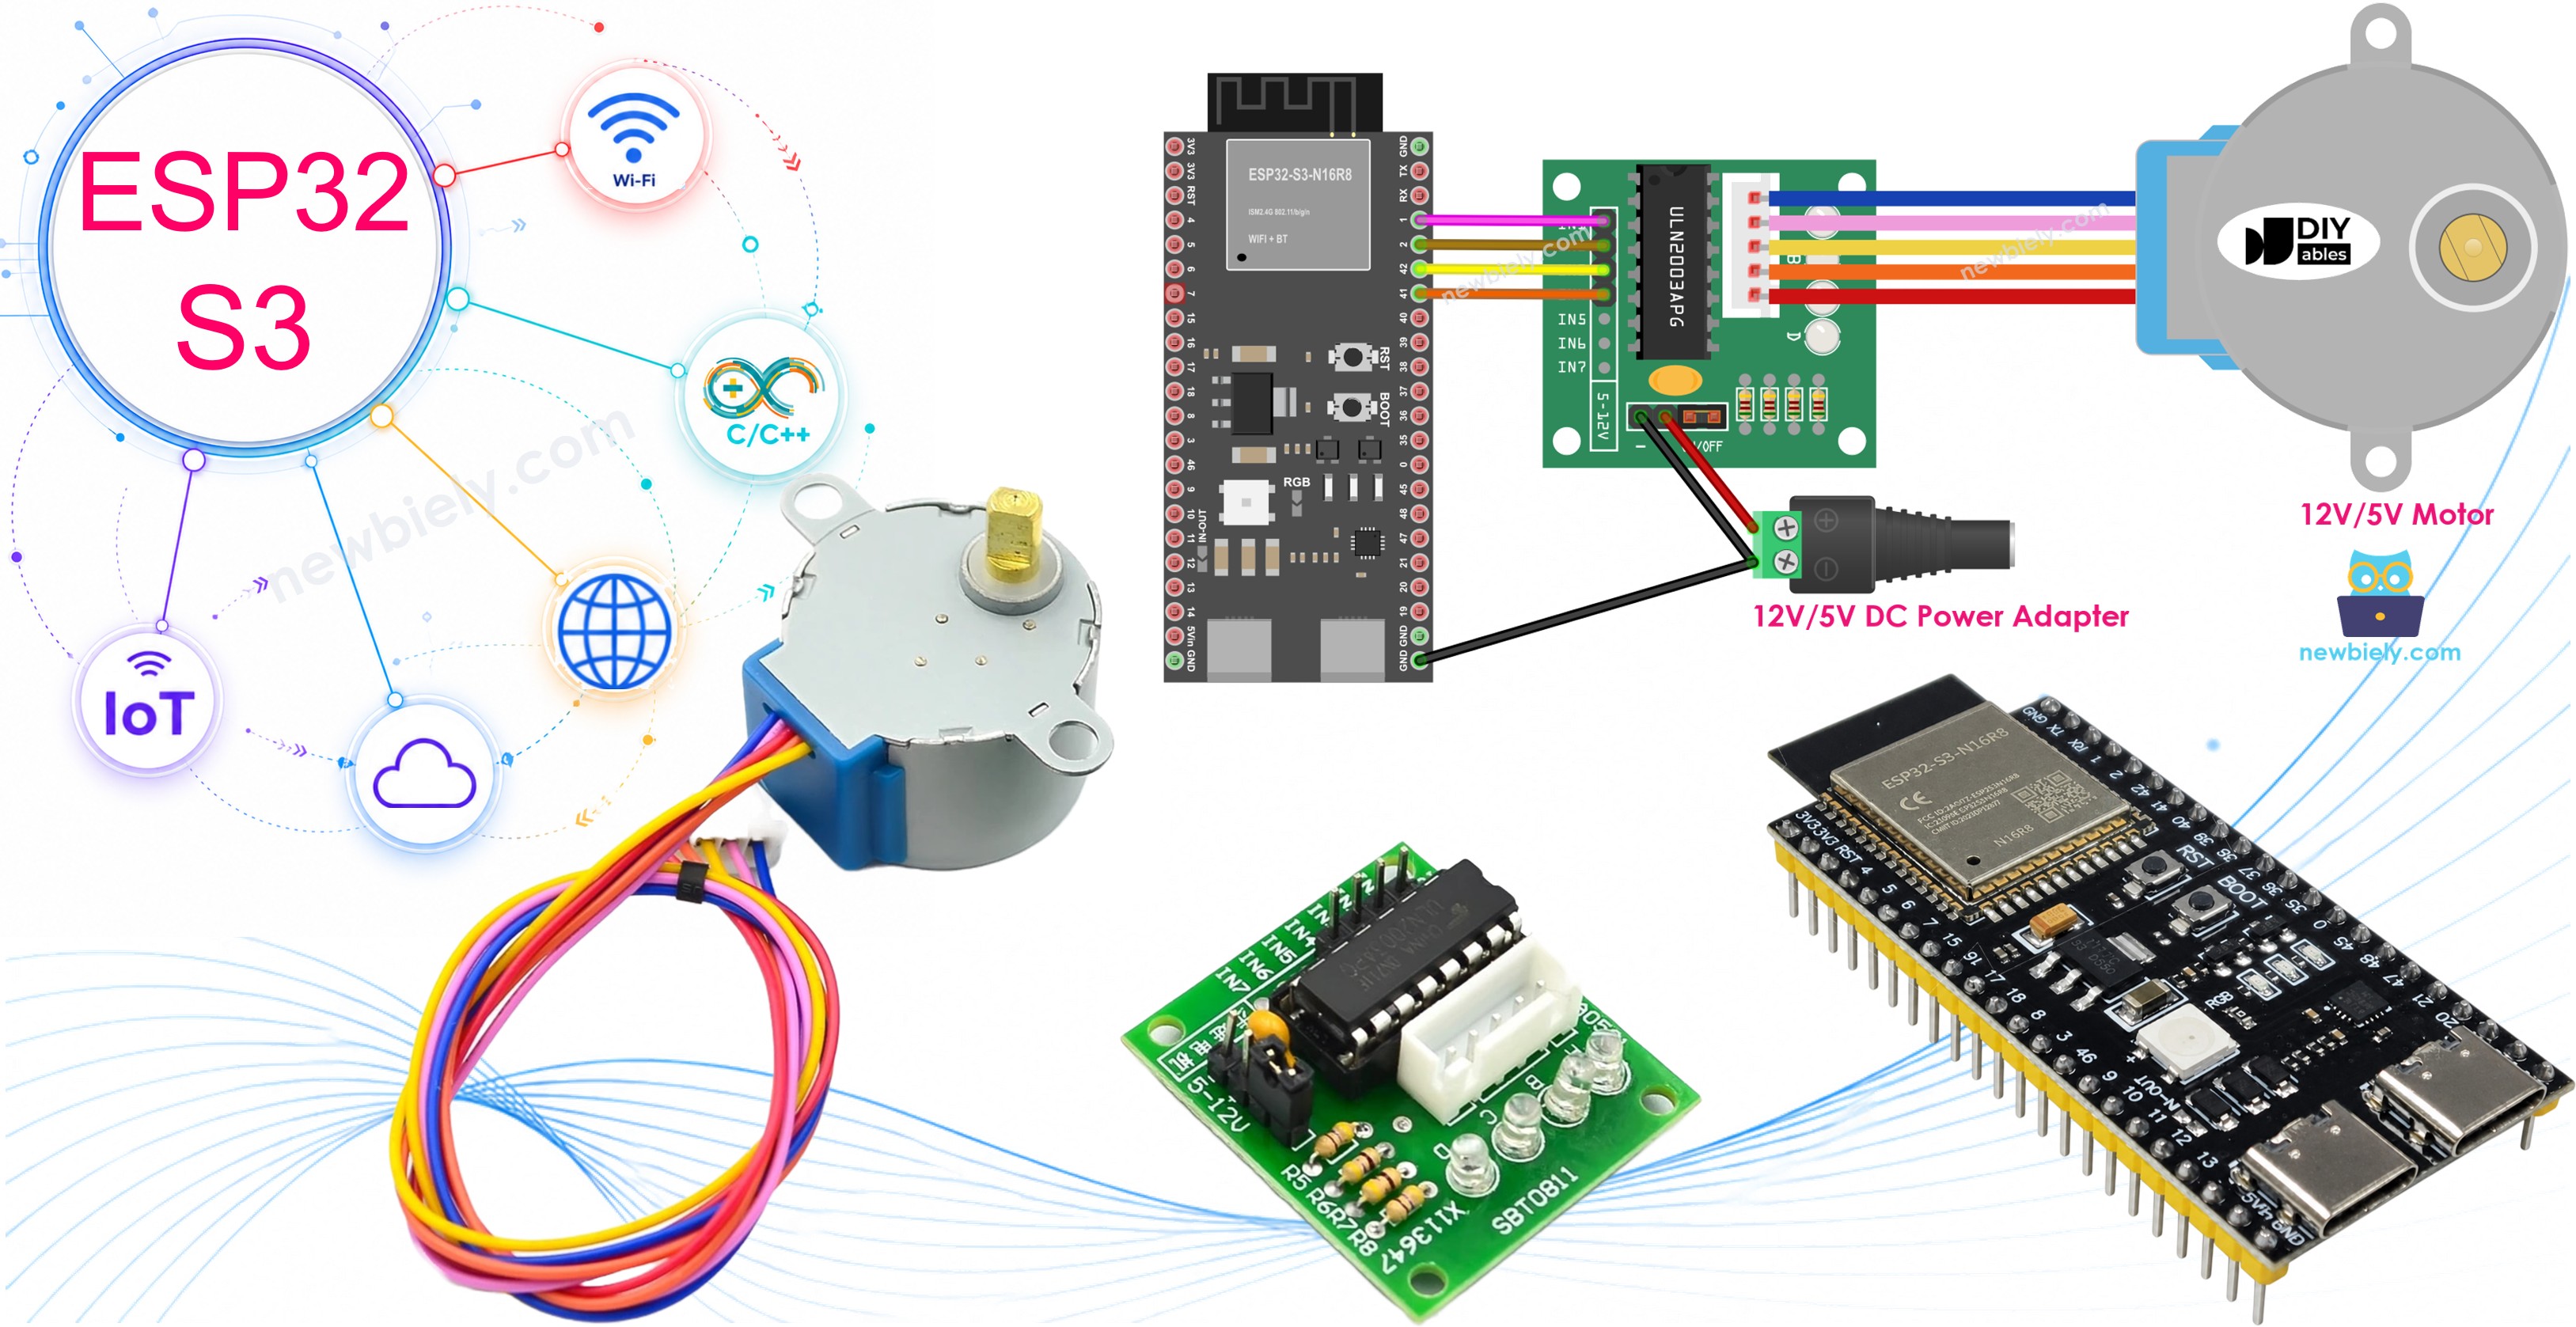
Learn how to control the 28BYJ-48 stepper motor using the ESP32 S3 and ULN2003 driver module for precise position control in your Arduino projects. This tutorial shows you how to wire, program, and control one or multiple stepper motors with simple code examples.
What you'll build:
- A single 28BYJ-48 stepper motor controlled by the ESP32 S3 via ULN2003 driver
- Clockwise and counter-clockwise rotation patterns using the AccelStepper library
- Smooth, non-blocking motor control that lets your ESP32 S3 handle other tasks simultaneously
- A two-motor setup with independent speed and direction control
Why use stepper motors with ESP32 S3:
- Excellent for precision position control in robotics and automation
- Break down full rotation into discrete steps for accurate movement
- Commonly used in 3D printers, CNC machines, and industrial systems
- The 28BYJ-48 is affordable and beginner-friendly
- ULN2003 driver makes wiring and control simple
Hardware Preparation
Or you can buy the following kits:
| 1 | × | DIYables ESP32 S3 Starter Kit (ESP32 S3 included) | |
| 1 | × | DIYables Sensor Kit (18 sensors/displays) |
Additionally, some of these links are for products from our own brand, DIYables .
Overview of 28BYJ-48 Stepper Motor
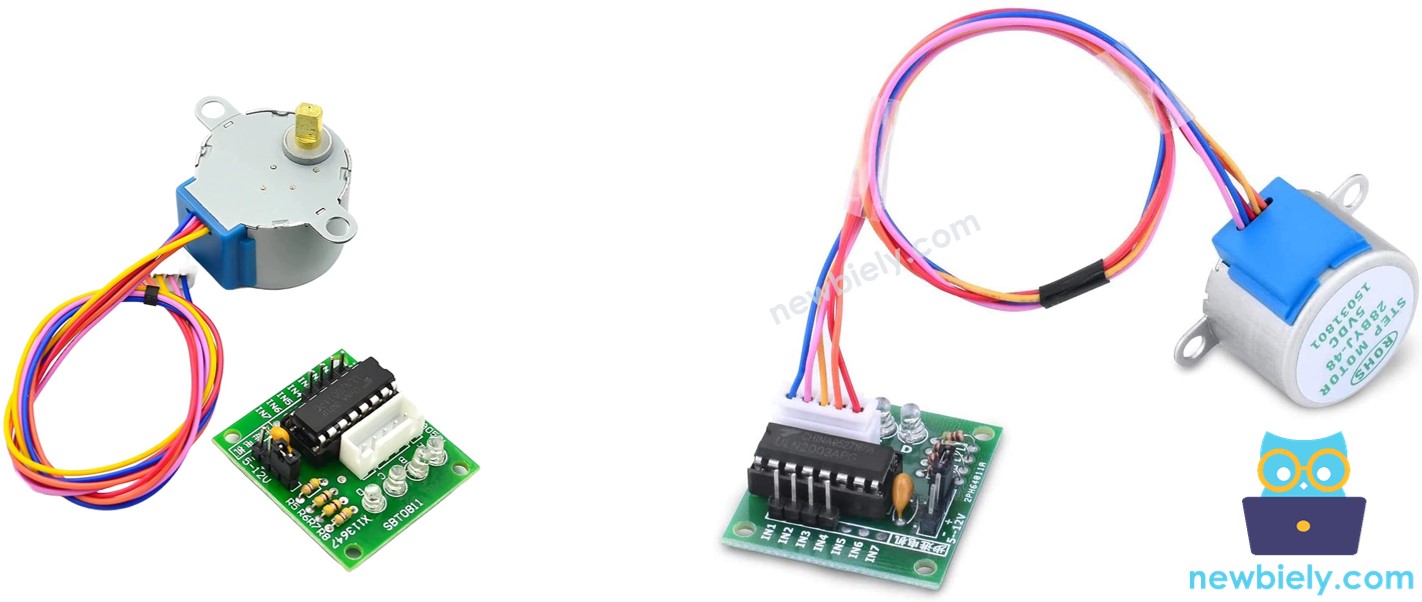
The 28BYJ-48 is a small unipolar stepper motor that provides precise position control through stepped rotation. Its built-in gear reduction and low cost make it one of the most popular motors for beginner Arduino and ESP32 S3 projects. When paired with the ULN2003 driver, it is easy to wire and control with just a few GPIO pins.
Key Specifications
- Step angle: 11.25 degrees in full-step mode (32 steps per revolution)
- Gear ratio: 1/64 reduction gear set included
- Total steps: 2048 steps per full revolution (32 × 64)
- Step precision: Approximately 0.1758 degrees per step (360°/2048)
- Operating voltage: 5V DC
- Interface: 5-pin connector that plugs directly into ULN2003 driver
- Torque: Low to medium torque suitable for light applications
- Cost: Very affordable for beginners learning stepper motor control
Important: When using the 28BYJ-48 stepper motor in full-step mode, it requires 2048 steps to complete one full revolution.
28BYJ-48 Stepper Motor Pinout
The 28BYJ-48 stepper motor has a 5-pin connector that plugs directly into the ULN2003 driver module — no individual pin wiring is needed on the motor side.
- Pin 1-5: Internal motor coil connections
- Connector: Male 5-pin connector that plugs into ULN2003 driver
Note: You don't need to worry about individual pin connections - simply plug the motor's connector directly into the ULN2003 driver module's socket.
Overview of ULN2003 Stepper Motor Driver Module
The ULN2003 is a popular and easy-to-use driver module specifically designed for controlling stepper motors with Arduino and ESP32 boards. It accepts four low-current control signals from the ESP32 S3 and switches the higher-current coil power for the motor, protecting your microcontroller from damage. Onboard LEDs provide a helpful visual indicator of which coils are energized as the motor steps.
Key Specifications
- 4 control inputs: IN1, IN2, IN3, IN4 for motor control signals
- LED indicators: Four onboard LEDs show real-time stepping activity
- Power control: ON/OFF jumper for easy motor power management
- Power supply: Separate power input (5V-12V) for the stepper motor
- Easy wiring: Direct plug-in connector for 28BYJ-48 motor
- Protection: Built-in protection for your microcontroller
- Beginner-friendly: Simple to wire and program
ULN2003 Driver Pinout
The ULN2003 module has 6 pins and one female connector for easy stepper motor control.
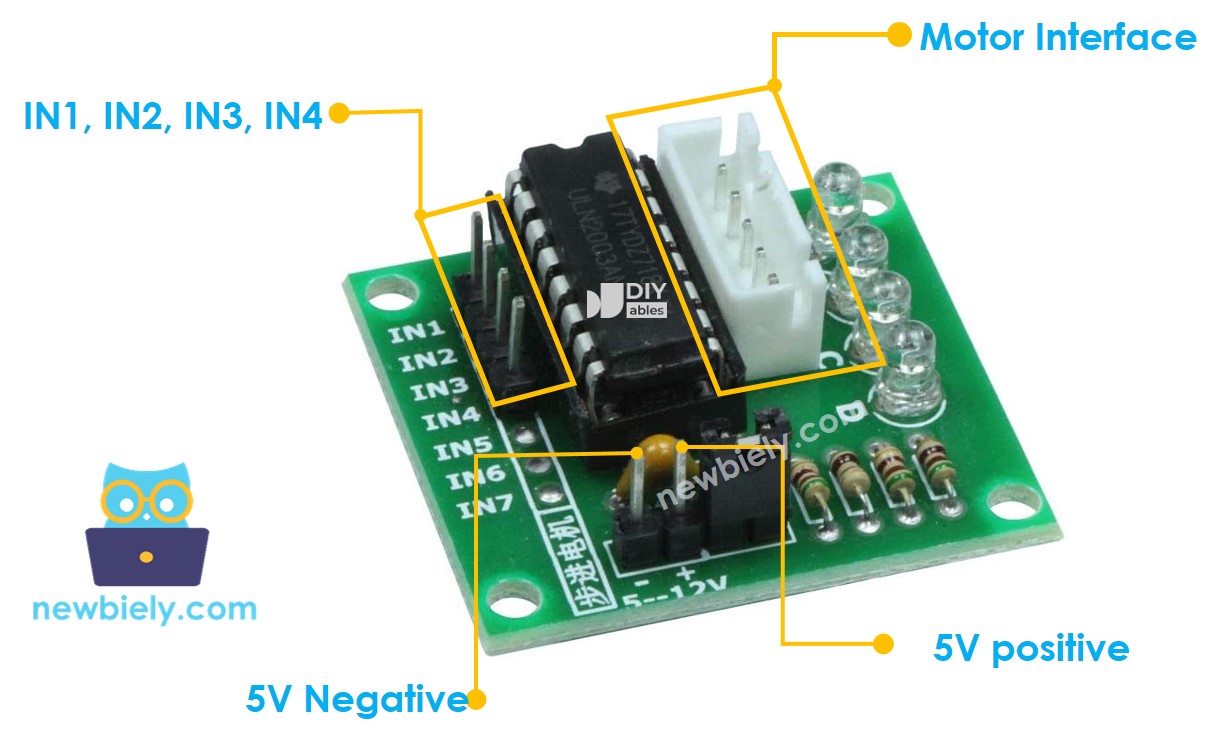
- IN1: Control input pin 1 - connects to ESP32 S3 digital pin
- IN2: Control input pin 2 - connects to ESP32 S3 digital pin
- IN3: Control input pin 3 - connects to ESP32 S3 digital pin
- IN4: Control input pin 4 - connects to ESP32 S3 digital pin
- GND: Ground pin - MUST connect to both ESP32 and external power supply ground
- VDD: Motor power supply input - connects to external 5V power source
- Motor Connector: Female socket where the 28BYJ-48 motor plugs in
※ NOTE THAT:
Important power supply notes for stepper motor operation:
- Always match the external power supply voltage to your motor's specifications
- The 28BYJ-48 stepper motor requires 5V DC external power supply
- Never connect the VDD pin to the ESP32 S3's 5V pin
- Stepper motors draw high current that can damage your ESP32
- Always use a dedicated external power supply for the motor
- Connect all grounds together (ESP32 GND, driver GND, power supply GND)
Wiring Diagram
Connect the ULN2003 driver's four input pins to ESP32 S3 GPIO pins, then plug the 28BYJ-48 motor's connector into the driver's female socket. Always use a dedicated external 5V power supply for the motor and share a common ground between the ESP32 S3, the driver module, and the power supply.
Safety Notes
Never power the ULN2003's VDD pin from the ESP32 S3's 5V output. The stepper motor draws more current than the ESP32 S3 can safely supply, which can permanently damage the board. Use a dedicated 5V power adapter connected directly to the driver's VDD and GND pins, with the ground tied to the ESP32 S3 ground as well.
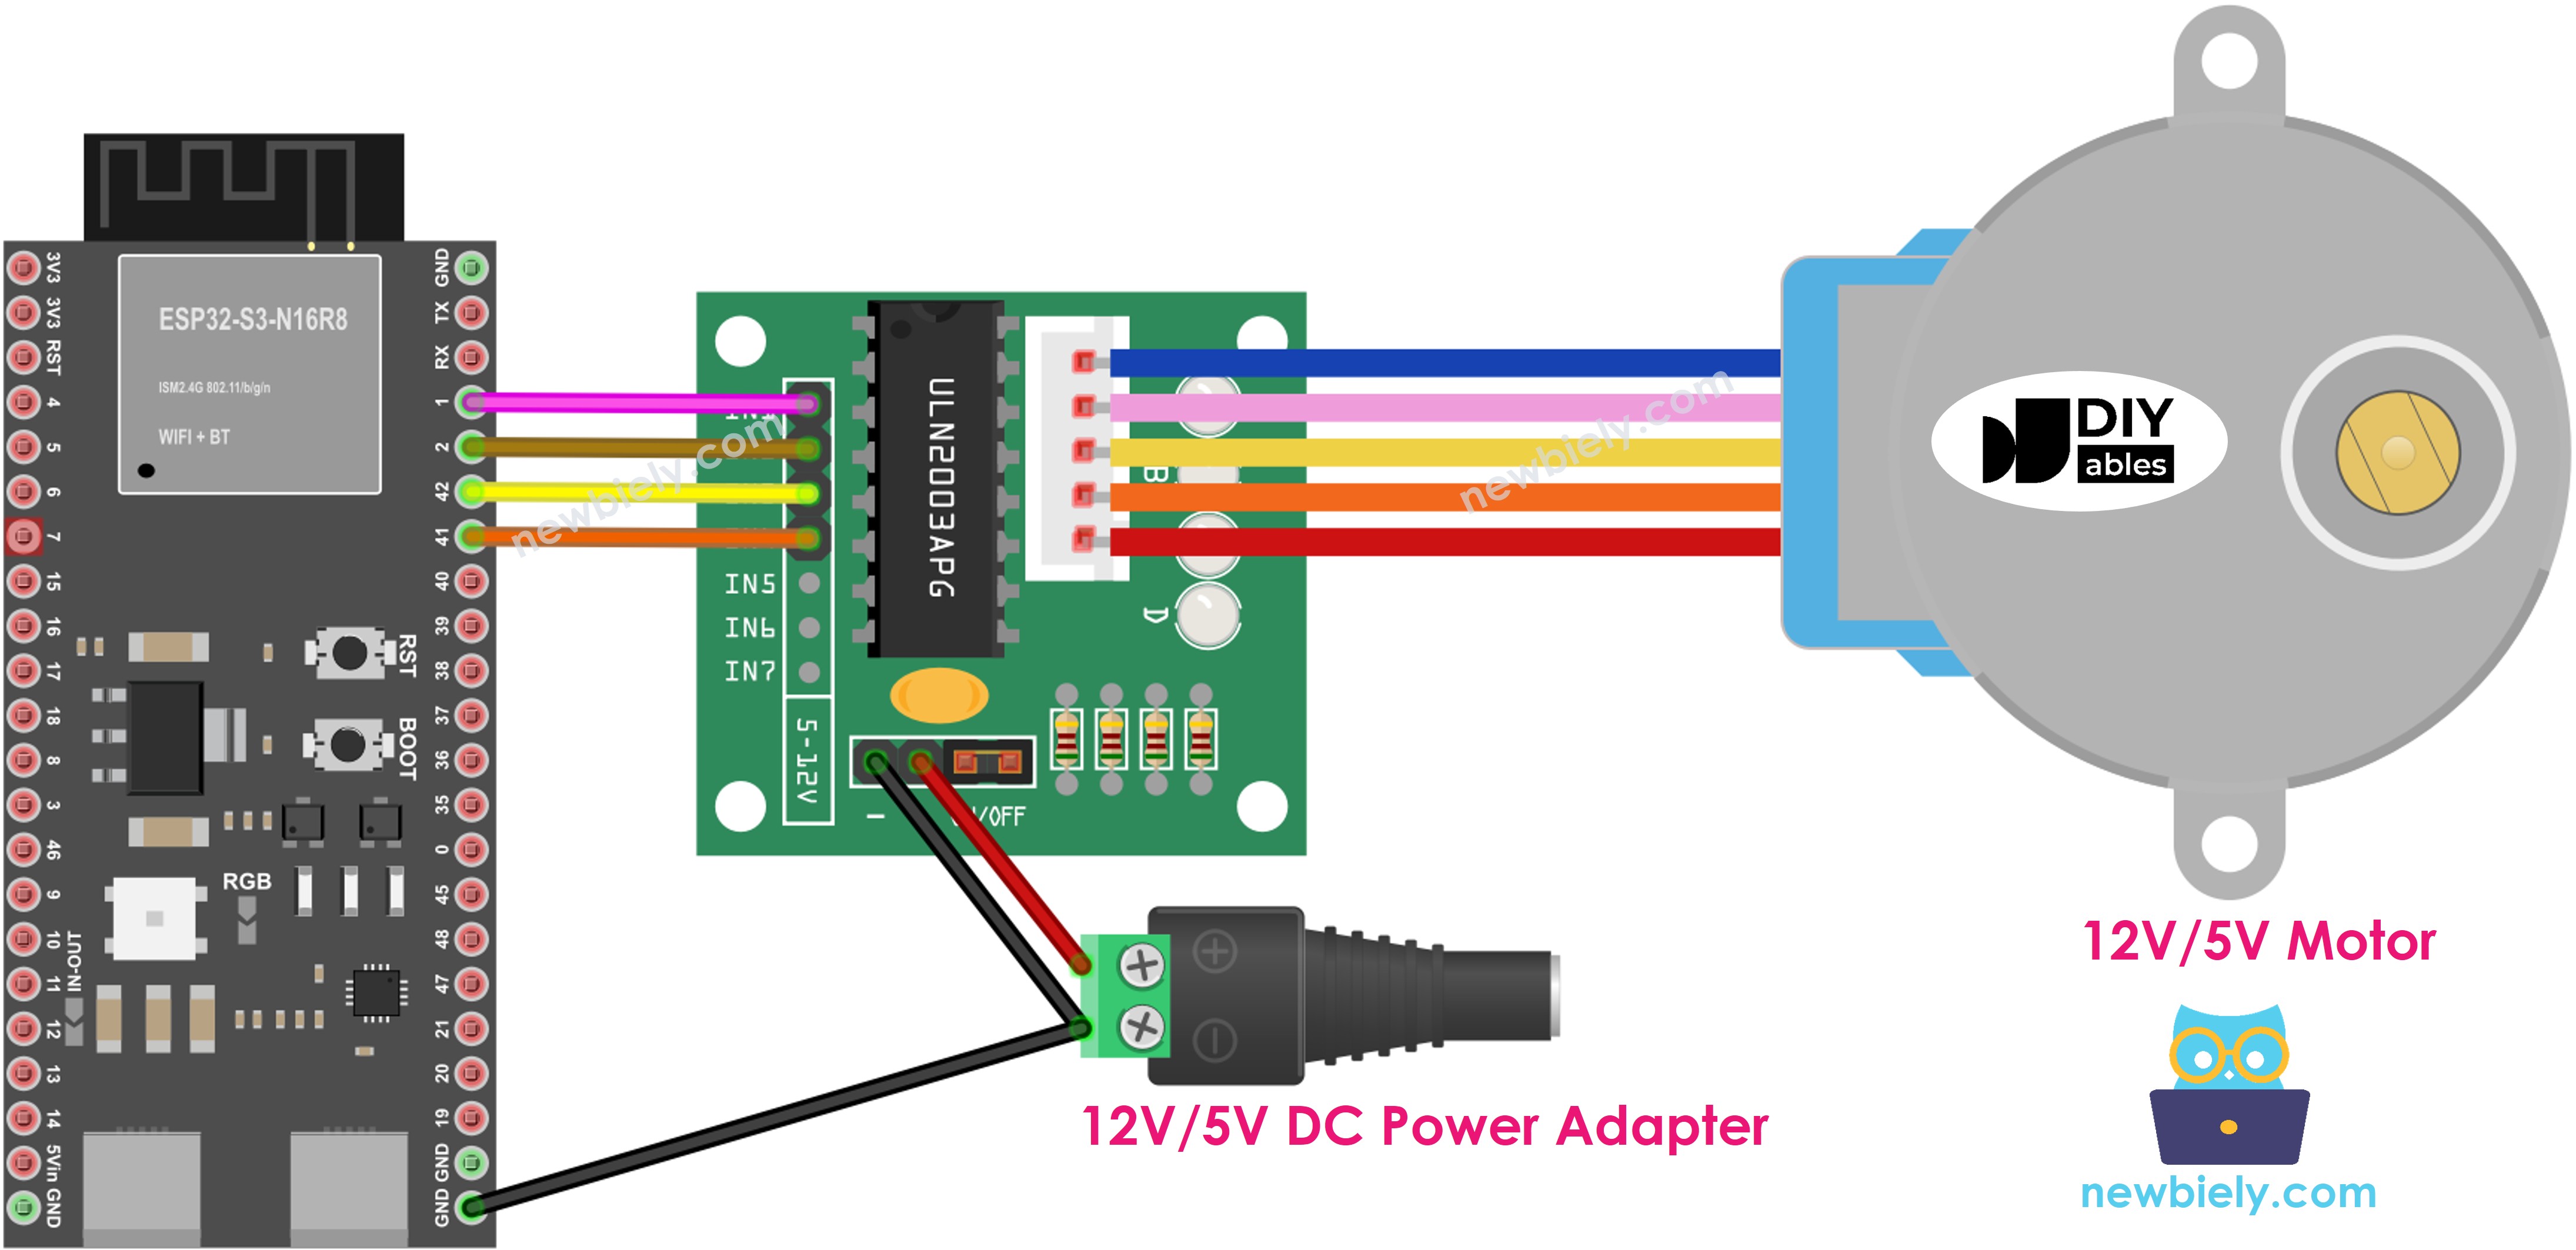
This image is created using Fritzing. Click to enlarge image
| ULN2003 Pin | ESP32 S3 Pin |
|---|---|
| IN1 | GPIO8 |
| IN2 | GPIO9 |
| IN3 | GPIO10 |
| IN4 | GPIO20 |
| GND | GND |
| VDD | 5V External Power Supply |
| Motor Connector | 28BYJ-48 Motor Connector |
| Power Supply GND | GND (shared with ESP32 and ULN2003) |
Note: The wire colors on the 28BYJ-48 stepper motor don't matter - simply plug the male connector into the female connector on the ULN2003 driver module.
How To Program to Control a Stepper Motor
Understanding stepper motor control methods helps you choose the right approach for your ESP32 S3 project. The AccelStepper library is the recommended choice because it operates in a non-blocking manner, letting your ESP32 S3 perform other tasks while the motor is moving. It also supports smooth acceleration and simultaneous control of multiple motors.
Three main stepper motor control methods:
- Full-Step: Basic method, provides full torque, suitable for most beginner projects
- Half-Step: Doubles resolution, smoother movement, slightly reduced torque
- Micro-Step: Highest resolution, smoothest operation, requires specialized drivers
Why we recommend the AccelStepper library:
- Non-blocking operation: ESP32 S3 can perform other tasks while controlling the motor
- Smooth acceleration: Gradual speed changes prevent motor stalling
- Multiple motor support: Control several stepper motors independently and simultaneously
- Flexible control: Supports both full-step and half-step driving modes
- Easy to use: Simple functions for beginners
Why avoid the built-in Arduino Stepper library:
- Blocking: Freezes ESP32 during motor operation
- Limited features: Lacks acceleration and advanced control
- Poor multi-motor support: Cannot control multiple motors efficiently
Note: The AccelStepper library does not support micro-step driving, but this is rarely needed for beginner projects.
ESP32 S3 Code - Single Stepper Motor
The following code demonstrates how to control one 28BYJ-48 stepper motor using the ESP32 S3 and AccelStepper library. It sets up the motor with the correct pin mapping and then runs a repeating pattern of clockwise and counter-clockwise rotations. The AccelStepper library handles acceleration automatically so the motor starts and stops smoothly without stalling.
What this stepper motor code does:
- Initializes the stepper motor with proper settings for 28BYJ-48
- Rotates one full revolution clockwise
- Rotates two full revolutions counter-clockwise
- Rotates two full revolutions clockwise
- Repeats this pattern continuously
- Uses acceleration for smooth motor movement
Detailed Instructions
- New to ESP32 S3? Complete our Getting Started with ESP32 S3 guide first.
- Install AccelStepper library: Open Library Manager in Arduino IDE, search "AccelStepper", and install the library by Mike McCauley
- Search for AccelStepper created by Mike McCauley
- Wire components: Connect the stepper motor and ULN2003 driver according to the wiring diagram above
- Connect ESP32: Plug your ESP32 S3 into your computer with a USB Type-C cable
- Select board: Choose "ESP32S3 Dev Module" and the correct COM port in Arduino IDE
- Upload code: Copy the code, paste it into Arduino IDE, and click Upload
- Observe motor: Watch the stepper motor rotate in the programmed pattern (1 rev CW, 2 rev CCW, 2 rev CW, repeat)
- Open Serial Monitor: View status messages at 115200 baud rate
- Pro Tip: Adjust the setMaxSpeed() and setAcceleration() values to change motor speed and smoothness - lower values make slower, smoother movements.
Serial Monitor Output
How to Control Multiple 28BYJ-48 Stepper Motors
Learn how to control two or more stepper motors independently at the same time using the ESP32 S3. Because the AccelStepper library is non-blocking, you can call run() on each motor inside the main loop and they will both advance their steps concurrently without interfering with each other.
Benefits of controlling multiple stepper motors:
- Each motor moves independently with different speeds and directions
- Perfect for robotics projects requiring coordinated movement
- ESP32 has enough pins to control 2-3 stepper motors easily
- AccelStepper library handles simultaneous control smoothly
Wiring Diagram for Two 28BYJ-48 Stepper Motors
This diagram shows how to connect two stepper motors to the ESP32 S3 using two ULN2003 driver modules.
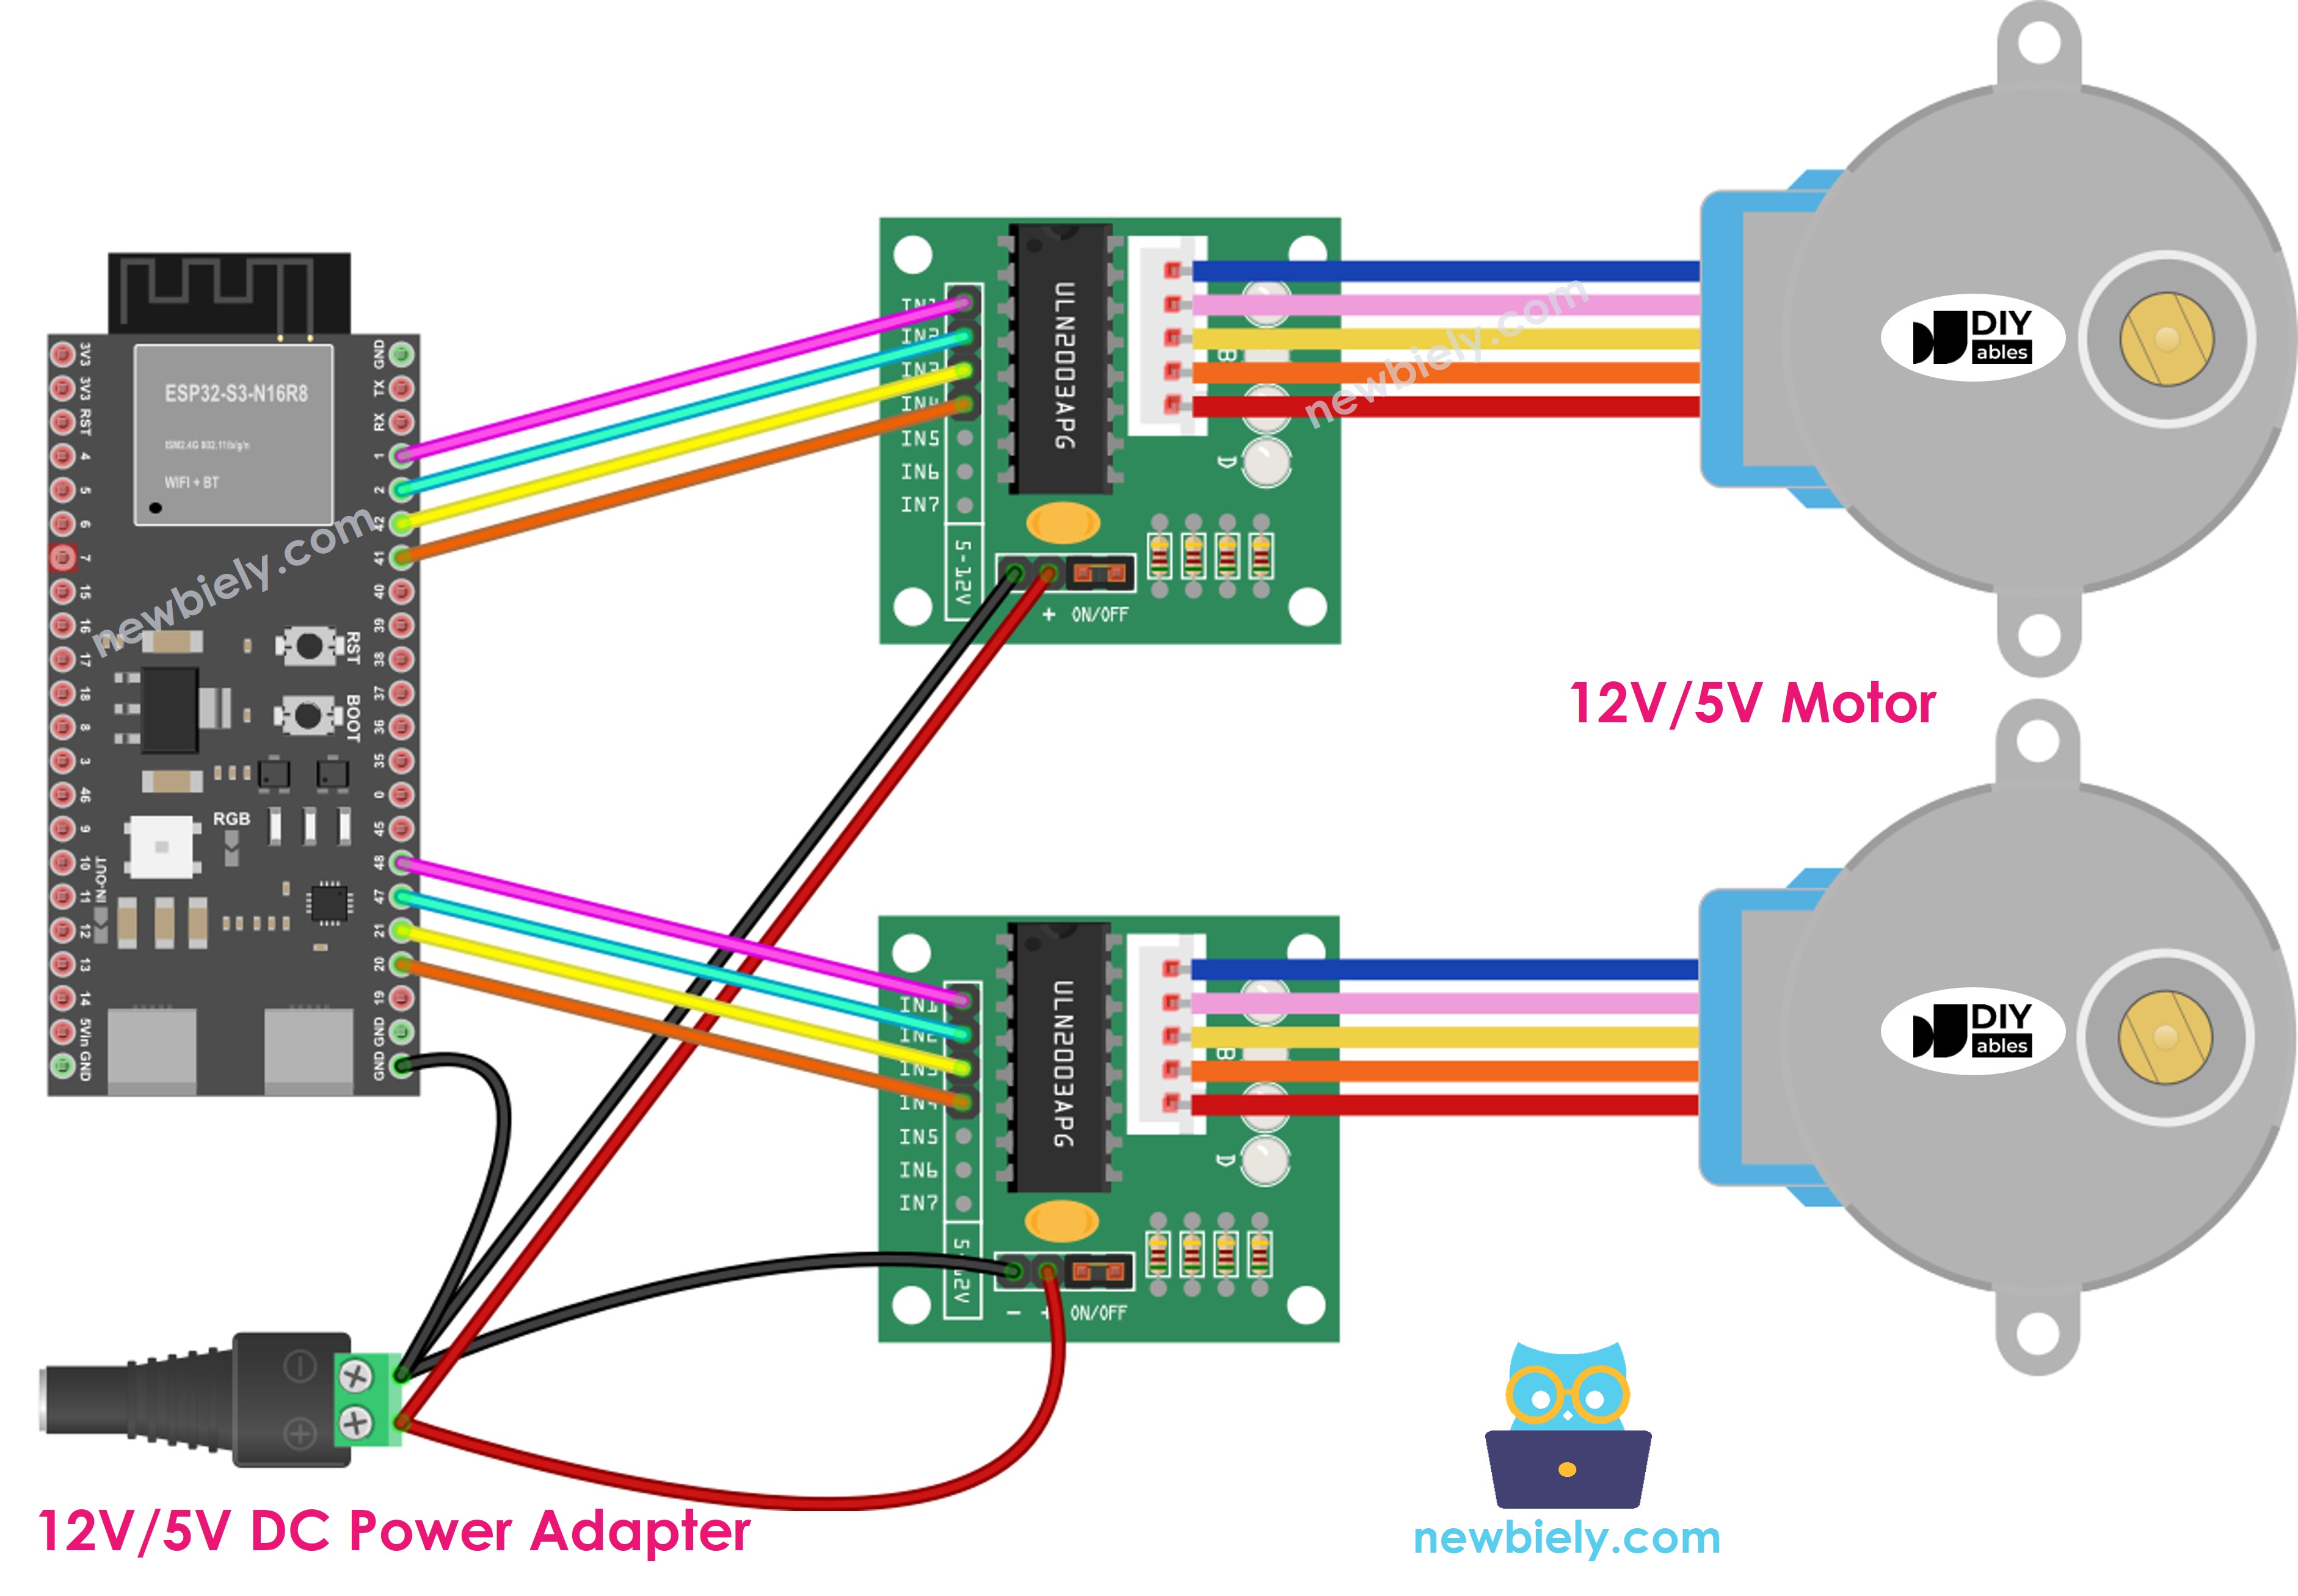
This image is created using Fritzing. Click to enlarge image
Wiring connections for two stepper motors:
| Component | ESP32 S3 Pin |
|---|---|
| ULN2003 #1 - IN1 | GPIO8 |
| ULN2003 #1 - IN2 | GPIO9 |
| ULN2003 #1 - IN3 | GPIO10 |
| ULN2003 #1 - IN4 | GPIO20 |
| ULN2003 #2 - IN1 | GPIO2 |
| ULN2003 #2 - IN2 | GPIO3 |
| ULN2003 #2 - IN3 | GPIO4 |
| ULN2003 #2 - IN4 | GPIO5 |
| Both ULN2003 GND | GND |
| Both ULN2003 VDD | 5V External Power Supply |
| Power Supply GND | GND (shared with ESP32 and both drivers) |
Note: Both ULN2003 modules share the same external 5V power supply and common ground with the ESP32 S3.
ESP32 S3 Code for Two 28BYJ-48 Stepper Motors
The following code demonstrates simultaneous control of two stepper motors with independent movement patterns. Each motor is assigned its own AccelStepper instance so you can set different speeds, accelerations, and target positions for each one independently.
What this multi-stepper code does:
- Controls two stepper motors completely independently
- Each motor rotates at different speeds
- Motors move in opposite directions
- Demonstrates non-blocking operation
- Shows how to coordinate multiple motors in one program
Applications and Project Ideas
The combination of the ESP32 S3 and 28BYJ-48 stepper motors opens up a wide range of automation, robotics, and creative projects you can build at home or in the classroom.
- Camera slider: Build an automated camera dolly for smooth time-lapse videos
- XY plotter: Create a drawing robot that plots designs on paper
- Automatic blinds: Control window blinds with scheduled or remote operation
- Pan-tilt mechanism: Make a camera mount that rotates horizontally and vertically
- Analog clock: Design a large wall clock with precise stepper motor hands
- Conveyor belt: Build a small sorting or transport system for objects
- Solar tracker: Create a panel that follows the sun throughout the day
- Robotic arm: Construct a simple 2-3 axis arm for pick-and-place tasks
Video Tutorial
Watch the step-by-step video walkthrough for this ESP32 S3 project below.
...VIDEO https://www.youtube.com/watch?v=EXAMPLE_VIDEO_ID_HERE
...VIDEO
Challenge Yourself
These exercises are designed to build your confidence with stepper motor control on the ESP32 S3, starting with simple modifications and progressing to more complex, real-world applications.
- Beginner: Modify the code to make the motor rotate 5 full revolutions clockwise, then stop
- Beginner: Change the motor speed by adjusting setMaxSpeed() to make it rotate twice as fast
- Intermediate: Create a pattern where the motor rotates 45 degrees, pauses 1 second, then repeats
- Intermediate: Add a push button that reverses the motor direction when pressed
- Advanced: Build a simple clock with two stepper motors for hour and minute hands
- Advanced: Create a program that accepts Serial Monitor commands to control motor position (e.g., "MOVE 1000" or "HOME")