
ESP32 S3 - Temperature Humidity Sensor
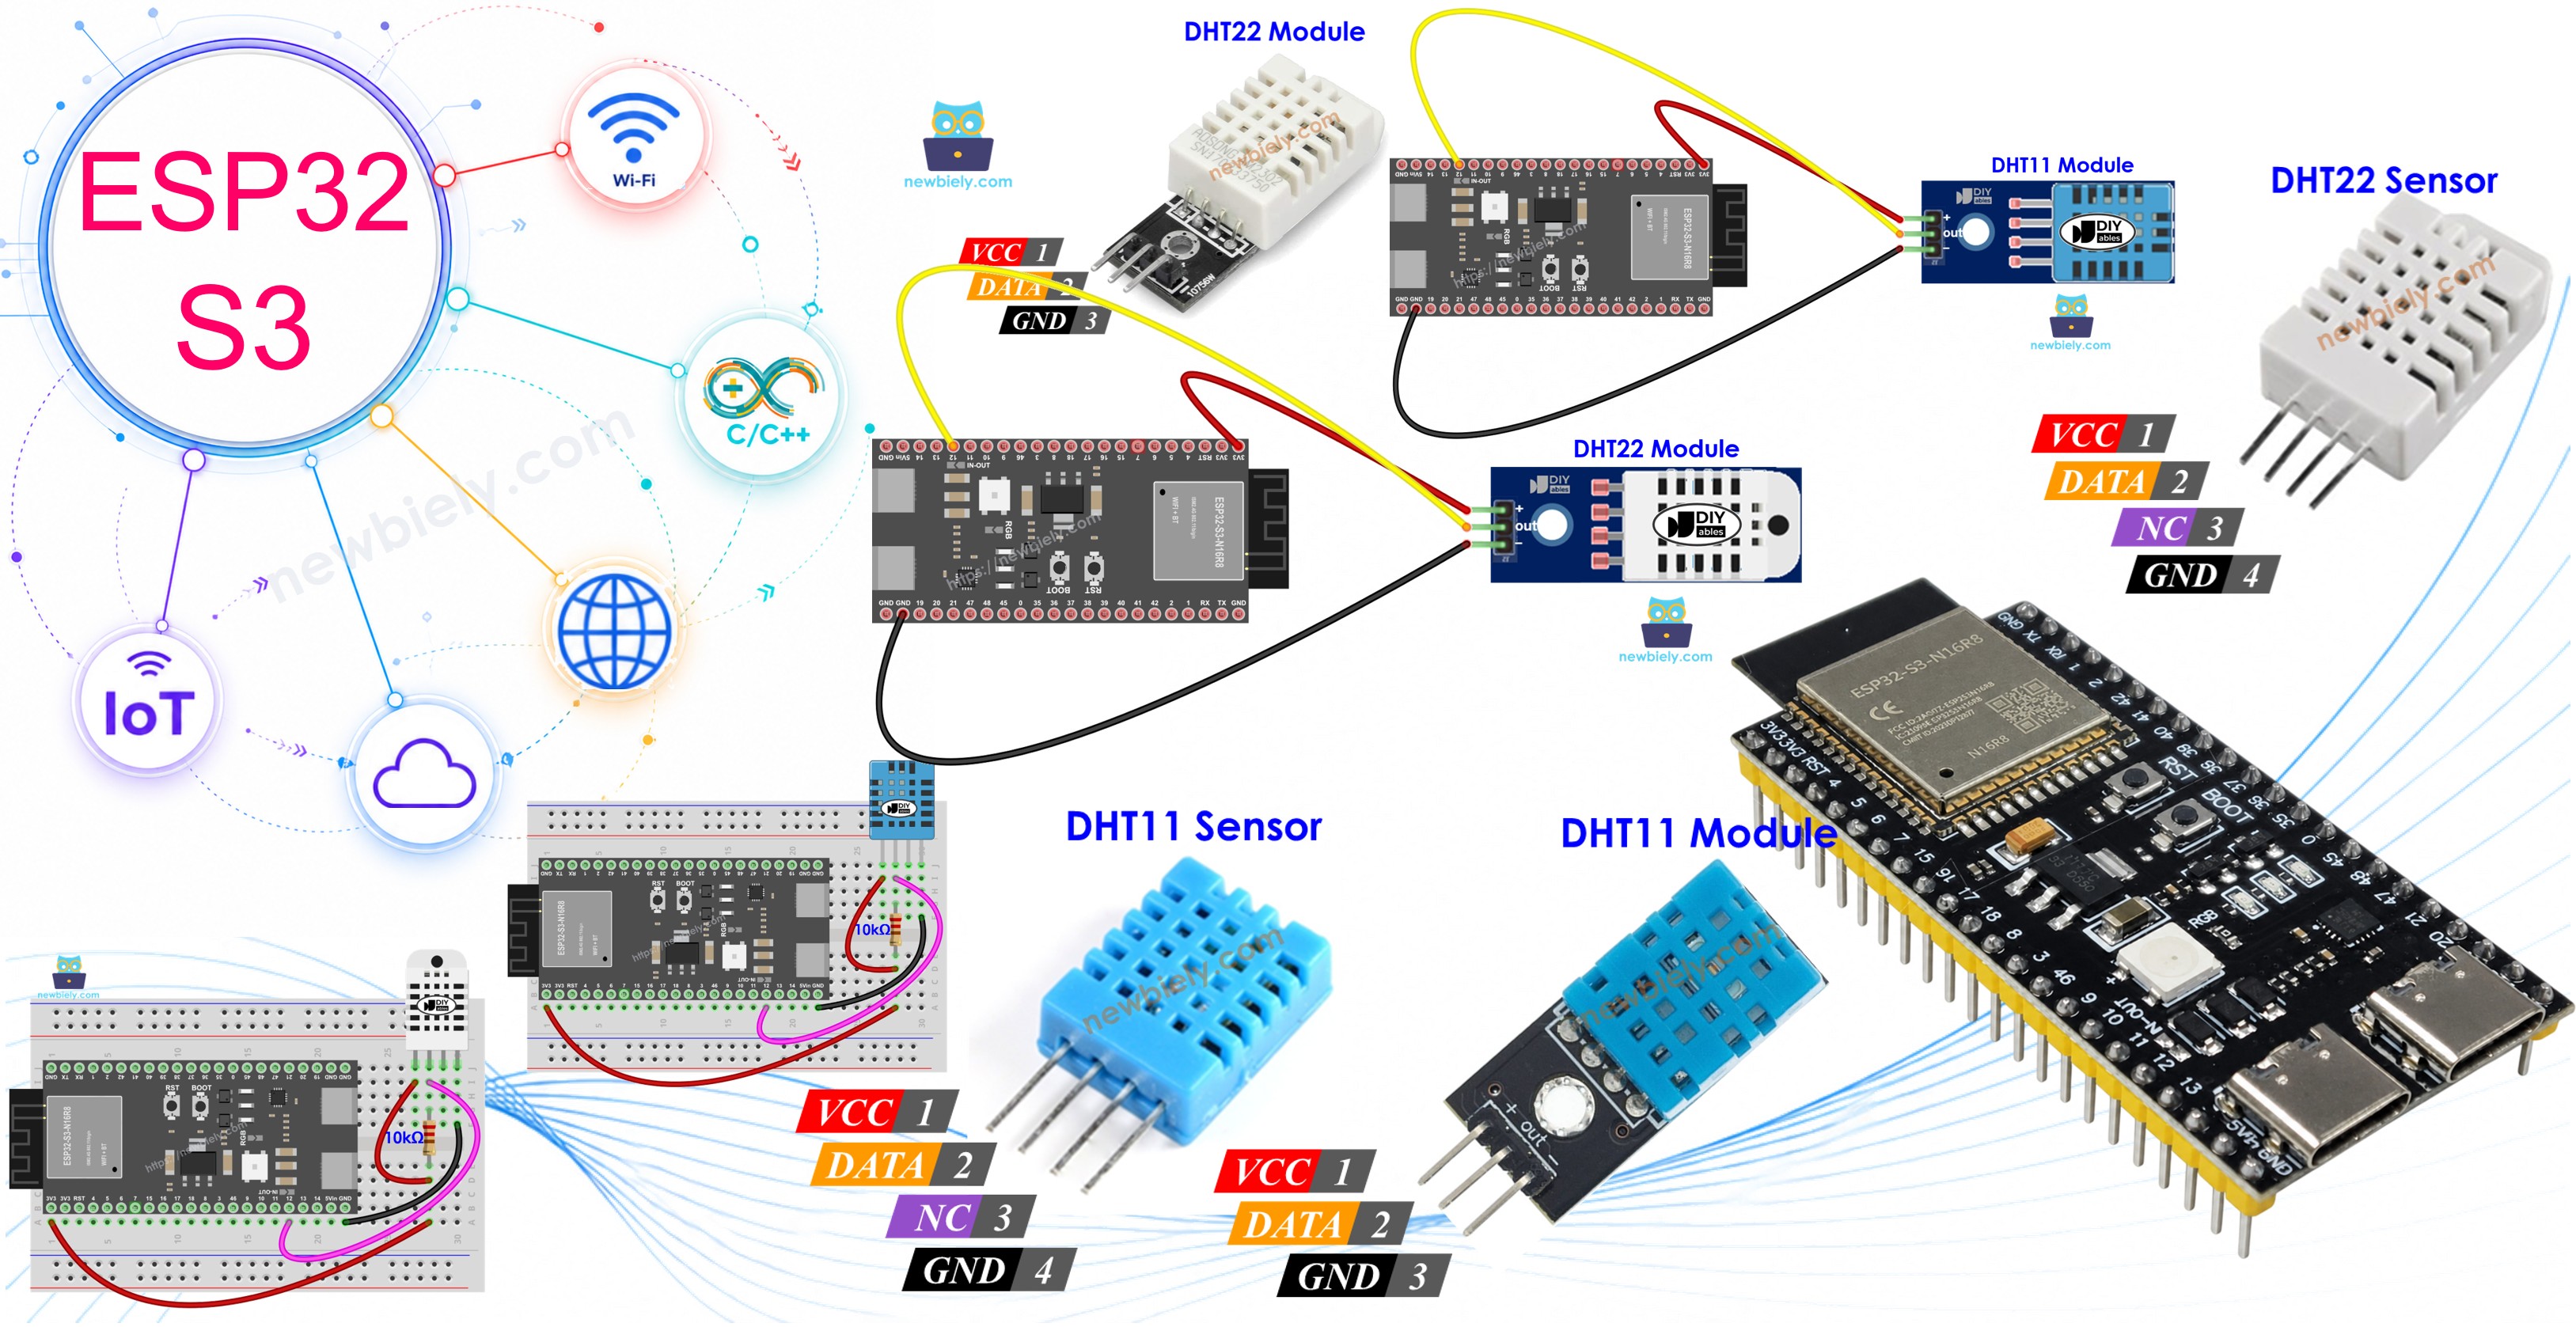
This tutorial shows you how to connect DHT11 or DHT22 temperature and humidity sensors to your ESP32 S3 and read environmental data in real-time. Whether you're building a weather station or a home automation project, the DHT sensors pair seamlessly with the ESP32 S3's digital I/O capabilities.
What you'll build:
- A circuit connecting a DHT11 or DHT22 sensor to the ESP32 S3
- Arduino sketch that reads temperature and humidity values from the sensor
- Serial Monitor output displaying live temperature in both Celsius and Fahrenheit
- A foundation for real-world projects such as smart greenhouses and climate monitors
Hardware Preparation
Or you can buy the following kits:
| 1 | × | DIYables ESP32 S3 Starter Kit (ESP32 S3 included) | |
| 1 | × | DIYables Sensor Kit (18 sensors/displays) |
Additionally, some of these links are for products from our own brand, DIYables .
Overview of DHT11 and DHT22 Temperature and Humidity Sensor
DHT11 and DHT22 are digital temperature and humidity sensors that deliver calibrated output over a single data wire, making them straightforward to integrate with the ESP32 S3. Both sensors are widely used in maker projects because they require no analog circuitry and are supported by a well-maintained Arduino library. While they share the same pinout and communication protocol, the DHT22 offers greater accuracy and a wider measurement range, whereas the DHT11 is the more budget-friendly option for basic applications.
Key Specifications
The table below compares the two sensors side by side:
| DHT22 | DHT11 | |
|---|---|---|
| The price | low cost | ultra low cost |
| The humidity range | 0% to 100% | 20% to 80% |
| The humidity accuracy | ± 2% to 5% | 5% |
| The temperature range | -40°C to 80°C | 0°C to 50°C |
| The temperature accuracy | ± 0.5°C | ± 2°C |
| The reading rate | 0.5Hz (one time per 2 seconds) | 1Hz (one time per second) |
| Dimension | 15.1mm x 25mm x 7.7mm | 15.5mm x 12mm x 5.5mm |
| Operating Voltage | 3 to 5V | 3 to 5V |
The DHT22 is the better choice when precision matters, while the DHT11 is a cost-effective solution for non-critical environmental sensing. Both sensors operate at 3.3V, which is native to the ESP32 S3 — no level shifter needed.
The Commons Between DHT11 and DHT22
- Identical 4-pin pinout configuration
- Same wiring connections to ESP32 S3
- Compatible code with minimal changes
- Both use single-wire digital communication
- Low power consumption ideal for battery projects
DHT11 and DHT22 Pinout
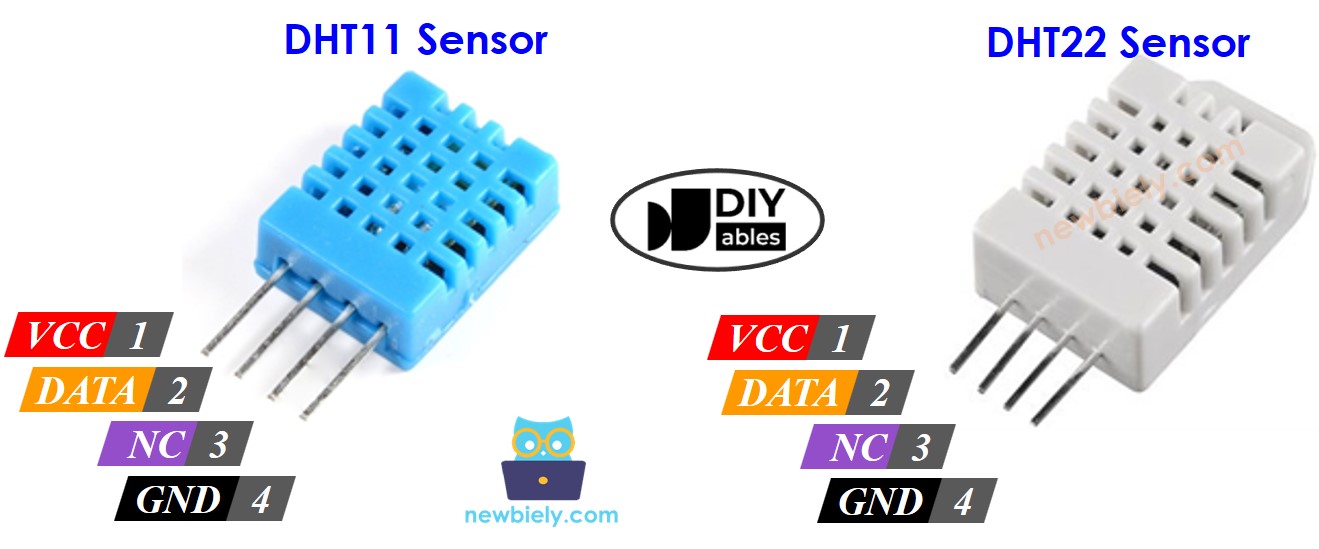
Both DHT11 and DHT22 temperature humidity sensors share the same 4-pin configuration. The pin roles from left to right are as follows:
- VCC pin: Connect to power supply (3.3V or 5V)
- DATA pin: Digital signal pin for communication with ESP32 S3
- NC pin: Not connected (leave unconnected)
- GND pin: Connect to ground (0V)
Module Version (Recommended)
We highly recommend using DHT11 and DHT22 sensor modules for easier wiring. Sensor modules include a built-in pull-up resistor, so no external resistor is needed. The module exposes only three pins — VCC, GND, and DATA (sometimes labelled +, −, and OUT) — which makes breadboard assembly much quicker and less error-prone.
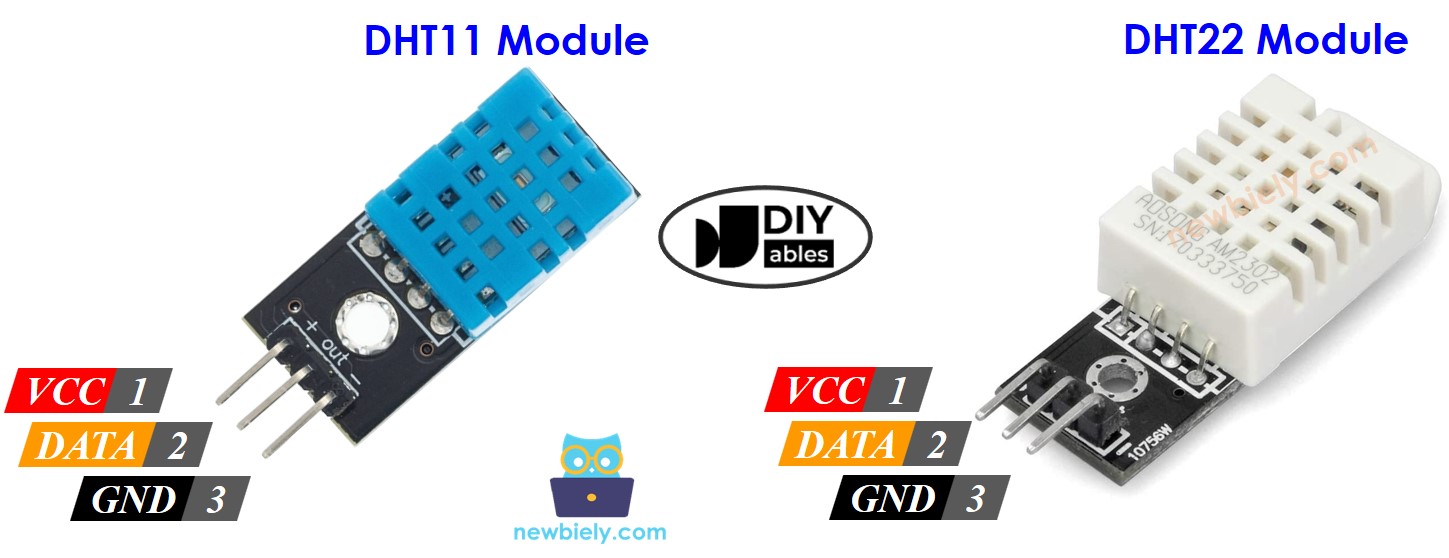
Note: Pin order may vary between manufacturers — always check the labels printed on your module before connecting power.
Wiring Diagram between DHT11/DHT22 and ESP32 S3
The wiring connections are identical for both DHT11 and DHT22 sensors with the ESP32 S3, so you only need to learn one wiring pattern regardless of which sensor you choose. If you are using the bare 4-pin sensor (not a module), place a 10 kΩ pull-up resistor between the DATA line and the 3.3V rail to ensure reliable communication.
Safety Notes
Always power the sensor from the ESP32 S3's 3.3V pin rather than 5V — both DHT11 and DHT22 are compatible with 3.3V and the ESP32 S3's GPIO pins are not 5V-tolerant. Keep the DATA wire as short as practical to avoid signal integrity issues, and never hot-swap the sensor while the board is powered.
ESP32 S3 - DHT11 Sensor Wiring
| DHT11 Pin | ESP32 S3 Pin |
|---|---|
| VCC | 3.3V |
| GND | GND |
| DATA | GPIO12 (or any digital pin) |
| NC | Not connected |
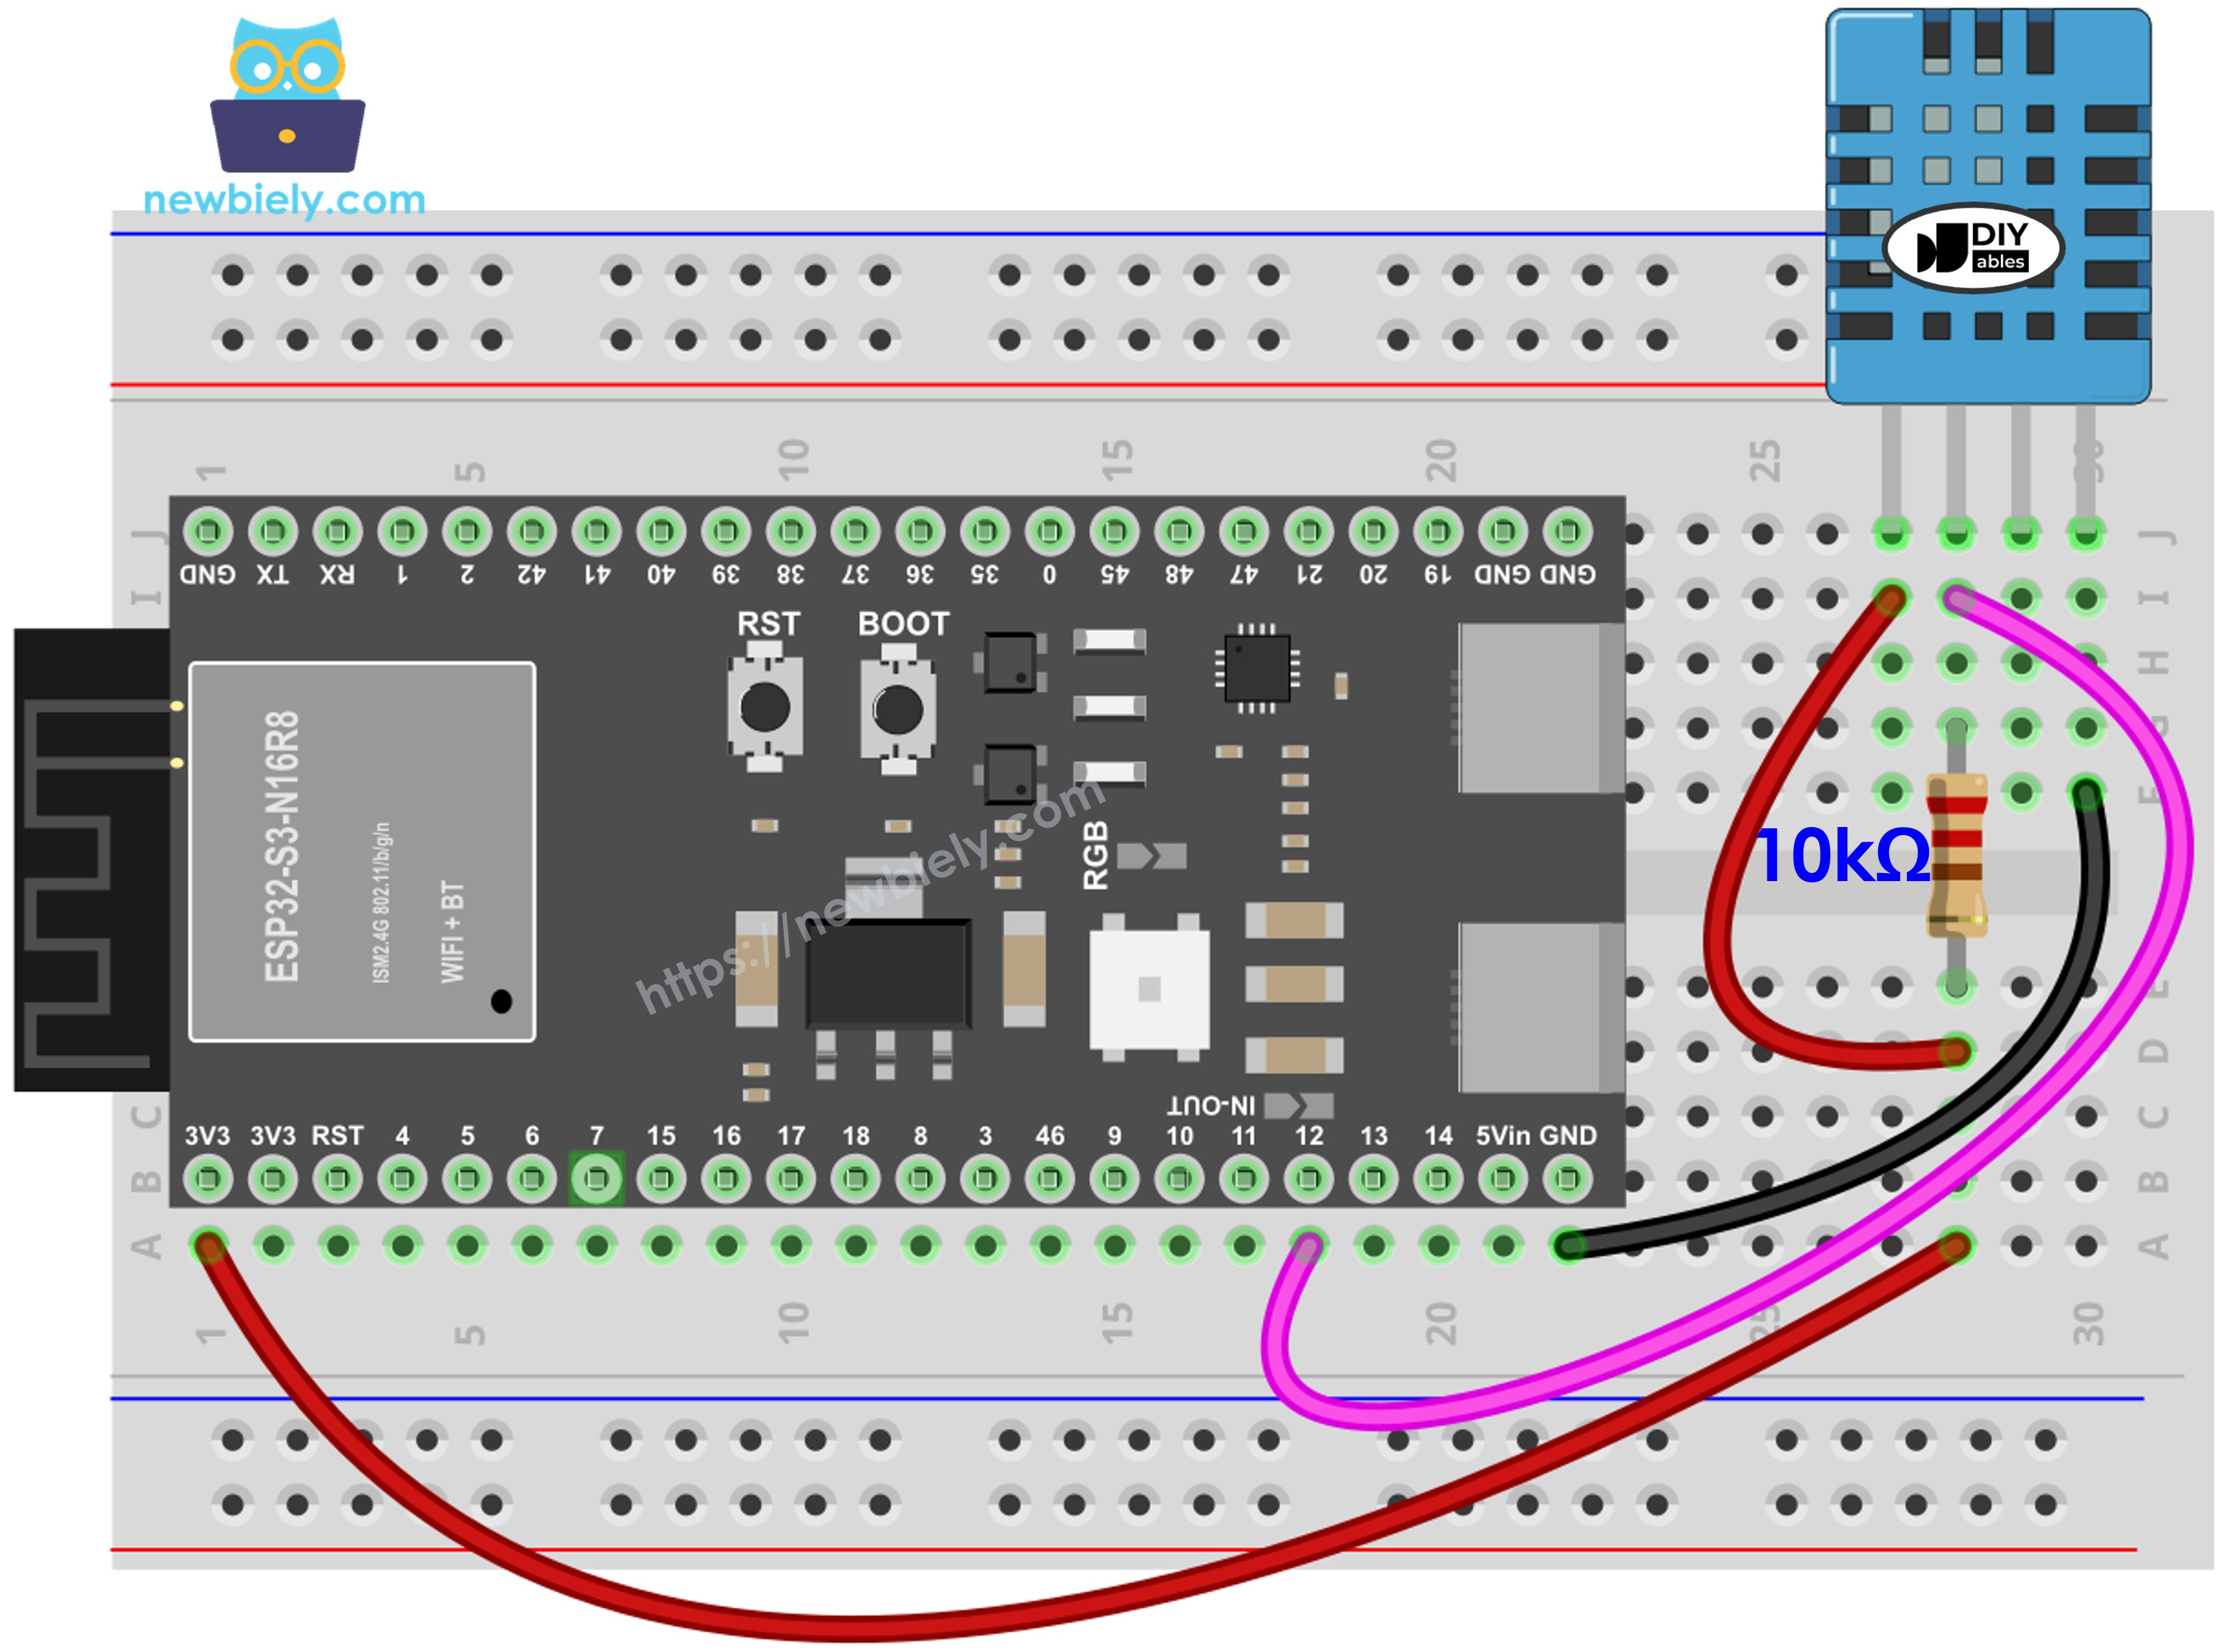
This image is created using Fritzing. Click to enlarge image
ESP32 S3 - DHT22 Sensor Wiring
| DHT22 Pin | ESP32 S3 Pin |
|---|---|
| VCC | 3.3V |
| GND | GND |
| DATA | GPIO12 (or any digital pin) |
| NC | Not connected |
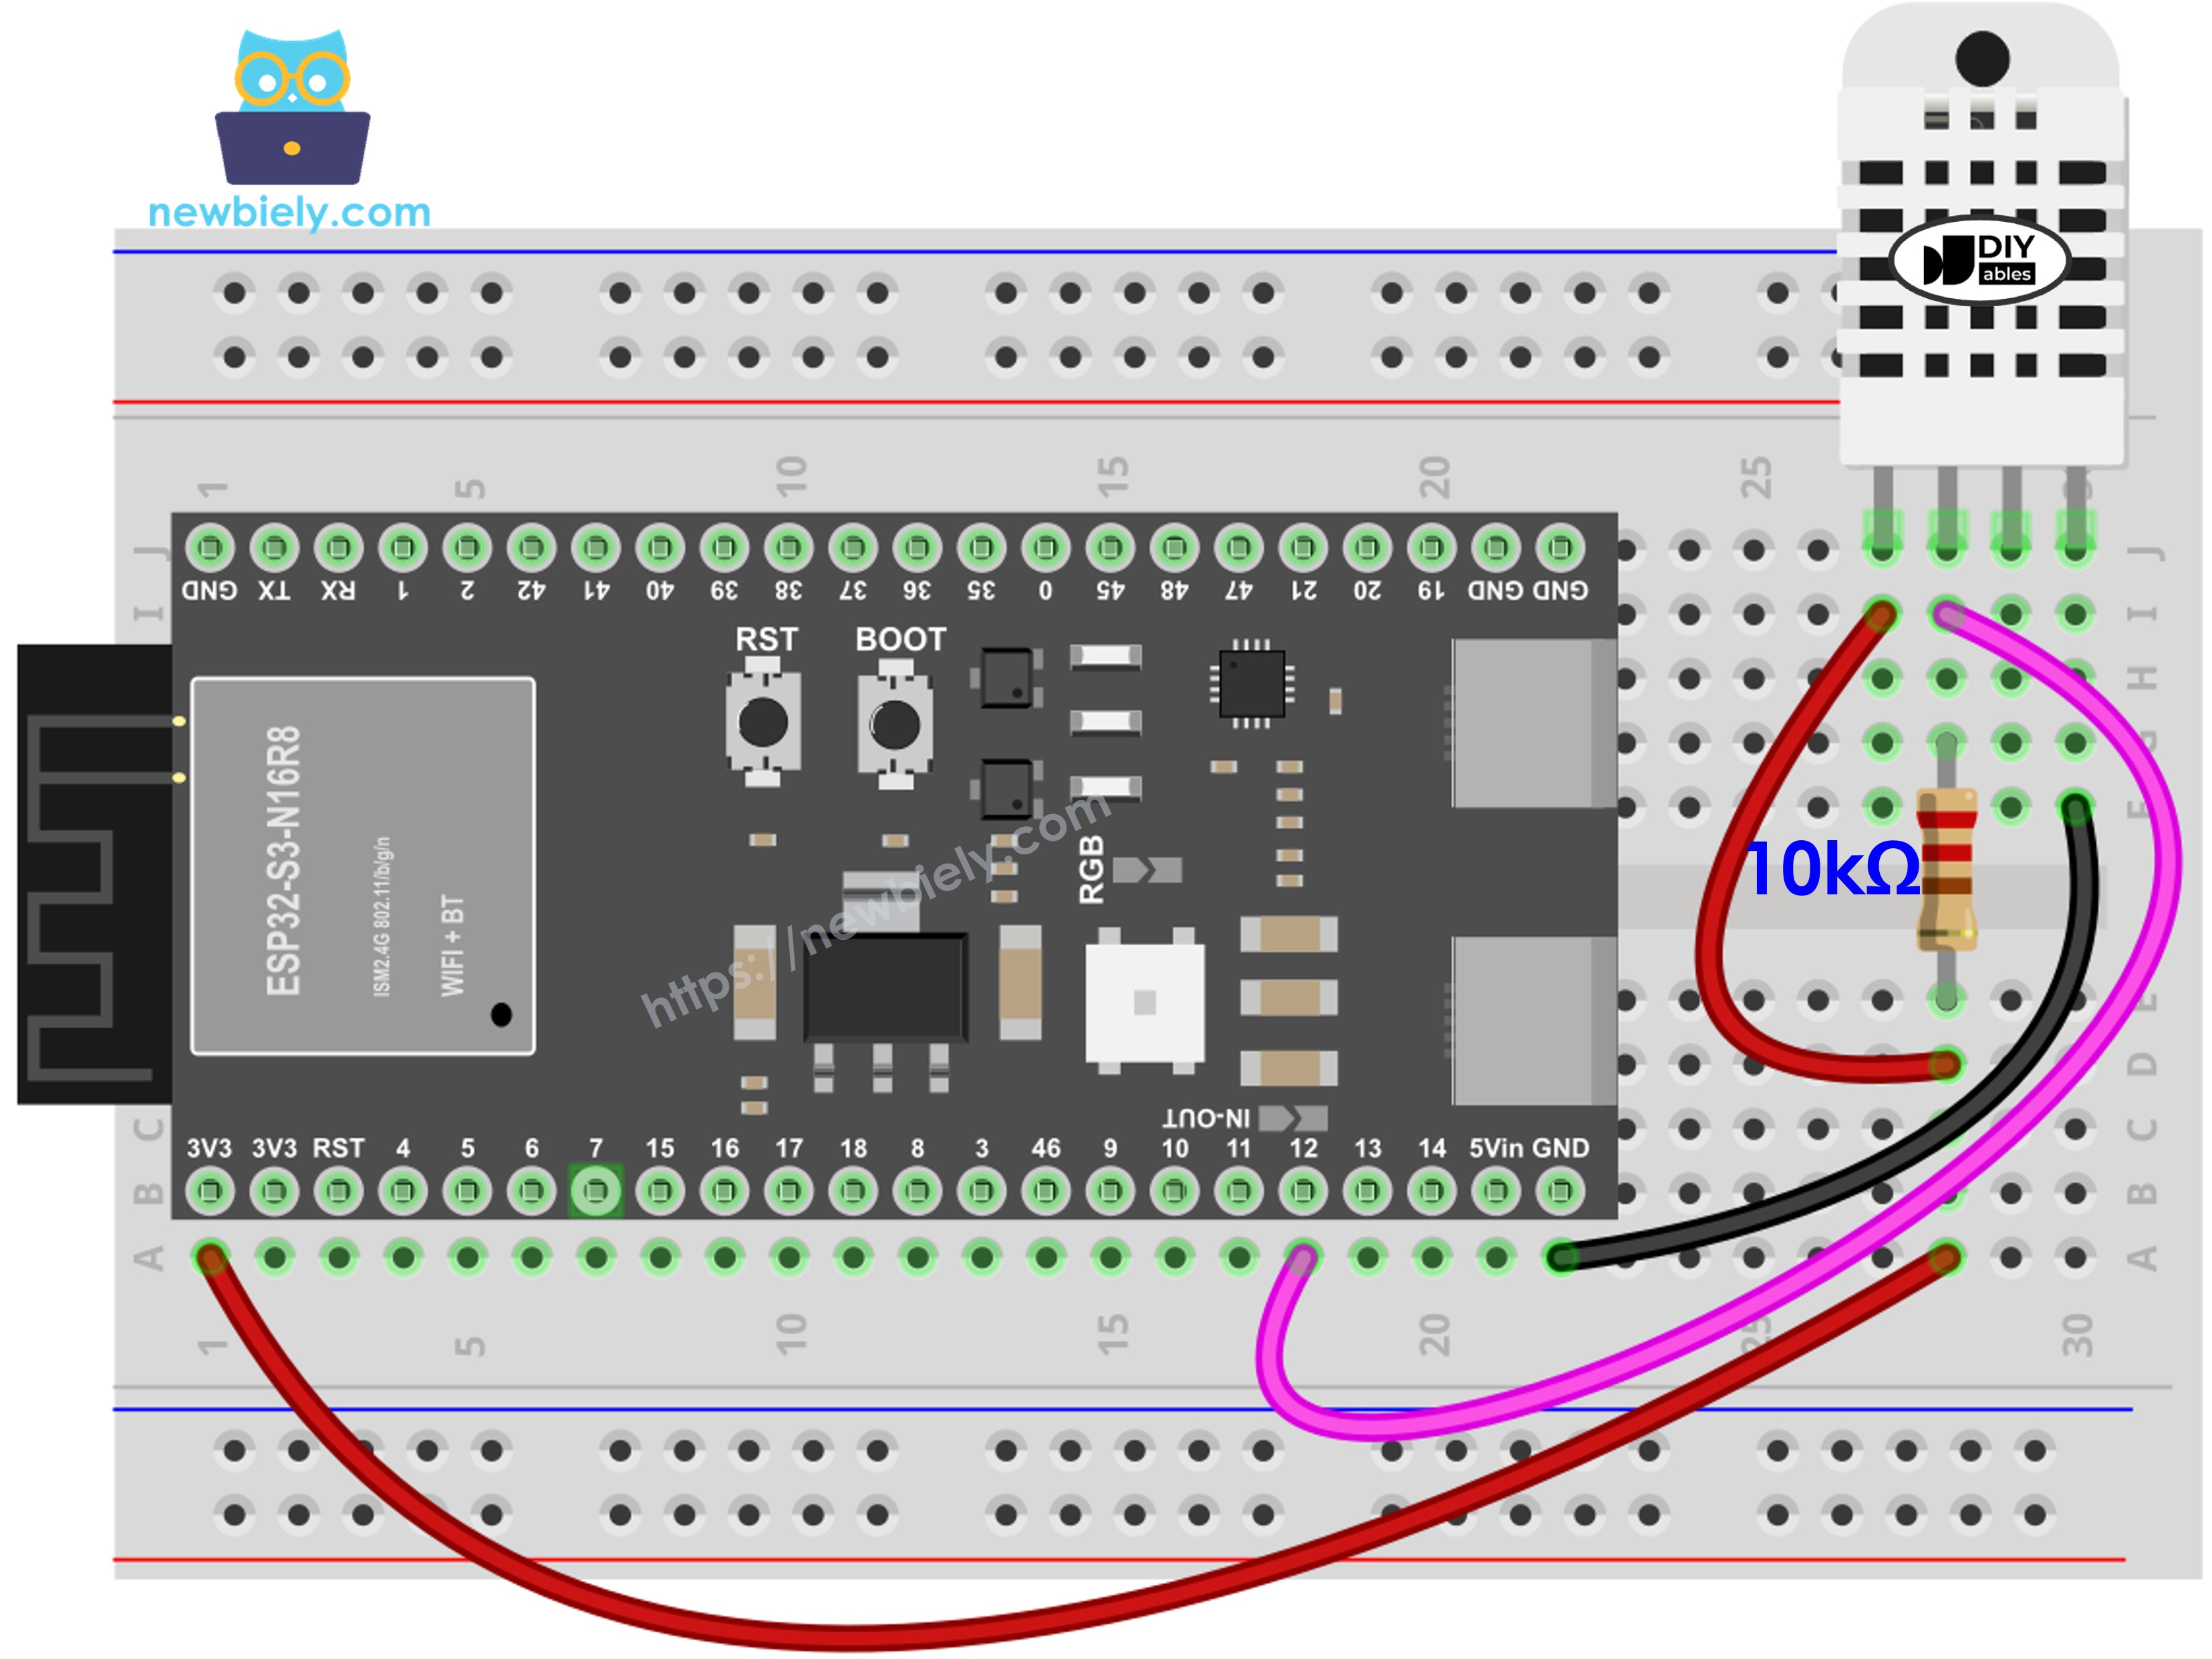
This image is created using Fritzing. Click to enlarge image
ESP32 S3 - DHT11 Module Wiring
Most DHT11 sensor modules include a built-in resistor, simplifying your wiring setup:
| DHT11 Module Pin | ESP32 S3 Pin |
|---|---|
| + (or VCC) | 3.3V |
| * (or GND) | GND |
| OUT (or DATA) | GPIO12 |
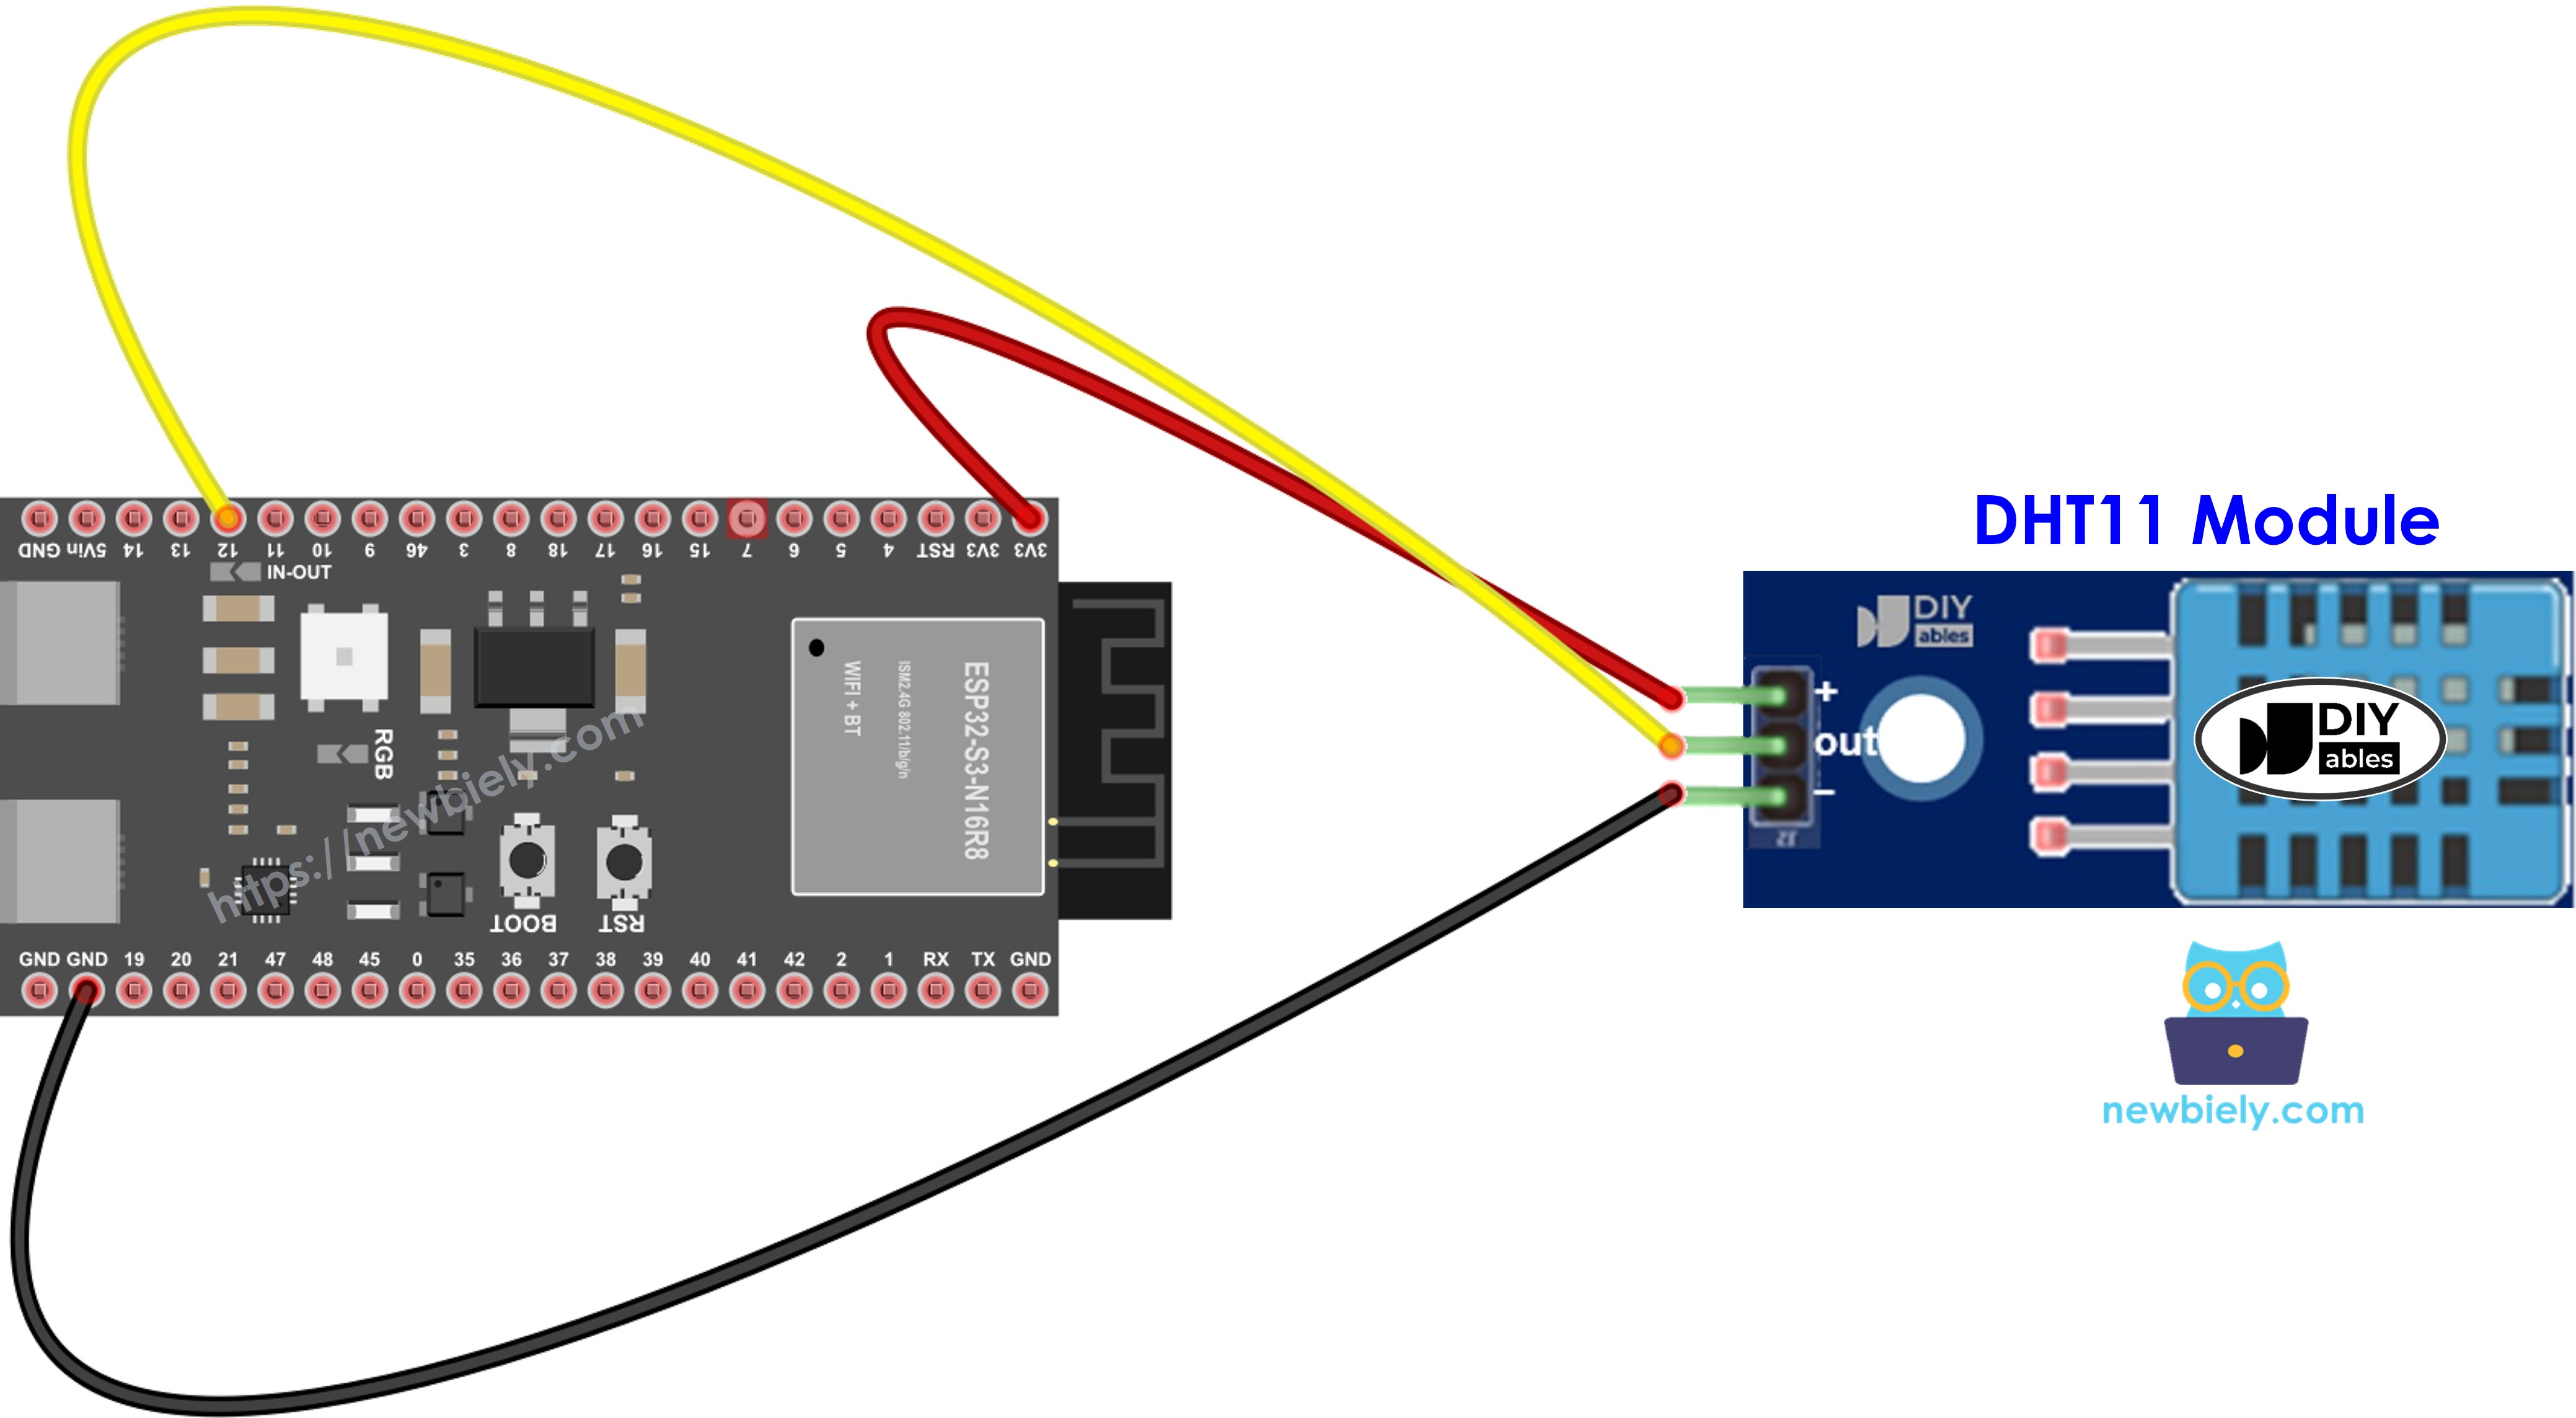
This image is created using Fritzing. Click to enlarge image
ESP32 S3 - DHT22 Module Wiring
Most DHT22 sensor modules include a built-in resistor, eliminating the need for external components:
| DHT22 Module Pin | ESP32 S3 Pin |
|---|---|
| + (or VCC) | 3.3V |
| * (or GND) | GND |
| OUT (or DATA) | GPIO12 |
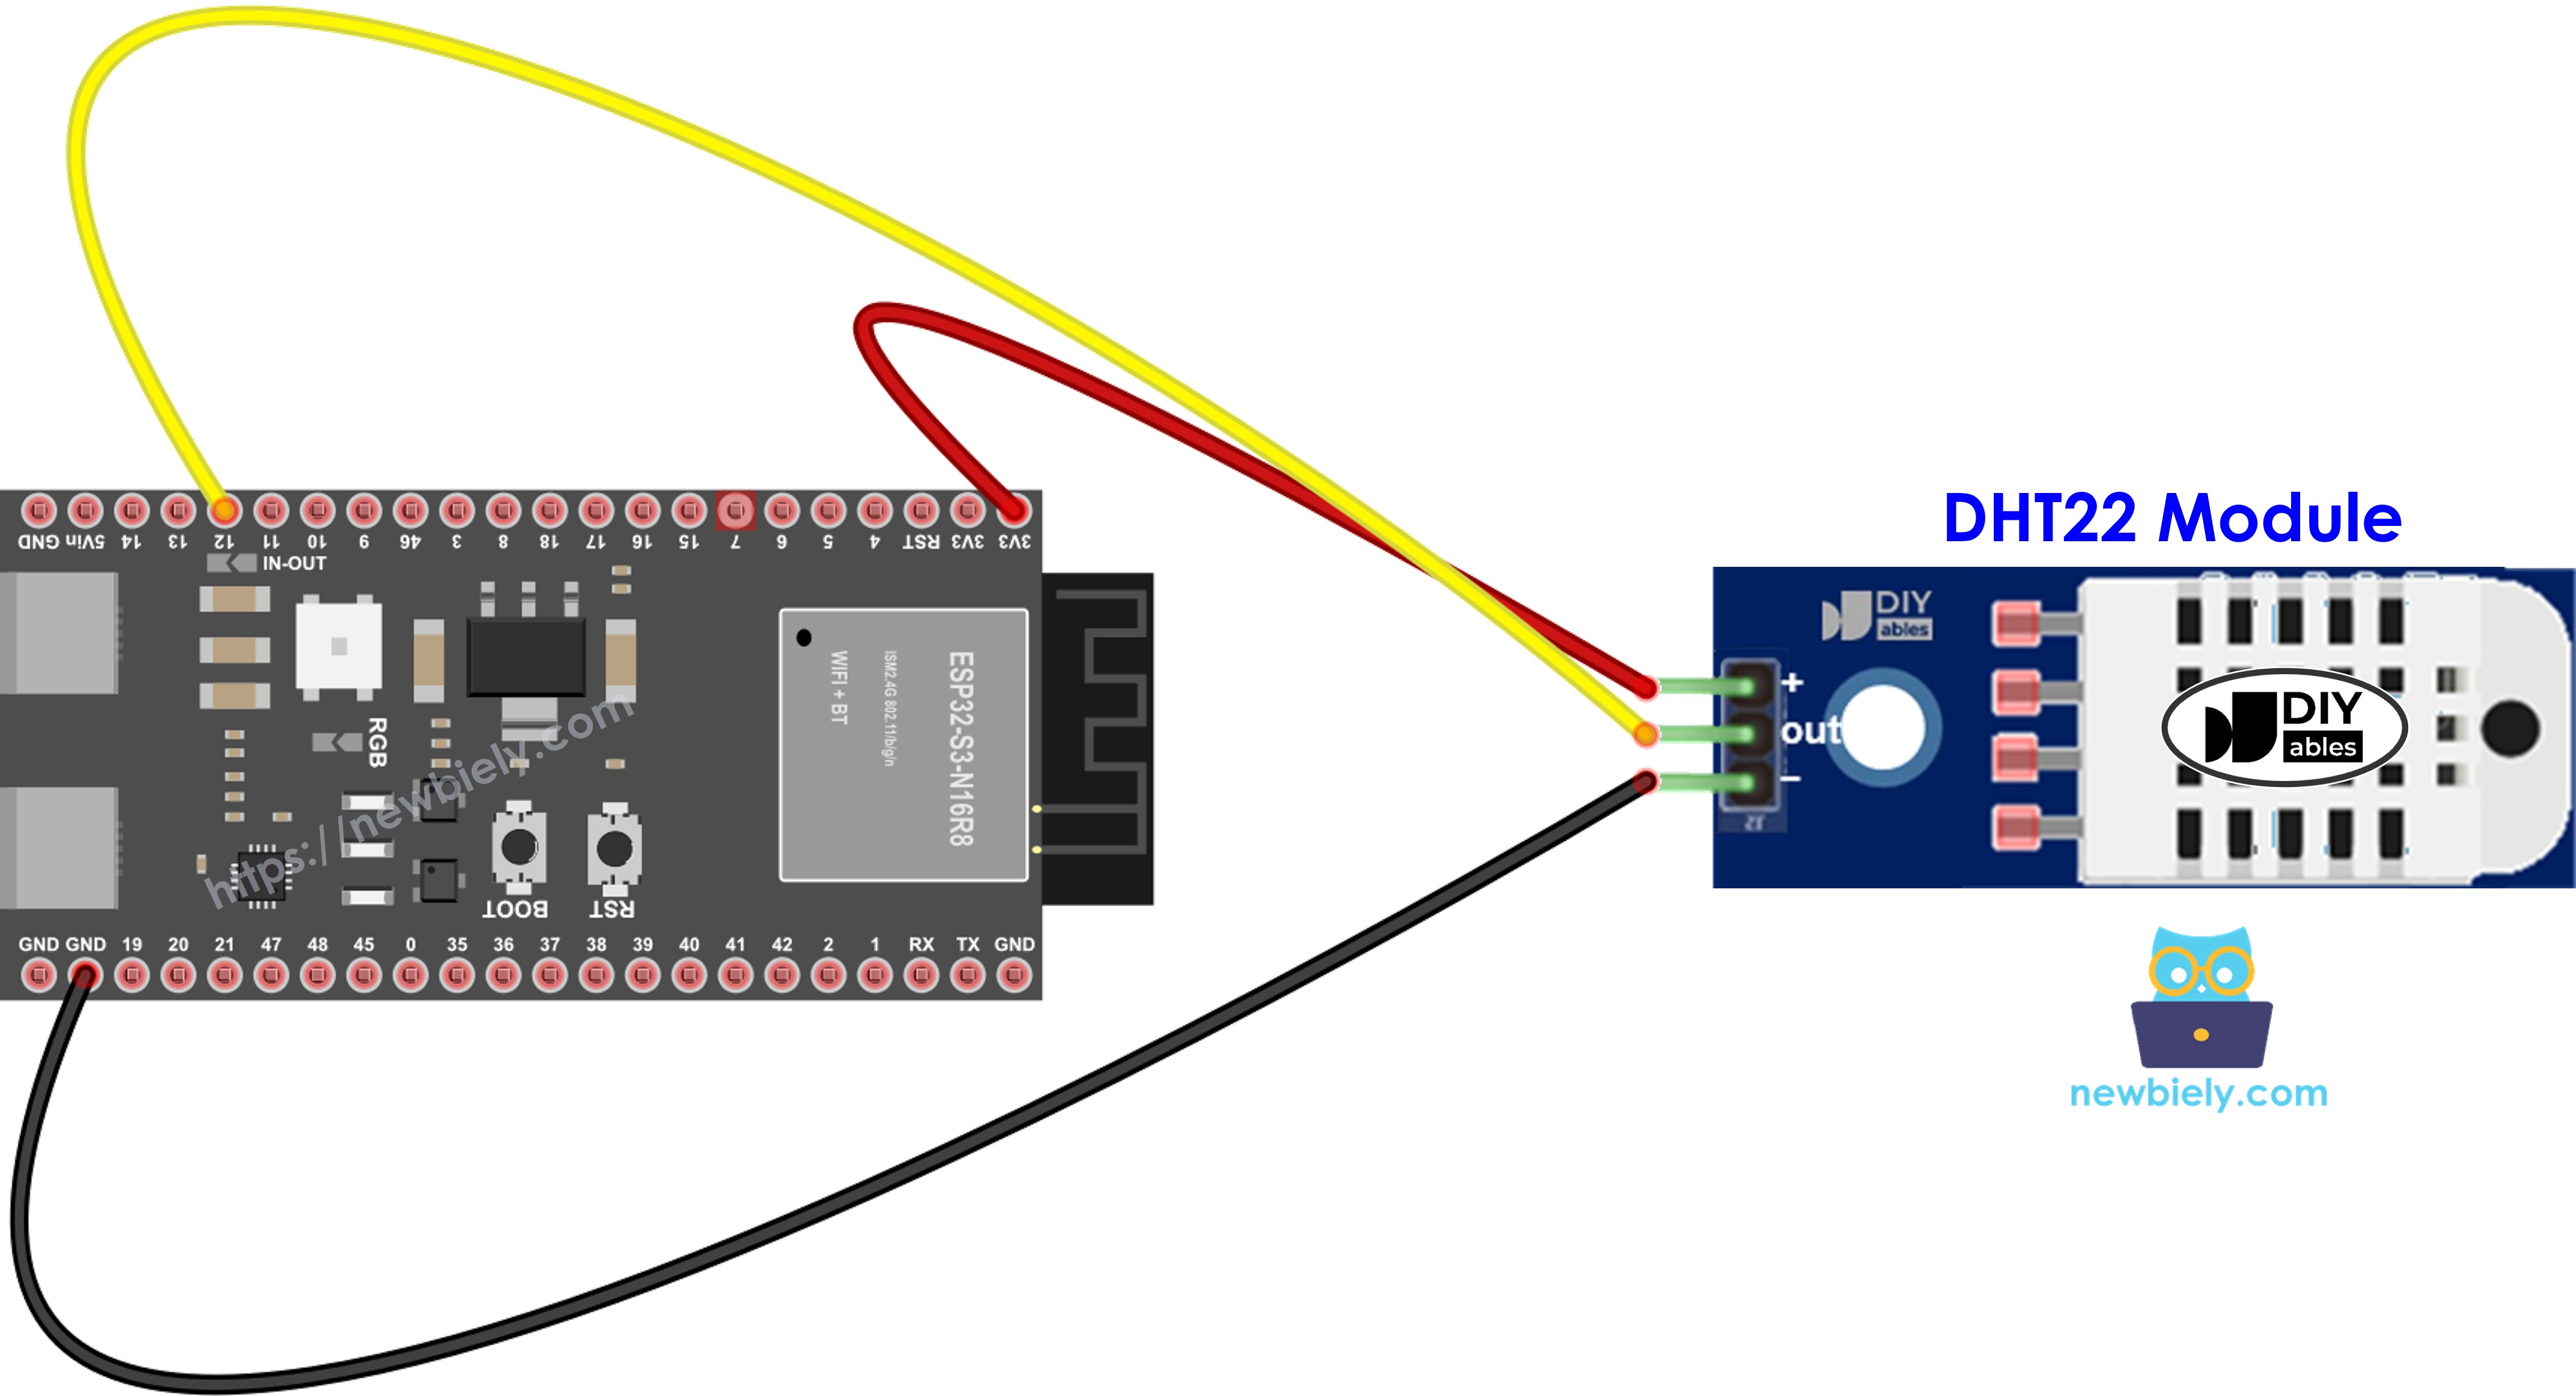
This image is created using Fritzing. Click to enlarge image
ESP32 S3 Code - DHT11
The following code reads temperature and humidity from the DHT11 sensor and prints both values to the Serial Monitor every two seconds. It initialises the Adafruit DHT library with the sensor type set to DHT11 and the data pin assigned to GPIO12, then formats each reading as a human-readable line showing humidity percentage alongside temperature in both Celsius and Fahrenheit.
ESP32 S3 Code - DHT22
The following code reads temperature and humidity from the DHT22 sensor with improved accuracy compared to the DHT11. Only the sensor type constant differs from the DHT11 sketch — the wiring, library calls, and output format are identical, making it easy to switch between sensors.
Important: The two code examples above differ by only one line — the sensor type definition (DHT11 vs DHT22).
Detailed Instructions
- New to ESP32 S3? Complete our Getting Started with ESP32 S3 guide first.
- Wire the components: Follow the wiring diagram above to connect your DHT sensor to the ESP32 S3.
- Connect USB cable: Plug your ESP32 S3 into your computer using a Type-C cable.
- Open Arduino IDE: Launch the Arduino IDE software on your computer.
- Select board: Choose ESP32 S3 from the board menu.
- Select COM port: Choose the correct COM port for your ESP32 S3.
- Install DHT library: Click the Library Manager icon in the left sidebar.
- Search for library: Type "Adafruit DHT" in the search box.
- Install Adafruit DHT: Click Install on the DHT sensor library by Adafruit.
- Search for DHT sensor library created by Adafruit and click the Install button.
- Install dependencies: When prompted, click Install All to add required dependencies.
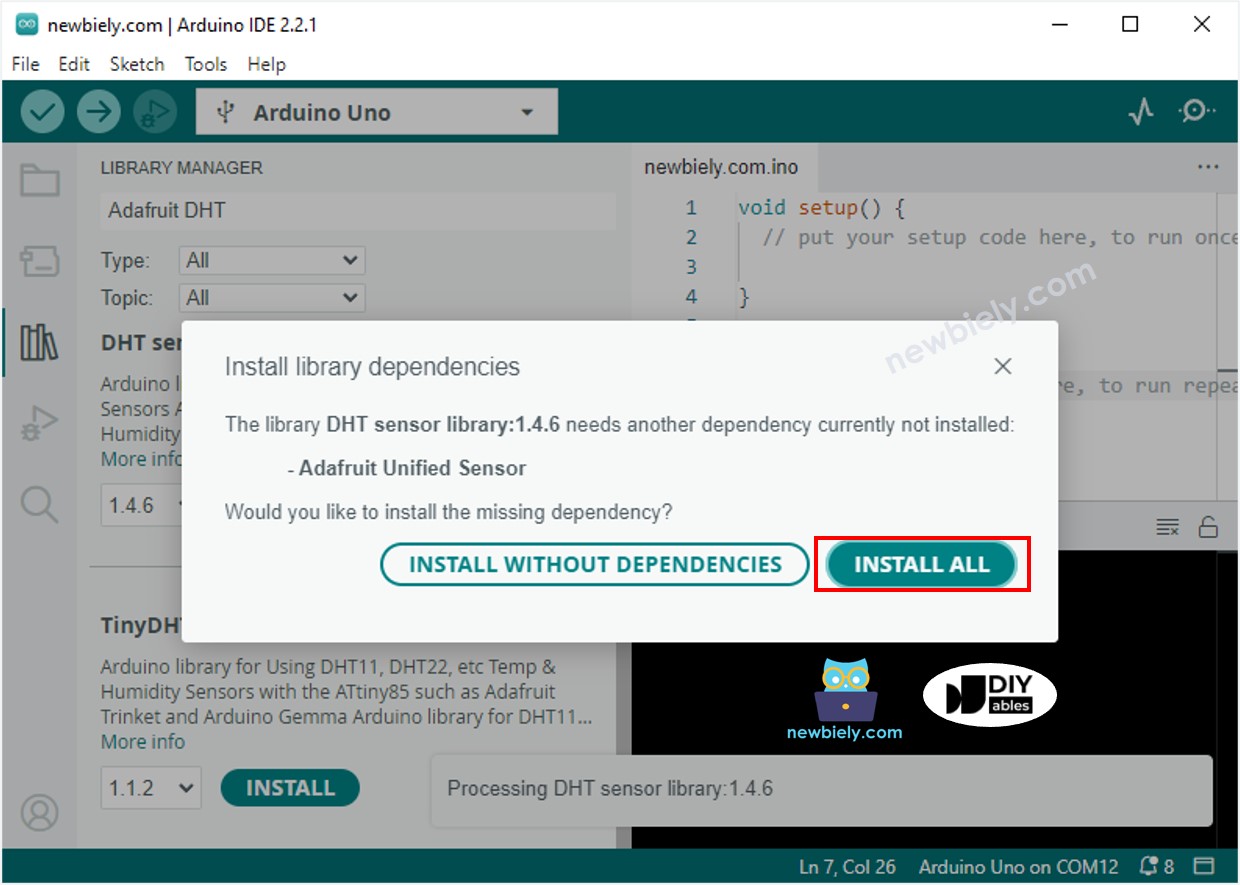
- Copy the code: Select either the DHT11 or DHT22 code based on your sensor.
- Upload code: Click the Upload button to program your ESP32 S3.
- Open Serial Monitor: Set baud rate to 115200 to view sensor readings.
- Test the sensor: Place the sensor near a heat source (like a coffee cup) to see values change.
- Pro Tip: Wait 2–3 seconds between readings for stable measurements — DHT sensors need a brief settling period after each sample, and polling them too quickly can return stale or invalid data.
Serial Monitor Output
After uploading the code, open the Serial Monitor at 115200 baud to see real-time temperature and humidity readings. The output below shows typical values measured in a room environment on 2026-06-16:
Application and Project Ideas
The DHT11 and DHT22 sensors open the door to a wide range of practical ESP32 S3 projects, from simple data displays to fully automated environmental control systems.
- Home weather station: Monitor indoor temperature and humidity on a display.
- Smart greenhouse controller: Automate watering and ventilation based on humidity levels.
- Bathroom exhaust fan automation: Turn on a fan automatically when humidity exceeds a set threshold.
- Server room monitor: Send an alert when temperature rises above safe operating levels.
- Smart thermostat: Build a WiFi-enabled temperature controller for home automation.
- Data logger: Record environmental data to an SD card for long-term analysis.
- Comfort index calculator: Derive heat index or dew point values from the sensor readings.
Video Tutorial
Watch the step-by-step video walkthrough for this ESP32 S3 project below.
Challenge Yourself
Once you have the basic sensor readings working, there are many ways to extend the project and deepen your understanding of the ESP32 S3 platform.
- Beginner: Add an LED that lights up when temperature exceeds 25°C.
- Beginner: Display temperature in Celsius only, or add a button to toggle between Celsius and Fahrenheit.
- Intermediate: Add a buzzer alarm that sounds when humidity drops below 30% or rises above 70%.
- Intermediate: Create a web server on the ESP32 S3 to display live sensor readings on a smartphone browser.
- Advanced: Log temperature and humidity data to an SD card with timestamps for trend analysis.
- Advanced: Send sensor data to a cloud platform such as ThingSpeak or Blynk for remote monitoring.
- Advanced: Build a complete climate control system that automatically drives a fan and humidifier based on real-time sensor readings.