
ESP32 S3 - MP3 Player
Building an MP3 player with the ESP32 S3 is a rewarding project that demonstrates how a microcontroller can control audio playback from a Micro SD Card. In this guide, you will learn how to connect a serial MP3 player module and speaker to the ESP32 S3, then program it to play, pause, and navigate between songs.
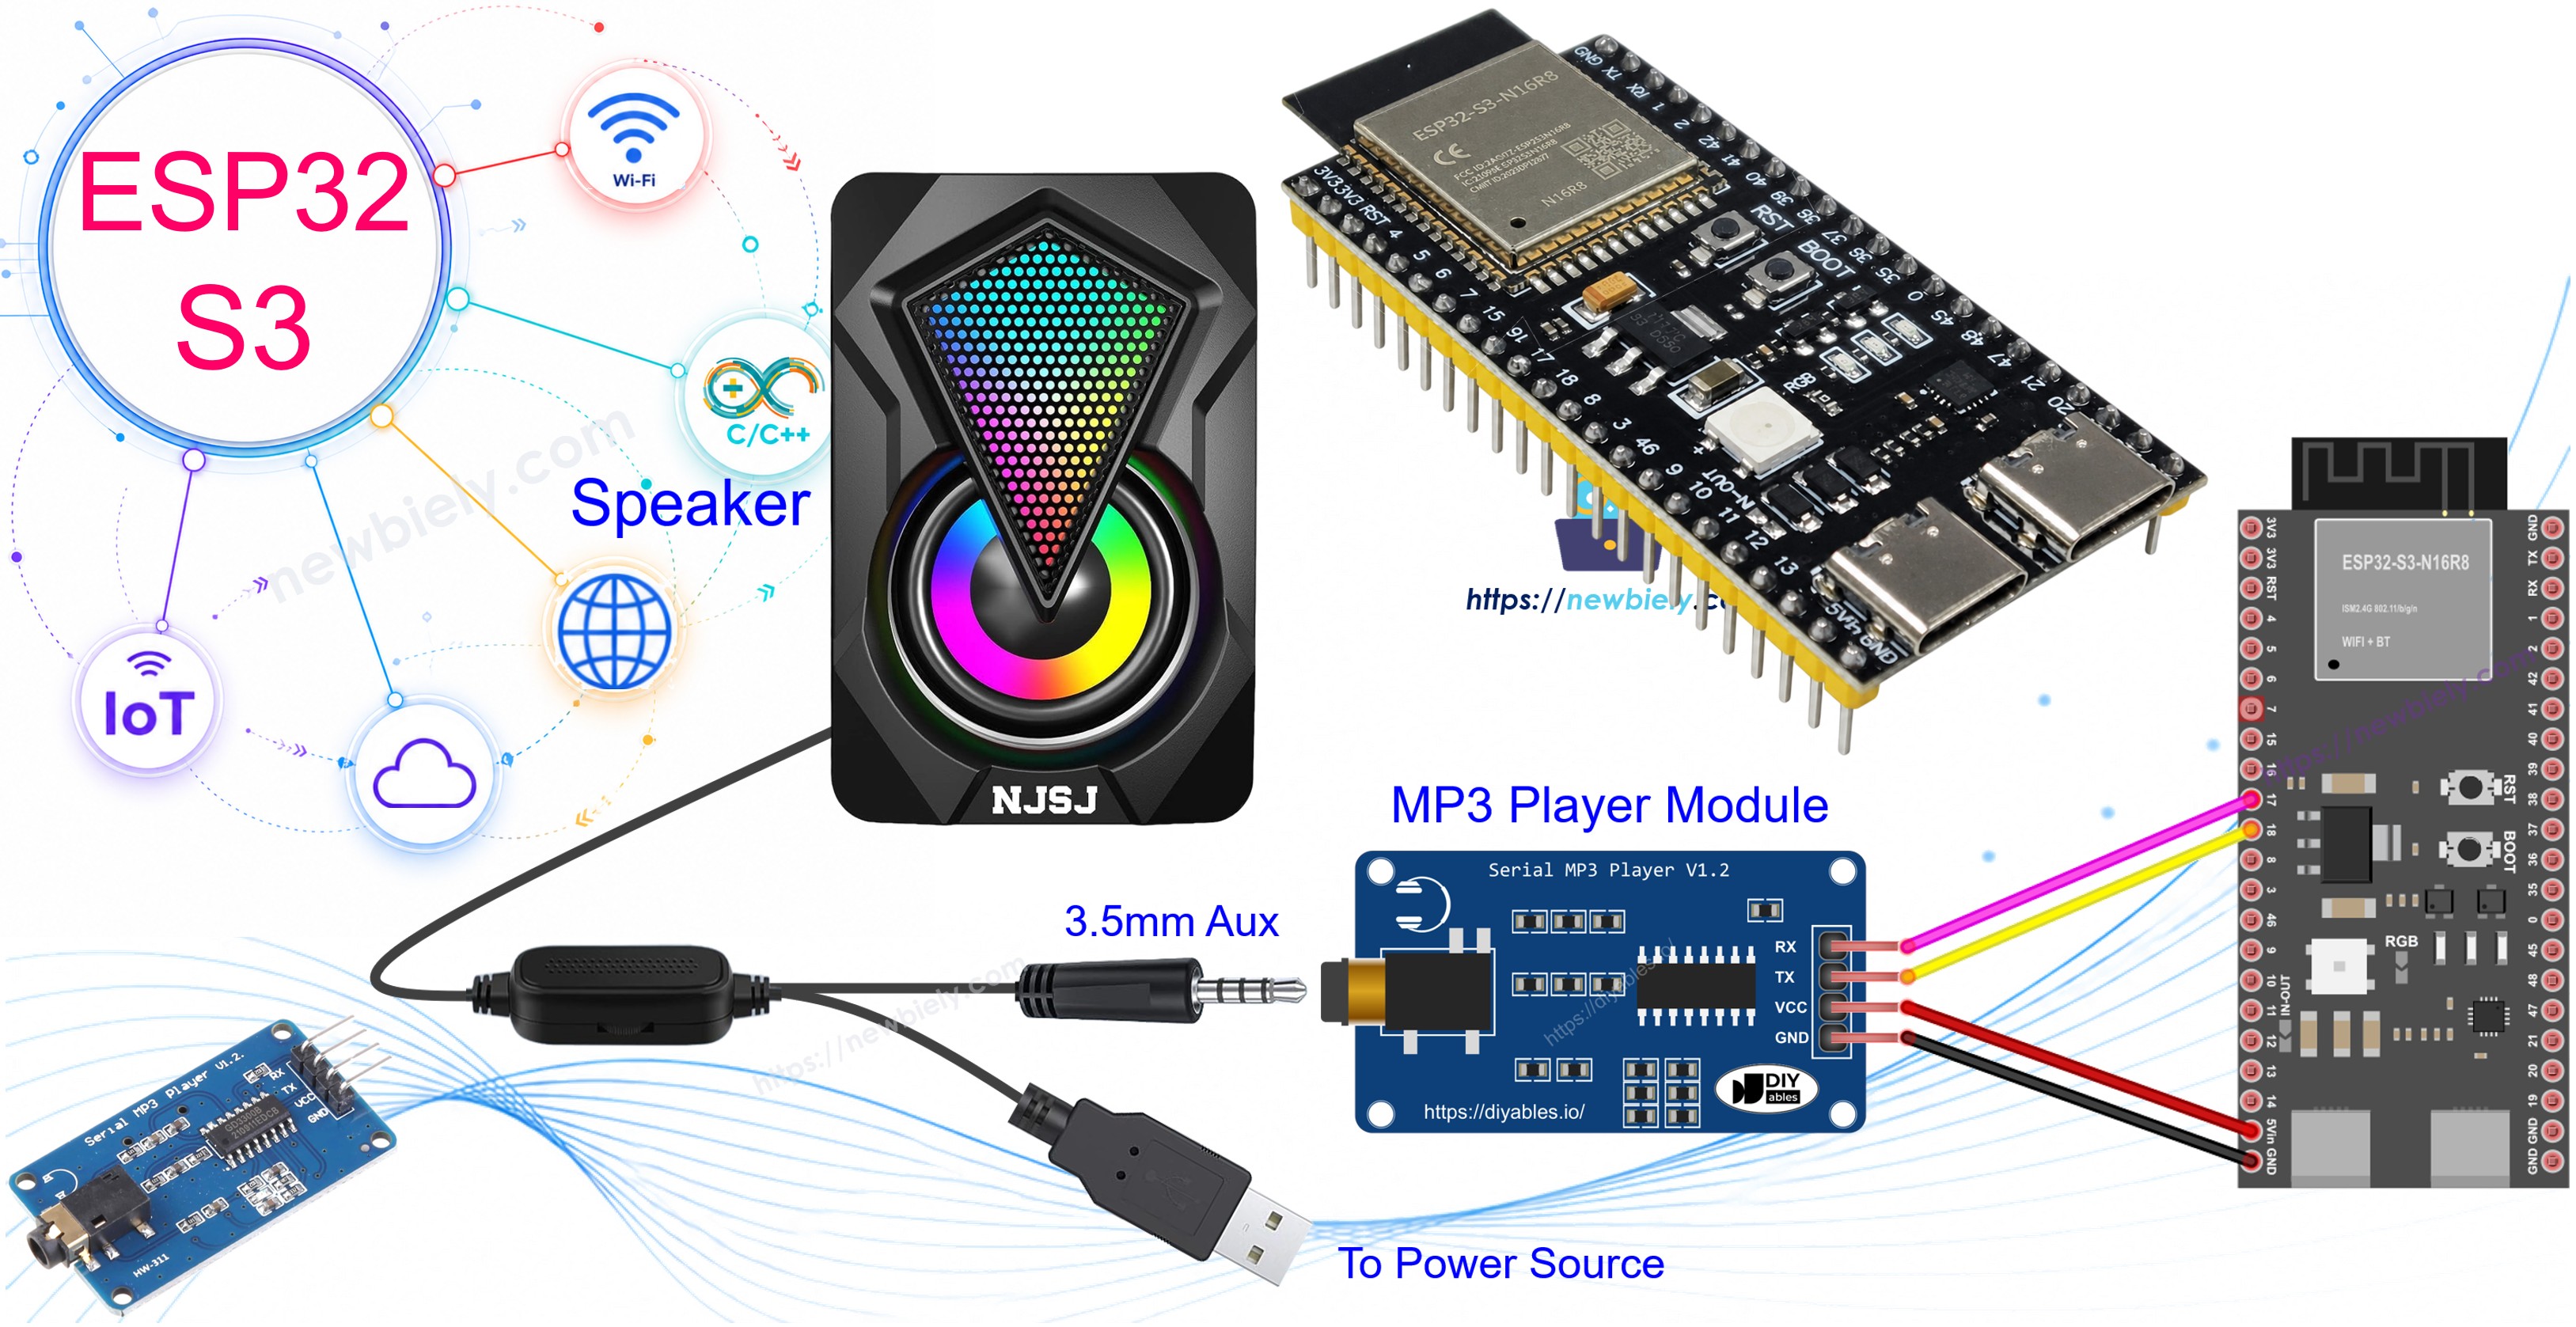
What you'll build:
- A working MP3 player that reads audio files from a Micro SD Card
- A system where the ESP32 S3 sends serial commands to the MP3 module
- Playback control using physical buttons (play, pause, next, previous)
- A foundation you can extend with volume control via potentiometer or rotary encoder
Hardware Preparation
Or you can buy the following kits:
| 1 | × | DIYables ESP32 S3 Starter Kit (ESP32 S3 included) | |
| 1 | × | DIYables Sensor Kit (18 sensors/displays) |
Additionally, some of these links are for products from our own brand, DIYables .
Overview of Serial MP3 Player Module and Speaker
The serial MP3 player module acts as a standalone audio decoder that accepts commands over a UART serial interface, reads MP3 files from a Micro SD Card, and outputs the decoded audio signal through a 3.5mm Aux jack. Pairing it with the ESP32 S3 allows full programmatic control of playback without needing any external audio library on the microcontroller itself.
Key Specifications
Serial MP3 Player Module Pinout
The module exposes three distinct interfaces for communication, audio output, and storage.
- RX pin: data input — connect to a TX pin on the ESP32 S3
- TX pin: data output — connect to a RX pin on the ESP32 S3
- VCC pin: power supply — connect to 3.3 V or 5 V
- GND pin: ground reference — connect to GND
- 3.5mm Aux jack: audio output — connects directly to the speaker
- Micro SD Card socket: located on the rear of the module — insert the card holding your MP3 files
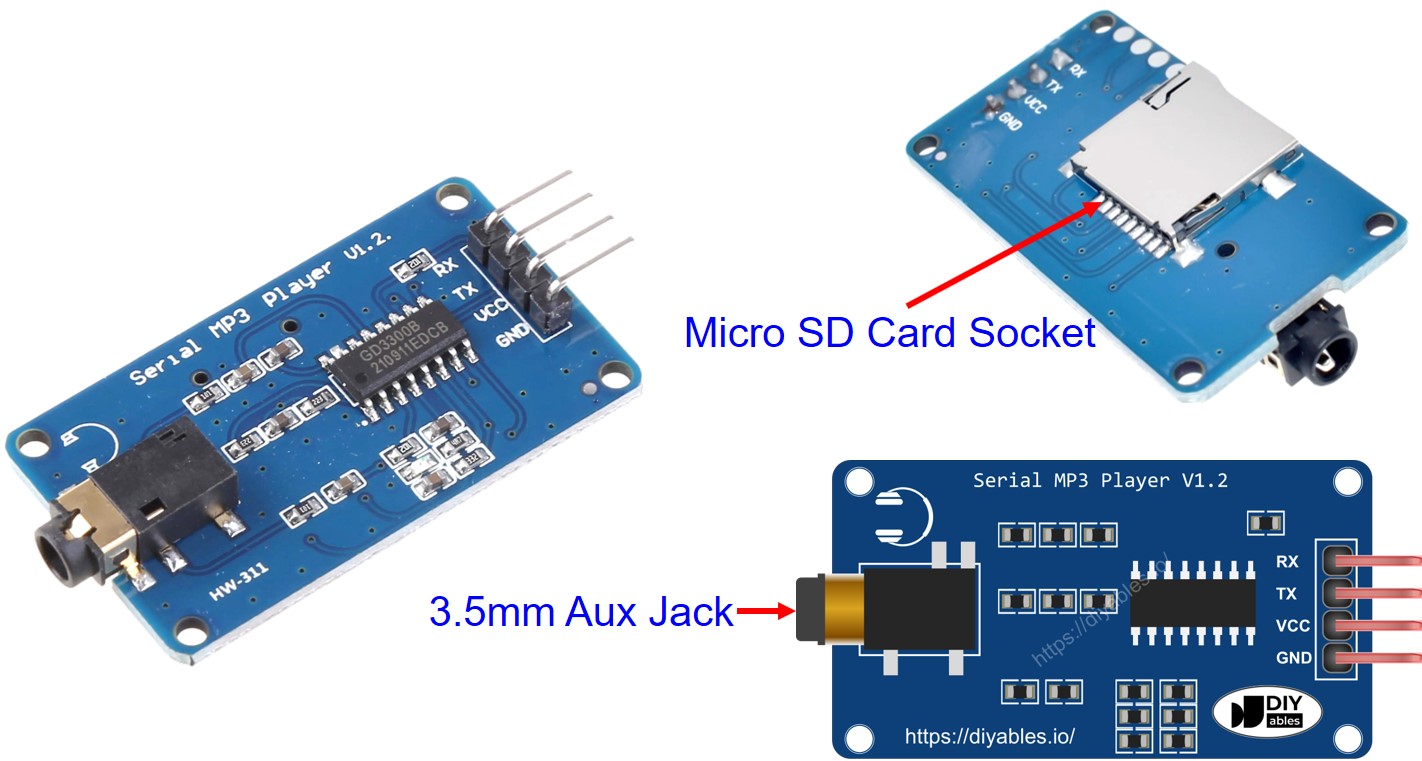
Speaker Pinout
A compatible speaker typically provides two interfaces to bring audio to life.
- 3.5mm Aux male connector: audio signal input — plugs into the MP3 module's output jack
- Power interface: USB, 5 V adapter, or any supported supply — powers the speaker's amplifier
How It Works
To get started, make sure you have the following:
- Gather a collection of songs or recorded audio that you want to play and store them on a Micro SD Card.
- Insert the Micro SD Card into the MP3 player module.
- Connect the MP3 player module to the ESP32 S3 and connect the speaker to the MP3 player module. Also, ensure the speaker is connected to a power source.
Each MP3 file on the Micro SD Card gets an ID, starting from 0. Then, you can tell the ESP32 S3 to do various things with the MP3 player module, such as:
- Play: Start playing the selected song.
- Pause: Pause the song.
- Play Next: Move to the next song.
- Play Previous: Go back to the previous song.
- Change Volume: Adjust how loud the music is.
When the MP3 player module gets a command, it reads the MP3 file from the Micro SD Card, turns it into an audio signal, and sends that signal to the speaker using a 3.5mm Aux connection.
Wiring Diagram
Connect the MP3 module's serial pins to the ESP32 S3's UART pins, and plug the speaker into the module's audio jack. Ensure that both the module and the speaker receive appropriate power before uploading your sketch.
Safety Notes
Keep signal wire runs short to reduce interference, and never connect the speaker's amplifier power directly to the ESP32 S3's 3.3 V rail — use a dedicated 5 V source to protect the board.
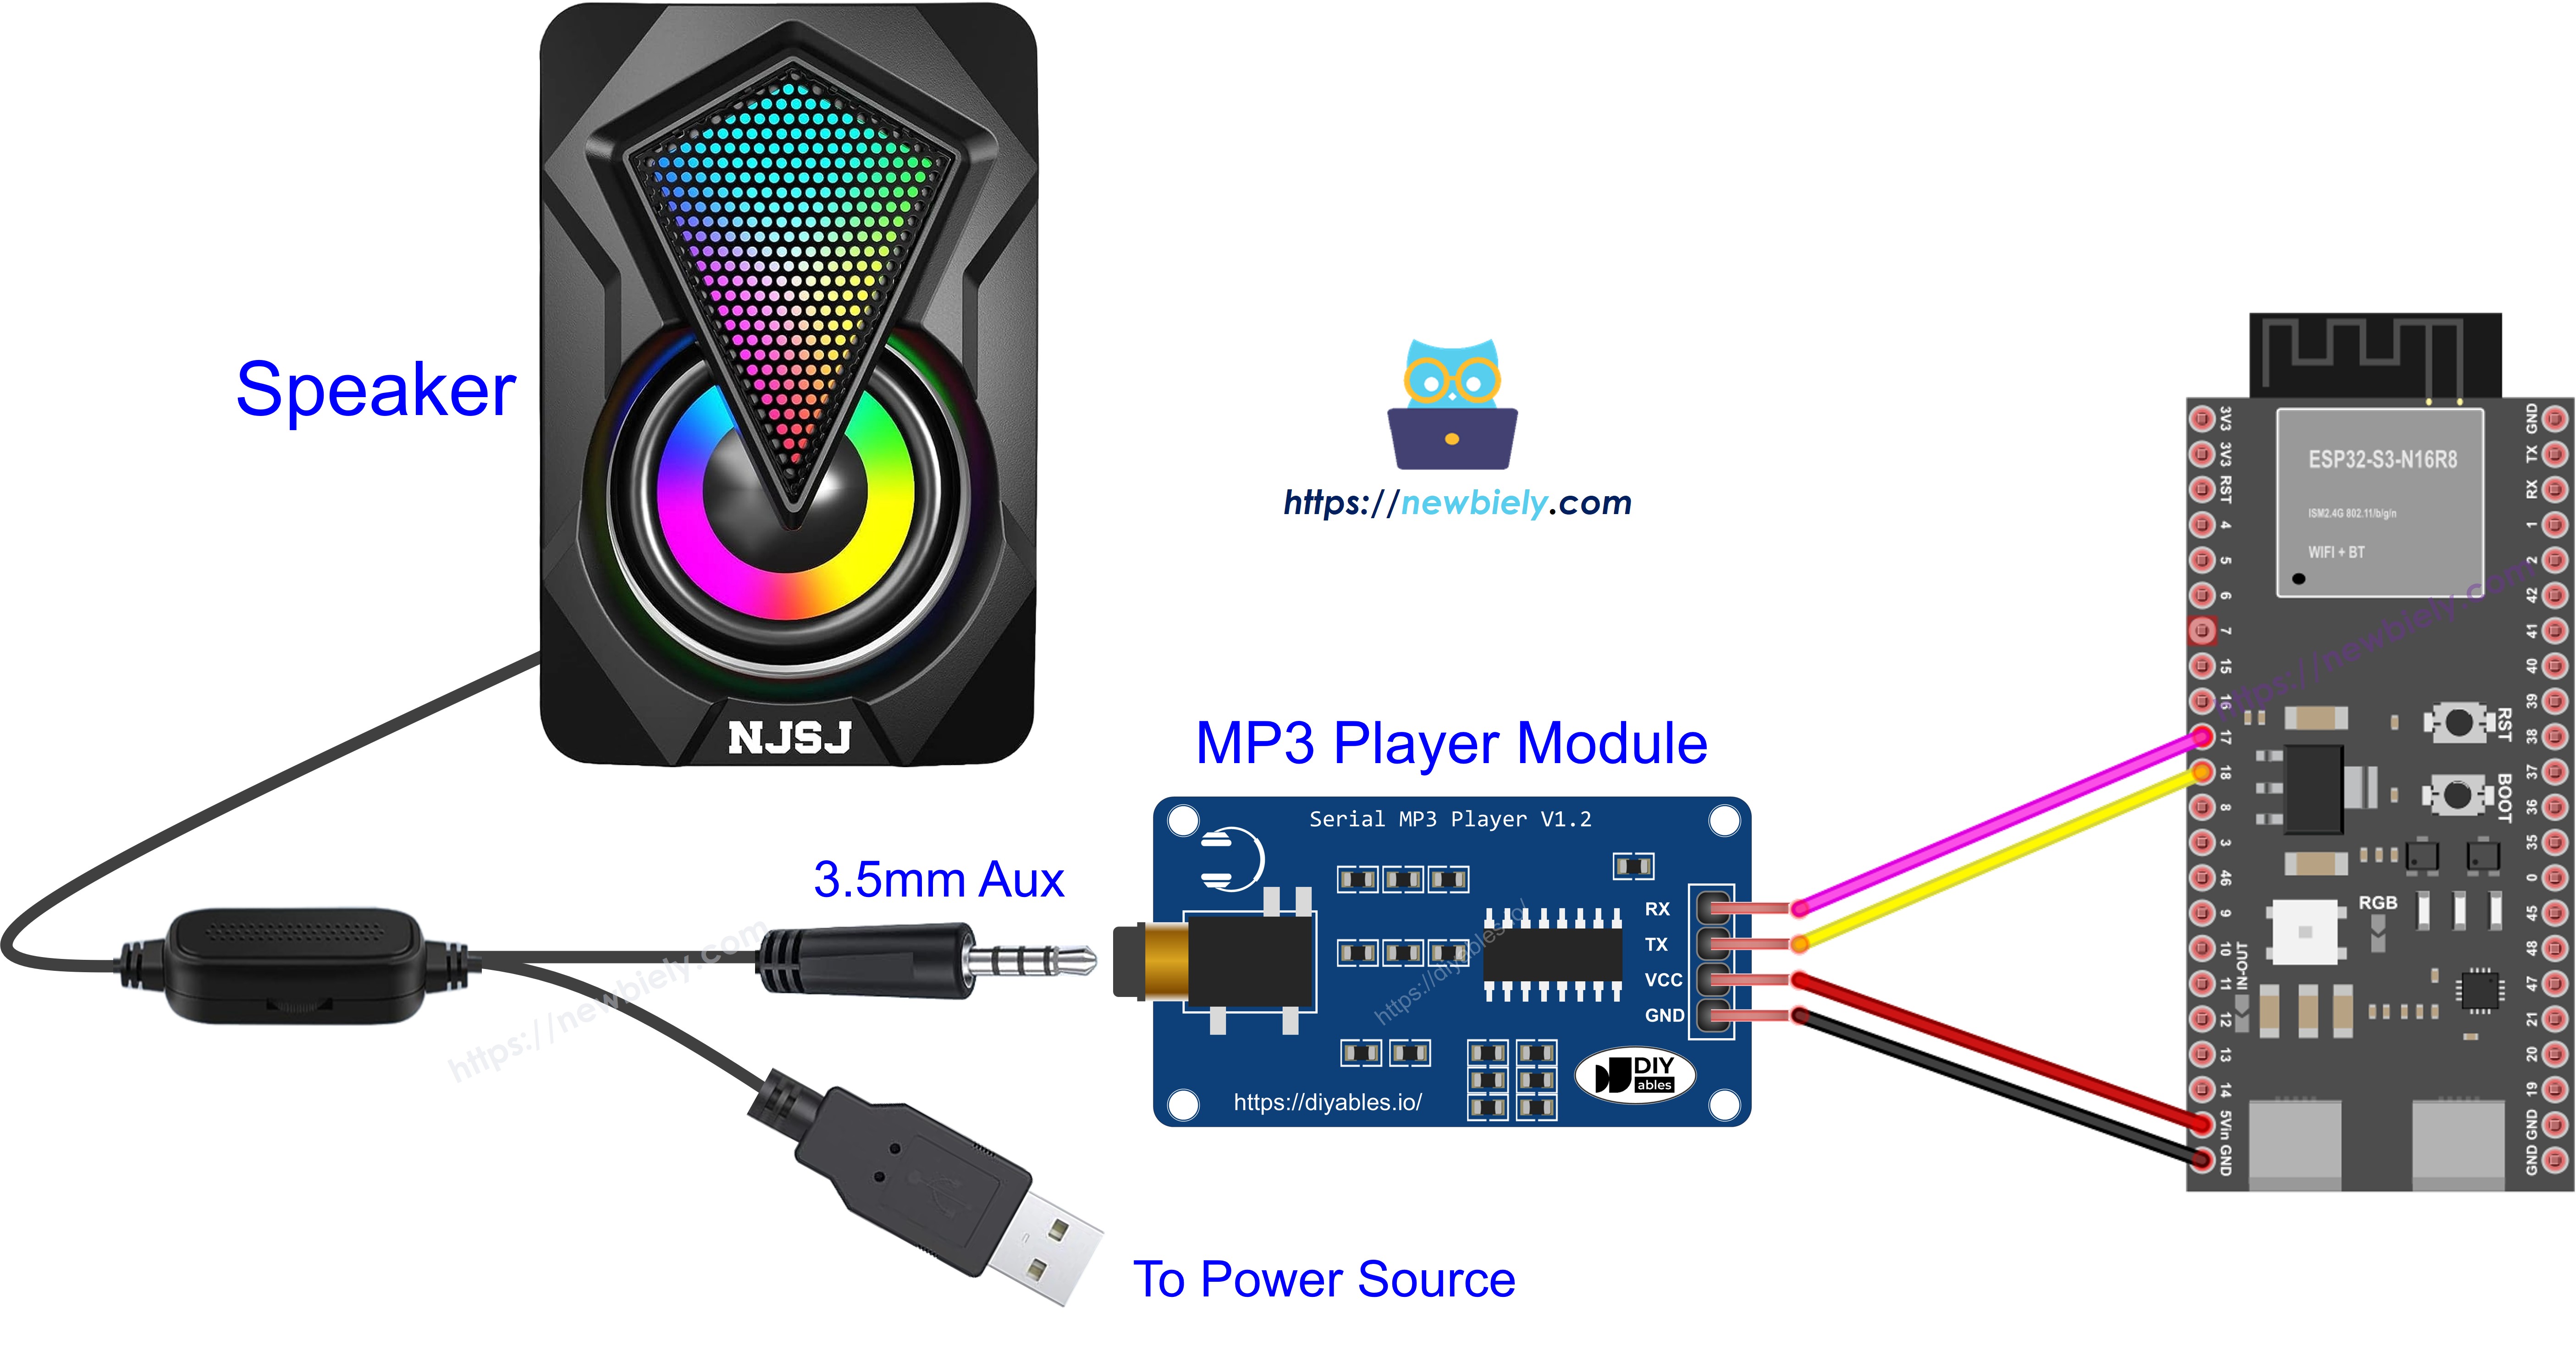
This image is created using Fritzing. Click to enlarge image
ESP32 S3 Code - Play Music
The following code plays the first song stored on the Micro SD Card. It initialises a software serial connection to the MP3 module and sends the play command immediately on startup. The following code demonstrates the simplest possible playback scenario to verify your wiring is correct before adding controls.
Detailed Instructions
- New to ESP32 S3? Complete our Getting Started with ESP32 S3 guide first.
- Follow the instructions in the How It Works section above — prepare your Micro SD Card and insert it into the module.
- Copy the above code and open it with Arduino IDE.
- Click Upload button on Arduino IDE to upload code to ESP32 S3.
- Enjoy the music.
- Pro Tip: If no sound plays, double-check the RX/TX wiring polarity — the module's RX must connect to the ESP32 S3's TX pin and vice versa.
Serial Monitor Output
Open the Serial Monitor at 9600 baud to observe command acknowledgements from the MP3 module. The following readings were captured during a typical playback session.
ESP32 S3 Code - Play Music with Control Buttons
The following code upgrades the basic example by adding four push buttons so you can interact with the MP3 player in real time. Each button maps to a playback action — play, pause, next, and previous — giving you hands-on control without modifying the code.
The wiring diagram for the above code:
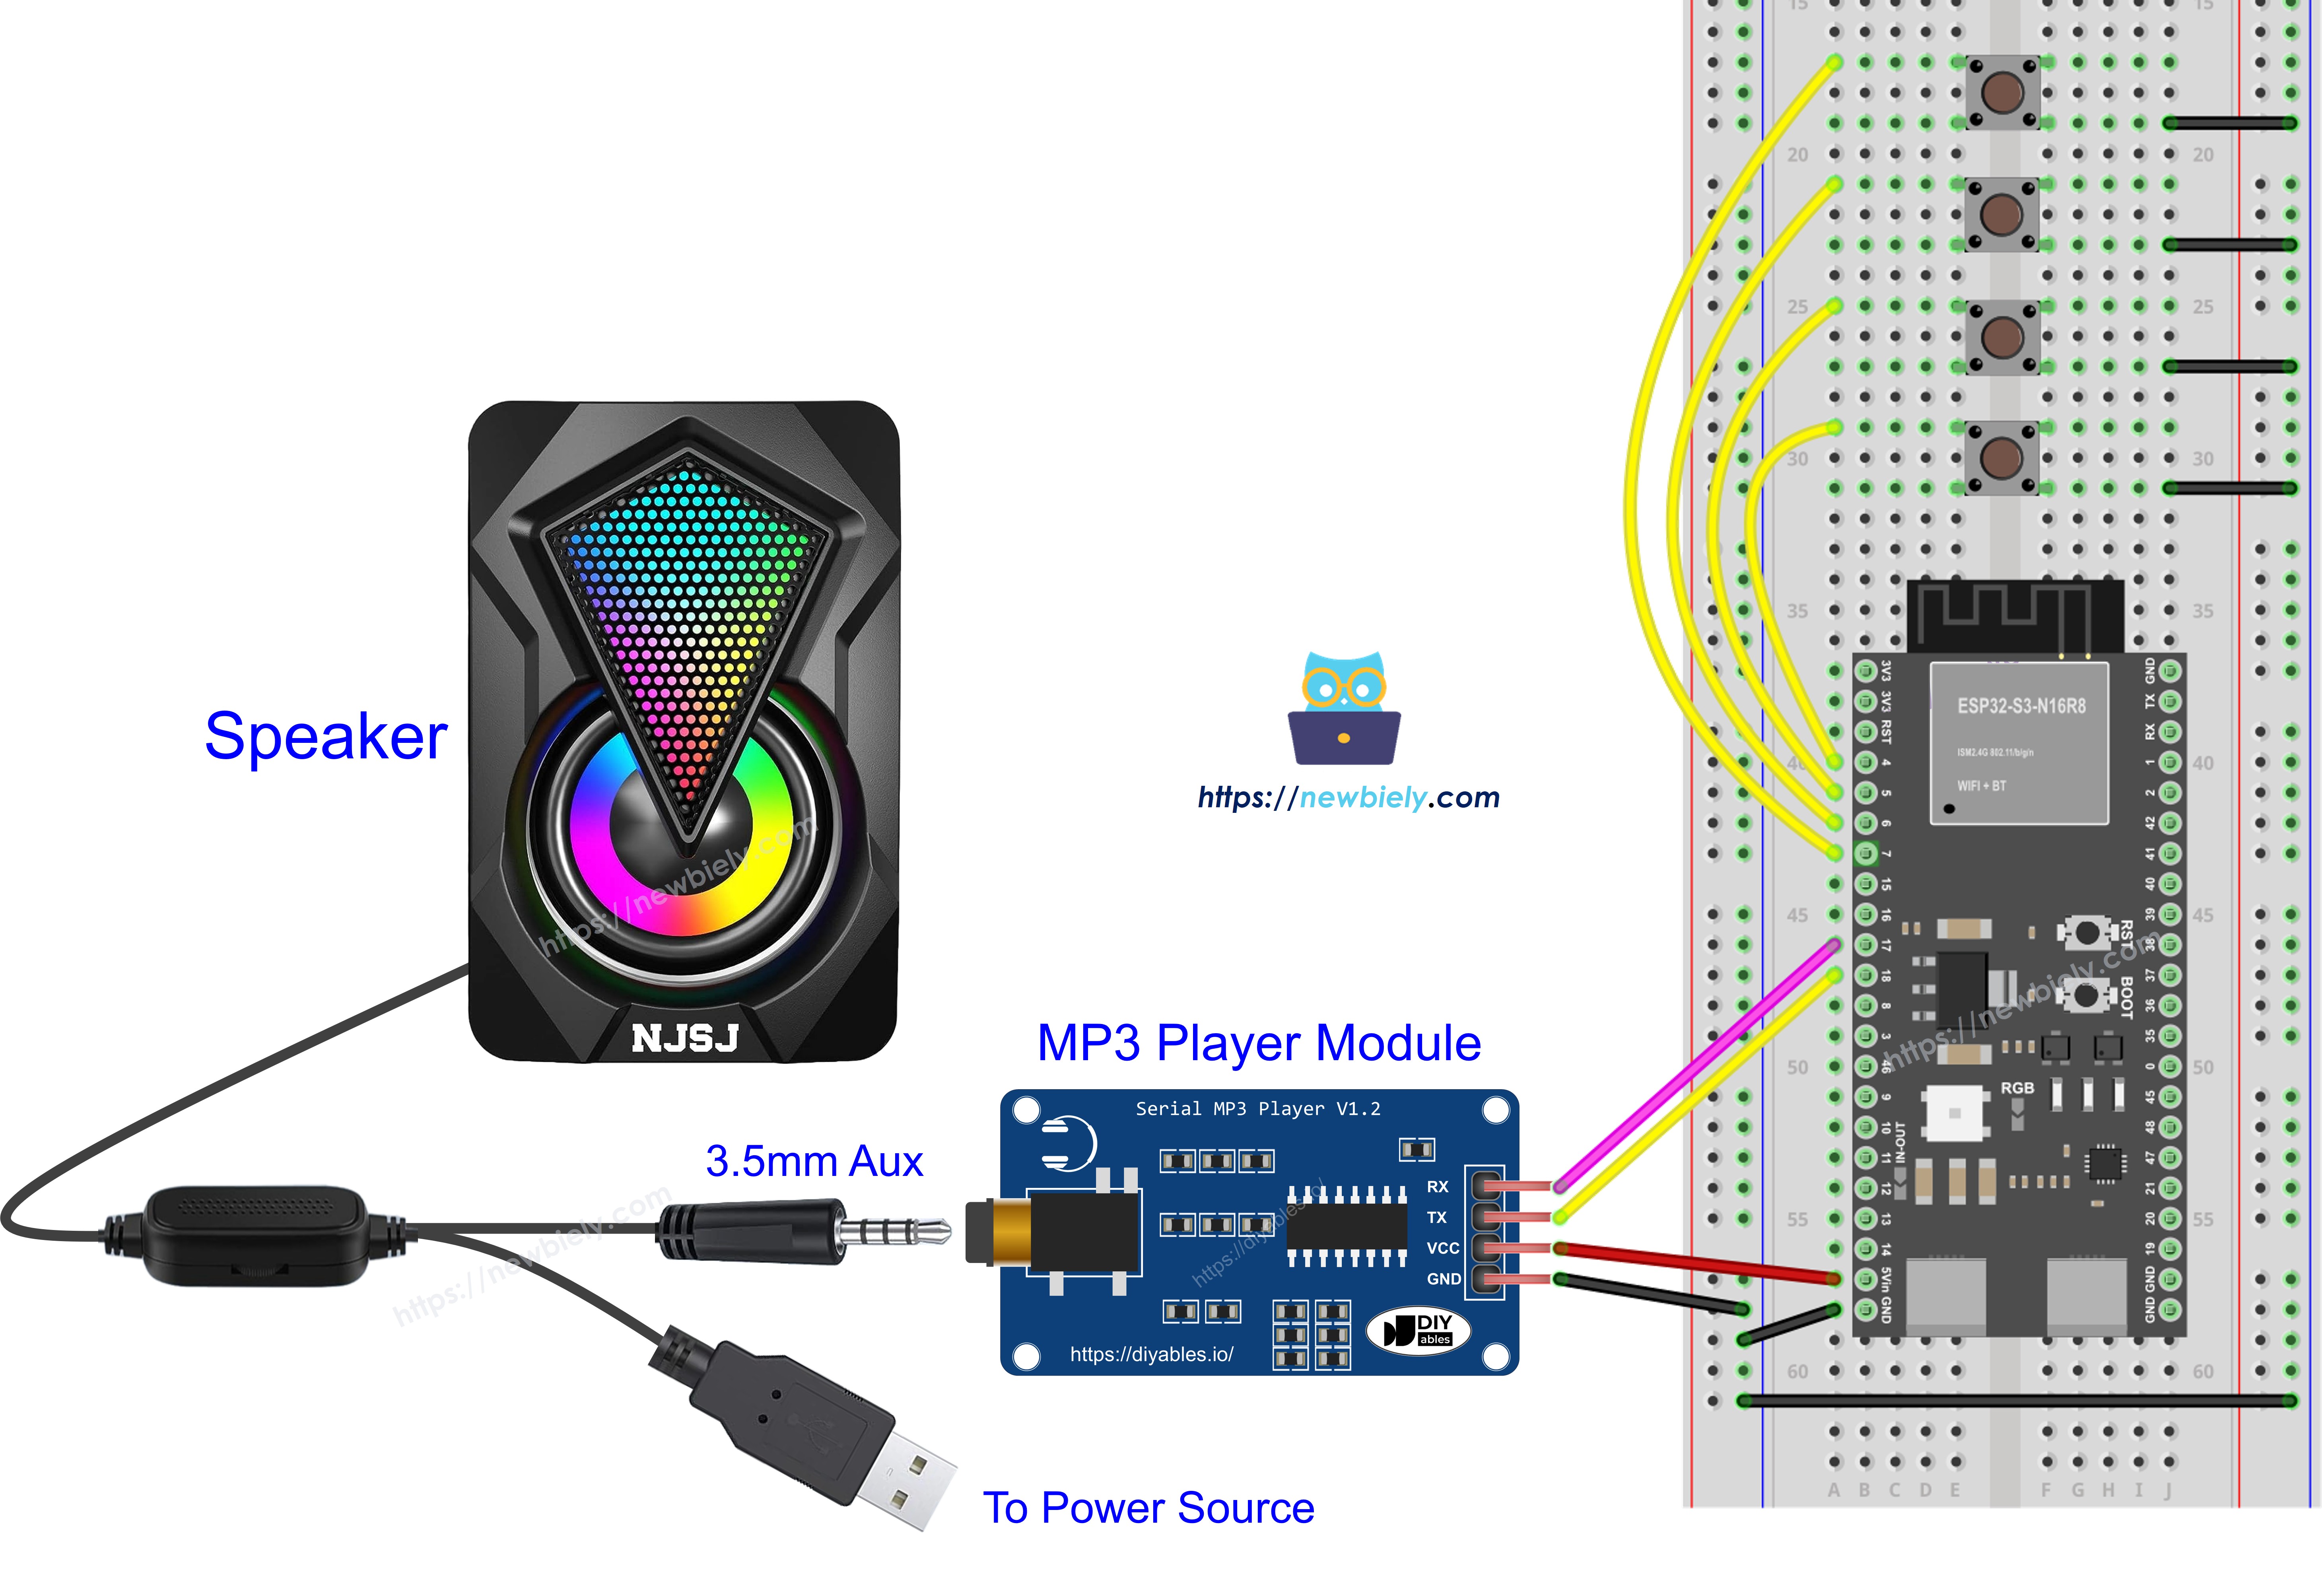
This image is created using Fritzing. Click to enlarge image
Now, you can modify the projects to add more functions, for example:
- Add a potentiometer to control the volume, see ESP32 S3 Potentiometer tutorial
- Add an IR remote controller, see ESP32 S3 IR Remote Controller tutorial
- Add a RFID reader and card to make RFID MP3 player, see ESP32 S3 RFID tutorial
Applications
The ESP32 S3 MP3 player module combination is versatile enough to power many real-world audio projects. Below are some practical use cases worth exploring.
- Ambient sound machine: Play looping nature sounds or white noise for relaxation or sleep aid devices.
- Interactive exhibit: Trigger themed audio clips in museum or escape-room installations based on visitor actions.
- Voice prompt system: Announce status messages or warnings in industrial or home-automation panels.
- Educational toy: Play alphabet letters, numbers, or short lessons when a child presses a button.
- Alarm and alert system: Sound custom alarm tones or spoken alerts in security or monitoring applications.
Video Tutorial
Watch the step-by-step video walkthrough for this ESP32 S3 project below.
Challenges
Extending your MP3 player project is a great way to deepen your ESP32 S3 skills. Try one of the challenges below to push the project further.
- Beginner: Add an LED that blinks in sync with playback state — lit while playing, off when paused.
- Intermediate: Connect a potentiometer and map its value to volume level so you can adjust loudness with a knob.
- Advanced: Build a playlist manager that reads a text file from the SD card to determine playback order and allows shuffle mode via a dedicated button.