
DIYables Web Apps Web Rotator
Overview
This ESP32 S3 Uno web rotator tutorial shows you how to control the angle of a servo or stepper motor from a round disc in your web browser. The ESP32 S3 Uno form board serves the disc page over WiFi, and every turn of the disc sends a new angle to your sketch in real time. It is a simple way to build web servo control for robot arms, camera mounts or antennas.
In this tutorial, you will:
- Install the DIYables ESP32 WebApps library in Arduino IDE
- Open an interactive rotator disc in the browser of your phone or PC
- Choose between continuous rotation and a limited angle range
- Move a servo motor on the ESP32 S3 Uno with the web disc
- Adapt the code for a stepper motor or several axes
This video shows the Web Rotator app moving a servo motor step by step:
Features
The WebRotator app turns your browser into a rotary control knob. The library builds the whole page for you, so you only write the code that reacts to the angle.
Interactive rotatable disc
You turn the disc with the mouse on a computer or with your finger on a phone or tablet. A marker on the disc shows the current position.
Two operation modes
Continuous mode lets the angle go from 0° up past 360° with no limit. Limited mode keeps the angle between a minimum and a maximum that you choose.
Real-time angle feedback
The page shows the current angle in degrees. Data travels over WebSocket, so the ESP32 S3 Uno gets each new angle at once, without a page reload.
Easy setup
You set the mode and the angle range once, in the constructor. The page adapts its display to your settings by itself.
Clean design
The disc uses a conic gradient and turns smoothly. The layout works on small and large screens.
Hardware Preparation
| 1 | × | ESP32 S3 Uno-form Board | |
| 1 | × | USB Cable Type-A to Type-C (for USB-A PC) | |
| 1 | × | USB Cable Type-C to Type-C (for USB-C PC) | |
| 1 | × | Servo Motor (optional for testing) | |
| 1 | × | Breadboard | |
| 1 | × | Jumper Wires |
Or you can buy the following kits:
| 1 | × | DIYables Sensor Kit (18 sensors/displays) |
Additionally, some of these links are for products from our own brand, DIYables .
Buy Note: For controlling multiple servo motors, use the PCA9685 16 Channel PWM Servo Driver Module to save MCU pins and simplify wiring.
Setup Instructions
Detailed Instructions
The first four steps prepare the board. The rest install the library and run the basic WebRotator example, which only prints the angle. You can add a servo later.
- New to the ESP32 S3 Uno? Follow ESP32 S3 Uno - Getting Started first.
- Wire it up: for this first test, no wiring is needed. If you want to move a servo, see the wiring diagram further down.
- Connect the board to your computer with a USB Type-C cable.
- Open Arduino IDE, choose the ESP32S3 Dev Module board and the correct COM port.
- Open the Library Manager by clicking the Libraries icon on the left bar of Arduino IDE.
- Search the library: type "DIYables ESP32 WebApps" and find the DIYables ESP32 WebApps Library by DIYables.
- Install it: click the Install button.
- Search for DIYables ESP32 WebApps created by DIYables and click the Install button.
- Install the dependencies: Arduino IDE asks to install some other libraries. Click Install All.
- Open the example: go to File Examples DIYables ESP32 WebApps WebRotator, or copy the code below into Arduino IDE.
- Set your WiFi: put your network name and password in these two lines:
- Upload: click the Upload button to send the code to the ESP32 S3 Uno.
- Open the Serial Monitor at 9600 baud. You should see something like this:
- No output? Press the RESET button on the ESP32 S3 Uno and watch the Serial Monitor again.
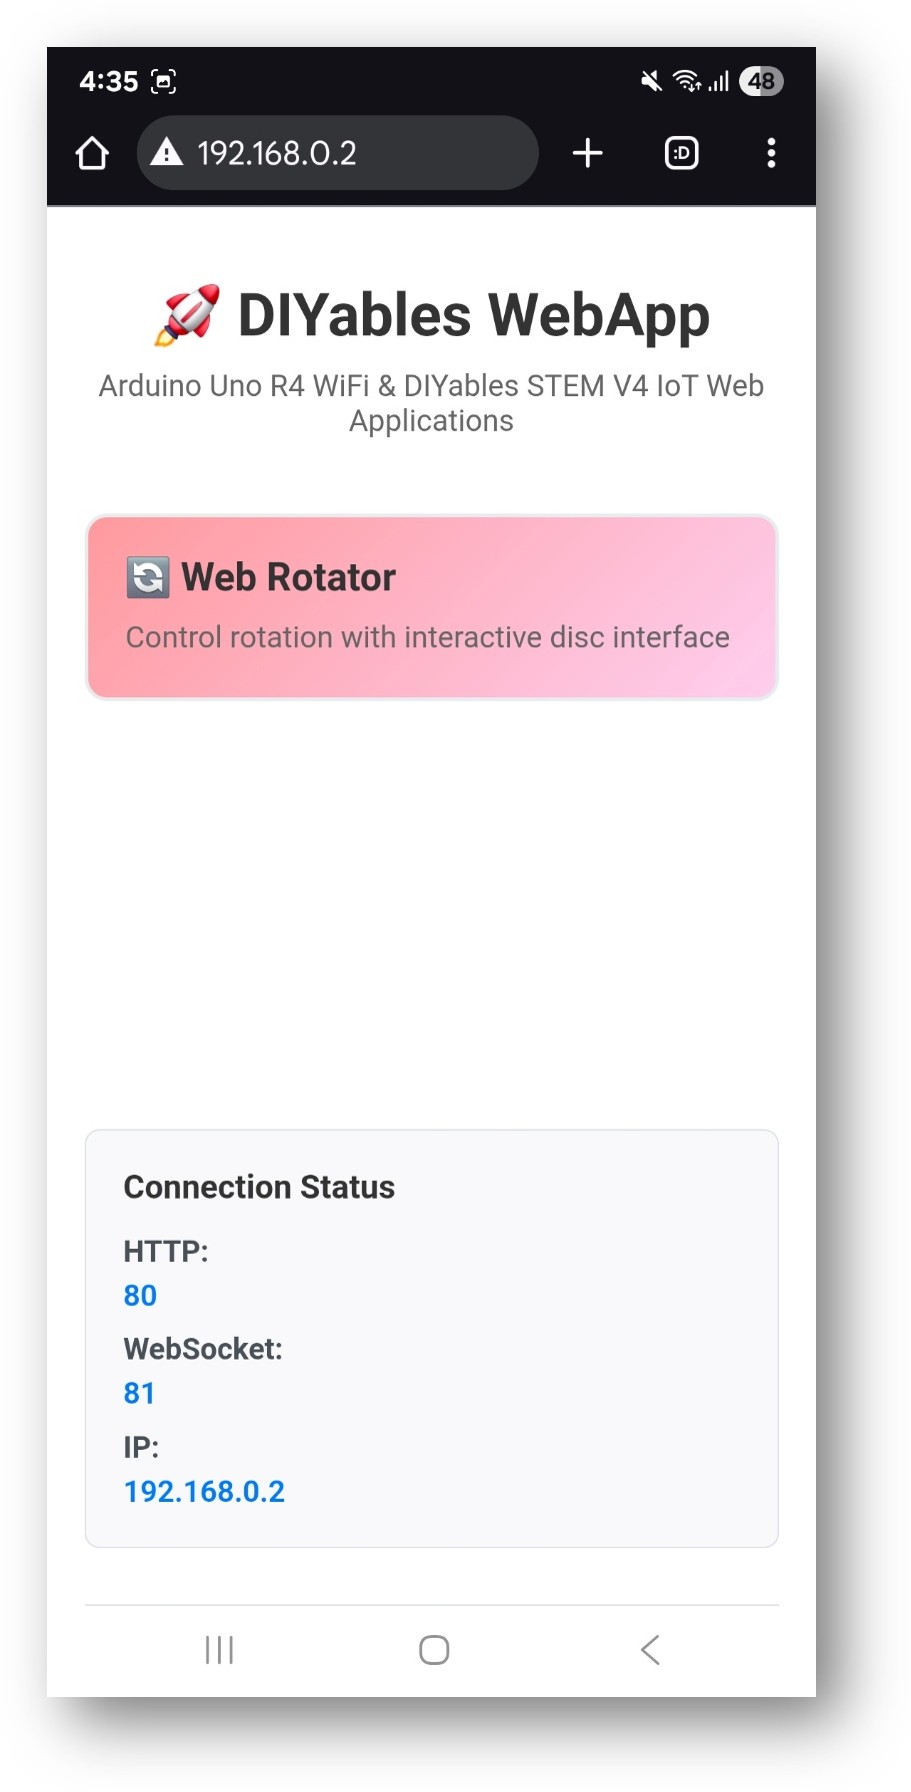
- Open the home page: type the IP address from the Serial Monitor into the address bar of a browser on your phone or PC, for example http://192.168.0.2. You will see the home page:
- Open the rotator: click the Web Rotator link. The Web Rotator app looks like this:
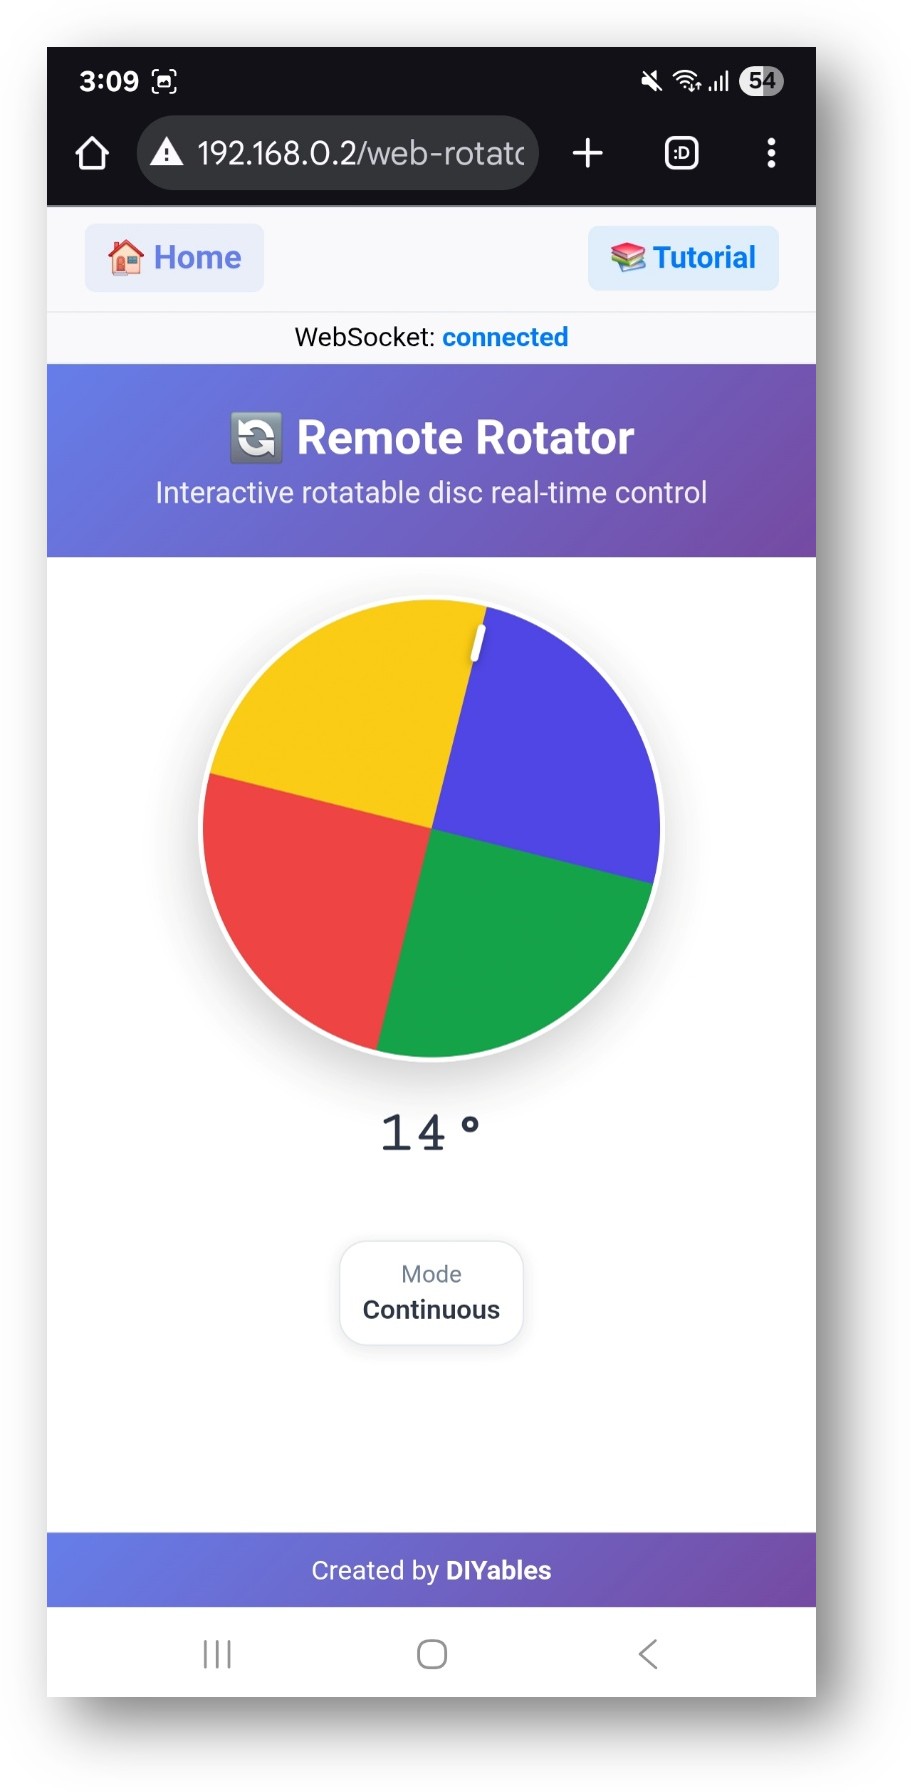
- Turn the disc: drag it with the mouse or your finger. Each new angle shows up in the Serial Monitor.
- Tip: you can skip the home page and open the rotator directly by adding /web-rotator to the IP address, for example http://192.168.0.2/web-rotator. Bookmark it on your phone.
Web Interface Features
The page is small, but it gives you clear feedback. You always see where the disc points and which mode is active.
Rotatable Disc Control
Drag to rotate
Click and drag the disc, and it follows your movement. The rotation is smooth, and the gradient design makes the direction easy to see.
Angle and mode display
The current angle is shown in degrees next to the disc. A mode indicator tells you if the rotator is in continuous or limited mode, and shows the limits.
Touch and Mouse Support
On a computer you use the mouse. On a phone or tablet you touch and swipe. The layout adjusts to the screen size, and the marker shows clearly where you can grab the disc.
Code Configuration
You only need two things in your sketch: a rotator page object with the right mode, and a callback function that receives the angle.
Rotator Setup
Create the page in continuous mode or in limited mode, then connect your callback:
Receiving Angle Commands
The library calls this function each time you turn the disc. The angle comes as a float, so you get decimal precision. Put your motor code where the comment is.
Operation Modes
The mode decides which angles the disc can send. Pick the one that matches the motor you want to drive.
Continuous Mode
In continuous mode the angle starts at 0° and can grow past 360° with no upper limit. It does not wrap back to 0°, so you can count full turns. This fits continuous rotation servos, antennas and turntables. Use ROTATOR_MODE_CONTINUOUS.
Limited Mode
In limited mode you set a minimum and a maximum angle, and the disc stops at these limits. This fits standard servos, robot arm joints and steering systems. Use ROTATOR_MODE_LIMITED, minAngle, maxAngle.
Hardware Integration
The angle from the web page is just a number. These two short examples show how to turn it into real motion on the ESP32 S3 Uno.
Servo Motor Control
※ NOTE THAT:
This is only a part of a sketch. Add it to your full ESP32 S3 Uno sketch (WiFi setup, server and pages) to make it work. The complete servo code is further down.
The ESP32 S3 Uno uses the ESP32Servo library instead of the standard Servo library. The servo signal wire goes to header pin D9, which is GPIO46 in code.
Stepper Motor Control
For a stepper motor, convert the angle into a number of steps. The four driver inputs use header pins D8, D9, D10 and D11, which are GPIO21, GPIO46, GPIO10 and GPIO11 in code.
Customization Options
You can shape the rotator to fit your machine. Most changes are just numbers in the constructor.
Angle Range
Set the lowest and highest allowed angle to protect your mechanics. You can also choose the start angle when the system boots, and how fine the angle updates should be.
Visual Appearance
The web page follows your configuration on its own. It shows the angle limits, the current mode and a marker for the current angle, all in the same smooth gradient style.
ESP32 S3 Uno Pinout
The image below shows the pinout diagram of the ESP32 S3 Uno form board. Use it to find header pin D9 and its GPIO number before you connect the servo.

Wiring Diagram
The servo has three wires: power, ground and signal. Connect the signal wire to D9 (GPIO46) as shown below.
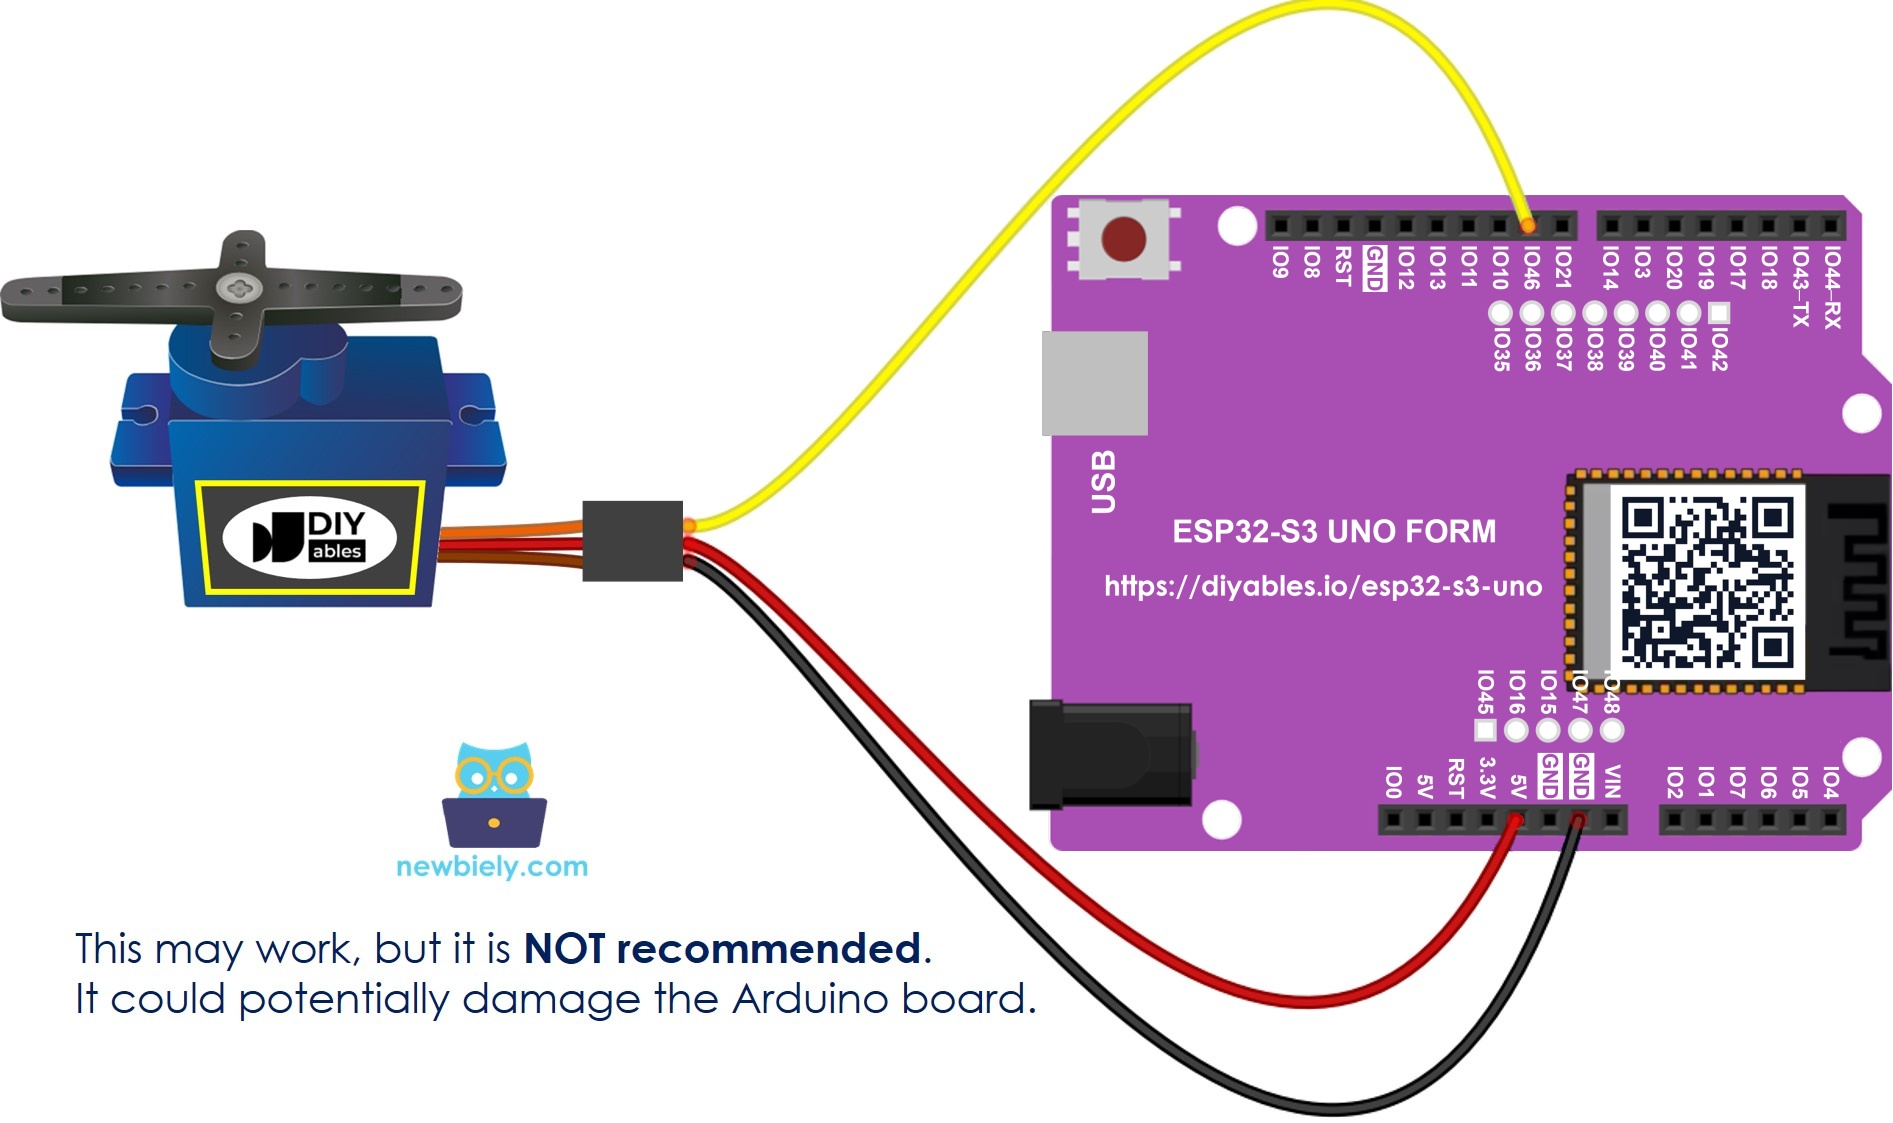
This image is created using Fritzing. Click to enlarge image
| Servo Pin | ESP32 S3 Uno Pin |
|---|---|
| VCC (red) | 5V |
| GND (black or brown) | GND |
| Signal (yellow or orange) | D9 (GPIO46) |
WARNING
D9 is GPIO46, a boot strapping pin on the ESP32 S3 Uno. The board reads this pin at power-up to choose its boot mode. A servo signal wire is normally fine here, but if the board does not boot or cannot upload code, unplug the servo signal wire from D9, upload, and then plug it back in.
※ NOTE THAT:
The servo runs from 5V, but the ESP32 S3 Uno sends a 3.3V control signal. This is safe, because the signal goes out of the board, and most hobby servos accept 3.3V. For a big servo or a servo under load, use an external 5V supply and connect its GND to the ESP32 S3 Uno GND.
ESP32 S3 Uno Web Rotator with Servo Motor
This complete sketch connects the web disc to a servo motor on D9 (GPIO46). It uses limited mode from 0° to 180°, and it reverses the angle (180 - angle) so that the servo turns in the same direction as the disc. The pulse range 500 to 2400 µs fits an SG90 servo.
Watch the video below to see this ESP32 S3 Uno project step by step.
Common Use Cases
A rotary control from the web is useful in many projects. Here are some ideas to get you started.
Educational Projects
Students can learn how PWM drives a servo, how a robot arm joint is positioned, or how to point a directional antenna. A camera pan/tilt mount is another fun project you can control from your phone.
Practical Applications
At home, the rotator can open blinds, vents or small doors. In robotics, it can move arm joints or steer a mobile robot. It also works for remote positioning in IoT projects, and for valve or positioning control in small automation setups.
Common Problems
If something does not move as expected, check these points first. A full problem table is at the end of this page.
Rotation Not Working
Make sure the WiFi connection and the WebSocket are up. Check that the callback is set with onRotatorAngleFromWeb(). Then check the servo or motor wiring and its power supply.
Incorrect Angle Values
Check the angle mapping for your motor and the pin in the code. Make sure your callback scales the angle the right way, and watch the Serial Monitor to see the real values.
Connection Issues
Check the IP address in the browser and your firewall. The ESP32 S3 Uno works only with 2.4GHz WiFi, not 5GHz. Refreshing the browser page often helps.
Advanced Features
When the basic example works, you can make the rotator smarter. These functions are already in the example sketch.
Runtime Mode Changes
You can switch between continuous and limited mode while the sketch runs:
Position Feedback
You can also send the real position back to the web page, for example from a motor with an encoder:
※ NOTE THAT:
Sending many angle updates to the web page can make the disc move less smoothly. Use this feature only when you really need live position feedback.
Multi-Axis Control
Add two rotators to control two axes, for example pan and tilt:
Educational Integration
The WebRotator is a good tool for the classroom. It links web technology with real motion, so students see the result of their code at once.
STEM Learning Objectives
Students learn how servo and stepper motors work, how angles describe a position, how a real-time web interface talks to hardware, and how callback functions run code when an event happens.
Classroom Activities
Try servo calibration to learn about PWM signals, then practice precise positioning tasks. Next, combine sensors with motor control, and finish with debugging hardware and software problems together.
This example gives you a solid base for rotation control on the ESP32 S3 Uno, for both learning and real robotics projects. You can find more web apps in the ESP32 S3 Uno DIYables Web Apps tutorial.
FAQ
Which library do I use for the web rotator on the ESP32 S3 Uno?
Use the "DIYables ESP32 WebApps" library by DIYables, not the "DIYables WebApps" library for the UNO R4. The ESP32 version needs #include <DIYables_ESP32_Platform.h> and ESP32ServerFactory instead of UnoR4ServerFactory.
Why does the ESP32 S3 Uno servo code use ESP32Servo.h?
The standard Servo library does not support the ESP32 S3 Uno. Install the "ESP32Servo" library by Kevin Harrington and include ESP32Servo.h. The functions attach() and write() work the same way.
Can I power the servo from the ESP32 S3 Uno 5V pin?
A small servo like the SG90 with no load usually works from the 5V pin. A bigger servo or a servo under load can pull a big current spike and reset the board. In that case, use an external 5V supply and connect its GND to the ESP32 S3 Uno GND.
Is the 3.3V signal of the ESP32 S3 Uno enough for a 5V servo?
Yes, for most hobby servos. The signal goes out of the board, so it cannot harm the ESP32 S3 Uno pins, and the servo reads 3.3V as a high level. Never connect a 5V signal into an ESP32 S3 Uno pin, because the pins are not 5V tolerant.
Why can I not open the web rotator page?
Your phone or PC must be on the same WiFi network as the ESP32 S3 Uno. The board works only with 2.4GHz WiFi. Check the IP address in the Serial Monitor and type it exactly, for example http://192.168.0.2/web-rotator.
What if my project needs more pins than the Uno headers give?
The ESP32 S3 Uno has two extra rows of holes with more GPIOs: GPIO15 and GPIO16 (I/O, PWM, analog), GPIO45 and GPIO35 to GPIO42 (I/O, PWM), and GPIO47/GPIO48 (output only, PWM). Solder pin headers to use them and write the GPIO number in code. For extra servos or stepper driver inputs, GPIO35 to GPIO42 are a good choice. Be careful with two things: GPIO47/GPIO48 may run at 1.8V instead of 3.3V on some modules (especially ones with "V" in the name, like R8V or R16V), so 3.3V devices can be damaged or act strangely. Also, GPIO0, GPIO3 (D6), GPIO45 and GPIO46 (D9) are boot strapping pins, and a wrong connection can stop the board from booting or uploading code. Use the other extra pins first.
Troubleshooting
| Problem | Possible Cause | Solution |
|---|---|---|
| No COM port in Arduino IDE | USB driver missing or board not in upload mode | Install the CP210x or CH340 driver, use a data USB cable, or hold BOOT while pressing RESET |
| Upload fails while the servo is connected | The servo signal on D9 (GPIO46) affects the boot strapping pin | Unplug the servo signal wire from D9, upload, then plug it back in |
| Board resets when the servo moves | The servo pulls too much current from the board | Power the servo from an external 5V supply and share GND with the ESP32 S3 Uno |
| Compile error "Servo.h" not found or not supported | The standard Servo library is used | Install the ESP32Servo library and use #include |
| Compile error on UnoR4ServerFactory | Code for the UNO R4 library is used | Install DIYables ESP32 WebApps and use ESP32ServerFactory with DIYables_ESP32_Platform.h |
| No IP address in the Serial Monitor | Wrong WiFi name or password, or a 5GHz network | Check WIFI_SSID and WIFI_PASSWORD and use a 2.4GHz network |
| Servo turns the wrong way | The servo code reverses the angle with 180 - angle | Use myServo.write(angle) instead if you want the other direction |
| Serial Monitor shows strange characters | Wrong baud rate | Set the Serial Monitor to 9600 baud |