
ESP32 S3 UNO - DIYables Bluetooth App Plotter
Overview
This ESP32 S3 Uno Bluetooth plotter tutorial shows you how to send live data from the ESP32 S3 Uno form board to your phone and see it as a moving graph. You use BLE (Bluetooth Low Energy) and the DIYables Bluetooth App, so it works as a real-time data plotter on both Android and iOS. The demo sketch draws sine, cosine and tangent waves, and you can swap them for your own sensor readings.
In this tutorial, you will:
- Install the DIYables Bluetooth library in the Arduino IDE
- Upload the BLE plotter example to the ESP32 S3 Uno
- Connect the DIYables Bluetooth App and watch a real-time graph
- Set the plot title, axis labels, Y-axis range and legend
- Plot analog sensor values and filter noisy data
※ NOTE THAT:
The ESP32 S3 Uno supports BLE only. It has no Classic Bluetooth, so the BluetoothSerial version of this example does not work on it. This page uses only the BLE example (Esp32BLE_Plotter). Good news: BLE works with the app on both Android and iOS, and you do not need to pair the board first.
Features
The plotter turns your phone into a small live chart. Here is what it can do for your ESP32 S3 Uno project.
Many Data Series at Once
You can draw up to 10 data series on the same graph. Each series gets its own color and its own name in the legend.
Live, Scrolling Graph
New points appear on the right side and old points scroll away. You can choose how many points stay on the screen.
Flexible Axes
You can set a plot title, axis labels and a fixed Y-axis range. If you do not know the range of your data, turn on auto-scale and the app fits the graph for you.
Works on Android and iOS
Because the ESP32 S3 Uno talks over BLE, the app works on both phone systems. There is no pairing step: scan, tap and connect.
Hardware Preparation
| 1 | × | ESP32 S3 Uno-form Board | |
| 1 | × | USB Cable Type-A to Type-C (for USB-A PC) | |
| 1 | × | USB Cable Type-C to Type-C (for USB-C PC) | |
| 1 | × | Breadboard | |
| 1 | × | Jumper Wires |
Or you can buy the following kits:
| 1 | × | DIYables Sensor Kit (18 sensors/displays) |
Additionally, some of these links are for products from our own brand, DIYables .
ESP32 S3 Uno Pinout
The basic example needs no wiring, because it creates its test data in code. When you later plot real sensors, use the pinout diagram below to find the Uno header pins (A0, A1, SDA…) and their GPIO numbers.

ESP32 S3 Uno Code
The main example only needs the board and a USB cable. It sends three test waves to the app every 100 ms, so you can check that BLE and the plotter work before you add any sensor.
Detailed Instructions
Follow these steps in order:
- New to the ESP32 S3 Uno? Follow ESP32 S3 Uno - Getting Started first.
- Connect the board to your computer with a USB Type-C cable.
- Open Arduino IDE, choose the ESP32S3 Dev Module board and the correct COM port.
- Set the partition scheme: go to Tools > Partition Scheme and pick "Huge APP (3MB No OTA/1MB SPIFFS)". The Bluetooth library is big and does not fit in the default space.
- Open the Library Manager by clicking the Libraries icon on the left bar of the Arduino IDE.
- Search the library: type "DIYables Bluetooth" and find the DIYables Bluetooth library by DIYables.
- Install it: click the Install button.
- Search for DIYables Bluetooth created by DIYables and click the Install button.
- Install the dependencies: the IDE asks to install other libraries too. Click Install All.
ESP32 S3 Uno BLE Code (works with the app on Android and iOS)
This sketch starts a BLE server named "ESP32BLE_Plotter", adds the Plotter app to it and sets the title, axis labels, Y range and legend. In loop(), it sends one sine, cosine and scaled tangent value every 100 ms, and also prints the same three numbers to the Serial Monitor.
- Open the example: in the Arduino IDE, go to File Examples DIYables Bluetooth Esp32BLE_Plotter, or copy the code below into the editor.
- Upload: click the Upload button to send the code to the ESP32 S3 Uno.
- Open the Serial Monitor and set it to 115200 baud.
- Check the output. You should see:
- Tip: if the Serial Monitor stays empty, press the RESET button on the board once. The start message is printed only one time, right after boot.
Mobile App
Now you connect your phone to the board. Because the ESP32 S3 Uno uses BLE, you do not pair it in the phone's Bluetooth settings. You connect from inside the app.
- Open the app. The first time, it asks for permissions. Allow them:
- Nearby Devices (Android 12+) or Bluetooth (iOS), so the app can scan and connect
- Location (Android 11 and older only), because older Android needs it for BLE scans
- Turn on Bluetooth on your phone.
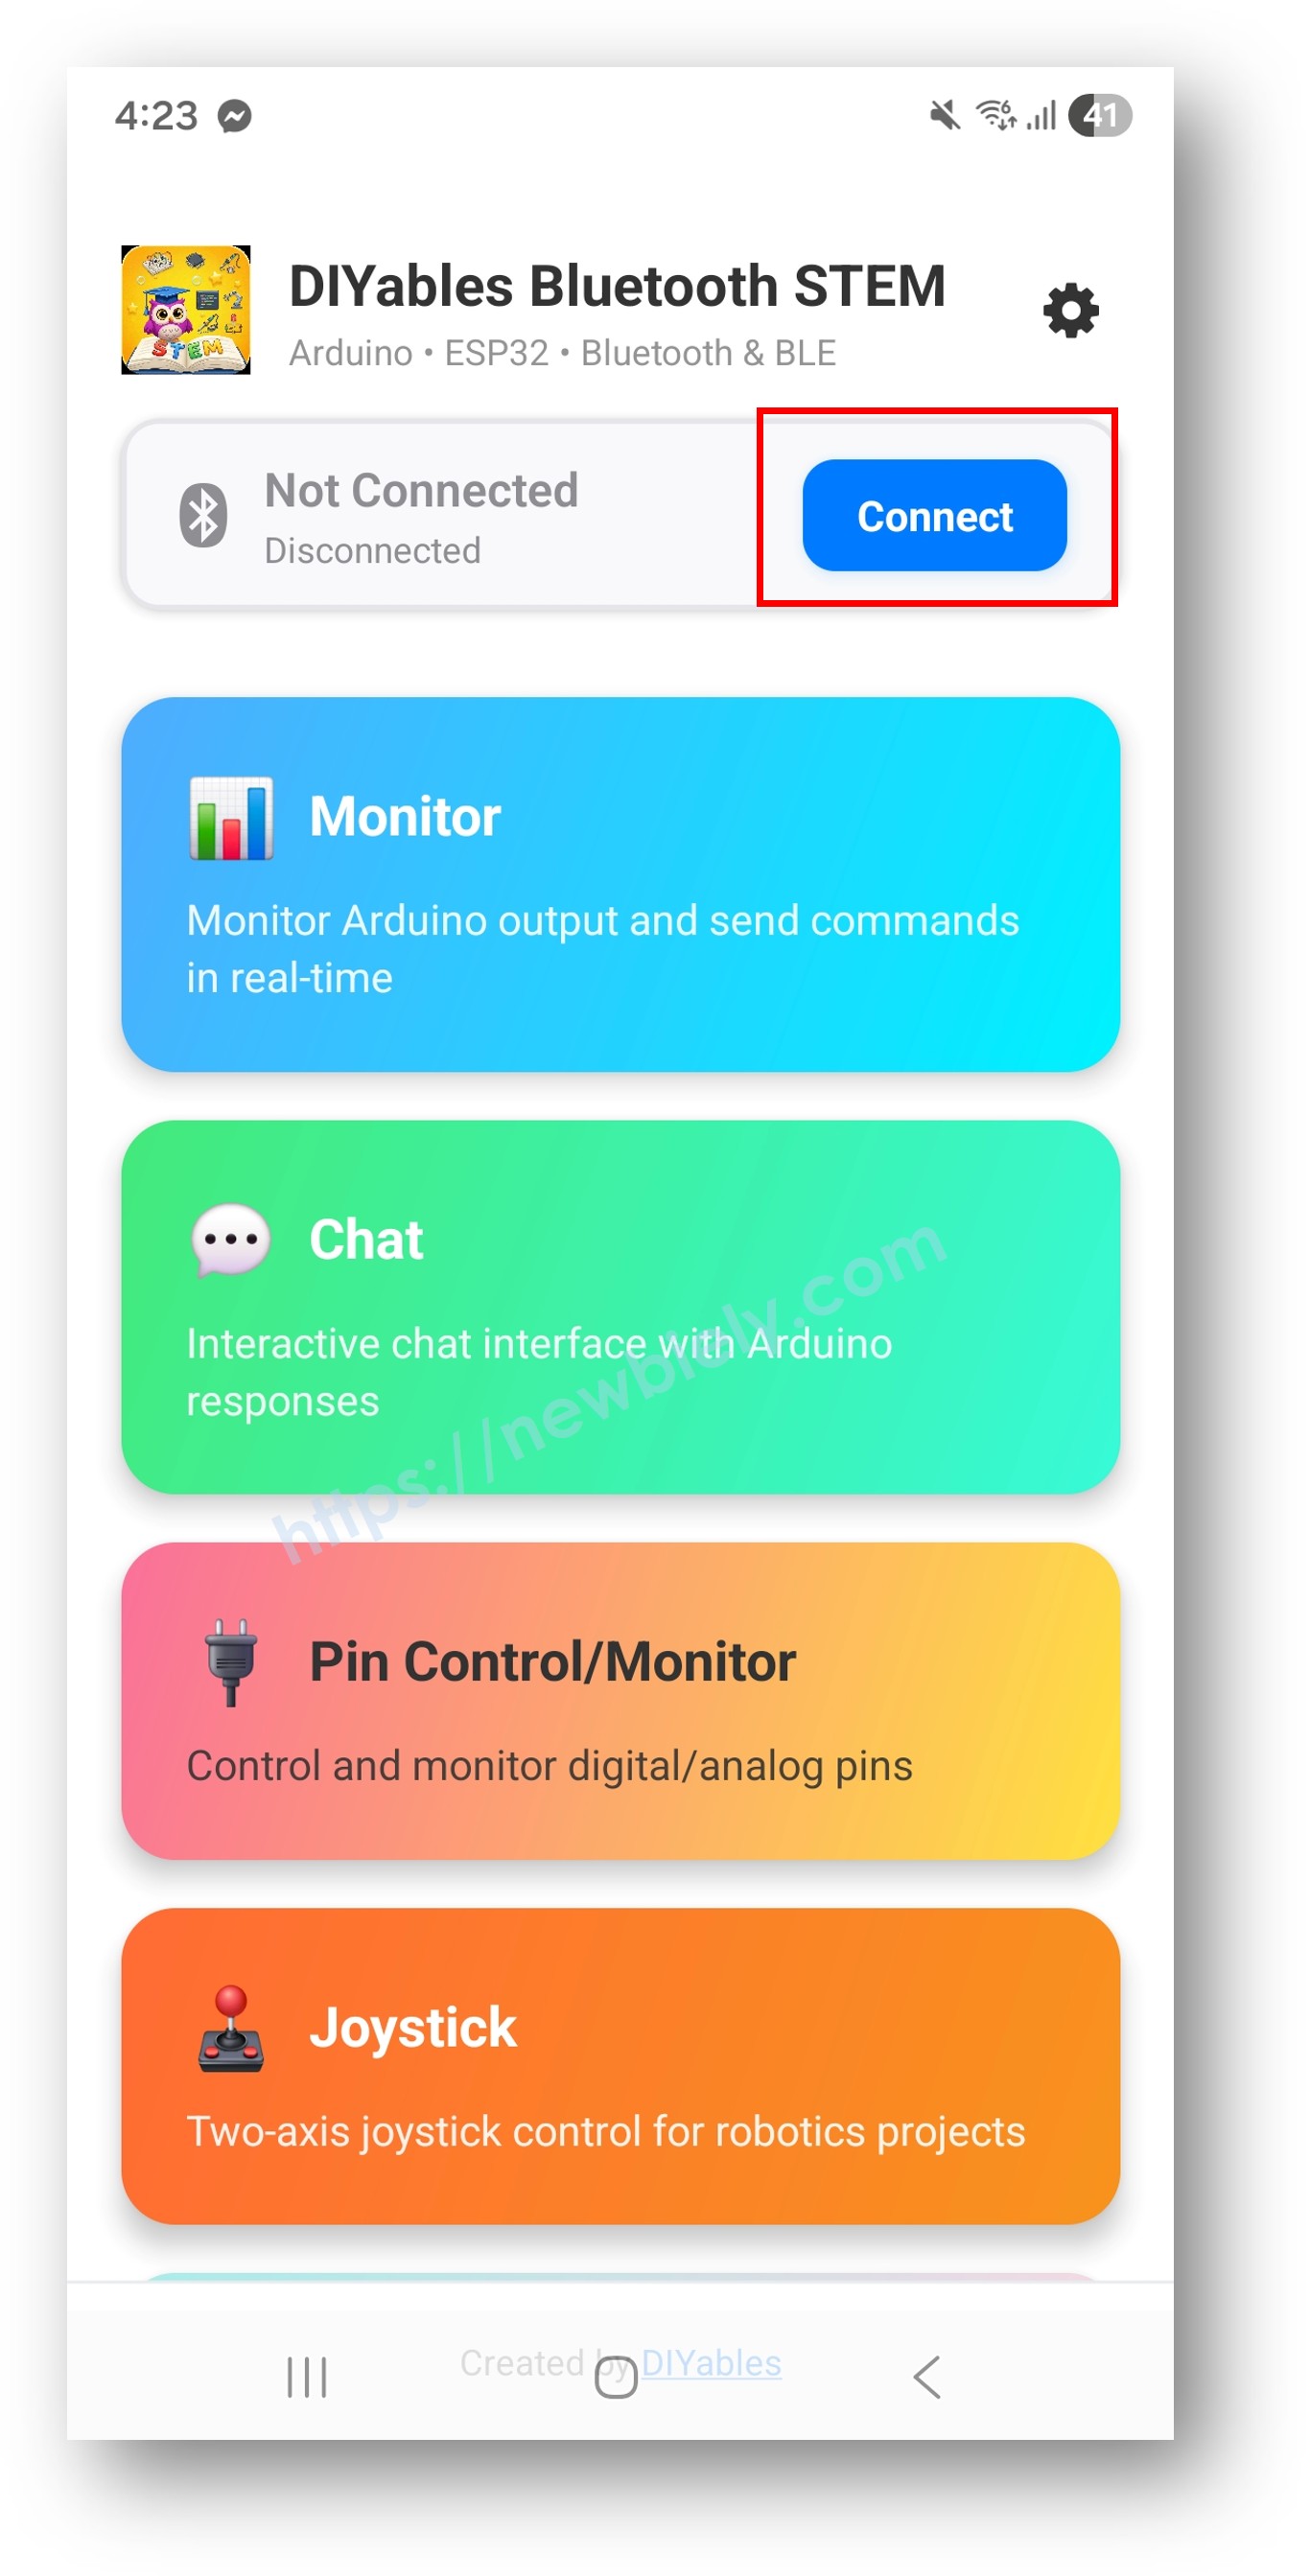
- Scan: on the home screen, tap the Connect button.
- Connect: tap "ESP32BLE_Plotter" in the scan list.
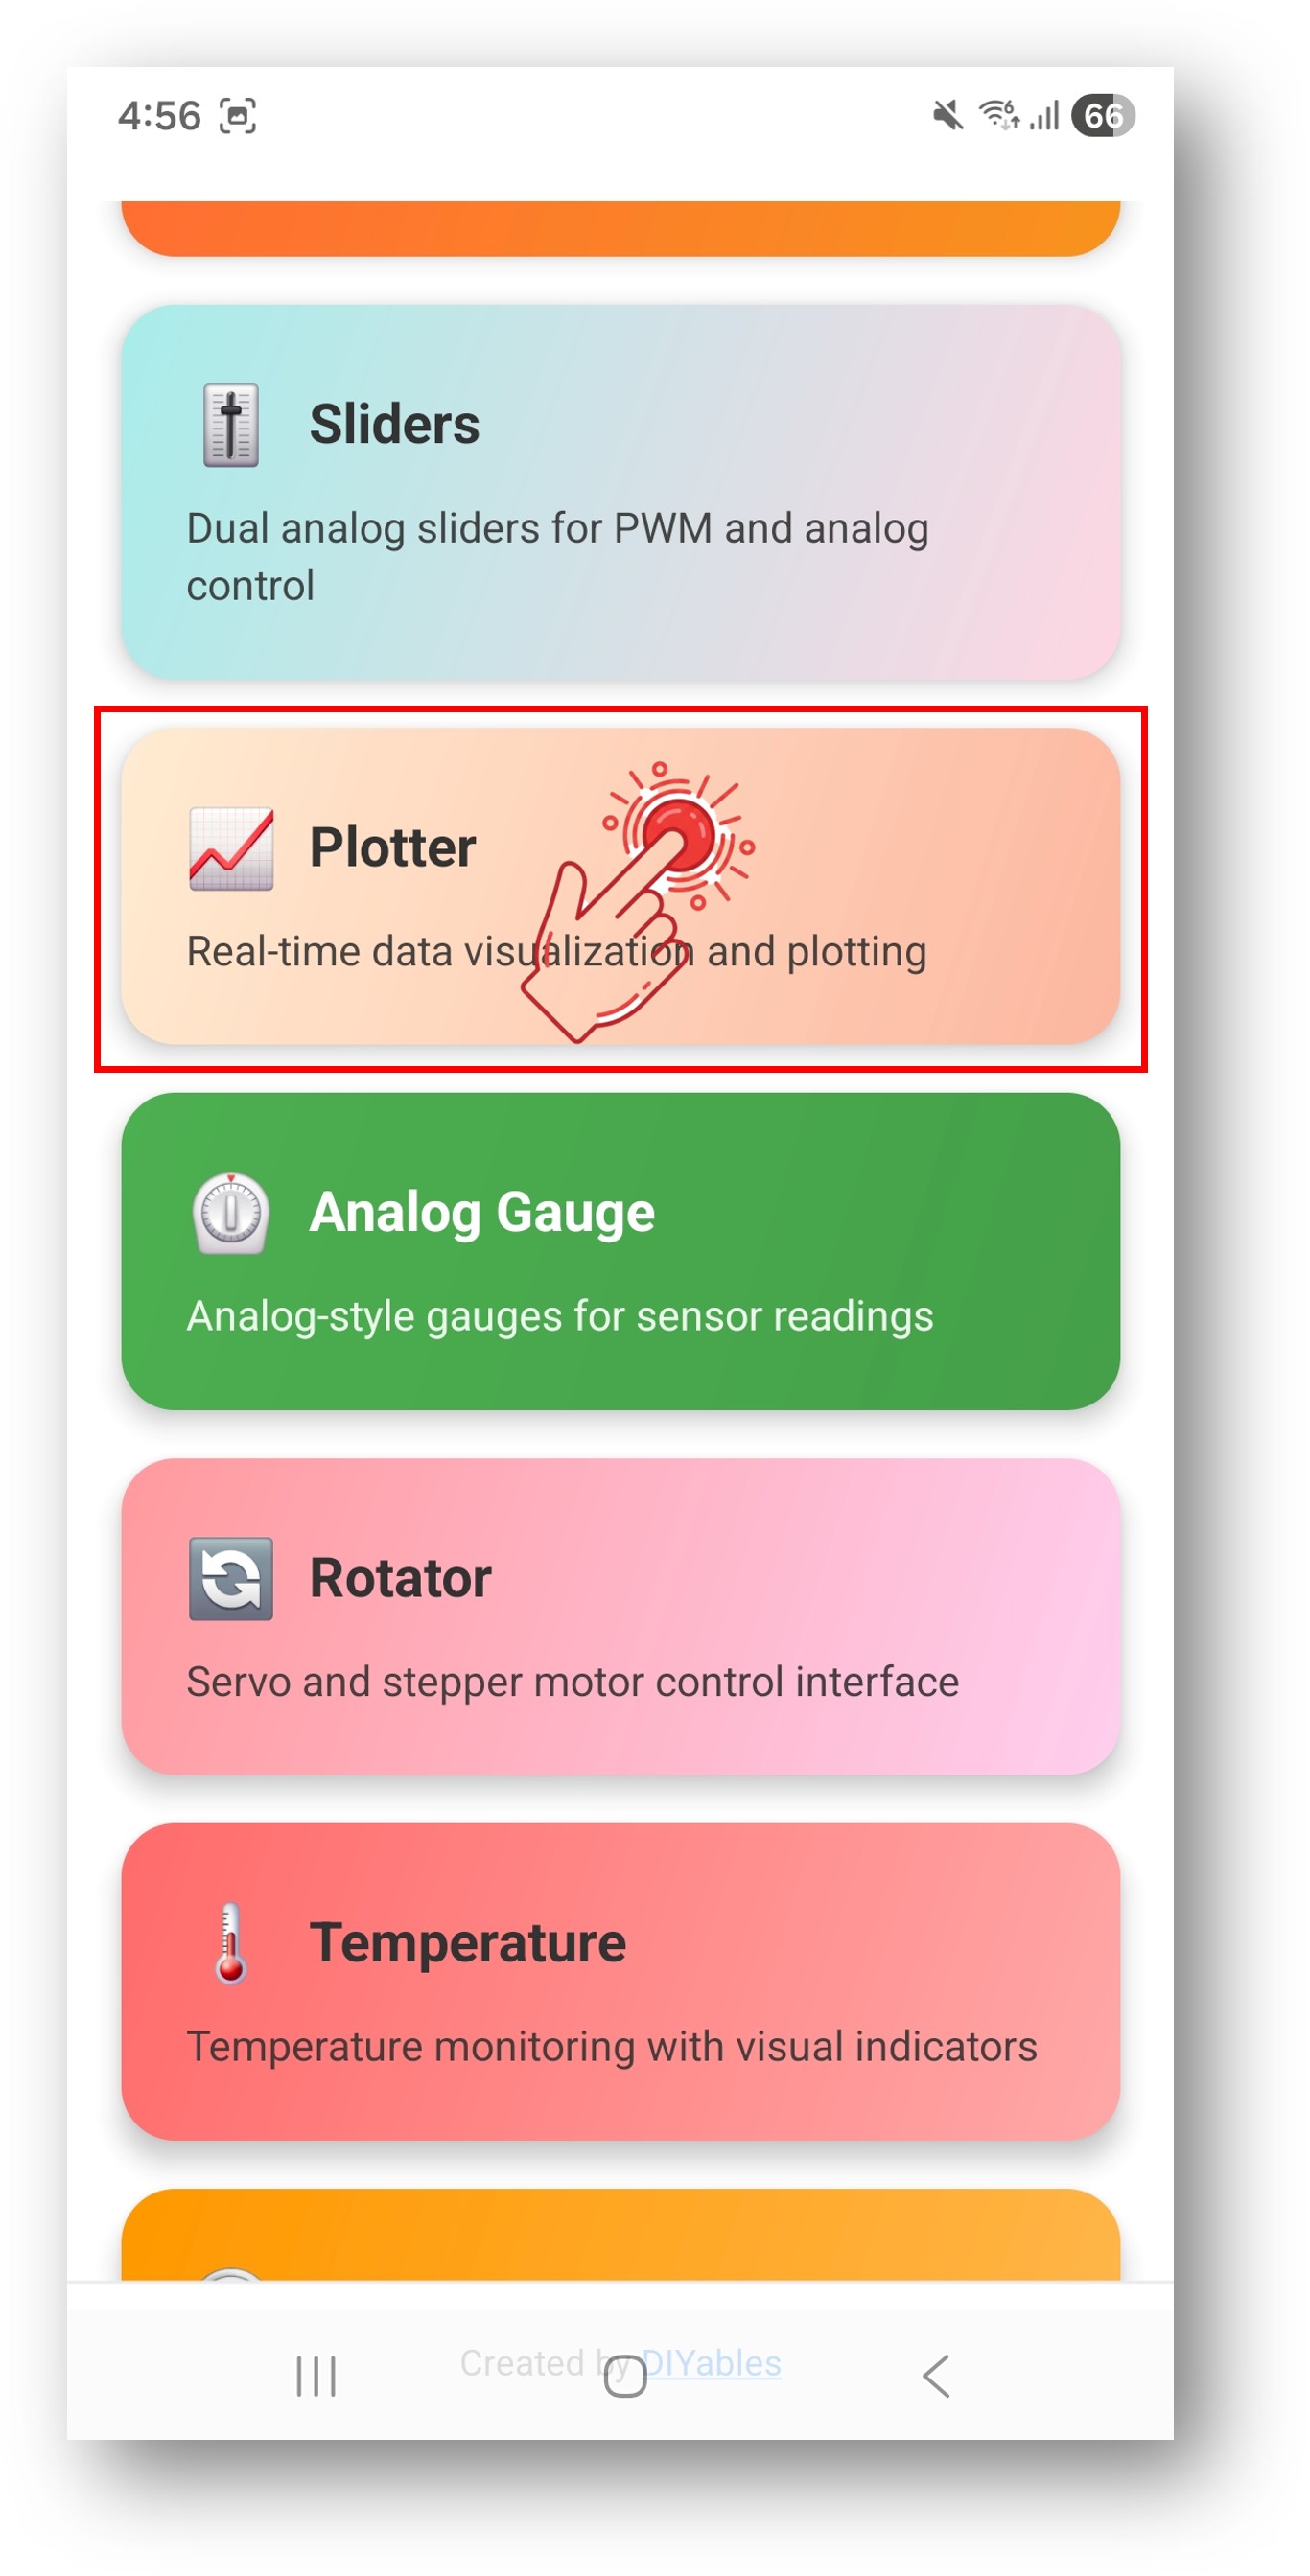
- Open the Plotter: after connecting, the app goes back to the home screen. Tap the Plotter app.
※ NOTE THAT:
You can tap the settings icon on the home screen to show or hide apps. For more details, read the DIYables Bluetooth App User Manual.
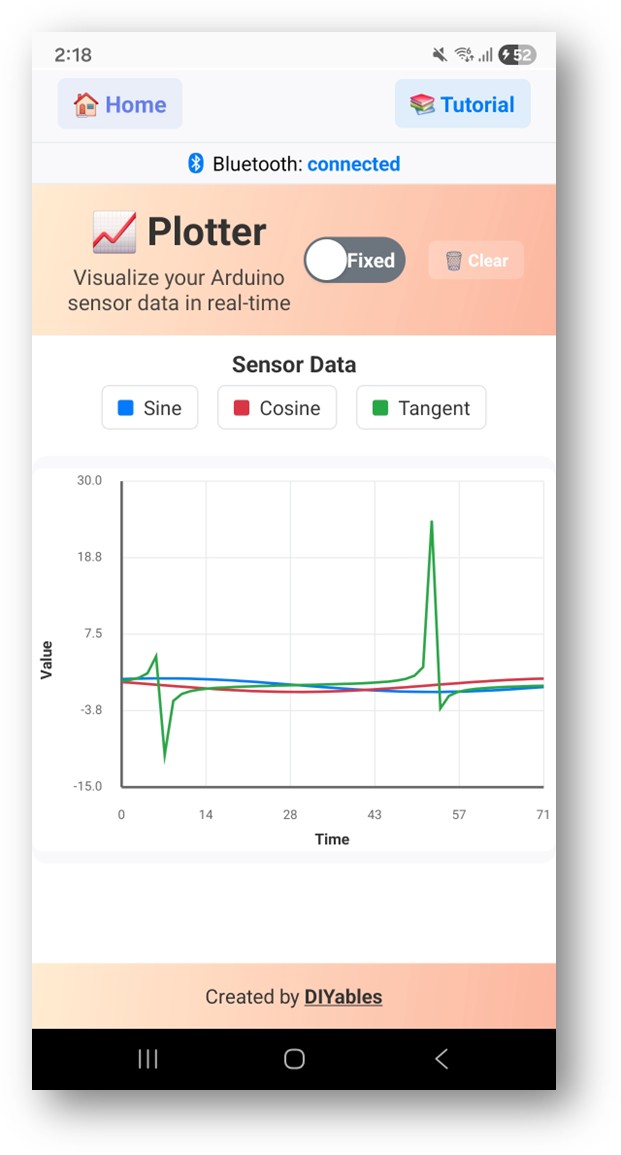
- Watch the graph: three waves scroll across the screen in real time.
Go back to the Serial Monitor in the Arduino IDE. You will see the same values that the app is drawing:
The plotter shows the sine, cosine and tangent waves live. The tangent is multiplied by 0.3 so its big peaks stay inside the -15 to 30 range.
Creative Customization - Adapt the Code to Your Project
The demo waves are only a starting point. The functions below let you change how the graph looks and what data it shows, so you can fit it to your own ESP32 S3 Uno project.
Configure Plot Settings
Set the look of the plot in setup(), before the phone connects:
Send Data to Plotter
The send() function has several forms. Pick the one that matches the number of series you want to draw:
Handle Data Request from App
When the app opens the Plotter screen, it can ask the board for data. You can react to that request here:
Handle Connection Events
These two callbacks tell you when the phone connects or leaves. They are handy for turning a status LED on and off.
How to Use the Plotter
Knowing how the app shows data helps you choose a good send rate and a good number of series.
App Interface
The Plotter screen shows a scrolling line chart. Each series has its own color, and the legend tells you which color is which. The chart scrolls by itself, so the newest data is always visible.
Data Format
The board sends each sample as comma-separated float values. One value makes one line, and three values make three lines. For a smooth graph, send new data every 10 to 100 ms.
Programming Examples
These short examples show how to plot real data instead of test waves. Each one is a part of a sketch: keep the BLE setup lines from the main example and add these parts to it.
Single Sensor Plot
This example draws one temperature line at 10 Hz. Replace readTemperatureSensor() with the read function of your own sensor.
Multi-Sensor Accelerometer Plot
This example reads an MPU6050 over I2C and plots the X, Y and Z acceleration in g. On the ESP32 S3 Uno, connect the module to the SDA (GPIO8) and SCL (GPIO9) header pins, not to A4/A5. Wire.begin() uses these pins by default.
| MPU6050 Pin | ESP32 S3 Uno Pin |
|---|---|
| VCC | 3.3V |
| GND | GND |
| SDA | SDA (GPIO8) |
| SCL | SCL (GPIO9) |
Analog Pin Plotter
This example reads three analog pins (A0, A1 and A2) and plots them together. The ESP32 S3 Uno ADC is 12-bit, so the values go from 0 to 4095, and the Y range is set to match. Connect each sensor output to its pin as shown below.
| Sensor Output | ESP32 S3 Uno Pin |
|---|---|
| Sensor 1 | A0 (GPIO2) |
| Sensor 2 | A1 (GPIO1) |
| Sensor 3 | A2 (GPIO7) |
WARNING
The ESP32 S3 Uno pins are NOT 5V tolerant. Power your analog sensors from 3.3V, or use a voltage divider so the signal on A0, A1 and A2 never goes above 3.3V.
The line analogSetAttenuation(ADC_11db) is important. By default, the ESP32 S3 Uno ADC can only measure a small voltage. With 11 dB attenuation, the analog pins can read the full range from 0V up to about 3.3V. Without it, the readings hit 4095 too early and your graph looks flat at the top.
Signal Generator
This example needs no sensor. It makes three test signals (sine, square and triangle) so you can see how different wave shapes look in the app.
Advanced Programming Techniques
Real sensor data is often noisy, and some projects need to show different data at different times. These two techniques help with that.
Moving Average Filter
This filter keeps the last 10 readings and returns their average. The sketch plots the raw voltage from A0 (GPIO2) and the smoothed voltage side by side, so you can see the effect of the filter. The math uses 3.3V and 4095 because the ESP32 S3 Uno ADC is 12-bit.
Dynamic Plot Configuration
You can also change the plot settings while the sketch runs. Call one of these functions, for example when a button is pressed, to switch between two views.
Why BLE Only on the ESP32 S3 Uno?
Some ESP32 boards have two kinds of Bluetooth: BLE and Classic. The ESP32 S3 Uno has only BLE, so this tutorial uses only the BLE example. The table shows what BLE gives you.
| Feature | BLE on the ESP32 S3 Uno |
|---|---|
| iOS support | Yes |
| Android support | Yes |
| Power use | Low |
| Range | About 30-100 m (open space) |
| Pairing | Not needed (connect from the app) |
| Example name | Esp32BLE_Plotter |
| Classic Bluetooth (Esp32Bluetooth_Plotter) | Not supported on this board |
Common Issues and Debug Tips
Most plotter problems come from the connection, the send rate or the plot settings. Check these points first.
The device does not show up in the app
Make sure the sketch is uploaded and the ESP32 S3 Uno has power. Turn on Bluetooth on your phone, and on Android 11 or older also turn on Location. Remember that the board uses BLE, so do not look for it in the phone's Bluetooth settings. Scan from inside the app.
The plot does not update
Check that the app shows "connected" and that you are on the Plotter screen. Make sure bluetoothServer.loop() and bluetoothPlotter.send() are both called in loop(). If it still does not move, disconnect and connect again.
The graph looks choppy
Send data more often, for example every 50 ms instead of 500 ms. If you plot many series, try fewer, because BLE has limited bandwidth.
The Y-axis does not fit the data
Use enableAutoScale(true), or set a wider range with setYAxisRange(). For raw ESP32 S3 Uno analog values, the range is 0 to 4095.
Legend labels are missing
Call setLegendLabels() in setup(), before the phone connects. The number of labels should match the number of series you send.
The sketch is too large
Go to Tools > Partition Scheme and choose "Huge APP (3MB No OTA/1MB SPIFFS)" or "No OTA (Large APP)". The default scheme gives only about 1.2 MB for code, which is not enough for the Bluetooth library. The bigger scheme gives about 3 MB but removes OTA updates.
Debug Tips
This helper prints the values you send, plus the free memory, to the Serial Monitor:
Project Ideas
A live graph on your phone is useful in many projects. Here are some ideas to try with the ESP32 S3 Uno.
Sensor Monitoring
Show temperature and humidity trends, track light levels during the day, follow the motion of an accelerometer, or watch a pressure sensor.
Signal Analysis
Build a simple audio level viewer, check vibrations, show a pulse signal, or measure the strength of a magnetic field.
Education
Compare sine, cosine and tangent waves, watch an RC circuit charge and discharge, see how a PID controller reacts, or log data from a physics experiment.
Industrial
Monitor machine vibration, follow a process value over time, track power use, or chart quality control data.
Integration with Other Bluetooth Apps
The DIYables Bluetooth library can run several apps on one connection. Mixing the plotter with other apps makes your project more interactive.
Combine with Bluetooth Slider
Use two sliders to change the frequency and amplitude of the plotted wave:
Combine with Bluetooth Table
Show the current, max, min and average values in a table next to the graph:
Next Steps
When the plotter works well, try these examples next:
- Bluetooth Temperature - a display made for temperature values
- Bluetooth Analog Gauge - show one value on a round meter
- Bluetooth Table - show many numbers in rows
- Multiple Bluetooth Apps - use the plotter together with other apps
Support
If you need more help:
- Read the API Reference documentation of the library.
- Visit the DIYables tutorials.
- Ask in the Arduino community forums.
FAQ
Does the ESP32 S3 Uno support Classic Bluetooth for this plotter?
No. The ESP32 S3 Uno has only BLE (Bluetooth Low Energy). The BluetoothSerial library and the Esp32Bluetooth_Plotter example do not work on it. Use the Esp32BLE_Plotter example, which works with the app on both Android and iOS.
Do I need to pair the ESP32 S3 Uno with my phone first?
No. BLE does not need pairing in the phone settings. Open the DIYables Bluetooth App, tap Connect and choose "ESP32BLE_Plotter" from the scan list.
Why does my analog plot only go up to 4095 and not 1023?
The ESP32 S3 Uno has a 12-bit ADC, so analogRead() gives values from 0 to 4095. The UNO R4 uses 10-bit (0-1023) by default. Set the Y-axis range to 0-4095 for raw values, or convert them to volts with value * 3.3 / 4095.0.
Why does the code call analogSetAttenuation(ADC_11db)?
It sets the ESP32 S3 Uno ADC input range to about 0-3.3V, so the full sensor signal maps to 0-4095. Without it, the range is smaller and the readings saturate early, so the top of your graph looks flat. The UNO R4 does not need this line, because it is ESP32-only. Always keep the sensor output at 3.3V or less.
How fast can I send data to the plotter?
A send interval of 10 to 100 ms gives a smooth graph. The main example uses 100 ms (10 samples per second). If you send many series very fast, BLE may not keep up and the graph can look choppy.
What if my project needs more analog pins than the Uno headers give?
The ESP32 S3 Uno has two extra rows of holes with more GPIOs: GPIO15 and GPIO16 (I/O, PWM, analog), GPIO45 and GPIO35-GPIO42 (I/O, PWM), and GPIO47/GPIO48 (output only, PWM). Solder pin headers to them and write the GPIO number in your code. For extra analog sensors in this plotter, GPIO15 and GPIO16 are the best choice; do not use GPIO47/GPIO48 for inputs. Two warnings: (1) GPIO47 and GPIO48 may run at 1.8V instead of 3.3V on some modules (especially ones with "V" in the name, like R8V or R16V), so 3.3V devices can be damaged or act strangely. (2) GPIO0, GPIO3 (D6), GPIO45 and GPIO46 (D9) are boot strapping pins, and a wrong connection can stop the board from booting or uploading code. Use the other extra pins first.
Troubleshooting
| Problem | Possible Cause | Solution |
|---|---|---|
| No COM port in Arduino IDE | USB driver missing or board not in upload mode | Install the CP210x or CH340 driver, try another USB cable, or hold BOOT while you press RESET |
| Upload fails with "Sketch too big" | Default partition scheme is too small for the Bluetooth library | Choose Tools > Partition Scheme > Huge APP (3MB No OTA/1MB SPIFFS) |
| "ESP32BLE_Plotter" not in the scan list | Sketch not running, phone Bluetooth off, or Location off on old Android | Press RESET on the board, turn on Bluetooth, and turn on Location on Android 11 or older |
| Looking for the board in phone Bluetooth settings | The ESP32 S3 Uno uses BLE and does not pair there | Connect from inside the DIYables Bluetooth App instead |
| Graph stays flat at the top | Analog input above the ADC range or attenuation not set | Add analogSetAttenuation(ADC_11db) and keep the signal at 3.3V or less |
| Analog lines jump around randomly | Analog pin floating or loose wire | Check the sensor wiring and ground, and add the moving average filter |
| Serial Monitor shows strange characters | Wrong baud rate | Set the Serial Monitor to 115200 baud |
| MPU6050 values stay at zero | Module wired to A4/A5 instead of SDA/SCL | Move the wires to the SDA (GPIO8) and SCL (GPIO9) header pins |