
DIYables Web Apps Web Temperature
Overview
This ESP32 S3 Uno web thermometer tutorial shows you how to display temperature on a visual thermometer page served by the ESP32 S3 Uno form board. You open the page in any web browser, and the mercury column rises and falls in real time. It is a simple way to build web-based temperature monitoring for a room, a greenhouse or a science experiment.
In this tutorial, you will:
- Install the DIYables ESP32 WebApps library in Arduino IDE
- Run the WebTemperature example and open the thermometer in a web browser
- Set the temperature range and unit (°C, °F or K) in code
- Connect a DS18B20 temperature sensor and send real readings to the web page
The video below shows the Web Temperature app working with a DS18B20 temperature sensor, step by step:
Features
The thermometer page handles all the drawing and animation. Your sketch only has to send a number, so you can focus on the sensor.
Visual thermometer in the browser
The page draws a classic thermometer with a mercury-style column. You open it from any browser on the same WiFi network.
Your own range and unit
You choose the minimum temperature, the maximum temperature and the unit once, in the constructor. The library sends this setup to the page for you.
Celsius, Fahrenheit and Kelvin
The display works with °C, °F and K, or with any short unit text you choose.
Instant updates over WebSocket
New readings reach the page right away, with no page refresh. The mercury level moves smoothly from one value to the next.
Works on every screen
The clean, responsive design fits desktop, tablet and phone screens.
Hardware Preparation
Or you can buy the following kits:
| 1 | × | DIYables Sensor Kit (18 sensors/displays) |
Additionally, some of these links are for products from our own brand, DIYables .
Buy Note: Many DS18B20 sensors available in the market are unreliable. We strongly recommend buying the sensor from the DIYables brand using the link provided above. We tested it, and it worked reliably.
Setup Instructions
You can test the first sketch without any sensor. It simulates a temperature that slowly climbs from 15°C to 35°C and back, so you only need the board and a USB cable. You will connect a real DS18B20 sensor later in this tutorial.
Detailed Instructions
Follow these steps in order:
- New to the ESP32 S3 Uno? Follow ESP32 S3 Uno - Getting Started first.
- Connect the board to your computer with a USB Type-C cable.
- Open Arduino IDE, choose the ESP32S3 Dev Module board and the correct COM port.
- Open the Library Manager by clicking the Libraries icon on the left bar of Arduino IDE.
- Search for the library: type "DIYables ESP32 WebApps" and find the DIYables ESP32 WebApps library by DIYables.
- Install it by clicking the Install button.
- Search for DIYables ESP32 WebApps created by DIYables and click the Install button.
- Install the dependencies: Arduino IDE asks to install some other libraries too. Click Install All.
- Open the example: go to File Examples DIYables ESP32 WebApps WebTemperature, or copy the code below and paste it into Arduino IDE.
- Add your WiFi details by changing these two lines:
- Upload the code: click the Upload button in Arduino IDE to send the sketch to the ESP32 S3 Uno.
- Open the Serial Monitor and set it to 9600 baud. You should see output like this:
- No output? Press the RESET button on the ESP32 S3 Uno and watch the Serial Monitor again.
- Open a web browser on your PC or phone. It must be on the same WiFi network as the board.
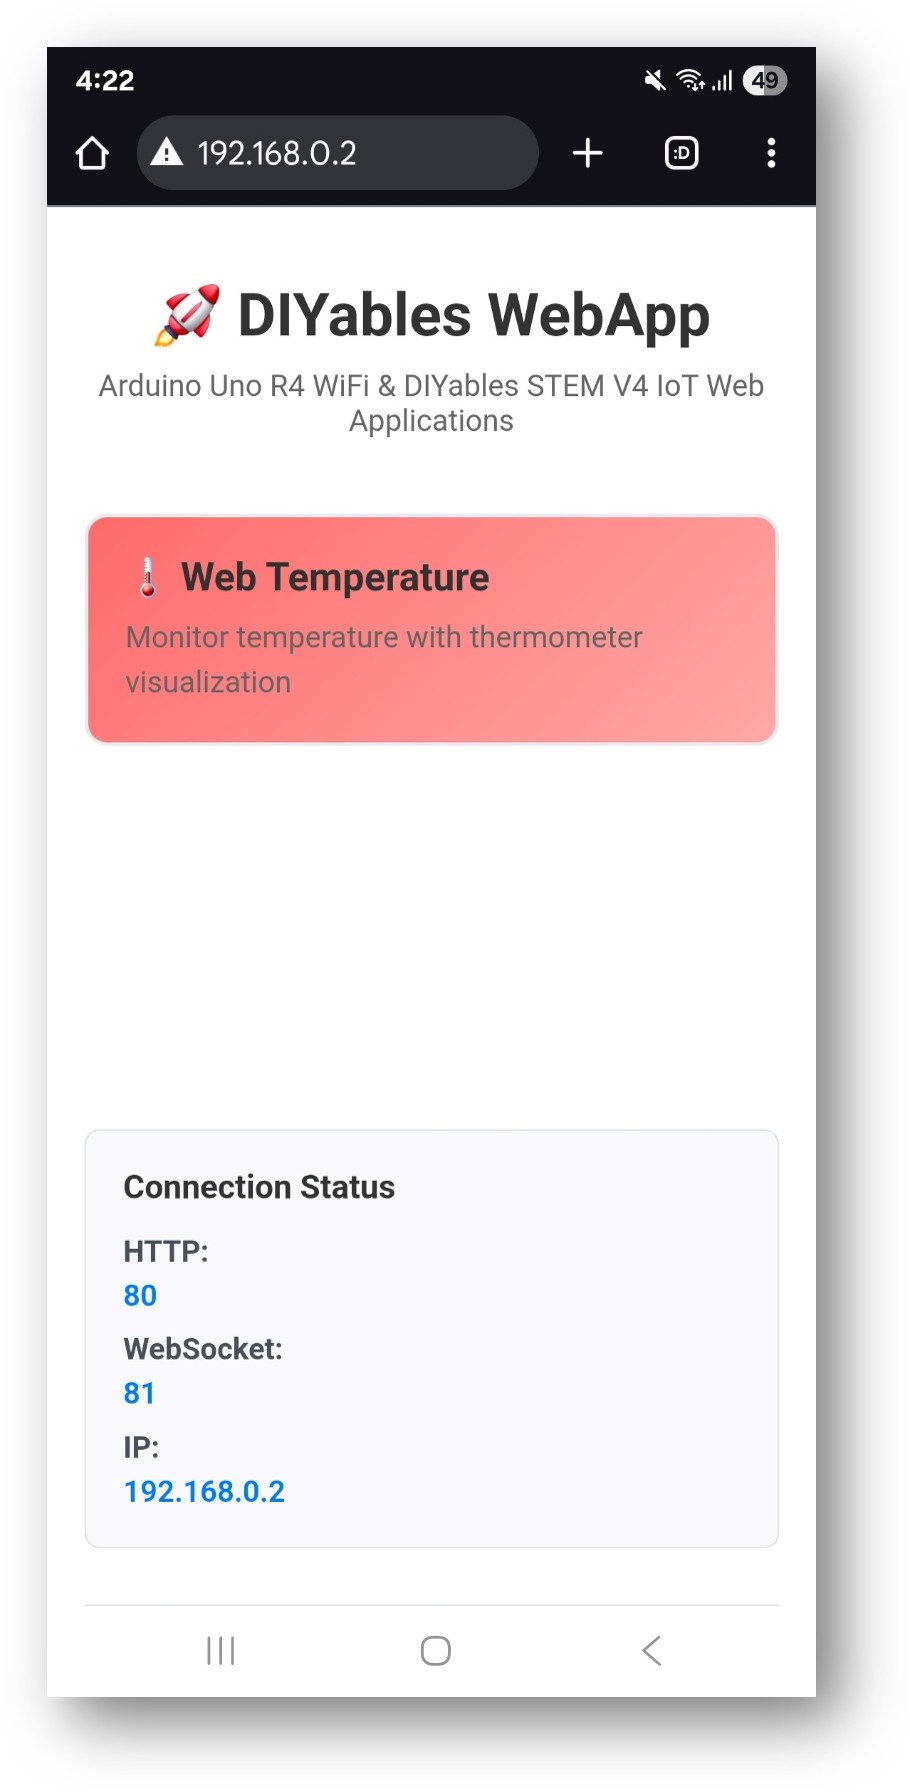
- Type the IP address from the Serial Monitor into the address bar, for example http://192.168.0.2. The home page appears:
- Click the Web Temperature link to open the thermometer:
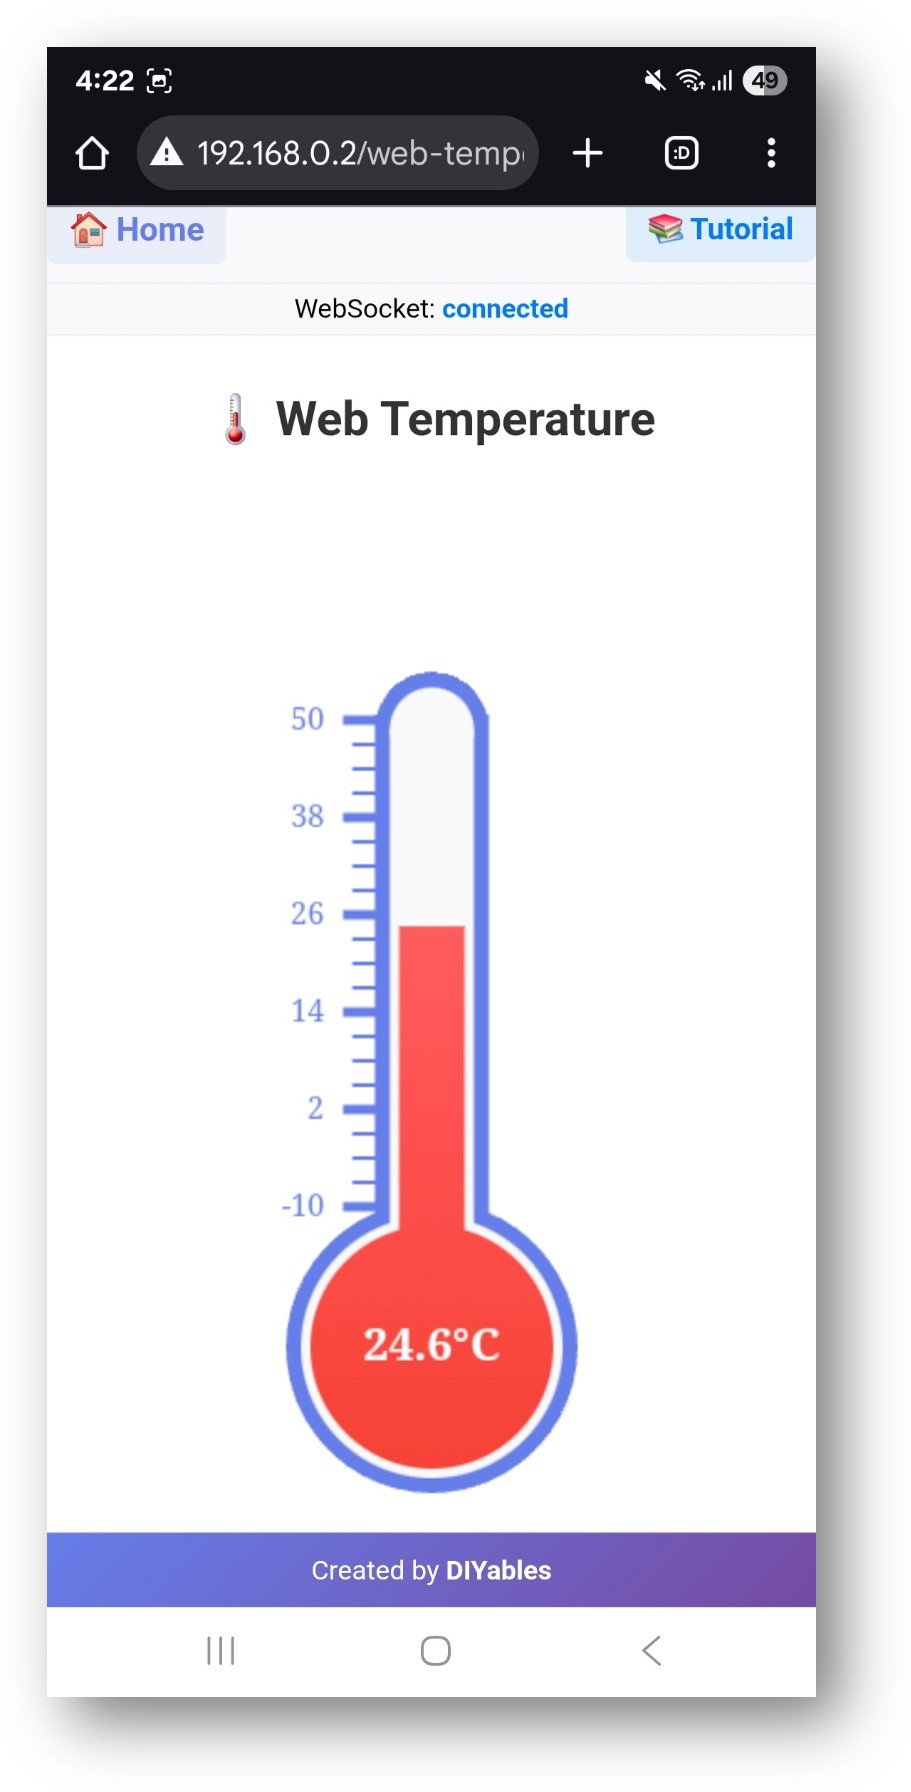
- Watch the thermometer: the mercury column follows the simulated temperature and updates every 2 seconds.
- Tip: you can skip the home page and open the thermometer directly with the IP address plus /web-temperature, for example http://192.168.0.2/web-temperature. Bookmark it on your phone for quick checks.
Web Interface Features
It helps to know what the page shows, so you can read your temperature data at a glance.
Thermometer Display
The page draws a classic, school-style thermometer with clear scale marks. The scale starts at the minimum and ends at the maximum you set in code. The mercury column moves smoothly to each new reading, and the unit you chose (°C, °F or K) appears next to the value.
Real-time Monitoring
The page keeps a WebSocket connection open to the ESP32 S3 Uno, so new values arrive on their own. A status indicator shows if the connection is alive. The touch-friendly layout works well on phones.
Code Configuration
Two small pieces of code control the thermometer: one creates the page, and one sends it values.
Temperature Setup
The constructor takes the lowest temperature, the highest temperature and the unit. After that, you register a callback that runs when a browser asks for the current value.
Sending Temperature Values
Inside the callback, read your sensor and pass the result to sendTemperature(). The page then moves the mercury to the new value.
Temperature Sensor Integration
The thermometer page does not care where the number comes from. Pick the sensor you have, and change only the readTemperatureSensor() function. The examples below use the Uno header labels (D2, A0) for wiring, and the matching ESP32 S3 Uno GPIO number in code.
DS18B20 Digital Temperature Sensor
The DS18B20 uses the OneWire bus. Here the DATA wire goes to D2, which is GPIO18 on the ESP32 S3 Uno. The sensor range is -55°C to 125°C, so the page uses the same range.
DHT22 Temperature/Humidity Sensor
The DHT22 also uses one data wire, connected to D2 (GPIO18). It measures from -40°C to 80°C. Power the module from 3.3V so its data line stays at a safe level for the ESP32 S3 Uno.
Analog Temperature Sensor (TMP36)
The TMP36 gives a voltage that grows with temperature. Connect its output to A0, which is GPIO2. The ESP32 S3 Uno ADC is 12-bit and works at 3.3V, so the math divides by 4095 and multiplies by 3.3, not 1023 and 5V. Power the TMP36 from 3.3V.
The analogSetAttenuation(ADC_11db) line matters on the ESP32 S3 Uno. By default, its ADC can only measure a small voltage. With 11 dB attenuation, the analog pin reads the full range, from 0V up to about 3.3V. Without it, the reading hits 4095 too early and the temperature looks wrong.
Unit Conversion
Many people want to see Fahrenheit or Kelvin instead of Celsius. The page only shows the unit text you give it, so you set the range in the same unit and convert the value before you send it.
Supporting Multiple Units
The three ranges above cover the same span of temperature: -10°C to 50°C. Most sensor libraries return Celsius, so call a conversion function first when the page uses °F or K.
Customization Options
You can shape the thermometer to fit your project with a few small changes.
Temperature Range
Set the minimum to the lowest reading you expect, and the maximum to the highest. The unit is a short text such as °C, °F or K, and you can also use your own text. The scale on the page adjusts to the range on its own, so a narrow range gives you a more detailed view.
Update Frequency
Do not send a new value on every loop. A timer keeps the page smooth and avoids flooding the WebSocket connection.
ESP32 S3 Uno Pinout
The image below shows the pinout diagram of the ESP32 S3 Uno form board. Use it to find the D2 header pin and its GPIO number before you wire the DS18B20 sensor.

ESP32 S3 Uno Web Temperature with DS18B20 Temperature Sensor
Now replace the simulated value with a real one. The DS18B20 is a good first sensor: it is waterproof in its probe version, accurate to about ±0.5°C, and needs only one data wire.
Wire the sensor as shown in the table. The DATA line needs a 4.7kΩ pull-up resistor to 3.3V, unless you use the wiring adapter, which already has one.
| DS18B20 Pin | ESP32 S3 Uno Pin |
|---|---|
| VCC (red) | 3.3V |
| GND (black) | GND |
| DATA (yellow) | D2 (GPIO18) |
WARNING
The ESP32 S3 Uno pins work at 3.3V and are NOT 5V tolerant. Power the DS18B20 from 3.3V. If you power it from 5V, the pull-up resistor pulls D2 (GPIO18) up to 5V and can damage the pin.
The sketch below reads the DS18B20 on D2 (GPIO18) and sends the temperature to the web thermometer every 2 seconds. It also prints each value to the Serial Monitor. The rest of the code is the same as the WebTemperature example.
Install the "DallasTemperature" library (it also installs "OneWire") from the Library Manager before you upload this sketch.
Watch the video below to see this ESP32 S3 Uno project step by step.
For more details on the DS18B20 sensor, see the ESP32 S3 Uno - DS18B20 Temperature Sensor tutorial. Note that it wires DATA to D4 (GPIO19). If you follow that wiring, change the code to #define ONE_WIRE_BUS 19.
Common Use Cases
A live thermometer fits any project where you want to check a temperature from your phone. Here are some ideas.
Educational Projects
Track indoor and outdoor temperature for a weather project. Watch heat transfer and thermal changes in physics lessons. Follow a greenhouse or a small climate model in environmental science. Learn sensor wiring and data display in electronics classes.
Practical Applications
Check room temperature for home heating and cooling. Keep a greenhouse at the right temperature for plants. Watch a fridge or storage box for food safety. Follow a process temperature for simple quality control.
Debugging Tips
Most problems come from the network, the wiring or the callback. Check these first, before you look deeper.
Temperature Not Updating
Make sure the board is on WiFi and the WebSocket status on the page shows connected. Check the sensor wiring and power. Confirm that onTemperatureValueRequested() is set as the callback, and look at the Serial Monitor to see if the sensor gives readings.
Incorrect Temperature Values
Compare the reading with another thermometer to check calibration. For analog sensors, use 3.3V and 4095 in the math, and keep analogSetAttenuation(ADC_11db) in setup(). Make sure the sensor starts correctly, and test it alone with a basic sketch.
Sensor Connection Issues
Check the power, ground and data wires. Digital sensors like the DS18B20 need a pull-up resistor on the data line. Test the sensor with a multimeter if needed, and make sure its library is installed.
Advanced Features
Once one thermometer works, you can grow the project into a small monitoring dashboard.
Multiple Temperature Sensors
Create one thermometer page for each place you want to watch, and add each one to the server:
Temperature Logging
The thermometer only shows the current value. To see the history too, combine it with the Web Plotter and send the same value to both pages:
Alert System
You can also check each reading against limits and react when it is too hot or too cold:
Educational Integration
A thermometer on a phone screen makes temperature easy to see, so this project works well in a classroom.
STEM Learning Objectives
Students learn basic thermal concepts and how heat moves. They compare digital and analog temperature sensors. They see real-time data visualization in action, and they practice callback functions and sensor code.
Classroom Activities
- Compare different sensor types side by side.
- Calibrate a sensor and talk about accuracy.
- Track temperature changes in the room over a day.
- Combine the thermometer with other environmental sensors.
Science Experiments
- Measure temperature changes during a heat transfer experiment.
- Watch the temperature stay flat while ice melts or water boils.
- Compare how well different materials insulate.
- Log temperature over many days for a small climate study.
This example gives you a solid base for temperature monitoring and visualization with the ESP32 S3 Uno, for both school projects and practical builds.
FAQ
Do I need a sensor to try the ESP32 S3 Uno web thermometer?
No. The WebTemperature example simulates a temperature that moves between 15°C and 35°C. You only need the board, a USB cable and a 2.4GHz WiFi network. Add a DS18B20 later when you want real data.
Which pin should I use for the DS18B20 on the ESP32 S3 Uno?
This tutorial uses D2, which is GPIO18, so the code has #define ONE_WIRE_BUS 18. Always write the GPIO number in code, not the D label. Avoid D0 and D1 (USB serial) and the boot strapping pins D6 (GPIO3) and D9 (GPIO46).
Can I power the temperature sensor from 5V on the ESP32 S3 Uno?
Power it from 3.3V. The ESP32 S3 Uno pins are not 5V tolerant, and a 5V pull-up on the data line can damage the pin. The DS18B20, DHT22 and TMP36 all work fine at 3.3V.
Is this library the same as the DIYables WebApps library for the UNO R4 WiFi?
The web pages and the API are almost the same, but the ESP32 S3 Uno uses the "DIYables ESP32 WebApps" library. The sketch includes DIYables_ESP32_Platform.h and creates an ESP32ServerFactory instead of UnoR4ServerFactory. The rest of the WebTemperature code stays the same.
Why does the TMP36 code call analogSetAttenuation(ADC_11db)?
It sets the ESP32 S3 Uno ADC input range to about 0–3.3V, so the full TMP36 signal maps to 0–4095. Without it the range is smaller and readings saturate early. The UNO R4 does not need this line, because it is ESP32-only. Keep the sensor output at 3.3V or less.
What if my project needs more pins than the Uno headers give?
The ESP32 S3 Uno has two extra rows of holes with more GPIOs: GPIO15 and GPIO16 (I/O, PWM, analog), GPIO45 and GPIO35–GPIO42 (I/O, PWM), and GPIO47/GPIO48 (output only, PWM). Solder pin headers to use them and write the GPIO number in code. For more thermometers, put extra DS18B20 or DHT22 sensors on GPIO35–GPIO42, and analog sensors like the TMP36 on GPIO15 or GPIO16. Do not use GPIO47 or GPIO48 for sensors, because they are output only. Be careful with two things. First, GPIO47 and GPIO48 may run at 1.8V instead of 3.3V on some modules (especially ones with "V" in the name, like R8V or R16V), so 3.3V devices can be damaged or act strangely. Second, GPIO0, GPIO3 (D6), GPIO45 and GPIO46 (D9) are boot strapping pins, and a wrong connection can stop the board from booting or uploading code. Use the other extra pins first.
Troubleshooting
| Problem | Possible Cause | Solution |
|---|---|---|
| No COM port in Arduino IDE | USB driver missing or board not in upload mode | Install the CP210x or CH340 driver, try another USB cable, or hold BOOT while you press RESET and upload again |
| Board never connects to WiFi | Wrong WiFi name or password, or a 5GHz network | Check WIFI_SSID and WIFI_PASSWORD and use a 2.4GHz network |
| Web page does not open | Wrong IP address or the device is on another network | Use the IP from the Serial Monitor and connect your phone or PC to the same WiFi |
| Thermometer does not move | WebSocket blocked or callback not set | Refresh the page, check the firewall, and make sure the callback is registered before begin() |
| Temperature always shows -127°C | DS18B20 not found on the bus | Check the DATA wire on D2 (GPIO18), add the 4.7kΩ pull-up, and make sure ONE_WIRE_BUS is 18 |
| DHT22 shows nan | Wrong data pin or loose power wire | Connect DATA to D2 (GPIO18), power the module from 3.3V and wait 2 seconds between reads |
| TMP36 reading is far too high or low | 5V math or no ADC attenuation | Use 3.3 and 4095 in the formula and keep analogSetAttenuation(ADC_11db) in setup() |
| Library not found when compiling | DIYables ESP32 WebApps or DallasTemperature not installed | Install the libraries and click Install All for the dependencies |