
ESP32 S3 UNO - Keypad 4x4
This ESP32 S3 Uno keypad 4x4 tutorial shows you how to connect a 4x4 matrix keypad to the ESP32 S3 Uno form board and read every key press with Arduino code. You will see each pressed key in the Serial Monitor. Then you will turn the membrane keypad into a simple password lock that checks the code you type.
In this tutorial, you will:
- Wire a 4x4 matrix keypad to the ESP32 S3 Uno
- Install the DIYables_Keypad library in the Arduino IDE
- Read which key is pressed and print it to the Serial Monitor
- Check a password entered on the keypad
Hardware Preparation
| 1 | × | ESP32 S3 Uno-form Board | |
| 1 | × | USB Cable Type-A to Type-C (for USB-A PC) | |
| 1 | × | USB Cable Type-C to Type-C (for USB-C PC) | |
| 1 | × | Keypad 4x4 | |
| 1 | × | Jumper Wires |
Or you can buy the following kits:
| 1 | × | DIYables Sensor Kit (18 sensors/displays) |
Additionally, some of these links are for products from our own brand, DIYables .
Overview of 4x4 Keypad
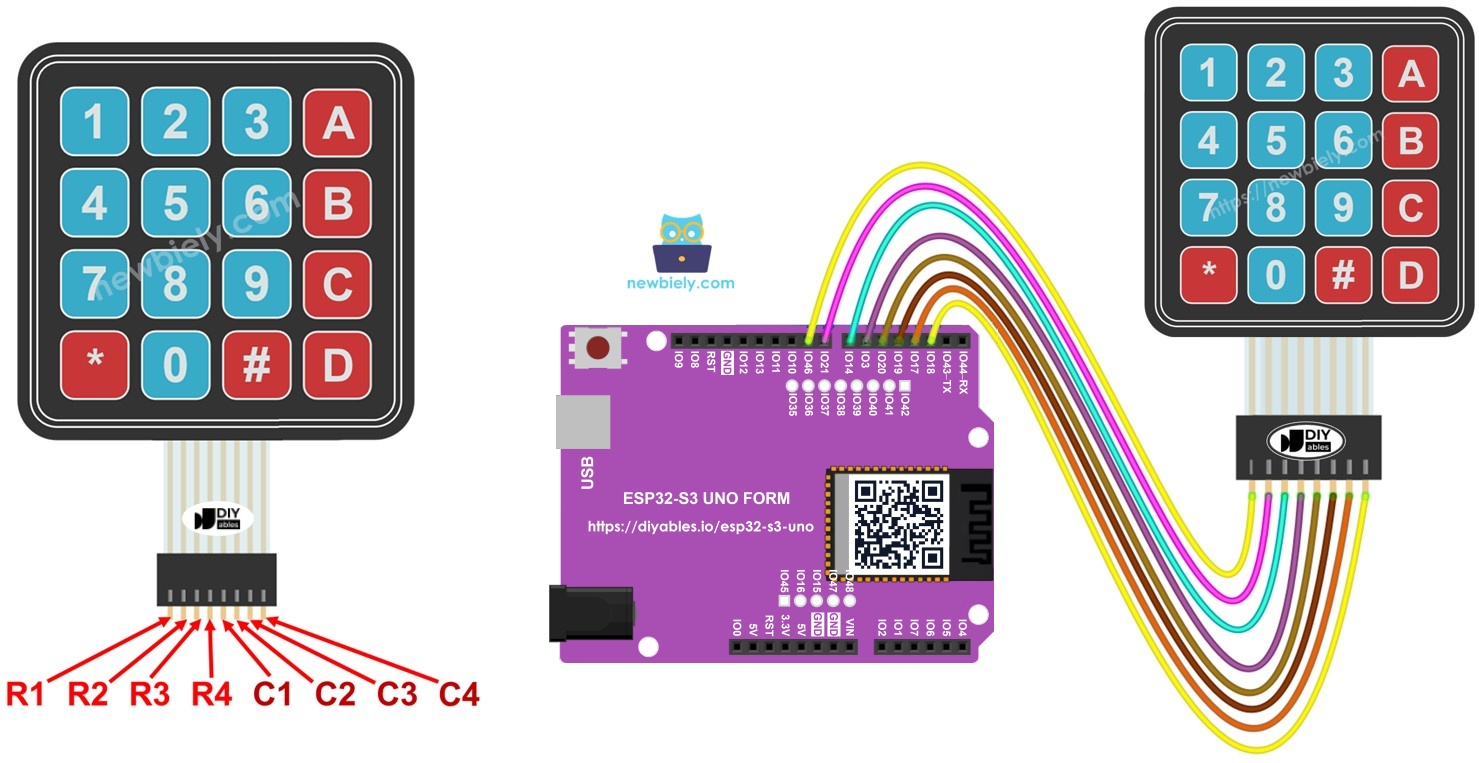
A 4x4 keypad is a cheap and easy way to give your project 16 input buttons. The keys are thin membrane switches laid out in a grid of rows and columns, which is called a matrix. Each button in the grid is called a key.
Pinout
The matrix layout means you do not need 16 wires for 16 keys. The keypad has only 8 pins, split into two groups.
Row pins
Four pins connect to the four rows of keys. They are labeled R1, R2, R3 and R4.
Column pins
Four pins connect to the four columns of keys. They are labeled C1, C2, C3 and C4.
When you press a key, it joins one row pin to one column pin. The library scans the rows and columns very fast to find out which pair is joined, and so which key is pressed.
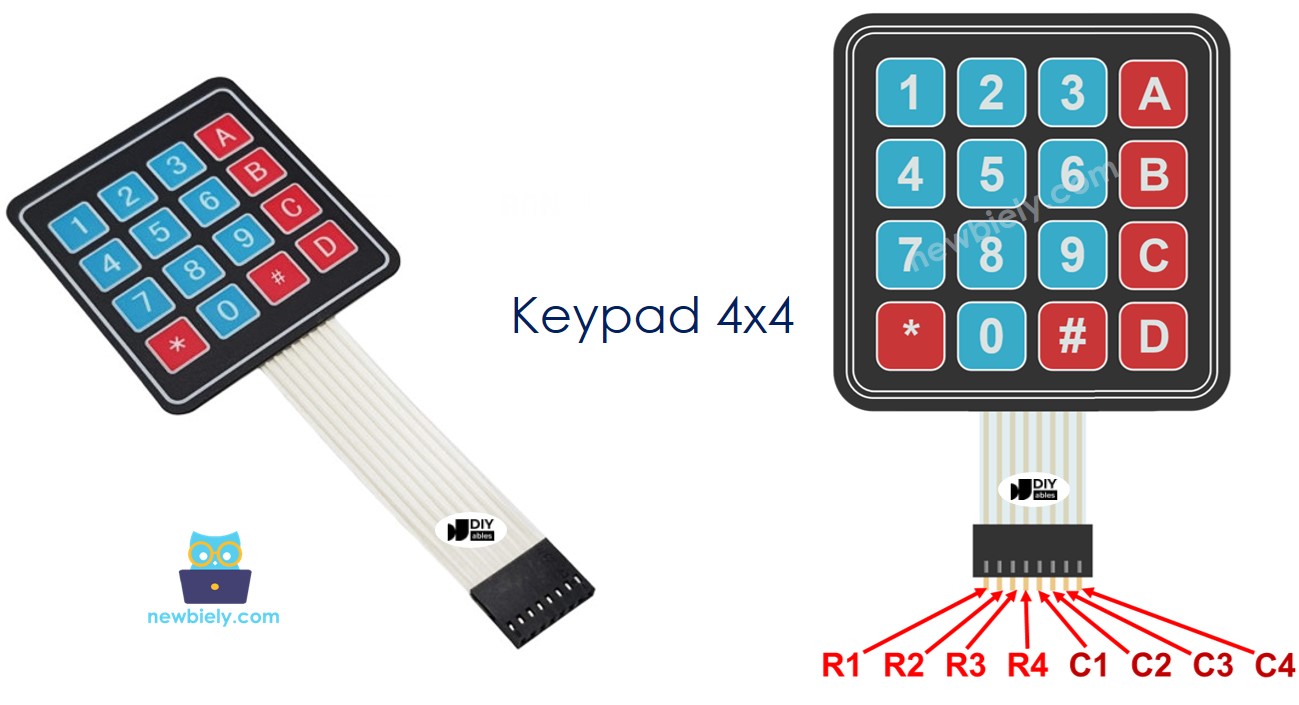
ESP32 S3 Uno Pinout
The image below shows the pinout diagram of the ESP32 S3 Uno form board. Use it to find the Uno header pins D2 to D9 and their GPIO numbers when you wire the keypad.

Wiring Diagram
The keypad uses eight digital pins in a row, from D9 down to D2. Plug the keypad's 8-pin connector into the board with jumper wires as shown below.
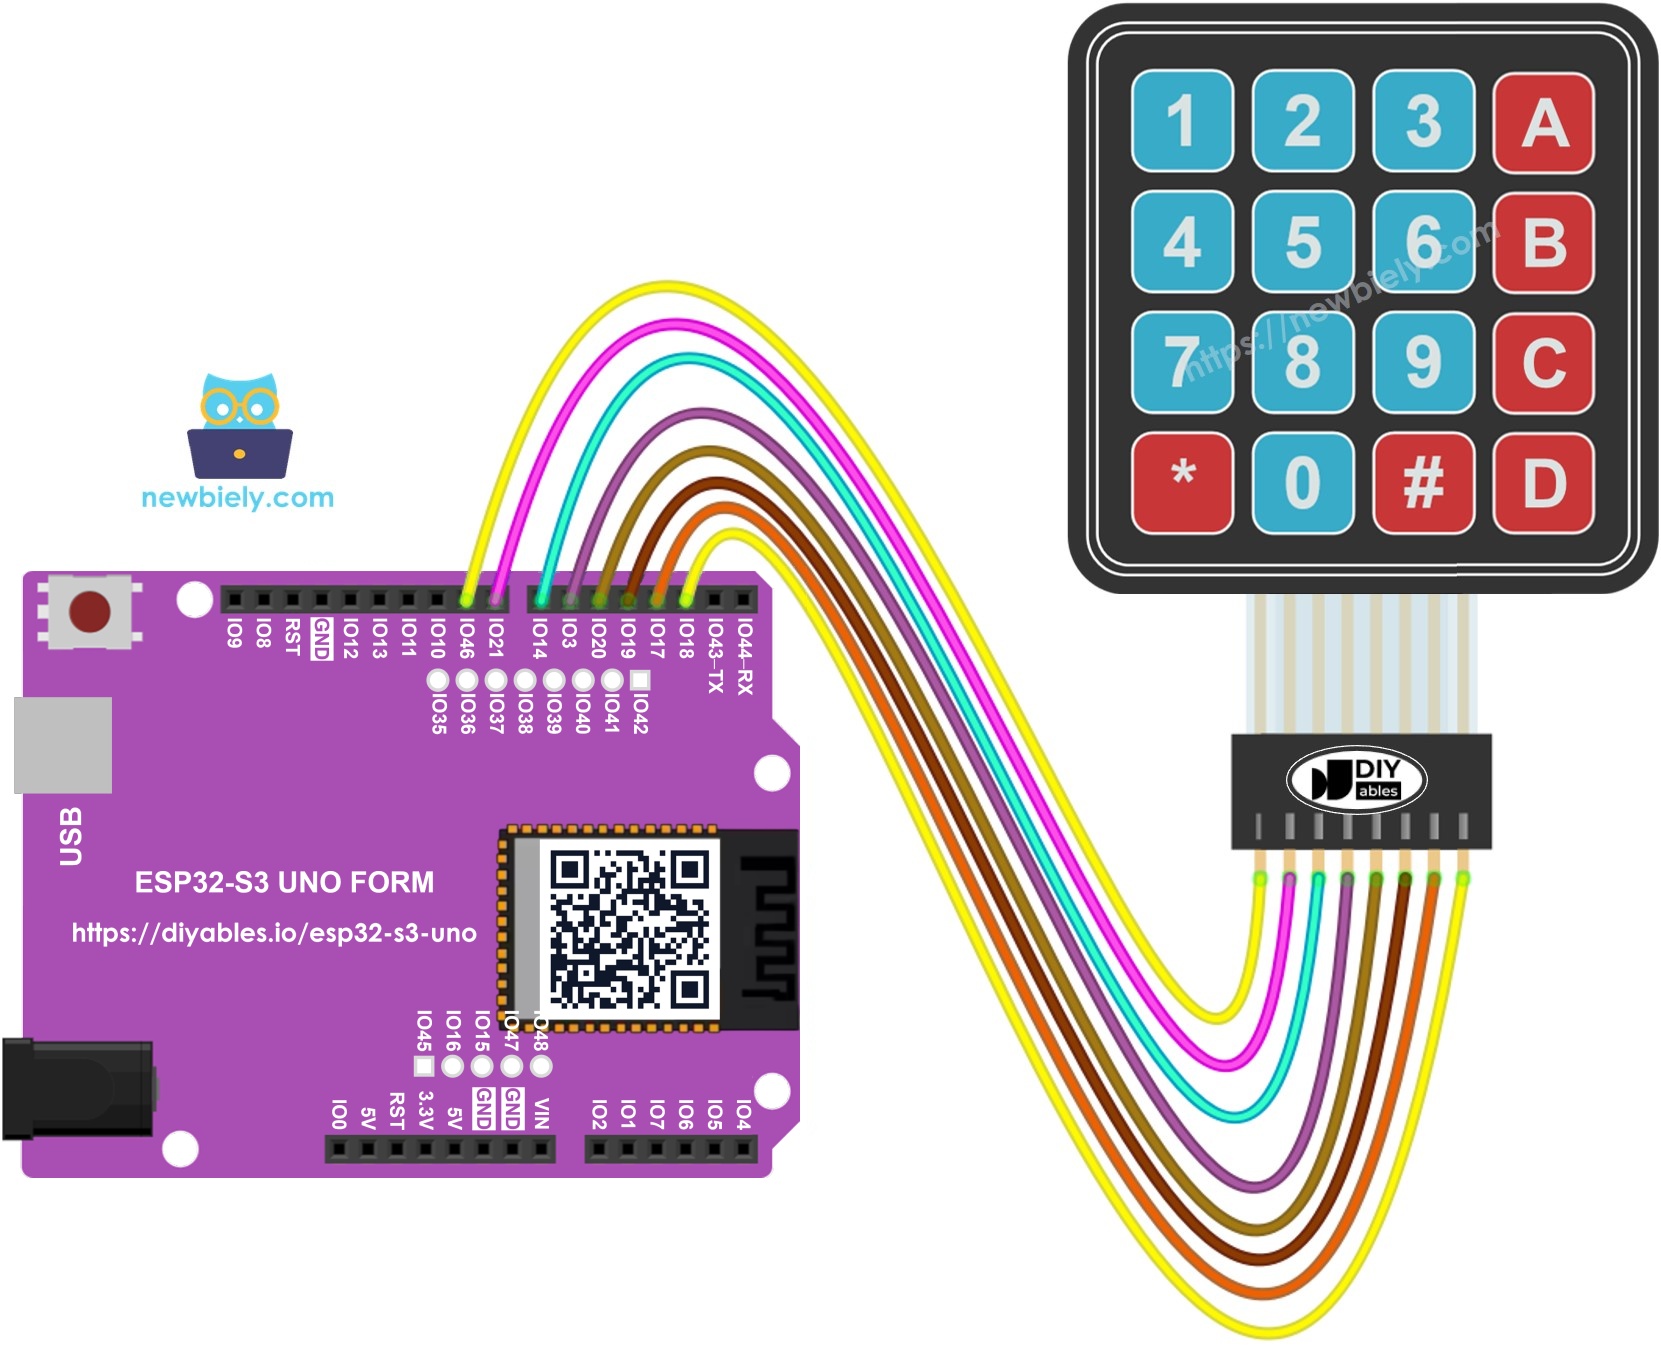
This image is created using Fritzing. Click to enlarge image
| Keypad Pin | ESP32 S3 Uno Pin |
|---|---|
| R1 | D9 (GPIO46) |
| R2 | D8 (GPIO21) |
| R3 | D7 (GPIO14) |
| R4 | D6 (GPIO3) |
| C1 | D5 (GPIO20) |
| C2 | D4 (GPIO19) |
| C3 | D3 (GPIO17) |
| C4 | D2 (GPIO18) |
WARNING
D9 (GPIO46) and D6 (GPIO3) are boot strapping pins on the ESP32 S3 Uno. The board reads them at power-up to choose its boot mode. A keypad is a passive part, so it is normally safe here. Still, do not hold any key down while you power on, reset or upload. If the board does not boot or the upload fails, unplug the keypad wires from D9 and D6, upload again, and then plug them back in.
ESP32 S3 Uno Code
This sketch sets up the keypad with the DIYables_Keypad library and a 4x4 key map. In the loop, it asks the library for a key. When a key is pressed, the sketch prints that key to the Serial Monitor.
The two arrays pin_rows and pin_column hold the GPIO numbers, not the D labels. If you wire the keypad to other pins, change only these two lines.
Detailed Instructions
Follow these steps to get the keypad working:
- New to the ESP32 S3 Uno? Follow ESP32 S3 Uno - Getting Started first.
- Wire it up as shown in the diagram.
- Connect the board to your computer with a USB Type-C cable.
- Open Arduino IDE, choose the ESP32S3 Dev Module board and the correct COM port.
- Open the Library Manager by clicking the Libraries icon on the left side of the Arduino IDE.
- Search for the library: type DIYables_Keypad in the search box and find the keypad library by DIYables.io.
- Install it by clicking the Install button.
- Search for DIYables_Keypad created by DIYables.io and click the Install button.
- Copy the code above and paste it into the Arduino IDE.
- Upload the code by clicking the Upload button.
- Open the Serial Monitor and set the baud rate to 9600.
- Press some keys on the keypad and watch the Serial Monitor.
- Tip: if a whole row or column of keys does nothing, one wire is loose or in the wrong pin. Check that wire against the wiring table first.
Keypad and Password
Password entry is one of the most popular uses for a keypad. It lets you build a door lock, a safe or an alarm panel. To make it work, you give two keys a special job.
Start key
The "*" key starts a new password. It clears anything typed before.
Enter key
The "#" key ends the password. The sketch then checks what you typed.
All other keys are part of the password. Each time you press a key, the sketch does one of three things:
- If the key is "*", it clears the typed password.
- If the key is "#", it compares the typed password with the saved one, prints the result, and then clears the typed password.
- If the key is anything else, it adds the key to the end of the typed password.
Keypad - Password Code
The saved password in this sketch is "1234A". The sketch builds a String from your key presses and compares it with the saved one when you press "#". You can change the password on the line const String password.
- Upload the code above to the ESP32 S3 Uno.
- Open the Serial Monitor at 9600 baud.
- Type a wrong password: press "1234BC" and then "#".
- Type the right password: press "1234A" and then "#".
- Check the result in the Serial Monitor.
- Tip: put your own action, like turning on a relay or a servo, under the comment DO YOUR WORK HERE.
Video Tutorial
Watch the video below to see this ESP32 S3 Uno project step by step.
Additional Knowledge
These guides show two common next steps for keypad projects:
FAQ
Does the 4x4 keypad work with the 3.3V pins of the ESP32 S3 Uno?
Yes. The keypad is only a grid of switches, so it has no power pin and no voltage of its own. The ESP32 S3 Uno drives the pins at 3.3V and reads them back, so the keypad is safe to connect directly.
Why does the code use 46, 21, 14, 3 instead of 9, 8, 7, 6?
On the ESP32 S3 Uno, the Uno header labels are not the same as the GPIO numbers. For example, D9 is GPIO46 and D6 is GPIO3. In code you must always write the GPIO number, so the pin arrays use the numbers from the pinout diagram.
Can I use the same keypad library as on the UNO R4?
Yes. The DIYables_Keypad library works on the ESP32 S3 Uno with no change. Only the pin numbers in the code are different.
Can I wire the keypad to other pins?
Yes. Any pin that works as a digital input and output is fine, for example D10 (GPIO10), D11 (GPIO11), D12 (GPIO13) or D13 (GPIO12). Update the pin_rows and pin_column arrays to match your wiring. Avoid D0 and D1, because they are used for the USB serial link.
What if my project needs more pins than the Uno headers give?
The ESP32 S3 Uno has two extra rows of holes with more GPIOs: GPIO15 and GPIO16 (I/O, PWM, analog), GPIO45 and GPIO35 to GPIO42 (I/O, PWM), and GPIO47/GPIO48 (output only, PWM). Solder pin headers to them and write the GPIO number in code. For a keypad, GPIO35 to GPIO42 are a good choice, for example to move the rows off D9 and D6. Do not use GPIO47/GPIO48 for the keypad, because the library needs pins that can also read input. Two warnings: (1) GPIO47/GPIO48 may run at 1.8V instead of 3.3V on some modules (especially ones with "V" in the name, like R8V or R16V), so 3.3V devices can be damaged or act strangely. (2) GPIO0, GPIO3 (D6), GPIO45 and GPIO46 (D9) are boot strapping pins, and a wrong connection can stop the board from booting or uploading code. Use the other extra pins first.
How do I change the password?
Edit the line const String password = "1234A"; and put your own keys between the quotes. Do not use "*" or "#" in the password, because these two keys have special jobs.
Troubleshooting
| Problem | Possible Cause | Solution |
|---|---|---|
| No COM port shows up in the Arduino IDE | USB driver is missing or the cable is power-only | Install the CP210x or CH340 driver and use a USB data cable |
| Upload fails or the board does not boot | A key is held down or a wire on D9 (GPIO46) or D6 (GPIO3) disturbs the boot | Release all keys. Unplug the D9 and D6 wires, upload, then plug them back in |
| Nothing prints when a key is pressed | Wrong baud rate or loose keypad connector | Set the Serial Monitor to 9600 baud and push the jumper wires firmly into the keypad |
| One whole row or column of keys does not work | One wire is loose or on the wrong pin | Check each wire against the wiring table |
| The wrong key is printed | Row and column wires are swapped or in reverse order | Make sure R1 goes to D9 and C4 goes to D2 as in the table |
| Compile error about DIYables_Keypad.h | Library is not installed | Install DIYables_Keypad from the Library Manager |
| Password is never correct | Extra keys were typed before the password | Press "*" first to clear the input, then type the password and press "#" |