
ESP32 S3 UNO - Motion Sensor - Servo Motor
This ESP32 S3 Uno motion sensor servo motor tutorial shows you how to wire an HC-SR501 PIR sensor and a servo motor to the ESP32 S3 Uno form board and control them with Arduino code. When the PIR motion sensor sees a person, the servo turns to 90 degrees, and when the movement ends, it goes back to 0 degrees. You can use the same idea to open a small gate, aim a camera, or move a robot arm.
In this tutorial, you will:
- Wire an HC-SR501 motion sensor and a servo motor to the ESP32 S3 Uno
- Set the time delay, detection range and trigger mode of the PIR sensor
- Detect when motion starts and stops with digitalRead()
- Rotate a servo motor with the ESP32Servo library
Hardware Preparation
Or you can buy the following kits:
| 1 | × | DIYables Sensor Kit (18 sensors/displays) |
Additionally, some of these links are for products from our own brand, DIYables .
Buy Note: For controlling multiple servo motors, use the PCA9685 16 Channel PWM Servo Driver Module to save MCU pins and simplify wiring.
Overview of Servo Motor and Motion Sensor
This project links one input and one output. The motion sensor tells the board when someone moves, and the servo motor turns to show it. If one of these parts is new to you, read its own tutorial first. Each one explains the pinout, how the part works, and how to program it.
Servo motor
A servo turns its arm to an exact angle between 0 and 180 degrees. The board sets the angle with a PWM signal on one wire. See the ESP32 S3 Uno - Servo Motor tutorial.
Motion sensor
The HC-SR501 is a PIR (passive infrared) sensor. It feels the body heat of people and animals. Its OUT pin goes HIGH when it detects movement and goes back to LOW when the movement is over. See the ESP32 S3 Uno - Motion Sensor tutorial.
ESP32 S3 Uno Pinout
The image below shows the pinout diagram of the ESP32 S3 Uno form board. Use it to find the Uno header pins (D2, D9, 5V…) and their GPIO numbers when you connect the sensor and the servo.

Wiring Diagram
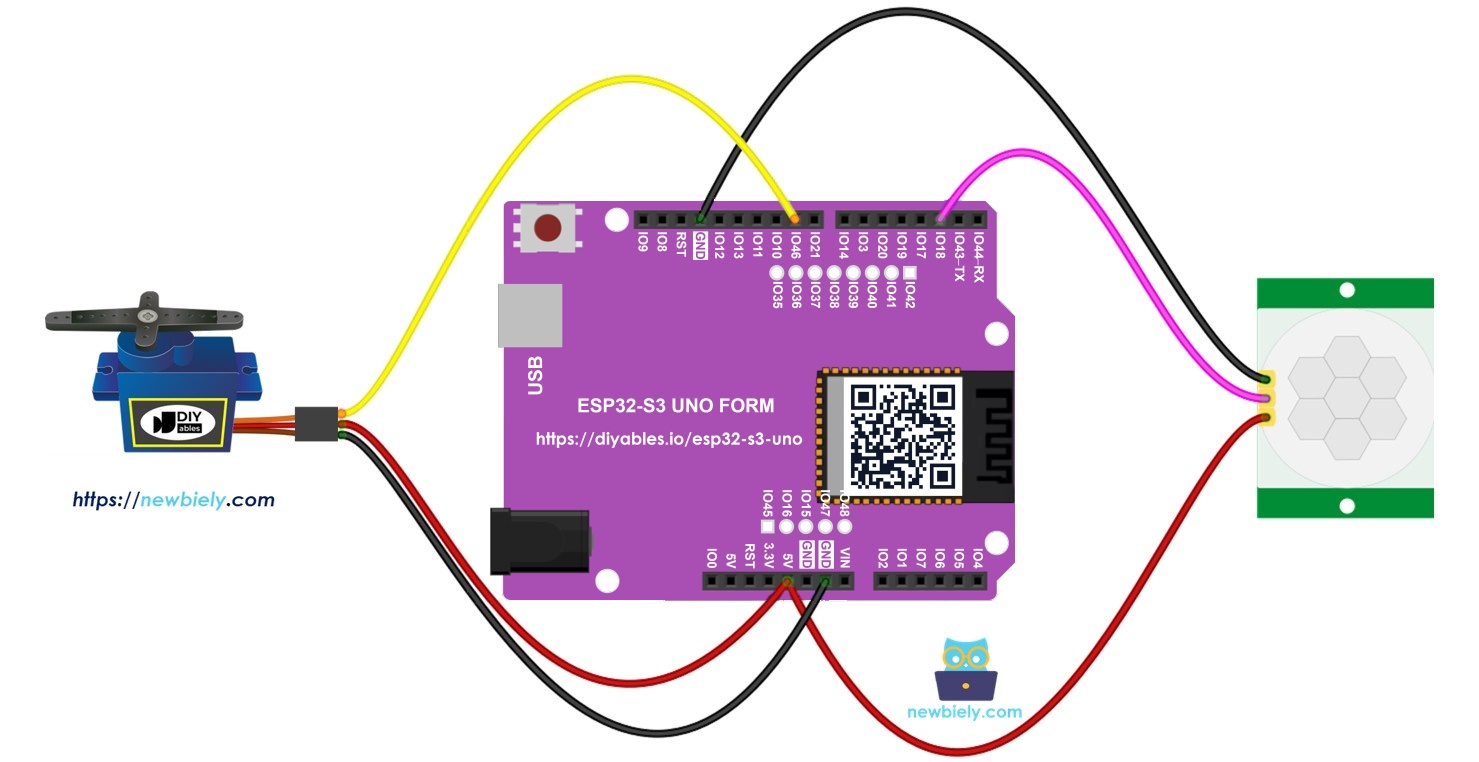
Connect the motion sensor output to D2 and the servo signal wire to D9, as shown below. Both parts take power from the 5V pin and share the board GND.
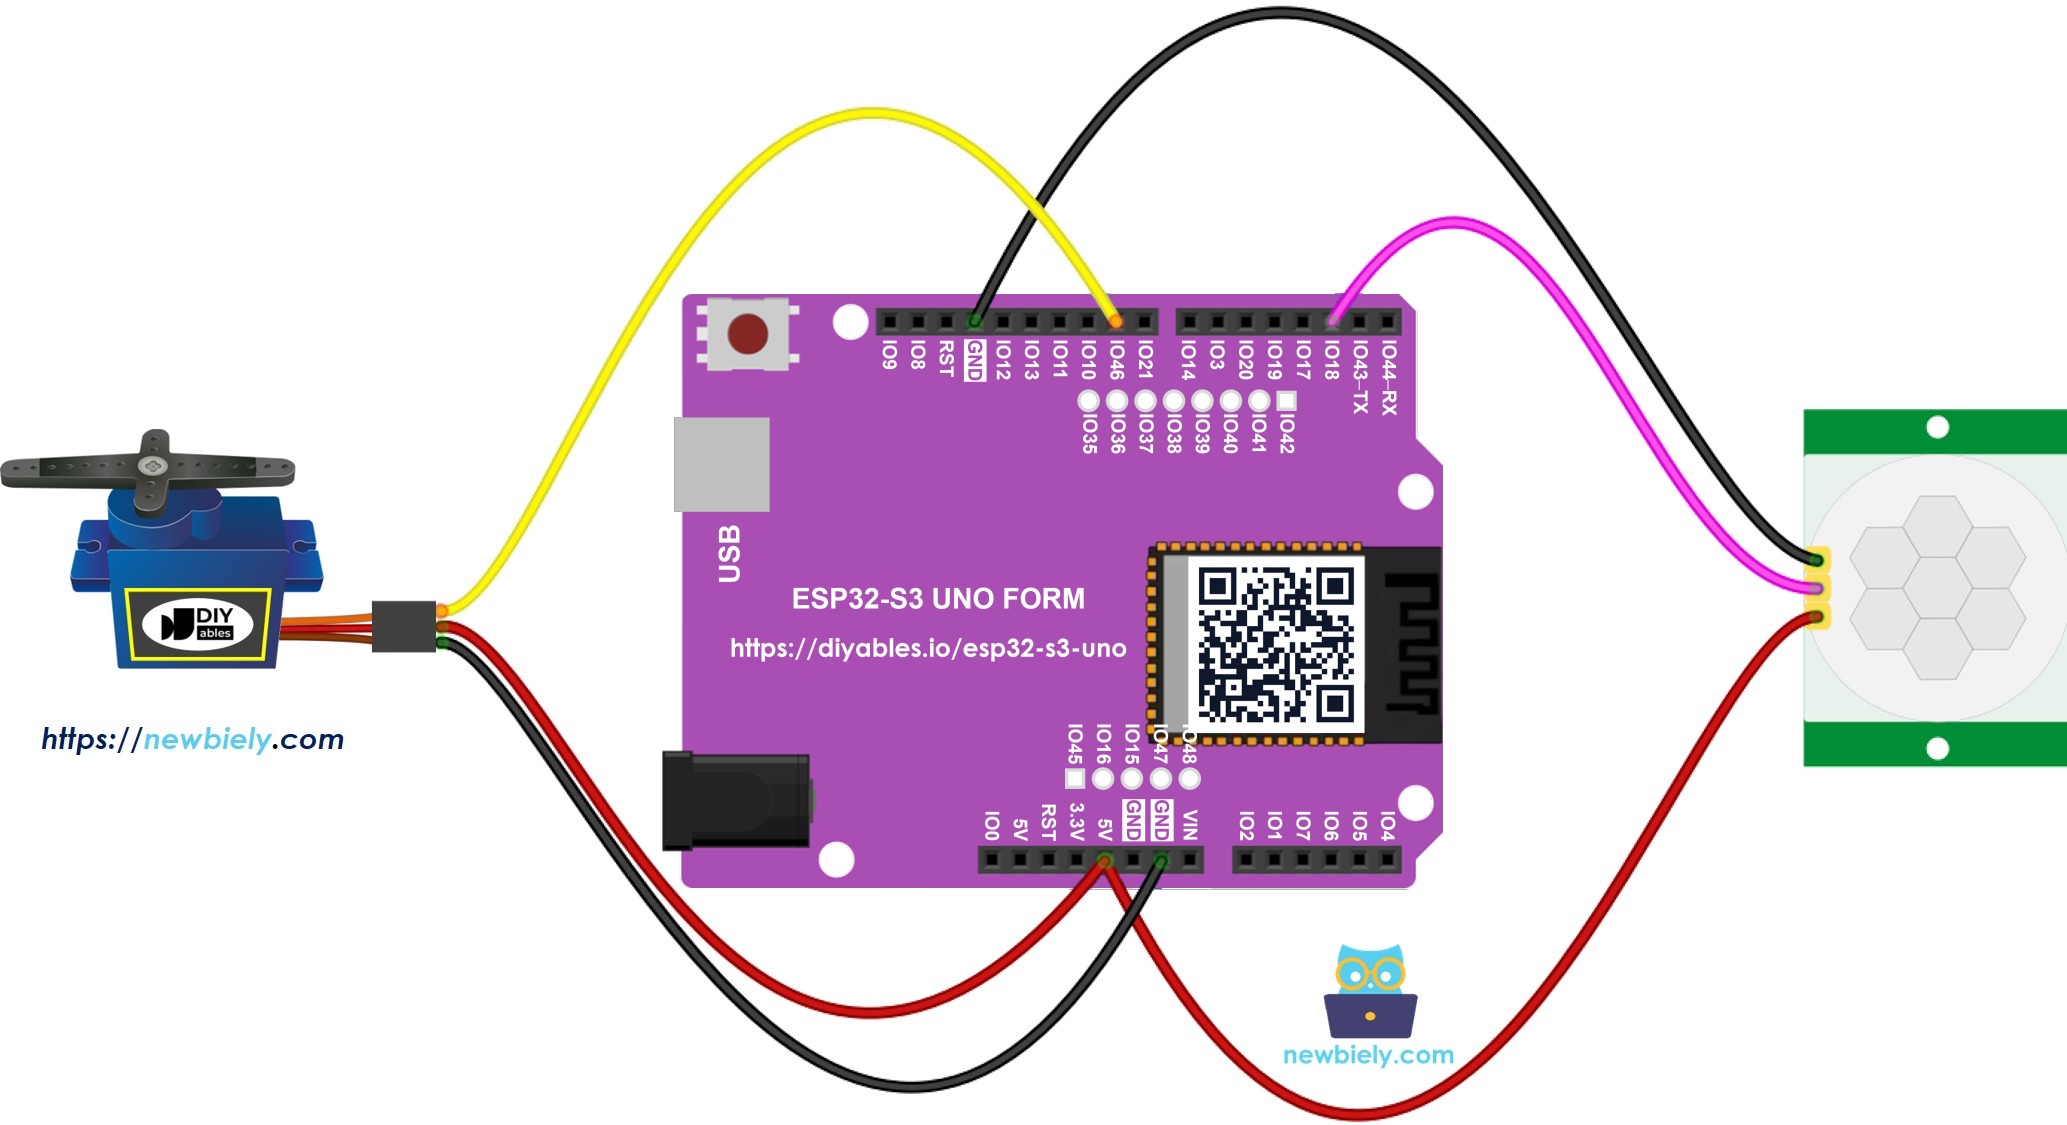
This image is created using Fritzing. Click to enlarge image
| Component Pin | ESP32 S3 Uno Pin |
|---|---|
| Motion Sensor VCC | 5V |
| Motion Sensor OUT | D2 (GPIO18) |
| Motion Sensor GND | GND |
| Servo VCC (red) | 5V |
| Servo GND (brown or black) | GND |
| Servo Signal (orange or yellow) | D9 (GPIO46) |
WARNING
D9 is GPIO46, a boot strapping pin on the ESP32 S3 Uno. The board checks this pin at power-up to choose its boot mode. A servo signal wire is usually safe here. But if the board does not boot or cannot upload code, unplug the servo signal wire from D9, upload the code, and then plug it back in.
※ NOTE THAT:
The HC-SR501 runs on 5V, but its OUT pin gives a 3.3V signal, so it is safe for the ESP32 S3 Uno input. ESP32 S3 Uno pins are NOT 5V tolerant, so never connect a 5V signal to them. The servo also runs on 5V, but its signal wire only receives a 3.3V signal from the board. Most hobby servos work fine with this.
Initial Setting
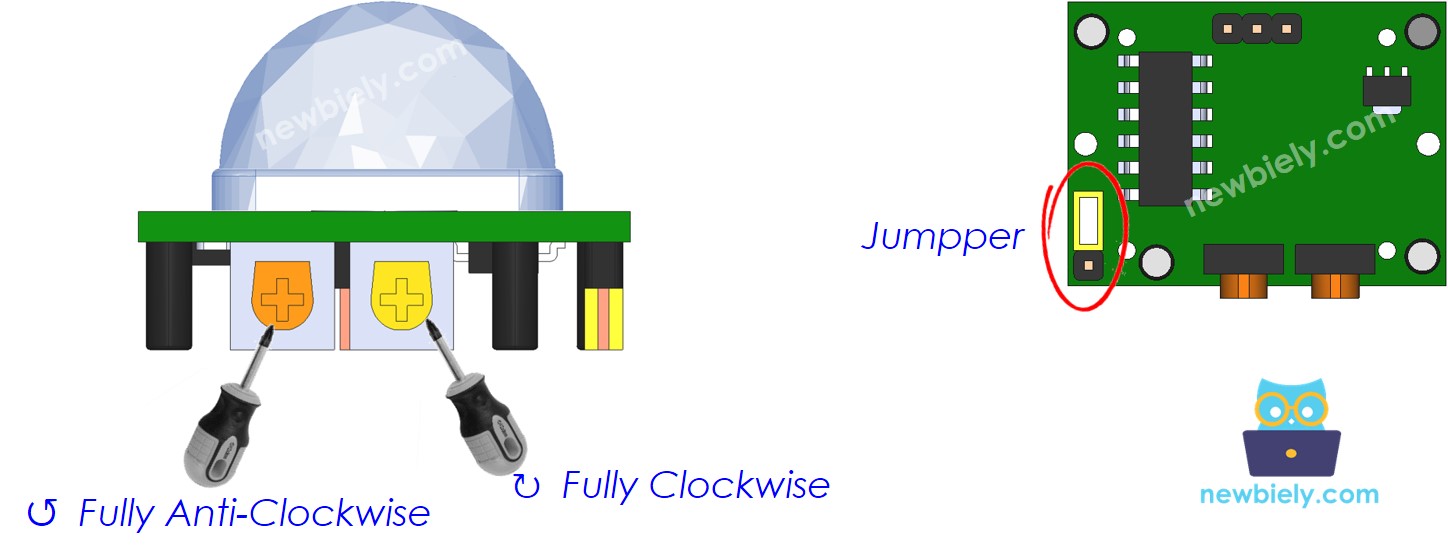
The HC-SR501 has two small screws and one jumper on its back. Set them as below before you run the code. This makes the sensor react quickly and gives it the longest range, so the servo moves as soon as you walk by.
| Time Delay Adjuster | Turn it fully anti-clockwise. |
| Detection Range Adjuster | Turn it fully clockwise. |
| Repeat Trigger Selector | Place the jumper as shown in the image. |
ESP32 S3 Uno Code - Motion Sensor Controls Servo Motor
The sketch reads the motion sensor on D2 (GPIO18) in every loop and compares the new state with the last one. When the state changes, it prints a message to the Serial Monitor and moves the servo on D9 (GPIO46) to 90 degrees or back to 0 degrees.
The standard Servo.h library does not work on the ESP32 S3 Uno, so the code uses ESP32Servo.h. It has the same attach() and write() functions, so the rest of the logic does not change.
Detailed Instructions
- New to the ESP32 S3 Uno? Follow ESP32 S3 Uno - Getting Started first.
- Wire it up as shown in the diagram.
- Connect the board to your computer with a USB Type-C cable.
- Open Arduino IDE, choose the ESP32S3 Dev Module board and the correct COM port.
- Install the ESP32Servo library. Open the Library Manager, search for ESP32Servo, and install the one by Kevin Harrington.
- Copy the code above and paste it into Arduino IDE.
- Upload the code by clicking the Upload button.
- Wave your hand in front of the motion sensor.
- Watch the servo turn, then open the Serial Monitor at 9600 baud to see the messages.
- Tip: The PIR sensor needs about 30 to 60 seconds to settle after power-up. Wait a little before you test it, or you may see false triggers.
ESP32 S3 Uno with HC-SR501 Motion Sensor - Video Tutorial
Watch the video below to see this ESP32 S3 Uno project step by step. At the end of the video, you will see an automatic door: a servo opens the door and a buzzer beeps when someone comes near. The code for that door project is below.
In this door version, the motion sensor stays on D2 (GPIO18), the servo uses D5 (GPIO20), and a buzzer is added on D6 (GPIO3). When motion starts, the servo turns to 180 degrees and the buzzer beeps twice. When motion stops, the servo goes back to 0 degrees and beeps again.
WARNING
D6 is GPIO3, a boot strapping pin on the ESP32 S3 Uno. A buzzer on this pin is normally fine. If the board does not boot or upload with the buzzer connected, unplug the buzzer wire from D6 during upload, then connect it again.
FAQ
Can I power the HC-SR501 motion sensor from the ESP32 S3 Uno?
Yes. Connect the sensor VCC to the 5V pin of the board. The sensor works from about 4.5V to 20V, and its OUT pin gives a 3.3V signal. This signal is safe for the ESP32 S3 Uno input pins, so you do not need a level shifter.
Why does the code use ESP32Servo.h instead of Servo.h?
The standard Servo library supports AVR and some other Arduino boards, but not the ESP32 S3 Uno. The ESP32Servo library by Kevin Harrington uses the PWM hardware of the board and keeps the same functions. Your old UNO R4 servo code works after you change the include line and the pin numbers.
Why does the servo move again after I stop moving?
The HC-SR501 keeps its OUT pin HIGH for a while after the last movement. The time delay screw sets this time, from a few seconds up to a few minutes. Turn the screw fully anti-clockwise to make it as short as possible.
Can I use a different pin for the servo instead of D9?
The wiring uses D9 (GPIO46), which is a boot strapping pin. It works in most cases. If you have boot or upload problems, move the signal wire to another PWM pin such as D5 (GPIO20) and change SERVO_PIN in the code to 20.
What if my project needs more sensors or servos than the Uno headers give?
The ESP32 S3 Uno has two extra rows of holes with more GPIOs: GPIO15 and GPIO16 (I/O, PWM, analog), GPIO45 and GPIO35 to GPIO42 (I/O, PWM), and GPIO47/GPIO48 (output only, PWM). Solder pin headers to use them and write the GPIO number in code. For a second motion sensor, use GPIO35 to GPIO42, not GPIO47/GPIO48, because those two are output only. For more servos, GPIO15, GPIO16 or GPIO35 to GPIO42 work well. Be careful with two things. First, GPIO47/GPIO48 may run at 1.8V instead of 3.3V on some modules (especially ones with "V" in the name, like R8V or R16V), so 3.3V devices can be damaged or act strangely. Second, GPIO0, GPIO3 (D6), GPIO45 and GPIO46 (D9) are boot strapping pins, and a wrong connection can stop the board from booting or uploading code. Use the other extra pins first.
Troubleshooting
| Problem | Possible Cause | Solution |
|---|---|---|
| No COM port shows up in Arduino IDE | USB driver missing or board not in upload mode | Install the CP210x or CH340 driver. Or hold BOOT, press RESET, then release BOOT and upload again |
| Upload fails or board does not boot | The servo signal on D9 (GPIO46) affects the boot strapping pin | Unplug the servo signal wire from D9 during upload, then plug it back in |
| Compile error "Servo.h - No such file" | The code uses the AVR Servo library | Install the ESP32Servo library and use #include |
| Servo does not move at all | Wrong wiring or no power to the servo | Check that red goes to 5V, brown to GND and the signal wire to D9 (GPIO46) |
| Sensor never detects motion | OUT pin on the wrong pin or sensor not powered | Wire OUT to D2 (GPIO18) and VCC to 5V, then wait 60 seconds after power-up |
| Sensor triggers by itself | Sensor still settling, or heat sources nearby | Wait one minute after power-up and keep the sensor away from heaters, fans and direct sunlight |
| Servo jitters or the board resets | The servo draws too much current from USB | Power the servo from an external 5V supply and join the GNDs |