
ESP32 S3 UNO - Mini Mp3 Player Module
This ESP32 S3 Uno mini mp3 player tutorial shows you how to wire the DIYables Mini Mp3 Player module to the ESP32 S3 Uno form board and play music from a micro SD card. The module is built on the YX5200 chip, the same chip used in DFPlayer Mini style boards. You send it simple UART commands, and it plays mp3 files through a small speaker.
In this tutorial, you will:
- Wire the YX5200 mp3 module and a speaker to the ESP32 S3 Uno
- Prepare a micro SD card with numbered mp3 files and folders
- Play, pause, resume and skip tracks with Arduino code
- Control the volume, loop tracks and play from folders with buttons
- Send commands from the Serial Monitor and read the player status
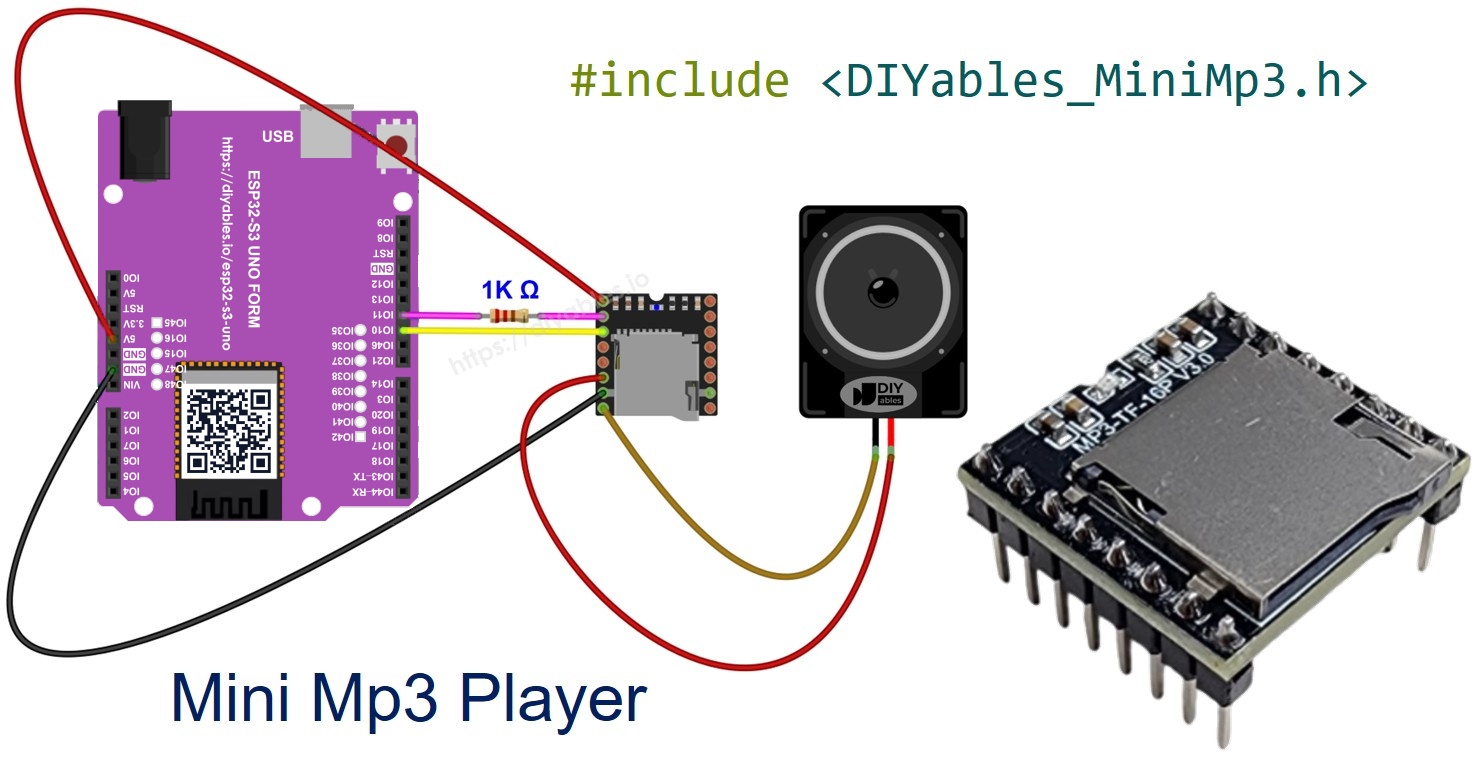
Hardware Preparation
Or you can buy the following kits:
| 1 | × | DIYables Sensor Kit (18 sensors/displays) |
Additionally, some of these links are for products from our own brand, DIYables .
Overview of Mini Mp3 Player Module
It helps to know what the module can do before you write any code. Once you see its features, each example sketch below will feel easy.
The DIYables Mini Mp3 Player is a small mp3 decoder board with a YX5200-24SS chip on it. It reads mp3 files straight from a micro SD card. A built-in amplifier can drive a speaker of up to 3W. If you want a bigger sound, you can take a line-level signal from the DAC pins and feed it to an external amplifier.
The ESP32 S3 Uno talks to the module over UART at 9600 baud. You send a short command, and the module does the rest. You do not need to decode any audio on the board.
What it can do
You can play, pause, resume and stop tracks. The volume goes from 0 to 30, and there are six equalizer presets: Normal, Pop, Rock, Jazz, Classic and Bass.
Playback modes
The module can repeat one track, repeat a folder, or shuffle every track on the card. It also supports numbered folders, and it can interrupt the current song to play an advertisement track.
Status queries
You can ask the module for the current track, volume, play state and more. This is useful when you want to show the status on the Serial Monitor or a display.
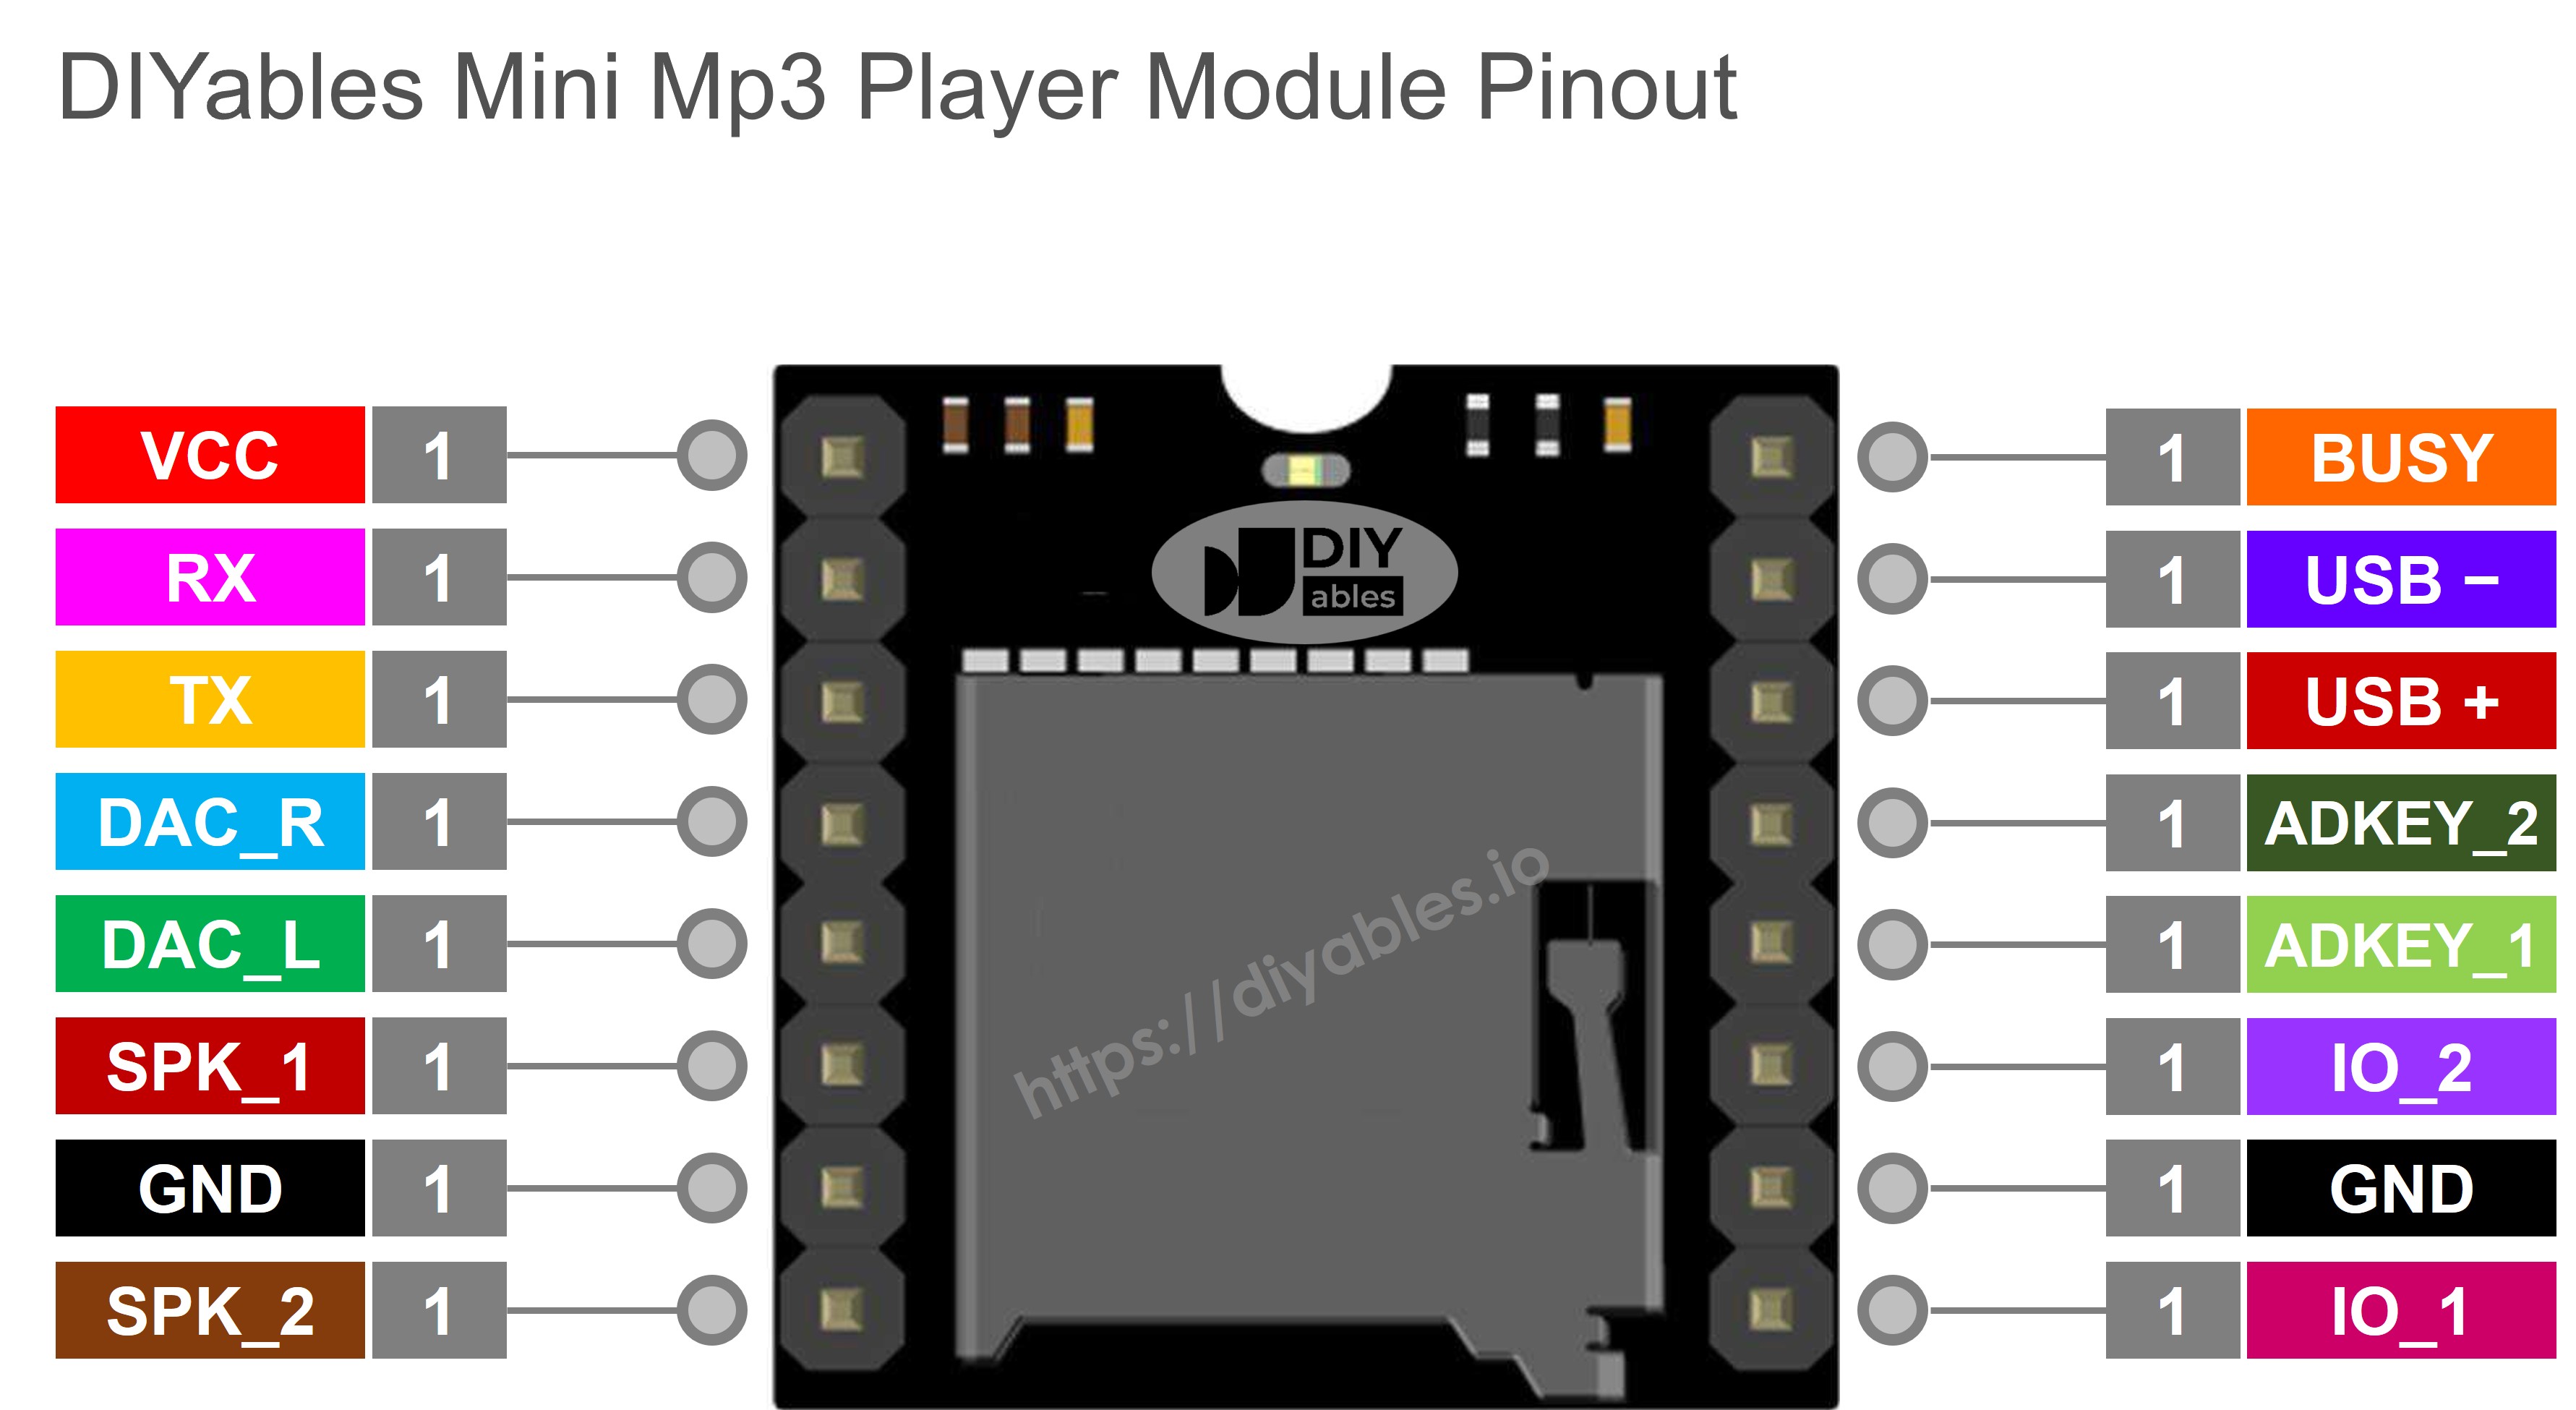
Module Pinout
Most projects only use six pins: power, ground, the two UART pins and the two speaker pins. The other pins are there for extra options.
| Pin | Description |
|---|---|
| VCC | Power input (3.2V to 5.0V) |
| GND | Ground |
| RX | Serial data in. Connect to the board TX pin through a 1K resistor |
| TX | Serial data out. Connect to the board RX pin |
| SPK_1 | Speaker positive terminal (direct drive, 3W max) |
| SPK_2 | Speaker negative terminal (direct drive, 3W max) |
| DAC_R | Right channel line output (for an external amplifier) |
| DAC_L | Left channel line output (for an external amplifier) |
| BUSY | LOW while playing, HIGH when idle |
| IO_1 | Short press = previous track, long press = volume down |
| IO_2 | Short press = next track, long press = volume up |
ESP32 S3 Uno Pinout
The image below shows the pinout of the ESP32 S3 Uno form board. Use it to find the Uno header pins (D2, D10, D11…) and their GPIO numbers while you wire the circuit.

Wiring Diagram
Power the module from the 5V pin and connect its UART pins to D10 and D11. The speaker goes straight to SPK_1 and SPK_2.
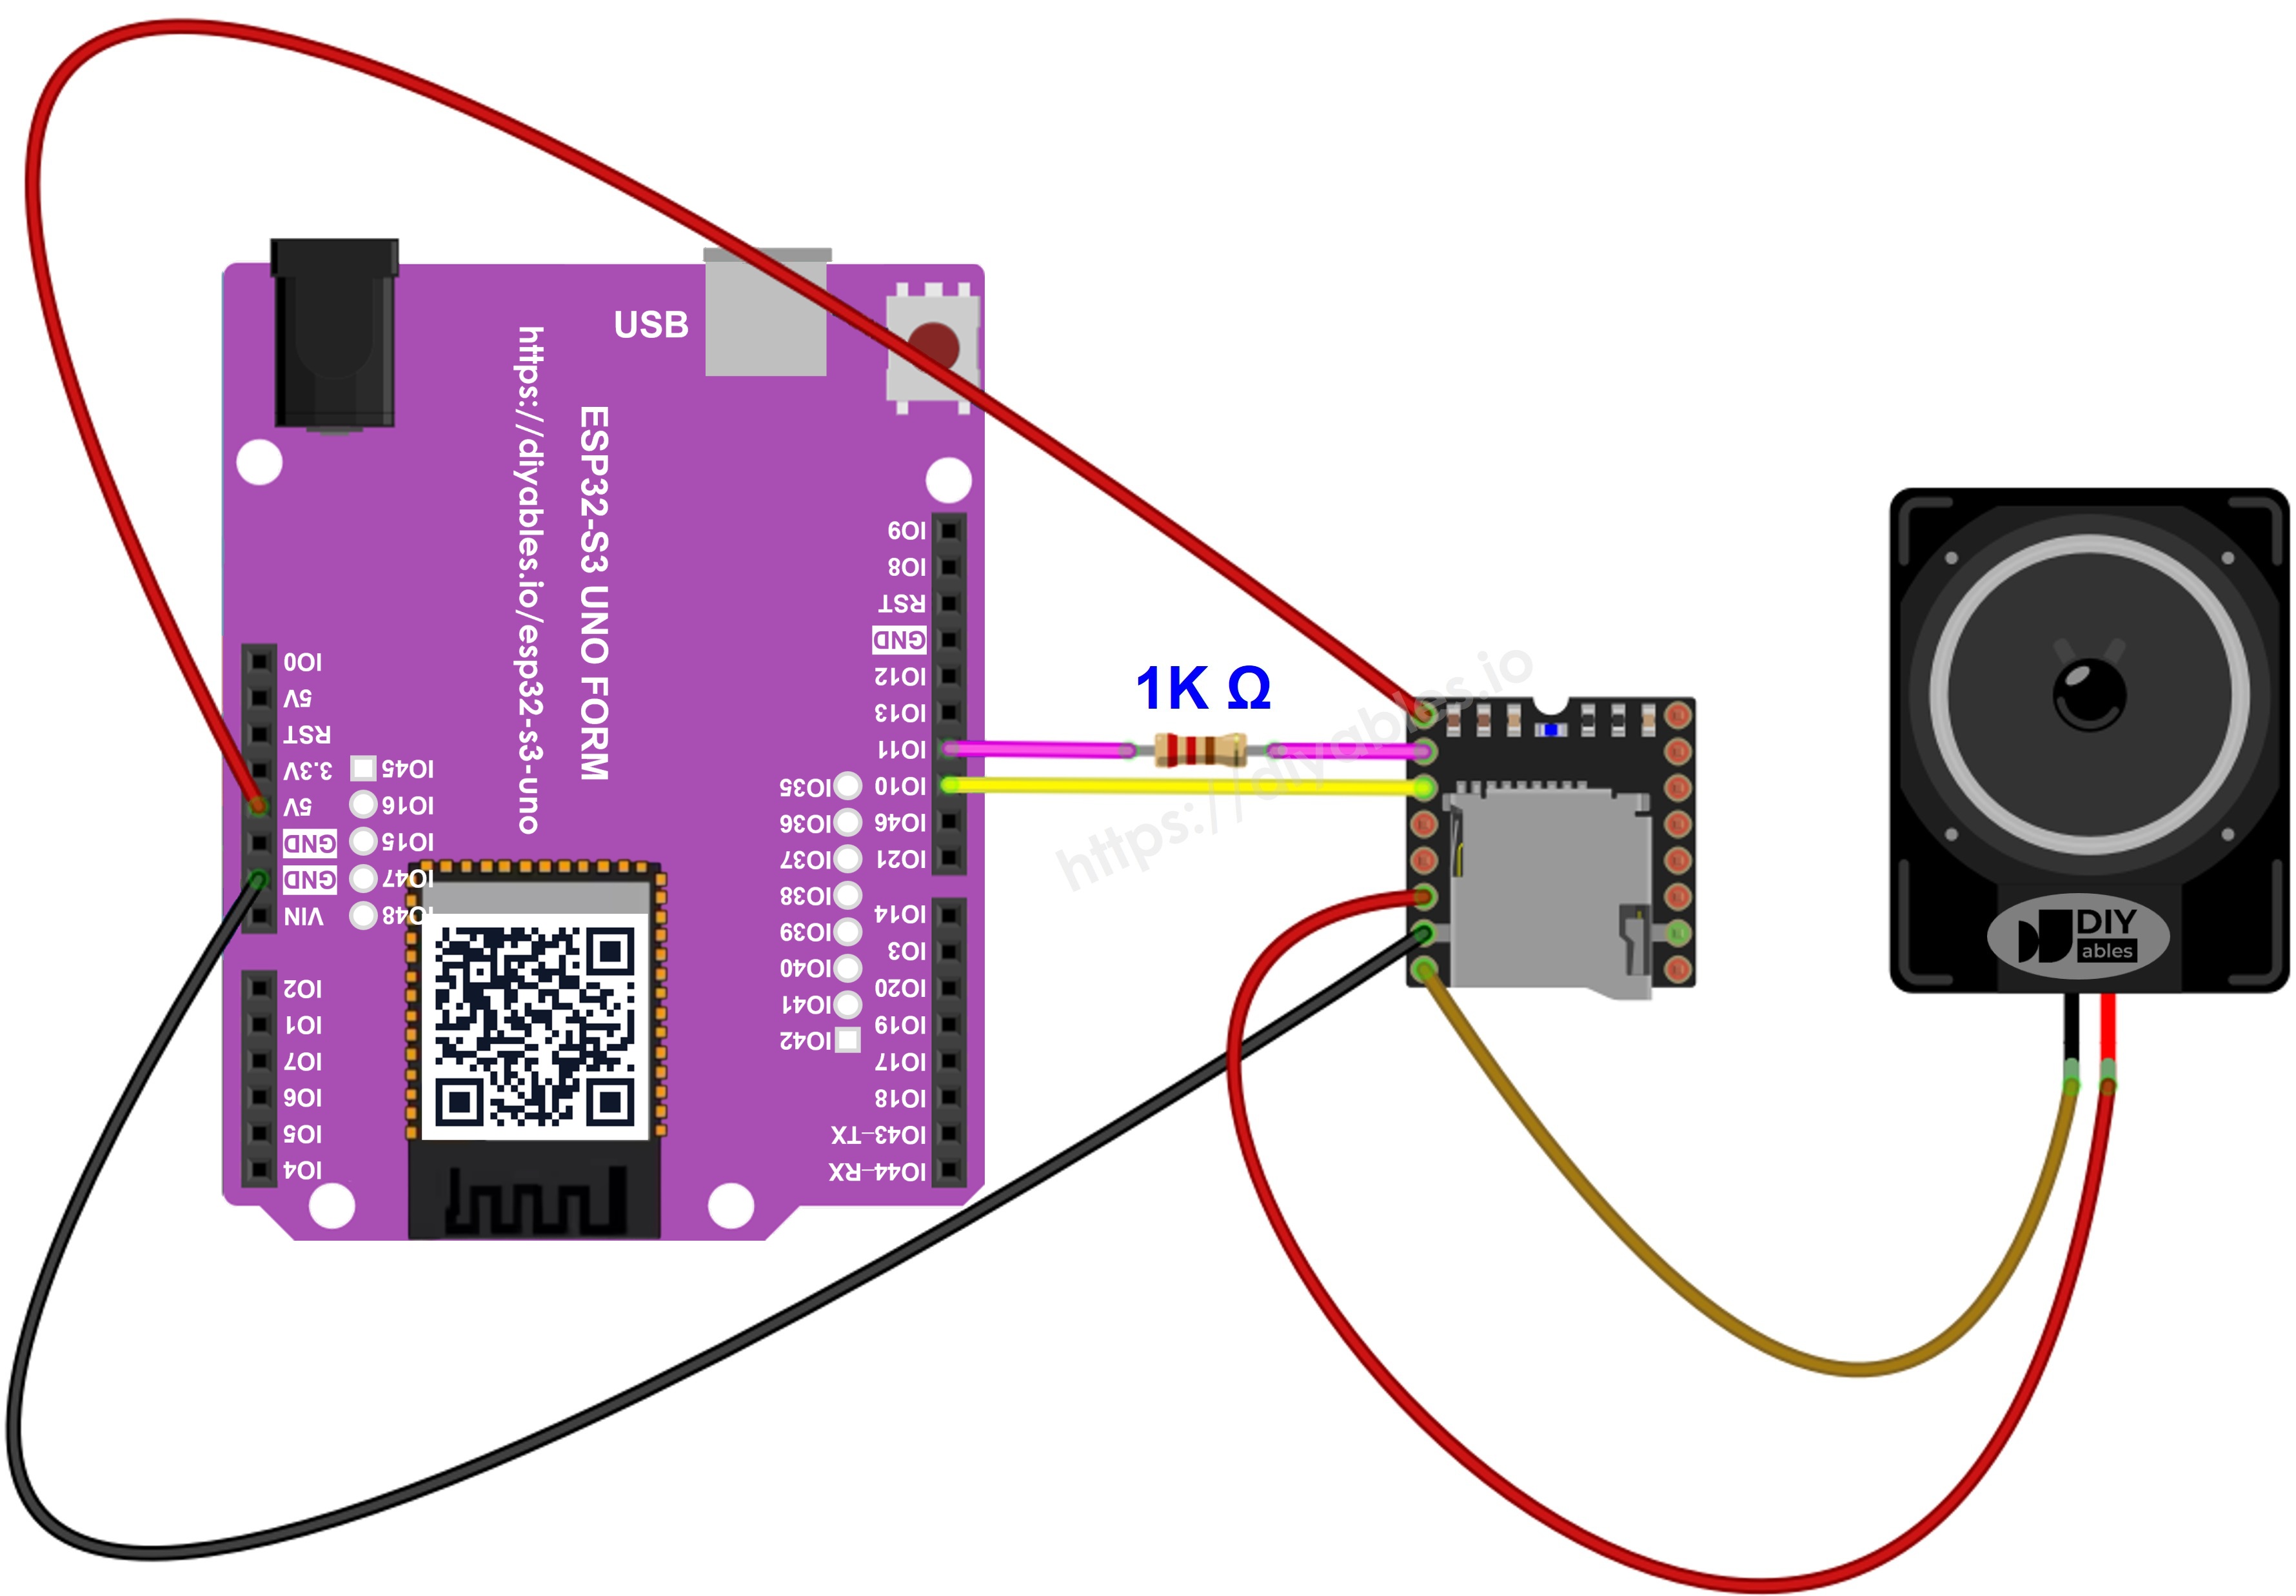
This image is created using Fritzing. Click to enlarge image
| Mini Mp3 Player Pin | ESP32 S3 Uno Pin | Note |
|---|---|---|
| VCC | 5V | |
| GND | GND | |
| RX | D11 (GPIO11) | Through a 1K resistor |
| TX | D10 (GPIO10) | |
| SPK_1 | Speaker + | |
| SPK_2 | Speaker − |
The ESP32 S3 Uno uses 3.3V logic, and its pins are NOT 5V tolerant. The YX5200 chip also works at 3.3V logic, even when VCC is 5V, so the signal on its TX pin is safe for D10 (GPIO10). Keep the 1K resistor on the RX line. It limits current and cuts the hiss and noise that this module often makes without it.
The button examples later in this tutorial add push buttons on D2 (GPIO18) and D3 (GPIO17). The other leg of each button goes to GND.
※ NOTE THAT:
The ESP32 S3 Uno has no SoftwareSerial library. The code uses the hardware port Serial1 instead and maps it to D10 (RX) and D11 (TX) with Serial1.begin(9600, SERIAL_8N1, 10, 11). Do not use D0 (GPIO44) and D1 (GPIO43) for the module. These pins belong to the USB-serial port, so they would clash with uploads and the Serial Monitor.
Preparing the SD Card
The module is picky about file names and file order. A few minutes spent here will save you a lot of confusion later.
- Format the micro SD card as FAT16 or FAT32.
- Copy your mp3 files to the root folder, with zero-padded names:
- To play by folder, make numbered folders and put numbered files inside them:
Rules to remember
Track numbers start at 1, not 0. Folder names use 2 digits (01 to 99), and file names inside folders use 3 digits (001 to 255).
The module sets the track order by the order in which you copied the files, not by their names. So format the card first, and then copy the files one by one in the order you want.
Installing the Library
The DIYables_MiniMp3 library builds every command packet for you, so your sketch stays short. You install it once from the Library Manager.
- Connect the board to your computer with a USB Type-C cable.
- Open Arduino IDE, choose the ESP32S3 Dev Module board and the correct COM port.
- Open the Library Manager by clicking the Libraries icon on the left side.
- Search for "DIYables_MiniMp3" and find the library by DIYables.
- Click Install to get the latest version.
- Search for DIYables_MiniMp3 created by DIYables
and click the Install button.
The library has no other dependencies, so nothing else needs to be installed.
ESP32 S3 Uno Code - Play a Single Track
This is the simplest test, and a good first step to check your wiring. The sketch sets the volume to 25 and plays track 001.mp3 once.
Serial1 is started on GPIO10 (RX) and GPIO11 (TX) at 9600 baud, and the library uses it to talk to the module. The one-second delay gives the module time to read the SD card before the first command.
How To Run
- New to the ESP32 S3 Uno? Follow ESP32 S3 Uno - Getting Started first.
- Prepare the SD card with mp3 files (001.mp3, 002.mp3…) and put it in the module.
- Wire it up as shown in the diagram.
- Connect the board to your computer with a USB Type-C cable.
- Open Arduino IDE, choose the ESP32S3 Dev Module board and the correct COM port.
- Copy the code above and paste it into the Arduino IDE.
- Click Upload to send the code to the ESP32 S3 Uno.
- Listen: track 001.mp3 plays through the speaker.
- Tip: If you hear nothing, open the Serial Monitor at 9600 baud and check that "Playing track 1..." appears. If it does, check the speaker wires and the SD card files.
Playback Functions at a Glance
These are the basic commands you will use most often.
| Function | What It Does | Usage |
|---|---|---|
| play(trackNum) | Starts a specific track | mp3.play(1) |
| playNext() | Skips to the next track | mp3.playNext() |
| playPrevious() | Goes back to the previous track | mp3.playPrevious() |
| pause() | Pauses the current track | mp3.pause() |
| resume() | Resumes a paused track | mp3.resume() |
| stop() | Stops playback completely | mp3.stop() |
ESP32 S3 Uno Code - Play Multiple Tracks in Sequence
Now you can build a small playlist. This sketch plays tracks 1 to 3 in a loop, with a fixed wait between them.
The sketch uses millis() instead of delay(), so loop() keeps running while it waits. Change totalTracks to match your card, and trackDuration to set the gap in milliseconds.
How To Run
- Check the SD card: it needs at least 3 tracks (001.mp3, 002.mp3, 003.mp3).
- Upload the code to the ESP32 S3 Uno.
- Listen: tracks 1, 2 and 3 play in a loop, with 5 seconds between each start.
- Tip: If your songs are longer than 5 seconds, raise trackDuration, or the next track will cut the current one short.
ESP32 S3 Uno Code - Pause and Resume Toggle
One button is enough to pause and resume. Wire it to D2 (GPIO18).
A bool variable named paused remembers the current state. Each press calls pause() or resume() and then flips the variable.
How To Run
- Wire a button to D2 (GPIO18), then upload the code.
- Press the button once to pause the music.
- Press it again to continue from the same spot.
- Tip: If one press toggles twice, raise the 300 ms debounce delay a little.
ESP32 S3 Uno Code - Loop a Track
Sometimes you want one sound to repeat forever, like background music or an alarm. This sketch loops track 001.mp3 with the Normal equalizer.
The module handles the repeat by itself. After loopTrack(1), the ESP32 S3 Uno is free, so you can put your own code in loop().
How To Run
- Upload the code to the ESP32 S3 Uno.
- Listen: track 001.mp3 plays again and again.
- Tip: Change EQ_NORMAL to EQ_ROCK or EQ_BASS to hear a different sound profile.
Repeat and Shuffle Functions
These functions control how the module repeats or mixes your tracks.
| Function | What It Does | Usage |
|---|---|---|
| loopTrack(trackNum) | Repeats one track forever | mp3.loopTrack(1) |
| loopFolder(folder) | Repeats every track in a folder | mp3.loopFolder(1) |
| loopAll() | Repeats all tracks on the card | mp3.loopAll() |
| stopLoop() | Cancels any active loop | mp3.stopLoop() |
| shuffle() | Plays all tracks in random order | mp3.shuffle() |
ESP32 S3 Uno Code - Play from a Folder
Folders help you sort sounds into groups, such as one folder for music and one for voice messages. This sketch plays tracks from folder 01 and then folder 02.
playFolder(folder, track) takes two numbers: the folder and the file inside it. The sketch waits 5 seconds between each track, and then stops.
How To Run
- Set up the SD card with folders 01 and 02, each holding numbered files (001.mp3, 002.mp3).
- Upload the sketch to the ESP32 S3 Uno.
- Listen: folder 01 track 001, then folder 01 track 002, then folder 02 track 001.
- Tip: If the wrong file plays, format the card and copy the files again in the right order.
Folder Playback Functions
Pick the function that fits the size of your sound library.
| Function | What It Does | Usage |
|---|---|---|
| playFolder(folder, track) | Plays a track from a folder (up to 99 folders, 255 tracks) | mp3.playFolder(1, 1) |
| playLargeFolder(folder, track) | Plays from a folder (up to 15 folders, 3000 tracks) | mp3.playLargeFolder(1, 1500) |
| playFromMP3Folder(trackNum) | Plays from the /mp3 folder | mp3.playFromMP3Folder(1) |
ESP32 S3 Uno Code - Serial Monitor Control
This is the best sketch for testing. You type one-letter commands in the Serial Monitor and control every feature without any buttons.
The sketch reads one character at a time and runs the matching command in a switch block. The "?" command asks the module for its volume, current track, play state and track count.
How To Run
- Upload the code, then open the Serial Monitor at 9600 baud.
- Type a command from the table below and press Enter.
| Key | Action |
|---|---|
| 1–9 | Play track number 1 to 9 |
| + | Turn the volume up |
| − | Turn the volume down |
| p | Pause playback |
| r | Resume playback |
| s | Stop playback |
| n | Skip to the next track |
| b | Go back to the previous track |
| ? | Print the current status |
- Tip: Set the Serial Monitor line ending to "No line ending" so that only your command is sent.
Equalizer Modes
The equalizer changes the tone of the sound. The module has six presets, and you can switch between them with one line of code.
| Constant | ID | Sound Profile |
|---|---|---|
| DIYables_MiniMp3::EQ_NORMAL | 0 | Flat / neutral |
| DIYables_MiniMp3::EQ_POP | 1 | Pop |
| DIYables_MiniMp3::EQ_ROCK | 2 | Rock |
| DIYables_MiniMp3::EQ_JAZZ | 3 | Jazz |
| DIYables_MiniMp3::EQ_CLASSIC | 4 | Classical |
| DIYables_MiniMp3::EQ_BASS | 5 | Bass boost |
Querying Playback Status
Your ESP32 S3 Uno code can also ask the module what it is doing. This lets you react to the player, for example to start the next song only when the current one ends.
Each call waits up to 100 ms for the reply from the module. A return value of −1 means an error or a timeout.
| Function | Return Type | Description |
|---|---|---|
| isPlaying() | bool | true while a track is playing |
| getVolume() | int16_t | Current volume level (0–30) |
| getEQ() | int16_t | Active EQ preset (0–5) |
| getTrackCount() | int16_t | Number of tracks on the SD card |
| getCurrentTrack() | int16_t | Track number now playing |
| getFolderCount() | int16_t | Number of folders on the SD card |
| getTrackCountInFolder(folder) | int16_t | Number of tracks in one folder |
FAQ
Why does the ESP32 S3 Uno code use Serial1 instead of SoftwareSerial?
The SoftwareSerial library does not exist for the ESP32 S3 Uno. The board has free hardware UART ports, so the code uses Serial1 and maps it to D10 (GPIO10) for RX and D11 (GPIO11) for TX. A hardware port is also more reliable than a software one.
Can I connect the mini mp3 player to D0 and D1 on the ESP32 S3 Uno?
It is better not to. D0 (GPIO44) and D1 (GPIO43) are used by the USB-serial port for uploads and the Serial Monitor. If the module is on these pins, uploads can fail and the Serial Monitor can show garbage. Keep the module on D10 and D11.
Is the mini mp3 player safe with the 3.3V pins of the ESP32 S3 Uno?
Yes. The YX5200 chip uses 3.3V logic, so its TX signal is safe for the ESP32 S3 Uno, even when the module is powered from 5V. Keep the 1K resistor on the module RX line to reduce noise.
Should I power the module from 3.3V or 5V?
The module works from 3.2V to 5V. Use 5V for a louder speaker and more stable sound. The 3.3V pin can work for quiet sound, but a speaker at high volume can pull too much current and cause resets or crackling.
Why does the wrong track play?
The module numbers tracks by the order in which they were copied to the card, not by their file names. Format the card and copy the files one by one in the order you want.
What if my project needs more buttons than the Uno headers give?
The ESP32 S3 Uno has two extra rows of holes with more GPIOs: GPIO15 and GPIO16 (I/O, PWM, analog), GPIO45 and GPIO35 to GPIO42 (I/O, PWM), and GPIO47/GPIO48 (output only, PWM). Solder pin headers to use them and write the GPIO number in your code. For extra buttons in this project, GPIO35 to GPIO42 or GPIO15/GPIO16 are good choices. Do not use GPIO47/GPIO48 for buttons, because they are output only. Also keep two warnings in mind. First, GPIO47 and GPIO48 may run at 1.8V instead of 3.3V on some modules (especially ones with "V" in the name, like R8V or R16V), so 3.3V devices can be damaged or act strangely. Second, GPIO0, GPIO3 (D6), GPIO45 and GPIO46 (D9) are boot strapping pins, and a wrong connection can stop the board from booting or uploading code. Use the other extra pins first.
Troubleshooting
| Problem | Possible Cause | Solution |
|---|---|---|
| No COM port in Arduino IDE | USB driver missing or board not in upload mode | Install the CP210x or CH340 driver, use a data USB cable, or hold BOOT while you press RESET |
| No sound at all | Wrong wiring, no power, or no SD card | Check VCC to 5V, GND, and the speaker on SPK_1 and SPK_2. Make sure the SD card is fully inserted |
| Module does not respond to commands | TX and RX are swapped | Module TX goes to D10 (GPIO10) and module RX goes to D11 (GPIO11) through the 1K resistor |
| Loud hiss or noise from the speaker | No resistor on the RX line or weak power | Add the 1K resistor on the module RX line and power the module from 5V |
| Board resets at high volume | Speaker pulls too much current | Lower the volume, use a stable 5V supply, or use a speaker of 3W or less |
| Wrong track or track not found | Files copied in the wrong order or bad names | Format the card as FAT32 and copy files one by one with names like 001.mp3 |
| Compile error about SoftwareSerial.h | Old sketch made for another board | Use the ESP32 S3 Uno code from this page, which uses Serial1 |
| Status functions return −1 | Module busy, no reply, or wrong wiring | Wait after a command before you query, and check the TX line to D10 (GPIO10) |