
ESP32 S3 UNO - DIYables Bluetooth App Temperature
Overview
This ESP32 S3 Uno Bluetooth temperature tutorial shows you how to send temperature readings from the ESP32 S3 Uno form board to a thermometer gauge on your smartphone. The gauge is part of the DIYables Bluetooth STEM app, and it talks to the board over BLE (Bluetooth Low Energy). You pick the range and the unit, so this BLE thermometer fits a room monitor, a weather station or a fridge alarm.
In this tutorial, you will:
- Install the DIYables Bluetooth library in Arduino IDE
- Upload a BLE temperature sketch to the ESP32 S3 Uno
- Connect the DIYables Bluetooth app on Android or iOS and watch the temperature gauge
- Change the temperature range and unit (°C, °F or K)
- Read a real sensor like the DHT22, DS18B20 or an NTC thermistor
※ NOTE THAT:
The ESP32 S3 Uno supports only BLE. It has no Classic Bluetooth, so the Classic (BluetoothSerial) version of this example does not run on it, and this page shows only the BLE version. That is good news for you: BLE works with the app on both Android and iOS, and you do not need to pair the board first.
Features
The temperature app gives you a ready-made thermometer screen. Your sketch only has to send numbers.
Thermometer-style gauge
A visual gauge shows the reading, and a number under it shows the exact value.
Your own range and unit
You choose the minimum, the maximum and the unit text, such as °C, °F or K. You can change them while the sketch is running.
Live updates and requests
The sketch pushes a new reading every 2 seconds. The app can also ask the board for the current temperature at any time.
BLE on Android and iOS
BLE uses little power and needs no manual pairing. The same sketch works with both phone platforms.
Hardware Preparation
Or you can buy the following kits:
| 1 | × | DIYables Sensor Kit (18 sensors/displays) |
Additionally, some of these links are for products from our own brand, DIYables .
Buy Note: Many DS18B20 sensors available in the market are unreliable. We strongly recommend buying the sensor from the DIYables brand using the link provided above. We tested it, and it worked reliably.
ESP32 S3 Uno Code
The main sketch does not need a sensor. It makes a slowly changing value around 25°C and sends it to the gauge, so you can test the app first and add a real sensor later.
Detailed Instructions
- New to the ESP32 S3 Uno? Follow ESP32 S3 Uno - Getting Started first.
- Connect the board to your computer with a USB Type-C cable.
- Open Arduino IDE, choose the ESP32S3 Dev Module board and the correct COM port.
- Pick a big partition: go to Tools > Partition Scheme and select Huge APP (3MB No OTA/1MB SPIFFS). The Bluetooth library is large and does not fit in the default space.
- Open the library manager: click the Libraries icon on the left bar of Arduino IDE.
- Find the library: search "DIYables Bluetooth" and find the DIYables Bluetooth library by DIYables.
- Install it: click the Install button.
- Search for DIYables Bluetooth created by DIYables and click the Install button.
- Install the dependencies: Arduino IDE asks to add some other libraries. Click Install All.
- Tip: if the upload does not start, hold the BOOT button, press RESET, then release BOOT and try again.
ESP32 S3 Uno BLE Code (works with the app on Android and iOS)
The sketch starts a BLE server named "ESP32BLE_Temp" and adds the temperature app with a -10 to 50 °C range. When a phone connects, it sends a reading every 2 seconds and prints it to the Serial Monitor. The readTemperature() function is the only place you need to change when you add a real sensor.
- Load the code: in Arduino IDE go to File Examples DIYables Bluetooth Esp32BLE_Temperature, or copy the code below into the editor.
- Upload: click the Upload button to send the code to the ESP32 S3 Uno.
- Open the Serial Monitor and set it to 115200 baud.
- Check the output. You should see something like this:
- Tip: keep the Serial Monitor open. It shows when the phone connects and every reading that goes to the gauge.
Mobile App
Now you connect your phone. Because the ESP32 S3 Uno uses BLE, there is no pairing step in the phone settings. You only scan and tap in the app.
- Open the app and grant the permissions it asks for the first time:
- Nearby Devices (Android 12 and newer) or Bluetooth (iOS), to scan and connect to devices
- Location (Android 11 and older only), because older Android needs it to scan for BLE devices
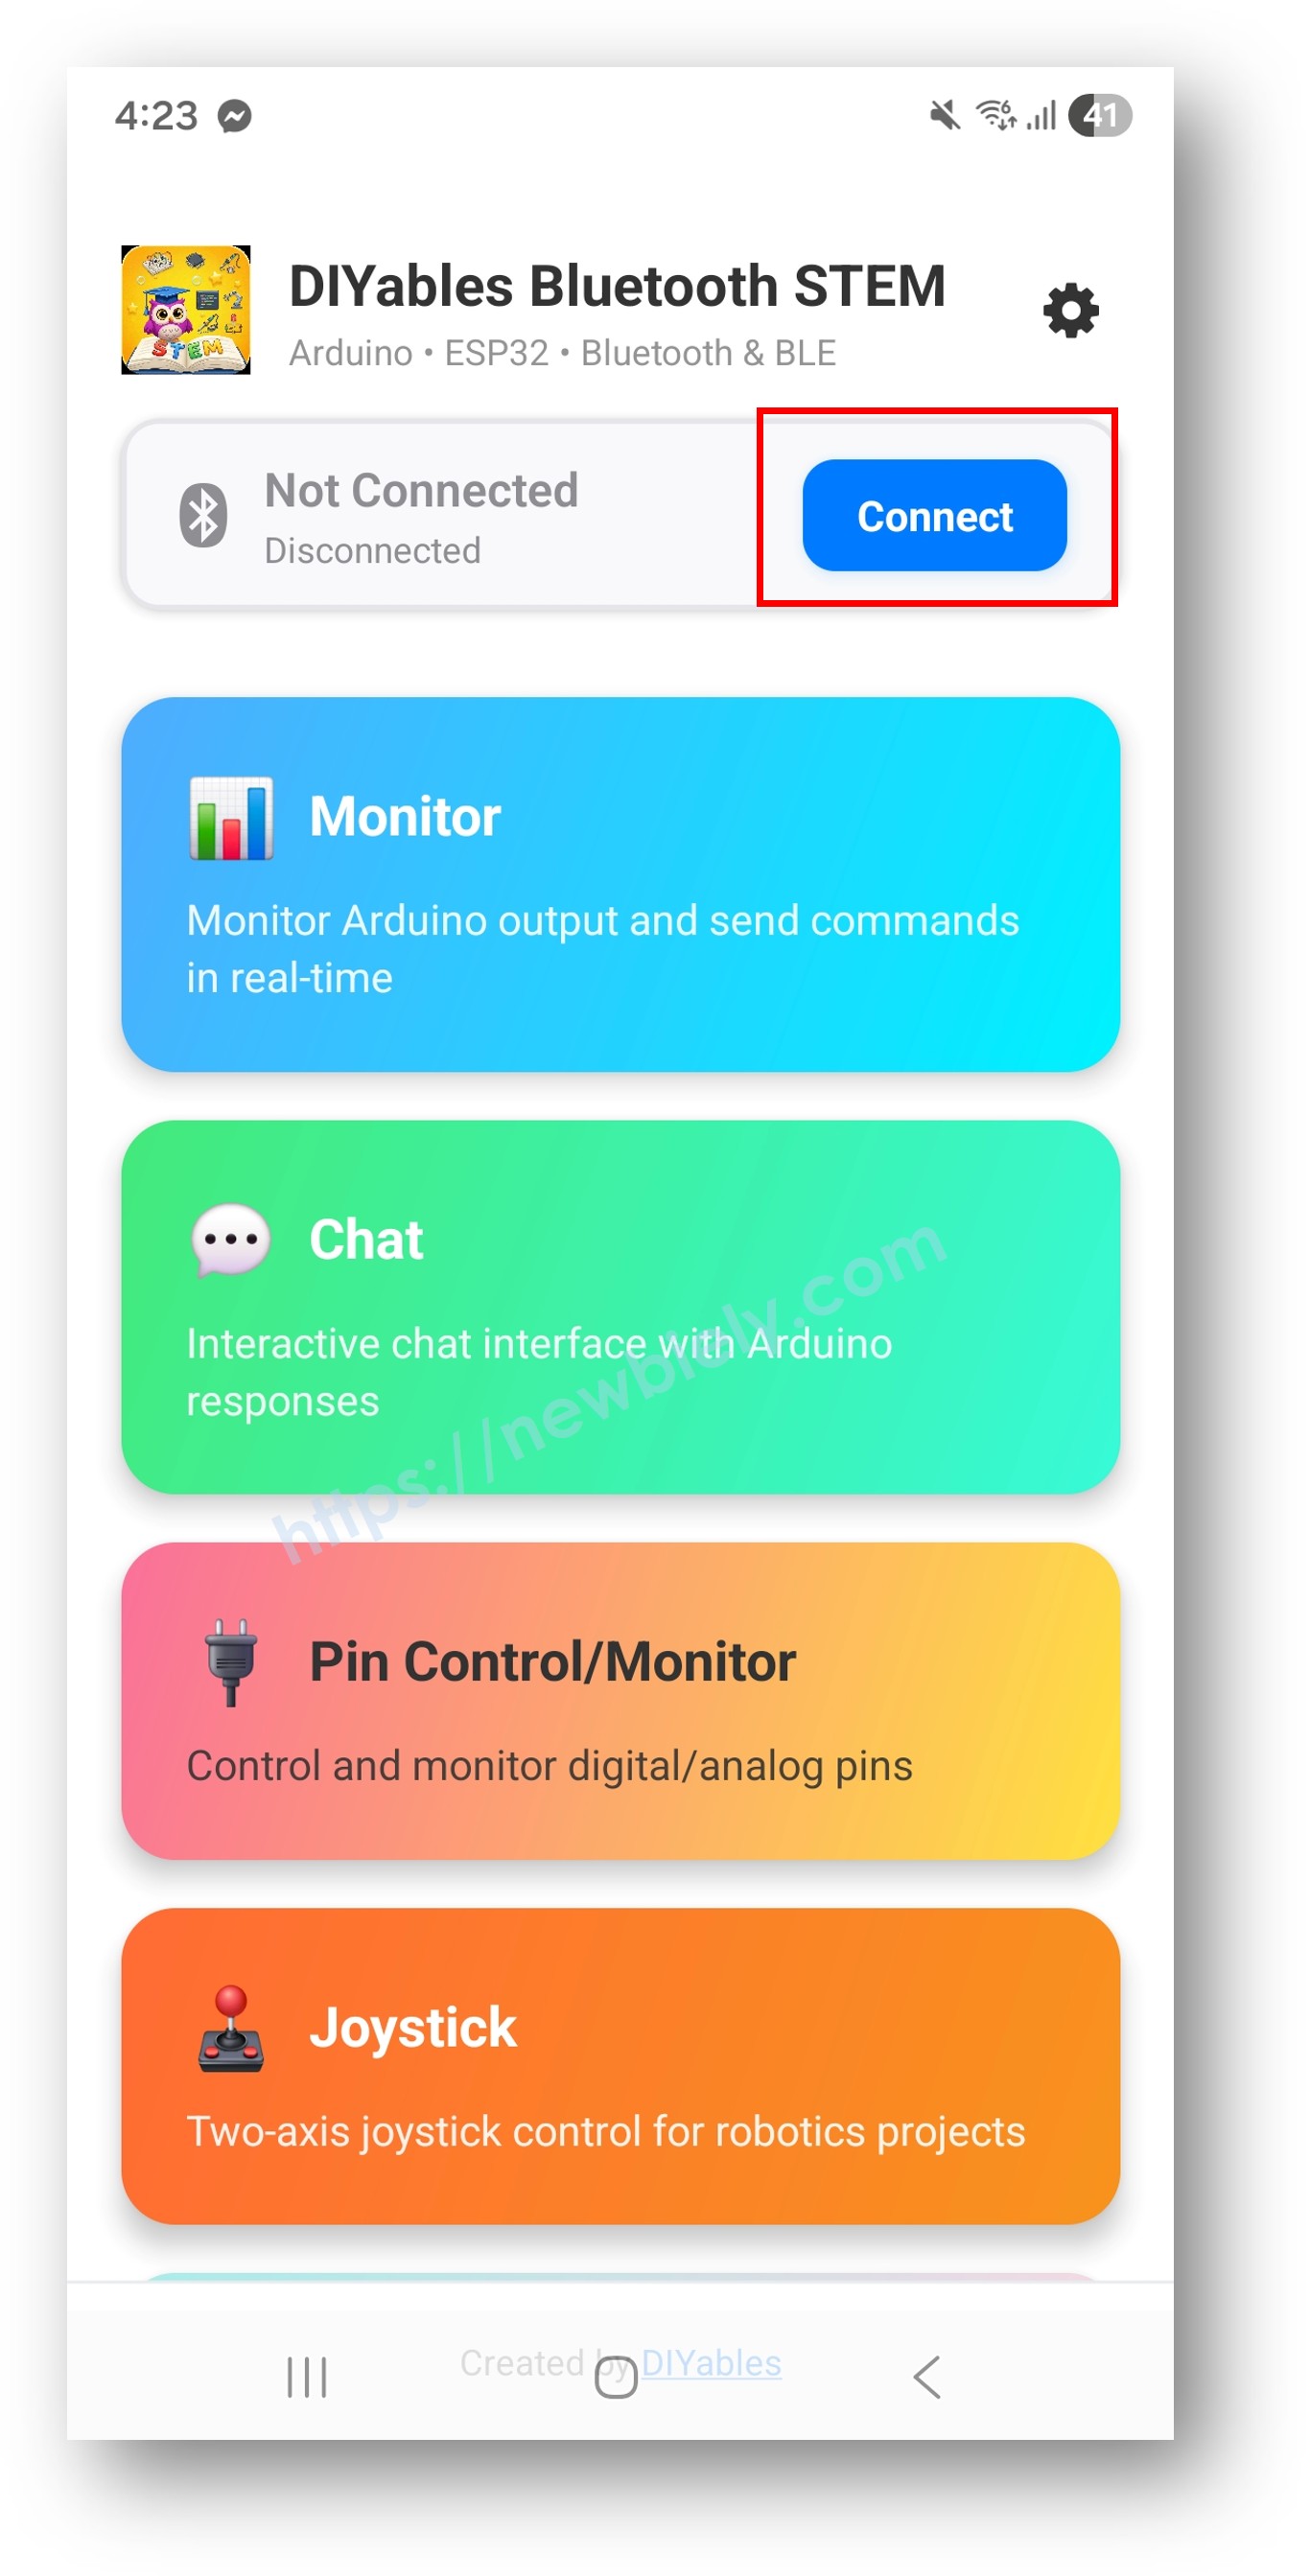
- Connect: tap "ESP32BLE_Temp" in the scan results. The app goes back to the home screen when the link is ready.
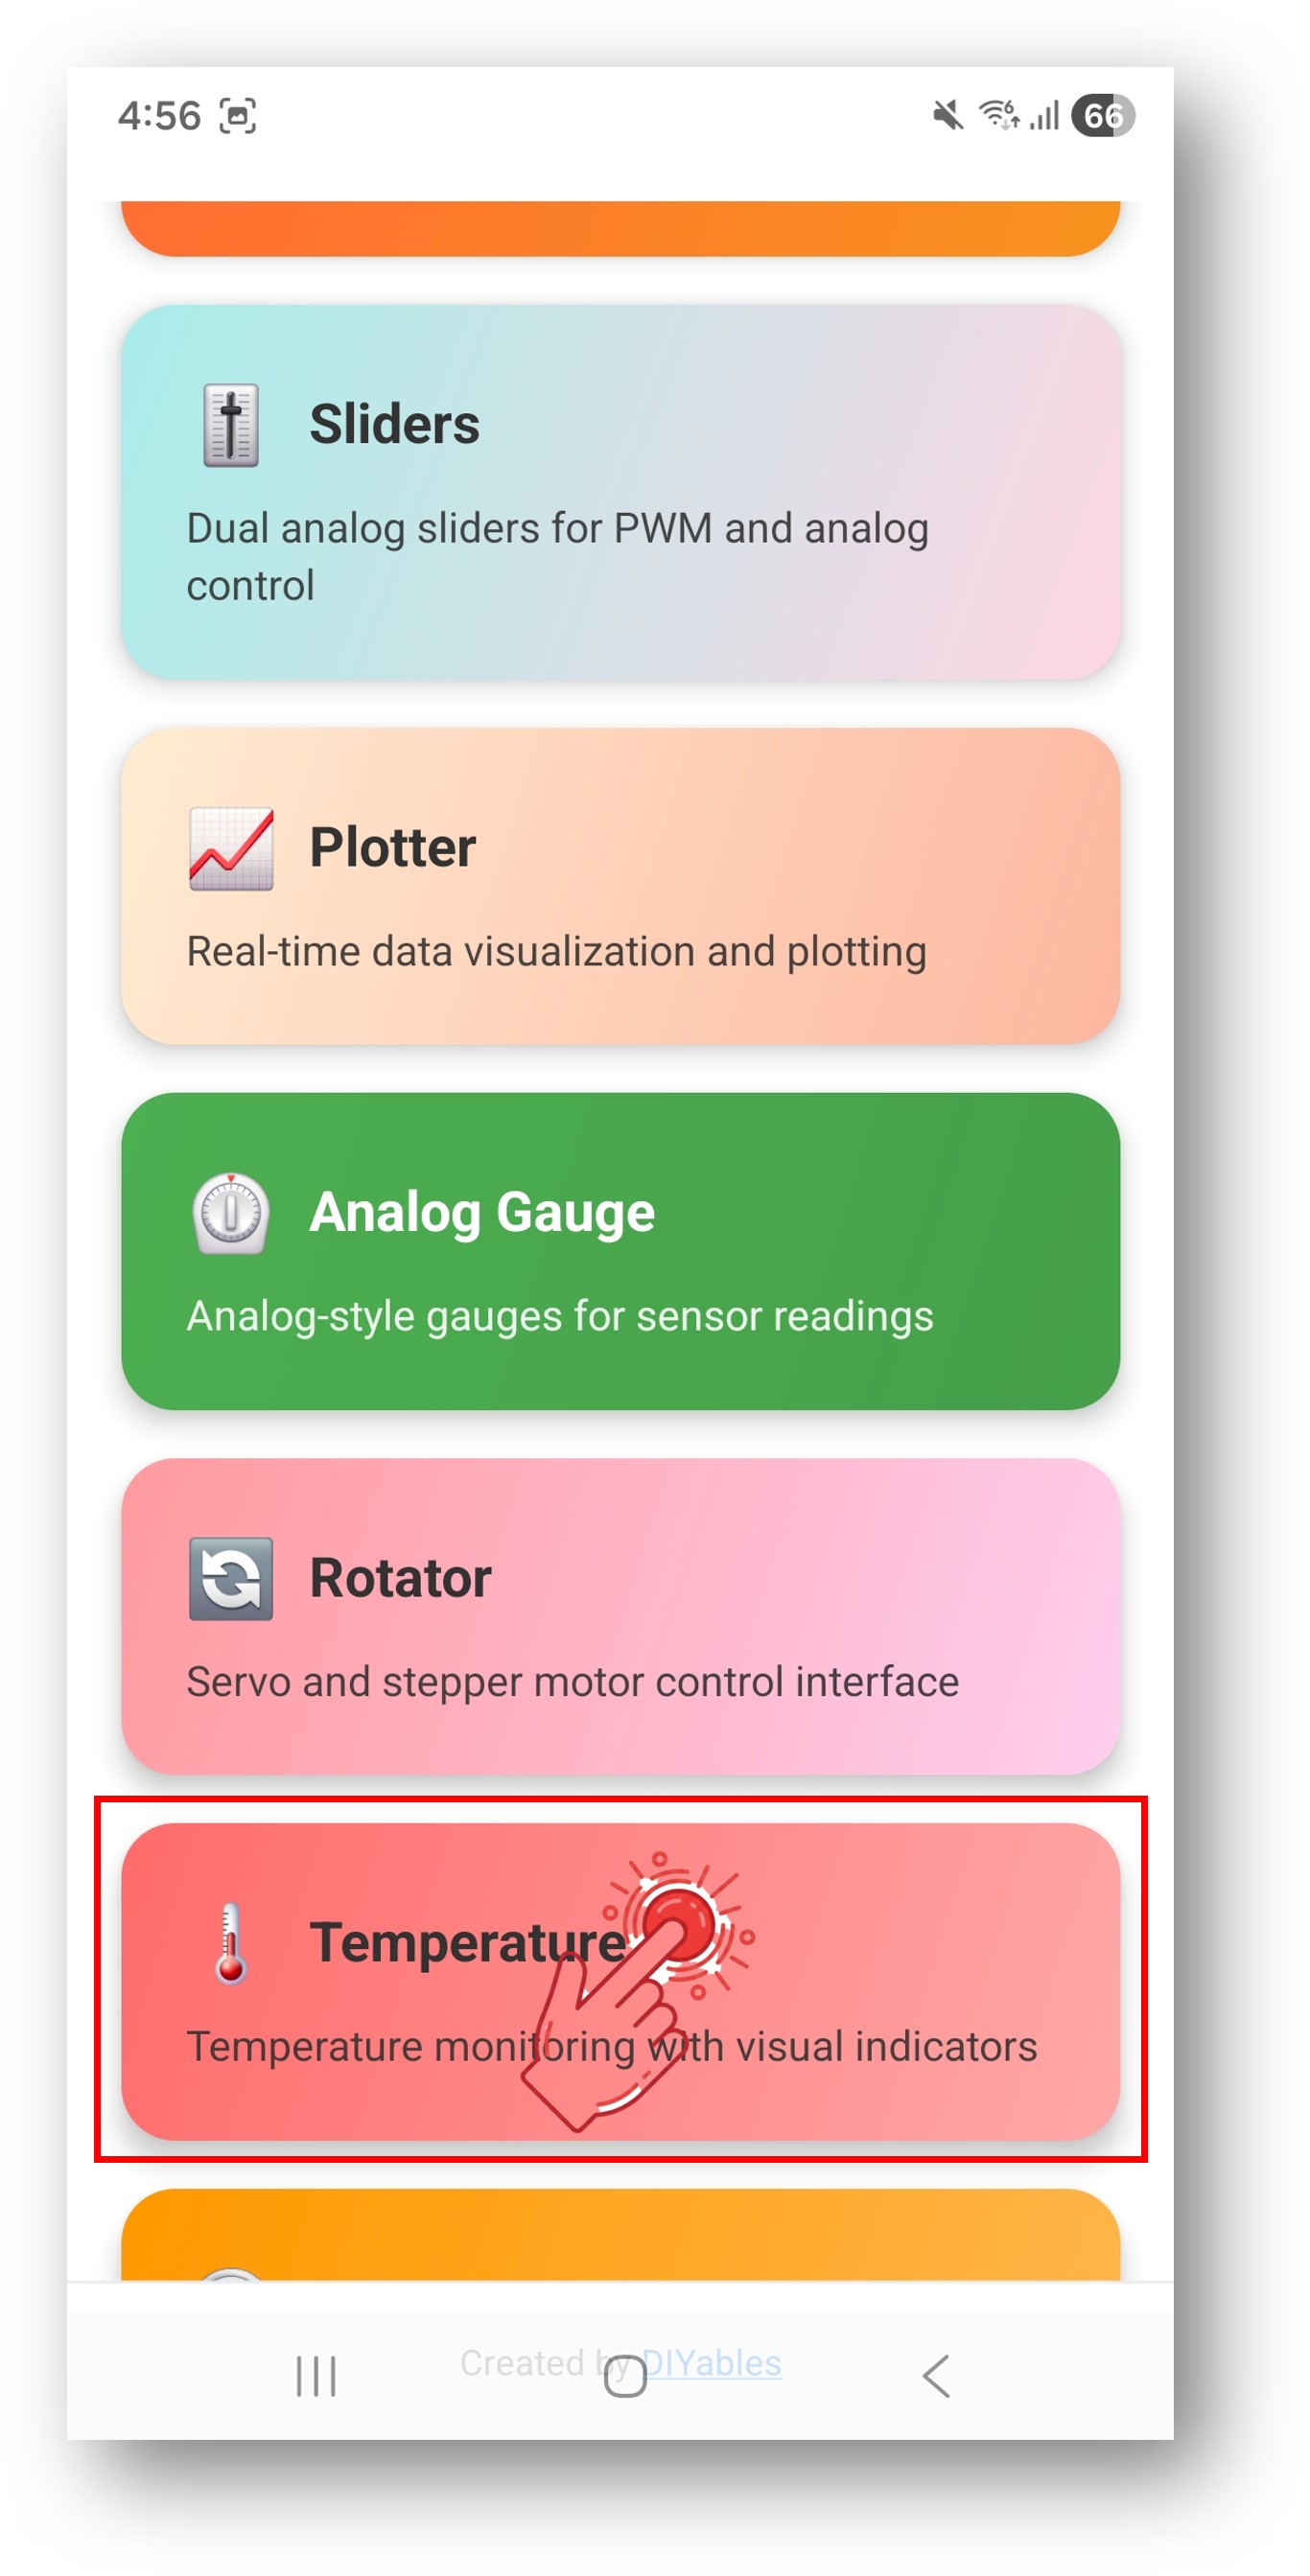
- Open the thermometer: select the Temperature app from the menu.
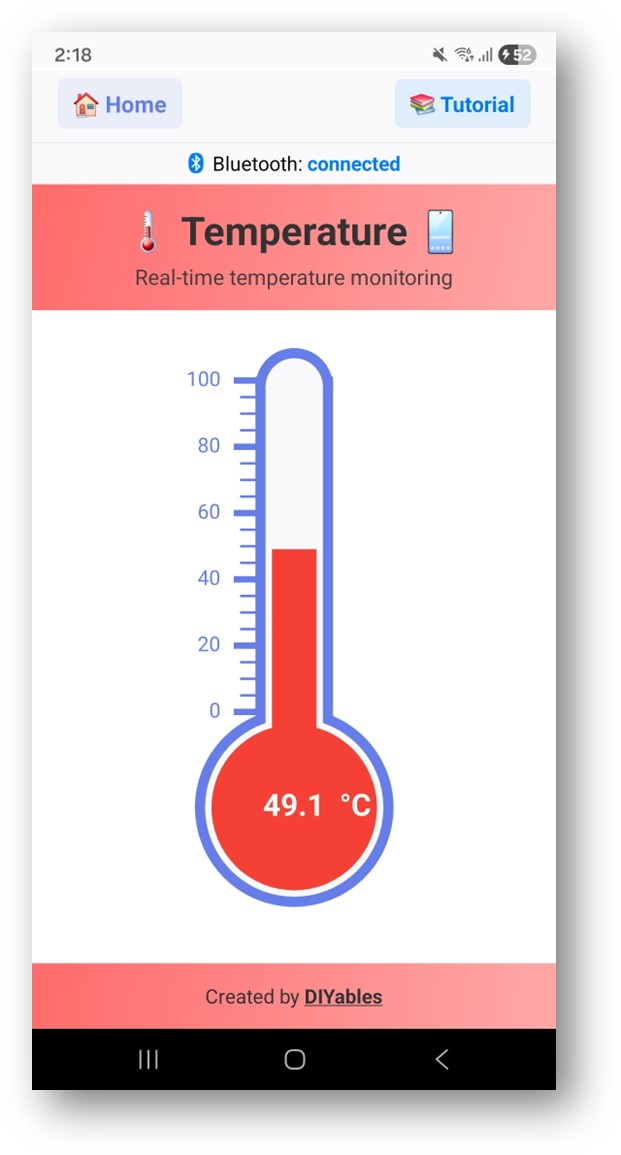
- Watch the gauge: it shows the current reading and moves as new values arrive.
- Tip: tap the settings icon on the home screen to hide or show apps. The DIYables Bluetooth App User Manual has more details.
Go back to the Serial Monitor in Arduino IDE. You will see lines like these:
Creative Customization - Adapt the Code to Your Project
The example is only a starting point. With a few lines you can make the gauge match your sensor and your project.
Configure Temperature Range and Unit
You set the range and the unit in the constructor. You can also change them later, for example when the user switches from Celsius to Fahrenheit.
Send Temperature Value
Call send() with a number to update the gauge. You can also send a short text, which is useful when the sensor fails.
Handle Temperature Requests from App
The app can ask for the latest reading, for example right after the temperature screen opens. This callback reads the sensor and answers at once.
Handle Connection Events
These two callbacks run when the phone connects or leaves. Sending a reading on connect means the gauge never starts empty.
How to Use the Temperature Display
It helps to know what each part of the screen means, so you can pick a good range and unit.
App Interface
The temperature screen has a thermometer gauge that fills up with the current reading. A number shows the exact value next to the unit text you set in the code. The ends of the scale show the minimum and maximum of your range.
Temperature Units
| Unit | Constructor |
|---|---|
| Celsius | DIYables_BluetoothTemperature(-10.0, 50.0, "°C") |
| Fahrenheit | DIYables_BluetoothTemperature(14.0, 122.0, "°F") |
| Kelvin | DIYables_BluetoothTemperature(263.0, 323.0, "K") |
ESP32 S3 Uno Pinout
The examples below connect real sensors to the board. The image shows the ESP32 S3 Uno form board pinout, so you can find the Uno header pins (D2, A0) and their GPIO numbers.

Programming Examples
Each example shows only the parts that change. Keep the BLE setup lines from the main sketch.
DHT22 Sensor Reading
The DHT22 data pin goes to D2 (GPIO18). Power the module from 3.3V, so its data signal stays safe for the ESP32 S3 Uno. Most DHT modules already have a pull-up resistor on the data line. With a bare sensor, add a 4.7k to 10k resistor between DATA and 3.3V.
| DHT22 Pin | ESP32 S3 Uno Pin |
|---|---|
| VCC | 3.3V |
| GND | GND |
| DATA | D2 (GPIO18) |
For a DHT11, change DHT_TYPE to DHT11. The wiring stays the same.
DS18B20 One-Wire Sensor
The DS18B20 uses one data wire on D2 (GPIO18). It needs a 4.7k pull-up resistor between DATA and 3.3V. Its range is -55°C to +125°C, so you can set a wide gauge range for it.
| DS18B20 Pin | ESP32 S3 Uno Pin |
|---|---|
| VCC (red) | 3.3V |
| GND (black) | GND |
| DATA (yellow) | D2 (GPIO18), plus 4.7k resistor to 3.3V |
NTC Thermistor Reading
A 10k NTC thermistor and a 10k fixed resistor make a voltage divider. Feed the divider from 3.3V and connect the middle point to A0 (GPIO2). The code uses the Steinhart-Hart (B value) formula to turn the 12-bit reading (0 to 4095) into °C.
| Divider Point | ESP32 S3 Uno Pin |
|---|---|
| Top of 10k series resistor | 3.3V |
| Middle point (resistor and thermistor) | A0 (GPIO2) |
| Bottom of thermistor | GND |
The setup() function calls analogSetAttenuation(ADC_11db). By default, the ESP32 S3 Uno ADC can only measure a small voltage. With 11 dB attenuation, A0 (GPIO2) reads the full range from 0V up to about 3.3V, so the divider uses the whole 0 to 4095 scale. Without it, readings hit 4095 too early and the temperature looks wrong.
Fahrenheit Display
This version reads the DHT sensor in Celsius, converts the value and shows it in °F.
Advanced Programming Techniques
Raw sensor values can jump a little. These small helpers make the display calmer and more useful.
Temperature Averaging / Smoothing
This code keeps the last 10 readings and sends their average. Small jumps disappear, and real changes still show after a few seconds.
Alert Threshold Detection
This function sends a text alert to the app when the temperature goes above 35°C or below 5°C. The alert is sent only once, until the value comes back into the normal band.
Hardware Integration Ideas
Many temperature sensors can drive the gauge. Keep every signal that goes into the ESP32 S3 Uno at 3.3V or less.
DHT22 / DHT11
These connect to one digital pin and also give humidity. They are a popular choice for indoor monitoring.
DS18B20 waterproof probe
It uses the OneWire bus and comes in a waterproof version. It is great for water, soil and outdoor use.
BME280 / BMP280
These I2C sensors measure temperature, humidity (BME280) and air pressure with good accuracy. On the ESP32 S3 Uno, wire them to the SDA (GPIO8) and SCL (GPIO9) header pins, not A4 and A5.
NTC thermistor
A cheap analog sensor that works in a voltage divider on an analog pin such as A0 (GPIO2).
Thermocouple (MAX6675 / MAX31855)
These measure very high temperatures, up to 1000°C and more, for ovens and kilns. They use SPI, and D10 to D13 on the ESP32 S3 Uno match the default SPI pins.
Bluetooth Mode on the ESP32 S3 Uno
The chip on the ESP32 S3 Uno has only BLE. Some other boards also offer Classic Bluetooth, but the Classic version of this example (Esp32Bluetooth_Temperature) does not work here. The table shows what BLE gives you.
| Feature | ESP32 S3 Uno (BLE, Esp32BLE_Temperature) |
|---|---|
| iOS support | Yes |
| Android support | Yes |
| Power use | Low |
| Range | About 30 to 100 m in open space |
| Pairing | Not needed, scan and connect in the app |
| Classic Bluetooth (BluetoothSerial) | Not supported by the chip |
Debug Tips
When the gauge shows something odd, print the value and the range. This small function puts everything in the Serial Monitor so you can compare it with the app.
Project Ideas
Need some inspiration? These projects all fit the temperature gauge well.
Home and environment
An indoor room thermometer, an outdoor weather station, a fridge or freezer monitor, or a greenhouse climate monitor.
Kitchen and food
A cooking thermometer, a sous vide display, a fermentation tracker or an oven thermometer.
Industrial and lab
A server room alert, a chemical process monitor, an incubator display or a soldering iron readout.
Water and aquatics
An aquarium thermometer, a pool or spa display, a hot water heater monitor or a hydroponics water sensor.
Integration with Other Bluetooth Apps
The temperature gauge works well next to other DIYables Bluetooth apps. One server can run several apps at once.
Combine with Bluetooth Plotter
Show the current reading on the gauge and draw the trend on the plotter.
Combine with Bluetooth Table
Use the gauge for a quick look and a table for the details, such as the daily minimum, maximum and average.
Next Steps
Once the temperature gauge works on your ESP32 S3 Uno, try these examples next:
- Bluetooth Analog Gauge - a general dial for pressure, speed and more
- Bluetooth Plotter - to see how the temperature changes over time
- Bluetooth Table - to show many sensor values in rows
- Multiple Bluetooth Apps - to combine the temperature gauge with other screens
Support
If you get stuck, these places can help:
- The API reference that comes with the DIYables Bluetooth library
- The Arduino community forums
FAQ
Why is there no Classic Bluetooth code for the ESP32 S3 Uno?
The chip on the ESP32 S3 Uno has only BLE (Bluetooth Low Energy). BluetoothSerial and other Classic Bluetooth code will not compile or run on it. Use the Esp32BLE_Temperature example. It works with the app on Android and iOS.
Do I need a sensor to try the ESP32 S3 Uno Bluetooth thermometer?
No. The main sketch makes a value that drifts between 20°C and 30°C, so the gauge moves without any wiring. When you are ready, put your sensor code inside readTemperature() and connect the sensor, for example a DHT22 or DS18B20 on D2 (GPIO18).
Can I power a DHT22 or DS18B20 from 5V on the ESP32 S3 Uno?
It is safer to use 3.3V. The ESP32 S3 Uno pins are 3.3V logic and are not 5V tolerant, and the data line is pulled up to the supply voltage. Both the DHT22 and the DS18B20 work well at 3.3V. If you must use 5V, add a level shifter on the data line.
Why does the code call analogSetAttenuation(ADC_11db)?
It is used in the NTC thermistor example. It sets the ESP32 S3 Uno ADC input range to about 0 to 3.3V, so the full divider signal maps to 0 to 4095. Without it the range is smaller and readings saturate early. The UNO R4 does not need this line, because it is only for the ESP32 family. Keep the sensor output at 3.3V or less.
Why do I get "Sketch too big" when I upload?
The Bluetooth stack needs a lot of flash. Go to Tools > Partition Scheme and choose "Huge APP (3MB No OTA/1MB SPIFFS)". Then upload again.
What if my project needs more pins than the Uno headers give?
The ESP32 S3 Uno has two extra rows of holes with more GPIOs: GPIO15 and GPIO16 (I/O, PWM, analog), GPIO45 and GPIO35 to GPIO42 (I/O, PWM), and GPIO47 and GPIO48 (output only, PWM). Solder pin headers to use them and write the GPIO number in code. For a second thermistor, GPIO15 or GPIO16 is the best choice; for more DHT or DS18B20 sensors, use GPIO35 to GPIO42, not GPIO47 or GPIO48, because those are output only. Be careful with two things. First, GPIO47 and GPIO48 may run at 1.8V instead of 3.3V on some modules (especially ones with "V" in the name, like R8V or R16V), so 3.3V devices can be damaged or act strangely. Second, GPIO0, GPIO3 (D6), GPIO45 and GPIO46 (D9) are boot strapping pins, and a wrong connection can stop the board from booting or uploading code. Use the other extra pins first.
Troubleshooting
| Problem | Possible Cause | Solution |
|---|---|---|
| No COM port in Arduino IDE | USB driver missing or charge-only cable | Install the CP210x or CH340 driver, use a data USB Type-C cable, or hold BOOT while pressing RESET |
| Sketch too big error | Default partition is too small for Bluetooth | Select Tools > Partition Scheme > Huge APP (3MB No OTA/1MB SPIFFS) |
| ESP32BLE_Temp does not show in the app | Board not powered, sketch not uploaded, or phone Bluetooth off | Check the Serial Monitor for "Waiting for Bluetooth connection...", turn on Bluetooth, and on Android 11 or older turn on Location |
| Classic Bluetooth code fails to compile | The ESP32 S3 Uno has no Classic Bluetooth | Use the BLE example Esp32BLE_Temperature instead of the BluetoothSerial one |
| Reading is NaN or -127 | Sensor wiring wrong or pull-up resistor missing | Check the data wire on D2 (GPIO18), power the sensor from 3.3V, and add a 4.7k pull-up for the DS18B20 |
| Gauge shows a wrong range | Min, max or unit in the constructor do not fit the sensor | Change the constructor values or call setRange() and setUnit() |
| Thermistor reads far too low or high | Divider wired wrong or no ADC attenuation | Feed the divider from 3.3V, check A0 (GPIO2), and keep analogSetAttenuation(ADC_11db) in setup() |
| Temperature does not update | bluetoothServer.loop() missing or send() not called | Call bluetoothServer.loop() in every loop() run and send a new value at a fixed interval |