
ESP32 S3 UNO - Motion Sensor - Relay
This ESP32 S3 Uno motion sensor relay tutorial shows you how to switch a relay on and off with an HC-SR501 PIR motion sensor and the ESP32 S3 Uno form board. When someone walks by, the relay turns on. When the movement stops, it turns off again. You can use it to control a light bulb, a fan, an LED strip or a solenoid lock automatically.
In this tutorial, you will:
- Wire an HC-SR501 PIR motion sensor and a relay module to the ESP32 S3 Uno
- Set up the time delay, range and trigger mode of the motion sensor
- Detect when motion starts and stops with Arduino code
- Turn a relay on and off from the motion sensor state
Hardware Preparation
Or you can buy the following kits:
| 1 | × | DIYables Sensor Kit (18 sensors/displays) |
Additionally, some of these links are for products from our own brand, DIYables .
Overview of Relay and Motion Sensor
This project puts two parts together. If one of them is new to you, read its own tutorial first. There you will learn the pinout, how it works and how to code it.
In short, the HC-SR501 senses the body heat of people and animals that move in front of it. Its OUTPUT pin goes HIGH when it sees motion and LOW when the motion is gone. The relay is an electric switch that the board turns on and off. The ESP32 S3 Uno reads the sensor and decides when the relay should switch.
ESP32 S3 Uno Pinout
The image below shows the pinout diagram of the ESP32 S3 Uno form board. Use it to find the D3 and D10 headers and their GPIO numbers when you wire the circuit.

Wiring Diagram
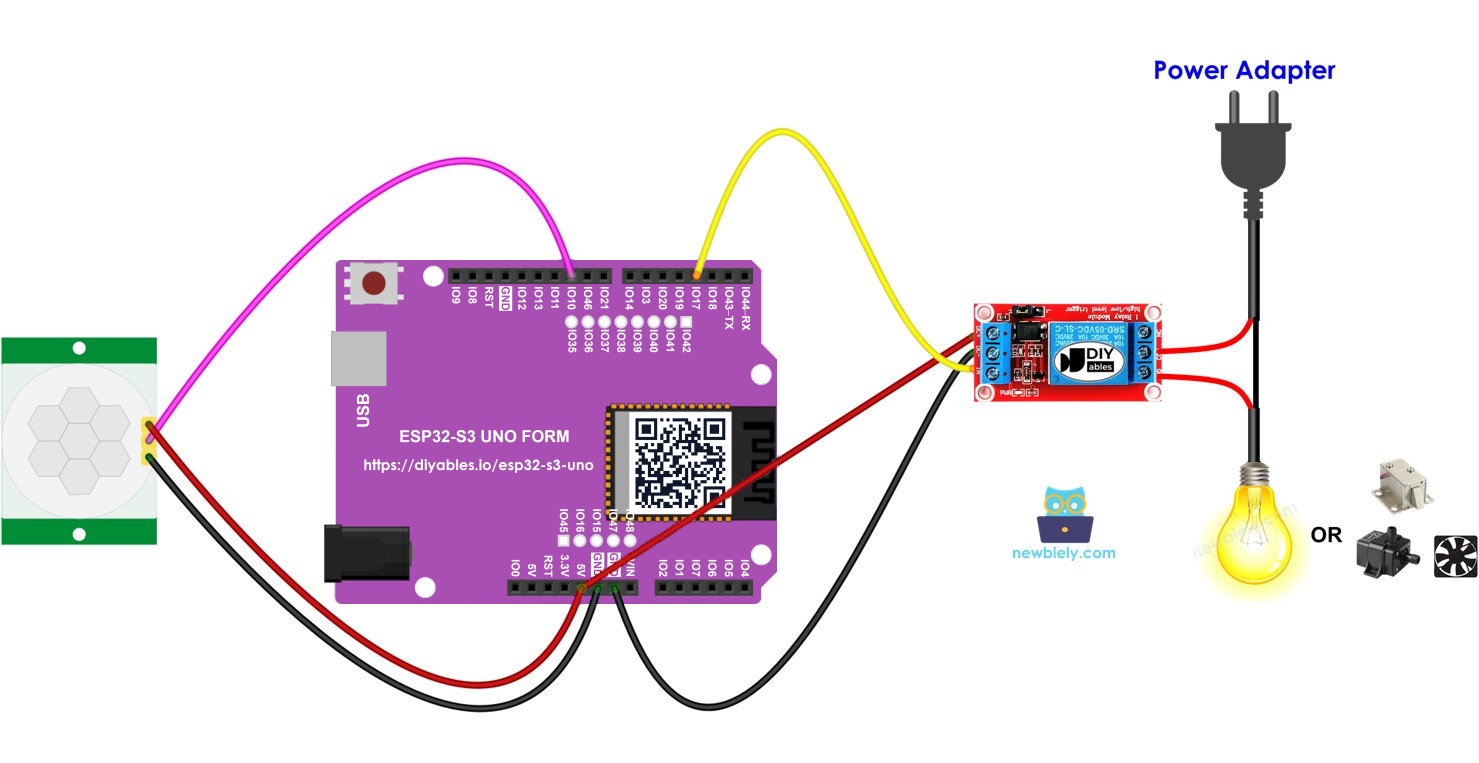
The motion sensor output goes to D10 and the relay input goes to D3. Both modules get power from the 5V pin.
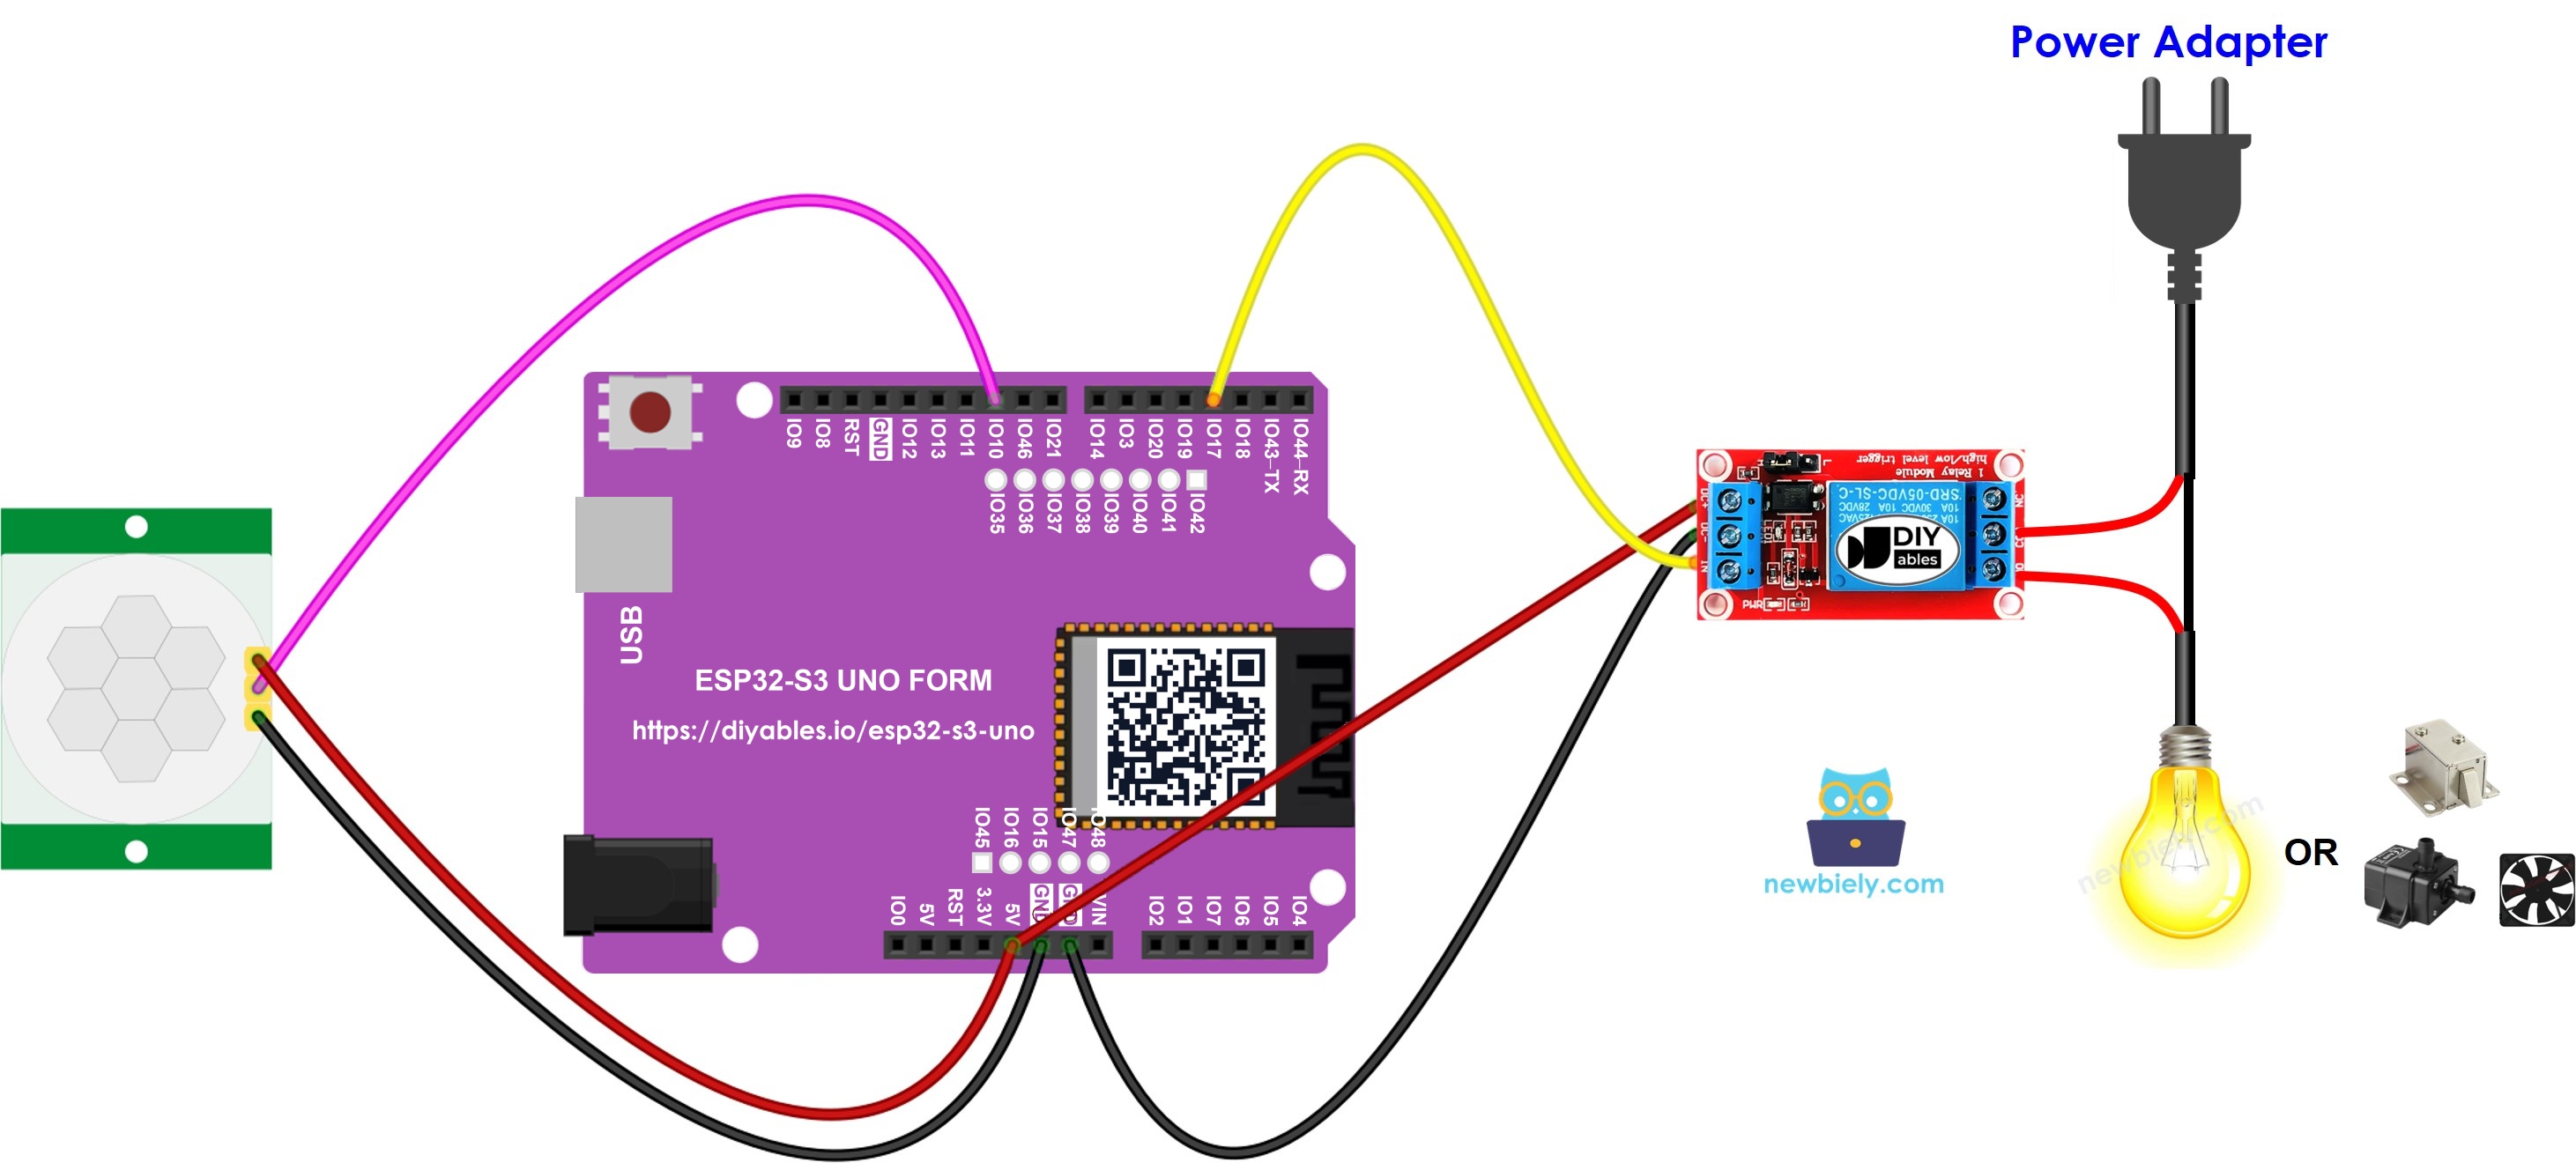
This image is created using Fritzing. Click to enlarge image
| Component Pin | ESP32 S3 Uno Pin |
|---|---|
| Motion sensor VCC | 5V |
| Motion sensor GND | GND |
| Motion sensor OUTPUT | D10 (GPIO10) |
| Relay VCC | 5V |
| Relay GND | GND |
| Relay IN | D3 (GPIO17) |
※ NOTE THAT:
The HC-SR501 needs 4.5V to 20V on its VCC pin, so power it from 5V. Its OUTPUT pin gives only about 3.3V when HIGH, so it is safe for the ESP32 S3 Uno input. The ESP32 S3 Uno pins are NOT 5V tolerant, so never send a 5V signal into D10.
If you use the optional solenoid lock, connect it to the relay's COM and NO screw terminals, together with the 12V power adapter and the DC power jack. Never power the lock from the ESP32 S3 Uno.
Initial Setting
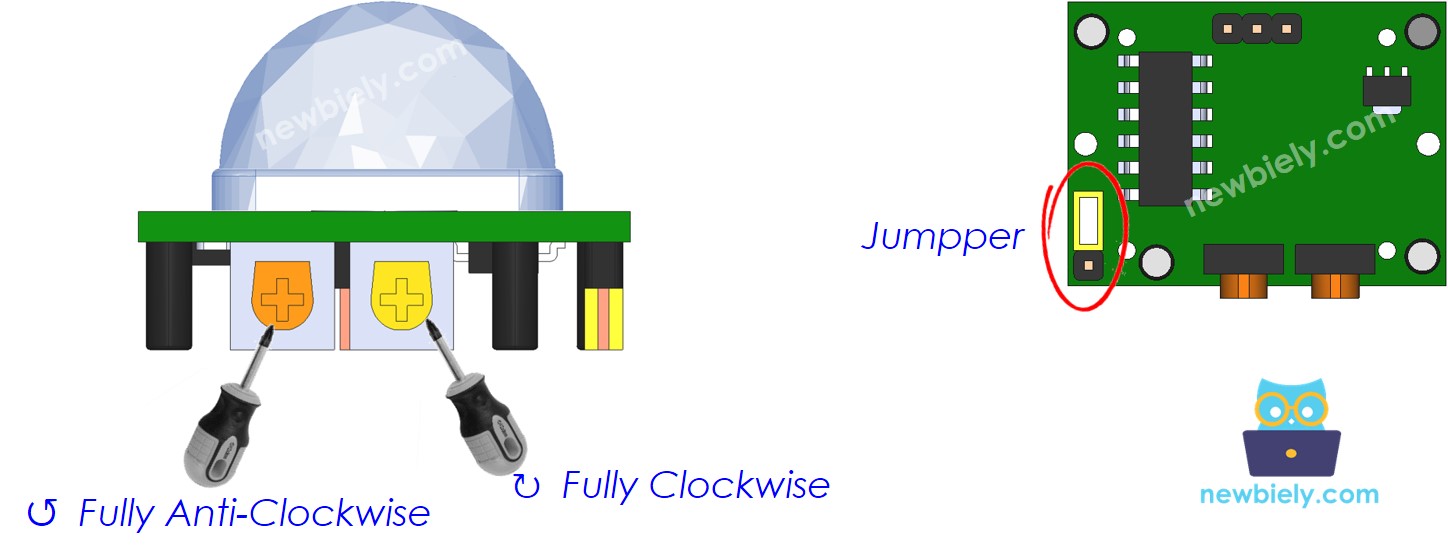
The HC-SR501 has two small knobs and a jumper. Set them as below before you test the project. With these settings, the relay follows the motion closely and the sensor covers the largest area.
| Time Delay Adjuster | Turn it fully anti-clockwise. |
| Detection Range Adjuster | Turn it fully clockwise. |
| Repeat Trigger Selector | Place the jumper as shown in the image. |
ESP32 S3 Uno Code
The sketch reads the motion sensor in every loop and compares the new state with the old one. When the state changes from LOW to HIGH, motion has started, so the relay turns on. When it changes from HIGH to LOW, motion has stopped, so the relay turns off.
Detailed Instructions
Follow these steps in order:
- New to the ESP32 S3 Uno? Follow ESP32 S3 Uno - Getting Started first.
- Wire it up as shown in the diagram.
- Connect the board to your computer with a USB Type-C cable.
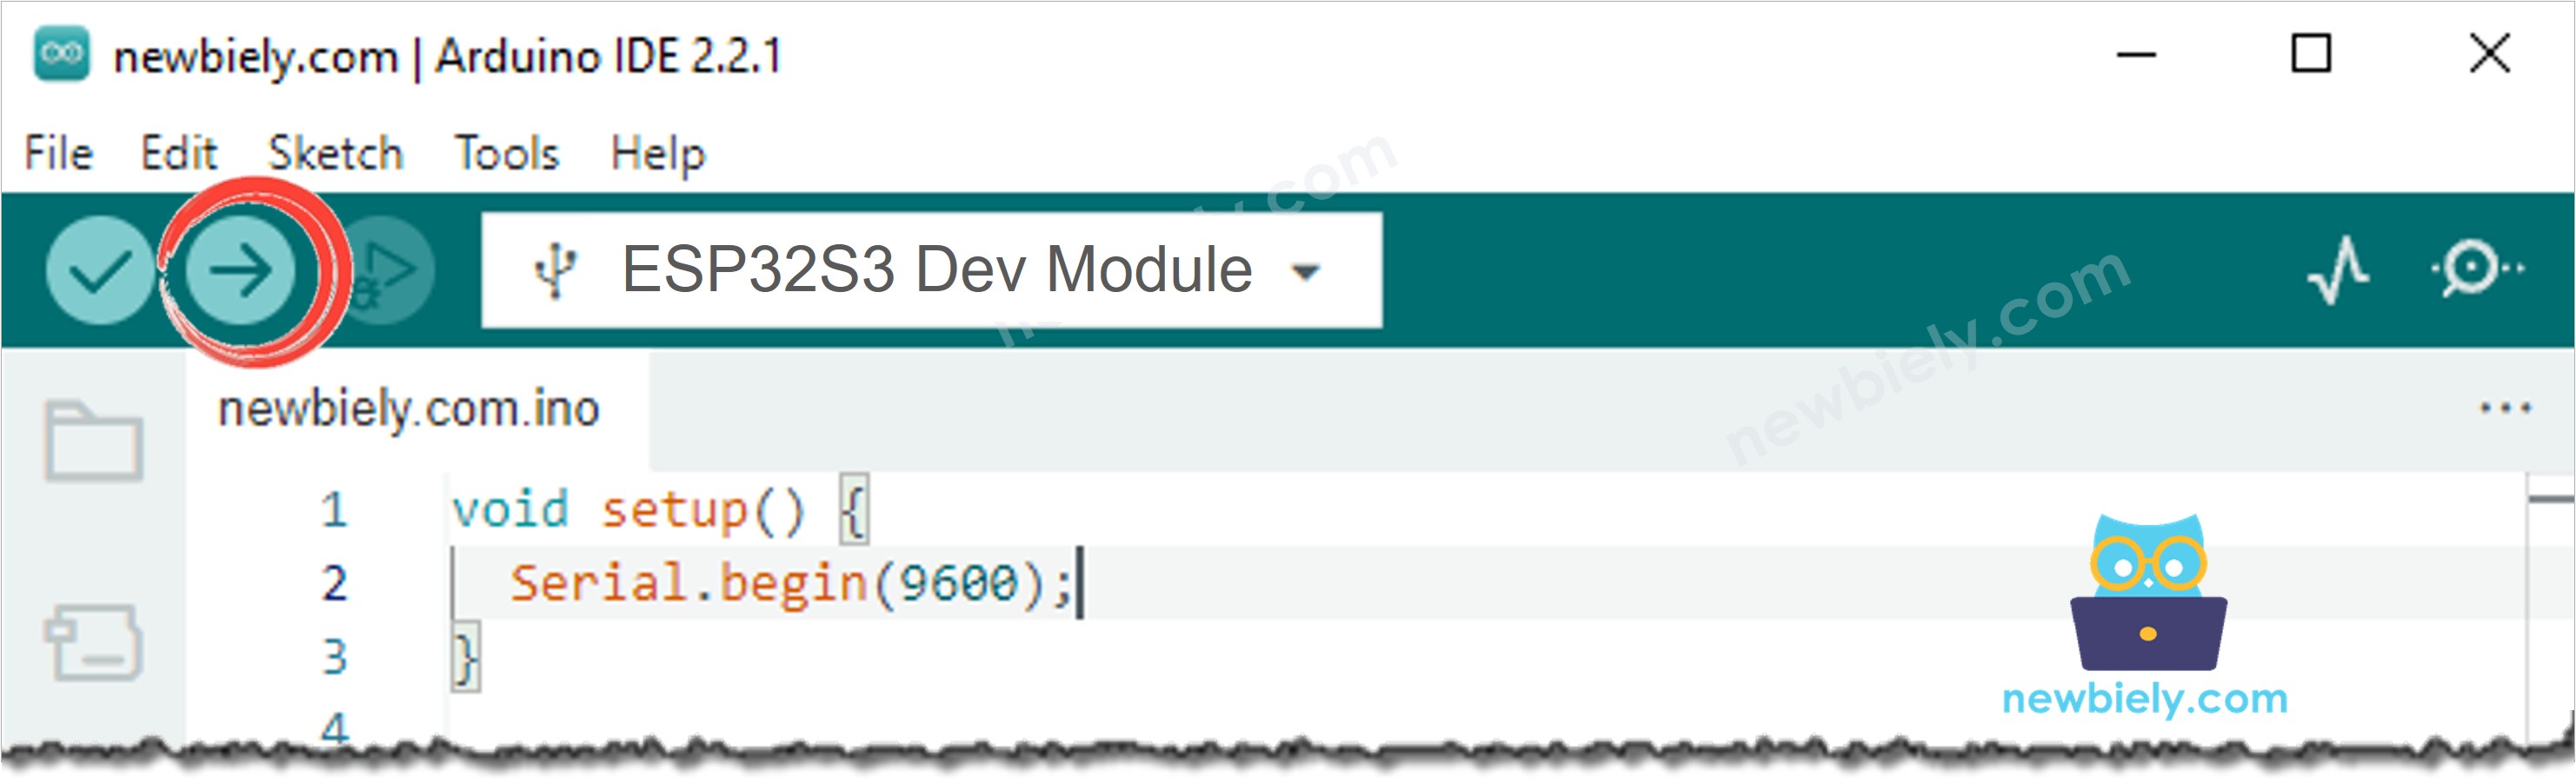
- Open Arduino IDE, choose the ESP32S3 Dev Module board and the correct COM port.
- Copy the code above and paste it into Arduino IDE.
- Upload the code by clicking the Upload button.
- Open the Serial Monitor at 9600 baud.
- Wave your hand in front of the sensor, then stay still.
- Watch the relay. It clicks on when you move and clicks off a few seconds after you stop.
- Tip: After power on, the HC-SR501 needs about 30 to 60 seconds to settle. Do not test it before that time.
Code Explanation
Every line of the sketch has a comment that says what it does. Read the comments in the code above to follow the logic step by step. The key idea is to act only when the sensor state changes, not on every loop, so the Serial Monitor shows one message per event.
Video Tutorial
Watch the video below to see this ESP32 S3 Uno project step by step.
FAQ
Can I connect the HC-SR501 output directly to the ESP32 S3 Uno?
Yes. The HC-SR501 runs from 5V, but its OUTPUT pin gives about 3.3V when HIGH. This is safe for the ESP32 S3 Uno, whose pins are NOT 5V tolerant. If you use another motion sensor with a 5V output, add a voltage divider first.
Can I power the relay module from the 3.3V pin of the ESP32 S3 Uno?
Most relay modules have a 5V coil, so power their VCC from the 5V pin. The IN pin can still take the 3.3V signal from the ESP32 S3 Uno on most modules. If your relay does not click, use a 3V relay module or a module with a transistor driver.
How do I keep the light on longer after motion stops?
Turn the time delay knob on the HC-SR501 clockwise. The sensor will hold its output HIGH longer, so the relay stays on longer. You can also add a timer in the code with millis().
Is the code different from the UNO R4 code?
The logic is the same. Only the pin numbers change. On the ESP32 S3 Uno you write the GPIO number in code, so D10 is 10 and D3 is 17. Choose the ESP32S3 Dev Module board in Arduino IDE.
What if my project needs more pins than the Uno headers give?
The ESP32 S3 Uno has two extra rows of holes with more GPIOs. GPIO15 and GPIO16 are I/O, PWM and analog. GPIO45 and GPIO35 to GPIO42 are I/O and PWM. GPIO47 and GPIO48 are output only, with PWM. Solder pin headers to use them and write the GPIO number in code. For a second motion sensor (an input), use GPIO15, GPIO16 or GPIO35 to GPIO42, never GPIO47 or GPIO48. For more relays, GPIO35 to GPIO42 are a good choice. Be careful with two things. First, GPIO47 and GPIO48 may run at 1.8V instead of 3.3V on some modules (especially ones with "V" in the name, like R8V or R16V), so 3.3V devices can be damaged or act strangely. Second, GPIO0, GPIO3 (D6), GPIO45 and GPIO46 (D9) are boot strapping pins, and a wrong connection can stop the board from booting or uploading code. Use the other extra pins first.
Can I switch a 220V lamp with this relay?
The relay can switch mains power, but mains voltage is dangerous. Only do it if you know how to work safely with high voltage. For learning, use a 12V solenoid lock or a 12V LED strip instead.
Troubleshooting
| Problem | Possible Cause | Solution |
|---|---|---|
| No COM port in Arduino IDE | USB driver is missing or the board is not in upload mode | Install the CP210x or CH340 driver, or hold BOOT while pressing RESET |
| Relay never switches | Relay VCC or GND is not connected, or the relay needs 5V | Power the relay VCC from 5V and check the GND wire |
| Motion is never detected | The sensor has no power or is still warming up | Power the sensor VCC from 5V and wait 30 to 60 seconds after power on |
| Relay turns on by itself | The sensor sees heat changes from a heater, a window or the sun | Point the sensor away from heat sources and lower the detection range |
| Relay stays on too long | The time delay knob is turned too far clockwise | Turn the time delay knob fully anti-clockwise |
| Relay works the opposite way | The relay module is active LOW | Swap HIGH and LOW in the digitalWrite() lines |
| Serial Monitor shows strange characters | Wrong baud rate | Set the Serial Monitor to 9600 baud |