
ESP32 S3 UNO - DIYables Bluetooth App Multiple Apps

Overview

This ESP32 S3 Uno Bluetooth multiple apps tutorial shows you how to run nine BLE app screens at the same time from one sketch on the ESP32 S3 Uno form board. With the free DIYables Bluetooth STEM app, your phone gets a Monitor, Chat, Slider, Joystick, Temperature view, Plotter, Table, Analog Gauge and Rotator, all over one Bluetooth Low Energy connection. It is a good base for an all-in-one dashboard or a remote control panel.

In this tutorial, you will:

  1. Install the DIYables Bluetooth library and upload the multi-app BLE example
  2. Pick the right partition scheme so a large sketch fits in flash
  3. Connect the DIYables Bluetooth App on Android or iPhone and switch between apps
  4. Link apps together, for example a slider that moves a gauge and updates a table
  5. Build your own combined dashboard with only the apps you need

BLE only on this board

The ESP32 S3 Uno supports Bluetooth Low Energy (BLE) only. It has no Classic Bluetooth radio, so the BluetoothSerial library and the Esp32Bluetooth_MultipleApps (Classic) example do not work on it. This page uses only the BLE example, Esp32BLE_MultipleApps. The good news: BLE works with the app on both Android and iOS, and you do not need to pair the board first.
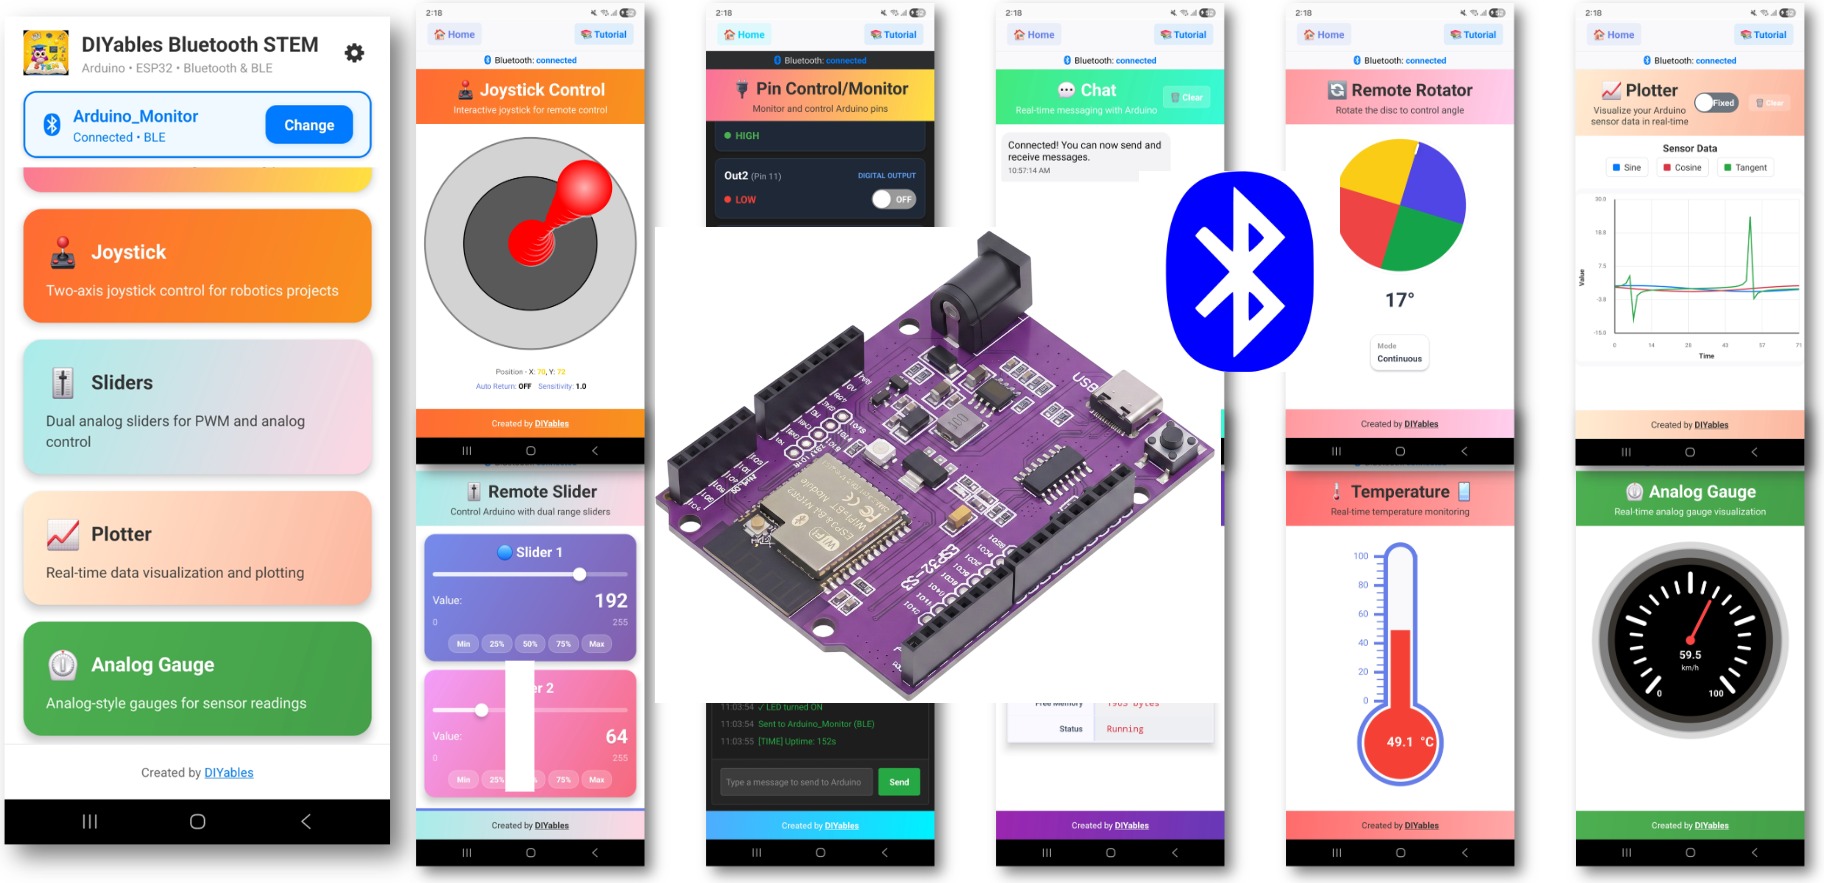
ESP32 S3 Uno Bluetooth multiple apps

Features

One BLE link can carry many app screens. The library keeps them apart for you, so each app works as if it were alone, and you only write the parts that matter for your project.

Nine apps in one sketch

Monitor, Chat, Slider, Joystick, Temperature, Plotter, Table, Analog Gauge and Rotator all run at the same time.

Own callbacks for each app

Every app has its own event handlers, so a slider change and a chat message never get mixed up.

Own timing for each app

Each app sends data at its own speed. The plotter can update 10 times a second while the table updates every 5 seconds.

Free app switching

In the phone app you can jump from one screen to another at any time. The board keeps running all apps in the background.

Android and iOS

BLE is supported on both platforms, so the same sketch works for every phone.

Low power, no pairing

BLE uses little power, and the phone finds the board in a scan. There is no pairing step in the phone settings.

Hardware Preparation

1×ESP32 S3 Uno-form Board
1×USB Cable Type-A to Type-C (for USB-A PC)
1×USB Cable Type-C to Type-C (for USB-C PC)
1×Breadboard
1×Jumper Wires
1×Optionally, LED
1×Alternatively, Button and LED Kit
1×Optionally, 220 ohm Resistor

Or you can buy the following kits:

1×DIYables Sensor Kit (18 sensors/displays)
Disclosure: Some of the links provided in this section are Amazon affiliate links. We may receive a commission for any purchases made through these links at no additional cost to you.
Additionally, some of these links are for products from our own brand, DIYables .

ESP32 S3 Uno Pinout

The image below shows the pinout of the ESP32 S3 Uno form board. Use it to find the D13 header pin and its GPIO number when you add the status LED.

ESP32 S3 Uno pinout diagram

Wiring Diagram

The multi-app sketch needs no wiring to work, because the BLE radio is inside the board. The code also drives a status LED that turns on when the phone connects and that you can switch with the LED_ON and LED_OFF commands. The ESP32 S3 Uno has no built-in LED on the Uno headers, so if you want to see this, add an external LED on D13 (GPIO12).

LED Pin ESP32 S3 Uno Pin
Anode (long leg), through a 220 ohm resistor D13 (GPIO12)
Cathode (short leg) GND

ESP32 S3 Uno Code

This example puts a lot of app libraries into one sketch, so the compiled program is bigger than usual. You set up the Arduino IDE once, then upload the BLE example and watch the Serial Monitor.

Detailed Instructions

Follow these steps in order:

  1. New to the ESP32 S3 Uno? Follow ESP32 S3 Uno - Getting Started first.
  2. Wire it up as shown in the wiring table above (only if you want the status LED).
  3. Connect the board to your computer with a USB Type-C cable.
  4. Open Arduino IDE, choose the ESP32S3 Dev Module board and the correct COM port.
  5. Open the library manager by clicking the Libraries icon on the left bar of the Arduino IDE.
  6. Search "DIYables Bluetooth" and find the DIYables Bluetooth library by DIYables.
  7. Install it by clicking the Install button.
  • Search for DIYables Bluetooth created by DIYables and click the Install button.
∞
Newbiely | Arduino IDE 2.3.8
──
☐
✕
File
Edit
Sketch
Tools
Help
ESP32S3 Dev Module
Library Manager
Type:
All
Topic:
All
DIYables Bluetooth by DIYables
A comprehensive Bluetooth library that connects Arduino to the DIYables Bluetooth STEM mobile app (Android & iOS) via BLE and Classic Bluetooth. Features 11 built-in apps: Monitor, Chat, Digital Pin Control, Joystick, Sliders, Plotter, Analog Gauge, Rotator, Temperature, RTC, and Data Table. Clean architecture with platform abstraction. Works with Arduino Uno R4 WiFi, Arduino Nano 33 BLE, ESP32, and other BLE-capable boards. No mobile coding required. More info
1.0.1
INSTALL
Newbiely.ino
···
1 void setup() {
Output
Serial Monitor
Ln 1, Col 1
ESP32S3 Dev Module on COM15
1
  1. Install the dependencies by clicking Install All when the IDE asks for other libraries.
  2. Tip: keep the Arduino IDE and the esp32 by Espressif Systems core up to date. Old cores can fail to build the BLE part of the library.

※ NOTE THAT:

This sketch is large. You must change the partition scheme before you upload, or the IDE will say the sketch is too big. The steps are in the next section.

ESP32 S3 Uno BLE Code (works with the app on Android and iOS)

The sketch creates one BLE server and registers nine apps on it. It sends a heartbeat to the Monitor, a changing temperature, sine and cosine waves to the Plotter, and live values to the Table and Gauge. Input from the Slider, Joystick and Rotator is printed to the Serial Monitor and copied into the Table, and the slider also moves the gauge.

  1. Open the example in Arduino IDE with File Examples DIYables Bluetooth Esp32BLE_MultipleApps, or copy the code below and paste it into the editor.
/* * This ESP32 S3 Uno code was developed by newbiely.com * * This ESP32 S3 Uno code is made available for public use without any restriction * * For comprehensive instructions and wiring diagrams, please visit: * https://newbiely.com/tutorials/esp32-s3-uno/esp32-s3-uno-diyables-bluetooth-app-multiple-apps */ /* * DIYables Bluetooth Library - ESP32 S3 Uno BLE Multiple Apps Example * Works with DIYables Bluetooth STEM app on Android and iOS * * This example demonstrates how to use multiple Bluetooth apps simultaneously: * - Monitor, Chat, Slider, Joystick, Temperature, Plotter, * Table, Analog Gauge, Rotator * * Board: ESP32 S3 Uno (BLE only, no Classic Bluetooth) * Arduino IDE board: ESP32S3 Dev Module * * LED: external LED on D13 (GPIO12) through a 220 ohm resistor * (the ESP32 S3 Uno has no built-in LED on the Uno headers) * * Note: Select "Huge APP (3MB No OTA/1MB SPIFFS)" partition scheme * in Arduino IDE: Tools > Partition Scheme * * Setup: * 1. Upload the sketch to your ESP32 S3 Uno * 2. Open Serial Monitor (115200 baud) * 3. Open DIYables Bluetooth App on your phone * 4. Connect to "ESP32 S3 Uno Multi-App" * 5. Navigate to different screens to test each app * * Tutorial: https://diyables.io/bluetooth-app * Author: DIYables */ #include <DIYables_BluetoothServer.h> #include <DIYables_BluetoothMonitor.h> #include <DIYables_BluetoothChat.h> #include <DIYables_BluetoothSlider.h> #include <DIYables_BluetoothJoystick.h> #include <DIYables_BluetoothTemperature.h> #include <DIYables_BluetoothPlotter.h> #include <DIYables_BluetoothTable.h> #include <DIYables_BluetoothAnalogGauge.h> #include <DIYables_BluetoothRotator.h> #include <platforms/DIYables_Esp32BLE.h> // BLE Configuration const char* DEVICE_NAME = "ESP32 S3 Uno Multi-App"; const char* SERVICE_UUID = "19B10000-E8F2-537E-4F6C-D104768A1214"; const char* TX_UUID = "19B10001-E8F2-537E-4F6C-D104768A1214"; const char* RX_UUID = "19B10002-E8F2-537E-4F6C-D104768A1214"; #define LED_PIN 12 // ESP32 S3 Uno pin D13 (GPIO12), external LED // Create Bluetooth instances DIYables_Esp32BLE bluetooth(DEVICE_NAME, SERVICE_UUID, TX_UUID, RX_UUID); DIYables_BluetoothServer bluetoothServer(bluetooth); // Create app instances DIYables_BluetoothMonitor bluetoothMonitor; DIYables_BluetoothChat bluetoothChat; DIYables_BluetoothSlider bluetoothSlider(0, 255, 1); DIYables_BluetoothJoystick bluetoothJoystick(false, 5); DIYables_BluetoothTemperature bluetoothTemperature(-10.0, 50.0, "°C"); DIYables_BluetoothPlotter bluetoothPlotter; DIYables_BluetoothTable bluetoothTable; DIYables_BluetoothAnalogGauge bluetoothGauge(0.0, 100.0, "%"); DIYables_BluetoothRotator bluetoothRotator(ROTATOR_MODE_CONTINUOUS); // State variables int currentSlider1 = 128; int currentSlider2 = 64; int currentJoystickX = 0; int currentJoystickY = 0; float currentTemperature = 25.0; float currentGaugeValue = 50.0; float currentRotatorAngle = 0.0; int messageCount = 0; // Timing variables unsigned long lastMonitorUpdate = 0; unsigned long lastTempUpdate = 0; unsigned long lastPlotUpdate = 0; unsigned long lastTableUpdate = 0; unsigned long lastGaugeUpdate = 0; float plotPhase = 0; void setup() { Serial.begin(115200); delay(1000); Serial.println("DIYables Bluetooth - ESP32 S3 Uno BLE Multiple Apps Example"); pinMode(LED_PIN, OUTPUT); digitalWrite(LED_PIN, LOW); bluetoothServer.begin(); bluetoothServer.addApp(&bluetoothMonitor); bluetoothServer.addApp(&bluetoothChat); bluetoothServer.addApp(&bluetoothSlider); bluetoothServer.addApp(&bluetoothJoystick); bluetoothServer.addApp(&bluetoothTemperature); bluetoothServer.addApp(&bluetoothPlotter); bluetoothServer.addApp(&bluetoothTable); bluetoothServer.addApp(&bluetoothGauge); bluetoothServer.addApp(&bluetoothRotator); Serial.print("Registered apps: "); Serial.println(bluetoothServer.getAppCount()); bluetoothPlotter.setPlotTitle("Sensor Data"); bluetoothPlotter.setAxisLabels("Time", "Value"); bluetoothPlotter.setYAxisRange(-1.5, 1.5); bluetoothPlotter.setMaxSamples(100); bluetoothPlotter.setLegendLabels("Sine", "Cosine", "Random"); bluetoothTable.addRow("Status"); bluetoothTable.addRow("Uptime"); bluetoothTable.addRow("Slider 1"); bluetoothTable.addRow("Slider 2"); bluetoothTable.addRow("Joystick X"); bluetoothTable.addRow("Joystick Y"); bluetoothTable.addRow("Temperature"); bluetoothTable.addRow("Gauge Value"); bluetoothTable.addRow("Rotator Angle"); bluetoothTable.addRow("Messages"); setupCallbacks(); Serial.println("Waiting for Bluetooth connection..."); } void setupCallbacks() { bluetoothServer.setOnConnected([]() { Serial.println("Bluetooth connected!"); digitalWrite(LED_PIN, HIGH); bluetoothMonitor.send("=== ESP32 S3 Uno Multi-App Connected ==="); bluetoothMonitor.send("All apps are ready!"); bluetoothChat.send("Hello! ESP32 S3 Uno Multi-App is connected."); }); bluetoothServer.setOnDisconnected([]() { Serial.println("Bluetooth disconnected!"); digitalWrite(LED_PIN, LOW); }); bluetoothMonitor.onMonitorMessage([](const String& message) { Serial.println("Monitor cmd: " + message); if (message == "HELP") { bluetoothMonitor.send("Commands: STATUS, HELP, LED_ON, LED_OFF, HEAP"); } else if (message == "STATUS") { bluetoothMonitor.send("Slider1=" + String(currentSlider1) + " Slider2=" + String(currentSlider2)); bluetoothMonitor.send("Joystick X=" + String(currentJoystickX) + " Y=" + String(currentJoystickY)); bluetoothMonitor.send("Temp=" + String(currentTemperature, 1) + "°C"); bluetoothMonitor.send("Gauge=" + String(currentGaugeValue, 1) + "%"); bluetoothMonitor.send("Rotator=" + String(currentRotatorAngle, 0) + "°"); } else if (message == "LED_ON") { digitalWrite(LED_PIN, HIGH); bluetoothMonitor.send("LED turned ON"); } else if (message == "LED_OFF") { digitalWrite(LED_PIN, LOW); bluetoothMonitor.send("LED turned OFF"); } else if (message == "HEAP") { bluetoothMonitor.send("Free heap: " + String(ESP.getFreeHeap()) + " bytes"); } else { bluetoothMonitor.send("Unknown: " + message + " (type HELP)"); } }); bluetoothChat.onChatMessage([](const String& message) { Serial.println("Chat: " + message); bluetoothChat.send("Echo: " + message); if (message.equalsIgnoreCase("ping")) { bluetoothChat.send("pong!"); } else if (message.equalsIgnoreCase("status")) { bluetoothChat.send("Uptime: " + String(millis() / 1000) + "s, Apps: " + String(bluetoothServer.getAppCount())); } }); bluetoothSlider.onSliderValue([](int slider1, int slider2) { currentSlider1 = slider1; currentSlider2 = slider2; Serial.print("Slider 1: "); Serial.print(slider1); Serial.print(", Slider 2: "); Serial.println(slider2); currentGaugeValue = map(slider1, 0, 255, 0, 100); bluetoothGauge.send(currentGaugeValue); bluetoothTable.sendValueUpdate("Slider 1", String(slider1)); bluetoothTable.sendValueUpdate("Slider 2", String(slider2)); bluetoothTable.sendValueUpdate("Gauge Value", String(currentGaugeValue, 1) + "%"); }); bluetoothSlider.onGetConfig([]() { bluetoothSlider.send(currentSlider1, currentSlider2); }); bluetoothJoystick.onJoystickValue([](int x, int y) { currentJoystickX = x; currentJoystickY = y; Serial.print("Joystick X: "); Serial.print(x); Serial.print(", Y: "); Serial.println(y); bluetoothTable.sendValueUpdate("Joystick X", String(x)); bluetoothTable.sendValueUpdate("Joystick Y", String(y)); }); bluetoothJoystick.onGetConfig([]() { bluetoothJoystick.send(currentJoystickX, currentJoystickY); }); bluetoothTemperature.onTemperatureRequest([]() { bluetoothTemperature.send(currentTemperature); }); bluetoothPlotter.onDataRequest([]() { Serial.println("Plotter data requested"); }); bluetoothTable.onDataRequest([]() { Serial.println("Table data requested"); bluetoothTable.sendTableStructure(); updateAllTableValues(); }); bluetoothGauge.onValueRequest([]() { bluetoothGauge.send(currentGaugeValue); }); bluetoothRotator.onRotatorAngle([](float angle) { currentRotatorAngle = angle; Serial.print("Rotator: "); Serial.print(angle); Serial.println("°"); bluetoothTable.sendValueUpdate("Rotator Angle", String(angle, 0) + "°"); }); } void updateAllTableValues() { bluetoothTable.sendValueUpdate("Status", "Running"); unsigned long uptime = millis() / 1000; String uptimeStr; if (uptime >= 60) { uptimeStr = String(uptime / 60) + "m " + String(uptime % 60) + "s"; } else { uptimeStr = String(uptime) + "s"; } bluetoothTable.sendValueUpdate("Uptime", uptimeStr); bluetoothTable.sendValueUpdate("Slider 1", String(currentSlider1)); bluetoothTable.sendValueUpdate("Slider 2", String(currentSlider2)); bluetoothTable.sendValueUpdate("Joystick X", String(currentJoystickX)); bluetoothTable.sendValueUpdate("Joystick Y", String(currentJoystickY)); bluetoothTable.sendValueUpdate("Temperature", String(currentTemperature, 1) + " °C"); bluetoothTable.sendValueUpdate("Gauge Value", String(currentGaugeValue, 1) + "%"); bluetoothTable.sendValueUpdate("Rotator Angle", String(currentRotatorAngle, 0) + "°"); bluetoothTable.sendValueUpdate("Messages", String(messageCount)); } void loop() { bluetoothServer.loop(); if (!bluetooth.isConnected()) { delay(10); return; } if (millis() - lastMonitorUpdate >= 5000) { lastMonitorUpdate = millis(); messageCount++; bluetoothMonitor.send("[INFO] Heartbeat #" + String(messageCount) + " - Uptime: " + String(millis() / 1000) + "s"); } if (millis() - lastTempUpdate >= 2000) { lastTempUpdate = millis(); static float tempOffset = 0; tempOffset += random(-10, 11) / 10.0; if (tempOffset > 5.0) tempOffset = 5.0; if (tempOffset < -5.0) tempOffset = -5.0; currentTemperature = 25.0 + tempOffset; bluetoothTemperature.send(currentTemperature); bluetoothTable.sendValueUpdate("Temperature", String(currentTemperature, 1) + " °C"); } if (millis() - lastPlotUpdate >= 100) { lastPlotUpdate = millis(); float sine = sin(plotPhase); float cosine = cos(plotPhase); float noise = random(-50, 51) / 100.0; bluetoothPlotter.send(sine, cosine, noise); plotPhase += 0.1; if (plotPhase > 2 * PI) plotPhase = 0; } if (millis() - lastTableUpdate >= 5000) { lastTableUpdate = millis(); unsigned long uptime = millis() / 1000; String uptimeStr; if (uptime >= 60) { uptimeStr = String(uptime / 60) + "m " + String(uptime % 60) + "s"; } else { uptimeStr = String(uptime) + "s"; } bluetoothTable.sendValueUpdate("Uptime", uptimeStr); bluetoothTable.sendValueUpdate("Messages", String(messageCount)); } if (millis() - lastGaugeUpdate >= 3000) { lastGaugeUpdate = millis(); float sensorValue = 50.0 + 30.0 * sin(millis() / 10000.0); currentGaugeValue = sensorValue; bluetoothGauge.send(currentGaugeValue); bluetoothTable.sendValueUpdate("Gauge Value", String(currentGaugeValue, 1) + "%"); } delay(10); }
  1. Set the partition scheme. Go to Tools > Partition Scheme and choose "Huge APP (3MB No OTA/1MB SPIFFS)". The default scheme leaves too little room for this example.
  2. Upload the code to the ESP32 S3 Uno by clicking the Upload button.
  3. Open the Serial Monitor and set it to 115200 baud.
  4. Check the output. It should look like this:
∞
Newbiely | Arduino IDE 2.3.8
──
☐
✕
File
Edit
Sketch
Tools
Help
ESP32S3 Dev Module
Newbiely.ino
···
8 Serial.println("Hello World!");
Output
Serial Monitor
Message (Enter to send message to 'ESP32S3 Dev Module' on 'COM15')
New Line
9600 baud
DIYables Bluetooth - ESP32 S3 Uno BLE Multiple Apps Example Registered apps: 9 Waiting for Bluetooth connection...
Ln 11, Col 1
ESP32S3 Dev Module on COM15
2
  1. Tip: if you see nothing, press the RESET button on the board once. The first lines are printed only at startup.

In this version of the code, the BLE device name is "ESP32 S3 Uno Multi-App", and the status LED uses LED_PIN 12, which is D13 (GPIO12) on the Uno header.

Mobile App

Now you connect your phone. With BLE there is no pairing step, so this part takes less than a minute.

  1. Install the app on your phone: Android | iOS
  2. Open the DIYables Bluetooth App. The first time, it asks for permissions. Allow them:
  • Nearby Devices (Android 12 and newer) or Bluetooth (iOS), so the app can scan and connect
  • Location (Android 11 and older only), because old Android versions need it to scan for BLE devices
  1. Turn on Bluetooth on your phone.
  2. Tap Connect on the home screen. The app starts to scan for devices.
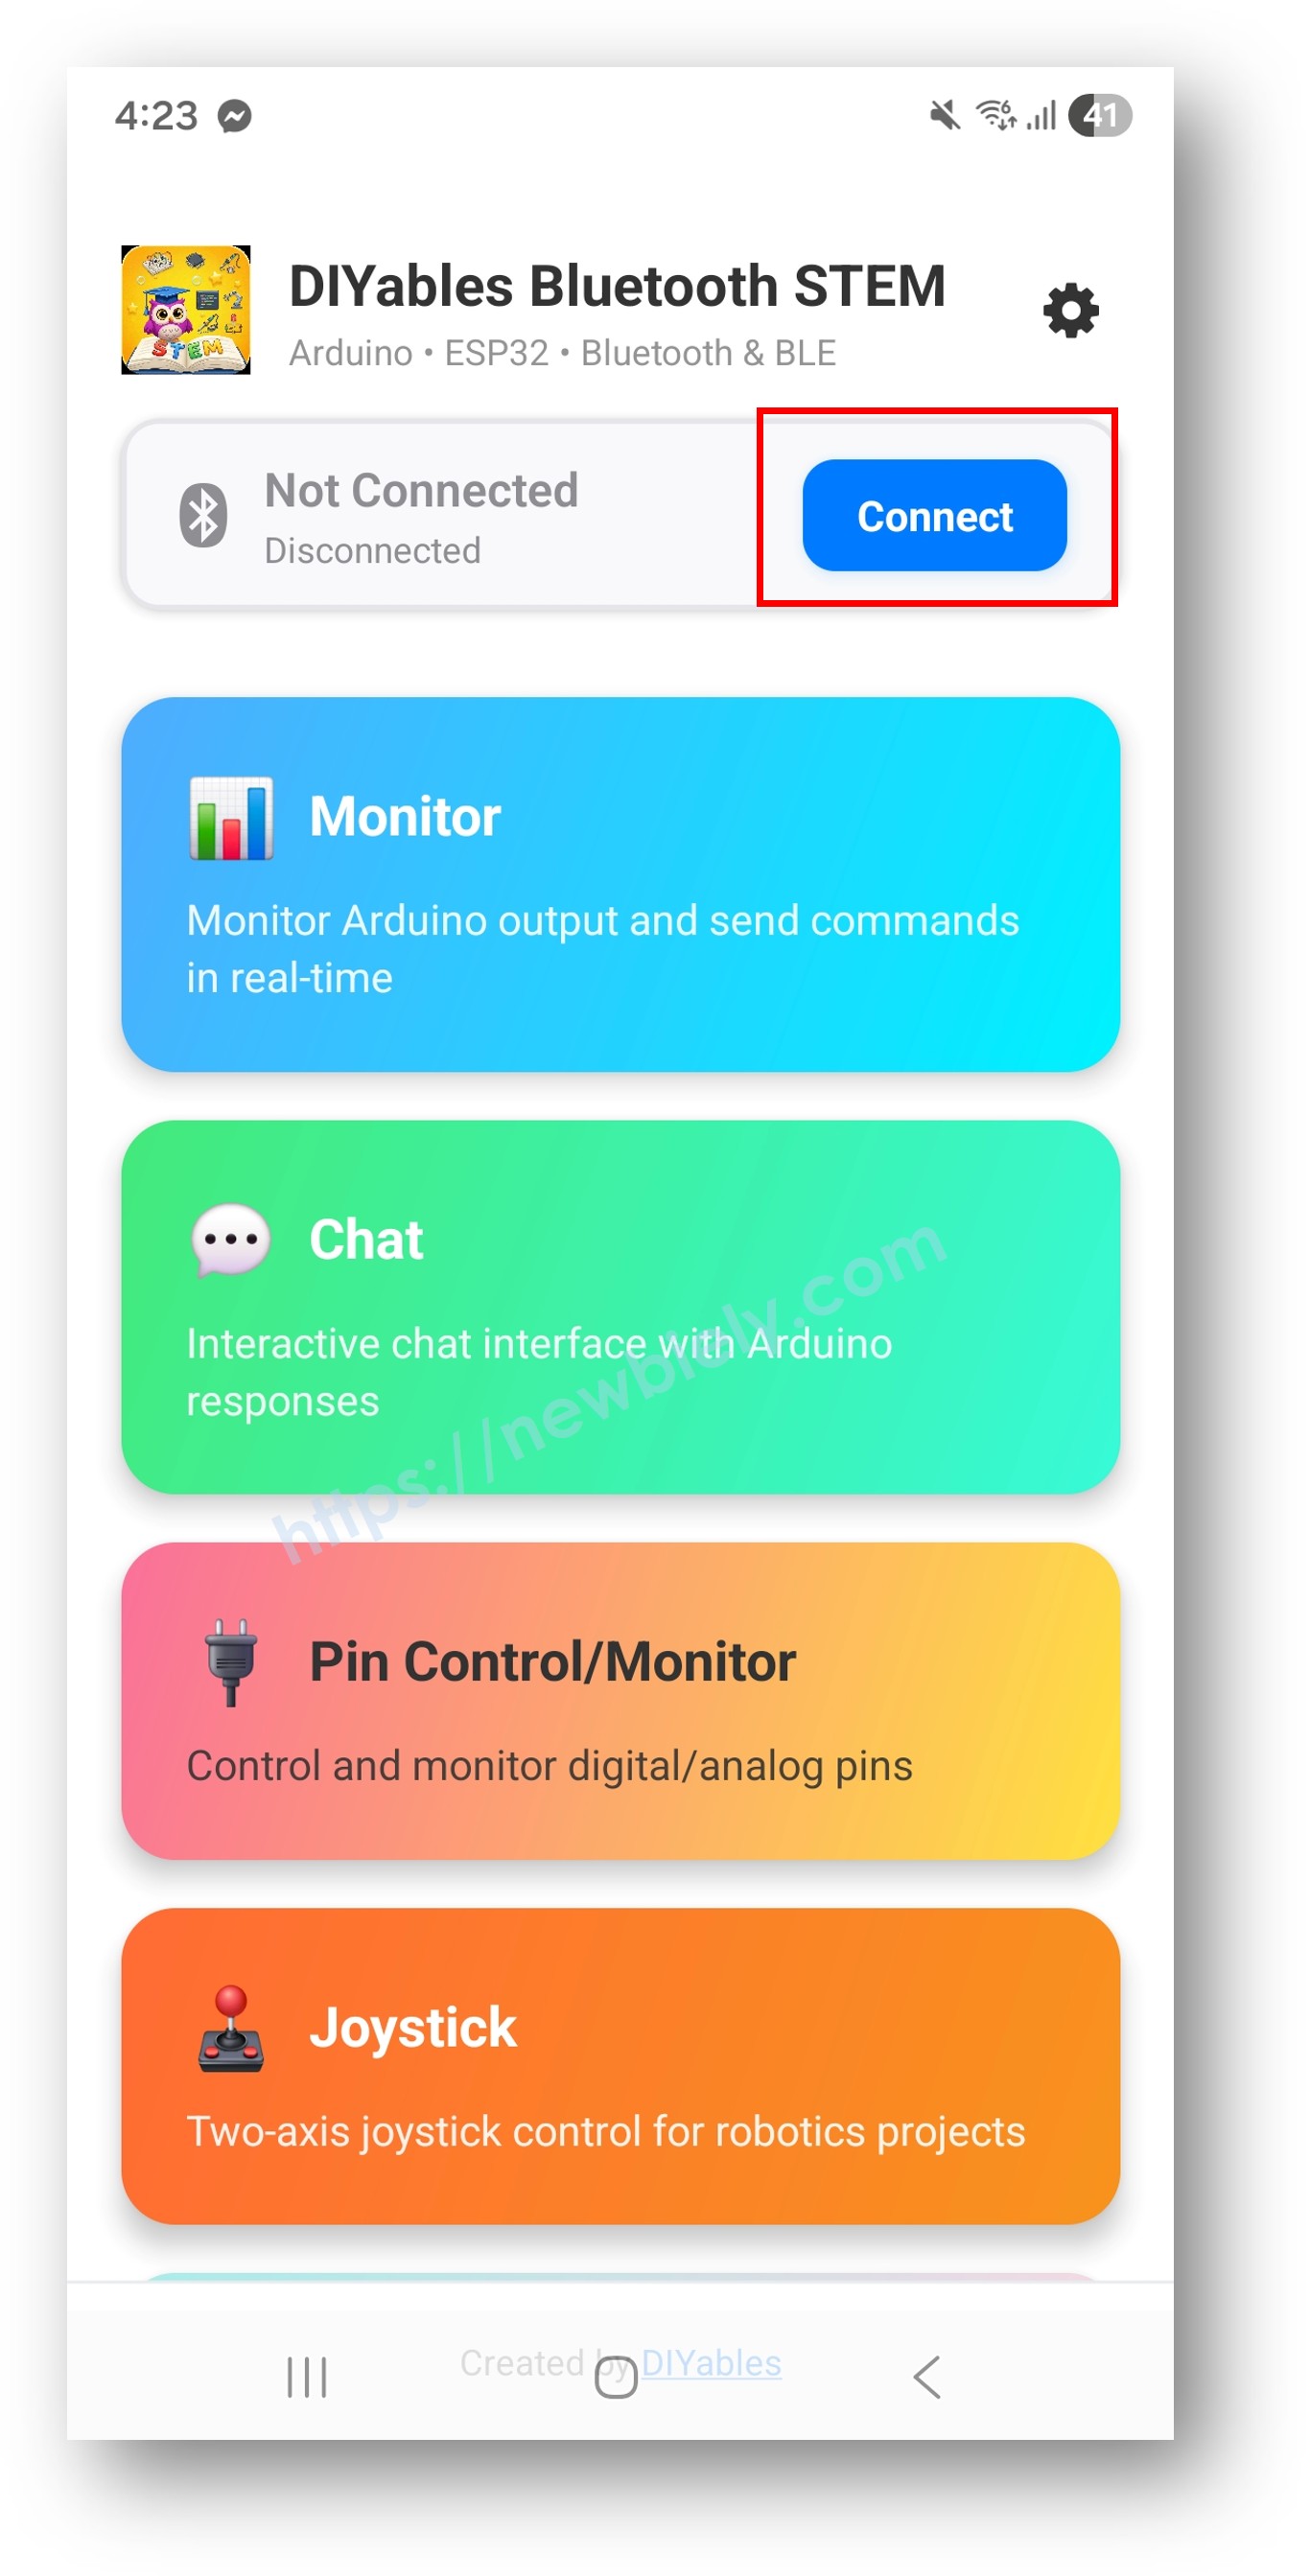
DIYables Bluetooth App - Home Screen with Scan Button
  1. Tap "ESP32 S3 Uno Multi-App" in the scan results.
  2. Look at the home screen. After the connection, the app goes back to it by itself. You see all app buttons. The 9 apps set up in the sketch respond; the other buttons are shown but do nothing with this sketch.
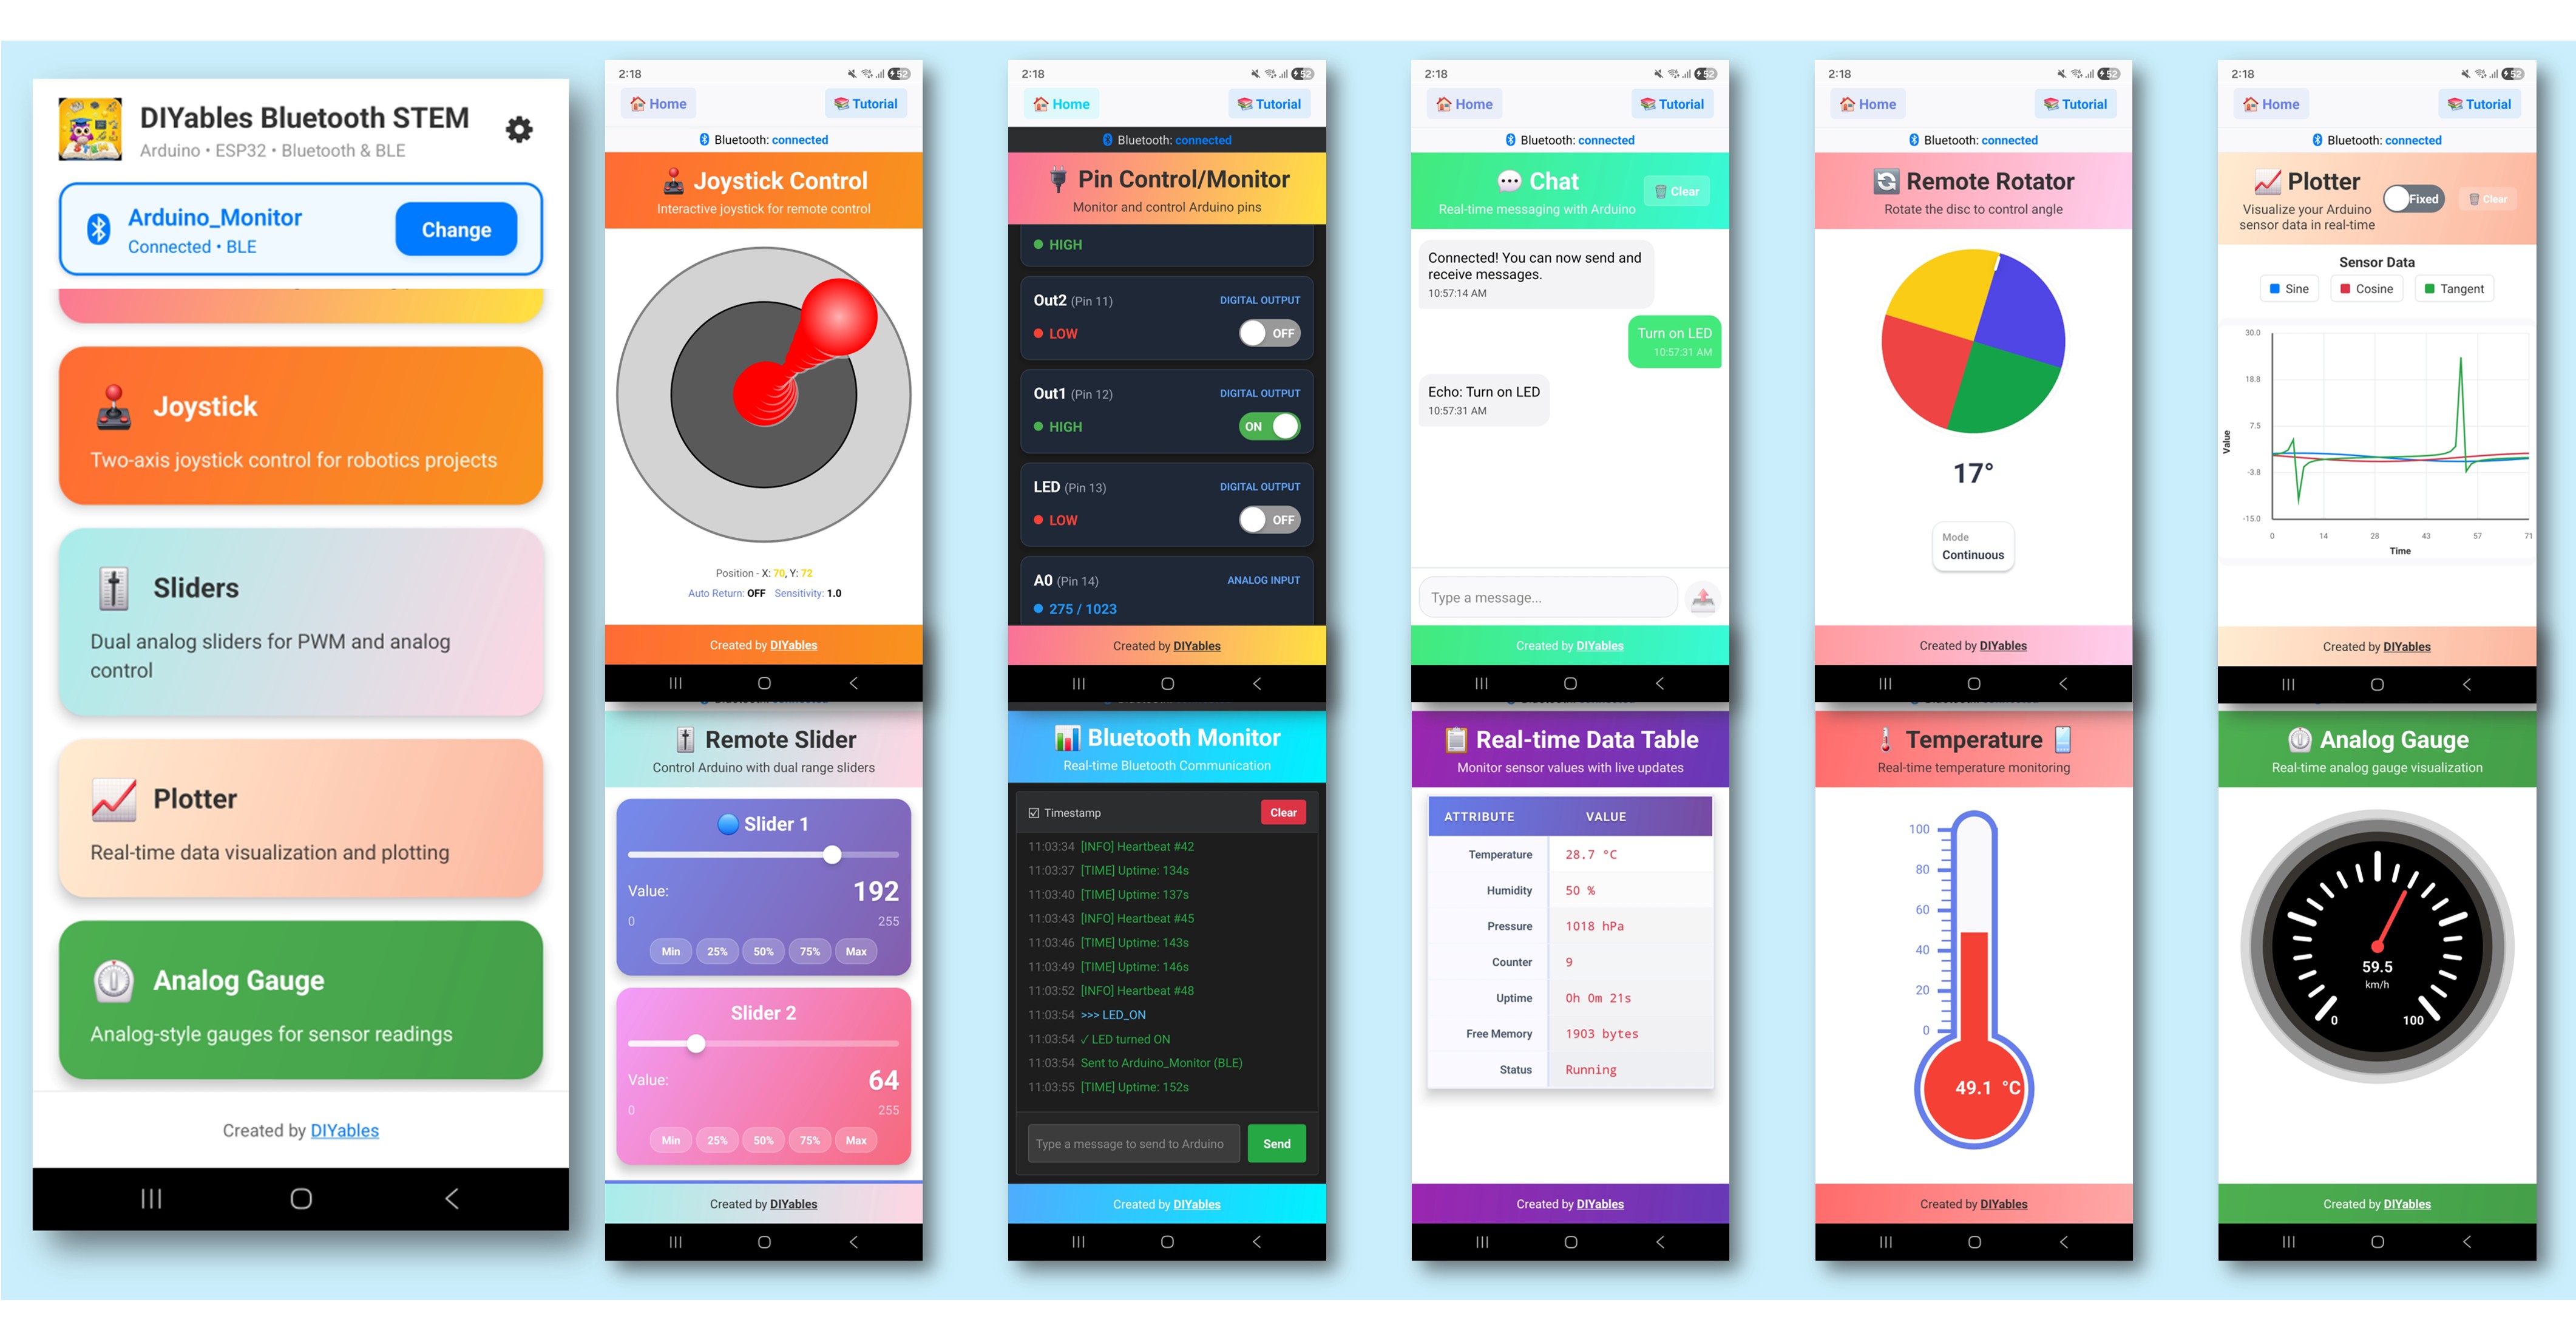
DIYables Bluetooth App - Home Screen with Multiple Apps

※ NOTE THAT:

Tap the settings icon on the home screen to hide or show app buttons. You can find more in the DIYables Bluetooth App User Manual.

  1. Try the apps. Open Monitor, Chat, Slider, Joystick, Temperature, Plotter, Table, Analog Gauge and Rotator one by one. Switch between them freely; they all use the same BLE connection.

Go back to the Serial Monitor in the Arduino IDE. You will see lines like these:

∞
Newbiely | Arduino IDE 2.3.8
──
☐
✕
File
Edit
Sketch
Tools
Help
ESP32S3 Dev Module
Newbiely.ino
···
8 Serial.println("Hello World!");
Output
Serial Monitor
Message (Enter to send message to 'ESP32S3 Dev Module' on 'COM15')
New Line
9600 baud
Bluetooth connected! Chat: Hello Slider 1: 200, Slider 2: 64 Joystick X: 35, Y: -60 Rotator: 90.00° Monitor cmd: STATUS Table data requested
Ln 11, Col 1
ESP32S3 Dev Module on COM15
2

In the Monitor app, type HELP to see the commands. STATUS shows all current values, LED_ON and LED_OFF switch the LED on D13 (GPIO12), and HEAP shows the free memory.

Creative Customization - Adapt the Code to Your Project

The example is a demo with fake sensor data. In a real project you keep the structure and change what each app sends or does. The parts below show the building blocks.

How Multiple Apps Work

You create each app as its own object and register it with the same Bluetooth server. All apps share one BLE connection, but each one works on its own.

// Include all app headers #include <DIYables_BluetoothMonitor.h> #include <DIYables_BluetoothChat.h> #include <DIYables_BluetoothSlider.h> #include <DIYables_BluetoothJoystick.h> #include <DIYables_BluetoothTemperature.h> #include <DIYables_BluetoothPlotter.h> #include <DIYables_BluetoothTable.h> #include <DIYables_BluetoothAnalogGauge.h> #include <DIYables_BluetoothRotator.h> // Create app instances DIYables_BluetoothMonitor bluetoothMonitor; DIYables_BluetoothChat bluetoothChat; DIYables_BluetoothSlider bluetoothSlider(0, 100, 1); DIYables_BluetoothJoystick bluetoothJoystick; DIYables_BluetoothTemperature bluetoothTemperature(-10.0, 50.0, "°C"); DIYables_BluetoothPlotter bluetoothPlotter; DIYables_BluetoothTable bluetoothTable; DIYables_BluetoothAnalogGauge bluetoothGauge(0.0, 100.0, "km/h"); DIYables_BluetoothRotator bluetoothRotator(ROTATOR_MODE_LIMITED, 0, 180); // Register all apps with the Bluetooth server bluetoothServer.addApp(&bluetoothMonitor); bluetoothServer.addApp(&bluetoothChat); bluetoothServer.addApp(&bluetoothSlider); bluetoothServer.addApp(&bluetoothJoystick); bluetoothServer.addApp(&bluetoothTemperature); bluetoothServer.addApp(&bluetoothPlotter); bluetoothServer.addApp(&bluetoothTable); bluetoothServer.addApp(&bluetoothGauge); bluetoothServer.addApp(&bluetoothRotator);

Set Up Callbacks for Each App

Each app gets its own handler. The handler runs only when that app sends something from the phone.

void setup() { // Monitor - receives text commands bluetoothMonitor.onMonitorMessage([](const String& message) { Serial.println("Monitor received: " + message); }); // Chat - two-way messaging bluetoothChat.onChatMessage([](const String& message) { Serial.println("Chat: " + message); bluetoothChat.send("Echo: " + message); }); // Slider - value changes bluetoothSlider.onSliderValue([](int slider1, int slider2) { Serial.println("Slider: " + String(slider1)); }); // Joystick - directional input bluetoothJoystick.onJoystickValue([](int x, int y) { Serial.println("Joystick: X=" + String(x) + " Y=" + String(y)); }); // Rotator - angle changes bluetoothRotator.onRotatorAngle([](float angle) { Serial.println("Rotator: " + String(angle) + "°"); }); }

Independent Update Intervals

Each output app can have its own timer. Use millis() instead of delay(), so the BLE server keeps running between updates.

void loop() { bluetoothServer.loop(); unsigned long now = millis(); // Monitor: every 5 seconds static unsigned long lastMonitor = 0; if (now - lastMonitor >= 5000) { lastMonitor = now; bluetoothMonitor.send("Uptime: " + String(now / 1000) + "s"); } // Temperature: every 2 seconds static unsigned long lastTemp = 0; if (now - lastTemp >= 2000) { lastTemp = now; bluetoothTemperature.send(readTemperature()); } // Plotter: every 100ms (fast updates for smooth graph) static unsigned long lastPlotter = 0; if (now - lastPlotter >= 100) { lastPlotter = now; bluetoothPlotter.send(readSensorValue()); } // Table: every 5 seconds static unsigned long lastTable = 0; if (now - lastTable >= 5000) { lastTable = now; updateTableValues(); } // Gauge: every 3 seconds static unsigned long lastGauge = 0; if (now - lastGauge >= 3000) { lastGauge = now; bluetoothGauge.send(readGaugeValue()); } delay(10); }

Choose Which Apps to Include

You do not need all nine apps. Include only the ones your project uses. A smaller sketch also builds faster and uses less memory.

// Example: Only Monitor + Slider + Temperature #include <DIYables_BluetoothMonitor.h> #include <DIYables_BluetoothSlider.h> #include <DIYables_BluetoothTemperature.h> DIYables_BluetoothMonitor bluetoothMonitor; DIYables_BluetoothSlider bluetoothSlider(0, 100, 1); DIYables_BluetoothTemperature bluetoothTemperature(-10.0, 50.0, "°C"); void setup() { // ... Bluetooth server setup ... bluetoothServer.addApp(&bluetoothMonitor); bluetoothServer.addApp(&bluetoothSlider); bluetoothServer.addApp(&bluetoothTemperature); // Only these 3 apps will appear in the mobile app }

Handle Connection Events

When the phone connects, it is a good moment to send the first values, so every app screen shows real data right away.

bluetoothServer.setOnConnected([]() { Serial.println("Bluetooth connected!"); // Send initial values for all apps bluetoothTemperature.send(currentTemperature); bluetoothGauge.send(currentGaugeValue); bluetoothRotator.send(currentAngle); }); bluetoothServer.setOnDisconnected([]() { Serial.println("Bluetooth disconnected!"); });

How to Use Multiple Apps

The phone shows one app screen at a time, but the board runs all of them all the time. Knowing which way the data flows helps you plan your own project.

App Switching

The home screen of the DIYables Bluetooth App shows every registered app as a button. Tap a button to open that app, and use the back or home button to return and pick another one. The ESP32 S3 Uno keeps all apps running, no matter which screen is open.

Data Flow

Input apps (Slider, Joystick, Rotator and Chat) send data from the phone to the ESP32 S3 Uno. Output apps (Monitor, Temperature, Plotter, Table and Gauge) send data from the board to the phone. Chat and Monitor work both ways: they can send and receive text.

Programming Examples

These three sketches show how to mix apps for a real use. The sensor and motor functions such as readTemperature() or setMotors() are placeholders; replace them with your own code.

Weather Station Dashboard

// Temperature gauge for main reading DIYables_BluetoothTemperature bluetoothTemperature(-10.0, 50.0, "°C"); // Table for all sensor data DIYables_BluetoothTable bluetoothTable; // Plotter for trend visualization DIYables_BluetoothPlotter bluetoothPlotter; // Monitor for log messages DIYables_BluetoothMonitor bluetoothMonitor; void setup() { // ... Bluetooth setup ... bluetoothTable.addRow("Temperature"); bluetoothTable.addRow("Humidity"); bluetoothTable.addRow("Pressure"); bluetoothTable.addRow("Wind Speed"); bluetoothTable.addRow("Rain"); bluetoothPlotter.setPlotTitle("Weather Trends"); bluetoothPlotter.setLegendLabels("Temp", "Humidity", "Pressure"); } void loop() { bluetoothServer.loop(); static unsigned long lastUpdate = 0; if (millis() - lastUpdate >= 2000) { lastUpdate = millis(); float temp = readTemperature(); float hum = readHumidity(); float press = readPressure(); // Temperature gauge bluetoothTemperature.send(temp); // Table update bluetoothTable.sendValueUpdate("Temperature", String(temp, 1) + " °C"); bluetoothTable.sendValueUpdate("Humidity", String(hum, 0) + "%"); bluetoothTable.sendValueUpdate("Pressure", String(press, 0) + " hPa"); // Plotter bluetoothPlotter.send(temp, hum, press / 10.0); // Monitor log bluetoothMonitor.send("Weather update: " + String(temp, 1) + "°C, " + String(hum, 0) + "%, " + String(press, 0) + "hPa"); } delay(10); }

Robot Controller

// Joystick for movement DIYables_BluetoothJoystick bluetoothJoystick; // Slider for speed limit DIYables_BluetoothSlider bluetoothSlider(0, 100, 5); // Rotator for arm/turret angle DIYables_BluetoothRotator bluetoothRotator(ROTATOR_MODE_LIMITED, 0, 180); // Monitor for status feedback DIYables_BluetoothMonitor bluetoothMonitor; // Gauge for battery level DIYables_BluetoothAnalogGauge bluetoothGauge(0.0, 100.0, "%"); int maxSpeed = 50; void setup() { // ... Bluetooth setup ... bluetoothSlider.onSliderValue([](int slider1, int slider2) { maxSpeed = slider1; bluetoothMonitor.send("Max speed set to: " + String(maxSpeed) + "%"); }); bluetoothJoystick.onJoystickValue([](int x, int y) { int leftMotor = constrain(y + x, -maxSpeed, maxSpeed); int rightMotor = constrain(y - x, -maxSpeed, maxSpeed); setMotors(leftMotor, rightMotor); bluetoothMonitor.send("Motors: L=" + String(leftMotor) + " R=" + String(rightMotor)); }); bluetoothRotator.onRotatorAngle([](float angle) { setArmAngle((int)angle); bluetoothMonitor.send("Arm angle: " + String((int)angle) + "°"); }); } void loop() { bluetoothServer.loop(); // Update battery level every 10 seconds static unsigned long lastBattery = 0; if (millis() - lastBattery >= 10000) { lastBattery = millis(); float battery = readBatteryLevel(); bluetoothGauge.send(battery); } delay(10); }

Home Automation Hub

// Chat for voice/text commands DIYables_BluetoothChat bluetoothChat; // Slider for dimmer/thermostat DIYables_BluetoothSlider bluetoothSlider(0, 100, 1); // Table for device status DIYables_BluetoothTable bluetoothTable; // Temperature for room temp DIYables_BluetoothTemperature bluetoothTemperature(10.0, 40.0, "°C"); // Monitor for activity log DIYables_BluetoothMonitor bluetoothMonitor; void setup() { // ... Bluetooth setup ... bluetoothTable.addRow("Living Room Light"); bluetoothTable.addRow("Bedroom Light"); bluetoothTable.addRow("AC Status"); bluetoothTable.addRow("Door Lock"); bluetoothTable.addRow("Security"); bluetoothChat.onChatMessage([](const String& msg) { String message = msg; message.toLowerCase(); if (message == "lights on") { setLights(true); bluetoothChat.send("Lights turned ON"); bluetoothTable.sendValueUpdate("Living Room Light", "ON"); } else if (message == "lights off") { setLights(false); bluetoothChat.send("Lights turned OFF"); bluetoothTable.sendValueUpdate("Living Room Light", "OFF"); } else if (message == "status") { bluetoothChat.send("Temp: " + String(readTemperature(), 1) + "°C"); bluetoothChat.send("All systems normal"); } bluetoothMonitor.send("[CMD] " + message); }); bluetoothSlider.onSliderValue([](int slider1, int slider2) { setDimmer(slider1); bluetoothMonitor.send("[DIMMER] Set to " + String(slider1) + "%"); }); }

Advanced Programming Techniques

When several apps show the same data, it pays to connect them and to keep the data in one place. These two patterns help with that.

Cross-App Communication

The value from one app can update other apps. Here the joystick moves a point, and the plotter, table and monitor all show where it is.

// Joystick controls movement, plotter shows trajectory float posX = 0, posY = 0; bluetoothJoystick.onJoystickValue([](int x, int y) { posX += x * 0.1; posY += y * 0.1; // Plot position on plotter bluetoothPlotter.send(posX, posY); // Show on table bluetoothTable.sendValueUpdate("Position X", String(posX, 1)); bluetoothTable.sendValueUpdate("Position Y", String(posY, 1)); // Log in monitor bluetoothMonitor.send("Pos: (" + String(posX, 1) + ", " + String(posY, 1) + ")"); });

Memory-Efficient Multi-App

Read the sensors once, store the results in one struct, and send the same values to every app. This saves memory and time.

// Shared sensor data struct SensorData { float temperature; float humidity; float pressure; unsigned long lastUpdate; } sensorData; void readAllSensors() { sensorData.temperature = readTemperature(); sensorData.humidity = readHumidity(); sensorData.pressure = readPressure(); sensorData.lastUpdate = millis(); } void updateAllApps() { readAllSensors(); // Temperature gauge bluetoothTemperature.send(sensorData.temperature); // Table bluetoothTable.sendValueUpdate("Temperature", String(sensorData.temperature, 1) + " °C"); bluetoothTable.sendValueUpdate("Humidity", String(sensorData.humidity, 0) + "%"); // Plotter bluetoothPlotter.send(sensorData.temperature, sensorData.humidity); // Gauge (pressure) bluetoothGauge.send(sensorData.pressure); // Monitor bluetoothMonitor.send("Sensors updated at " + String(sensorData.lastUpdate / 1000) + "s"); }

BLE vs Classic Bluetooth on the ESP32 S3 Uno

The DIYables Bluetooth library has two multi-app examples for Espressif boards: a BLE one and a Classic Bluetooth one. On the ESP32 S3 Uno you can only use the BLE one, because the chip has no Classic Bluetooth hardware. The table shows what this means for you.

Feature BLE (Esp32BLE_MultipleApps) Classic Bluetooth (Esp32Bluetooth_MultipleApps)
Works on ESP32 S3 Uno Yes No
iOS support Yes No
Android support Yes Yes
Power use Low Higher
Data rate Lower Higher
Pairing needed No (scan and connect) Yes (in phone settings)

※ NOTE THAT:

With many apps sending data, BLE bandwidth is the main limit. If the plotter updates every 100 ms and other apps also send often, spread the updates over time and send only what changed.

Common Issues and Debug Tips

Most problems with this example come from the large sketch size, memory use or too much data at once. Check these points before you change the code.

Cannot find the device in the app

Make sure the sketch is uploaded and the board is powered. Turn on Bluetooth on your phone, and on Android 11 or older also turn on Location. Look for "ESP32 S3 Uno Multi-App" in the scan list.

Sketch too large or not enough space

Go to Tools > Partition Scheme and choose "Huge APP (3MB No OTA/1MB SPIFFS)" or "No OTA (Large APP)". The default scheme gives only about 1.2 MB for code, which is not enough. The Huge APP scheme gives about 3 MB, but you lose over-the-air (OTA) updates. If it is still too large, remove the apps you do not need.

Some apps do not appear in the mobile app

Each app must be registered with bluetoothServer.addApp(). Check that every header you include matches an app object you create, and register all apps in setup().

Data updates are slow or late

Fewer apps sending at once, or longer intervals for less important apps, will help. BLE has limited bandwidth, so do not let all timers fire at the same moment.

The board crashes or resets

Check the free memory with ESP.getFreeHeap() (type HEAP in the Monitor app). Use fewer table rows or plotter samples, and power the board from a good USB port.

The connection drops often

Move the phone closer to the board, send less data, and spread out the update intervals.

Debug Tips

Print memory and uptime to the Serial Monitor now and then. A free heap that keeps going down means something in your code uses more memory over time.

void debugMultiApp() { Serial.println("=== Multi-App Debug ==="); Serial.println("Free Heap: " + String(ESP.getFreeHeap()) + " bytes"); Serial.println("Min Free Heap: " + String(ESP.getMinFreeHeap()) + " bytes"); Serial.println("Uptime: " + String(millis() / 1000) + "s"); Serial.println("======================="); } // Call periodically in loop static unsigned long lastDebug = 0; if (millis() - lastDebug >= 30000) { lastDebug = millis(); debugMultiApp(); }

Project Ideas

A multi-app sketch turns your phone into a full control panel. Pick the apps that match the job.

Dashboards

A weather station (Temperature, Table, Plotter, Monitor), a vehicle dashboard (Gauge, Rotator, Plotter, Monitor), a home automation hub (Chat, Slider, Table, Monitor) or a lab panel (Temperature, Gauge, Plotter, Table).

Remote control

A robot controller (Joystick, Slider, Rotator, Monitor, Gauge), a drone ground station (Joystick, Table, Plotter, Gauge), a small CNC interface (Slider, Rotator, Monitor, Table) or a camera gimbal (Joystick, Rotator, Monitor).

Education

A physics lab (Plotter, Table, Temperature, Gauge, Monitor), an electronics workbench (Gauge, Plotter, Table, Monitor), an environment project (Temperature, Plotter, Table, Monitor) or a robotics club kit (Joystick, Slider, Rotator, Monitor, Chat).

IoT

A smart greenhouse (Temperature, Slider, Table, Plotter, Monitor), an aquarium controller (Temperature, Slider, Table, Monitor), a solar tracker (Rotator, Gauge, Plotter, Table) or an energy monitor (Gauge, Plotter, Table, Monitor).

Next Steps

You now know how to combine many Bluetooth apps in one ESP32 S3 Uno project. To learn the full API of each app, look at the single-app tutorials:

  1. Bluetooth Monitor - text-based serial monitor
  2. Bluetooth Chat - two-way messaging
  3. Bluetooth Slider - value control with sliders
  4. Bluetooth Joystick - 2D direction input
  5. Bluetooth Temperature - temperature gauge display
  6. Bluetooth Plotter - real-time data plotting
  7. Bluetooth Table - structured data display
  8. Bluetooth Analog Gauge - analog meter display
  9. Bluetooth Rotator - rotatable knob control

Support

If you need more help:

FAQ

Can the ESP32 S3 Uno use Classic Bluetooth or BluetoothSerial?

No. The ESP32 S3 Uno has a BLE radio only, so BluetoothSerial and the Esp32Bluetooth_MultipleApps example do not compile or do not work on it. Use the Esp32BLE_MultipleApps example from this page. It works with the DIYables Bluetooth App on both Android and iOS.

Why do I need the Huge APP partition scheme?

Nine app libraries plus the BLE stack make a big program. The default partition scheme only gives about 1.2 MB for code, so the upload fails with a "sketch too big" error. Huge APP gives about 3 MB for code, but you cannot use OTA updates with it.

Where is the LED that the code turns on?

The ESP32 S3 Uno has no built-in LED on the Uno headers, so this code uses D13 (GPIO12) for an external LED. Connect the LED through a 220 ohm resistor to D13 and GND. The LED turns on when the phone connects, and the LED_ON and LED_OFF commands in the Monitor app switch it.

How many apps can I run at the same time?

This example runs nine apps, and that works well. More apps use more memory and more BLE bandwidth. If the board resets or updates get slow, remove apps you do not use and make the update intervals longer.

Can I use the UNO R4 multi-app sketch on the ESP32 S3 Uno?

Not directly. The UNO R4 sketch uses the ArduinoBLE platform (DIYables_ArduinoBLE), while the ESP32 S3 Uno uses DIYables_Esp32BLE. The app code is almost the same, but the BLE setup lines and the LED pin are different, so start from the Esp32BLE_MultipleApps example.

What if my project needs more pins than the Uno headers give?

The ESP32 S3 Uno has two extra rows of holes with more GPIOs. GPIO15 and GPIO16 work as I/O, PWM and analog. GPIO45 and GPIO35 to GPIO42 work as I/O and PWM. GPIO47 and GPIO48 are output only, with PWM. Solder pin headers to use them and write the GPIO number in code. For a multi-app dashboard, use GPIO15/GPIO16 for analog sensors that feed the Gauge or Plotter, and GPIO35 to GPIO42 for buttons, LEDs or relays you control from the Slider or Chat. Use GPIO47/GPIO48 only for outputs. Be careful with two things. First, GPIO47 and GPIO48 may run at 1.8V instead of 3.3V on some modules (especially ones with "V" in the name, like R8V or R16V), so 3.3V devices can be damaged or act strangely. Second, GPIO0, GPIO3 (D6), GPIO45 and GPIO46 (D9) are boot strapping pins, and a wrong connection can stop the board from booting or uploading code. Use the other extra pins first.

Troubleshooting

Problem Possible Cause Solution
No COM port or upload fails USB driver missing or board not in download mode Install the CP210x or CH340 driver, try another USB cable, or hold BOOT while you press RESET and upload again
Sketch too big error Default partition scheme is too small Choose Huge APP (3MB No OTA/1MB SPIFFS) in Tools > Partition Scheme
Board not found in the app scan Bluetooth or Location is off on the phone, or the sketch is not running Turn on Bluetooth (and Location on Android 11 or older), press RESET on the board, and scan again
Compile error about BluetoothSerial Classic Bluetooth example was used Use the Esp32BLE_MultipleApps example, because the ESP32 S3 Uno supports BLE only
Missing DIYables header when compiling Library or its dependencies not installed Install the DIYables Bluetooth library and click Install All for the dependencies
Status LED never turns on LED not wired, wrong pin, or LED reversed Wire the LED long leg through a 220 ohm resistor to D13 (GPIO12) and the short leg to GND
Board resets or connection drops Low memory or too much data at once Remove unused apps, make update intervals longer, and check free heap with the HEAP command
Garbage text in the Serial Monitor Wrong baud rate Set the Serial Monitor to 115200 baud

※ OUR MESSAGES

  • As freelancers, We are AVAILABLE for HIRE. See how to outsource your project to us
  • Please feel free to share the link of this tutorial. However, Please do not use our content on any other websites. We invested a lot of effort and time to create the content, please respect our work!