
ESP32 S3 UNO - Smart Weather Station
This ESP32 S3 Uno smart weather station tutorial shows you how to build a live WiFi weather display with a 1.28 inch round GC9A01 TFT and one push button. The ESP32 S3 Uno form board gets the weather from the free Open-Meteo weather API over HTTPS, so you need no temperature or humidity sensor. You will see the temperature, wind, rain chance and a 3-day forecast on eight round pages.
In this tutorial, you will:
- Wire a round GC9A01 TFT display and a push button to the ESP32 S3 Uno
- Call the Open-Meteo weather API over HTTPS with WiFi
- Read the JSON answer with the ArduinoJson library
- Keep a clock running with NTP time sync
- Move between eight weather pages with one button
The ESP32 S3 Uno has WiFi on the chip, so you do not need any extra network module. Because the data comes from a web service, the station can show things a cheap sensor cannot measure, like the rain chance for the next hours and the forecast for the next three days.
Hardware Preparation
You only need one of the two button parts. The wiring for both is shown below.
Or you can buy the following kits:
| 1 | × | DIYables Sensor Kit (18 sensors/displays) |
Additionally, some of these links are for products from our own brand, DIYables .
Overview of the Weather Station Pages
It helps to know what each screen shows before you build it. Then you can check every page after upload. The station has eight pages, and one push button steps through them.
| Page | What it shows |
|---|---|
| HOME | Weather icon, temperature, sky description and an NTP clock |
| TEMP | Temperature and the "feels like" temperature |
| HUMIDITY | Humidity drawn as a ring, plus the exact percentage |
| WIND | Wind speed and wind direction on a compass |
| RAIN | Rain chance with a small rain animation |
| NEXT HOURS | Temperature and rain chance for the next hours |
| FORECAST | Highest and lowest temperature for the next 3 days |
| SYSTEM | WiFi state, signal strength, API state and location |
The ESP32 S3 Uno asks for new weather every 10 minutes. Between two updates, the clock on the home page keeps going, because the board keeps its own time after the NTP sync.
Overview of the Open-Meteo Weather API
Every weather station needs a data source. Here, the source is Open-Meteo, a free web service that works well with a small board like the ESP32 S3 Uno.
| Open-Meteo | |
|---|---|
| API key | not needed, no sign-up |
| Cost | free for personal use |
| Answer format | plain JSON |
| Place | set by latitude and longitude |
| Protocol | HTTPS on port 443 |
One request gives you the weather now, hourly values for the next days, and a three-day daily summary. The timezone parameter makes the service send local times instead of UTC.
ESP32 S3 Uno Pinout
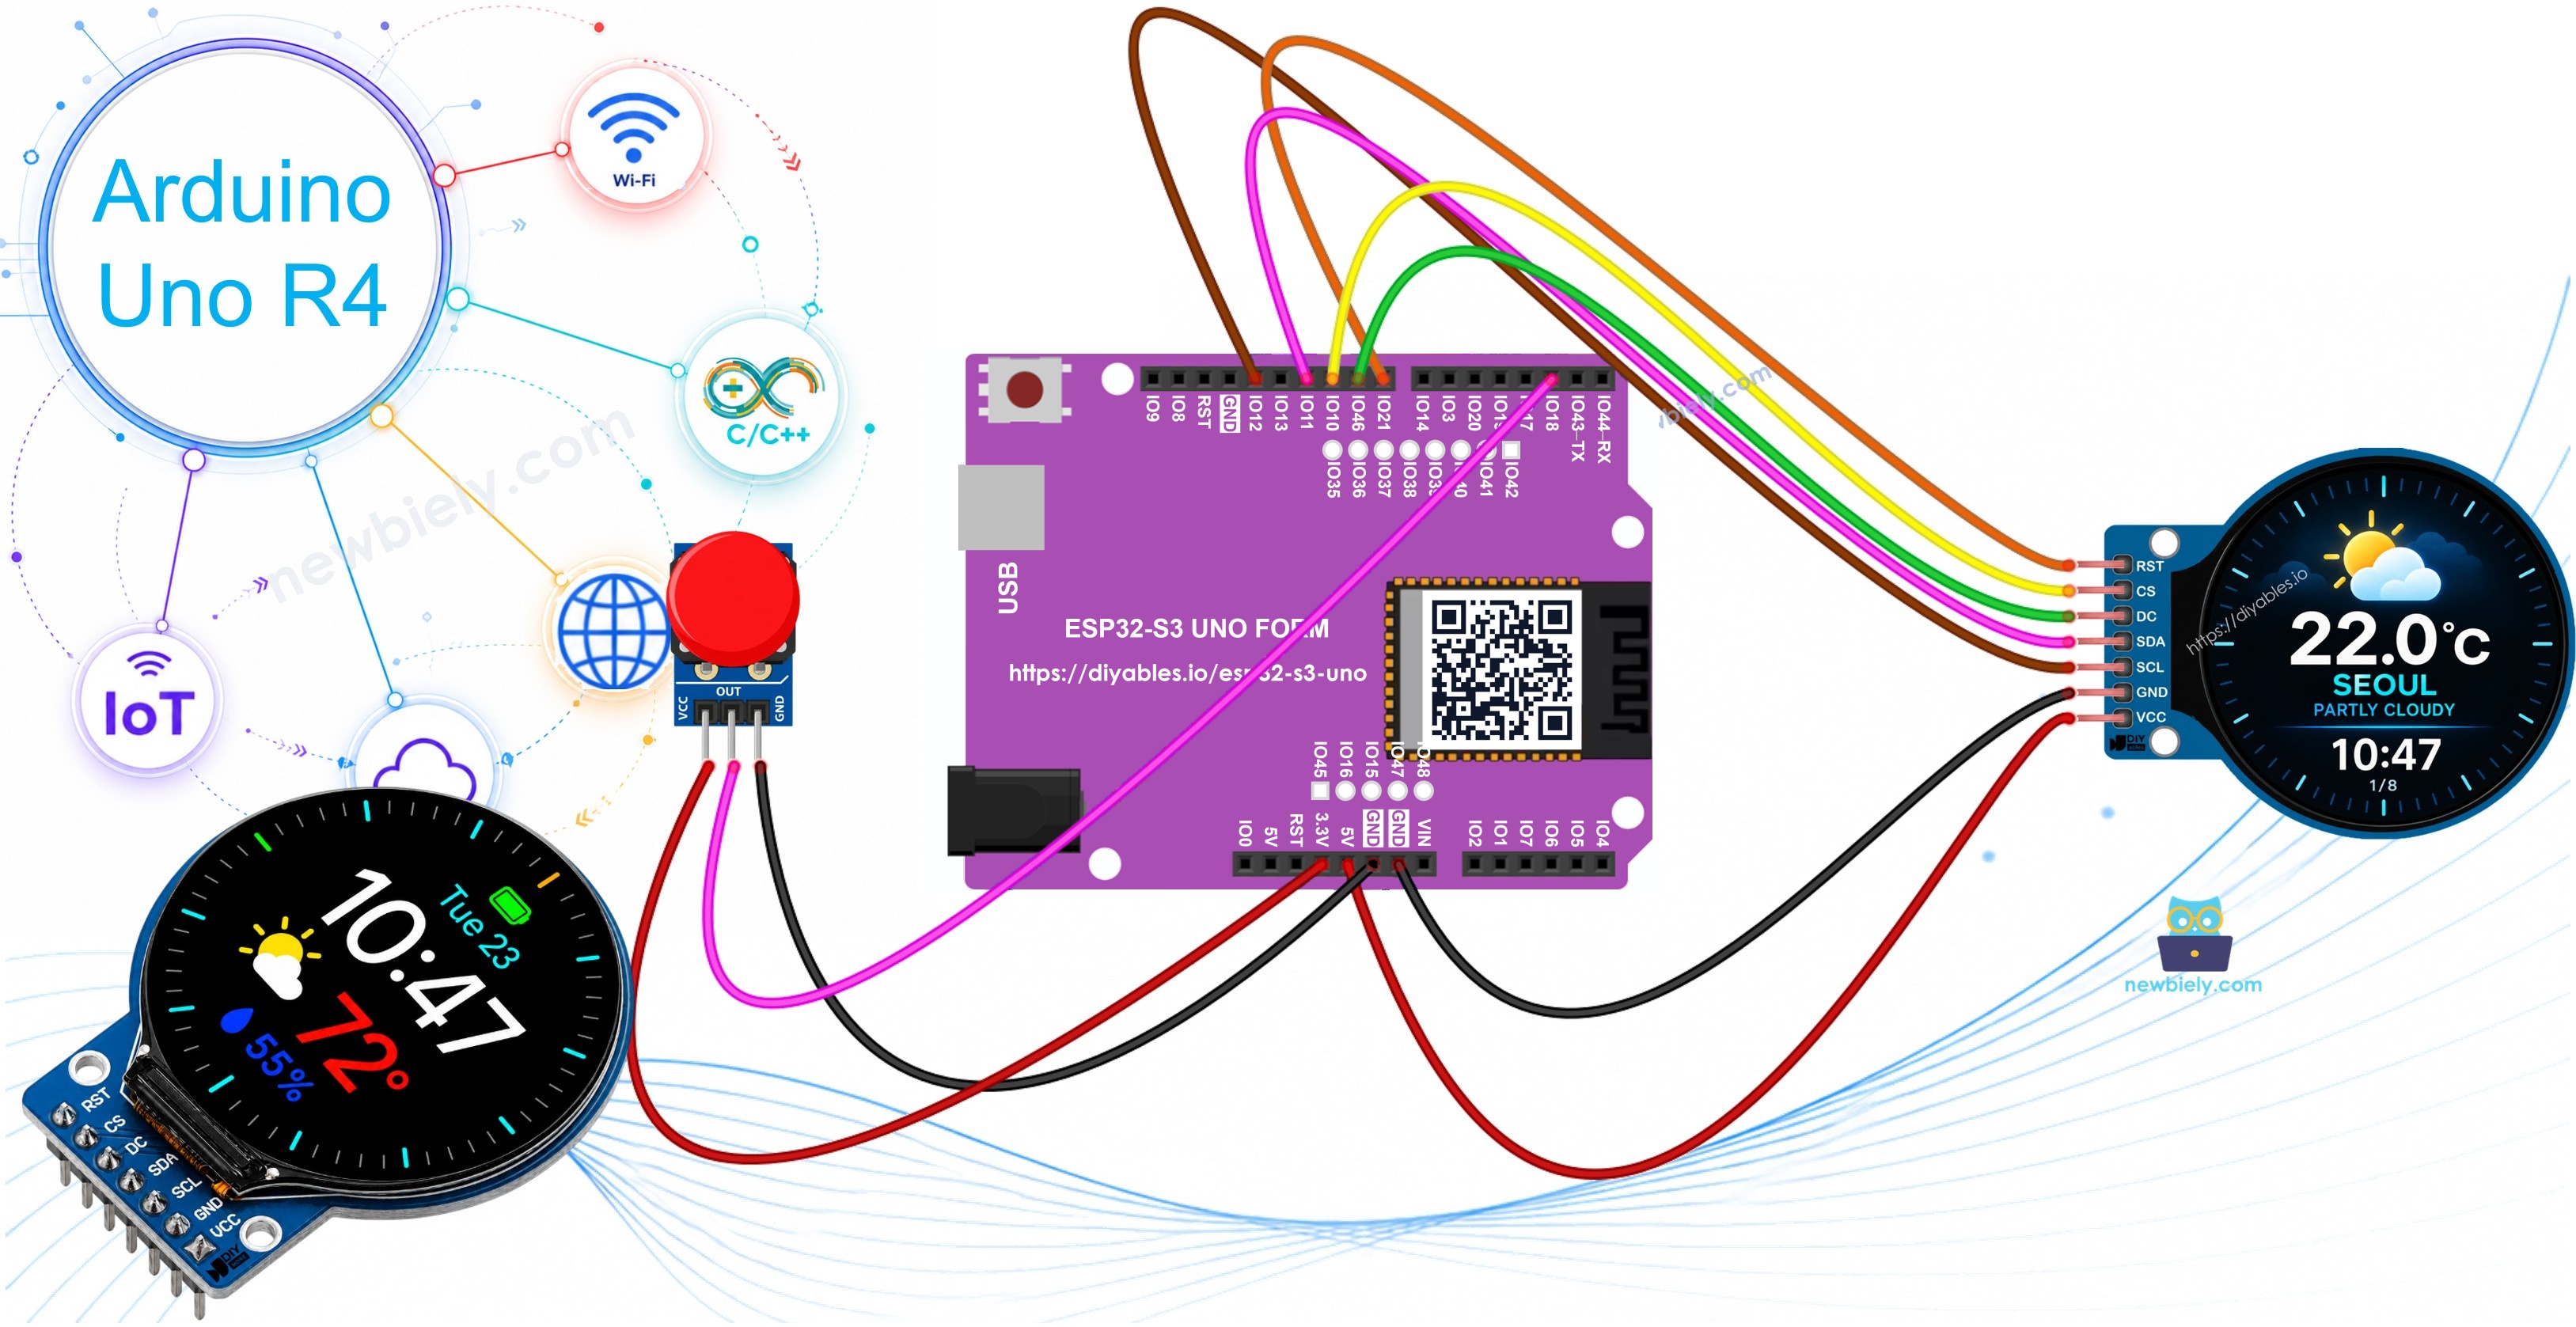
The image below shows the pinout of the ESP32 S3 Uno form board. Use it to find the Uno header pins (D2, D8, D9, D10, D11, D13) and their GPIO numbers while you wire the station.

Wiring Diagram
The round display talks over SPI. On the ESP32 S3 Uno, the D11 and D13 headers are the default hardware SPI pins (GPIO11 for MOSI and GPIO12 for the clock), so these two wires cannot move to other pins.
| TFT LCD Pin | ESP32 S3 Uno Pin | Description |
|---|---|---|
| VCC | 5V | Power supply |
| GND | GND | Ground |
| SCL | D13 (GPIO12) | SPI clock (fixed) |
| SDA | D11 (GPIO11) | SPI MOSI (fixed) |
| DC | D9 (GPIO46) | Data/Command |
| CS | D10 (GPIO10) | Chip Select |
| RST | D8 (GPIO21) | Reset |
WARNING
D9 is GPIO46, a boot strapping pin on the ESP32 S3 Uno. The chip reads it at power-up to pick the boot mode. The display DC input does not normally pull this pin, so the board boots fine. If the board will not start or upload while the display is connected, unplug the DC wire, upload, and connect it again.
※ NOTE THAT:
The display only receives signals from the board. No signal goes back into an ESP32 S3 Uno pin, so powering the module from 5V is safe. The module also runs from 3.3V if you prefer.
The button goes to D2 (GPIO18). You can use a plain push button or a ready-made button module. Wire the part you have, then make the code match it.
Option 1: Bare Push Button
A plain push button has no resistor. One leg goes to D2 and the other goes to GND. The ESP32 S3 Uno turns on its internal pull-up resistor, so the pin reads HIGH at rest and LOW while you press.
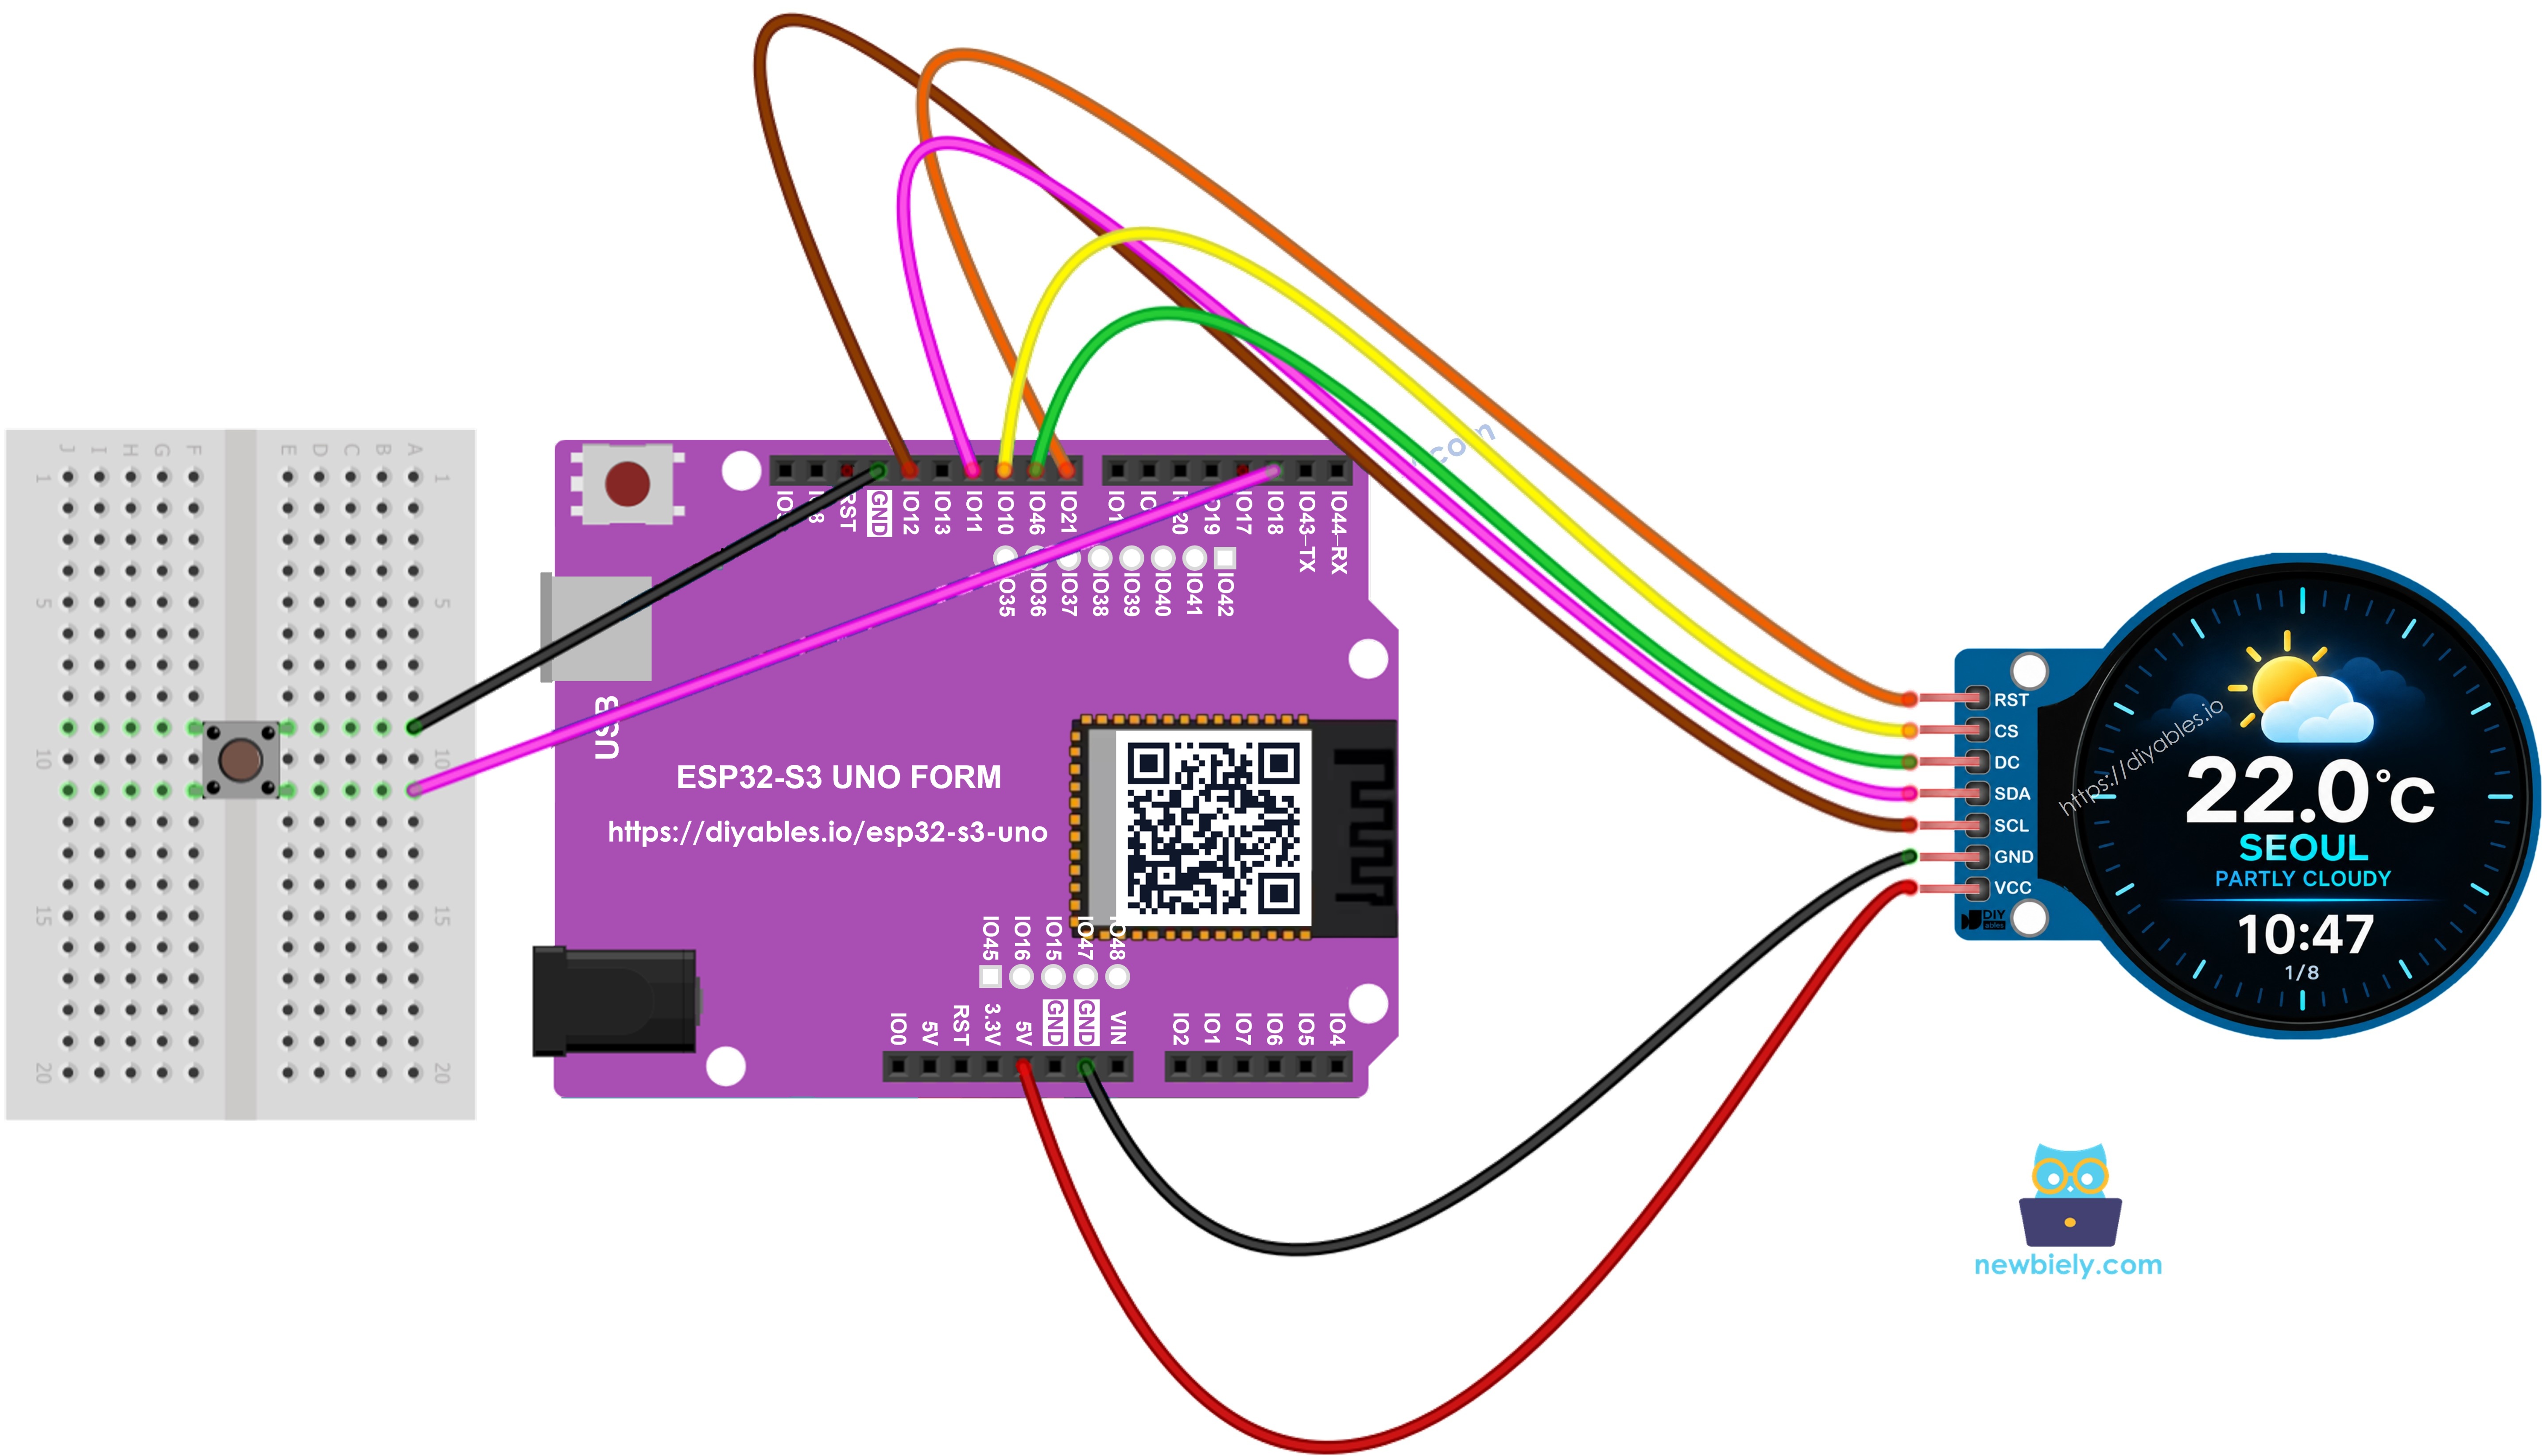
This image is created using Fritzing. Click to enlarge image
| Button Pin | ESP32 S3 Uno Pin | Description |
|---|---|---|
| Pin 1 | D2 (GPIO18) | Button input, internal pull-up |
| Pin 2 | GND | Ground |
The sketch is already set up for this option:
Option 2: Button Module
A button module has its own pull-down resistor and needs power. Its OUT pin is LOW at rest and goes HIGH when you press, which is the opposite of the bare button.
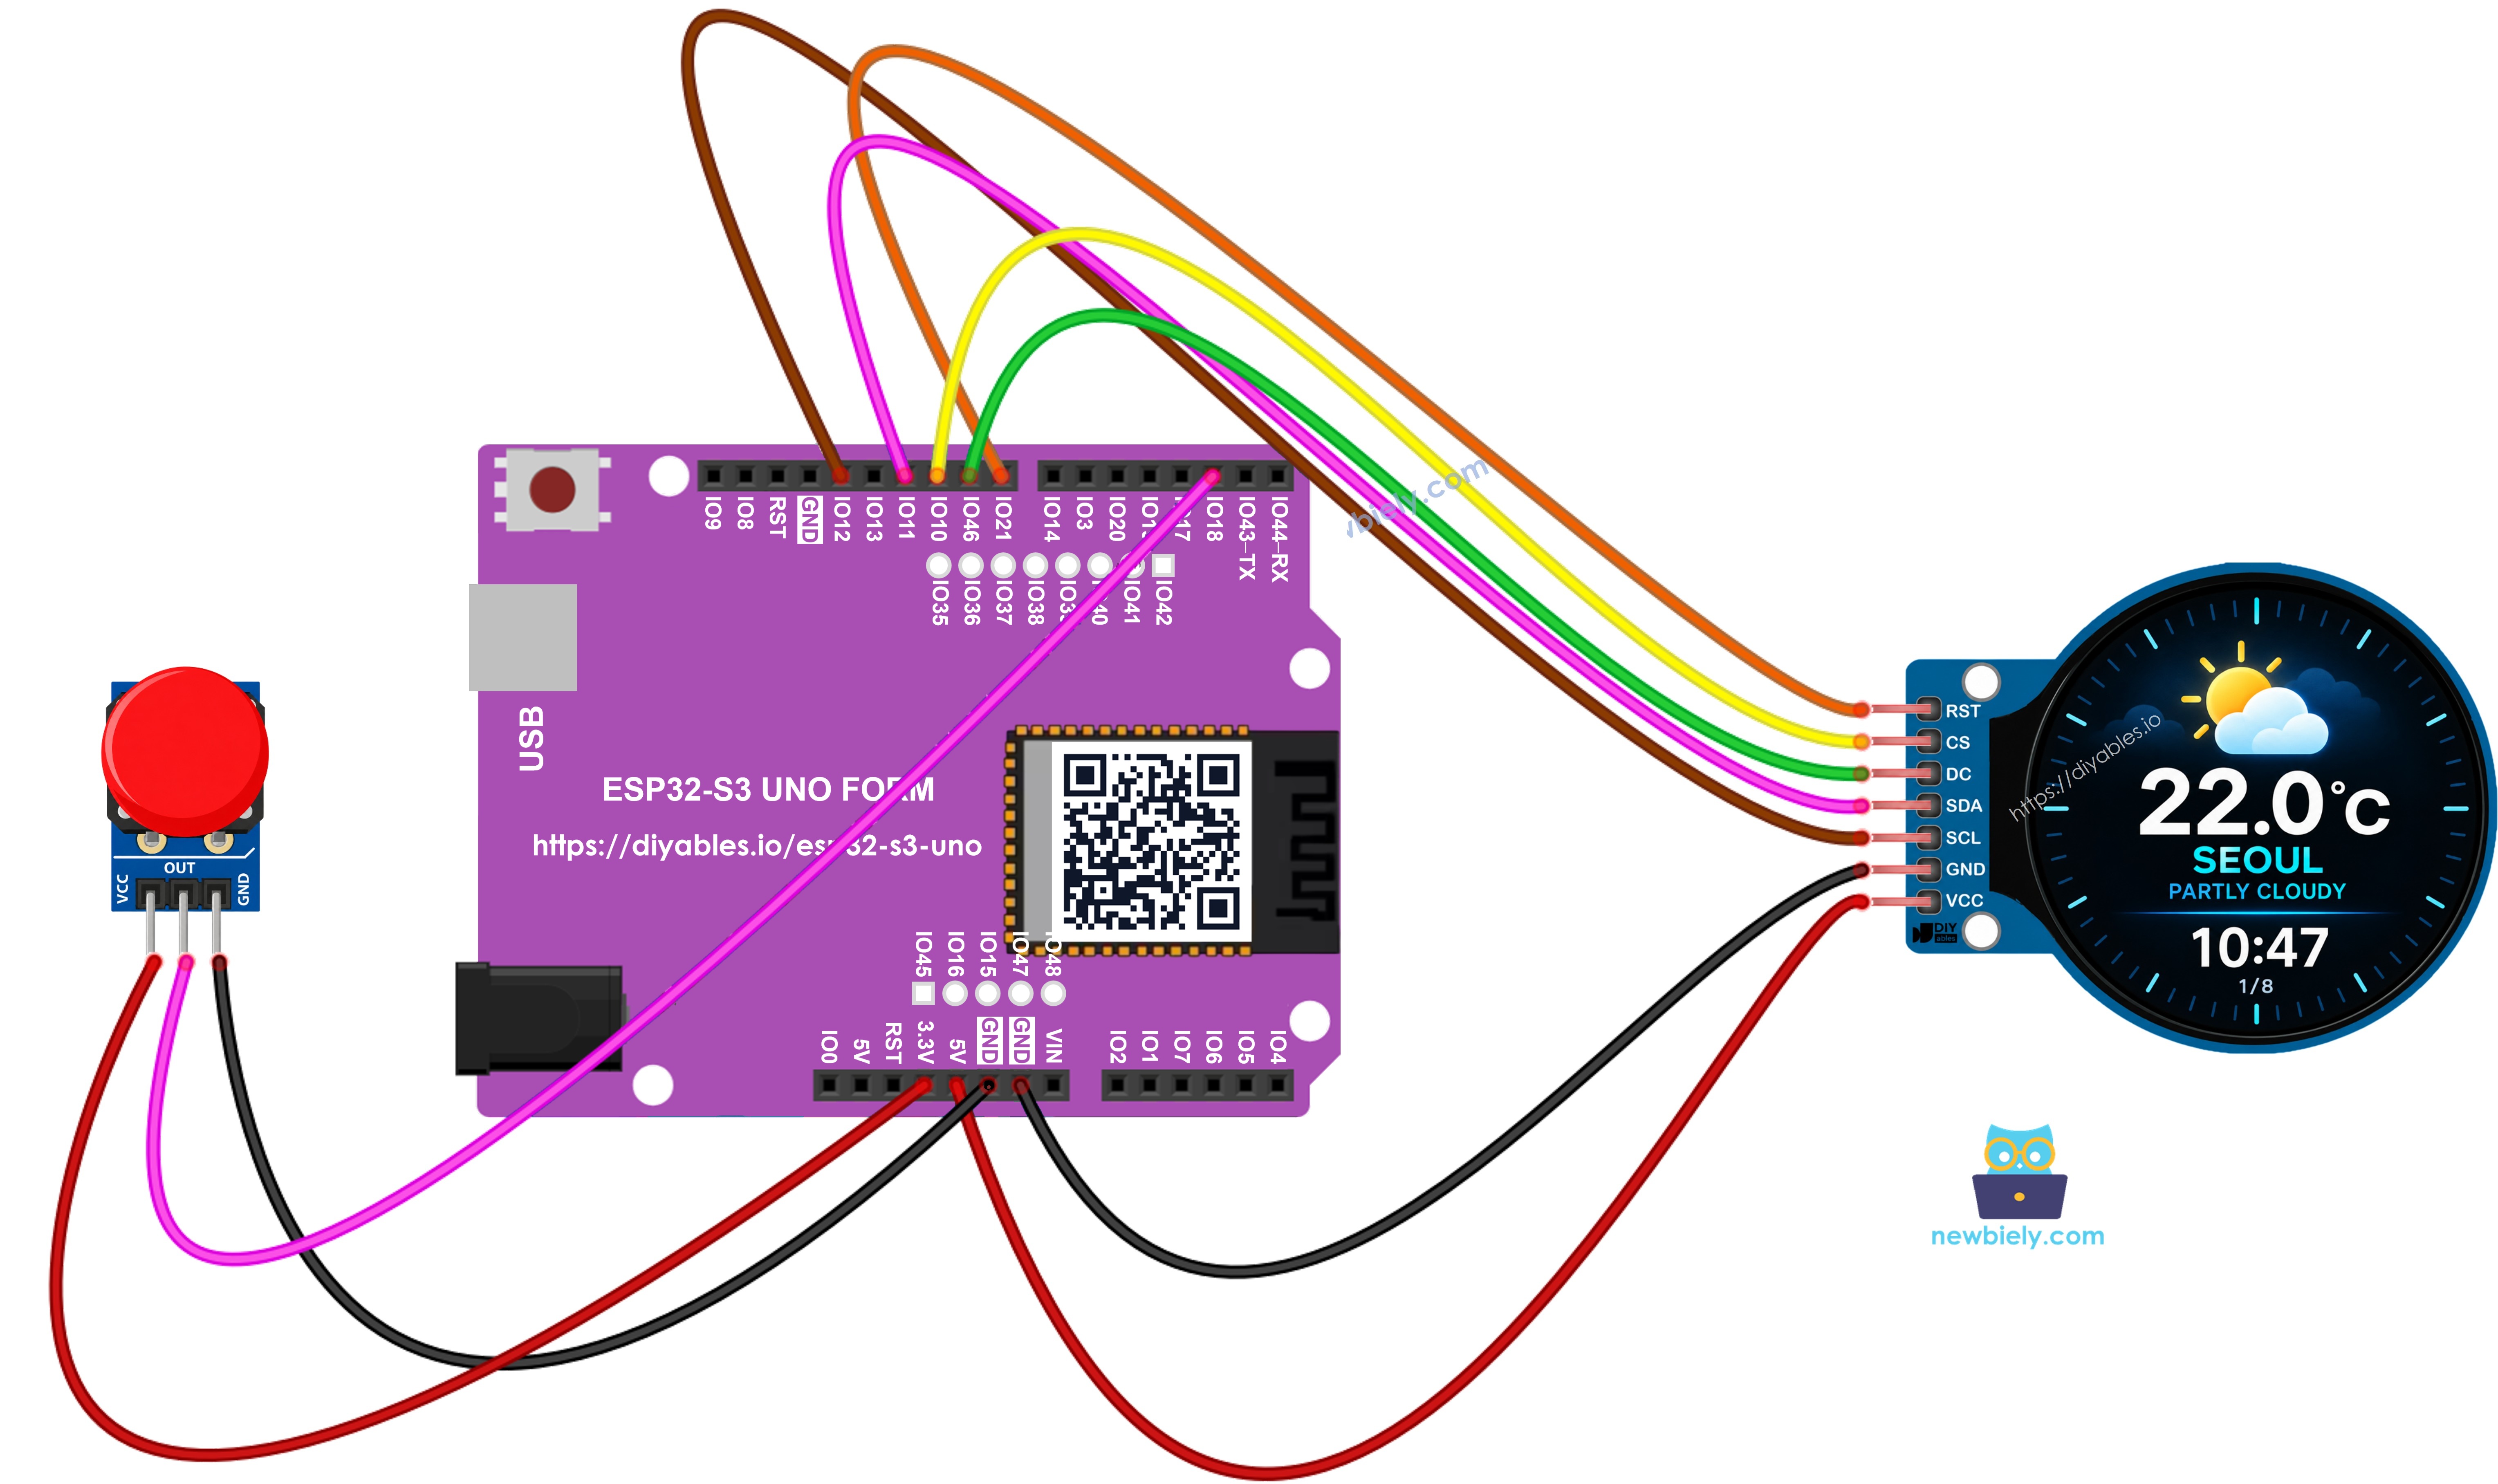
This image is created using Fritzing. Click to enlarge image
| Button Module Pin | ESP32 S3 Uno Pin | Description |
|---|---|---|
| VCC | 3.3V | Power supply |
| GND | GND | Ground |
| OUT | D2 (GPIO18) | Signal, LOW at rest, HIGH when pressed |
WARNING
Power the button module from 3.3V, not 5V. Its OUT pin gives the same voltage as its VCC, and ESP32 S3 Uno pins are NOT 5V tolerant. A 5V signal on D2 can damage GPIO18.
The module has its own resistor, so the internal one must stay off. Change one line:
How To Program ESP32 S3 Uno for the Weather Station
Before you open the full sketch, it helps to see the main building blocks one by one. Each short piece below is a part of the complete code.
Include the libraries
WiFi.h, WiFiClientSecure.h, HTTPClient.h and time.h come with the esp32 board package by Espressif Systems. You only need to install ArduinoJson, DIYables_TFT_Round and ezButton from the Library Manager.
Create the display object
The display object takes the reset, data/command and chip select pins. On the ESP32 S3 Uno these are D8 (GPIO21), D9 (GPIO46) and D10 (GPIO10).
Set your WiFi and your place
Join the network
Sync the clock with NTP
GMT_OFFSET_SEC is your offset from UTC, in seconds.
Send the HTTPS request
The code opens a secure connection and sends the request. setInsecure() skips the certificate check. This keeps the sketch short for a hobby project.
Read a value from the JSON answer
Draw it on the round screen
ESP32 S3 Uno Code - Smart Weather Station
The full sketch below joins your WiFi, syncs the clock, and asks Open-Meteo for new weather every 10 minutes. It draws the eight pages on the round display and reads the button to switch pages, refresh the data, or go home.
Detailed Instructions
Follow these steps in order. Most problems come from a skipped library or a wrong WiFi name.
- New to the ESP32 S3 Uno? Follow ESP32 S3 Uno - Getting Started first.
- Wire it up as shown in the diagram.
- Connect the board to your computer with a USB Type-C cable.
- Open Arduino IDE, choose the ESP32S3 Dev Module board and the correct COM port.
- Open the Library Manager with the Libraries icon on the left bar of the Arduino IDE.
- Install the display library. Search “DIYables TFT Round”, find the DIYables_TFT_Round library by DIYables, and click Install.
- Search for DIYables TFT Round created by DIYables.io and click the Install button.
- Install the dependencies. When a window asks about other libraries, click Install All.
- Install ArduinoJson. Search “ArduinoJson”, find the library by Benoit Blanchon, and click Install.
- Install ezButton. Search “ezButton”, find the library by ArduinoGetStarted, and click Install.
- Copy the code above and paste it into the Arduino IDE.
- Enter your WiFi details. Change WIFI_SSID and WIFI_PASSWORD to your own WiFi name and password.
- Set your city. Change LATITUDE, LONGITUDE, LOCATION_NAME, TIMEZONE and GMT_OFFSET_SEC to match your city. See the section below.
- Upload the code by clicking the Upload button.
- Open the Serial Monitor and set the baud rate to 115200.
- Watch the screen. You see the boot screen, then the WiFi screen, then the first weather page.
- Press the button to go to the next page, and check the Serial Monitor.
- Tip: if the upload fails with a "sketch too big" error, open Tools > Partition Scheme and pick Huge APP.
Setting Your Own City
The sketch comes set to Seoul, South Korea. To show the weather for your home, you only need to edit five lines near the top of the code.
LATITUDE and LONGITUDE
These set the position of your city. Any map website shows them.
LOCATION_NAME
This is the label on the screen. A short name fits the round display better.
TIMEZONE
This value goes into a web address, so you must write the / character as %2F. For example, Europe/Berlin becomes Europe%2FBerlin.
GMT_OFFSET_SEC and DST_OFFSET_SEC
GMT_OFFSET_SEC sets the NTP clock. Berlin in winter is UTC+1, so you write (1 * 3600). DST_OFFSET_SEC adds summer time. Set it to 3600 where summer time applies, or leave it at 0.
※ NOTE THAT:
The values come in Celsius and km/h. To use Fahrenheit and mph, change the temperature_unit and wind_speed_unit parameters inside getWeatherURL() to fahrenheit and mph.
Code Explanation
The full sketch has comments on almost every line. Read them in the code above to see how each part works.
Video Tutorial
Watch the video below to see this ESP32 S3 Uno project step by step.
FAQ
Do I need a temperature or humidity sensor for this ESP32 S3 Uno weather station?
No. The ESP32 S3 Uno gets all the data from the Open-Meteo weather API over WiFi. The values are for your city, not for your room. If you want indoor readings too, you can add a sensor such as a DHT22 later.
Does the Open-Meteo API need an API key?
No. Open-Meteo is free for personal use and needs no sign-up or key. You only set the latitude, longitude and time zone in the code.
Can I use a different pin for the button or the display?
The button and the DC, CS and RST pins can move to other free pins. Change PIN_BUTTON, PIN_DC, PIN_CS and PIN_RST in the code to match. The SCL and SDA display wires must stay on D13 (GPIO12) and D11 (GPIO11), because they are the hardware SPI pins of the ESP32 S3 Uno.
Can I power the button module from 5V like on the Arduino UNO R4?
No. The Arduino UNO R4 uses 5V logic, but ESP32 S3 Uno pins work at 3.3V and are NOT 5V tolerant. A button module powered from 5V sends 5V into D2 when you press it. Power it from the 3.3V pin instead. The display can stay on 5V, because no signal from it goes back to the board.
What if my project needs more pins than the Uno headers give?
The ESP32 S3 Uno has two extra rows of holes with more GPIOs. GPIO15 and GPIO16 support I/O, PWM and analog. GPIO45 and GPIO35 to GPIO42 support I/O and PWM. GPIO47 and GPIO48 are output only, with PWM. Solder pin headers to use them and write the GPIO number in code. For this station, a second button or a buzzer fits well on GPIO15, GPIO16 or GPIO35 to GPIO42. Do not use GPIO47 or GPIO48 for button inputs. Be careful with two things. First, GPIO47 and GPIO48 may run at 1.8V instead of 3.3V on some modules (especially ones with "V" in the name, like R8V or R16V), so 3.3V devices can be damaged or act strangely. Second, GPIO0, GPIO3 (D6), GPIO45 and GPIO46 (D9) are boot strapping pins, and a wrong connection can stop the board from booting or uploading code. Use the other extra pins first.
Why does the screen show the right weather but the wrong time?
The clock comes from NTP, not from the weather answer. Check GMT_OFFSET_SEC and DST_OFFSET_SEC for your city. Also make sure TIMEZONE matches, so the forecast hours line up with your local time.
Troubleshooting
| Problem | Possible Cause | Solution |
|---|---|---|
| No COM port appears or the upload fails | Missing USB driver or the board is not in download mode | Install the CP210x or CH340 driver, or hold BOOT while you press RESET, then upload again |
| The display stays black | SCL or SDA is on the wrong pin, or VCC/GND is loose | Put SCL on D13 (GPIO12) and SDA on D11 (GPIO11), then check the power wires |
| Board will not boot or upload with the display connected | D9 (GPIO46) is a boot strapping pin | Unplug the DC wire during upload, then connect it again |
| Stuck on the WiFi screen | Wrong WiFi name or password, or a 5 GHz network | Check WIFI_SSID and WIFI_PASSWORD and use a 2.4 GHz network |
| HTTP CODE is negative | The HTTPS connection failed | Make sure the WiFi has Internet access and is not a captive portal network |
| The clock shows --.-- | The NTP sync did not finish | Check that your network does not block UDP port 123, then restart the board |
| Button does nothing or pages jump by themselves | Wrong button option in code, or button module on 5V | Use EXTERNAL_PULLDOWN only with the module, and power the module from 3.3V |
| Sketch too big error | The default partition is too small for this sketch | In Tools > Partition Scheme, choose Huge APP |