
ESP32 S3 UNO - MQ3 Alcohol Sensor
This ESP32 S3 Uno MQ3 alcohol sensor tutorial shows you how to wire an MQ-3 module to the ESP32 S3 Uno form board and detect alcohol vapor with Arduino code. The MQ3 is a low-cost ethanol sensor, and it is the heart of many DIY breathalyzer and alcohol detector projects. You will see the result as live messages and values in the Serial Monitor.
In this tutorial, you will:
- Wire the MQ3 alcohol sensor module with a safe voltage divider
- Detect alcohol with the digital DO pin and digitalRead()
- Measure alcohol concentration with the analog AO pin and analogRead()
- Build a simple breathalyzer with calibrated thresholds
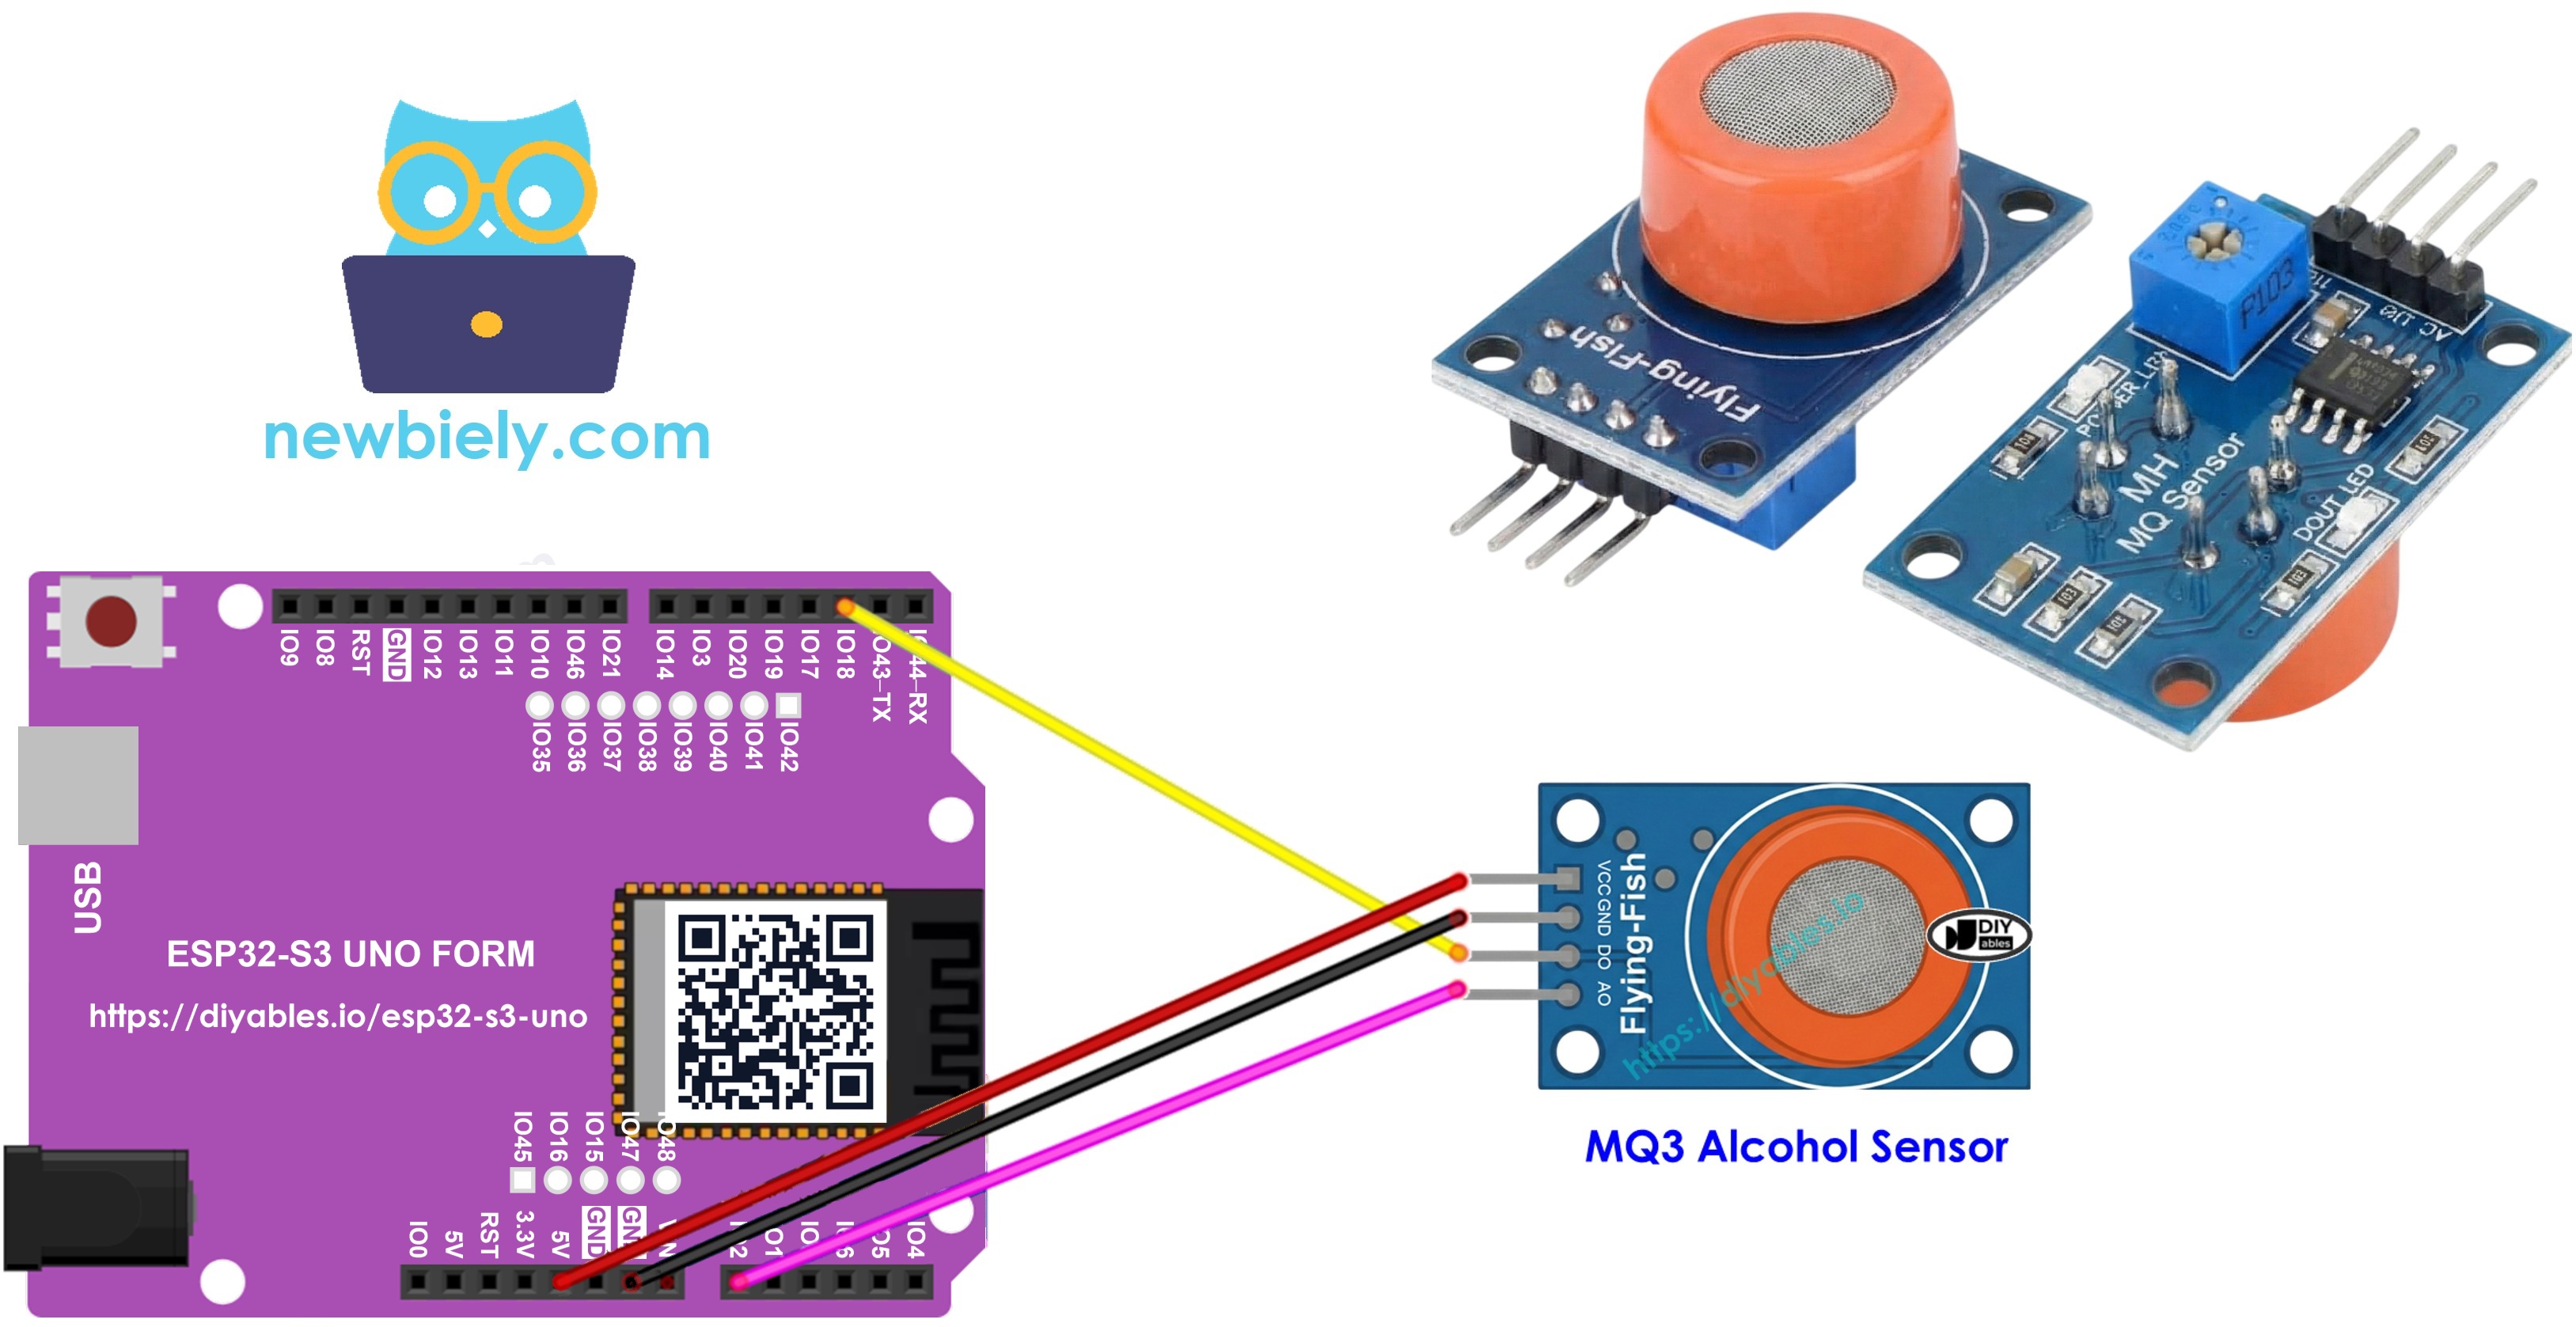
Hardware Preparation
| 1 | × | ESP32 S3 Uno-form Board | |
| 1 | × | USB Cable Type-A to Type-C (for USB-A PC) | |
| 1 | × | USB Cable Type-C to Type-C (for USB-C PC) | |
| 1 | × | MQ3 Alcohol Sensor | |
| 4 | × | Resistors for the voltage dividers (2 | |
| 1 | × | Jumper Wires |
Or you can buy the following kits:
| 1 | × | DIYables Sensor Kit (18 sensors/displays) |
Additionally, some of these links are for products from our own brand, DIYables .
Overview of MQ3 Alcohol Sensor
Before you write any code, it helps to know what the MQ3 really measures and why it gets hot. This makes the readings much easier to understand.
The MQ3 is a MOS (Metal Oxide Semiconductor) gas sensor. People also call it a Chemiresistor, because its resistance changes when alcohol vapor touches the sensing material. It is made to detect ethanol in the air, and it reacts strongly even to small amounts.
Inside, a layer of Tin Dioxide (SnO2) sits on an Aluminum Oxide ceramic base. A small heater warms this layer, and only then does it become sensitive to alcohol. A stainless steel mesh (anti-explosion network) covers the top. It protects the hot element and keeps dust out, but it still lets gas reach the sensing chamber.
You will find the MQ3 in breath analyzers, drunk driving detectors, alcohol alarms and any project that needs to watch alcohol levels in the air.
Technical Specifications
| Parameter | Value |
|---|---|
| Operating Voltage | 5V DC |
| Load Resistance | 200 KΩ |
| Heater Resistance | 33Ω ± 5% |
| Heating Consumption | less than 800mW |
| Sensing Resistance | 1 MΩ to 8 MΩ |
| Detection Range | 25 to 500 ppm (parts per million) |
| Preheat Time | 24 to 48 hours for first use |
What does ppm mean?
Parts-per-million (ppm) is the unit for gas concentration. For example, 500 ppm of alcohol means that 500 out of every one million gas molecules are alcohol. The other 999,500 molecules are other gases.
Pinout
The MQ3 module has four pins. Two pins give it power, and two pins send the alcohol signal to your board.
| Pin | What It Does |
|---|---|
| VCC | Power input. Connect it to 5V, because the heater needs 5V |
| GND | Ground (0V) |
| DO | Digital output. LOW when alcohol is detected, HIGH when it is not. The onboard potentiometer sets the detection threshold |
| AO | Analog output. The voltage goes up when there is more alcohol in the air |
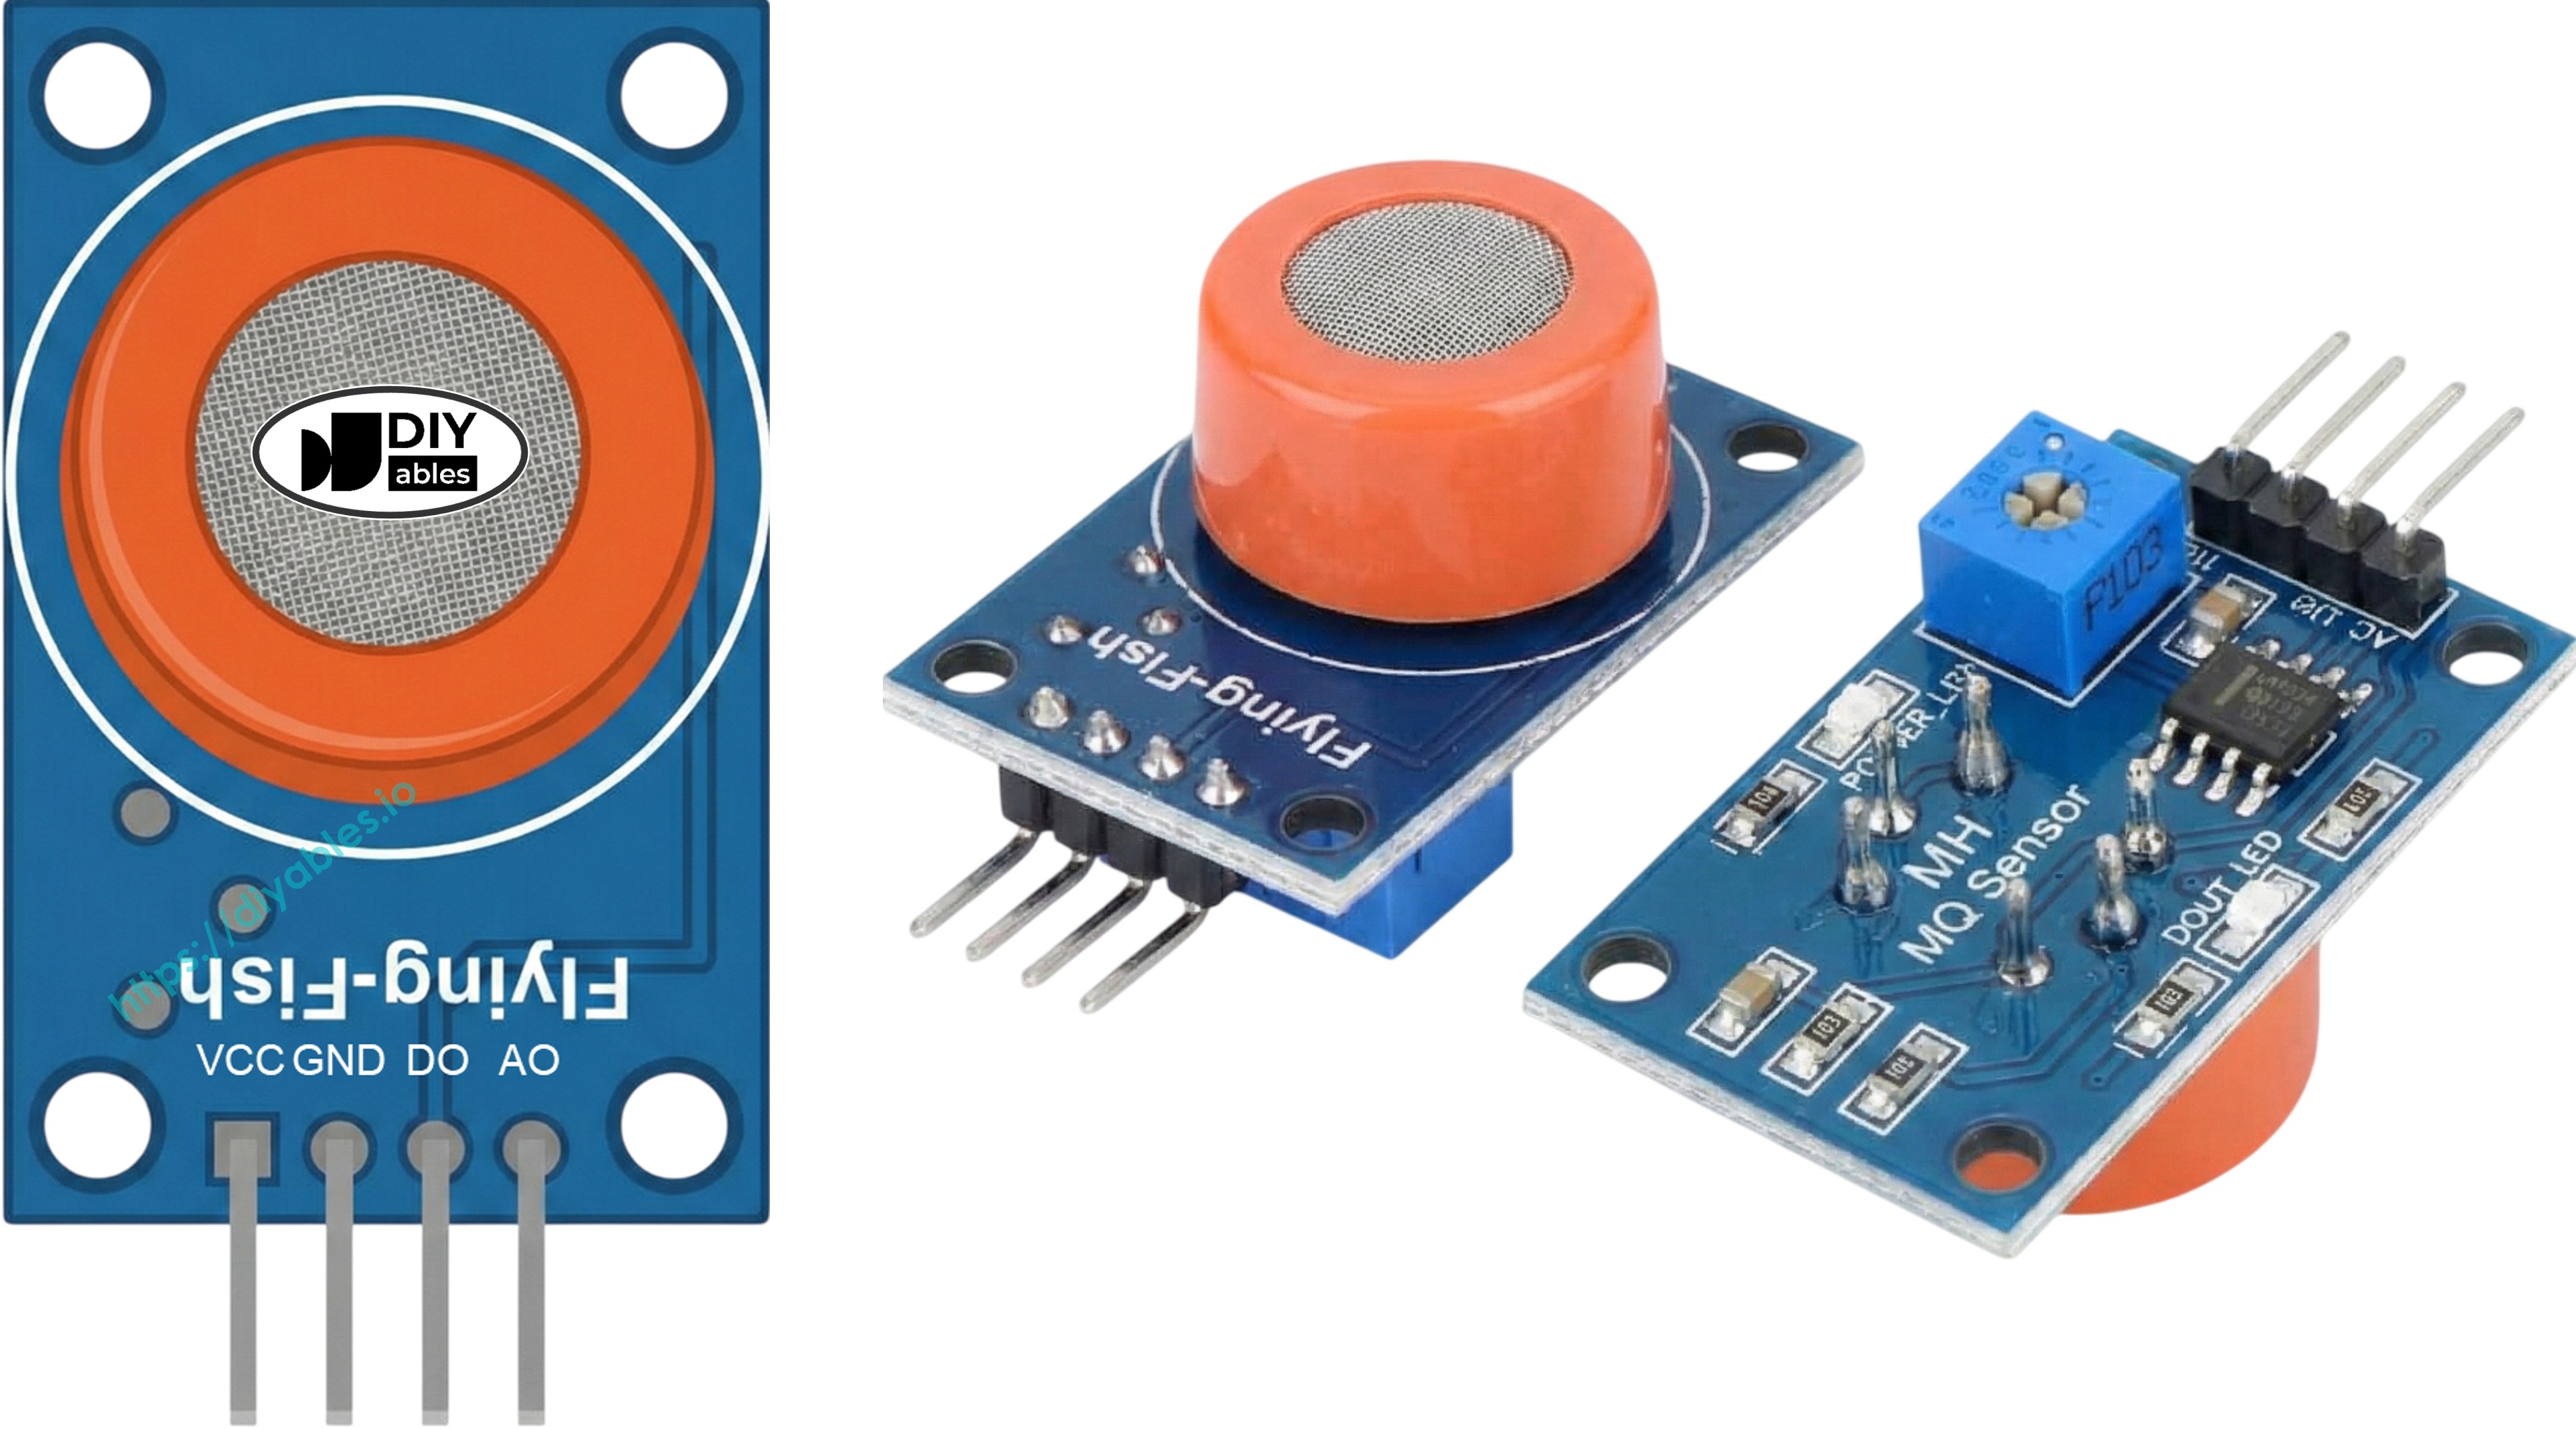
The module also has two small LEDs. The PWR-LED turns on when the module has power. The DO-LED follows the DO pin: it lights up when alcohol is detected and turns off when the air is clean.
How It Works
The MQ3 turns a chemical reaction into a change in resistance. The module then turns that resistance into a voltage your board can read.
In clean air
When the SnO2 layer is hot, oxygen molecules stick to its surface. They pull electrons away and build an energy barrier. Because of this barrier, the material has a very high resistance and almost no current flows.
With alcohol in the air
Alcohol vapor reacts with the oxygen on the surface. Less oxygen means a lower barrier, so electrons move freely into the tin dioxide and current can flow. The more alcohol there is, the lower the resistance gets.
DO pin (digital)
The potentiometer on the module sets a threshold. When the alcohol level goes above it, the DO pin turns LOW and the DO-LED turns on. When the level drops below it, the DO pin goes back HIGH and the DO-LED turns off.
AO pin (analog)
The AO voltage follows the alcohol concentration. More alcohol vapor gives a higher voltage, and less vapor gives a lower voltage. The potentiometer does not change the AO pin at all.
The MQ3 Sensor Warm-up and Calibration
The MQ3 only gives useful numbers when its heater is warm and you know what "clean air" looks like for your own sensor. These steps help you get there.
Warm-up Time
How long you need to wait depends on how the sensor was used before:
- First use, or stored for more than a month: keep it powered for 24 to 48 hours to get stable and accurate readings.
- Used recently: 5 to 10 minutes is enough. The readings may start high, but they settle down quickly.
To warm up the sensor, just connect its VCC to 5V and GND to GND, for example on the 5V and GND pins of the ESP32 S3 Uno, and leave it powered.
Calibration for Threshold Values
The MQ3 uses a heater, so its readings can drift after long storage. Calibrate it before you trust any threshold in a breathalyzer project:
- Record a baseline. Run the AO sketch in clean air and write down the values. With the voltage divider in this tutorial, they are often around 400 to 600 on the ESP32 S3 Uno.
- Test with alcohol. Use isopropyl alcohol or hand sanitizer. Never put liquid on the sensor, only vapor. Squeeze the bottle near the sensor and write down the values. They often go to 1600 to 3600, depending on the amount of vapor.
- Set thresholds from your own numbers, for example:
- Sober: a little above your baseline (e.g. below 480)
- Within legal limits: between the baseline and a moderate level (e.g. 480 to 1600)
- Above legal limits: above the moderate level (e.g. above 1600)
※ NOTE THAT:
These values change from sensor to sensor and from room to room. Always calibrate with your own sensor, and treat the numbers above only as a starting point.
Adjusting Digital Output Threshold
You set the DO threshold with the small potentiometer on the module:
- Hold some alcohol vapor near the sensor.
- Turn the potentiometer clockwise until the DO-LED turns on.
- Turn it counterclockwise just until the LED turns off.
- Done. The threshold is now set.
ESP32 S3 Uno Pinout
The image below shows the pinout of the ESP32 S3 Uno form board. Use it to find the Uno header pins (D2, A0, 5V…) and their GPIO numbers when you wire the MQ3 sensor.

Wiring Diagram
The MQ3 module has two outputs, and you can use one of them or both. The diagram connects DO to D2 and AO to A0, so all three sketches below work without moving a wire.
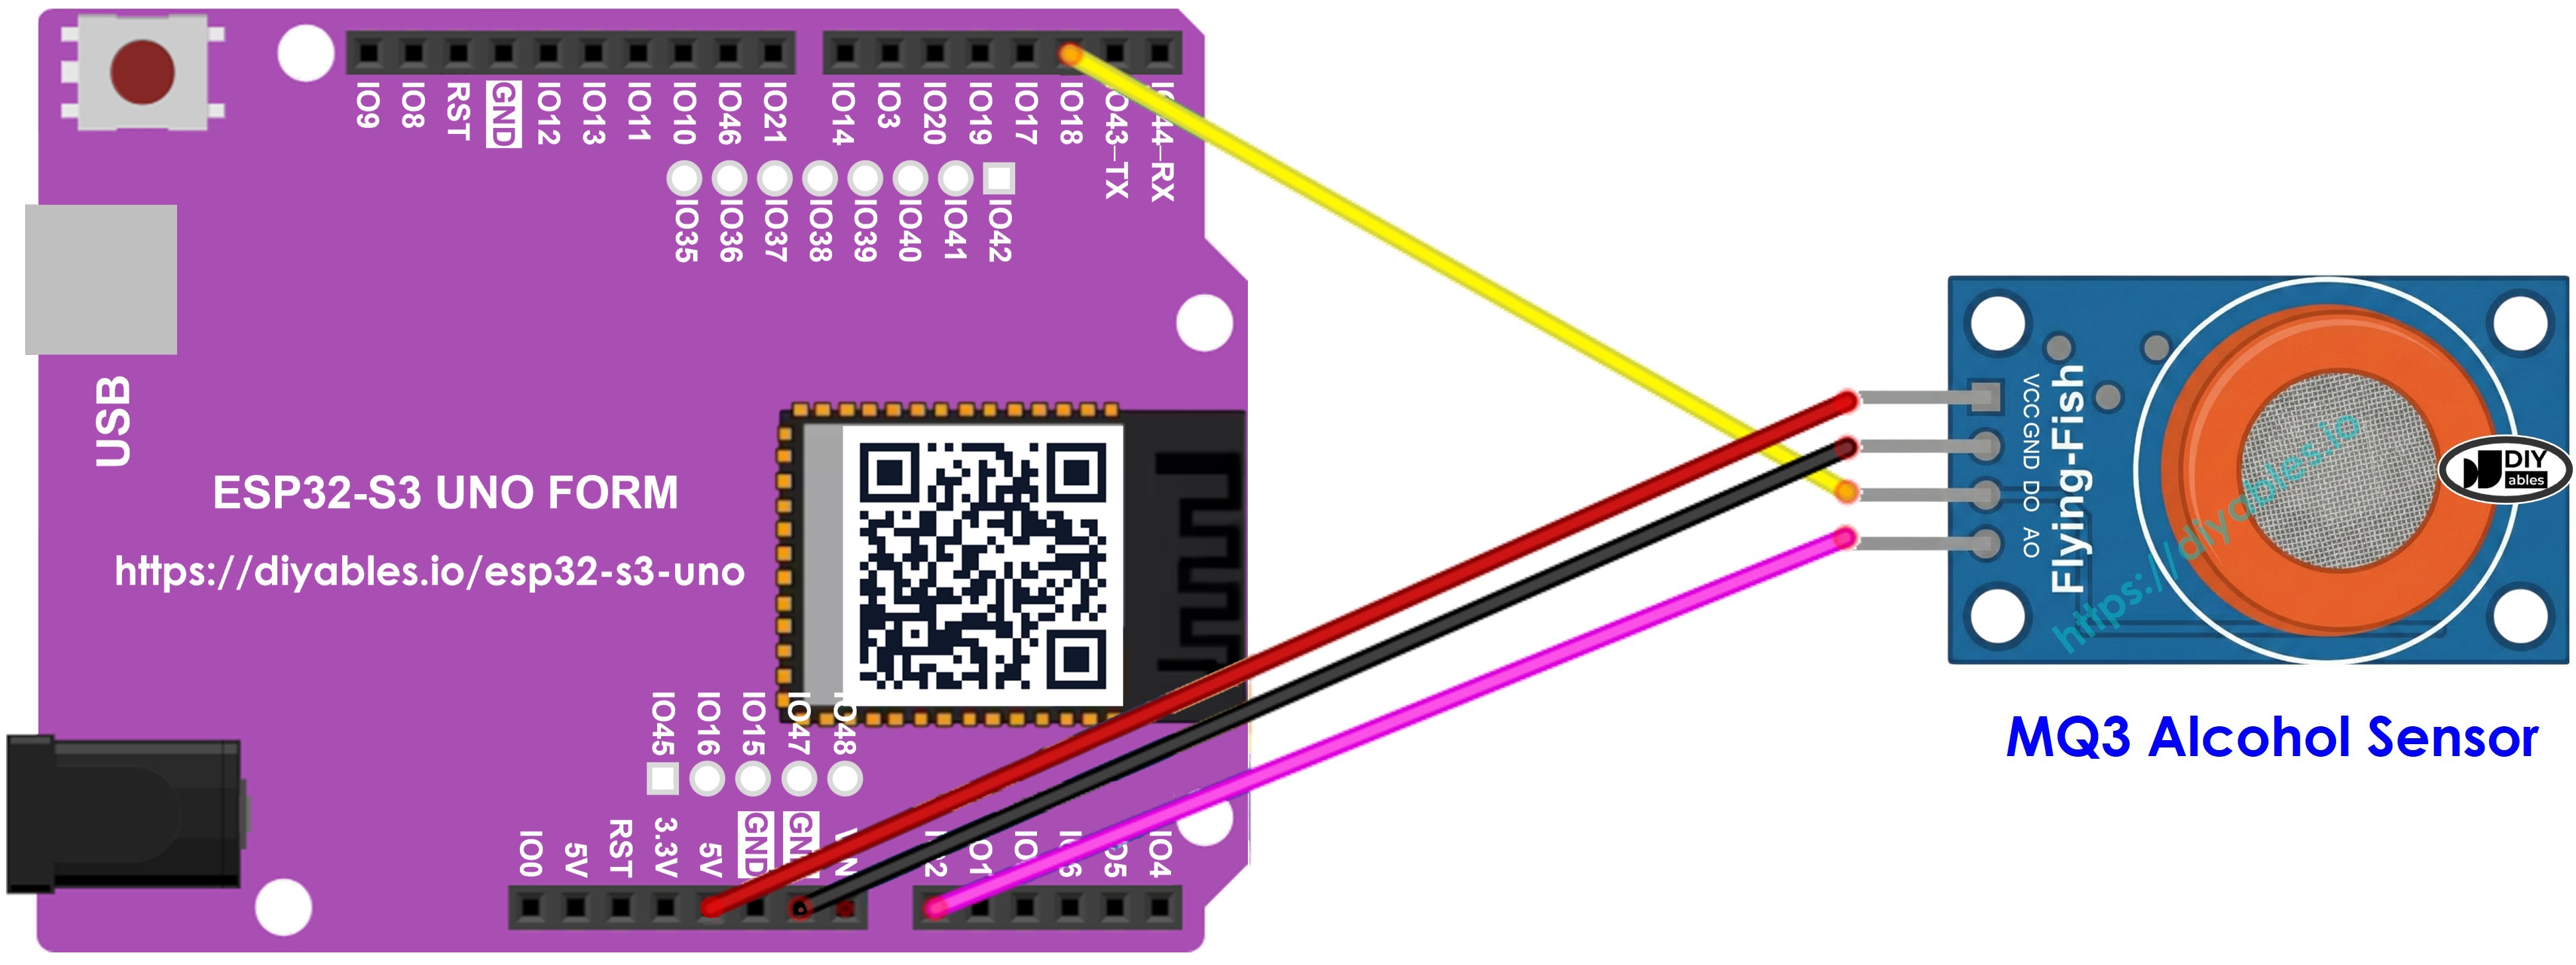
This image is created using Fritzing. Click to enlarge image
| MQ3 Alcohol Sensor | ESP32 S3 Uno |
|---|---|
| VCC | 5V |
| GND | GND |
| DO | D2 (GPIO18), through a 10 kΩ / 20 kΩ voltage divider |
| AO | A0 (GPIO2), through a 10 kΩ / 20 kΩ voltage divider |
WARNING
The MQ3 heater needs 5V, so VCC stays on the 5V pin. But this also means the AO and DO pins can output up to about 5V. ESP32 S3 Uno pins are NOT 5V tolerant, and a 5V signal can damage them. Put a voltage divider on each signal wire: connect the sensor pin to a 10 kΩ resistor, connect the other end of that resistor to the board pin (A0 or D2), and connect a 20 kΩ resistor from the board pin to GND. This scales 5V down to about 3.3V. The wiring image does not show these resistors, so add them yourself.
ESP32 S3 Uno Code - Read value from DO pin
This sketch waits 20 seconds for the sensor to warm up. Then it reads the DO pin again and again and prints whether alcohol is detected. A LOW signal means alcohol, and a HIGH signal means clean air.
Detailed Instructions
- New to the ESP32 S3 Uno? Follow ESP32 S3 Uno - Getting Started first.
- Wire it up as shown in the diagram, with the voltage dividers on DO and AO.
- Connect the board to your computer with a USB Type-C cable.
- Open Arduino IDE, choose the ESP32S3 Dev Module board and the correct COM port.
- Copy the code above and paste it into Arduino IDE.
- Upload the code by clicking the Upload button.
- Test the sensor by holding alcohol vapor near it, for example hand sanitizer or rubbing alcohol on a cotton ball.
- Open the Serial Monitor and check the messages.
- Tip: wait the full 20 seconds before you test. During warm-up the sensor can report alcohol even in clean air.
※ NOTE THAT:
If the messages do not match reality (for example, it reports alcohol in clean air, or misses alcohol that is there), adjust the potentiometer on the module. Turn it clockwise to make it more sensitive, or counterclockwise to make it less sensitive, until the detection matches what you expect.
ESP32 S3 Uno Code - Read value from AO pin
This sketch reads the AO pin every half second and prints the raw value. On the ESP32 S3 Uno the analog reading goes from 0 to 4095, not 0 to 1023 like on 10-bit boards.
The sketch calls analogSetAttenuation(ADC_11db) in setup(). By default, the ESP32 S3 Uno ADC can only measure a small voltage. With 11 dB attenuation, the analog pin reads the full range from 0V up to about 3.3V. Without this line, the readings hit 4095 too early and the sensor values look wrong.
Detailed Instructions
- Copy the code above and open it in Arduino IDE.
- Upload the code by clicking the Upload button.
- Test the sensor with alcohol vapor from hand sanitizer or rubbing alcohol.
- Open the Serial Monitor and watch the values.
- Tip: write down the values in clean air and with alcohol. You will need them for the breathalyzer sketch below.
With the values from DO or AO, you can set your own alcohol levels and use them to sound an alarm, turn on a warning LED, or log data for a breathalyzer project.
ESP32 S3 Uno Code - Simple Breathalyzer with Thresholds
This example turns the analog reading into a simple status message. It compares each reading with two calibrated thresholds and prints "Stone Cold Sober", "Drinking but within limits" or "DRUNK".
The thresholds in this sketch are already scaled for the 12-bit ADC and the voltage divider. Still, every MQ3 sensor is a little different, so replace them with your own values.
Detailed Instructions
- Calibrate first. Run the AO sketch above and note the values in clean air and with alcohol vapor.
- Edit the thresholds. Replace SOBER_THRESHOLD and DRUNK_THRESHOLD in the code with your calibrated values.
- Upload the code to the ESP32 S3 Uno.
- Test it with vapor from hand sanitizer or isopropyl alcohol.
- Open the Serial Monitor and check the status.
- Tip: let the sensor return to its clean-air value before each new test, or the next reading will start too high.
WARNING
This project is for learning only. Never use it as a legal breathalyzer or to decide if someone is fit to drive.
Video Tutorial
Watch the video below to see this ESP32 S3 Uno project step by step.
Function References
FAQ
Can I power the MQ3 alcohol sensor from the 3.3V pin of the ESP32 S3 Uno?
No. The MQ3 heater needs 5V to reach its working temperature. At 3.3V the heater stays too cold, and the readings become weak and unstable. Keep VCC on 5V and protect the signal pins with voltage dividers instead.
Why do I need a voltage divider on the AO and DO pins?
Because the module runs at 5V, its AO and DO pins can output up to about 5V. ESP32 S3 Uno pins are not 5V tolerant and work at 3.3V. A 10 kΩ / 20 kΩ divider brings 5V down to about 3.3V, which is safe for D2 (GPIO18) and A0 (GPIO2).
Why do my values go up to 4095 instead of 1023?
The ESP32 S3 Uno has a 12-bit ADC, so analogRead() returns 0 to 4095. 10-bit boards like the UNO R4 return 0 to 1023 by default. That is why the thresholds in this tutorial are about four times bigger than on those boards.
Why does the code call analogSetAttenuation(ADC_11db)?
It sets the ESP32 S3 Uno ADC input range to about 0V to 3.3V, so the full MQ3 signal maps to 0 to 4095. Without it, the range is smaller and the readings saturate early. The UNO R4 does not need this line, because it is ESP32-only. Keep the voltage at the pin at 3.3V or less, which the voltage divider does for you.
Why does the sensor get hot and show high values at first?
The MQ3 has a heater inside, so it is normal for it to feel warm. When it is new or has been stored for a long time, the readings start high and need 24 to 48 hours of power to become stable. After recent use, 5 to 10 minutes is enough.
What if my project needs more pins than the Uno headers give?
The ESP32 S3 Uno has two extra rows of holes with more GPIOs: GPIO15 and GPIO16 (I/O, PWM, analog), GPIO45 and GPIO35 to GPIO42 (I/O, PWM), and GPIO47/GPIO48 (output only, PWM). Solder pin headers to use them and write the GPIO number in your code. For a second gas sensor's AO pin, use GPIO15 or GPIO16, because they support analog input. For a DO pin, any I/O pin works, but not GPIO47/48, because they are output only. Be careful with two things. First, GPIO47 and GPIO48 may run at 1.8V instead of 3.3V on some modules (especially ones with "V" in the name, like R8V or R16V), so 3.3V devices can be damaged or act strangely. Second, GPIO0, GPIO3 (D6), GPIO45 and GPIO46 (D9) are boot strapping pins, and a wrong connection can stop the board from booting or uploading code. Use the other extra pins first.
Troubleshooting
| Problem | Possible Cause | Solution |
|---|---|---|
| No COM port shows up in Arduino IDE | USB driver missing or the board is not in upload mode | Install the CP210x or CH340 driver, try another USB cable, or hold BOOT while you press RESET |
| Upload fails with a timeout | Wrong board or port selected | Choose ESP32S3 Dev Module and the correct COM port, then upload again |
| Module LEDs are off and values stay at 0 | VCC or GND not connected, or VCC on 3.3V | Connect VCC to 5V and GND to GND, and check the jumper wires |
| AO value is very high even in clean air | Sensor is not warmed up yet | Keep it powered for 5 to 10 minutes, or 24 to 48 hours for a new sensor |
| AO value is stuck at 4095 | No voltage divider, or analogSetAttenuation(ADC_11db) is missing | Add the 10 kΩ / 20 kΩ divider and keep the attenuation line in setup() |
| DO always reports alcohol or never reports it | Threshold potentiometer is set wrong | Turn the potentiometer slowly until the DO-LED switches at the right alcohol level |
| DO reads LOW or unstable even in clean air | The module pull-up and the divider make the HIGH level too low | Check the voltage at D2 with a meter, or use a logic level converter for the DO pin |
| Breathalyzer status is always the same | Thresholds do not match your sensor | Run the AO sketch, note your own values and update SOBER_THRESHOLD and DRUNK_THRESHOLD |