
ESP32 S3 UNO - Solenoid Lock
This ESP32 S3 Uno solenoid lock tutorial shows you how to lock and unlock a door, cabinet or drawer with Arduino code. You will wire a 12V electric strike lock to the ESP32 S3 Uno form board through a relay, then make the lock tongue move out and pull back on a timer.
In this tutorial, you will:
- Learn how an electric strike lock works and why it needs a relay.
- Wire a solenoid lock, a relay and a 12V adapter to the ESP32 S3 Uno.
- Control the relay with digitalWrite() to lock and unlock the door.
- Upload and test the code in the Arduino IDE.
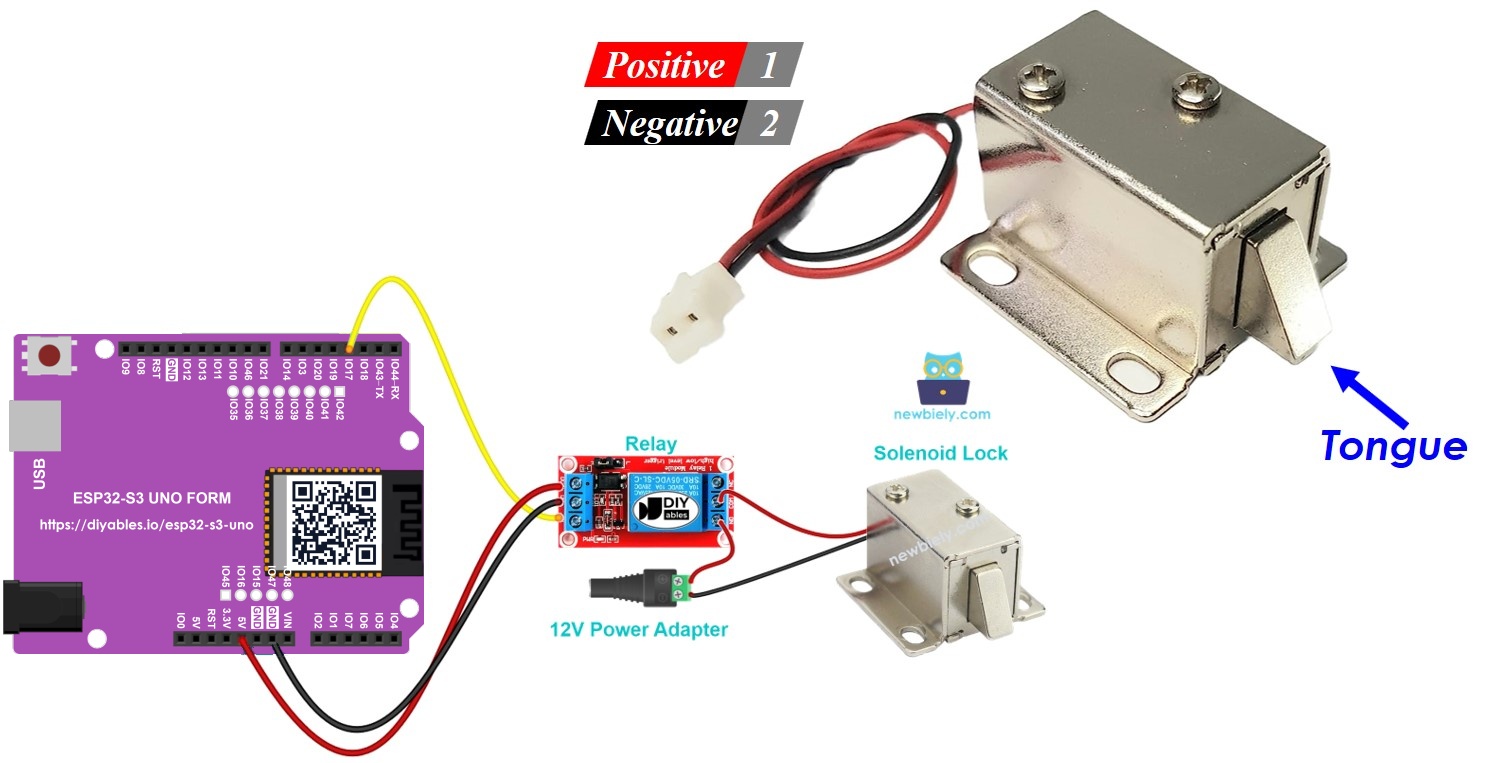
Hardware Preparation
| 1 | × | ESP32 S3 Uno-form Board | |
| 1 | × | USB Cable Type-A to Type-C (for USB-A PC) | |
| 1 | × | USB Cable Type-C to Type-C (for USB-C PC) | |
| 1 | × | Solenoid Lock | |
| 1 | × | Relay | |
| 1 | × | 12V Power Adapter | |
| 1 | × | DC Power Jack |
Or you can buy the following kits:
| 1 | × | DIYables Sensor Kit (18 sensors/displays) |
Additionally, some of these links are for products from our own brand, DIYables .
Overview of Solenoid Lock
A solenoid lock is a small electric lock. People also call it an electric strike lock. You find it on cabinets, drawers and doors where a microcontroller decides who can open them.
Pinout
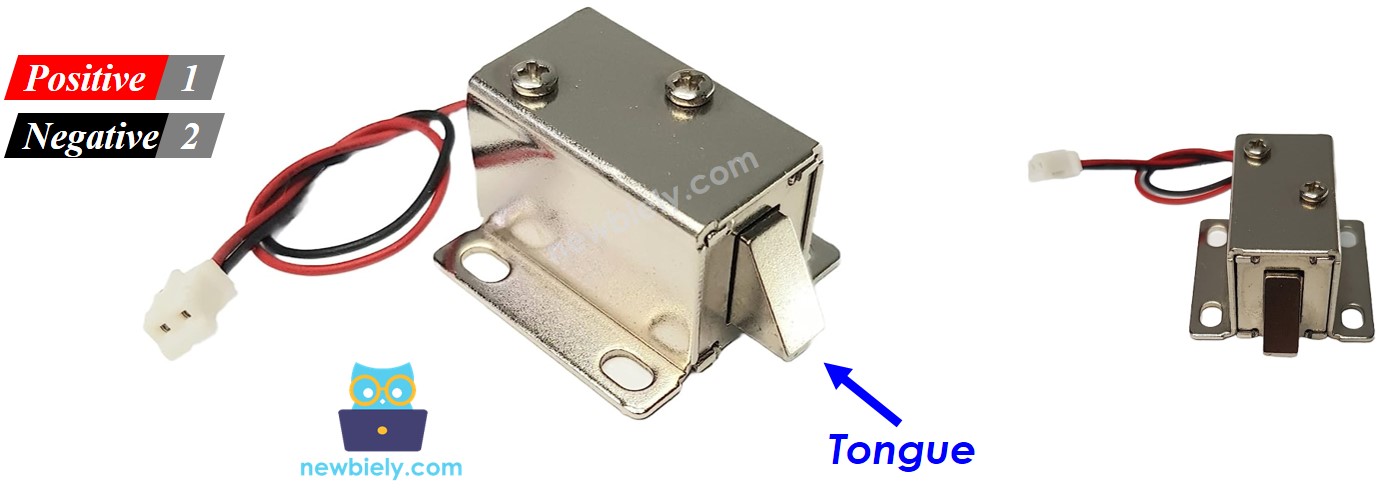
The solenoid lock has only two wires, so the wiring is simple. The red wire is the positive (+) side and goes to the 12V output of the DC power supply. The black wire is the negative (-) side and goes to the ground (GND) of the same power supply.
How It Works
The lock tongue (also called the strike) moves with power. Once you know this, the code becomes easy to read.
With power
Current flows through the coil, and the lock tongue pushes out. The door is locked.
Without power
No current flows, and the lock tongue pulls back. The door is unlocked.
※ NOTE THAT:
A solenoid lock usually needs 12V, 24V or 48V. Never connect it directly to an ESP32 S3 Uno pin. The ESP32 S3 Uno pins give only 3.3V and a few milliamps. Always switch the lock through a relay.
Using a relay
When you wire the lock to the normally open (NO) terminal of the relay, the relay state decides the lock state. If the relay is open, the lock has no power and the door is unlocked. If the relay is closed, the lock gets power and the door is locked.
So the ESP32 S3 Uno only has to switch the relay on and off. To learn more about relays, see ESP32 S3 Uno - Relay.
ESP32 S3 Uno Pinout
The image below shows the pinout of the ESP32 S3 Uno form board. Use it to find the D3 header pin and its GPIO number before you wire the relay.

Wiring Diagram
The relay signal comes from D3 on the ESP32 S3 Uno. The solenoid lock gets its power from the 12V adapter through the relay, not from the board.
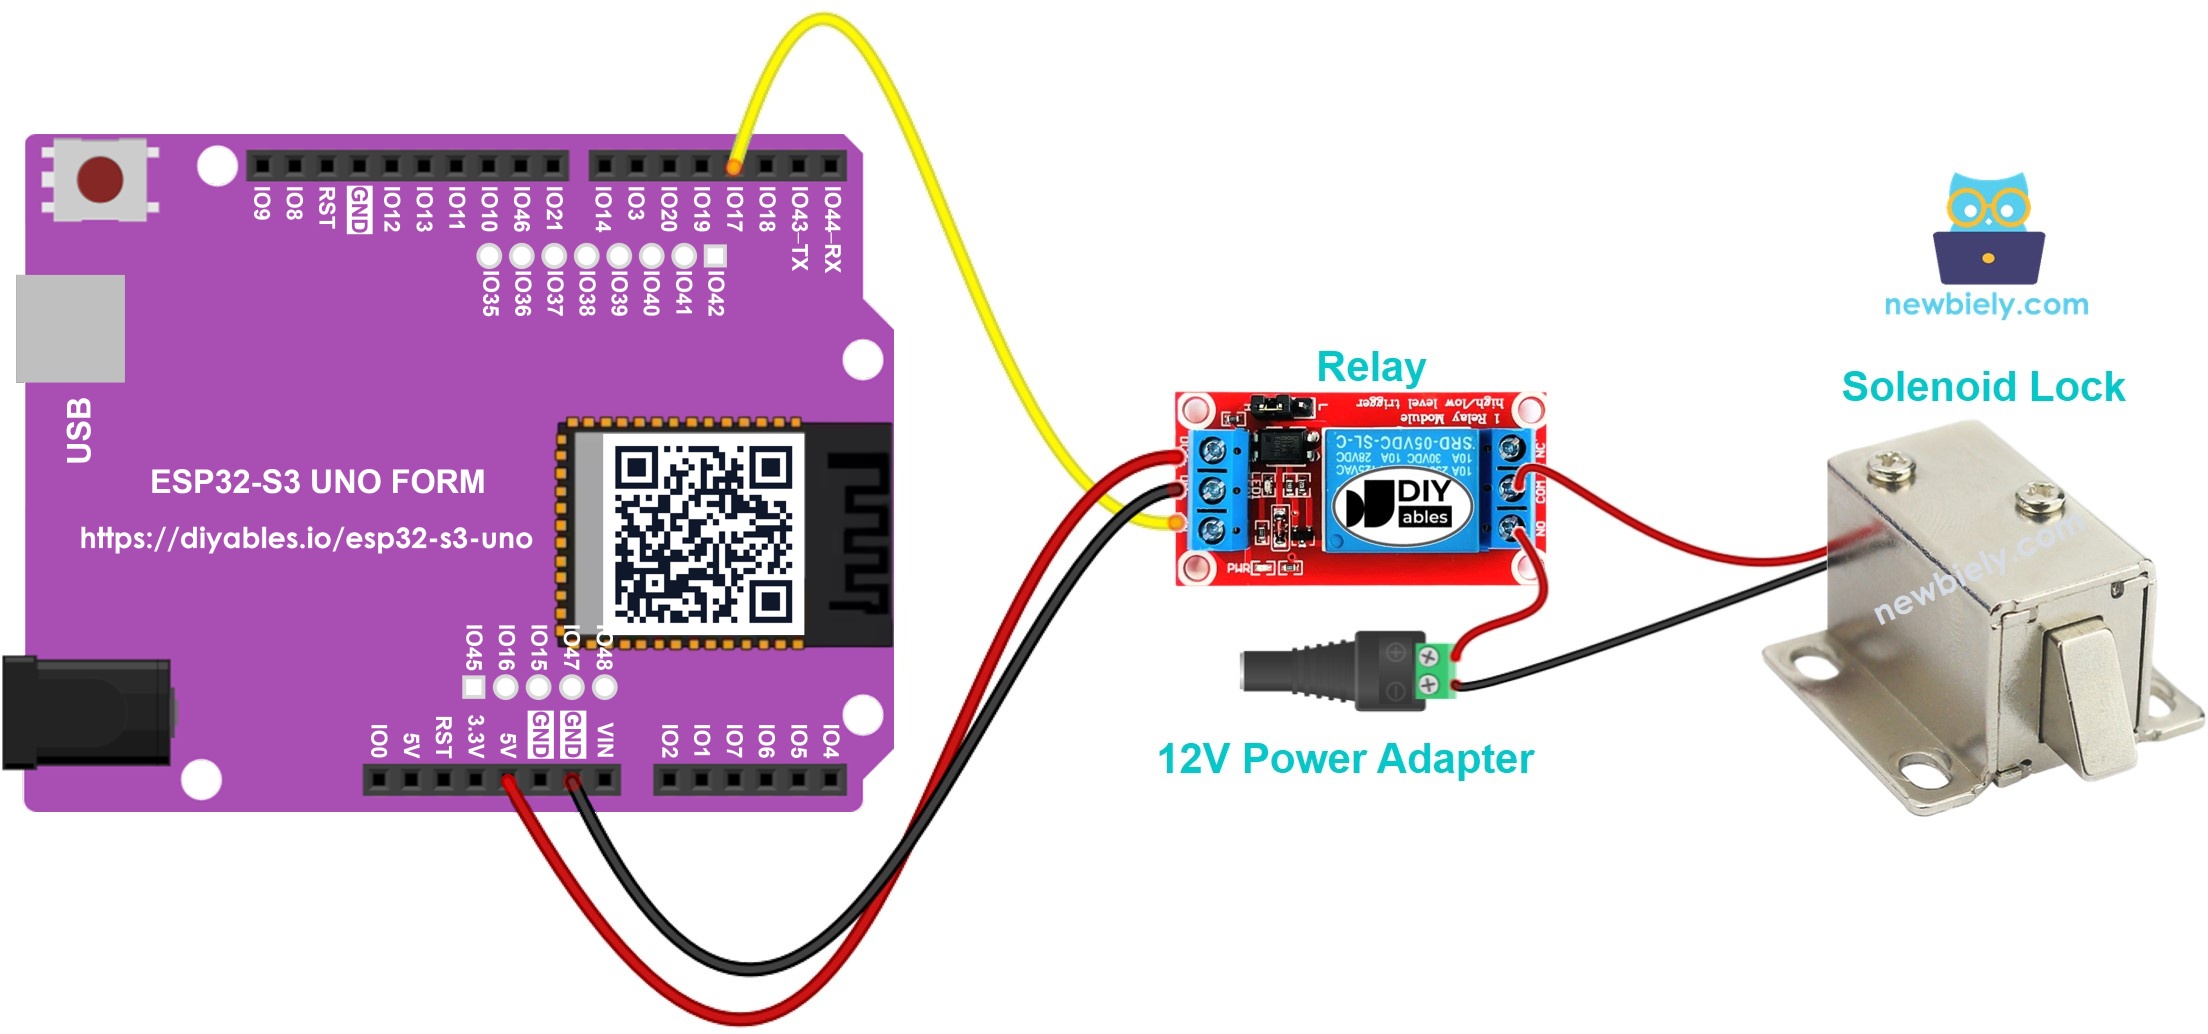
This image is created using Fritzing. Click to enlarge image
| Component Pin | ESP32 S3 Uno Pin |
|---|---|
| Relay VCC | 5V |
| Relay GND | GND |
| Relay IN | D3 (GPIO17) |
| Component Pin | Connects To |
|---|---|
| Relay COM | 12V power adapter (+) via DC power jack |
| Relay NO | Solenoid lock red wire (+) |
| Solenoid lock black wire (-) | 12V power adapter (-) via DC power jack |
※ NOTE THAT:
Most relay modules have a 5V coil, so power the relay VCC from the 5V pin. The IN pin only gets the 3.3V signal from the ESP32 S3 Uno, and most modules switch fine with it. Never send a 5V signal back into an ESP32 S3 Uno pin. The ESP32 S3 Uno pins are NOT 5V tolerant.
ESP32 S3 Uno Code
The sketch below locks the door, waits 5 seconds, unlocks it, waits 5 seconds, and repeats. It sets D3 (GPIO17) as an output and writes HIGH or LOW to switch the relay.
Detailed Instructions
Follow these steps in order:
- New to the ESP32 S3 Uno? Follow ESP32 S3 Uno - Getting Started first.
- Wire it up as shown in the diagram above.
- Connect the board to your computer with a USB Type-C cable.
- Open Arduino IDE, choose the ESP32S3 Dev Module board and the correct COM port.
- Copy the code and paste it into a new sketch in the Arduino IDE.
- Upload the code by clicking the Upload button.
- Watch the lock: the lock tongue should move out and pull back every 5 seconds.
- Tip: plug in the 12V adapter only after you check all wires. A loose wire on the 12V side can damage the relay or the lock.
Video Tutorial
Watch the video below to see this ESP32 S3 Uno project step by step.
FAQ
Can I connect the solenoid lock directly to the ESP32 S3 Uno?
No. A solenoid lock needs 12V or more and a lot of current. An ESP32 S3 Uno pin gives only 3.3V and a few milliamps. Use a relay (or a MOSFET module) and a separate 12V power supply.
Does a 5V relay module work with the 3.3V ESP32 S3 Uno?
Usually yes. Power the relay VCC from the 5V pin and drive the IN pin with D3 (GPIO17). Most relay modules accept a 3.3V signal. If your relay does not click, use a relay module rated for 3.3V input or add a small transistor driver.
Why is the door locked when the pin is HIGH?
With the lock on the normally open terminal, HIGH closes the relay. The lock gets power and the tongue moves out, so the door is locked. LOW opens the relay, and the door is unlocked. If you want the opposite, wire the lock to the normally closed (NC) terminal.
Can I keep the solenoid lock powered all the time?
Many cheap solenoid locks get hot if they stay powered for a long time. Check the datasheet of your lock. If it is not made for continuous use, keep it powered only for short periods.
What if my project needs more pins than the Uno headers give?
The ESP32 S3 Uno has two extra rows of holes with more GPIOs: GPIO15 and GPIO16 (I/O, PWM, analog), GPIO45 and GPIO35 to GPIO42 (I/O, PWM), and GPIO47/GPIO48 (output only, PWM). Solder pin headers to use them and write the GPIO number in your code. For extra relays or locks, GPIO35 to GPIO42 are a good choice. Be careful with two things. First, GPIO47 and GPIO48 may run at 1.8V instead of 3.3V on some modules (especially ones with "V" in the name, like R8V or R16V), so 3.3V devices can be damaged or act strangely. Second, GPIO0, GPIO3 (D6), GPIO45 and GPIO46 (D9) are boot strapping pins, and a wrong connection can stop the board from booting or uploading code. Use the other extra pins first.
Can I use a keypad or RFID reader to open the lock?
Yes. Read the keypad or RFID card in your code, and set the relay pin LOW only when the code or card is correct. The relay part of the code stays the same.
Troubleshooting
| Problem | Possible Cause | Solution |
|---|---|---|
| No COM port appears in Arduino IDE | USB driver missing or board not in upload mode | Install the CP210x or CH340 driver, try another USB cable, or hold BOOT while you press RESET |
| Upload fails | Wrong board selected in Arduino IDE | Select ESP32S3 Dev Module and the correct COM port |
| Relay clicks but the lock does not move | 12V adapter not connected or wired to the wrong relay terminal | Check the 12V adapter, the DC power jack polarity, and use the COM and NO terminals |
| Relay does not click at all | Relay VCC not powered or IN wire on the wrong pin | Power the relay VCC from 5V and connect IN to D3 (GPIO17) |
| Relay LED lights but the relay does not switch | 3.3V signal too weak for this relay module | Use a relay module that accepts 3.3V input or add a transistor driver |
| Lock works the opposite way | Lock wired to the NC terminal | Move the lock wire to the NO terminal or swap HIGH and LOW in the code |
| Lock gets hot | Lock powered for too long | Keep the lock powered only for short periods or use a lock made for continuous duty |
| Board resets when the lock switches | Lock and board share a weak power supply | Power the lock from its own 12V adapter and connect only the relay signal to the board |