
ESP32 S3 UNO - DIYables Bluetooth App Chat
Overview
This ESP32 S3 Uno Bluetooth chat tutorial shows you how to send and receive text messages between the ESP32 S3 Uno form board and your smartphone over BLE (Bluetooth Low Energy). You use the free DIYables Bluetooth App as a wireless chat window and serial monitor. You can type commands on your phone, get replies from the board, and forward text from the Arduino IDE Serial Monitor to the app.
In this tutorial, you will:
- Install the DIYables Bluetooth library and upload the BLE chat code
- Connect the DIYables Bluetooth App to your board without pairing
- Handle text commands like ping, status and LED ON
- Build a Serial-to-Bluetooth bridge for wireless debugging
- Control LEDs, relays, a servo and a motor with chat commands
BLE only, no Classic Bluetooth
The ESP32 S3 Uno supports BLE only. It has no Classic Bluetooth radio, so the BluetoothSerial library and the Classic Bluetooth chat example (Esp32Bluetooth_Chat) do not work on this board. That is why this page uses only the BLE example. The good news: BLE works with the app on both Android and iOS, and you do not need to pair the board in your phone settings.
Features
A chat screen is one of the most flexible ways to talk to your project. Any word you type can become a command, and the board can answer in plain text.
Two-way messaging
You send text from the phone, and the board sends text back, in real time.
Echo mode
The example code echoes every message back to the app, so you can see right away that the link works.
Command handling
The sketch already knows four commands: ping, status, time and heap. You can add your own in a few lines.
Periodic messages
The board sends a status update every 10 seconds while the phone is connected.
Serial-to-Bluetooth bridge
Text you type in the Arduino IDE Serial Monitor goes straight to the app.
Android and iOS
BLE works on both phone systems, and it uses little power.
Hardware Preparation
Or you can buy the following kits:
| 1 | × | DIYables Sensor Kit (18 sensors/displays) |
Additionally, some of these links are for products from our own brand, DIYables .
Buy Note: Use the LED Module for easier wiring. It includes an integrated resistor.
The basic chat example needs only the board and a USB cable. The LED and resistor are for the video demo code, which turns an LED on and off with chat commands.
ESP32 S3 Uno Pinout
The basic chat example needs no wiring, because the BLE radio is inside the board. When you add LEDs, relays or sensors later, use the pinout diagram below to find the Uno header pins (D2, D13, A0…) and their GPIO numbers.

ESP32 S3 Uno Code
You need the DIYables Bluetooth library before you upload the code. It handles all the BLE work, so your sketch only deals with the chat messages.
Detailed Instructions
- New to the ESP32 S3 Uno? Follow ESP32 S3 Uno - Getting Started first.
- Connect the board to your computer with a USB Type-C cable.
- Open Arduino IDE, choose the ESP32S3 Dev Module board and the correct COM port.
- Open the Library Manager by clicking the Libraries icon on the left bar of the Arduino IDE.
- Search for "DIYables Bluetooth" and find the DIYables Bluetooth library by DIYables.
- Install it by clicking the Install button.
- Search for DIYables Bluetooth created by DIYables and click the Install button.
- Install the dependencies. When the IDE asks about other required libraries, click Install All.
- Tip: Bluetooth sketches are big. If the upload fails with a "sketch too big" error, open Tools > Partition Scheme and pick Huge APP (3MB No OTA/1MB SPIFFS).
ESP32 S3 Uno BLE Code (works with the app on Android and iOS)
This sketch starts a BLE server named ESP32BLE_Chat, echoes every message it gets, and answers four commands. It also sends a status message every 10 seconds and forwards any text you type in the Serial Monitor to the app.
- Open the example: in the Arduino IDE, go to File Examples DIYables Bluetooth Esp32BLE_Chat, or copy the code below into the editor.
- Upload the code by clicking the Upload button.
- Open the Serial Monitor and set the baud rate to 115200.
- Check the output. You should see something like this:
- Tip: If the Serial Monitor stays empty, press the RESET button on the board once. The first lines are printed only at startup.
Mobile App
The app is your chat window. It finds the board over BLE and shows every message in a list, like a messenger app.
- Skip pairing. The ESP32 S3 Uno uses BLE, so you do not pair it in the phone settings. The app connects directly.
- Open the app and grant the permissions it asks for the first time:
- Nearby Devices permission (Android 12+) or Bluetooth permission (iOS). The app needs it to scan and connect.
- Location permission (Android 11 or older only). Older Android versions need it to scan for BLE devices.
- Turn on Bluetooth on your phone.
- Tap Connect. On the home screen, tap the Connect button. The app scans for nearby devices.
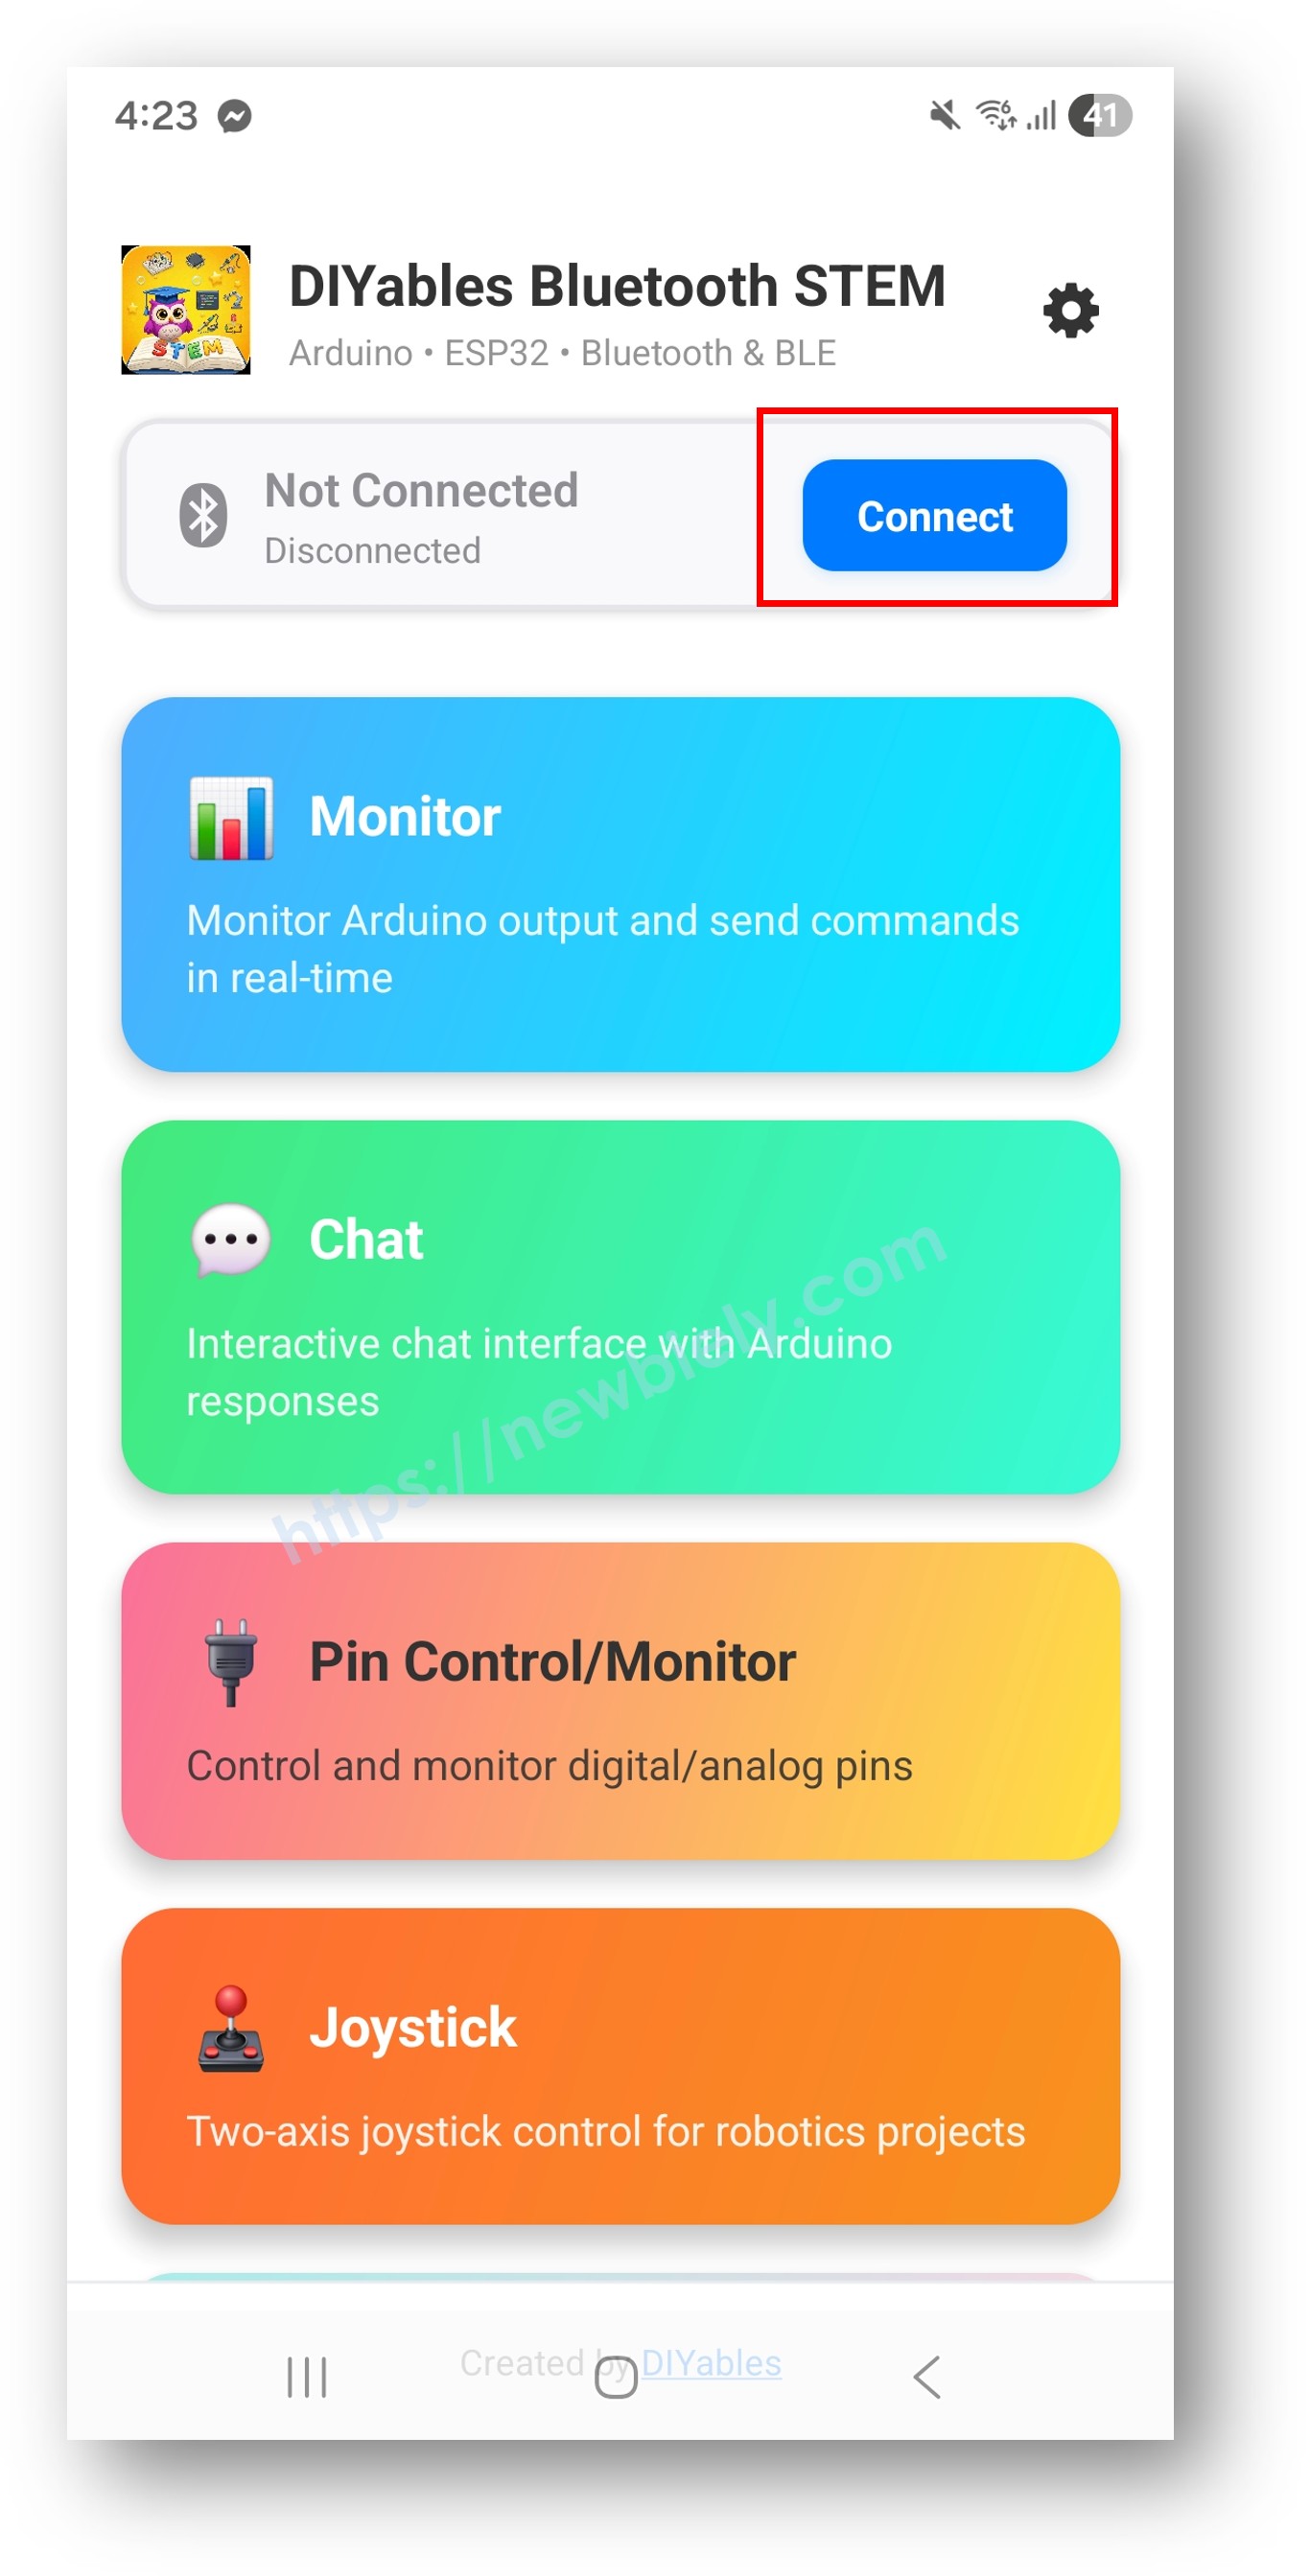
- Pick your board. Tap "ESP32BLE_Chat" in the scan results.
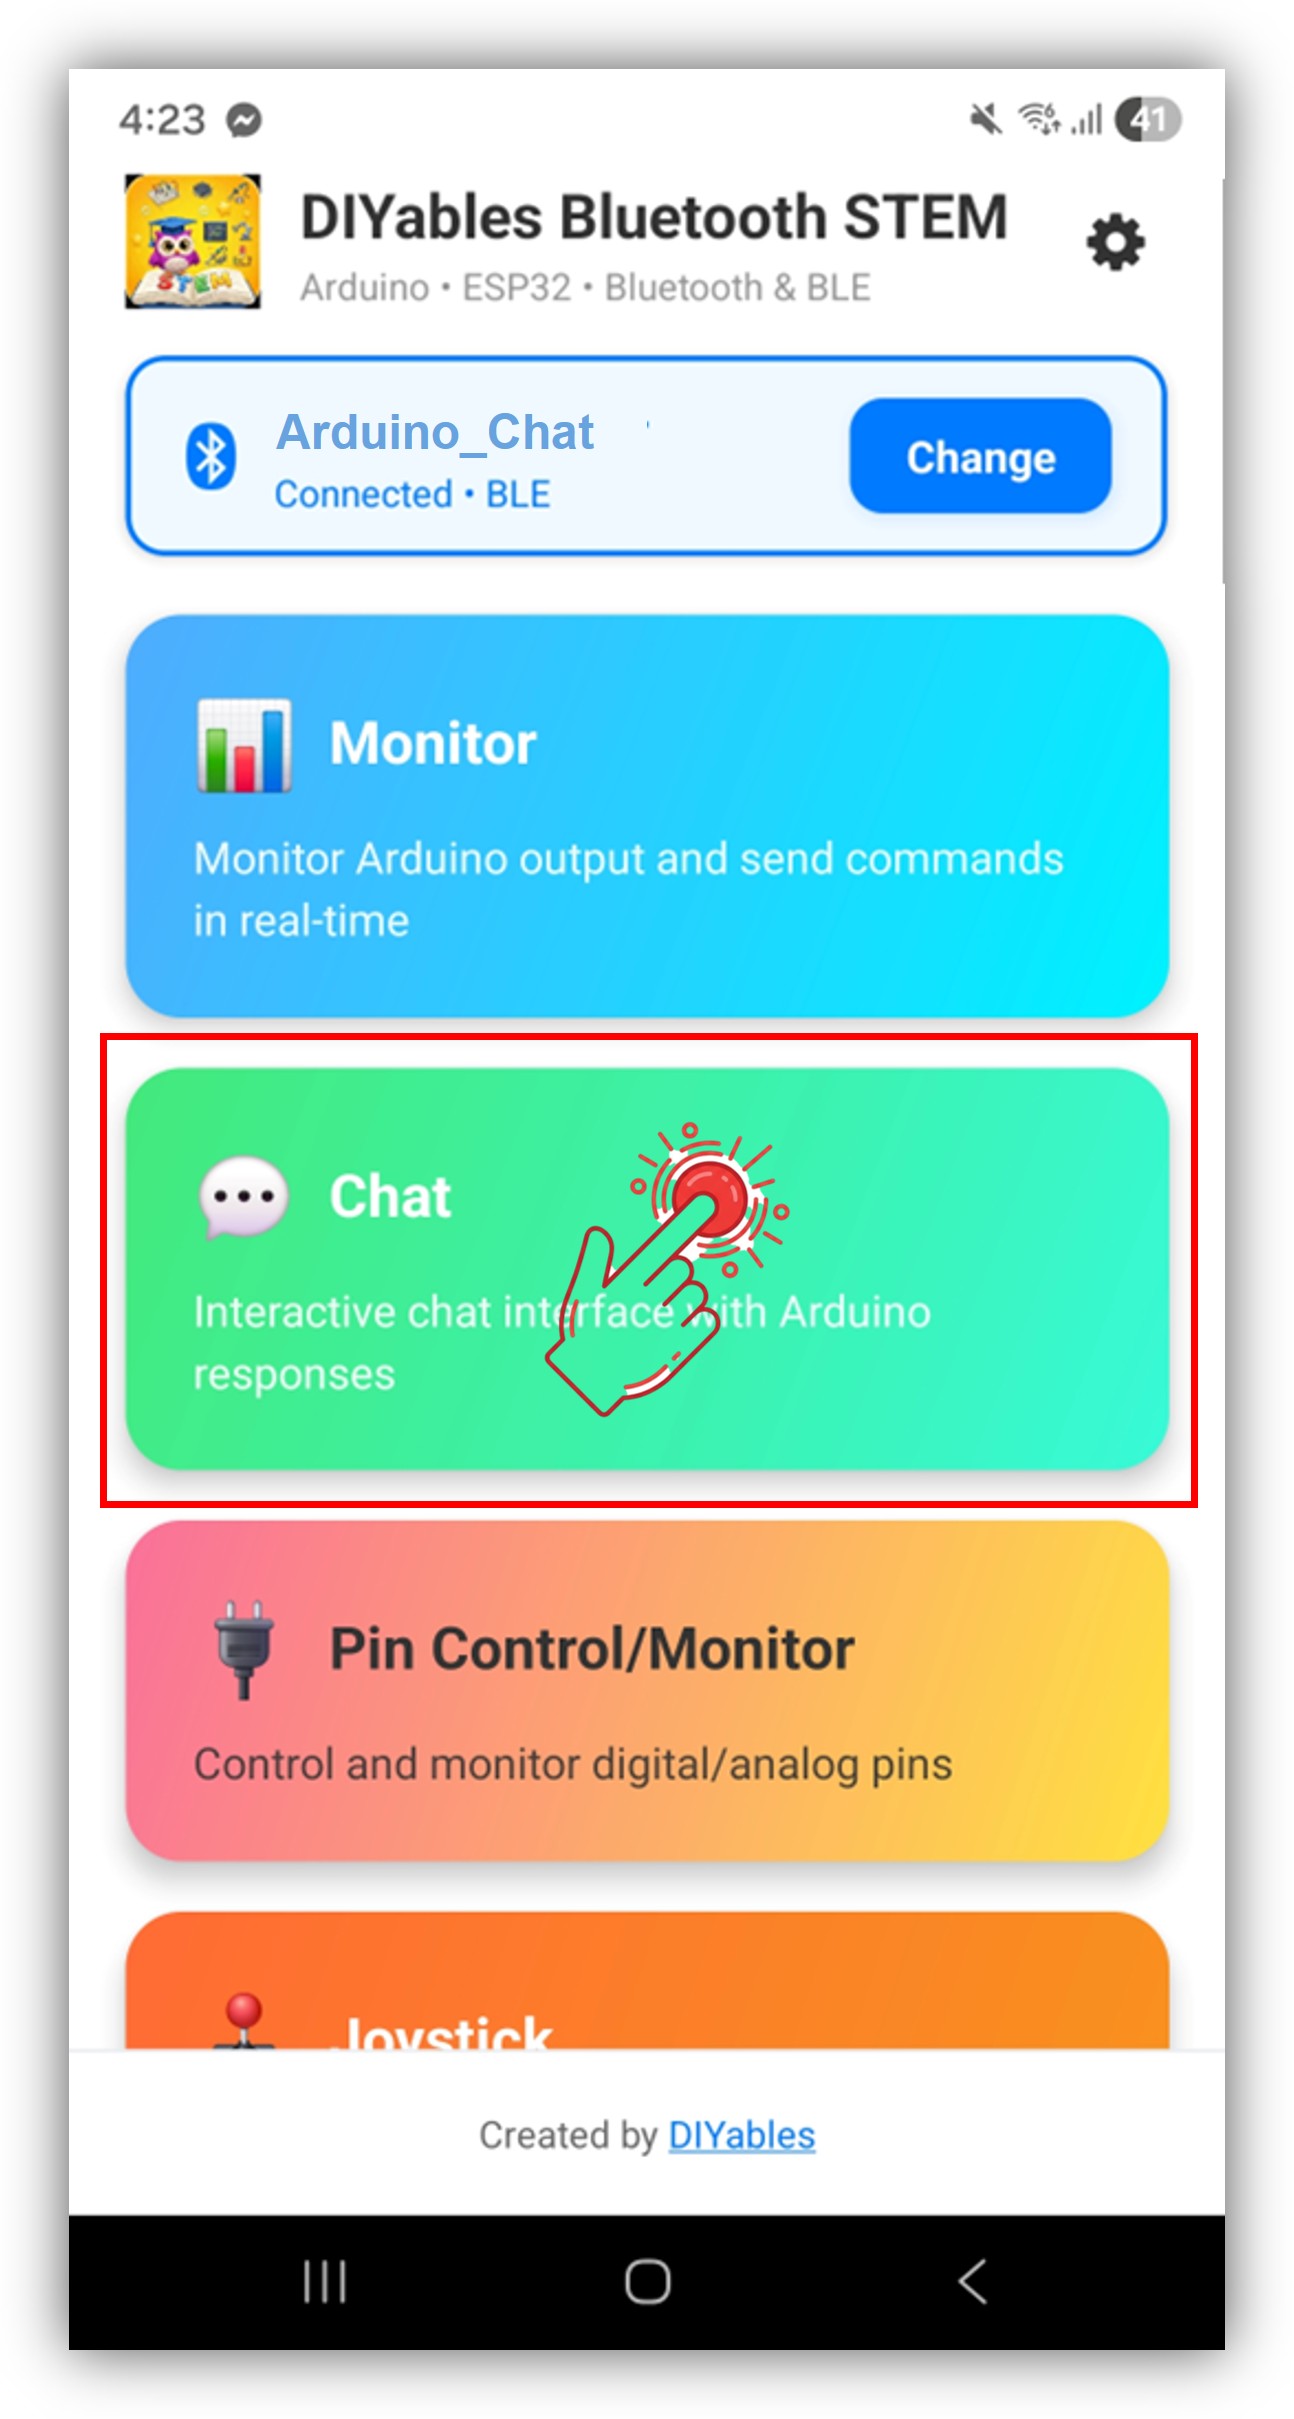
- Open the Chat app. After connecting, the app goes back to the home screen. Tap Chat in the app menu.
※ NOTE THAT:
You can tap the settings icon on the home screen to show or hide apps. For more details, read the DIYables Bluetooth App User Manual.
- Send a message. Type some text in the input box and tap Send.
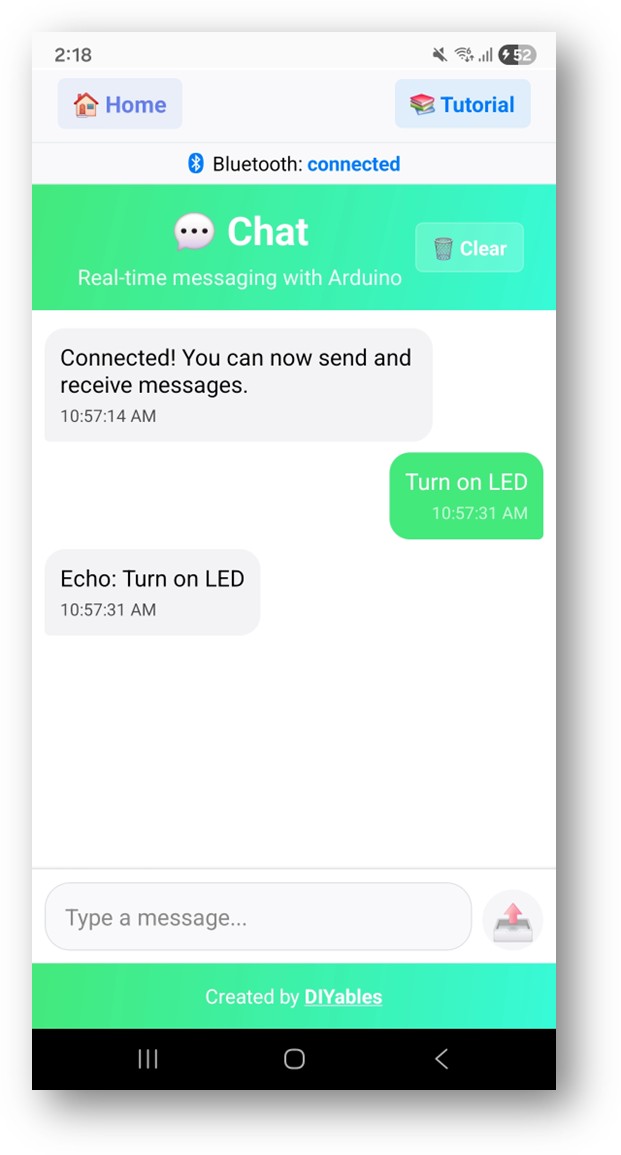
Now look at the Serial Monitor in the Arduino IDE. You should see lines like these:
Try the built-in commands ping, status, time and heap in the app. You can also type text in the Serial Monitor and press Enter, and it shows up in the app chat.
Creative Customization - Adapt the Code to Your Project
The example is only a starting point. The snippets below show the main building blocks, so you can turn the chat into a control panel for your own project.
Receive Messages from App
The onChatMessage() callback runs every time a message arrives from the app. Inside it, you compare the text with your own command words and act on them. Here, an LED on D13 (GPIO12) turns on and off:
Add more else if blocks for more commands. For example, use RELAY_ON / RELAY_OFF for a relay, or READ to take a sensor reading. Remember to call pinMode(12, OUTPUT); in setup() first.
Send Messages to App
The board can send text to the app at any time, not only as a reply. This is handy for alerts and sensor values.
Handle Connection Events
You can run your own code when the phone connects or disconnects. A welcome message on connect tells the user that the board is ready.
Serial-to-Bluetooth Bridge
This loop reads one line from the Serial Monitor and sends it to the app. It is a simple way to debug a project without a USB cable on the phone side.
How to Use the Chat
The chat screen looks like a normal messenger. Knowing its parts and the built-in commands helps you test the link fast.
App Interface Controls
Message list
A scrollable list shows the messages you sent and the ones you received.
Text input
You type your message in the box at the bottom.
Send button
Tap it to send the typed message to the board.
Auto-scroll
The list jumps to the newest message by itself.
Built-in Commands
The example code answers these commands (upper or lower case both work):
| Command | Reply |
|---|---|
| ping | pong! |
| status | ESP32 S3 Uno BLE is running normally |
| time | Uptime in seconds |
| heap | Free heap memory in bytes |
Programming Examples
These examples are complete callback blocks you can drop into the chat sketch. Each one shows a common use of chat commands. All pins are Uno header pins, written as GPIO numbers in the code.
Basic Echo Chat
The simplest possible chat: the board sends back every message it gets. Use it to check that both directions work.
Command-Based LED Control
This example drives one LED on D13 and an RGB LED on D2, D3 and D4. Type HELP in the app to get the list of commands.
Sensor Query System
Here the phone asks for sensor values on demand. A DHT22 sensor on D2 (GPIO18) gives temperature and humidity. Power the DHT22 from 3.3V so its data line stays at a safe level for the ESP32 S3 Uno.
Relay Control with Confirmation
Two relays on D7 (GPIO14) and D8 (GPIO21) switch on and off by chat. The board always replies, so you know the command arrived.
※ NOTE THAT:
Use a relay module that accepts a 3.3V control signal. Many 5V relay modules work with 3.3V input, but check the module first.
Advanced Programming Techniques
Once the basics work, you can make the chat smarter. These techniques add timed messages, logging and commands with arguments.
Periodic Status Updates
The board sends a status line every 10 seconds, but only while the phone is connected. It also reports uptime and free heap memory.
Message Logging
Every incoming message and every reply is printed to the Serial Monitor with a time stamp in seconds. A helper function builds the reply.
Command Parser with Arguments
This parser splits a message into a command and an argument, like "PWM 128". The PWM output is on D5 (GPIO20). For the PIN command, type the GPIO number, not the Uno label. For example, "PIN 12 HIGH" sets D13 (GPIO12) high.
WARNING
Do not let the PIN command drive GPIO0, GPIO3 (D6), GPIO45 or GPIO46 (D9) unless you know what is connected. These are boot strapping pins on the ESP32 S3 Uno.
Hardware Integration Examples
Chat commands are great for moving things. These two examples control a servo and a DC motor with plain words.
Servo Control via Chat
Send a number from 0 to 180, or "SERVO 90", and the servo moves to that angle. "SWEEP" moves it all the way and back. The servo signal is on D3 (GPIO17). The code uses the ESP32Servo library by Kevin Harrington.
Motor Control via Chat
A motor driver gets its speed on D5 (GPIO20) and its direction on D7 (GPIO14) and D8 (GPIO21). Type FORWARD, REVERSE, STOP or "SPEED 150".
BLE on the ESP32 S3 Uno
The DIYables Bluetooth library has two chat examples: one for Classic Bluetooth and one for BLE. On the ESP32 S3 Uno you only have one choice, because the chip has a BLE radio and no Classic Bluetooth radio. The table shows what you get with BLE.
| Feature | BLE (Esp32BLE_Chat) on the ESP32 S3 Uno |
|---|---|
| iOS Support | Yes |
| Android Support | Yes |
| Power Consumption | Low |
| Range | About 10 to 30 m indoors |
| Data Rate | Enough for text chat |
| Pairing Required | No (connect inside the app) |
| Classic Bluetooth (BluetoothSerial) | Not supported on this board |
Video Tutorial
Watch the video below to see this ESP32 S3 Uno project step by step. The demo code turns an external LED on and off from the chat, makes it blink, and reports its status. The ESP32 S3 Uno has no built-in LED on the Uno headers, so connect an LED to D13 (GPIO12) through a 220 ohm resistor.
| LED Pin | ESP32 S3 Uno Pin |
|---|---|
| Anode (long leg, through 220 ohm resistor) | D13 (GPIO12) |
| Cathode (short leg) | GND |
Type HELP in the app to see the commands: LED ON, LED OFF, STATUS, UPTIME and BLINK.
Common Issues and Debug Tips
Most chat problems come from the connection, the Serial Monitor settings or a missing callback. Check these points before you change your code.
The device does not show up in the app
Make sure the sketch is uploaded and the board is powered. Turn on Bluetooth on your phone, and on Android 11 or older also turn on Location. Remember that the ESP32 S3 Uno shows up as a BLE device named ESP32BLE_Chat, so you never pair it in the phone settings.
Messages do not appear in the app
Check the connection status in the app and in the Serial Monitor. Make sure your code calls bluetoothChat.send(). If it still fails, disconnect and connect again.
Echo does not work
Check that the onChatMessage() callback is set up in setup(). Make sure the Chat screen is open in the app, and watch the Serial Monitor for "Received" lines.
The connection drops often
Move the phone closer to the board and keep other BLE devices away. Use a good USB cable and a stable power source.
The Serial-to-Bluetooth bridge does nothing
Set the Serial Monitor to 115200 baud and the line ending to "Newline". The bridge only sends text while bluetooth.isConnected() is true, and the Serial.available() code must be inside loop().
Sketch too large
Go to Tools > Partition Scheme and choose "Huge APP (3MB No OTA/1MB SPIFFS)" or "No OTA (Large APP)". The default scheme gives only about 1.2MB for code, which is too small for the Bluetooth libraries. The bigger scheme gives about 3MB by removing the OTA (over-the-air update) space.
Debug Tips
This helper prints the message, its length and the free heap memory. Call it at the start of your chat callback when something looks wrong.
Project Ideas
A text chat fits many kinds of projects. Here are some ideas to get you started.
Remote control projects
Control a robot with text commands, build a home automation command center, switch relays with text feedback, or set a servo position from the chat.
Monitoring projects
Ask the board for sensor values, run health checks by chat, log data with Bluetooth feedback, or debug your project without a cable.
Interactive projects
Make a quiz or trivia game, write a step-by-step guide that answers in the chat, build a small chatbot about your project, or create a remote settings tool.
Education projects
Learn the basics of Bluetooth communication, practice string parsing and command handling, and design your own simple message protocol.
Integration with Other Bluetooth Apps
The DIYables Bluetooth library can run several app screens at the same time. The chat is a good partner for other screens, because it can switch modes or apply presets.
Combine with Bluetooth Monitor
Use the chat to start and stop monitoring, and the monitor screen for the live data. The sensor is on A0 (GPIO2).
The ESP32 S3 Uno ADC gives values from 0 to 4095, not 0 to 1023. Add analogSetAttenuation(ADC_11db); in setup() so the analog pin can read the full range, from 0V up to about 3.3V. Without it, the reading hits 4095 too early and the values look wrong.
Combine with Bluetooth Slider
Use the chat to load preset values, and the sliders for fine control.
Next Steps
When the chat works well, try the other app screens with your ESP32 S3 Uno:
- ESP32 S3 Uno - Bluetooth Monitor - stream text from the board to the app
- ESP32 S3 Uno - Bluetooth Slider - set values with sliders
- ESP32 S3 Uno - Bluetooth Pin Control - turn pins on and off
- ESP32 S3 Uno - Bluetooth Low Energy (BLE) - see all the BLE examples
Support
If you get stuck, these places can help:
- Read the API reference of the DIYables Bluetooth library.
- Visit the DIYables Bluetooth App tutorials.
- Ask in the Arduino community forums.
FAQ
Does the ESP32 S3 Uno support Classic Bluetooth for this chat?
No. The ESP32 S3 Uno has BLE only, so the BluetoothSerial library and the Esp32Bluetooth_Chat example do not compile or do not work on it. Use the Esp32BLE_Chat example from this page. It works with the DIYables Bluetooth App on both Android and iOS.
Do I need to pair the ESP32 S3 Uno in my phone's Bluetooth settings?
No. BLE devices connect inside the app. Open the DIYables Bluetooth App, tap Connect and choose ESP32BLE_Chat. If you paired it in the phone settings by mistake, remove it there and connect from the app.
Can I change the Bluetooth name of my board?
Yes. Change the DEVICE_NAME value at the top of the sketch, for example to "Kitchen_Chat", and upload again. Use a short name so it fits in the scan list. Give each board a different name if you have more than one nearby.
Is the chat code the same as the UNO R4 WiFi version?
The idea and the callbacks are the same, but the platform file is different. The UNO R4 WiFi uses DIYables_ArduinoBLE.h, while the ESP32 S3 Uno uses DIYables_Esp32BLE.h and the DIYables_Esp32BLE class. The ESP32 S3 Uno sketch also uses 115200 baud and adds the heap command.
What if my project needs more pins than the Uno headers give?
The ESP32 S3 Uno has two extra rows of holes with more GPIOs. GPIO15 and GPIO16 work as input, output, PWM and analog. GPIO45 and GPIO35 to GPIO42 work as input, output and PWM. GPIO47 and GPIO48 are output only, with PWM. Solder pin headers to use them, and write the GPIO number in your code. For extra relays or LEDs controlled by chat, GPIO35 to GPIO42 are a good choice; for extra analog sensors, use GPIO15 or GPIO16. Be careful with two things. First, GPIO47 and GPIO48 may run at 1.8V instead of 3.3V on some modules (especially ones with "V" in the name, like R8V or R16V), so 3.3V devices can be damaged or act strangely. Second, GPIO0, GPIO3 (D6), GPIO45 and GPIO46 (D9) are boot strapping pins, and a wrong connection can stop the board from booting or uploading code. Use the other extra pins first.
Why does the monitor example call analogSetAttenuation(ADC_11db)?
It sets the ESP32 S3 Uno ADC input range to about 0 to 3.3V, so the full sensor signal maps to 0 to 4095. Without it the range is smaller and readings reach 4095 too early. The UNO R4 does not need this line, it is for ESP32 boards only. Keep the sensor output at 3.3V or less.
Troubleshooting
| Problem | Possible Cause | Solution |
|---|---|---|
| No COM port in Arduino IDE | USB driver missing or charge-only cable | Install the CP210x or CH340 driver, use a data USB cable, or hold BOOT while pressing RESET |
| ESP32BLE_Chat is not in the scan list | Sketch not running or phone Bluetooth off | Press RESET on the board, turn on Bluetooth (and Location on Android 11 or older), then scan again |
| Compile error about BluetoothSerial | Classic Bluetooth example used | Use the Esp32BLE_Chat example, the ESP32 S3 Uno has BLE only |
| Sketch too big error | Default partition is too small for Bluetooth | In Tools > Partition Scheme, choose Huge APP |
| Serial Monitor shows strange characters | Wrong baud rate | Set the Serial Monitor to 115200 baud |
| Text from Serial Monitor is not sent | Line ending not set or phone not connected | Set the line ending to Newline and connect the app first |
| LED in the demo does not light | Wrong pin or LED reversed | Connect the LED long leg to D13 (GPIO12) through 220 ohm and the short leg to GND |
| Board resets when a relay or motor turns on | Power drop on the board | Power relays and motors from a separate supply and connect the grounds |