
ESP32 S3 UNO - 74HC595 4-Digit 7-Segment Display
This ESP32 S3 Uno 74HC595 4-digit 7-segment display tutorial shows you how to wire the module and drive it with only three pins. You will use the ESP32 S3 Uno form board and the DIYables_4Digit7Segment_74HC595 library in the Arduino IDE. With a few lines of code, the shift register display shows numbers, decimal values, short words, temperature and a clock.
In this tutorial, you will:
- Wire a 74HC595 4-digit 7-segment display to the ESP32 S3 Uno.
- Install the DIYables_4Digit7Segment_74HC595 library in the Arduino IDE.
- Show integers and float numbers on the 7-segment LED display.
- Display text, the degree symbol and temperature values.
- Build a HH.MM clock display with a blinking dot.
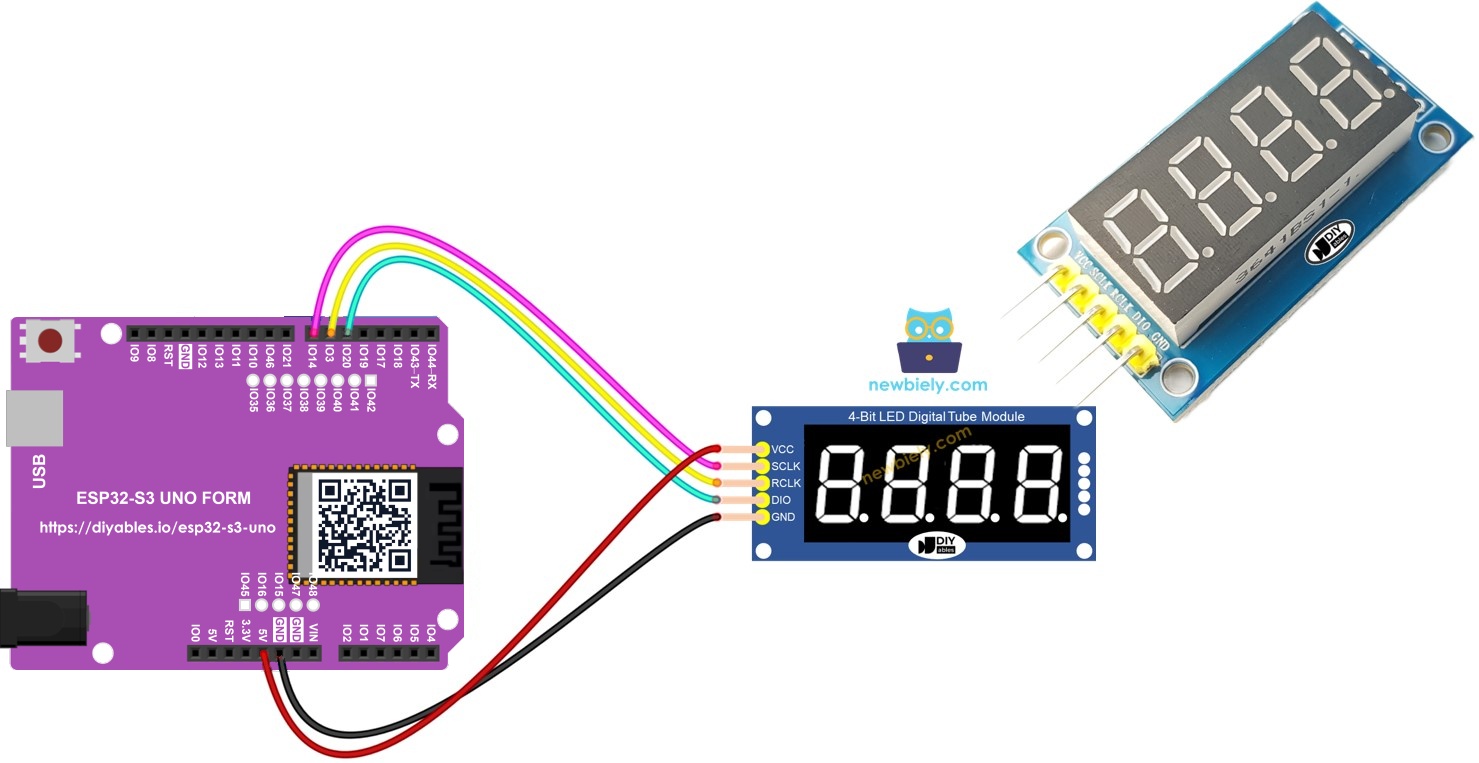
Hardware Preparation
| 1 | × | ESP32 S3 Uno-form Board | |
| 1 | × | USB Cable Type-A to Type-C (for USB-A PC) | |
| 1 | × | USB Cable Type-C to Type-C (for USB-C PC) | |
| 1 | × | 74HC595 4-digit 7-segment Display | |
| 1 | × | Jumper Wires |
Or you can buy the following kits:
| 1 | × | DIYables Sensor Kit (18 sensors/displays) |
Additionally, some of these links are for products from our own brand, DIYables .
74HC595 4-Digit 7-Segment Display Overview
Knowing how this module works helps you wire it right the first time. The board has four digits, and each digit has seven LED segments plus a decimal point. A 74HC595 shift register sits behind them, so your ESP32 S3 Uno needs only three signal pins to control all 32 LEDs.
The display is multiplexed. This means only one digit is lit at a time, but the digits switch so fast that your eyes see all four at once. The library does this work for you. You just call print() with a value and keep calling display.loop() so the digits stay refreshed.
Module Pins
| Function | Pin | Description |
|---|---|---|
| SCLK (SH_CP) | Serial Clock | Clock signal that shifts each data bit into the register |
| RCLK (ST_CP) | Register Clock | Latch that copies the shifted data to the output pins |
| DIO (DS) | Data Input | Serial data line into the shift register |
| VCC | Power | 3.3V or 5V supply |
| GND | Ground | Common ground |
ESP32 S3 Uno Pinout
The image below shows the pinout of the ESP32 S3 Uno form board. Use it to find the Uno header pins (D5, D6, D7…) and their GPIO numbers while you wire the display.

Wiring Diagram
Only five wires are needed. Connect the module to the ESP32 S3 Uno as shown in the diagram and the table below.
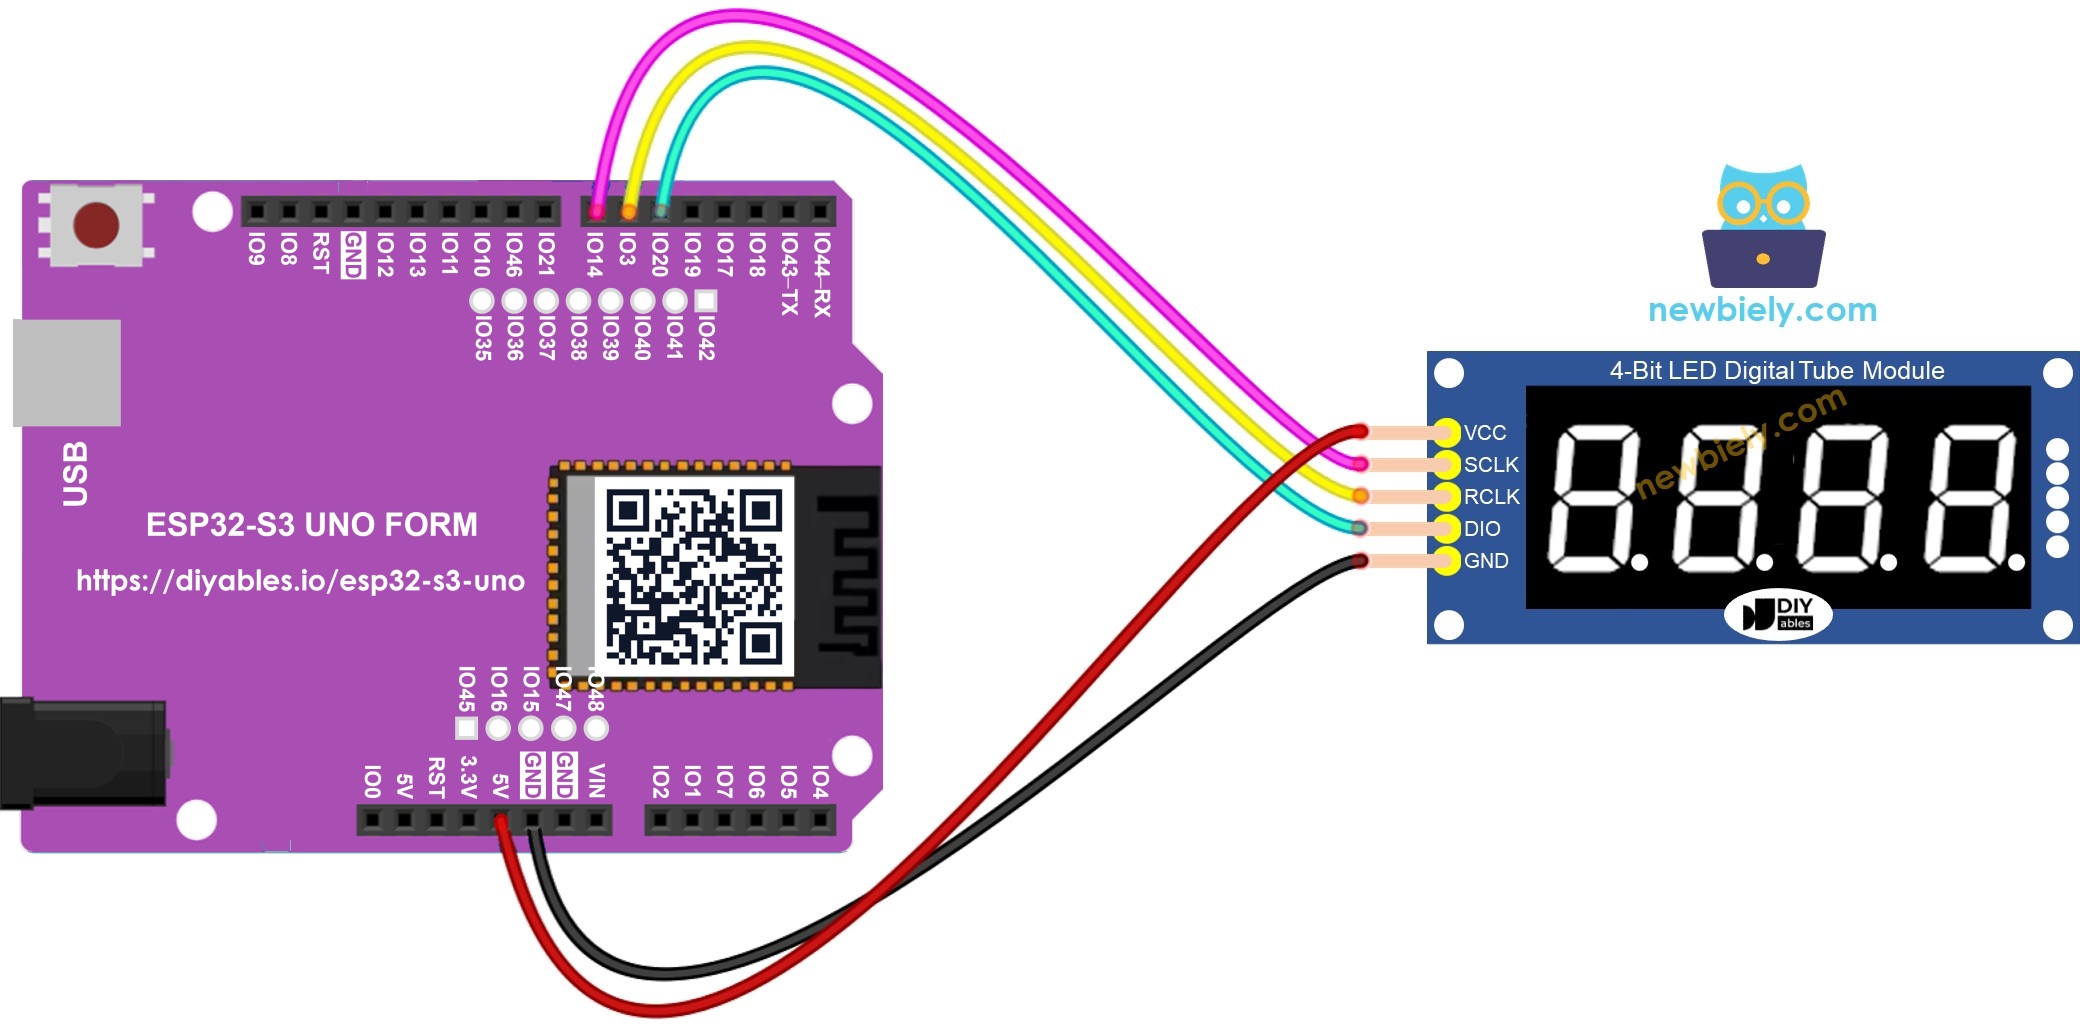
This image is created using Fritzing. Click to enlarge image
| Display Module Pin | ESP32 S3 Uno Pin |
|---|---|
| SCLK | D7 (GPIO14) |
| RCLK | D6 (GPIO3) |
| DIO | D5 (GPIO20) |
| VCC | 5V |
| GND | GND |
WARNING
D6 is GPIO3, a boot strapping pin on the ESP32 S3 Uno. The chip reads this pin at power-up. The RCLK input of the display module does not drive the pin, so it is normally safe. If your board does not boot or cannot upload code, unplug the RCLK wire from D6, upload the sketch, and then plug the wire back in.
※ NOTE THAT:
All three signal wires go OUT of the ESP32 S3 Uno into the module, so no 5V signal ever reaches the board. The ESP32 S3 Uno sends 3.3V logic, which most 74HC595 modules accept. If the digits look random or flicker when the module runs from 5V, move the VCC wire to the 3.3V pin. The module also works at 3.3V, only a little dimmer.
How to Install the Library
The DIYables library handles the shift register and the multiplexing for you, so you must install it before you upload any example.
- Connect the board. Plug the ESP32 S3 Uno into your computer with a USB Type-C cable.
- Select the board. In the Arduino IDE, choose the ESP32S3 Dev Module board and the correct COM port.
- Open the Library Manager. Click the Libraries icon in the left sidebar.
- Search for the library. Type "DIYables_4Digit7Segment_74HC595" in the search box and find the one made by DIYables.
- Install it. Click Install and pick version 2.0.0 or newer.
- Search for DIYables_4Digit7Segment_74HC595 created by DIYables.io and click the Install button.
The library has no other dependencies. It uses only standard Arduino functions, so it runs on the ESP32 S3 Uno without any change.
Minimal Sketch Structure
Every sketch in this tutorial is built on the same small skeleton. Once you understand it, the other examples are easy to read.
display.begin() runs once in setup() and sets up the three pins. After that, display.loop() must run again and again, because it lights the four digits one after another. The value you pass to print() stays on the display until you print something new.
If your code needs to wait, use display.delay(ms) instead of delay(). It waits for the same time but keeps the digits refreshed.
Display Integers
Whole numbers are the most common thing to show on a 7-segment display. This sketch steps through several values, including negative numbers, and then shows a zero-padded number.
The sketch changes the value every 2 seconds with a millis() timer, so display.loop() never stops running. It prints 0, 42, 1234, -5, -123 and 9999, and then shows 0042 with leading zeros.
How to Run
- New to the ESP32 S3 Uno? Follow ESP32 S3 Uno - Getting Started first.
- Wire it up as shown in the diagram.
- Connect the board to your computer with a USB Type-C cable.
- Open Arduino IDE, choose the ESP32S3 Dev Module board and the correct COM port.
- Copy the code above and paste it into the Arduino IDE.
- Upload the sketch by clicking the Upload button.
- Open the Serial Monitor and set the baud rate to 9600.
- Tip: if the Serial Monitor shows nothing, press the RESET button on the board once.
Method Quick Reference
| Method | What It Does | Usage |
|---|---|---|
| print(int) | Show an integer (-999 to 9999) | display.print(1234) |
| print(int, true) | Show an integer with leading zeros | display.print(42, true) |
| loop() | Refresh the display multiplexing | display.loop() |
| begin() | Set up the display pins | display.begin() |
Display Floats
Sensor readings often have a decimal part. This example shows how the library places the decimal point for you, or uses the number of decimal places you choose.
How to Run
- Paste the code into the Arduino IDE.
- Upload it to the ESP32 S3 Uno with the Upload button.
- Open the Serial Monitor to follow each step.
- Tip: watch the display and the Serial Monitor together to see how each value is formatted.
First the display picks the decimal places by itself (1.5, 12.34, 3.141, -1.20, 0.5). Then it shows values with 1 and 2 fixed decimal places, and at the end a zero-padded value, 01.50.
Display Text and Temperature
A 7-segment display can also show simple words and a temperature with a degree symbol. This sketch goes through some text, two temperatures, a custom string with the degree character and a string with dots.
How to Run
- Upload the sketch to the ESP32 S3 Uno.
- Open the Serial Monitor to see which item is on the display.
- Tip: not every letter fits on 7 segments, so short words like "HELP" or "COOL" look best.
You will see "HELP", "Hi", "COOL" and "done", then 25°C and 72°F made with printTemperature(). After that comes a string built with DEGREE_CHAR, and finally "1.2.3.4".
Display Time
A 4-digit display is perfect for a small clock. This example shows 12.30 in HH.MM style, with a dot between hours and minutes that blinks.
How to Run
- Upload the sketch to the ESP32 S3 Uno.
- Open the Serial Monitor to read the start message.
- Tip: replace the fixed hours and minutes values with data from an RTC module or NTP time to make a real clock.
printTime() is called every 500 ms, and the dot is turned on and off each time. This gives the familiar blinking separator.
Blink the Display
Blinking catches the eye, so it is useful for alarms or for values that need attention. This sketch uses off() and on() to blink three different values.
How to Run
- Upload the sketch to the ESP32 S3 Uno.
- Open the Serial Monitor to see which value is blinking.
- Tip: change the 300 ms value in the code to make the blink faster or slower.
The display blinks 1234 five times, pauses, then blinks 12.34, and then "HELP". After that the cycle starts again.
Method Quick Reference
| Method | What It Does | Usage |
|---|---|---|
| off() | Blank the display | display.off() |
| on() | Turn the display back on | display.on() |
| delay(ms) | Wait and keep the display refreshed | display.delay(2000) |
| yield() | Run one refresh cycle inside long loops | display.yield() |
Platform Support
The library uses only standard Arduino functions (pinMode, digitalWrite and millis). Because of this, it works on any Arduino-compatible board, including the ESP32 S3 Uno with the esp32 core by Espressif Systems.
FAQ
Can I power the 74HC595 display from 3.3V on the ESP32 S3 Uno?
Yes. The module works with 3.3V or 5V. At 3.3V the LEDs are a little dimmer, but the 3.3V logic from the ESP32 S3 Uno matches the shift register supply exactly. This is a good choice if the display shows random segments when powered from 5V.
Is it safe to connect this display to the ESP32 S3 Uno pins?
Yes. SCLK, RCLK and DIO are all inputs on the module, so the ESP32 S3 Uno only sends signals out. No 5V signal comes back into the board, which matters because ESP32 S3 Uno pins are NOT 5V tolerant.
Can I use other pins instead of D5, D6 and D7?
Yes. Any GPIO that can work as an output is fine. Change SCLK_PIN, RCLK_PIN and DIO_PIN in the code and always write the GPIO number, not the D label. For example, D8 is 21 and D4 is 19. Moving RCLK away from D6 (GPIO3) also avoids the boot strapping pin.
Why does the display flicker or go blank when I add more code?
The library lights one digit at a time, so display.loop() must run very often. A long delay() stops the refresh. Use display.delay() or a millis() timer instead, and call display.yield() inside long loops.
Does the same code work on the Arduino UNO R4?
Yes, the logic is the same. Only the pin numbers change. On the UNO R4 you write 7, 6 and 5, while on the ESP32 S3 Uno you write the GPIO numbers 14, 3 and 20 for the same header positions.
What if my project needs more displays or sensors than the Uno headers allow?
The ESP32 S3 Uno has two extra rows of holes with more GPIOs. GPIO15 and GPIO16 support I/O, PWM and analog. GPIO45 and GPIO35 to GPIO42 support I/O and PWM. GPIO47 and GPIO48 are output only, with PWM. Solder pin headers to use them and write the GPIO number in your code. For a second display, the output-capable pins GPIO35 to GPIO42 are a good fit. Be careful with two things. First, GPIO47 and GPIO48 may run at 1.8V instead of 3.3V on some modules (especially ones with "V" in the name, such as R8V or R16V), so 3.3V devices can be damaged or act strangely. Second, GPIO0, GPIO3 (D6), GPIO45 and GPIO46 (D9) are boot strapping pins, and a wrong connection can stop the board from booting or uploading code. Use the other extra pins first.
Troubleshooting
| Problem | Possible Cause | Solution |
|---|---|---|
| No COM port appears in the Arduino IDE | USB driver missing or board not in upload mode | Install the CP210x or CH340 driver, try another USB cable, or hold BOOT while you press RESET |
| Upload fails or the board does not boot | RCLK wire on D6 (GPIO3) affects the boot strapping pin | Unplug the RCLK wire, upload the sketch, then plug it back in |
| Nothing shows on the display | Loose VCC or GND wire, or pins in code do not match the wiring | Check power and ground, confirm SCLK is GPIO14, RCLK is GPIO3 and DIO is GPIO20, and make sure begin() and display.loop() are called |
| Random or wrong segments light up | Module is common cathode, or 3.3V logic is too weak for the 5V supply | Pass false as the fourth argument for a common cathode module, or power VCC from 3.3V |
| Display flickers or goes blank | delay() blocks the multiplexing | Use display.delay() or a millis() timer instead of delay() |
| Compile error about DIYables_4Digit7Segment_74HC595.h | Library is not installed | Install DIYables_4Digit7Segment_74HC595 version 2.0.0 or newer from the Library Manager |
| Serial Monitor shows strange characters | Wrong baud rate | Set the Serial Monitor to 9600 baud |