
ESP32 S3 UNO - Light Sensor Control Relay
This ESP32 S3 Uno light sensor relay tutorial shows you how to switch a relay on and off from the light level around the ESP32 S3 Uno form board. You can use a raw LDR photoresistor or an LDR light sensor module. When it gets dark, the relay turns on, so a light bulb, LED strip, motor or solenoid lock can start working by itself.
In this tutorial, you will:
- Wire an LDR light sensor and a relay module to the ESP32 S3 Uno
- Read the light level with analogRead() and compare it with a threshold
- Use a digital LDR module output to control a relay
- Upload the Arduino code from Arduino IDE and test it
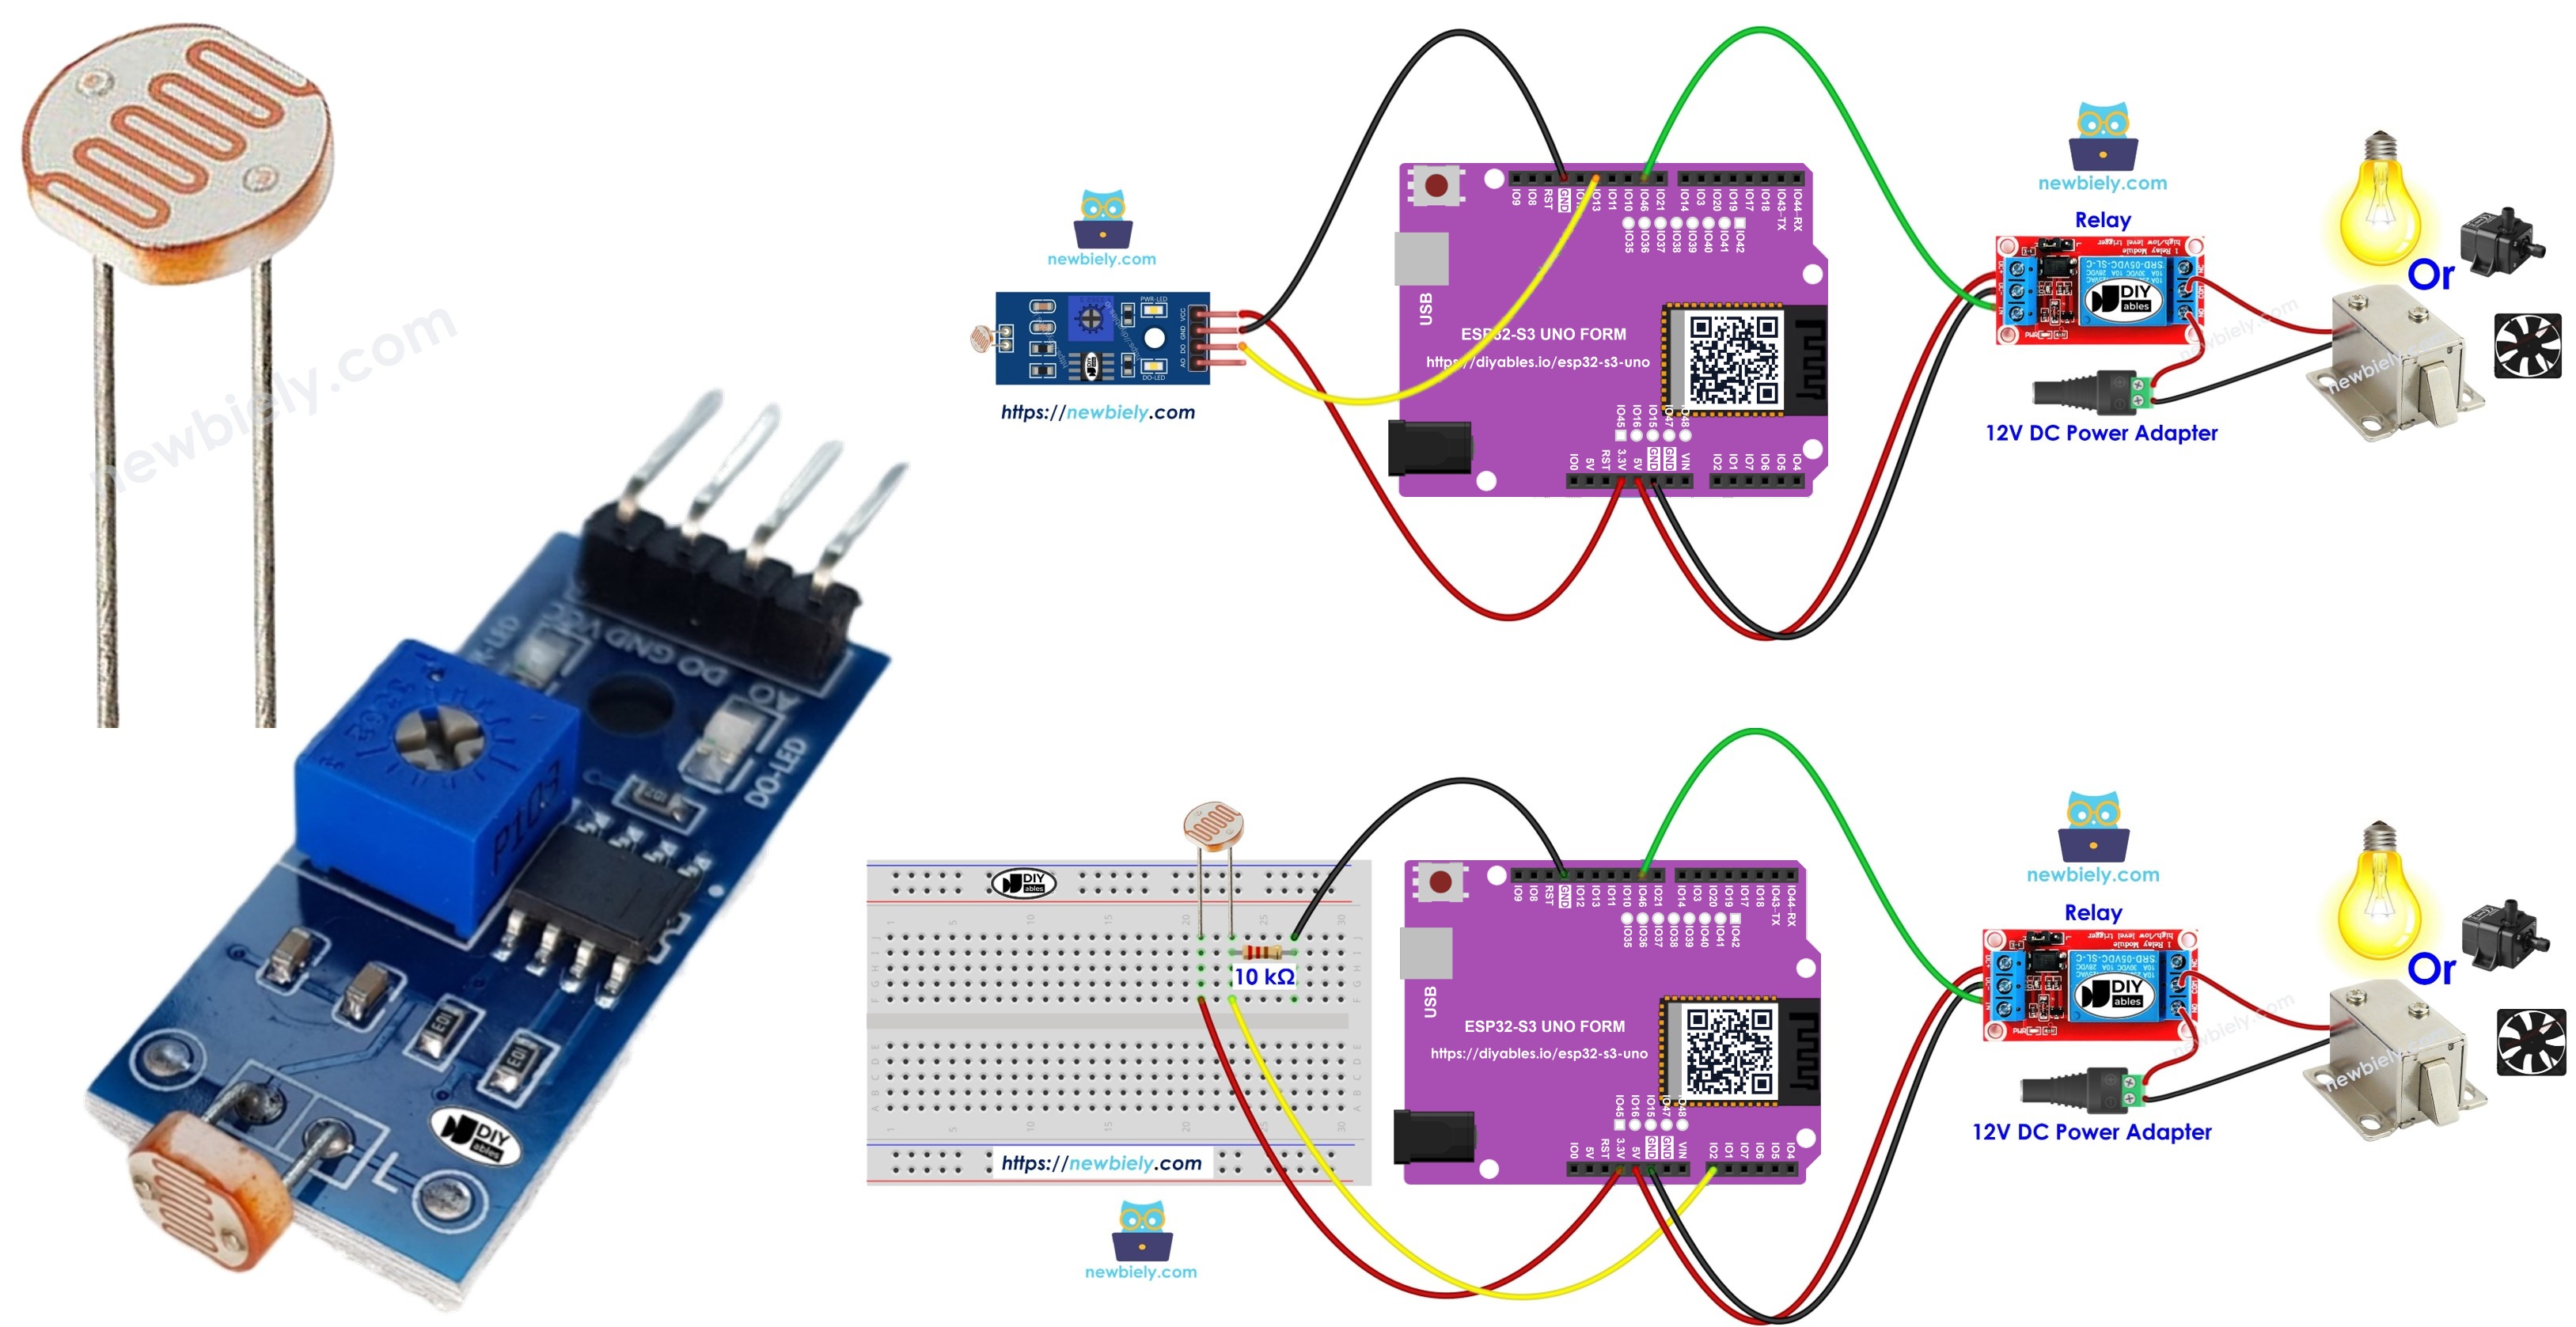
Hardware Preparation
Or you can buy the following kits:
| 1 | × | DIYables Sensor Kit (18 sensors/displays) |
Additionally, some of these links are for products from our own brand, DIYables .
A bare LDR light sensor is very cheap, but you need an extra resistor to wire it. If you want a simpler circuit, pick an LDR light sensor module instead. It has the resistor on board and gives you a digital output.
Overview of Relay and Light Sensor
This project joins two parts you may already know. If one of them is new to you, read its own tutorial first. You will learn the pinout, how it works and how to code it.
In short, the light sensor tells the board how bright it is. The relay is an electric switch that the board can turn on and off. The ESP32 S3 Uno sits in the middle and decides when the relay should switch.
ESP32 S3 Uno Pinout
The image below shows the pinout diagram of the ESP32 S3 Uno form board. Use it to find the A0, D9 and D12 headers and their GPIO numbers when you wire the circuit.

Wiring Diagram
There are two ways to build this project. Choose the diagram that matches your light sensor. In both cases the relay input goes to D9 (GPIO46).
Option 1 - Raw LDR light sensor (analog)
The photoresistor and the 10 kΩ resistor form a voltage divider. Their middle point goes to A0.
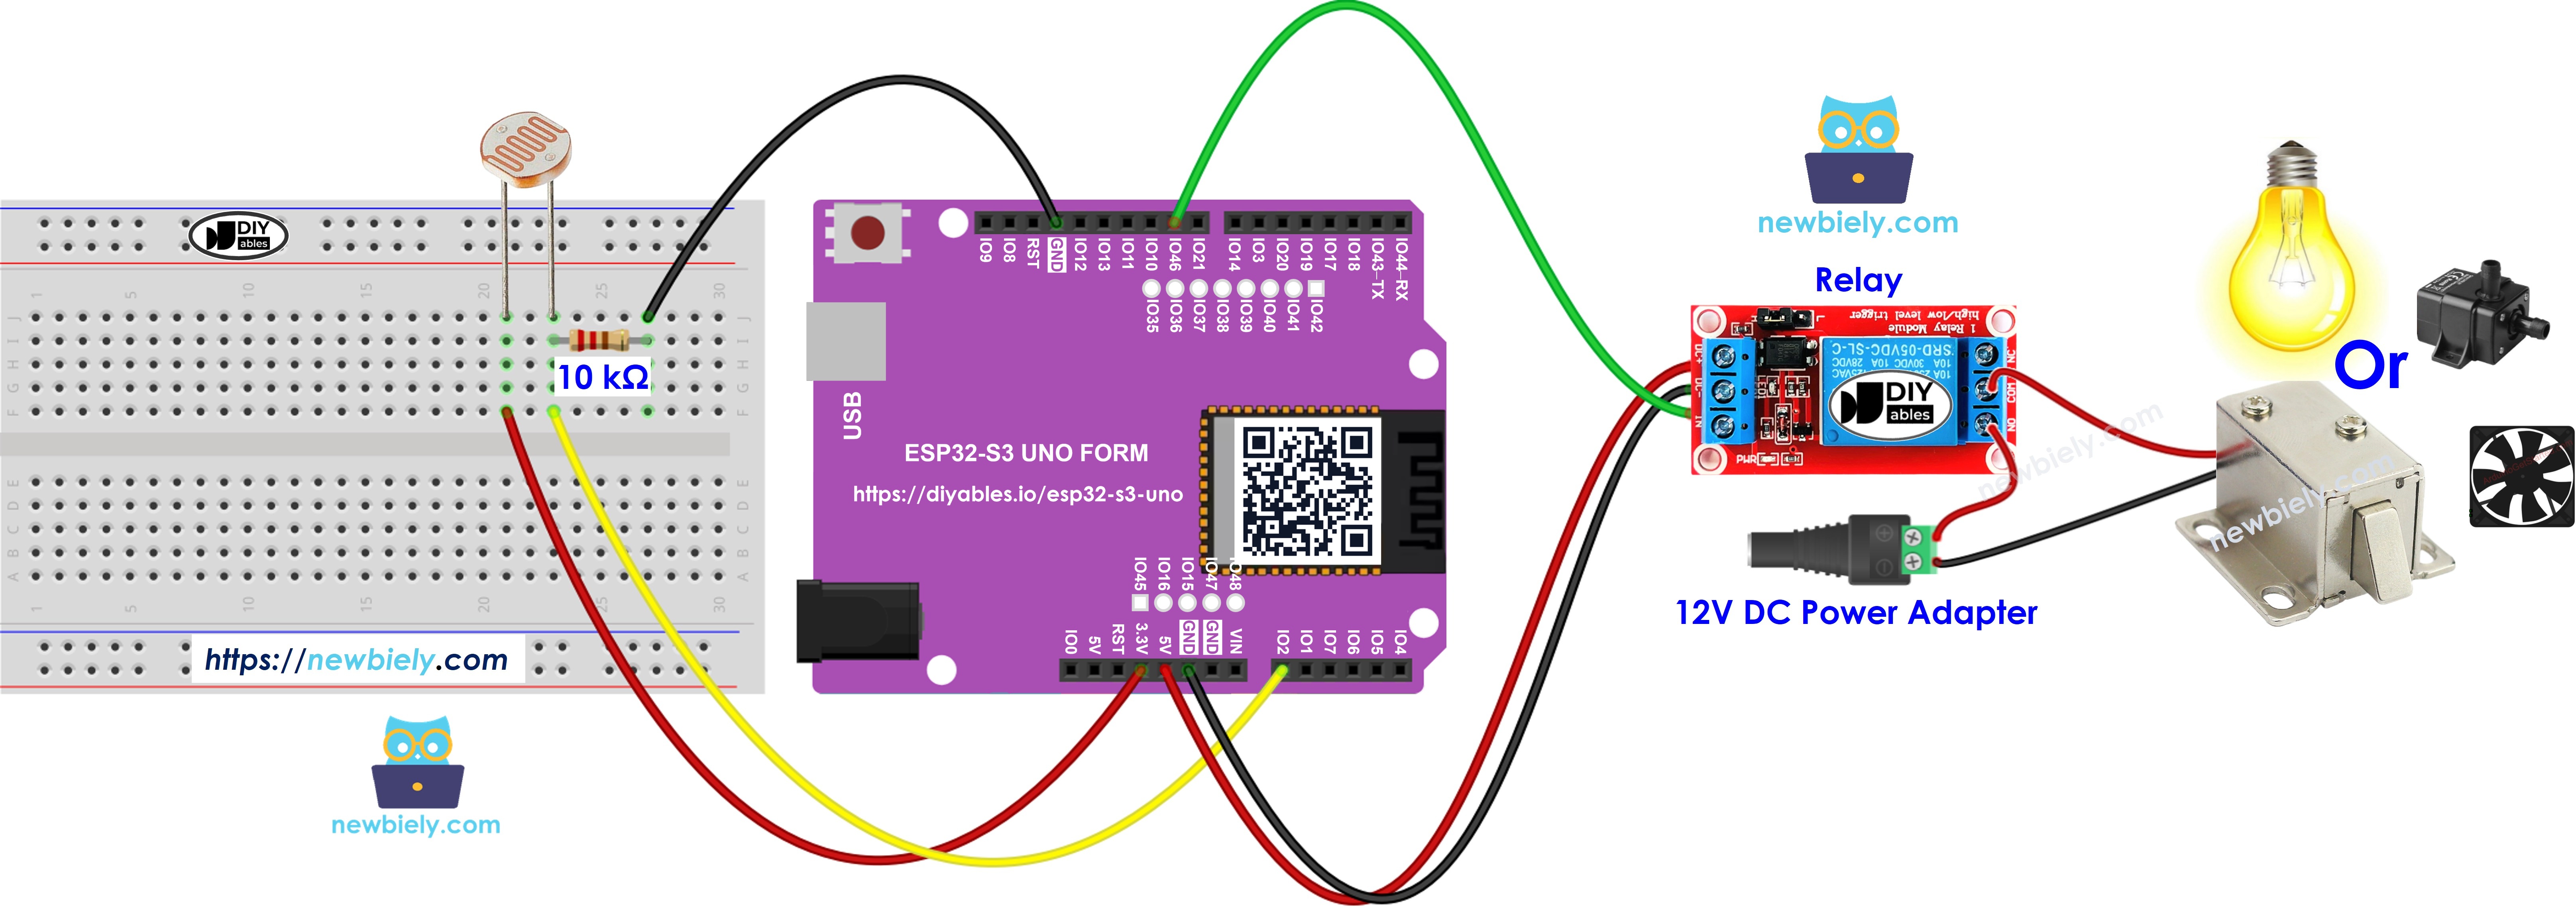
This image is created using Fritzing. Click to enlarge image
| Component Pin | ESP32 S3 Uno Pin |
|---|---|
| Light sensor pin 1 | 3.3V |
| Light sensor pin 2 | A0 (GPIO2) |
| 10 kΩ resistor, end 1 | A0 (GPIO2) |
| 10 kΩ resistor, end 2 | GND |
| Relay VCC | 5V |
| Relay GND | GND |
| Relay IN | D9 (GPIO46) |
Option 2 - LDR light sensor module (digital)
The module has its own resistor and comparator. Its DO pin goes to D12.
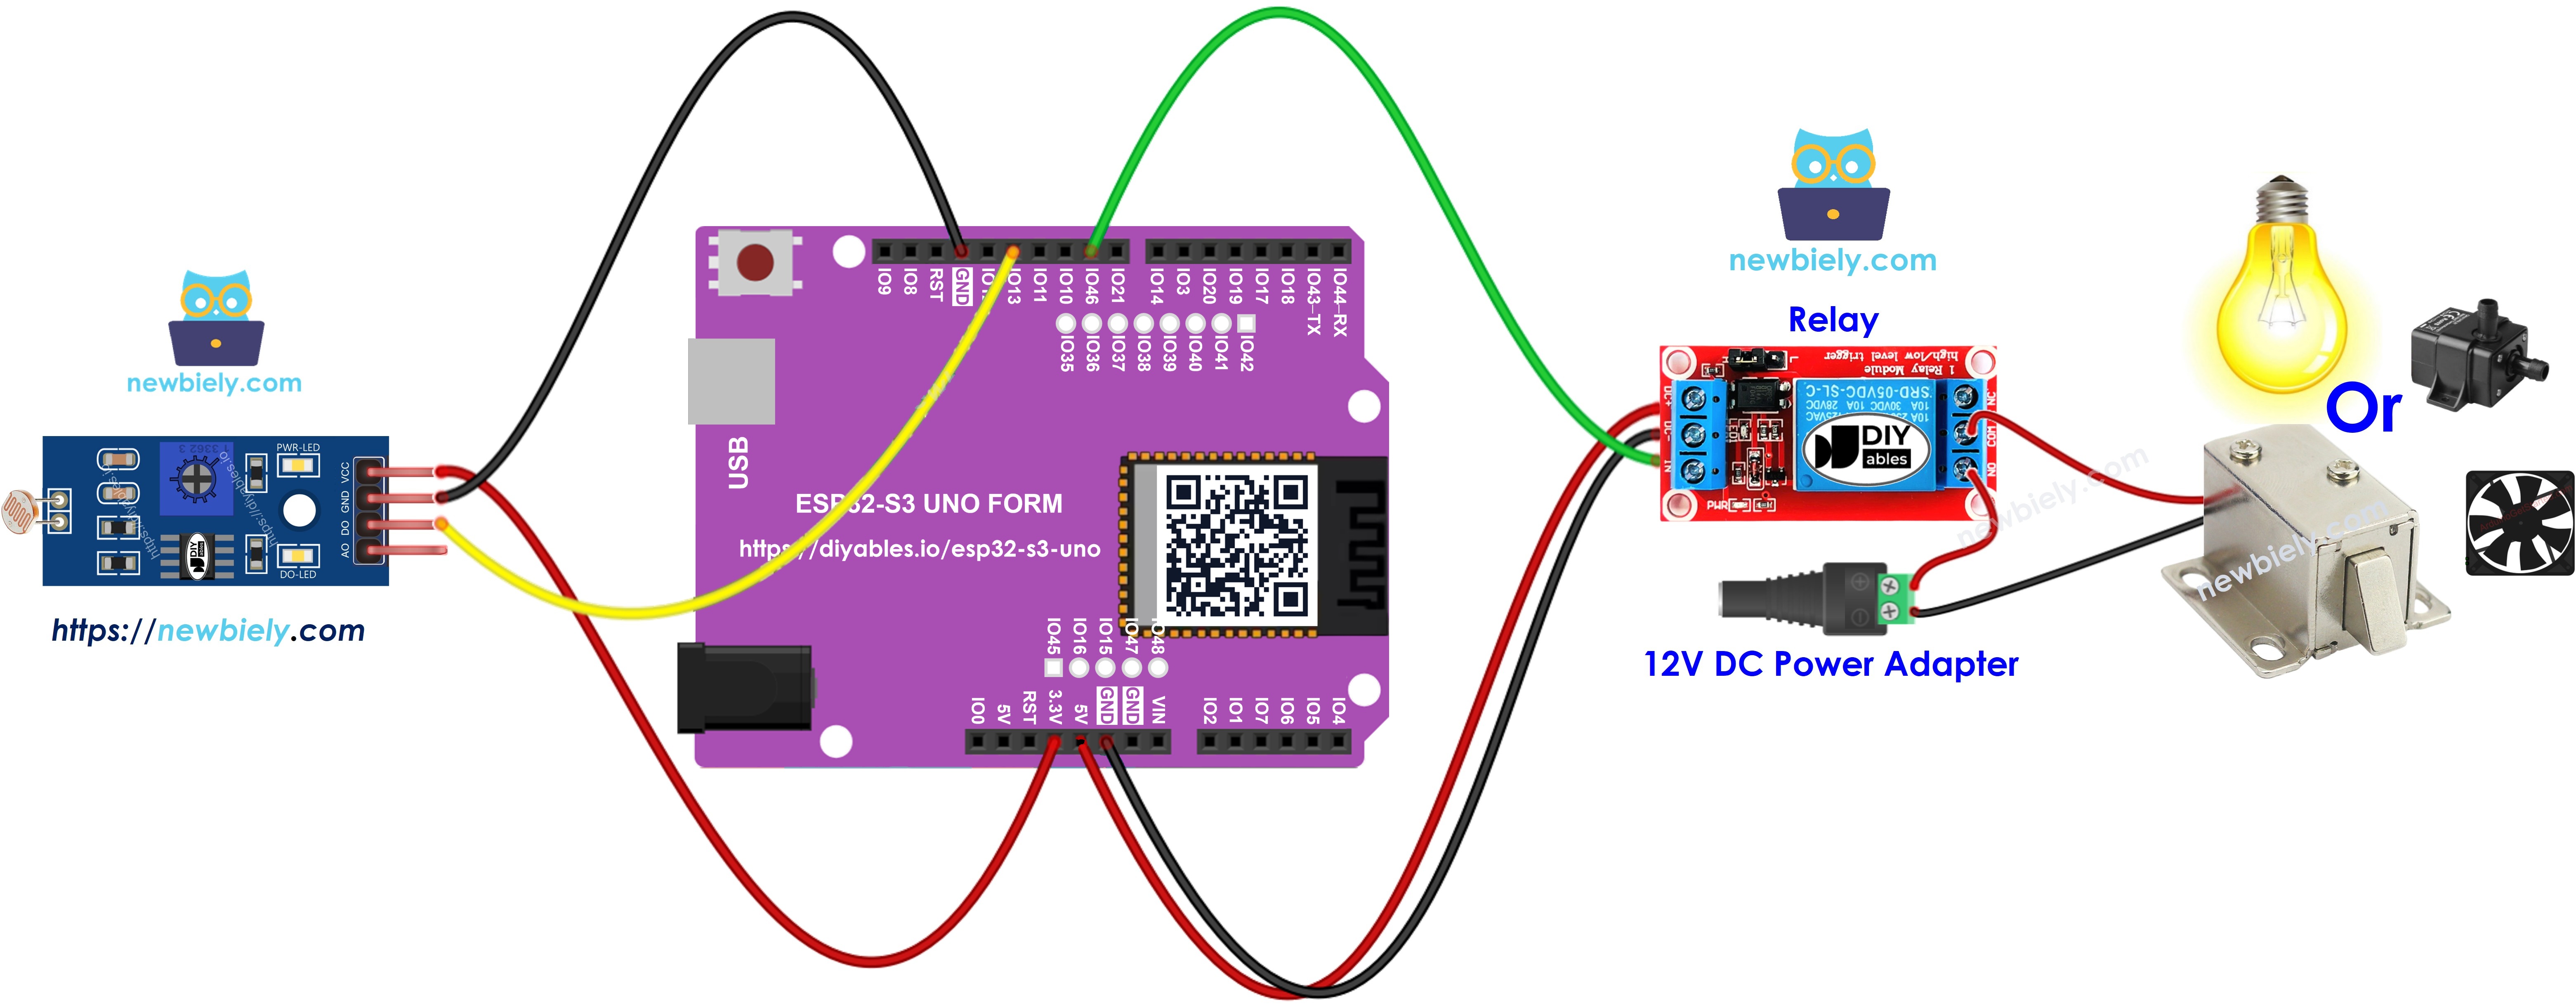
This image is created using Fritzing. Click to enlarge image
| Component Pin | ESP32 S3 Uno Pin |
|---|---|
| LDR module VCC | 3.3V |
| LDR module GND | GND |
| LDR module DO | D12 (GPIO13) |
| Relay VCC | 5V |
| Relay GND | GND |
| Relay IN | D9 (GPIO46) |
WARNING
D9 is GPIO46 on the ESP32 S3 Uno. It is a boot strapping pin. The board reads it at startup to pick the boot mode. Some relay modules pull their IN pin up or down, and this can stop the board from booting or uploading code. If that happens, unplug the relay IN wire, upload the code, and then plug it back in.
WARNING
Power the light sensor or the LDR module from 3.3V, not 5V. The ESP32 S3 Uno pins are NOT 5V tolerant. A 5V signal on A0 (GPIO2) or D12 (GPIO13) can damage the board. The relay module may use 5V on its VCC pin, because its IN pin only receives a signal from the board.
If you use the optional solenoid lock, connect it to the relay's COM and NO screw terminals, together with the 12V power adapter and the DC power jack. Never power the lock from the ESP32 S3 Uno.
ESP32 S3 Uno Code
There are two sketches, one for each wiring option. Both of them turn the relay on when it is dark and turn it off when there is light.
Code for the raw LDR light sensor
This sketch reads A0 (GPIO2) again and again. When the value is lower than the threshold (2000), it is dark, so the relay turns on. Otherwise, the relay turns off.
In setup(), the code calls analogSetAttenuation(ADC_11db). By default, the ESP32 S3 Uno ADC can only measure a small voltage. With 11 dB attenuation, the analog pin can read the full range, from 0V up to about 3.3V. Without this line, the readings reach 4095 too early and the light values look wrong.
The threshold of 2000 is the old 0 to 1023 value of 500 scaled up for the 12-bit ADC (0 to 4095). Change it to fit the light in your room.
Code for the LDR light sensor module
This sketch reads the digital DO pin on D12 (GPIO13). The module outputs HIGH when there is no light, so the relay turns on. It also prints the state to the Serial Monitor.
Detailed Instructions
Follow these steps in order:
- New to the ESP32 S3 Uno? Follow ESP32 S3 Uno - Getting Started first.
- Wire it up as shown in the diagram that matches your sensor.
- Connect the board to your computer with a USB Type-C cable.
- Open Arduino IDE, choose the ESP32S3 Dev Module board and the correct COM port.
- Copy the code for your sensor and paste it into Arduino IDE.
- Upload the code by clicking the Upload button.
- Shine a light on the sensor, then cover it with your hand.
- Watch the relay. It clicks on in the dark and clicks off in the light.
- Open the Serial Monitor at 9600 baud if you use the LDR module sketch.
- Tip: On the LDR module, turn the small blue potentiometer to set how dark it must be before the relay switches.
Code Explanation
Each line of the two sketches has a comment that says what it does. Read the comments in the code above to follow the logic step by step.
Video Tutorial
Watch the video below to see this ESP32 S3 Uno project step by step.
FAQ
Can I power the relay module from the 3.3V pin of the ESP32 S3 Uno?
Most relay modules have a 5V coil, so power their VCC from the 5V pin. The IN pin can still take the 3.3V signal from the ESP32 S3 Uno on most modules. If your relay does not click, use a 3V relay module or a module with a transistor driver.
Why is the threshold 2000 and not 500 like on the UNO R4?
The ESP32 S3 Uno has a 12-bit ADC, so analogRead() returns 0 to 4095. The UNO R4 sketch used 0 to 1023. The value 500 times 4 is about 2000, so the switch point stays about the same.
Why does the code call analogSetAttenuation(ADC_11db)?
It sets the ESP32 S3 Uno ADC input range to about 0 to 3.3V, so the full light sensor signal maps to 0 to 4095. Without it the range is smaller and readings saturate early. The UNO R4 does not need this line, as it is ESP32-only. Keep the sensor output at 3.3V or less.
Is it safe to use D9 for the relay?
D9 is GPIO46, a boot strapping pin. It works fine as an output after the board starts. But if the relay module holds this pin at a wrong level during startup, the board may not boot or upload. If you have problems, unplug the relay IN wire while you upload code.
What if my project needs more pins than the Uno headers give?
The ESP32 S3 Uno has two extra rows of holes with more GPIOs. GPIO15 and GPIO16 are I/O, PWM and analog. GPIO45 and GPIO35 to GPIO42 are I/O and PWM. GPIO47 and GPIO48 are output only, with PWM. Solder pin headers to use them and write the GPIO number in code. For a second light sensor, use GPIO15 or GPIO16. For more relays, GPIO35 to GPIO42 are a good choice. Be careful with two things. First, GPIO47 and GPIO48 may run at 1.8V instead of 3.3V on some modules (especially ones with "V" in the name, like R8V or R16V), so 3.3V devices can be damaged or act strangely. Second, GPIO0, GPIO3 (D6), GPIO45 and GPIO46 (D9) are boot strapping pins, and a wrong connection can stop the board from booting or uploading code. Use the other extra pins first.
Can I switch a 220V lamp with this relay?
The relay can switch mains power, but mains voltage is dangerous. Only do it if you know how to work safely with high voltage. For learning, use a 12V solenoid lock or a 12V LED strip instead.
Troubleshooting
| Problem | Possible Cause | Solution |
|---|---|---|
| No COM port in Arduino IDE | USB driver is missing or the board is not in upload mode | Install the CP210x or CH340 driver, or hold BOOT while pressing RESET |
| Upload fails or the board does not start | The relay module holds D9 (GPIO46) at a wrong level at boot | Unplug the relay IN wire, upload, then plug it back in |
| Relay never switches | Relay VCC or GND is not connected, or the relay needs 5V | Power the relay VCC from 5V and check the GND wire |
| Relay is always on or always off | The threshold does not match your room light | Print the analogRead() value and set the threshold between the dark and light values |
| Readings stay at 4095 | analogSetAttenuation(ADC_11db) is missing or the sensor gets 5V | Keep the attenuation line and power the sensor from 3.3V |
| Relay works the opposite way | The relay module is active LOW | Swap HIGH and LOW in the digitalWrite() lines |
| LDR module never changes state | The module sensitivity is set too high or too low | Turn the small potentiometer on the module while you cover the sensor |
| Serial Monitor shows strange characters | Wrong baud rate | Set the Serial Monitor to 9600 baud |