
ESP32 S3 UNO - Micro SD Card
This ESP32 S3 Uno Micro SD Card tutorial shows you how to store and load files with an SD card module and the ESP32 S3 Uno form board. You will log text to a file, read it back character by character or line by line, and replace old data, all with simple Arduino code.
In this tutorial, you will:
- Wire a Micro SD Card module to the ESP32 S3 Uno over SPI
- Create a file on the Micro SD Card if it does not exist yet
- Write data to a file and read it back, one character at a time
- Read a text file line by line
- Append to a file, or overwrite it with new content
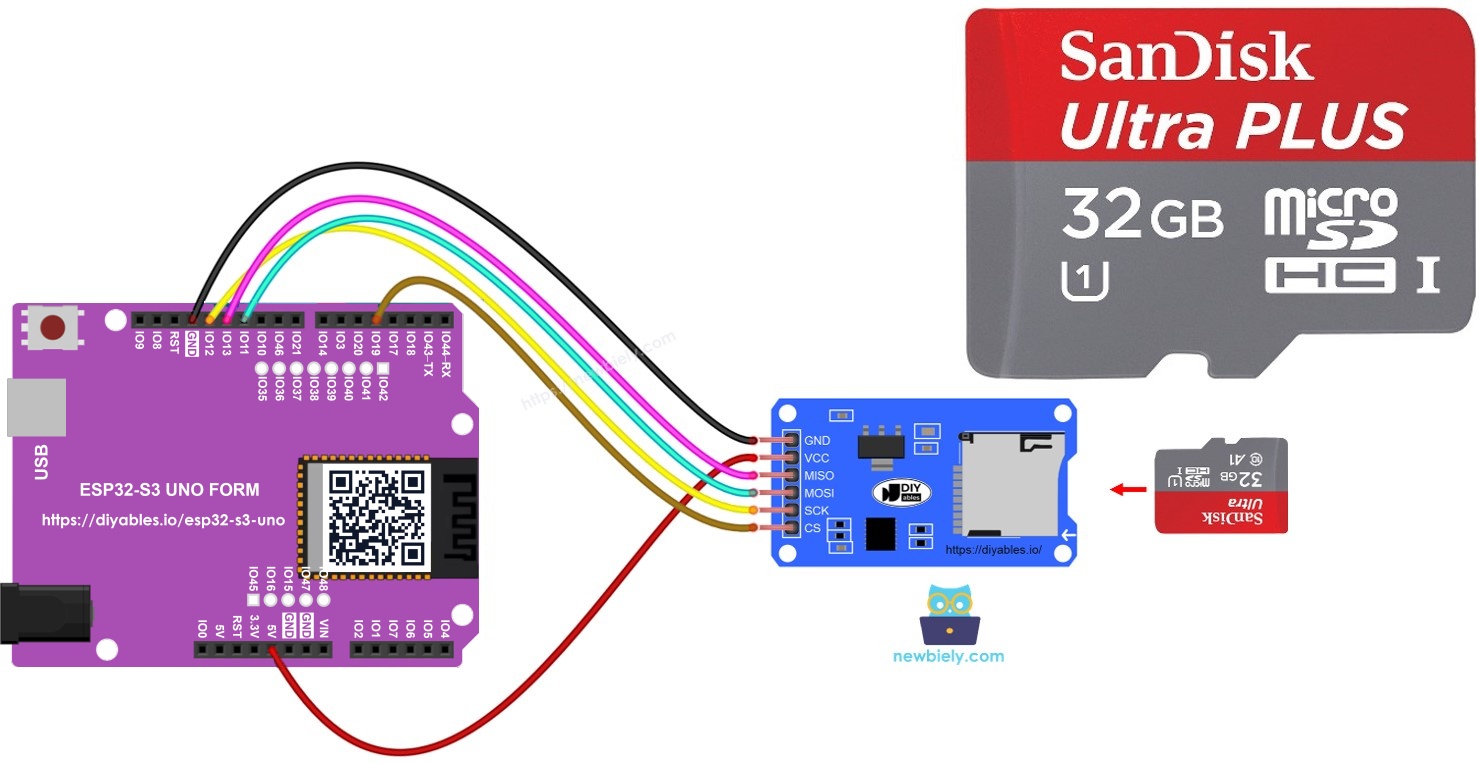
Hardware Preparation
Or you can buy the following kits:
| 1 | × | DIYables Sensor Kit (18 sensors/displays) |
Additionally, some of these links are for products from our own brand, DIYables .
Overview of Micro SD Card Module
A microcontroller has very little memory of its own, so a Micro SD Card is a cheap way to save a lot of data. The Micro SD Card Module is the bridge between the two: it holds the card and lets the ESP32 S3 Uno talk to it over the SPI bus.
You can use it for data logging, saving settings, or keeping files that your project reads at startup.
Pinout
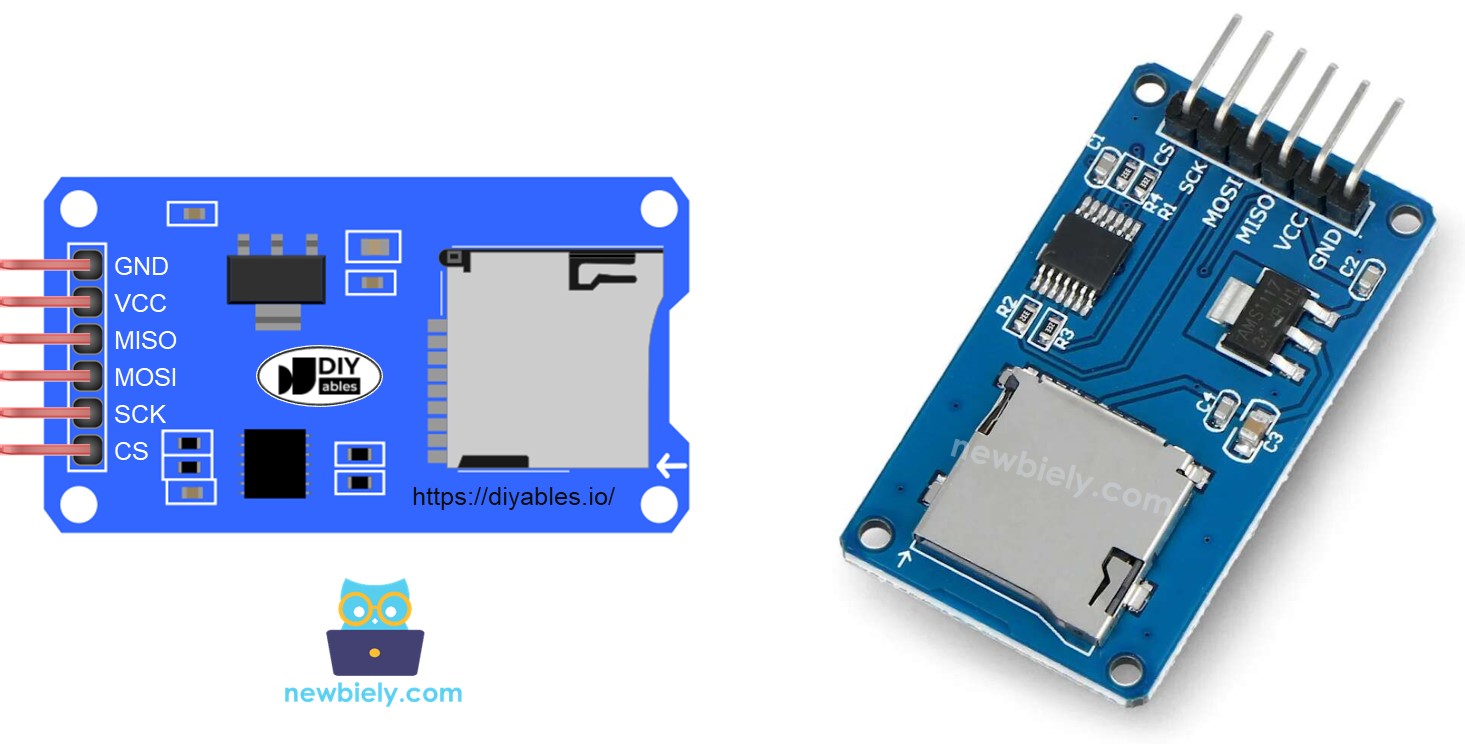
The module has 6 pins. Two of them are for power, and four are for SPI communication.
Power pins
The VCC pin goes to the 5V pin of the ESP32 S3 Uno, and the GND pin goes to GND. The module has its own 3.3V regulator for the card.
SPI pins
The MISO, MOSI and SCK pins connect to the matching SPI pins of the ESP32 S3 Uno. On this board, D11, D12 and D13 are the default SPI pins, just like on a classic Uno layout.
SS (chip select) pin
The SS pin (also called CS) tells the card when the board is talking to it. You can wire it to any free digital pin, as long as you use the same pin in the code. This tutorial uses D4 (GPIO19).
Preparation
Before you start, get the card ready on your computer. This saves you from the most common "SD card failed" error.
- Put the Micro SD Card into a USB 3.0 SD Card Reader and plug it into your computer.
- Make sure the card is formatted as FAT16 or FAT32. If not, format it with your computer's disk tool.
ESP32 S3 Uno Pinout
The image below shows the pinout diagram of the ESP32 S3 Uno form board. Use it to find the Uno header pins (D4, D11, D12, D13) and their GPIO numbers when you wire the SD card module.

Wiring Diagram
Connect the module as shown below. The SPI lines use the D11 to D13 headers, and the chip select line uses D4.
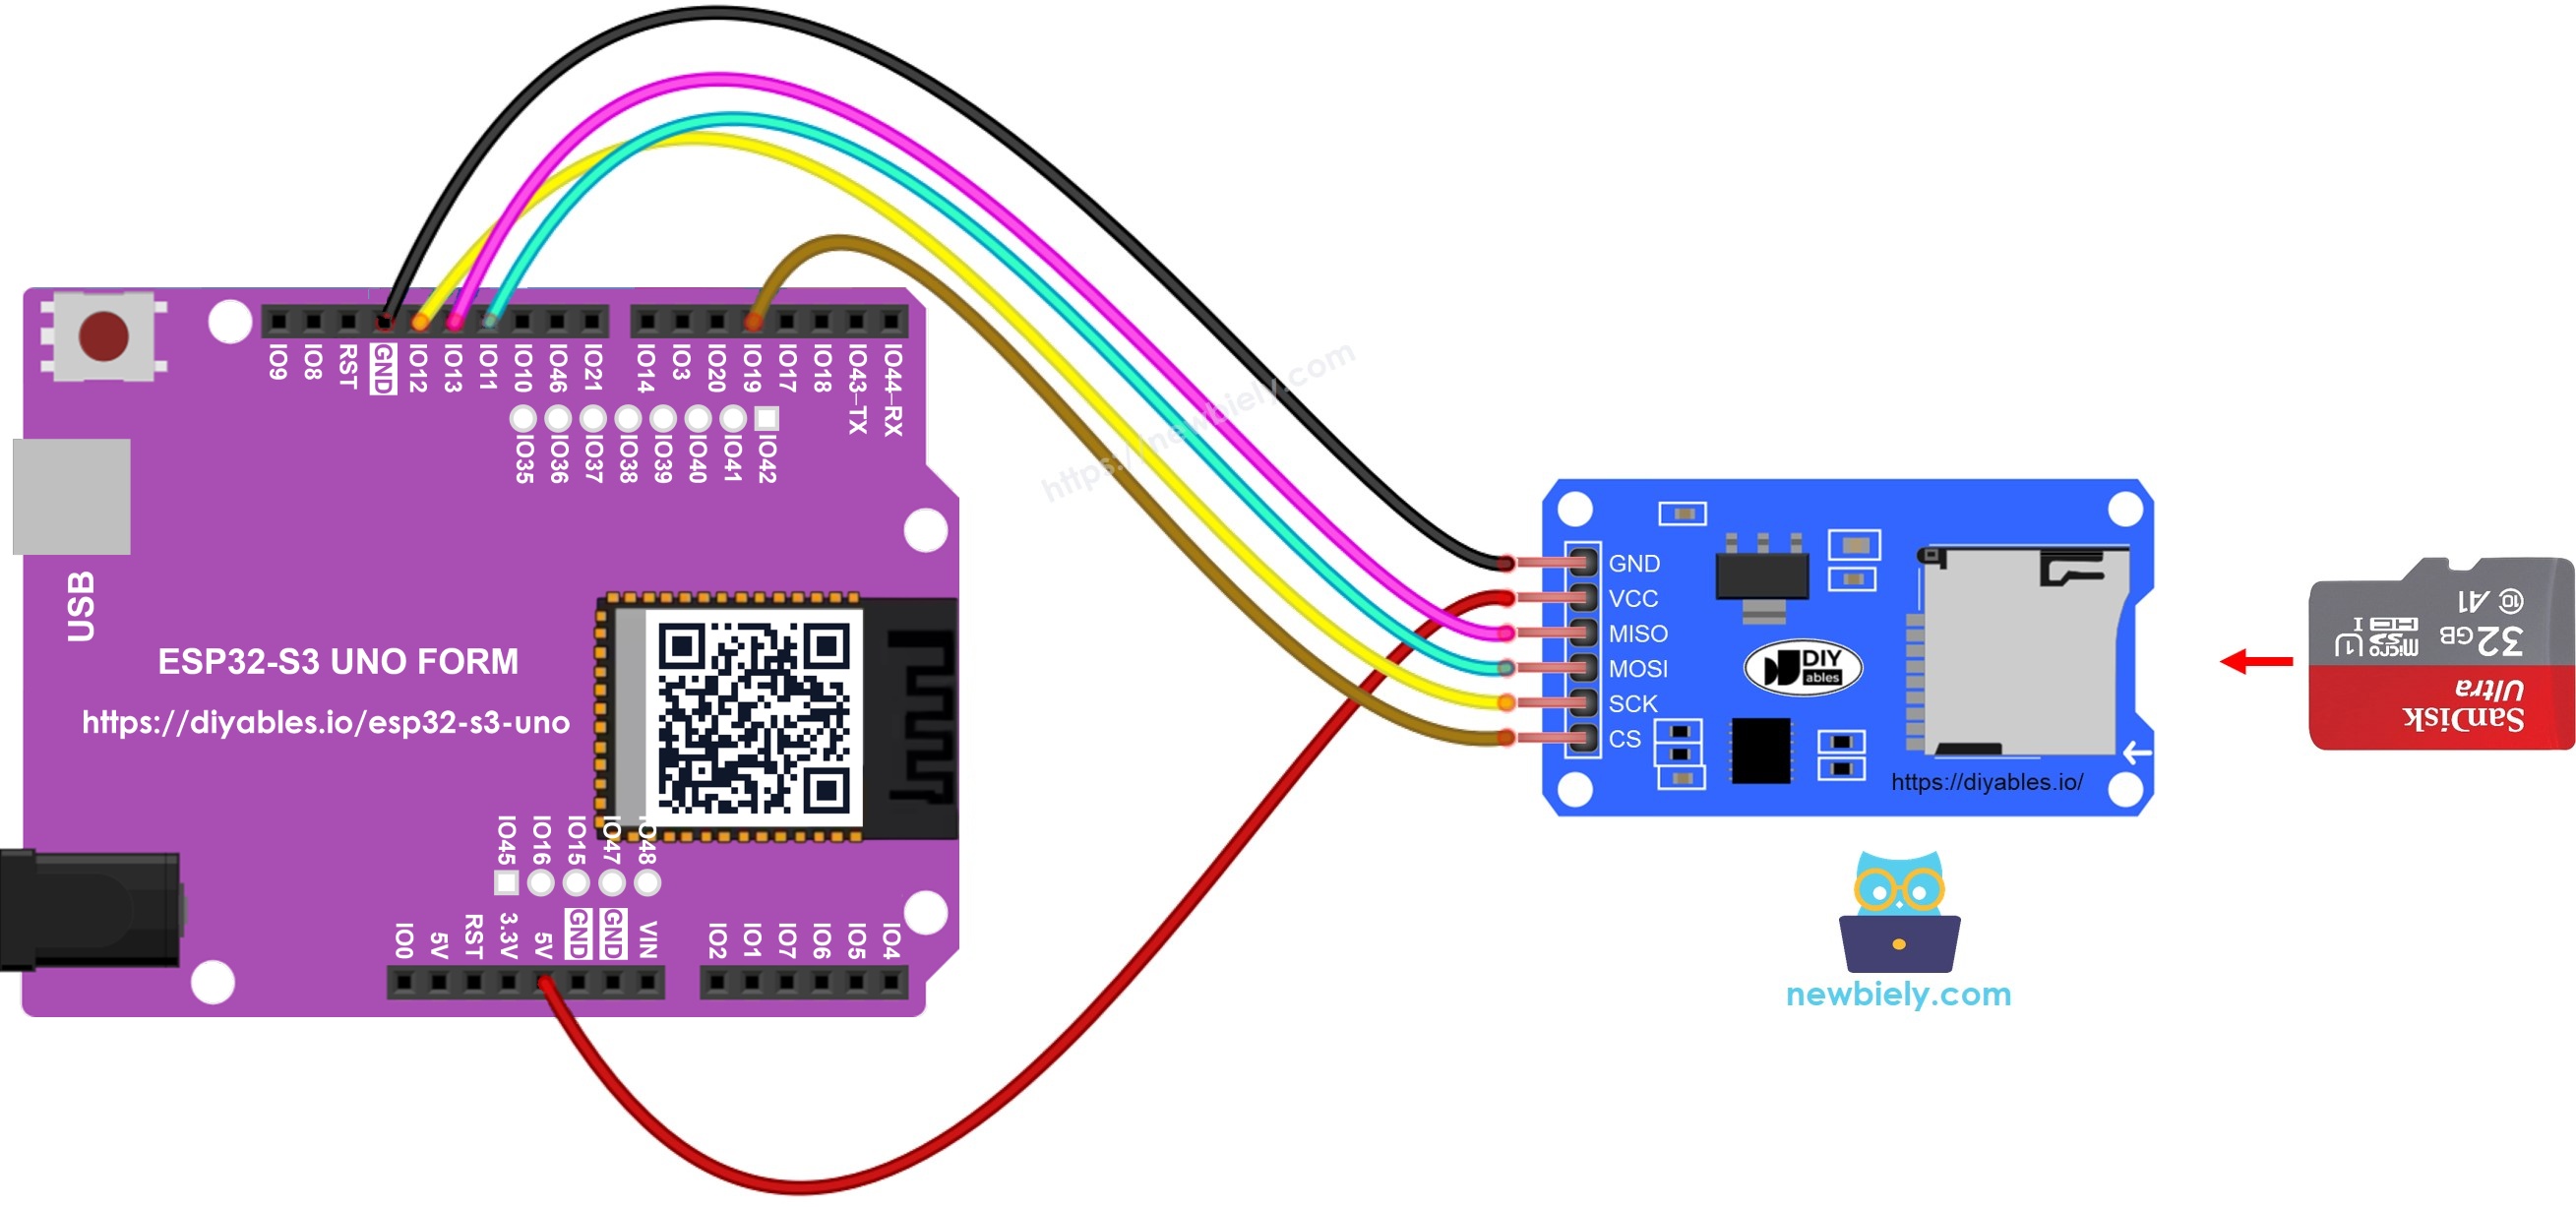
This image is created using Fritzing. Click to enlarge image
| Micro SD Card Module Pin | ESP32 S3 Uno Pin |
|---|---|
| VCC | 5V |
| GND | GND |
| MISO | D12 (GPIO13) |
| MOSI | D11 (GPIO11) |
| SCK | D13 (GPIO12) |
| SS (CS) | D4 (GPIO19) |
WARNING
The ESP32 S3 Uno pins are 3.3V only and are NOT 5V tolerant. The common Micro SD Card Module has a level-shifter chip, so its MISO output is 3.3V even when VCC is 5V. If your module has no level shifter (a bare SD card socket), power it from 3.3V, never from 5V.
※ NOTE THAT:
If you have a shield with a Micro SD Card slot (for example, an Ethernet shield), you can use the slot on the shield instead of a separate module. Check that the shield uses D11 to D13 for SPI and D4 for CS. Some shields take SPI only from the ICSP header, and those may not work on this board.
ESP32 S3 Uno - How to open a file on Micro SD Card and create if not existed
The first step in any SD card project is to open a file. This sketch checks whether a file named arduino.txt exists on the card, and creates an empty one if it does not.
ESP32 S3 Uno Code
The sketch starts the SD card on the CS pin, then uses SD.exists() to look for the file. If the file is missing, it opens the file in write mode and closes it right away, which creates an empty file.
On the ESP32 S3 Uno, every file path must start with a slash, like "/arduino.txt". Many other boards accept "arduino.txt", but the SD library in the ESP32 core needs the full path from the root folder. Without the slash, SD.open() and SD.exists() fail.
Detailed Instructions
- New to the ESP32 S3 Uno? Follow ESP32 S3 Uno - Getting Started first.
- Insert the card into the Micro SD Card module.
- Wire it up as shown in the diagram.
- Connect the board to your computer with a USB Type-C cable.
- Open Arduino IDE, choose the ESP32S3 Dev Module board and the correct COM port.
- Open the Serial Monitor and set the baud rate to 9600.
- Copy the code above and paste it into the Arduino IDE. The SD library is built into the ESP32 core, so you do not need to install anything.
- Upload the code by clicking the Upload button.
- Check the Serial Monitor. After the first upload, you should see:
- Press the RESET button to run the sketch again. Now the file is already there:
※ NOTE THAT:
If you open the Serial Monitor after the first upload has finished, you may miss the output. Press the RESET button on the board to run the sketch again.
- Check the file on your computer. Take the card out of the module, put it in the USB SD Card reader, plug it into your computer, and look for arduino.txt.
- Tip: change the file name in the code (keep the "/" at the start) and upload again to create a second file.
ESP32 S3 Uno - How to write/read data to/from a file on Micro SD Card
Writing and reading are the two jobs you will do most often. This sketch adds two lines of text to arduino.txt, then reads the whole file back and prints it on the Serial Monitor one character at a time.
Notice that the file is opened with FILE_APPEND, not FILE_WRITE. On many other Arduino boards, FILE_WRITE adds new data to the end of the file. On the ESP32 S3 Uno, FILE_WRITE erases the file first, and FILE_APPEND is the mode that adds to the end. That is why this sketch uses FILE_APPEND.
After you upload the code, the Serial Monitor shows the file content:
※ NOTE THAT:
The new text is added to the end of the file each time the sketch runs. If you reset the ESP32 S3 Uno, the two lines are written again, so you will see more lines:
You can also take the card out and open arduino.txt on your computer with a USB SD Card reader.
ESP32 S3 Uno - How to read a file on Micro SD Card line-by-line
Reading one line at a time is handy when each line holds one record, such as one sensor reading or one setting. This sketch appends the same two lines, then reads the file with readBytesUntil() and prints each line with its number.
The buffer holds up to 100 characters per line. If your lines are longer, make the line array and the limit in readBytesUntil() bigger.
The Serial Monitor shows:
※ NOTE THAT:
If the file already had content from an earlier sketch, you will see more lines, because this sketch also adds to the end of the file.
ESP32 S3 Uno - How to overwrite a file on Micro SD Card
Sometimes you want a fresh file instead of a growing one, for example to save only the latest settings. The simple way is to delete the old file and then create a new one with the same name.
The sketch calls SD.remove("/arduino.txt") first, then opens the file with FILE_WRITE and writes two new lines. On the ESP32 S3 Uno, FILE_WRITE also starts from an empty file by itself, but the delete step keeps the idea clear and works the same on other boards.
The Serial Monitor shows:
- Press the RESET button on the ESP32 S3 Uno.
- Check the Serial Monitor again. The content stays at two lines, because the old file is replaced every time.
You can also take the card out and check arduino.txt on your computer with a USB SD Card reader.
Video Tutorial
Watch the video below to see this ESP32 S3 Uno project step by step.
Function References
These pages explain the functions used in this tutorial in more detail.
FAQ
Why does the file name start with "/" on the ESP32 S3 Uno?
The SD library in the ESP32 core works with full paths from the root folder of the card. So you must write "/arduino.txt", not "arduino.txt". Without the slash, SD.open() returns an empty file object and SD.exists() returns false.
Why does FILE_WRITE erase my file on the ESP32 S3 Uno?
On the ESP32 core, FILE_WRITE opens the file in "w" mode, which clears it first. On the UNO R4 and other AVR-style boards, FILE_WRITE adds to the end. To add data to the end on the ESP32 S3 Uno, use FILE_APPEND.
Which pins does the Micro SD Card module use on the ESP32 S3 Uno?
It uses the SPI pins D11 (GPIO11) for MOSI, D12 (GPIO13) for MISO and D13 (GPIO12) for SCK. These are the default SPI pins of the ESP32 S3 Uno, so SD.begin() needs only the CS pin. This tutorial uses D4 (GPIO19) for CS.
What card size and format should I use?
Use a Micro SD Card formatted as FAT16 or FAT32. Cards up to 32 GB are usually FAT32 by default. Bigger cards often come as exFAT, so format them to FAT32 first.
Can I power the module from 3.3V instead of 5V?
A module with a regulator and level shifter is made for 5V, and on 3.3V it may not work well. A bare SD socket with no level shifter must use 3.3V. Check your module before you wire it.
What if my project needs more pins than the Uno headers give?
The ESP32 S3 Uno has two extra rows of holes with more GPIOs: GPIO15 and GPIO16 (I/O, PWM, analog), GPIO45 and GPIO35 to GPIO42 (I/O, PWM), and GPIO47/GPIO48 (output only, PWM). Solder pin headers to use them and write the GPIO number in code. For a second SPI device's CS pin or a data-logging sensor, GPIO35 to GPIO42 are a good choice, and GPIO15/16 are best for analog sensors. Be careful with two things. First, GPIO47 and GPIO48 may run at 1.8V instead of 3.3V on some modules (especially ones with "V" in the name, like R8V or R16V), so 3.3V devices can be damaged or act strangely. Second, GPIO0, GPIO3 (D6), GPIO45 and GPIO46 (D9) are boot strapping pins, and a wrong connection can stop the board from booting or uploading code. Use the other extra pins first.
Troubleshooting
| Problem | Possible Cause | Solution |
|---|---|---|
| "SD Card is either missing or has failed!" | Card not inserted, wrong wiring or wrong CS pin | Insert the card fully, check the wiring table, and make sure PIN_SPI_CS is 19 (D4) |
| SD.begin() fails with a new card | Card is formatted as exFAT or NTFS | Format the card as FAT32 (or FAT16) on your computer |
| File is not found or cannot be opened | File path has no leading slash | Write the path as "/arduino.txt", not "arduino.txt" |
| Old data disappears after each write | FILE_WRITE clears the file on the ESP32 S3 Uno | Use FILE_APPEND to add data to the end of the file |
| Card works sometimes, then fails | Loose jumper wires or weak power | Use short wires, power the module from the 5V pin, and check the GND wire |
| Board resets or the card gets hot | A bare SD socket is powered from 5V | Power a module without a level shifter from 3.3V only |
| No COM port in Arduino IDE | USB driver missing or board not in upload mode | Install the CP210x or CH340 driver, or hold BOOT while pressing RESET |
| Nothing shows on the Serial Monitor | Wrong baud rate or output sent before the monitor opened | Set the baud rate to 9600 and press the RESET button |