
ESP32 S3 UNO - Ultrasonic Sensor - Piezo Buzzer
This ESP32 S3 Uno ultrasonic sensor piezo buzzer tutorial shows you how to make a buzzer sound when an object comes close. You wire an HC-SR04 distance sensor and a buzzer to the ESP32 S3 Uno form board, then write Arduino code that turns the measured distance into a beep or a short song. It is a simple proximity alarm, like a parking sensor.
In this tutorial, you will:
- Wire an ultrasonic sensor and a piezo buzzer to the ESP32 S3 Uno
- Measure distance with the HC-SR04 and pulseIn()
- Turn the buzzer on when an object is closer than 50 cm, and off when it moves away
- Play a melody with tone() when someone comes near the sensor
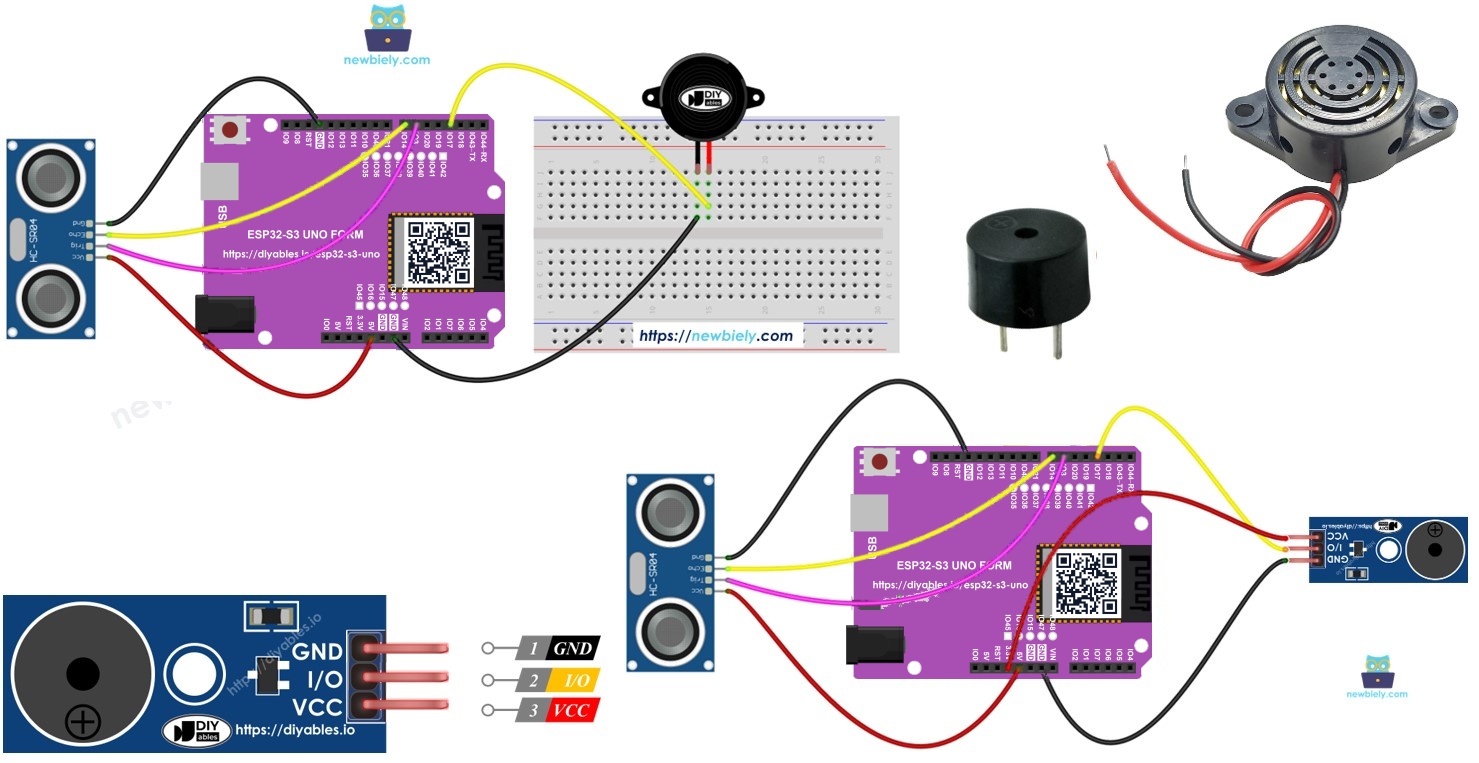
Hardware Preparation
Or you can buy the following kits:
| 1 | × | DIYables Sensor Kit (18 sensors/displays) |
Additionally, some of these links are for products from our own brand, DIYables .
Overview of Piezo Buzzer and Ultrasonic Sensor
This project joins two parts. The ultrasonic sensor tells the ESP32 S3 Uno how far away an object is, and the buzzer gives you a sound when that object is too close. If you have not used these parts before, read their own tutorials first.
The examples here use a small 3–5V buzzer that you can drive straight from a pin. If you want a loud 12V buzzer instead, you need a relay. The ESP32 S3 Uno - Buzzer tutorial shows how.
Why the HC-SR04 needs care on this board
The HC-SR04 runs on 5V, so its ECHO pin also sends back a 5V pulse. The ESP32 S3 Uno uses 3.3V logic, and its pins are NOT 5V tolerant. For this reason, put a level converter (or a simple voltage divider) on the ECHO line. The TRIG line is fine as it is, because the 3.3V pulse from the board is high enough for the sensor.
ESP32 S3 Uno Pinout
The image below shows the pinout diagram of the ESP32 S3 Uno form board. Use it to find the Uno header pins (D3, D6, D7…) and their GPIO numbers when you wire the sensor and the buzzer.

Wiring Diagram
You can use a bare piezo buzzer or a buzzer module. The sensor wiring is the same in both cases, and the buzzer signal always goes to D3 (GPIO17).
With a piezo buzzer
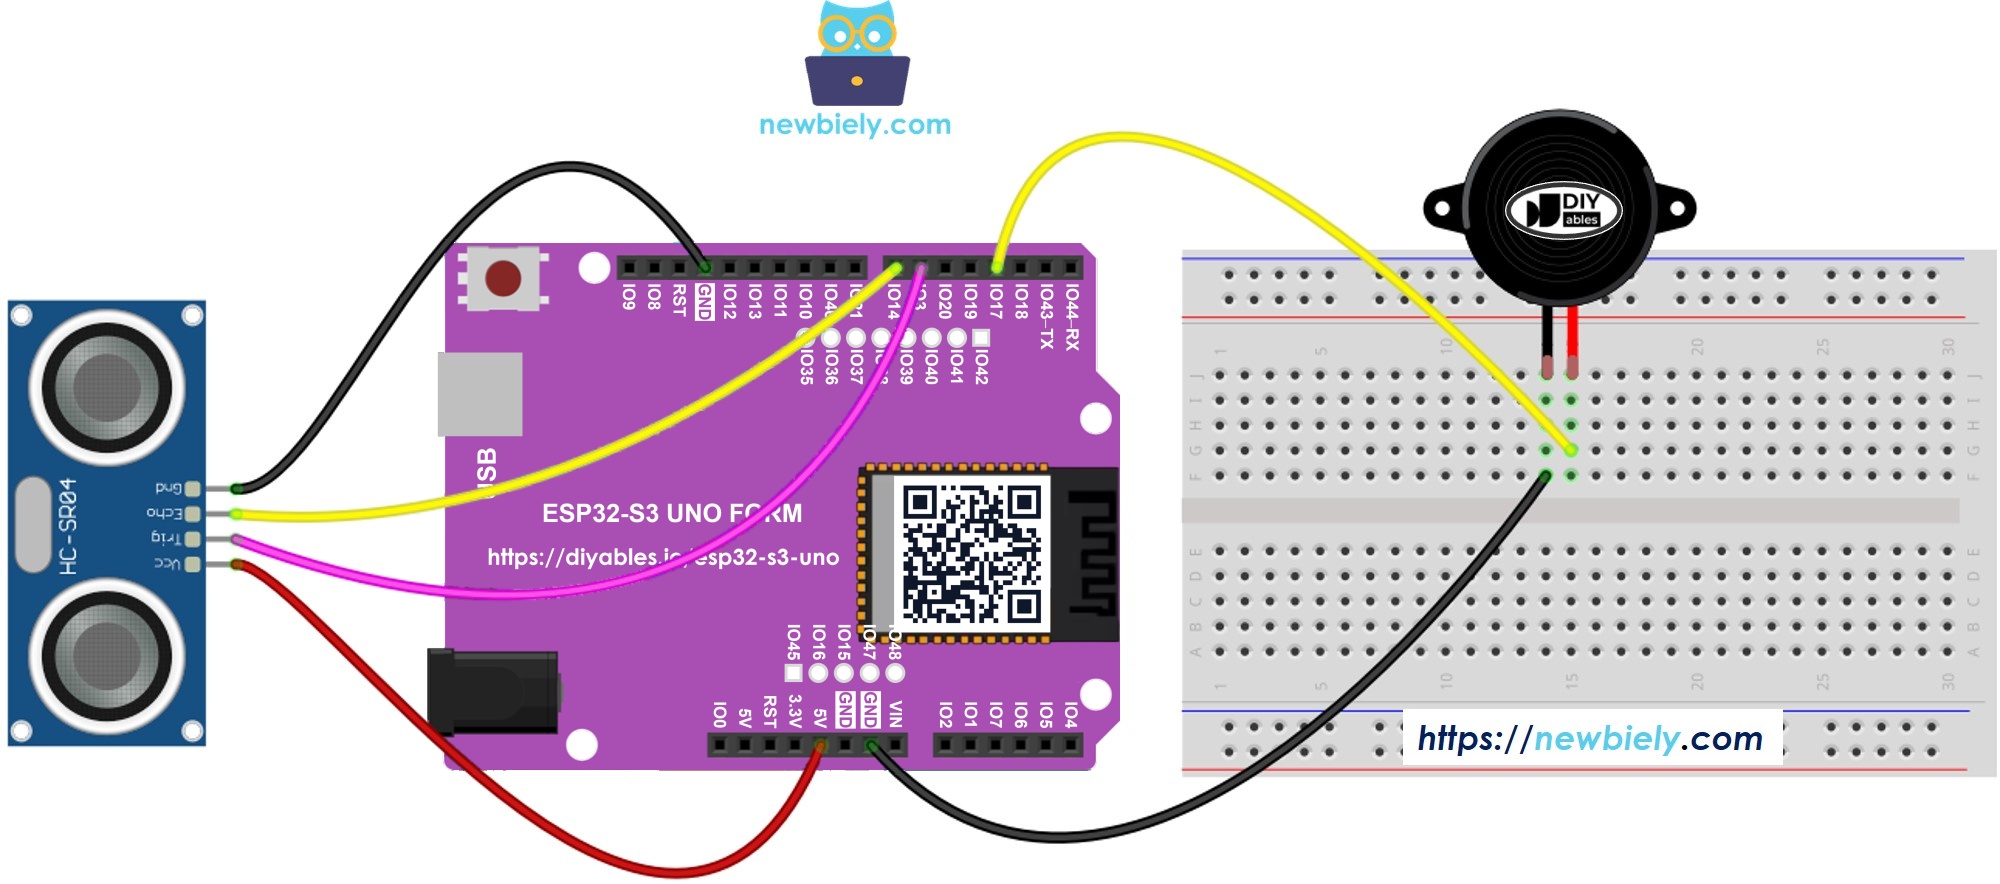
This image is created using Fritzing. Click to enlarge image
With a piezo buzzer module
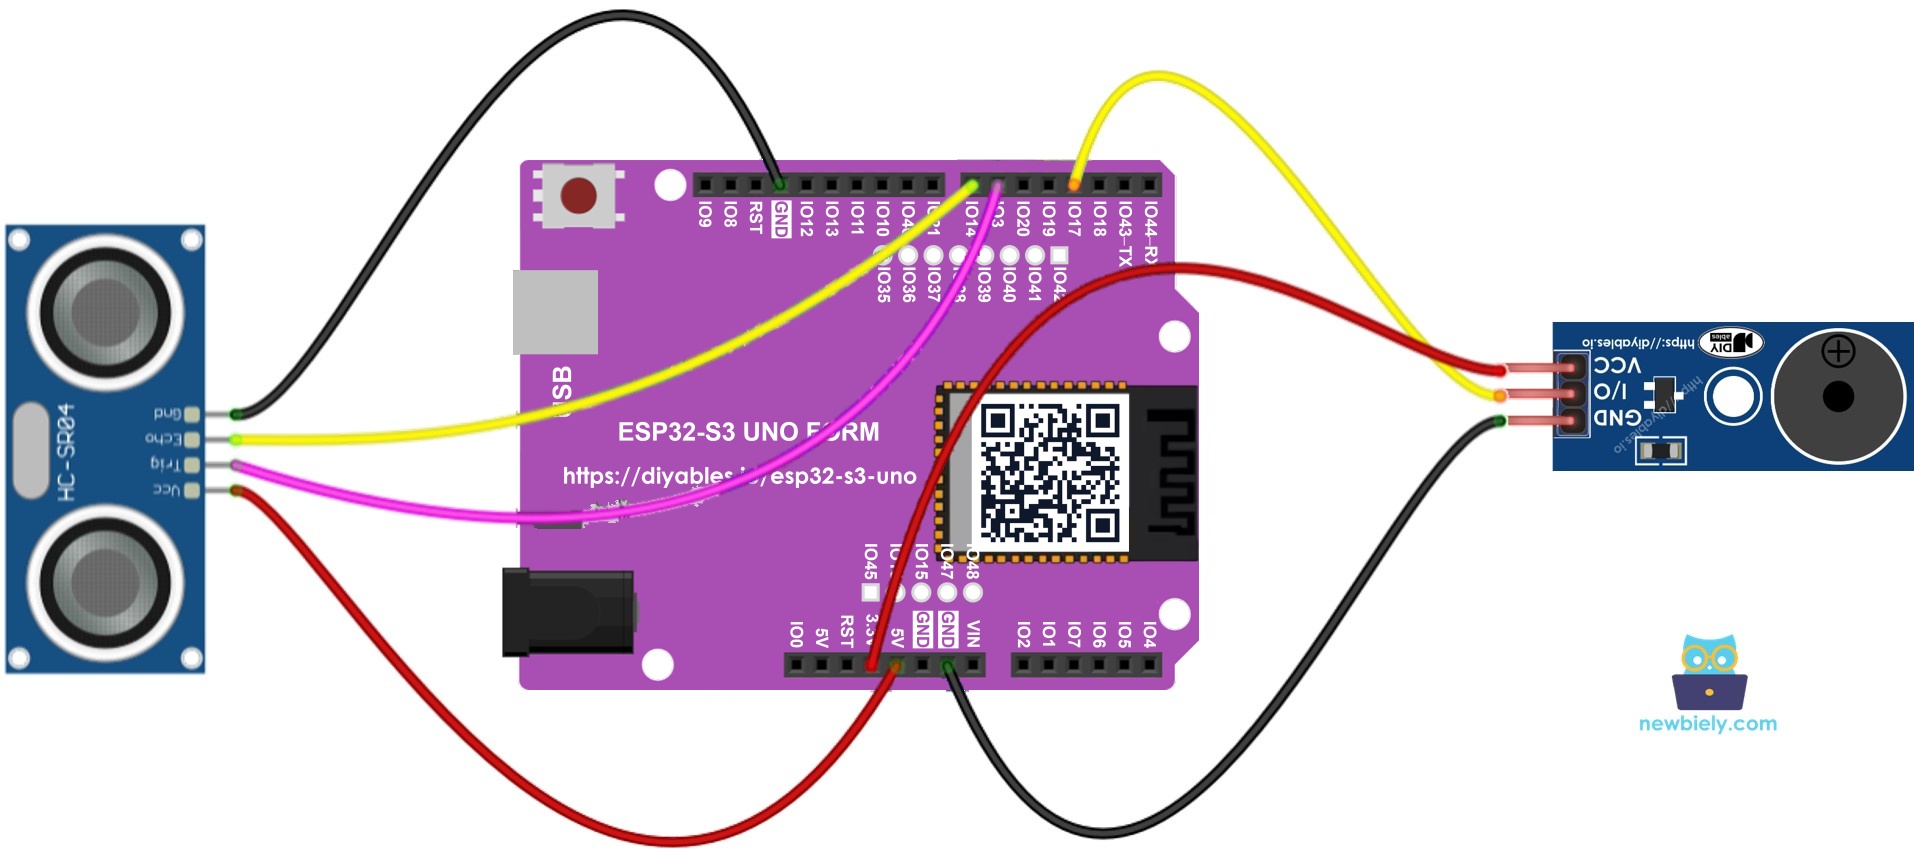
This image is created using Fritzing. Click to enlarge image
Pin connections
| Component Pin | ESP32 S3 Uno Pin |
|---|---|
| Ultrasonic Sensor VCC | 5V |
| Ultrasonic Sensor GND | GND |
| Ultrasonic Sensor TRIG | D6 (GPIO3) |
| Ultrasonic Sensor ECHO | D7 (GPIO14) through the level converter |
| Piezo Buzzer (+) or Module I/O | D3 (GPIO17) |
| Piezo Buzzer (-) or Module GND | GND |
| Buzzer Module VCC | 3.3V or 5V |
WARNING
The ECHO pin of the HC-SR04 outputs 5V, but the ESP32 S3 Uno pins only accept up to 3.3V. Connect ECHO to D7 (GPIO14) through a 5V to 3.3V level converter. If you do not have one, use a voltage divider: a 1kΩ resistor from ECHO to D7, and a 2kΩ resistor from D7 to GND.
WARNING
TRIG is on D6, which is GPIO3 on the ESP32 S3 Uno. GPIO3 is a boot strapping pin, and the board reads it at startup. The TRIG input of the sensor does not drive this pin, so it normally works fine. If the board does not boot or upload, unplug the TRIG wire, upload the code, and then plug it back in.
ESP32 S3 Uno Code - Simple Sound
This first sketch sends a short pulse to the sensor every half second and times the echo with pulseIn(). It turns that time into centimeters. When the distance is under 50 cm, the buzzer pin goes HIGH; otherwise it goes LOW. The distance is also printed to the Serial Monitor so you can see what the sensor measures.
Detailed Instructions
Follow these steps to build your first distance alarm:
- New to the ESP32 S3 Uno? Follow ESP32 S3 Uno - Getting Started first.
- Wire it up as shown in the diagram.
- Connect the board to your computer with a USB Type-C cable.
- Open Arduino IDE, choose the ESP32S3 Dev Module board and the correct COM port.
- Copy the code above and paste it into the Arduino IDE.
- Upload the code by clicking the Upload button.
- Open the Serial Monitor and set the baud rate to 9600.
- Move your hand in front of the sensor.
- Listen to the buzzer. It sounds when your hand is closer than 50 cm and stops when you pull it away.
- Tip: Change DISTANCE_THRESHOLD in the code to make the alarm react at a different distance.
Code Explanation
Each line of the sketch has a comment that says what it does. Read them from top to bottom, and you will follow the whole flow: send the TRIG pulse, measure the ECHO time, work out the distance, and switch the buzzer.
ESP32 S3 Uno Code - Melody
A beep is useful, but a tune is more fun. This second sketch measures distance in the same way. When an object is closer than 50 cm, it plays the whole "Jingle Bells" chorus with tone(). For a real melody, use a passive buzzer or a passive buzzer module.
Detailed Instructions
The melody needs a second file that holds the note frequencies. Follow these steps:
- Copy the code above and paste it into the Arduino IDE.
- Add a new tab for the note list. Click the button below the Serial Monitor icon and choose New Tab, or press Ctrl+Shift+N.
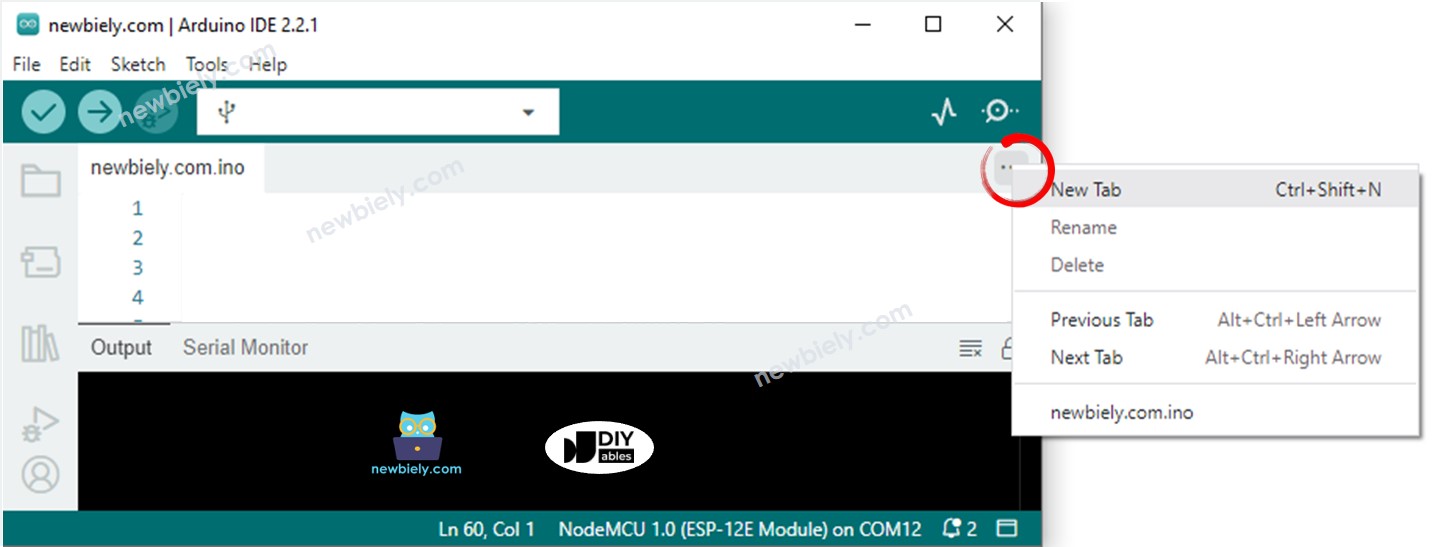
- Name the tab pitches.h and click OK.
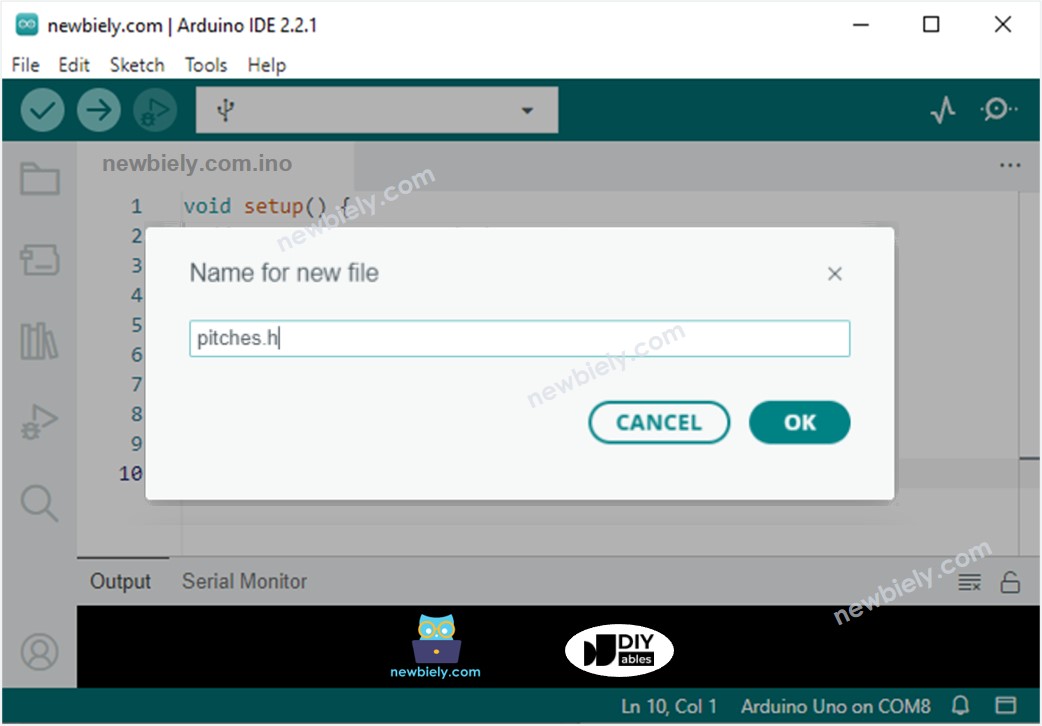
- Paste the note list below into the pitches.h tab.
- Upload the code to the ESP32 S3 Uno with the Upload button.
- Move your hand in front of the sensor.
- Listen to the melody from the buzzer.
- Tip: Keep your hand still while the song plays. The sketch does not measure distance again until the melody ends.
Code Explanation
The comments inside the code explain each step, so read through them to see how the melody and note durations work.
※ NOTE THAT:
- This code is made for learning. Ultrasonic readings can jump because of noise. For a real project, filter the readings first. See how to filter noise for the ultrasonic sensor.
Video Tutorial
Watch the video below to see this ESP32 S3 Uno project step by step.
FAQ
Can I power the HC-SR04 from the 3.3V pin of the ESP32 S3 Uno?
Most HC-SR04 modules need 5V to work well. At 3.3V they often give no reading or wrong values. Power the sensor from the 5V pin, and protect the ECHO line with a level converter or a voltage divider.
Why do I need a level converter on the ECHO pin?
With 5V power, the ECHO pin sends back a 5V pulse. The ESP32 S3 Uno pins are 3.3V only and are not 5V tolerant, so a 5V signal can damage the pin over time. The UNO R4 is a 5V board and does not need this, but the ESP32 S3 Uno does.
Can I use the same code as the UNO R4 version?
Yes, almost. The logic, pulseIn() and tone() work the same. Only the pin numbers change, because you write GPIO numbers in code: D6 is 3, D7 is 14, and D3 is 17. In Arduino IDE, select the ESP32S3 Dev Module board.
Why does the buzzer only beep and not play a song?
You are using an active buzzer. It has its own oscillator and makes one fixed tone, whatever frequency you send. Use a passive buzzer or a passive buzzer module to hear the melody.
What if my project needs more pins than the Uno headers give?
The ESP32 S3 Uno has two extra rows of holes with more GPIOs: GPIO15 and GPIO16 (I/O, PWM, analog), GPIO45 and GPIO35–GPIO42 (I/O, PWM), and GPIO47/GPIO48 (output only, PWM). Solder pin headers to use them and write the GPIO number in code. For a second sensor or a warning LED, GPIO35–GPIO42 are good choices. Do not use GPIO47/GPIO48 for an ECHO input, because they are output only. Be careful with two things. First, GPIO47 and GPIO48 may run at 1.8V instead of 3.3V on some modules (especially ones with "V" in the name, like R8V or R16V), so 3.3V devices can be damaged or act strangely. Second, GPIO0, GPIO3 (D6), GPIO45 and GPIO46 (D9) are boot strapping pins, and a wrong connection can stop the board from booting or uploading code. Use the other extra pins first.
Troubleshooting
| Problem | Possible Cause | Solution |
|---|---|---|
| No COM port in Arduino IDE | USB driver missing or charge-only cable | Install the CP210x or CH340 driver, use a data USB cable, or hold BOOT while pressing RESET |
| Upload fails or board does not start | TRIG wire on D6 (GPIO3) affects the boot strapping pin | Unplug the TRIG wire, upload the code, then plug it back in |
| Distance is always 0 and the buzzer never stops | No echo comes back so pulseIn() returns 0 | Check the ECHO wire and the level converter, and make sure VCC goes to 5V |
| Readings jump a lot | Noise or a soft surface in front of the sensor | Aim at a flat hard object and filter the readings in code |
| No sound from the buzzer | Wrong polarity or wrong pin | Connect + to D3 (GPIO17) and - to GND, and check module power |
| Melody sounds like one flat tone | Active buzzer used instead of passive | Use a passive buzzer or passive buzzer module |
| Compile error about NOTE_E5 | pitches.h tab is missing or named wrong | Add a new tab named exactly pitches.h and paste the note list |
| Serial Monitor shows strange characters | Wrong baud rate | Set the Serial Monitor to 9600 baud |