
Raspberry Pi - NTC Thermistor Temperature Sensor
A Raspberry Pi can stay switched on for months and run a script in the background the whole time. That makes it a patient keeper for slow changes: the water in a hydroponics tank, the soil of a greenhouse bed, or a battery box that should never get warm. All it needs is a probe that does not mind water. This tutorial instructs you how to use Raspberry Pi to read the temperature from a waterproof 10K NTC thermistor probe. The probe gives a resistance, not a number, and the 40-pin header of the Pi has no analog input. So an ADS1115 ADC module measures the voltage for the Pi and sends the result over I2C. In detail, we will learn:
- What is inside the steel probe, and why every probe comes with a 10K resistor
- How to connect the probe, the 10K resistor and the ADS1115 module to the Raspberry Pi
- How to turn the ADS1115 value into ohms, then into °C and °F, with a Python script started from an SSH terminal
- How the script warns you when the probe is unplugged or shorted
https://newbiely.com/images/cover/raspberry-pi-ntc-thermistor-temperature-sensor.jpg
We suggest:
- Utilizing the Raspberry Pi - ADC tutorial as a warm-up if you have never read an analog value through the ADS1115.
- Utilizing a waterproof DS18B20 temperature sensor if you prefer a digital probe that needs one GPIO pin, no ADC module and no math.
- Utilizing a MAX6675 thermocouple module for anything hotter than 105°C, such as an oven or a kiln.
Hardware Preparation
Or you can buy the following kits:
| 1 | × | DIYables Sensor Kit (18 sensors/displays) |
Additionally, some of these links are for products from our own brand, DIYables .
Overview of NTC Thermistor Temperature Sensor
The DIYables NTC thermistor temperature sensor is a small stainless-steel tube, 5mm wide and 25mm long with a round tip, on a 0.5m black cable. The tube is sealed, so the tip can sit in water, in wet soil or in the air. There is no chip inside it, only a thermistor: a tiny resistor whose value changes a lot with temperature. NTC stands for Negative Temperature Coefficient, which simply means that the resistance goes down when the temperature goes up. The Raspberry Pi measures that resistance and turns it into degrees. One kit holds 5 probes and 5 matching 10K resistors, so you never need to buy the resistor separately.

The cable ends in a white JST XH2.54 2-pin plug. There is no adapter board: you push two male jumper wires straight into the two openings of the plug. A thermistor is just a resistor, so its two wires have no polarity, and it does not matter which one goes where. In this tutorial, the probe and the 10K resistor are used like this:
- Wire 1 (either wire): This wire must be connected to the 3.3V supply. We take it from the VDD pin of the ADS1115 module, which already gets 3.3V from the Raspberry Pi
- Wire 2: This wire must be connected to input A0 of the ADS1115 module, never directly to a GPIO pin of the Pi
- 10K resistor: One leg must be connected to A0 too, and the other leg must be connected to ground (0V)
※ NOTE THAT:
The probe has no polarity, but ADS1115 modules are not all the same: the order of the VDD, GND, SCL, SDA and A0 pins can change from one manufacturer to another. Always follow the labels printed on your ADS1115 board, not only the position of the pins in the picture.
Key facts about the probe:
| NTC Thermistor Temperature Sensor | |
|---|---|
| Thermistor | 10K NTC (10kΩ at 25°C), ±1% |
| B value (beta) | 3950 |
| Measuring range | -20°C to 105°C |
| Probe | waterproof stainless steel, 5mm x 25mm, round tip |
| Cable | 0.5m, two black wires |
| Plug | JST XH2.54, 2 pins |
| Dissipation constant | 5mW/°C (typical) |
The Raspberry Pi cannot measure ohms directly. The thermistor and the 10K resistor form a voltage divider between 3.3V and GND, and the ADS1115 measures the voltage in the middle, at A0. When the probe warms up, its resistance falls, so A0 moves up toward 3.3V. When the probe cools down, A0 moves down toward 0V. From that voltage, the script works out the resistance of the thermistor, then it uses the B formula (also called the beta equation):
1/T = 1/T0 + (1/B) × ln(R/R0)
- T is the temperature in kelvin. Subtract 273.15 to get °C.
- T0 is 298.15K, which is 25°C.
- R is the resistance of the thermistor right now, and R0 is its resistance at 25°C (10000Ω).
- B is 3950, the value given for this thermistor.
Python makes the three-coefficient Steinhart-Hart equation easy too, but it only pays off over very wide ranges; the probe's B value of 3950 covers -20°C to 105°C well. In a room at 20°C to 30°C, the script is normally within about a degree. The two things that move it are the tolerance of the 10K resistor and the real voltage of the Pi's 3.3V rail.
Here are a few points of the curve for this circuit, read by the ADS1115 with GAIN = 1:
| Temperature | Thermistor resistance | Voltage on A0 | ADS1115 raw value |
|---|---|---|---|
| 0°C | 33.6kΩ | 0.757V | 6052 |
| 15°C | 15.8kΩ | 1.277V | 10218 |
| 25°C | 10.0kΩ | 1.650V | 13200 |
| 40°C | 5.3kΩ | 2.157V | 17253 |
| 70°C | 1.76kΩ | 2.806V | 22449 |
Wiring Diagram
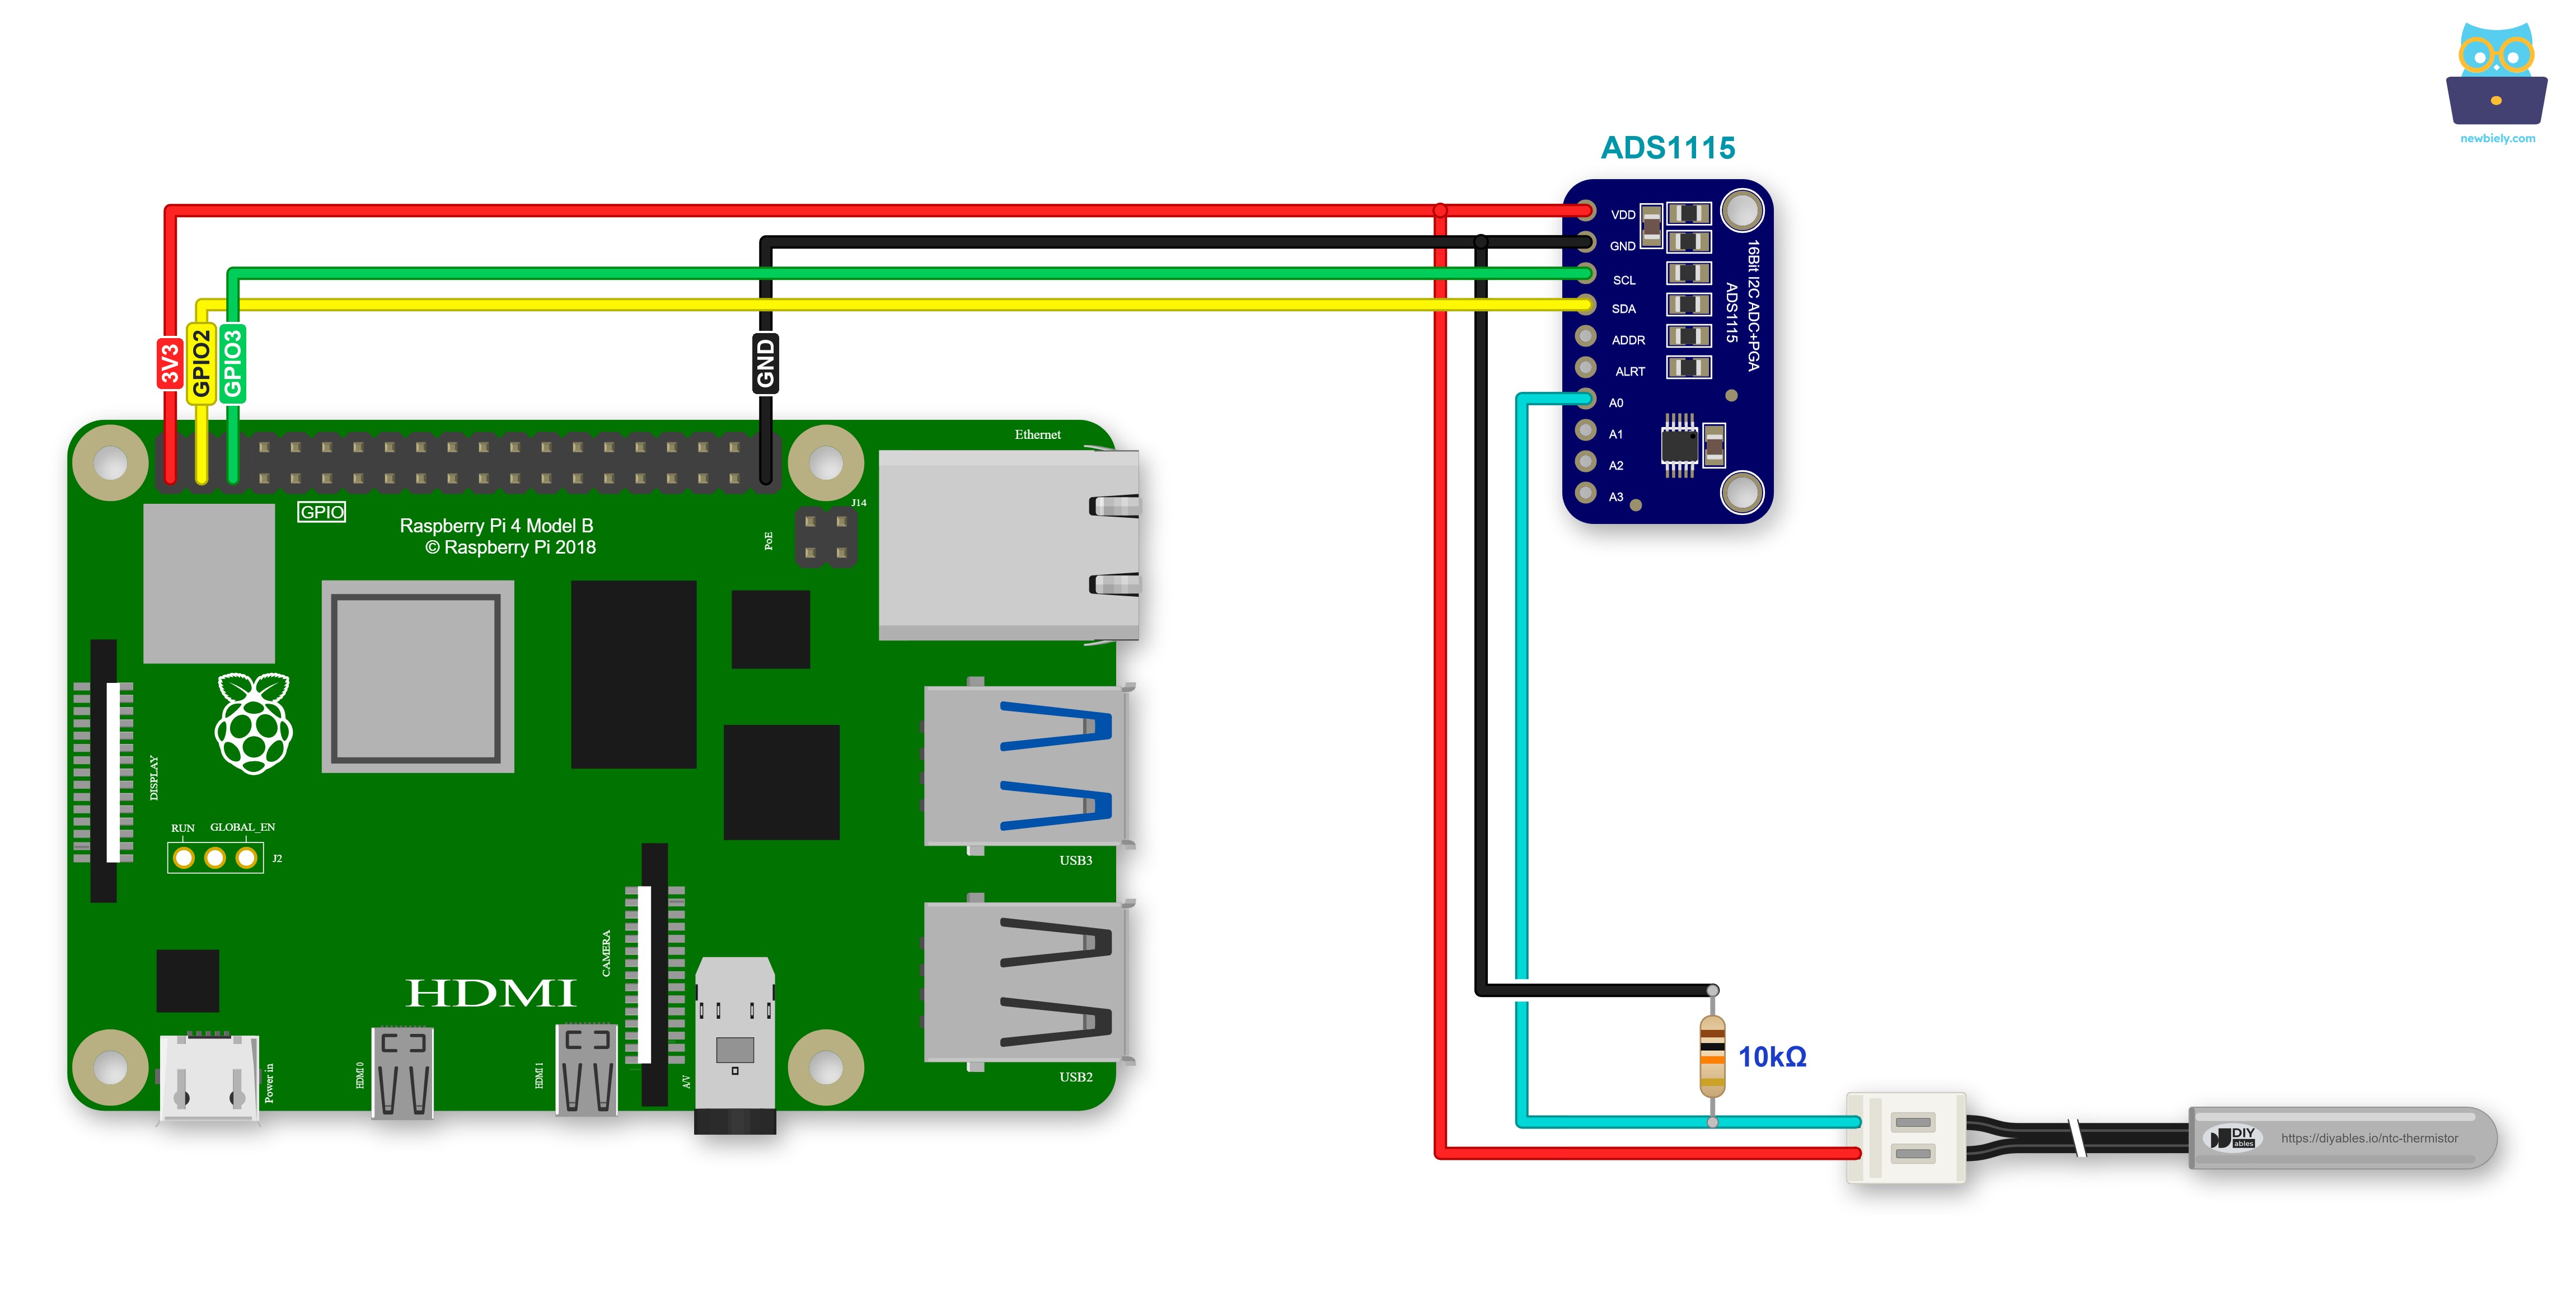
This image is created using Fritzing. Click to enlarge image
To simplify and organize your wiring setup, we recommend using a Screw Terminal Block Shield for Raspberry Pi. This shield ensures more secure and manageable connections, as shown below:

First, connect the ADS1115 module to the I2C pins of the Raspberry Pi:
- ADS1115 VDD pin to Raspberry Pi 3.3V (pin 1)
- ADS1115 GND pin to Raspberry Pi GND (pin 39)
- ADS1115 SCL pin to Raspberry Pi GPIO 3 (pin 5)
- ADS1115 SDA pin to Raspberry Pi GPIO 2 (pin 3)
Then connect the thermistor probe and the 10K resistor to the ADS1115 module:
- Thermistor wire 1 (either one) to the ADS1115 VDD pin, so it shares the 3.3V that comes from pin 1
- Thermistor wire 2 to ADS1115 A0
- 10K resistor leg 1 to ADS1115 A0
- 10K resistor leg 2 to ADS1115 GND
Three points of this circuit hold two wires each: VDD, A0 and GND of the ADS1115. A small breadboard makes these joints easy. Without one, twist the resistor legs and the wire ends together firmly, or solder them and cover them with heat-shrink tube.
Use the 3.3V pin here, not a 5V pin. Most ADS1115 modules pull their SDA and SCL lines up to VDD, so 5V on VDD would pull GPIO 2 and GPIO 3 toward 5V, and the GPIO pins of the Pi are made for 3.3V only. Also, an input of the ADS1115 must never go above the module's own supply. A hot probe pushes A0 close to the voltage that feeds the thermistor, so the thermistor must get the same 3.3V as the ADS1115.
Leave the ADDR pin unconnected (most modules pull it to GND on the board) or tie it to GND, so the I2C address stays 0x48, the default of the library. A1, A2 and A3 stay free for more probes from the kit, each with its own 10K resistor.
How To Program for Raspberry Pi to Read Temperature from the NTC Thermistor
The script asks the ADS1115 for 10 readings of A0, takes the average, and then does the math in three small steps:
- The first line turns the raw value into volts. gain=1 sets the input range of the ADS1115 to ±4.096V, so 32767 means 4.096V. The UV sensor tutorial uses gain=2 (±2.048V), but a hot probe pushes A0 up to about 3.1V, and gain=2 would cut off every temperature above about 36°C.
- The second line is the voltage divider rule turned around. It gives the resistance of the thermistor in ohms.
- The third line is the B formula. In Python, math.log() is the natural log (ln). The script then subtracts 273.15 for °C and converts °C to °F.
- The ADS1115 measures against its own built-in reference, not against the 3.3V pin, so the script needs the divider supply as a number (VCC = 3.3). The 3.3V pin of the Pi comes from a regulator and stays very steady. If your multimeter shows a slightly different value between pin 1 and pin 39, for example 3.28V, put that value into VCC.
- Before any math, the script checks the voltage. Almost 0V means the probe is unplugged. Almost 3.3V means the probe wires touch or the 10K resistor is missing. Then it prints a hint instead of a strange temperature.
Detailed Instructions
- Make sure you have Raspbian or any other Raspberry Pi compatible operating system installed on your Pi.
- Make sure your Raspberry Pi is connected to the same local network as your PC.
- Make sure your Raspberry Pi is connected to the internet if you need to install some libraries.
- If this is the first time you use Raspberry Pi, See how to set up the Raspberry Pi
- Connect your PC to the Raspberry Pi via SSH using the built-in SSH client on Linux and macOS or PuTTY on Windows. See to how connect your PC to Raspberry Pi via SSH.
- The ADS1115 needs the I2C interface. Open the Raspberry Pi configuration tool:
- Go to Interface Options > I2C and choose Yes to turn it on. See also How to enable I2C interface on Raspberry Pi
- Restart the Raspberry Pi:
- After the reboot, open the SSH connection again.
- Install the Adafruit_ADS1x15 library with this command:
- On Raspberry Pi OS Bookworm or newer, pip may refuse with an "externally-managed-environment" message. In that case, run sudo pip install --break-system-packages Adafruit-ADS1x15 instead, or install the library inside a Python virtual environment.
- Wire the probe, the 10K resistor and the ADS1115 module as shown in the wiring diagram above.
- Check that the Pi can see the ADS1115 module:
- The grid should show the number 48. If the command is not found, install it first with sudo apt-get install i2c-tools.
- Create a Python script file ntc_thermistor.py (for example with nano ntc_thermistor.py) and add the following code:
- Save the file (in nano: Ctrl + O, Enter, then Ctrl + X) and start the script:
- Leave the probe in the air for a few seconds, then lower the steel tip into a glass of cold tap water. Only the steel tip is waterproof, so keep the white plug and the resistor joints dry.
- Check the terminal:
The first three lines show the air of the room, about 21.7°C. Once the tip is in the water, the resistance goes up and the temperature goes down. The steel tube needs a few seconds to take on the temperature of the water, so the numbers fall step by step and then settle at about 13.1°C. A new line appears about every second (as set by the time.sleep(1) line) until you press Ctrl + C keys in the terminal.
Now pull the plug off the jumper wires while the script is running. The check in the script catches it:
If Python stops with "Remote I/O error" (OSError: [Errno 121]), the Pi cannot reach the ADS1115. Make sure I2C is turned on, and that SDA goes to GPIO 2 (pin 3) and SCL to GPIO 3 (pin 5). If the temperature is far off, for example 40°C in a cool room, check that the resistor is the 10K one from the kit.
Code Explanation
Check out the line-by-line explanation contained in the comments of the source code!
Additional Knowledge
NTC Thermistor Probe vs DS18B20 Waterproof Probe
Both probes look almost the same: a steel tube on a cable. Let's compare how they work with a Raspberry Pi:
| NTC Thermistor Probe | DS18B20 Waterproof Probe | |
|---|---|---|
| Type of signal | analog, a resistance | digital, 1-Wire |
| Extra parts on the Pi | ADS1115 module and a 10K resistor | one 4.7kΩ pull-up resistor |
| Range | -20°C to 105°C | -55°C to 125°C |
| Getting °C in Python | your own math with the B formula | the Linux 1-Wire driver does it |
| Several probes | one ADS1115 input each (4 per module) | many sensors on the same GPIO pin |
Evidently, the DS18B20 is the easier choice if you only want a temperature, because the Pi reads it without an extra chip. The NTC thermistor is a good choice when an ADS1115 is already in your project, when you want the cheapest probe, or when you want to see every step from a voltage to a temperature.
Project Ideas with the NTC Thermistor
- Water logger: add the date, the time and the temperature of a hydroponics tank to a CSV file every minute, then open it in a spreadsheet.
- Always-on sensor: start the script with a systemd service or a cron @reboot line, so it keeps measuring after a power cut.
- Top and bottom: put a second probe on A1 to compare the top and the bottom of a water tank or a compost bin.
- Small web page: show the latest temperature on a Flask page served by the Pi, so you can check it from your phone.