Arduino UNO Q - NTC Thermistor Temperature Sensor

Fish cannot send you a message when the aquarium heater dies in the middle of the night. A small steel probe can. Inside its tip sits an NTC thermistor, a tiny part whose resistance swings a lot as it gets warmer or colder. Drop it into a tank, a fridge or a fermenting bucket, and the Arduino UNO Q turns that resistance into degrees. The STM32 MCU does the measuring. The Linux side then hands the number to Python, or to your phone.

Here is the plan for this page:

Arduino UNO Q reads a 10K NTC thermistor probe and sends water temperature alerts to Telegram

Hardware Preparation

1×Arduino UNO Q
1×USB Cable for Arduino Uno Q
1×10K NTC Thermistor Waterproof Probe (with 10K resistor)
1×Jumper Wires
1×Optionally, Breadboard
1×Recommended: Screw Terminal Block Shield for Arduino Uno
1×Recommended: Sensors/Servo Expansion Shield for Arduino Uno
1×Recommended: Breadboard Shield for Arduino Uno
1×Recommended: Enclosure for Arduino Uno
1×Recommended: Prototyping Base Plate & Breadboard Kit for Arduino UNO

Or you can buy the following kits:

1×DIYables Sensor Kit (18 sensors/displays)
Disclosure: Some of the links provided in this section are Amazon affiliate links. We may receive a commission for any purchases made through these links at no additional cost to you.
Additionally, some of these links are for products from our own brand, DIYables .

The DIYables kit holds five probes and five matching 10K resistors, so there is no extra resistor to buy.

Overview of the NTC Thermistor Temperature Sensor
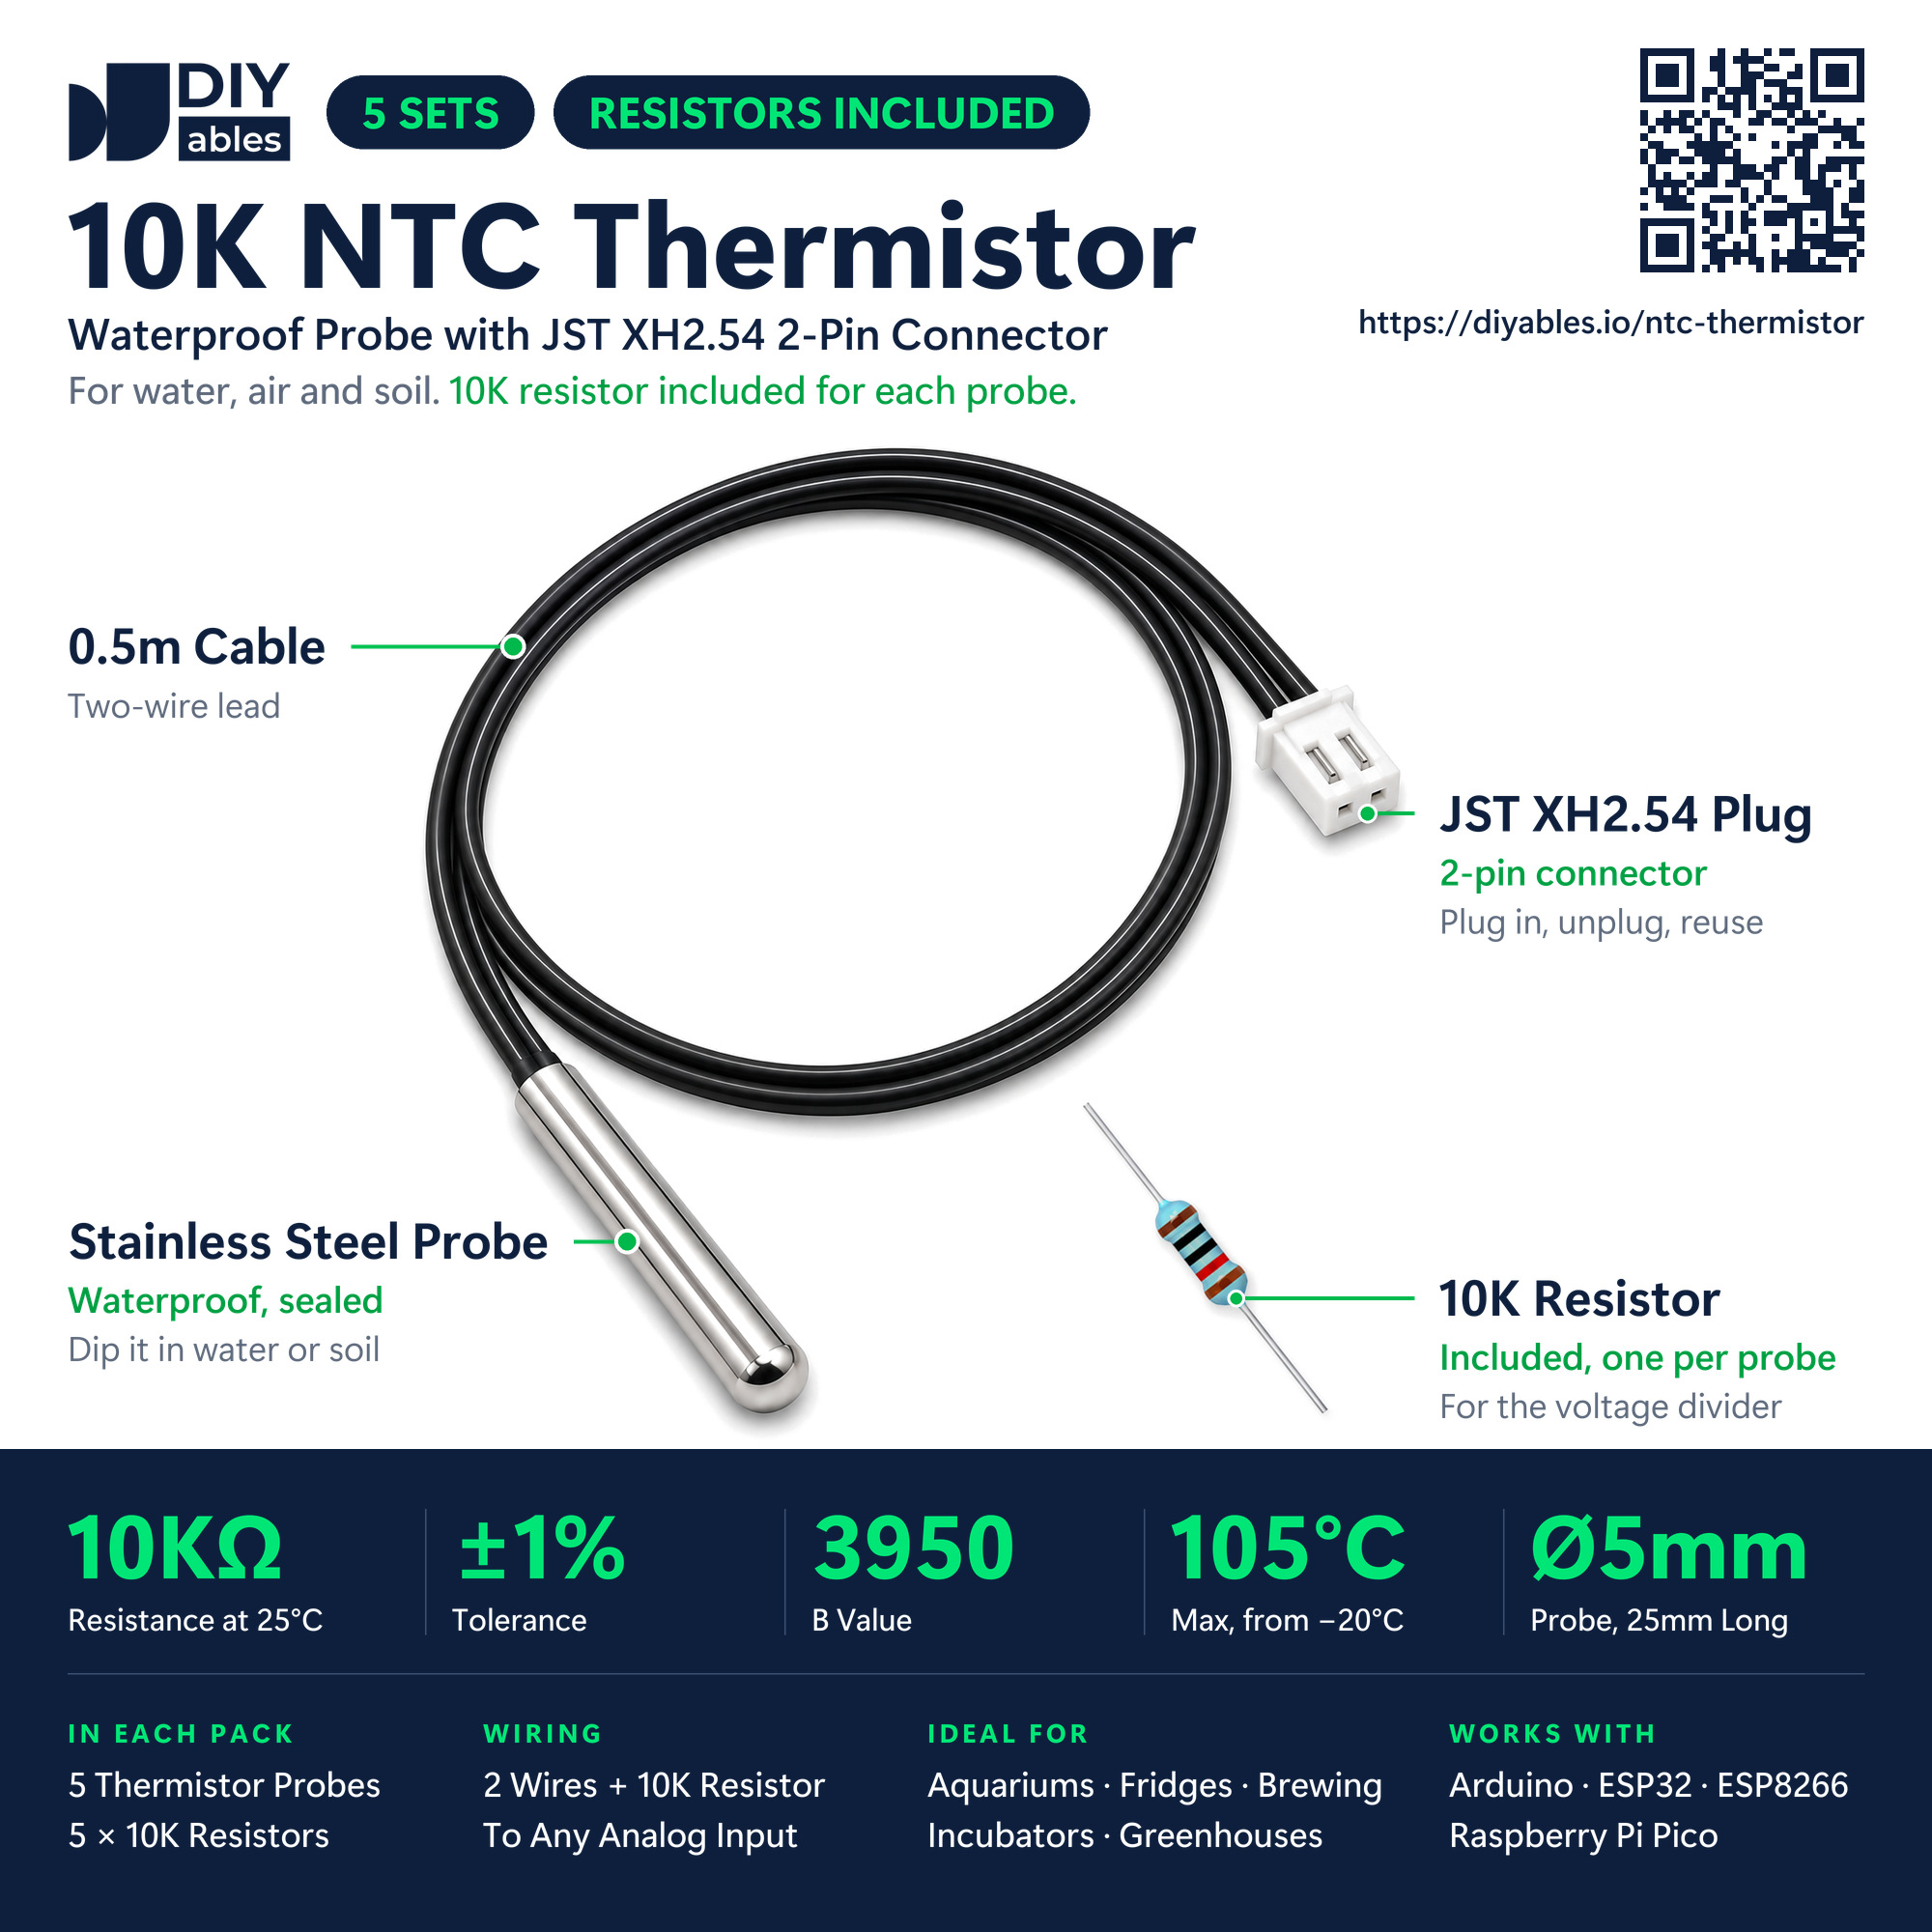
10K NTC thermistor waterproof probe pinout - two wires with no polarity and a JST XH2.54 plug
image source: diyables.io

The DIYables probe is a stainless-steel tube, 5 mm wide and 25 mm long, with a round tip. The thermistor is sealed inside it, so the tip can sit in water all day. A 0.5 m black cable with two wires runs from the tube to a white JST XH2.54 2-pin plug. There is no adapter board: male jumper wires push straight into the two openings of the plug.

Item Value
Thermistor NTC, 10 kΩ at 25 °C, ±1%
B value (beta) 3950
Measuring range -20 °C to 105 °C
Probe stainless steel, waterproof, 5 mm x 25 mm, round tip
Cable 0.5 m, two wires
Connector JST XH2.54, 2 pins
Output a resistance, read through a 10K divider on an analog pin
Dissipation constant 5 mW/°C (typical)

The plug has two openings and no labels. That is fine: a thermistor is a resistor, and a resistor has no plus or minus side.

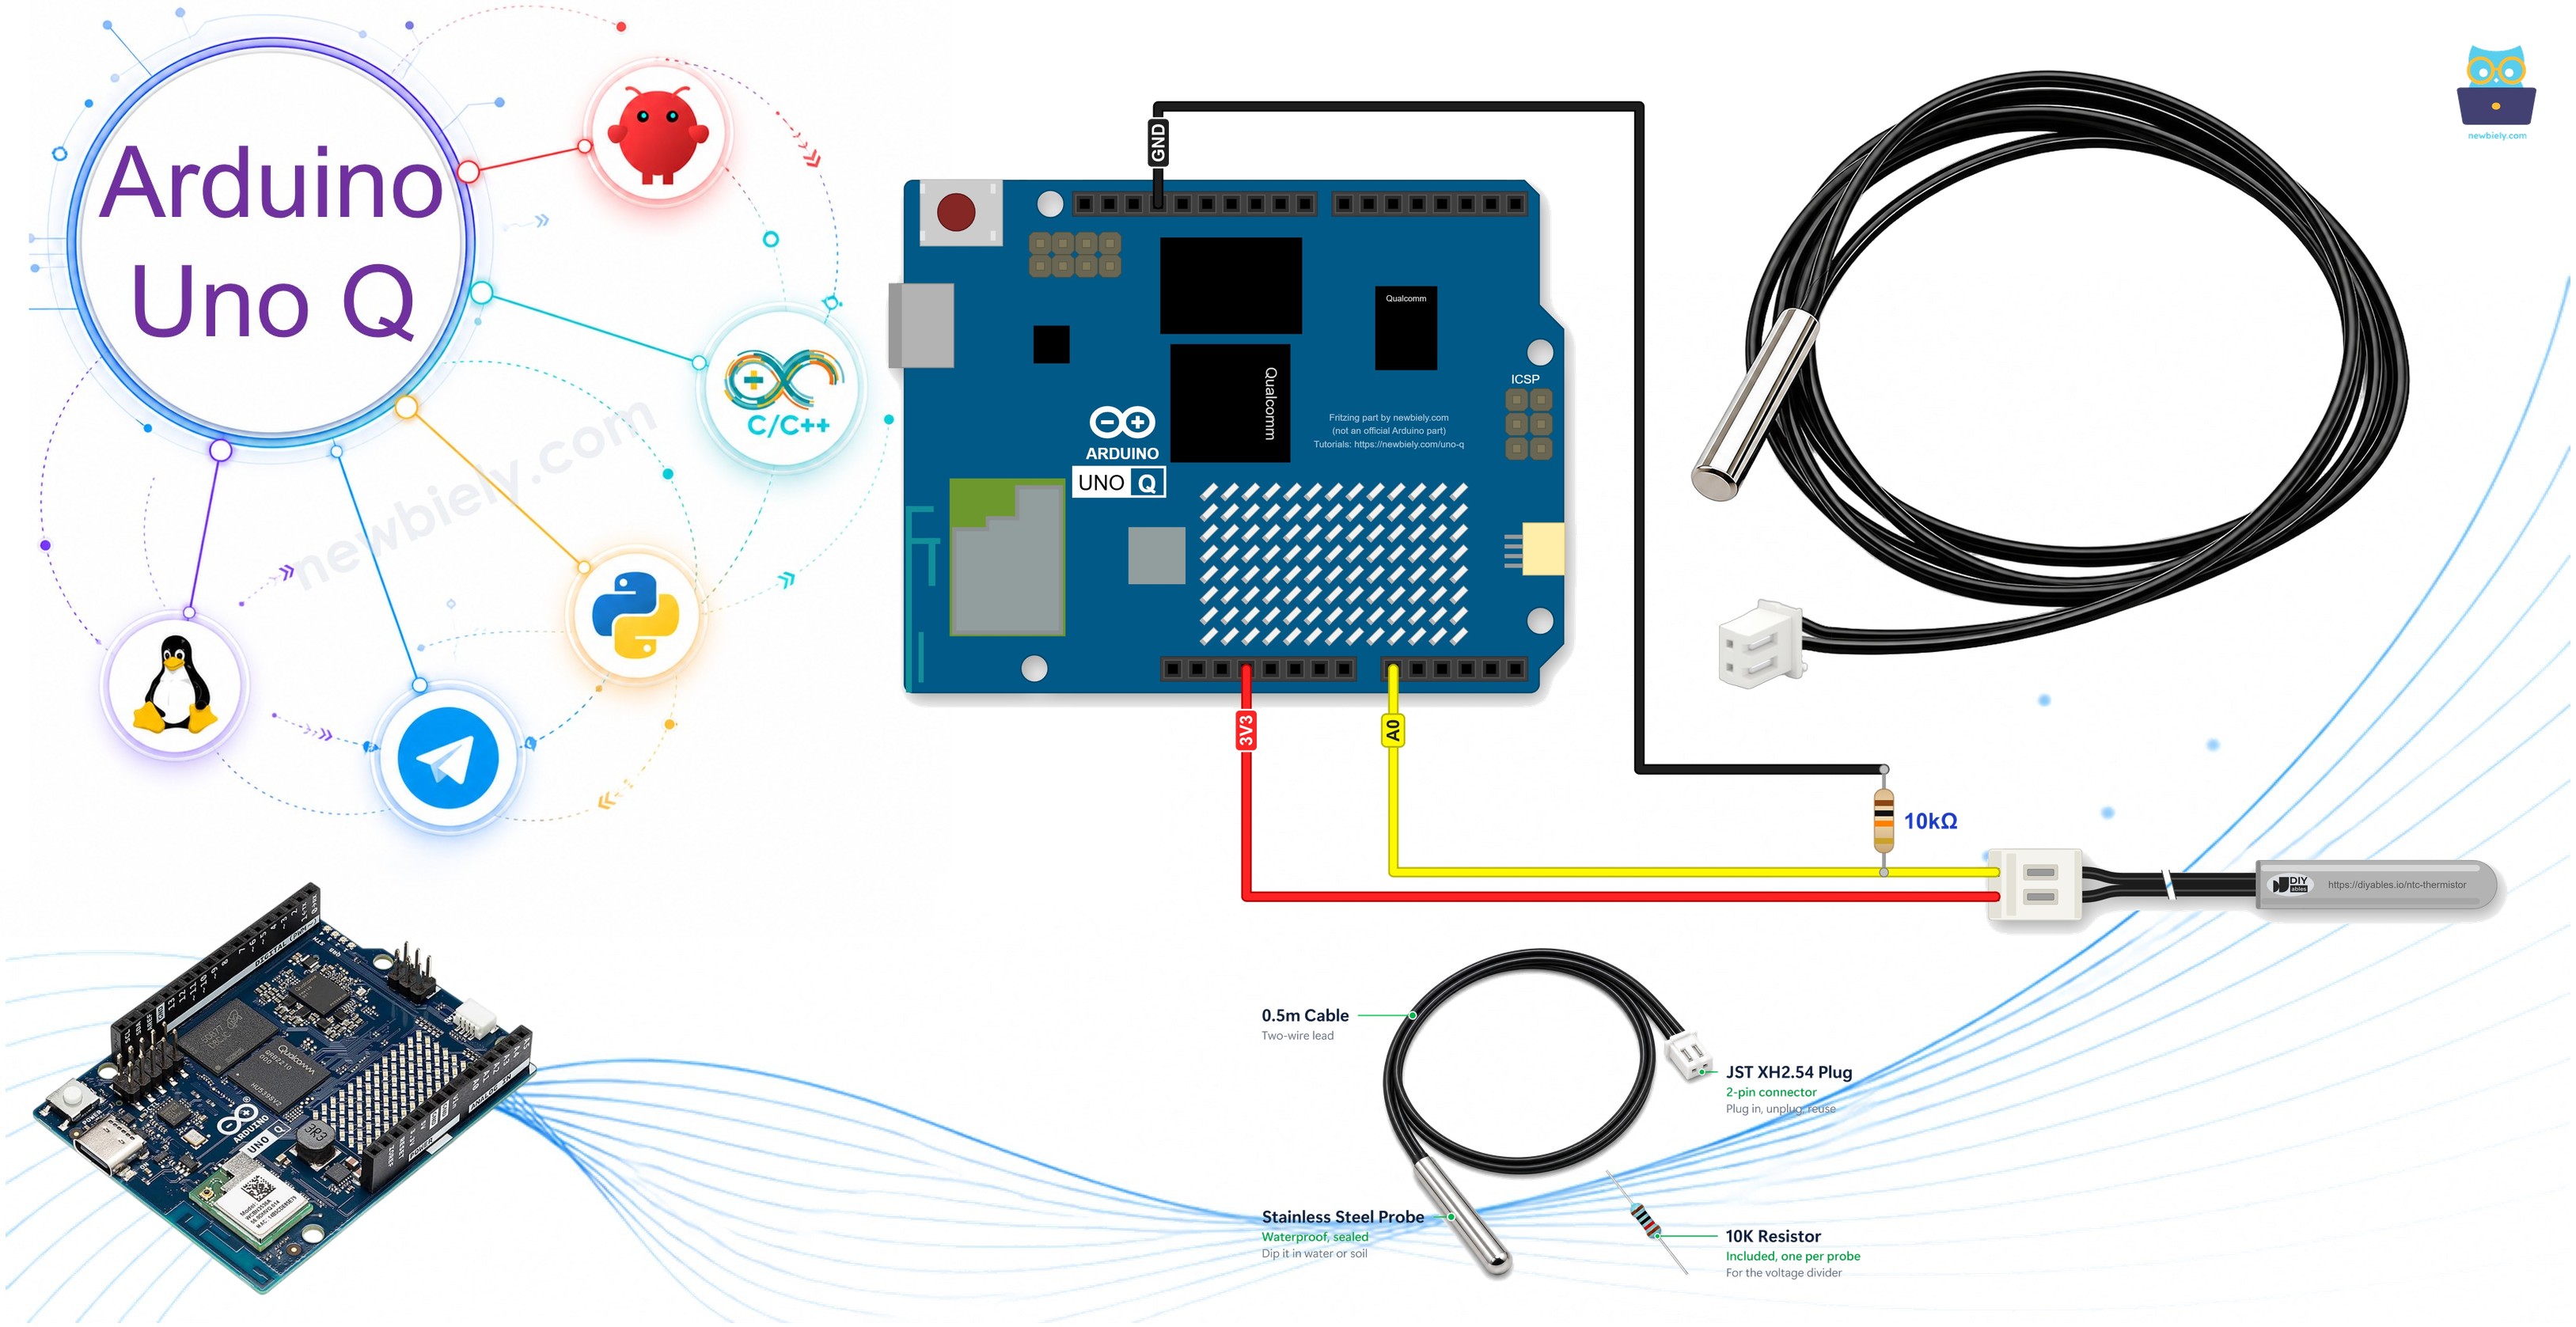
  • Wire 1 (either one): goes to the 3.3V pin of the Arduino UNO Q
  • Wire 2 (the other one): goes to A0. One leg of the 10K resistor joins it there, and the other leg goes to GND

How it works. NTC is short for Negative Temperature Coefficient. In plain words: when the tip warms up, the thermistor's resistance drops, and when it cools down, the resistance rises. The MCU cannot measure ohms, only volts. So the 10K resistor and the thermistor form a voltage divider, and the voltage in the middle tells the MCU how many ohms the thermistor has right now. The sketch then turns those ohms into degrees. A few points on the curve of this probe:

Temperature Thermistor Voltage on A0 ADC value (12-bit)
0 °C 33,621 Ω 0.76V 939
15 °C 15,837 Ω 1.28V 1585
25 °C 10,000 Ω 1.65V 2048
40 °C 5,301 Ω 2.16V 2676
70 °C 1,760 Ω 2.81V 3482

From ohms to degrees. The sketches use the B-parameter equation: 1/T = 1/T0 + (1/B) × ln(R/R0). Here T0 = 298.15 K (that is 25 °C), R0 = 10000 Ω and B = 3950. The result T is in kelvin, so °C = T − 273.15. Fussy projects can switch to the Steinhart-Hart equation, which describes the curve with three coefficients (see the Advanced challenge below). For an aquarium or a fridge, one B value is all you need: around room temperature the UNO Q lands within roughly 1 °C, with the 10K resistor and the STM32 ADC as the main error sources.

The UNO Q side of the math. The STM32 MCU reads A0 with a 12-bit ADC against 3.3V, so analogRead() gives 0 to 4095. The divider is fed from that same 3.3V. The exact supply voltage therefore drops out of the math, and the thermistor resistance is simply R = 10000 × (4095 / raw − 1).

Other temperature options. Want a digital waterproof probe with no resistor math? See Arduino UNO Q - Temperature Sensor with the DS18B20. For an oven or anything hotter than 105 °C, use Arduino UNO Q - MAX6675 Thermocouple Module.

Wiring Diagram

Three things meet at A0: one probe wire, one leg of the 10K resistor and the jumper wire from the board. The second probe wire goes to 3.3V, and the second resistor leg goes to GND. A small breadboard makes that A0 junction easy. No breadboard? Twist the resistor leg around the jumper wire, or solder it and cover it with heat-shrink tubing.
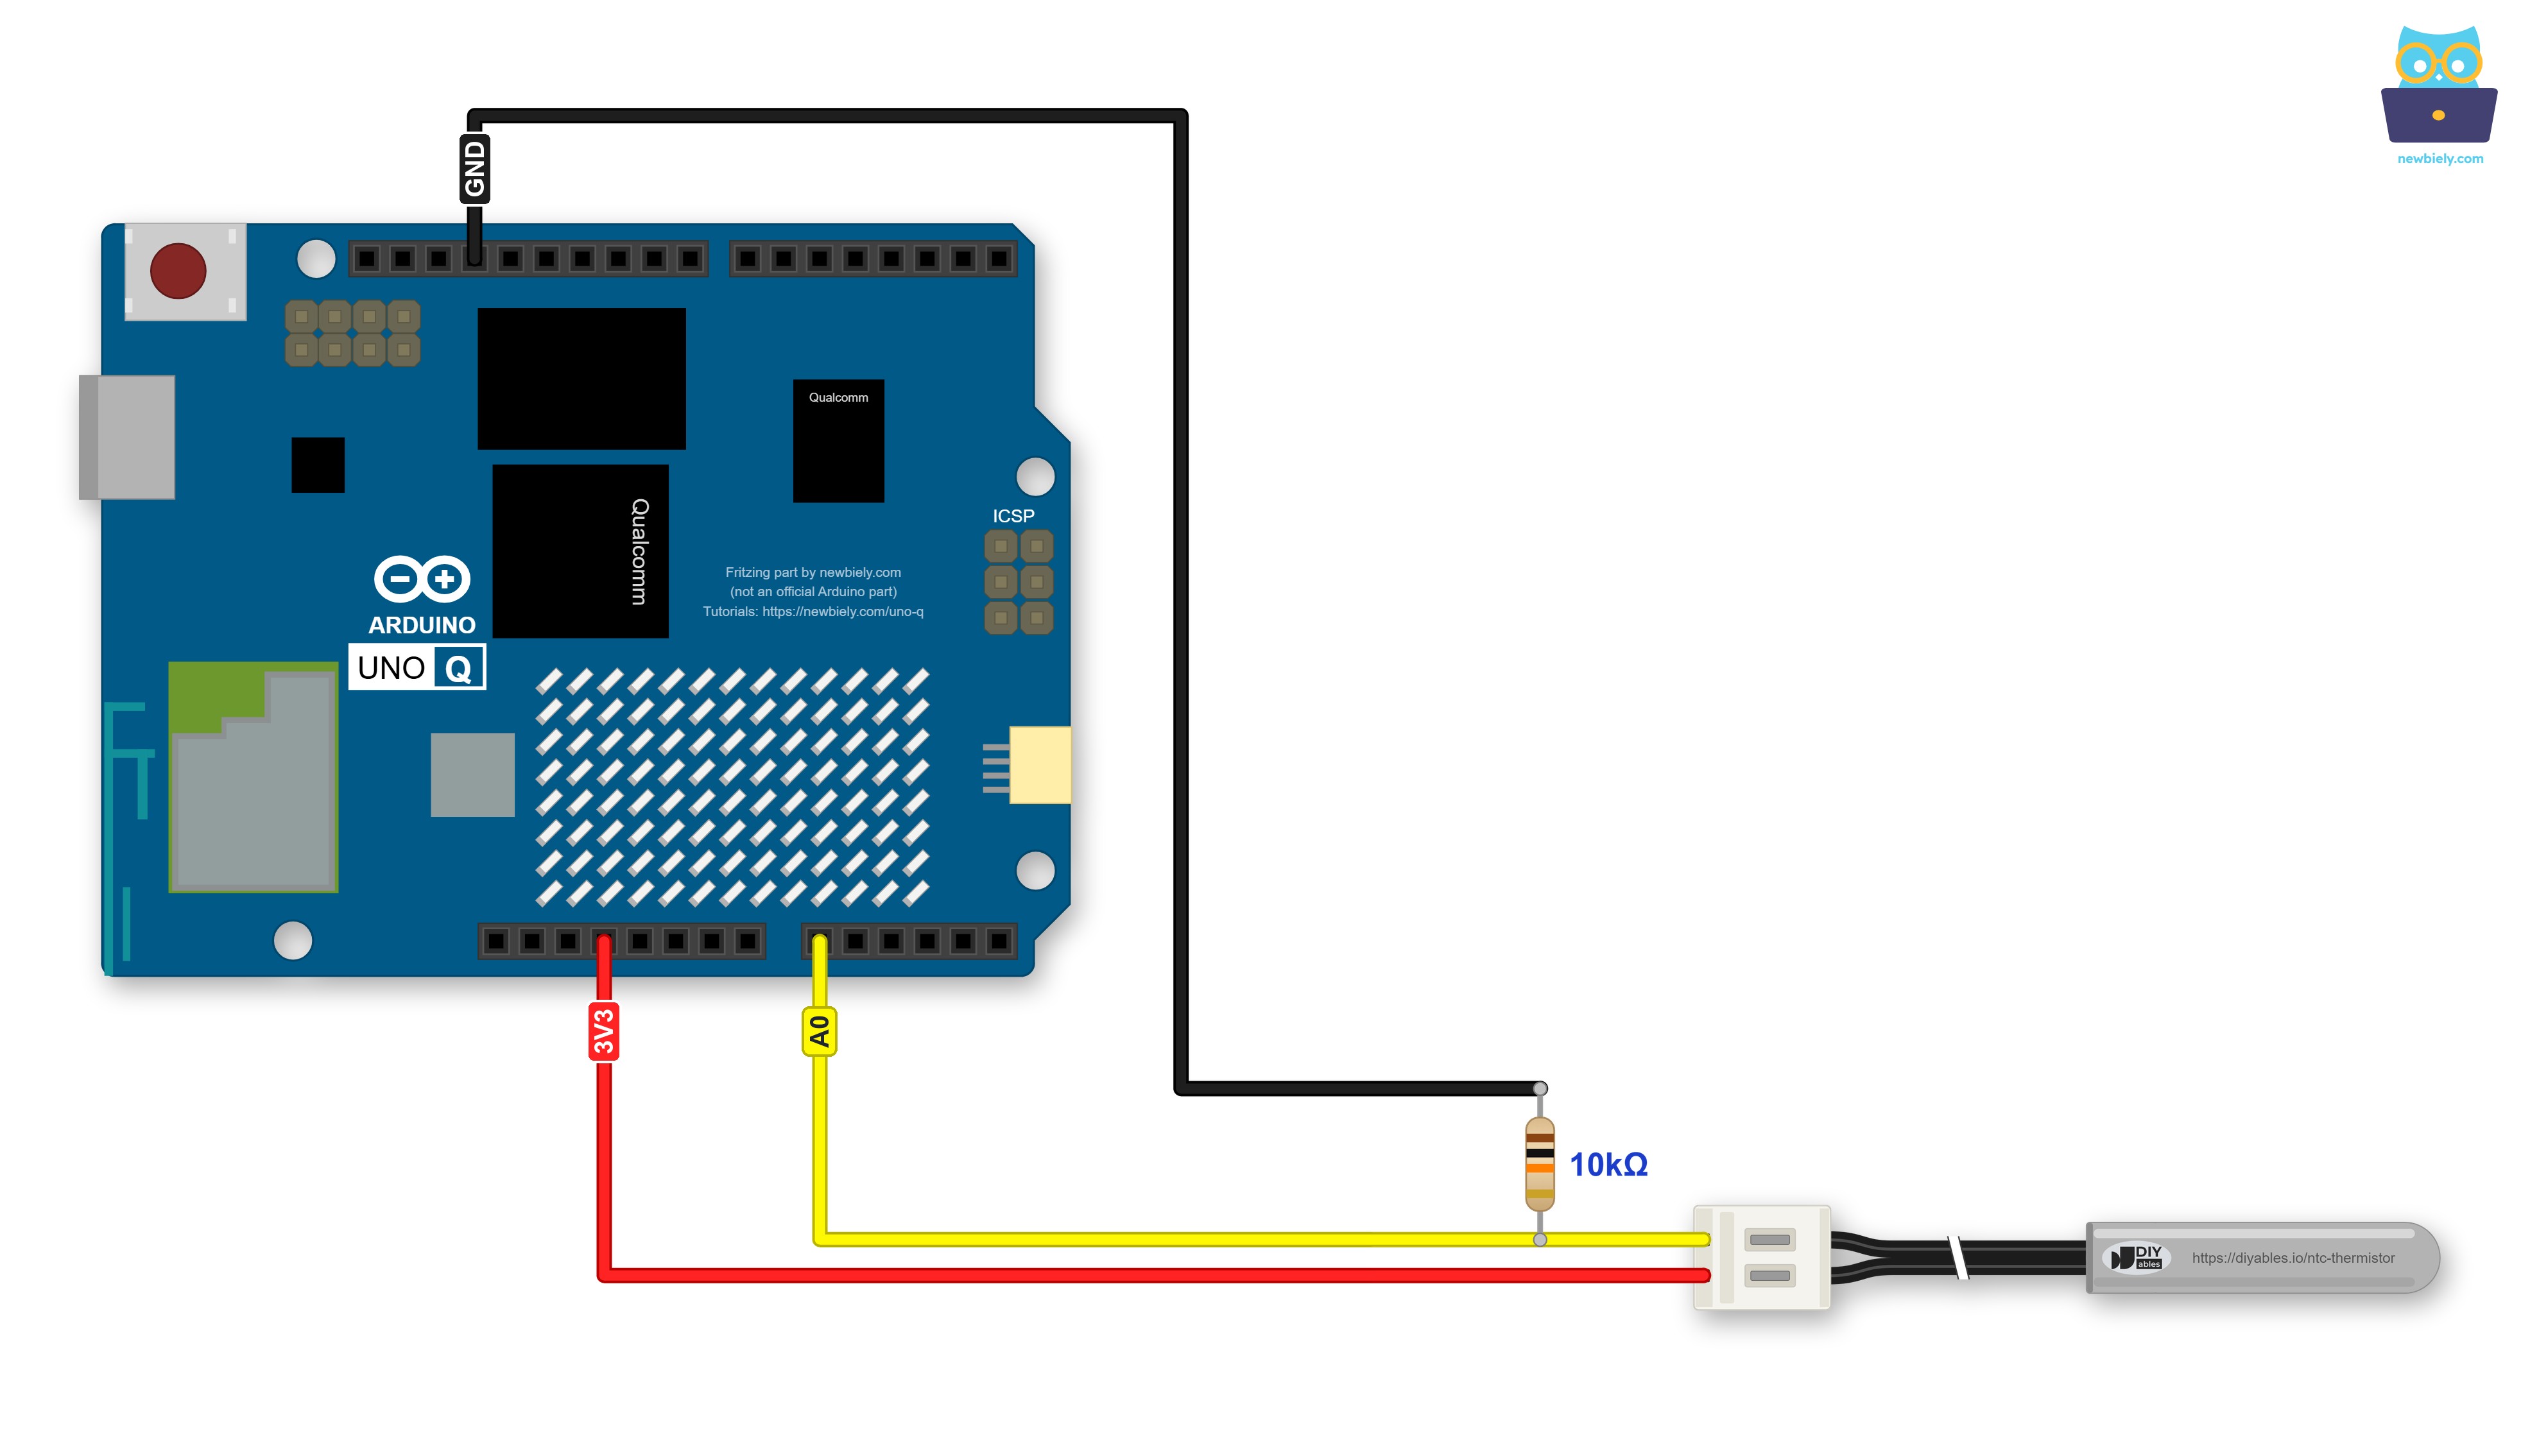
The wiring diagram between Arduino UNO Q NTC thermistor

This image is created using Fritzing. Click to enlarge image

Thermistor Circuit Arduino UNO Q Pin
One probe wire (either) 3.3V
Other probe wire A0
10K resistor, first leg A0
10K resistor, second leg GND

Pushing jumper wires into the headers is quick, but the wires can slip out. The Arduino UNO Q works with both the Proto Screw Terminal Block Shield and the Screw Shield V2. Both turn the header pins into screw terminals. Below is the wiring diagram with the Screw Shield V2.
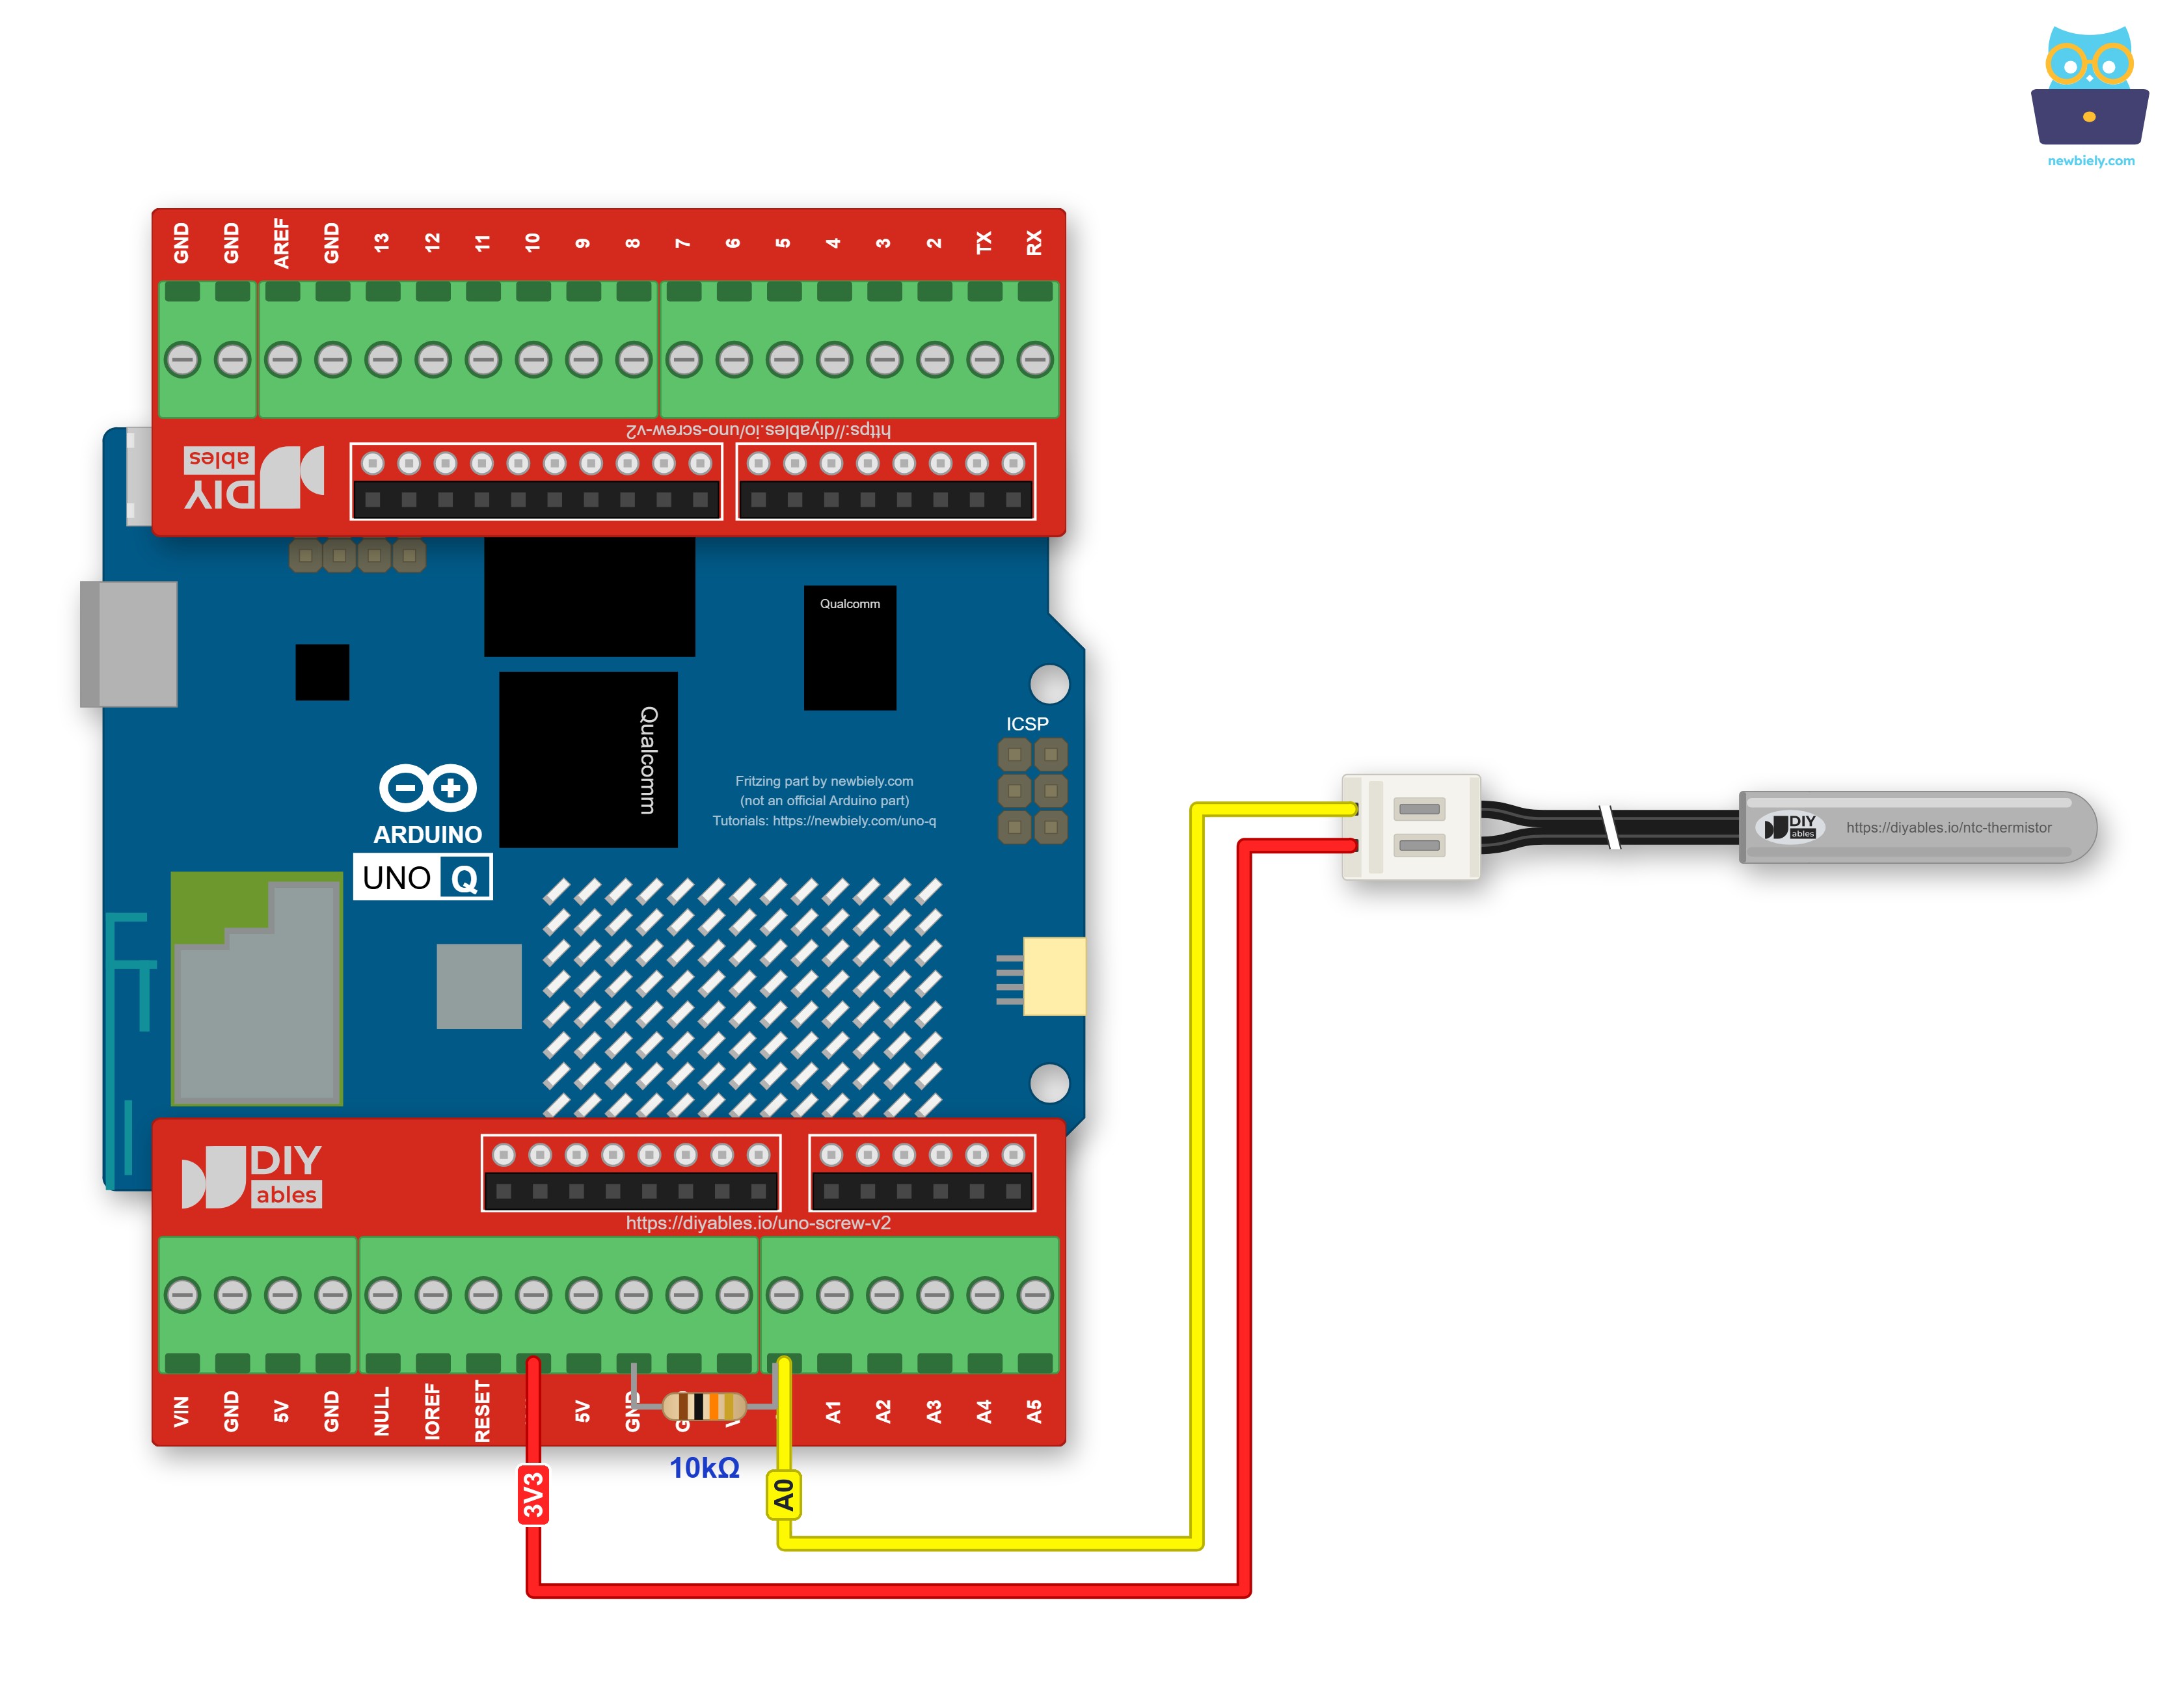
The wiring diagram between Arduino UNO Q NTC thermistor Screw Shield

This image is created using Fritzing. Click to enlarge image

With the shield, the resistor can skip the jumper wires too: put one leg in a GND screw terminal and the other in the A0 terminal next to the probe wire. One screw terminal holds two wires.

※ NOTE THAT:

⚠️ Feed the probe from 3.3V, never from 5V. When the tip gets hot, the thermistor's resistance falls and A0 climbs toward the supply. With 3.3V on top, A0 can never pass 3.3V. With 5V on top, it could. On the Arduino UNO Q this matters twice: the ADC tops out at 3.3V, and A0 and A1 are the two pins that are not 5V tolerant, so 5V there can damage the MCU.

Only the steel tip is waterproof. Keep the white plug, the resistor and the A0 junction dry and out of the water.

A0 is only an example. Any analog pin from A0 to A5 works the same way. If you move the wire, change NTC_PIN in the sketches.

How To Program For NTC Thermistor

No library is needed. The work is one analogRead() and a little math:

  1. Switch the ADC to 12 bits, once, in setup():
analogReadResolution(12); // analogRead() now returns 0 ... 4095
  1. Read A0 ten times and average, since a single sample can jump a few steps:
long sum = 0; for (int i = 0; i < 10; i++) { sum += analogRead(A0); delay(5); } float raw = sum / 10.0;
  1. Check the probe before you do any math. A value near 0 means no thermistor, because the 10K resistor pulls A0 down to GND. A value near 4095 means a short or a wrong wire:
if (raw < 30 || raw > 4065) { /* probe problem: skip the math and print a warning */ }
  1. Turn the reading into the thermistor resistance:
float r_ntc = 10000.0 * (4095.0 / raw - 1.0);
  1. Apply the B formula to get kelvin, then °C and °F. In Arduino code, log() is the natural logarithm:
float t_kelvin = 1.0 / (1.0 / 298.15 + log(r_ntc / 10000.0) / 3950.0); float temp_c = t_kelvin - 273.15; float temp_f = temp_c * 9.0 / 5.0 + 32.0;

Arduino UNO Q Code

A quick map of the two processors before you upload anything:

  • A0 belongs to the STM32 MCU, so the thermistor is read and converted there
  • The Qualcomm MPU with Debian Linux sits idle for now. It joins in the Bridge section
  • The sketch prints the ADC value, the thermistor resistance, °C and °F about once per second
/* * This Arduino UNO Q code was developed by newbiely.com * * This Arduino UNO Q code is made available for public use without any restriction * * For comprehensive instructions and wiring diagrams, please visit: * https://newbiely.com/tutorials/arduino-uno-q/arduino-uno-q-ntc-thermistor-temperature-sensor */ // Arduino UNO Q - NTC Thermistor Temperature Sensor (10K, B value 3950) // Wiring: thermistor wire 1 -> 3.3V, thermistor wire 2 -> A0, 10K resistor from A0 to GND // The divider runs on 3.3V, the same voltage the STM32 ADC measures against, // so only the ratio raw / 4095 matters, not the exact supply voltage. #define NTC_PIN A0 // The Arduino UNO Q pin between the thermistor and the 10K resistor #define ADC_MAX_VALUE 4095.0 // 12-bit ADC: 0 to 4095 #define R_FIXED 10000.0 // the 10K resistor from A0 to GND, in ohms #define R0_NTC 10000.0 // thermistor resistance at 25 °C, in ohms #define T0_KELVIN 298.15 // 25 °C in kelvin #define B_VALUE 3950.0 // B (beta) value of the probe #define SAMPLE_COUNT 10 // readings averaged for each result #define RAW_OPEN_LIMIT 30 // below this: no thermistor (the 10K pulls A0 down to GND) #define RAW_SHORT_LIMIT 4065 // above this: short circuit, or A0 wired straight to 3.3V // Read A0 several times and return the average, because one sample can jump a few steps float read_ntc_raw() { long sum = 0; for (int i = 0; i < SAMPLE_COUNT; i++) { sum += analogRead(NTC_PIN); delay(5); } return (float)sum / SAMPLE_COUNT; } void setup() { Serial.begin(115200); delay(1500); analogReadResolution(12); // analogRead() now returns 0 ... 4095 Serial.println("Arduino UNO Q NTC thermistor thermometer started"); } void loop() { float raw = read_ntc_raw(); if (raw < RAW_OPEN_LIMIT) { Serial.println("No thermistor found: check the 3.3V wire and the A0 wire"); } else if (raw > RAW_SHORT_LIMIT) { Serial.println("Reading stuck at the top: check for a short or a wrong wire"); } else { // Voltage divider: thermistor on the 3.3V side, 10K resistor on the GND side float r_ntc = R_FIXED * (ADC_MAX_VALUE / raw - 1.0); // B-parameter equation: 1/T = 1/T0 + ln(R/R0) / B, with T in kelvin (log() = natural log) float t_kelvin = 1.0 / (1.0 / T0_KELVIN + log(r_ntc / R0_NTC) / B_VALUE); float temp_c = t_kelvin - 273.15; float temp_f = temp_c * 9.0 / 5.0 + 32.0; Serial.print("ADC: "); Serial.print(raw, 0); Serial.print(" | NTC: "); Serial.print(r_ntc, 0); Serial.print(" ohm | "); Serial.print(temp_c, 2); Serial.print(" °C = "); Serial.print(temp_f, 2); Serial.println(" °F"); } delay(1000); // about one line per second }

Detailed Instructions

First time with the Arduino UNO Q? Set up Arduino App Lab with Getting Started with Arduino UNO Q first.

  • Wire it: One probe wire to 3.3V, the other to A0, and the 10K resistor from A0 to GND, as in the diagram.
  • Plug in: Connect the Arduino UNO Q to your computer with the USB-C cable.
  • Open App Lab: Start Arduino App Lab and wait until it finds the board.
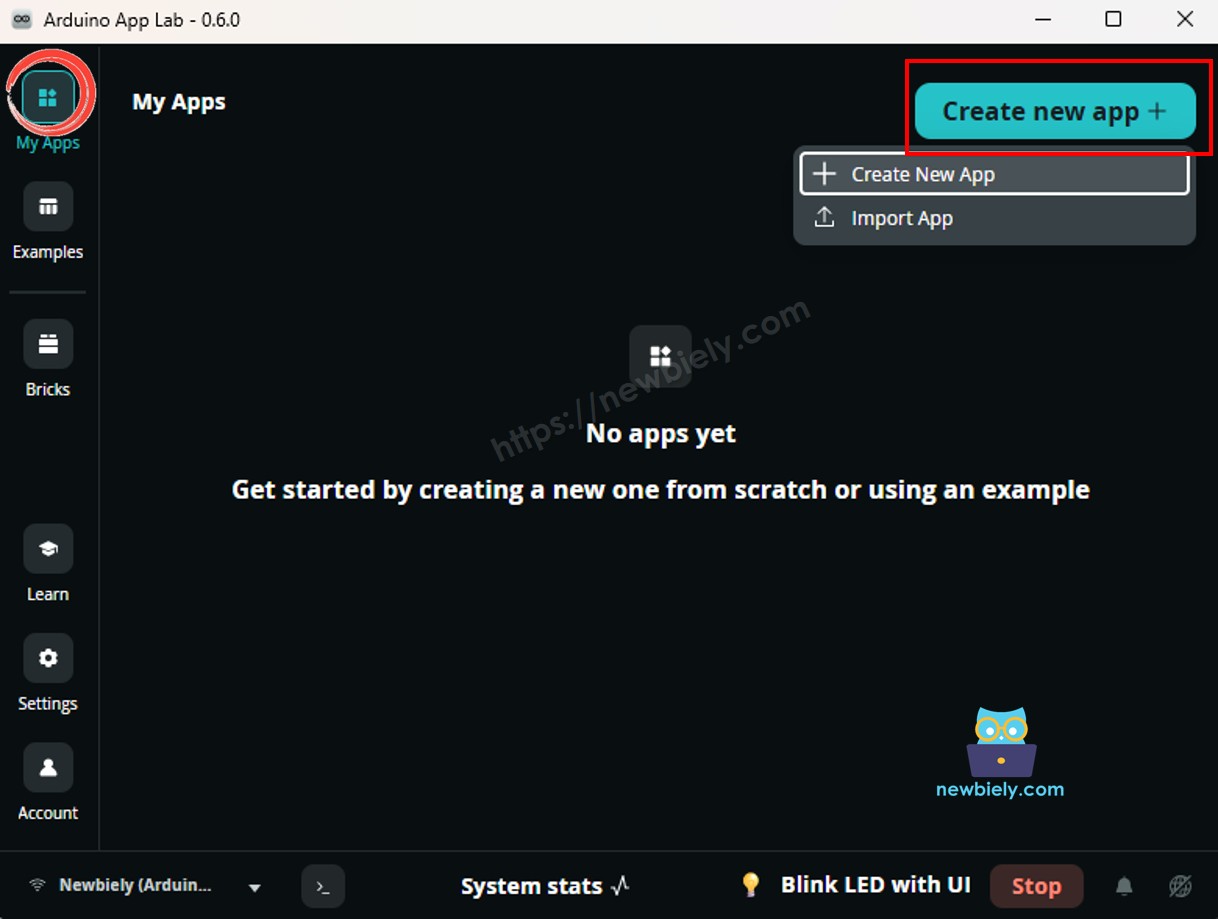
  • Create an App: Click Create New App.
Create New App in Arduino App Lab on Arduino UNO Q
  • Name it NtcThermistor and click Create.
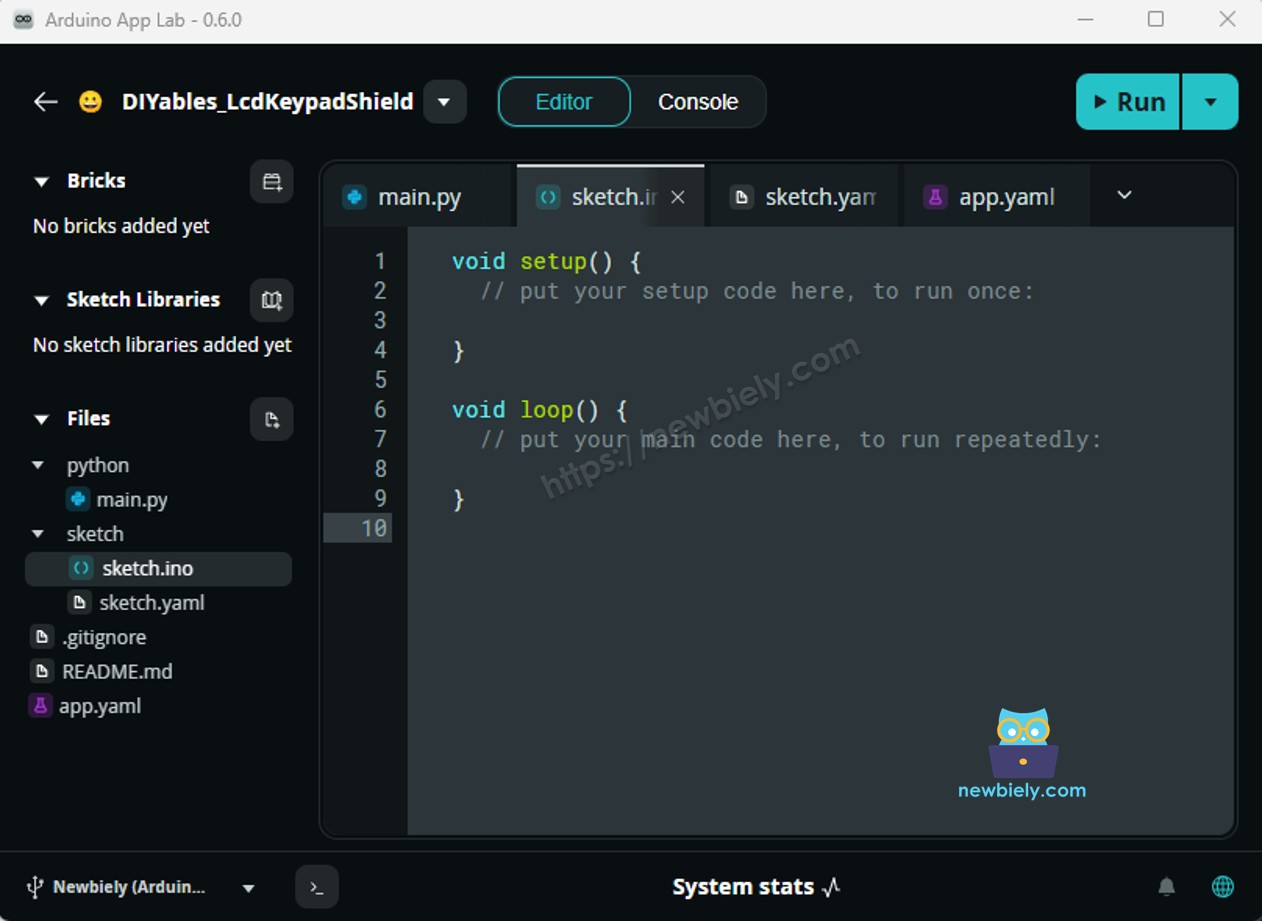
Arduino App Lab App folders and files on Arduino UNO Q
  • Paste: Open sketch/sketch.ino, delete what is in it and paste the code above. Nothing else needs to change.
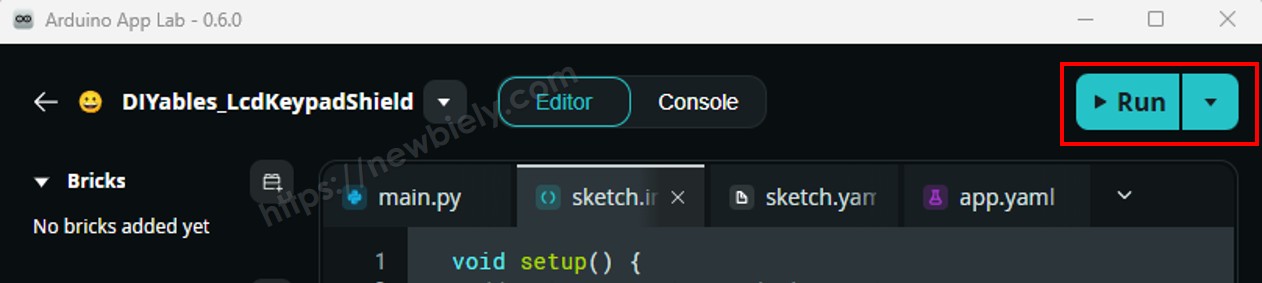
  • Run: Click the Run button.
Click Run button in Arduino App Lab on Arduino UNO Q
  • Ice test: Let a few lines go by at room temperature. Then put the steel tip into a glass of water with lots of ice, stir a little, and wait about half a minute.

App Lab Console Output

DIYables_Apps
Stop
sketch.ino
1#include "Arduino_RouterBridge.h"
Serial Monitor
Python
Message (Enter to send a message to "Newbiely" on usb(2820070321))
New Line
9600 baud
[2026-11-17 14:20:03] Arduino UNO Q NTC thermistor thermometer started [2026-11-17 14:20:04] ADC: 1903 | NTC: 11519 ohm | 21.85 °C = 71.33 °F [2026-11-17 14:20:05] ADC: 1899 | NTC: 11564 ohm | 21.77 °C = 71.18 °F [2026-11-17 14:20:06] ADC: 1904 | NTC: 11507 ohm | 21.87 °C = 71.37 °F [2026-11-17 14:20:12] ADC: 1761 | NTC: 13254 ohm | 18.79 °C = 65.83 °F [2026-11-17 14:20:14] ADC: 1517 | NTC: 16994 ohm | 13.53 °C = 56.35 °F [2026-11-17 14:20:17] ADC: 1290 | NTC: 21744 ohm | 8.49 °C = 47.28 °F [2026-11-17 14:20:21] ADC: 1134 | NTC: 26111 ohm | 4.86 °C = 40.75 °F [2026-11-17 14:20:27] ADC: 1049 | NTC: 29037 ohm | 2.80 °C = 37.03 °F [2026-11-17 14:20:35] ADC: 1002 | NTC: 30868 ohm | 1.62 °C = 34.92 °F [2026-11-17 14:20:44] ADC: 979 | NTC: 31828 ohm | 1.04 °C = 33.87 °F [2026-11-17 14:20:52] ADC: 976 | NTC: 31957 ohm | 0.96 °C = 33.73 °F

The first three lines come from the desk. Once the tip is in the ice water, the resistance climbs and the temperature falls: fast at first, then slower as the steel catches up. Ice water is 0 °C, and the probe settles just under 1 °C above it. That is the "about 1 °C" from above. If you see No thermistor found instead, a jumper wire has come out of the plug.

Bridge: Linux + MCU

The thermistor only reports. It never takes orders, so the data goes one way: up from the MCU to Linux.

  • The MCU measures once per second. It averages ten samples of A0, does the math and keeps the latest result
  • Four read-only values are offered with Bridge.provide():
    • get_temp_c — the temperature in °C, like 25.30
    • get_temp_f — the same in °F, like 77.53
    • get_ntc_ohms — the thermistor resistance, like 9869
    • get_probe_status — OK, OPEN (no thermistor) or SHORT
  • Python checks the status first. Then it reads the temperature every 2 seconds and keeps the lowest and highest value since the App started
  • No waiting: the MCU hands back numbers it already has, so a Bridge call never waits for the ADC
  • ⚠️ /dev/ttyHS1 (Linux) and Serial1 (MCU) are RESERVED by the router. Never open them in your code

In short: the water warms the tip → the MCU reads A0 and does the math → Python calls get_temp_c → Linux knows the temperature.

MCU Code (Bridge)

/* * This Arduino UNO Q code was developed by newbiely.com * * This Arduino UNO Q code is made available for public use without any restriction * * For comprehensive instructions and wiring diagrams, please visit: * https://newbiely.com/tutorials/arduino-uno-q/arduino-uno-q-ntc-thermistor-temperature-sensor */ // Arduino UNO Q - NTC Thermistor Temperature Sensor, shared with Linux via Bridge // Wiring: thermistor wire 1 -> 3.3V, thermistor wire 2 -> A0, 10K resistor from A0 to GND // The MCU measures once per second and keeps the latest result. // Python on Linux only asks for these values. It never reads A0 itself. #include "Arduino_RouterBridge.h" #define NTC_PIN A0 #define ADC_MAX_VALUE 4095.0 // 12-bit ADC #define R_FIXED 10000.0 // the 10K resistor from A0 to GND #define R0_NTC 10000.0 // thermistor resistance at 25 °C #define T0_KELVIN 298.15 // 25 °C in kelvin #define B_VALUE 3950.0 #define SAMPLE_COUNT 10 #define RAW_OPEN_LIMIT 30 // no thermistor #define RAW_SHORT_LIMIT 4065 // short circuit or wrong wire float temp_c = 0.0; // latest good temperature, in °C float temp_f = 32.0; // the same, in °F float r_ntc = 0.0; // latest thermistor resistance, in ohms const char* probe_status = "OK"; // "OK", "OPEN" or "SHORT" unsigned long last_sample_ms = 0; void sample_ntc() { long sum = 0; for (int i = 0; i < SAMPLE_COUNT; i++) { sum += analogRead(NTC_PIN); delay(5); } float raw = (float)sum / SAMPLE_COUNT; // A bad probe keeps the last good numbers and only changes the status if (raw < RAW_OPEN_LIMIT) { probe_status = "OPEN"; return; } if (raw > RAW_SHORT_LIMIT) { probe_status = "SHORT"; return; } probe_status = "OK"; r_ntc = R_FIXED * (ADC_MAX_VALUE / raw - 1.0); float t_kelvin = 1.0 / (1.0 / T0_KELVIN + log(r_ntc / R0_NTC) / B_VALUE); temp_c = t_kelvin - 273.15; temp_f = temp_c * 9.0 / 5.0 + 32.0; } // Read-only values for Python String get_temp_c(String arg) { return String(temp_c, 2); } String get_temp_f(String arg) { return String(temp_f, 2); } String get_ntc_ohms(String arg) { return String(r_ntc, 0); } String get_probe_status(String arg) { return String(probe_status); } void setup() { Bridge.begin(); Monitor.begin(); analogReadResolution(12); sample_ntc(); Bridge.provide("get_temp_c", get_temp_c); Bridge.provide("get_temp_f", get_temp_f); Bridge.provide("get_ntc_ohms", get_ntc_ohms); Bridge.provide("get_probe_status", get_probe_status); Monitor.println("Arduino UNO Q NTC thermistor Bridge ready"); } void loop() { if (millis() - last_sample_ms >= 1000) { last_sample_ms = millis(); sample_ntc(); } }

Python Code (Bridge)

""" This Arduino UNO Q script was developed by newbiely.com This Arduino UNO Q script is made available for public use without any restriction For comprehensive instructions and wiring diagrams, please visit: https://newbiely.com/tutorials/arduino-uno-q/arduino-uno-q-ntc-thermistor-temperature-sensor """ from arduino.app_utils import * import time # Linux side: every 2 seconds, ask the MCU for the thermistor reading and print it, # together with the lowest and highest temperature seen since the App started. low_c = None high_c = None def loop(): global low_c, high_c status = str(Bridge.call("get_probe_status")) # "OK", "OPEN" or "SHORT" if status != "OK": print(f"Probe problem: {status}. Check the thermistor wires.") time.sleep(2) return temp_c = float(str(Bridge.call("get_temp_c"))) # e.g. 25.30 temp_f = float(str(Bridge.call("get_temp_f"))) # e.g. 77.53 ohms = str(Bridge.call("get_ntc_ohms")) # e.g. "9869" low_c = temp_c if low_c is None else min(low_c, temp_c) high_c = temp_c if high_c is None else max(high_c, temp_c) print(f"{temp_c:.2f} °C / {temp_f:.2f} °F, NTC {ohms} ohm (low {low_c:.2f}, high {high_c:.2f})") time.sleep(2) App.run(user_loop=loop)

Detailed Instructions

  • New App: In Arduino App Lab, click Create New App and name it NtcThermistorBridge.
  • MCU part: Paste the MCU code into sketch/sketch.ino and add the Bridge library:
  • Install the library: Click the Add sketch library button (the open book icon with a + sign) in the left sidebar.
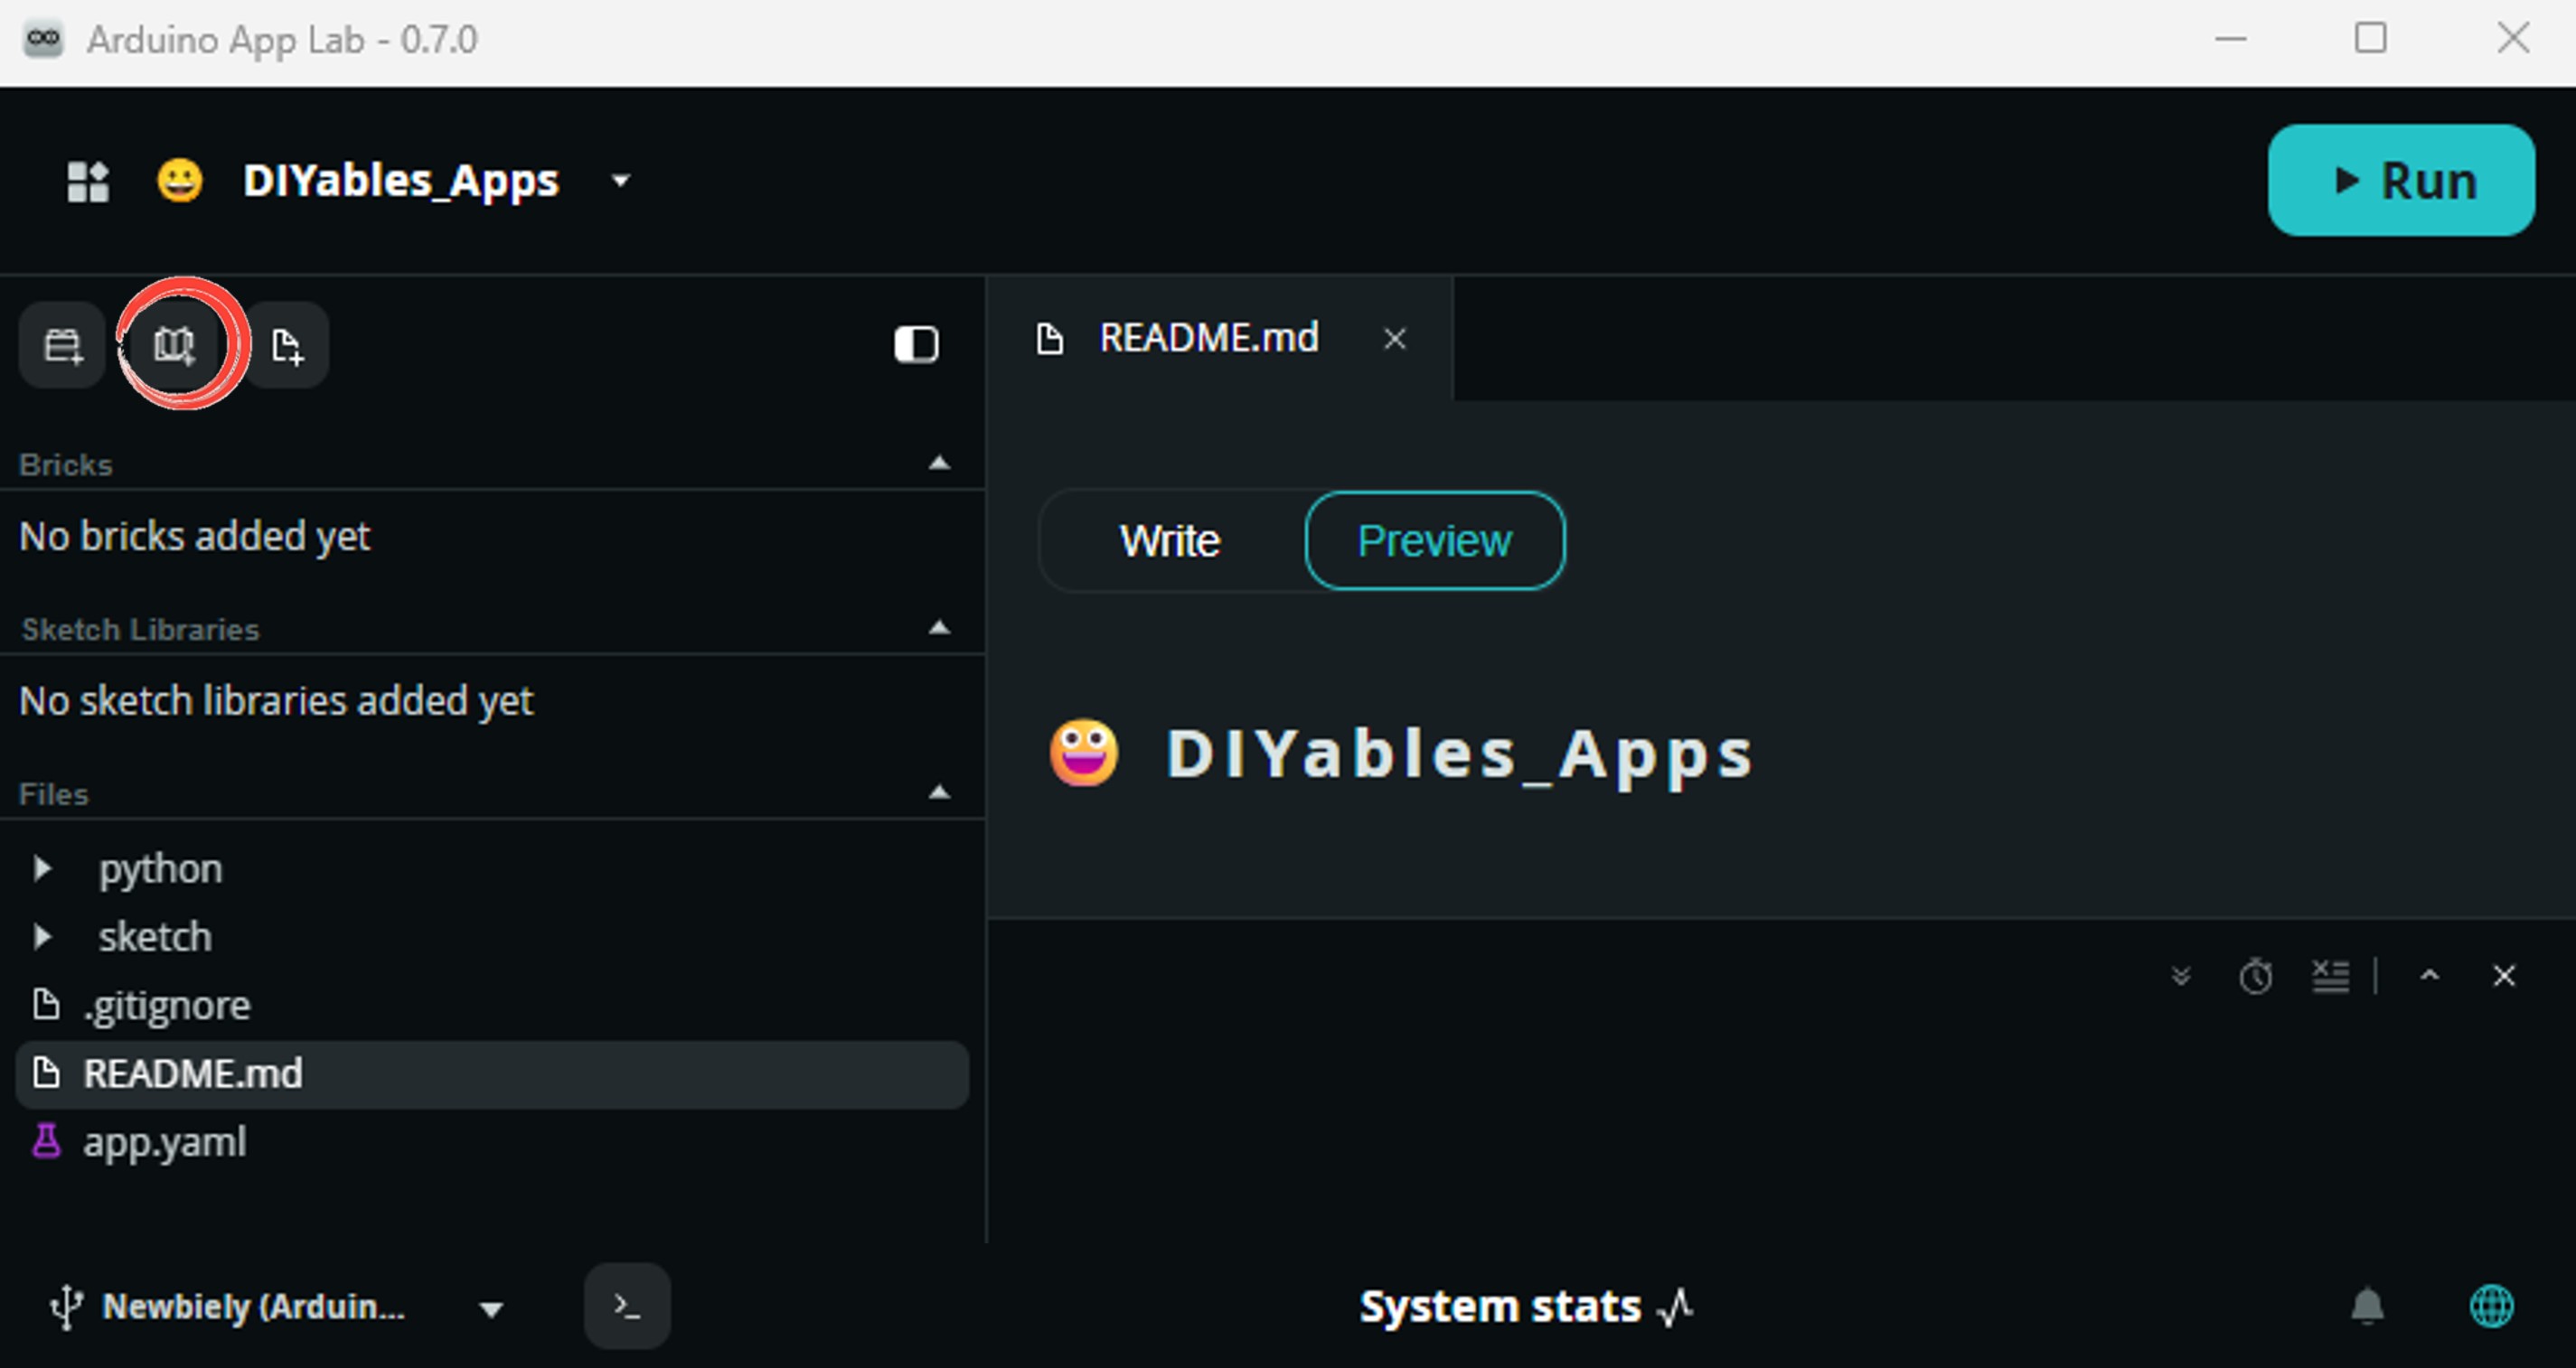
Add sketch library in Arduino App Lab on Arduino UNO Q
  • Search for Arduino_RouterBridge created by Arduino and click the Install button.
My Apps / DIYables Apps
Run
Bricks
No bricks added...
Sketch Libraries
No sketch libra...
Files
python
sketch
.gitignore
README.md
app.yaml
sketch.ino
Add sketch library
Arduino_RouterBridge Arduino

This library provides a simple RPC bridge for Arduino UNO Q boards, allowing communication between the board and other devices using MsgPack serialization.

0.4.1
Install
More Info
  • Linux part: Paste the Python code into the Python file of the same App.
  • Run: Click the Run button.
  • Into the tank: Start with the probe in the room air, then lower the tip into your aquarium (a bowl of lukewarm water works too) and watch the Python console.

App Lab Console Output

DIYables_Apps
Stop
sketch.ino
1#include "Arduino_RouterBridge.h"
Serial Monitor
Python
Message (Enter to send a message to "Newbiely" on usb(2820070321))
New Line
9600 baud
[2026-11-17 18:31:40] Arduino UNO Q NTC thermistor Bridge ready
DIYables_Apps
Stop
sketch.ino
1#include "Arduino_RouterBridge.h"
Serial Monitor
Python
[2026-11-17 18:31:41] 21.90 °C / 71.41 °F, NTC 11496 ohm (low 21.90, high 21.90) [2026-11-17 18:31:43] 21.83 °C / 71.29 °F, NTC 11530 ohm (low 21.83, high 21.90) [2026-11-17 18:31:51] 22.46 °C / 72.42 °F, NTC 11207 ohm (low 21.83, high 22.46) [2026-11-17 18:31:53] 23.68 °C / 74.62 °F, NTC 10609 ohm (low 21.83, high 23.68) [2026-11-17 18:31:55] 24.70 °C / 76.47 °F, NTC 10133 ohm (low 21.83, high 24.70) [2026-11-17 18:31:59] 25.30 °C / 77.53 °F, NTC 9869 ohm (low 21.83, high 25.30) [2026-11-17 18:32:07] 25.54 °C / 77.97 °F, NTC 9764 ohm (low 21.83, high 25.54) [2026-11-17 18:32:17] 25.63 °C / 78.13 °F, NTC 9725 ohm (low 21.83, high 25.63)

The low value keeps the room reading, while the high value follows the water up. Look at the last three lines: the steps get small because the steel tip needs a little time to reach the water temperature. Give it 20 to 30 seconds before you trust a new reading.

Telegram

Most tropical fish are happy between about 24 °C and 28 °C. Below 22 °C or above 30 °C they get stressed. A heater that fails at night, or a hot summer afternoon, can push the tank out of that range long before anyone looks. So hang the probe inside the tank, keep the plug and the resistor outside and dry, and let the UNO Q watch the water. The bot answers /temp at any time and messages you by itself when the water leaves the safe range.

Command What it does
/temp water temperature now, in °C and °F
/range the safe range the bot uses
/start turn on water alerts for this chat
/stop turn off water alerts for this chat

How the alerts work:

  • Only chats that sent /start get them, so the script needs no chat ID
  • The bot writes only when the water changes state: OK to TOO COLD, OK to TOO HOT, back to OK, or a probe problem. While the water stays cold, it does not repeat itself every second
  • "Back to normal" waits until the water is 0.5 °C inside the range again (22.5 °C or 29.5 °C). Without that gap, water sitting right at 22.0 °C would send a new message on every small wobble
  • Keep other fish? Change TOO_COLD_C, TOO_HOT_C or HYSTERESIS_C at the top of the script. Goldfish, for example, like cooler water

MCU sketch: Keep the MCU sketch from the Bridge section. It needs no change.

Python Code (Telegram)

""" This Arduino UNO Q script was developed by newbiely.com This Arduino UNO Q script is made available for public use without any restriction For comprehensive instructions and wiring diagrams, please visit: https://newbiely.com/tutorials/arduino-uno-q/arduino-uno-q-ntc-thermistor-temperature-sensor """ from arduino.app_utils import * import requests # Aquarium water guard for the 10K NTC thermistor probe. # /temp answers with the water temperature. # Chats that sent /start get a message when the water leaves the safe range # (below 22 °C or above 30 °C), and one more when it is back to normal. # Keep the MCU sketch from the Bridge section. TELEGRAM_BOT_TOKEN = "YOUR_TELEGRAM_BOT_TOKEN" API_URL = f"https://api.telegram.org/bot{TELEGRAM_BOT_TOKEN}" TOO_COLD_C = 22.0 # below this, the water is too cold for most tropical fish TOO_HOT_C = 30.0 # above this, warm water holds too little oxygen HYSTERESIS_C = 0.5 # the water must come this far back inside the range before "back to normal" last_update_id = 0 water_state = "OK" # "OK", "COLD", "HOT" or "PROBE" subscribers = set() # chats that receive the automatic messages HELP_TEXT = ( "Arduino UNO Q Aquarium Bot\n" "/temp - water temperature now\n" "/range - the safe range\n" "/start - turn on water alerts for this chat\n" "/stop - turn off water alerts" ) STATE_LABEL = {"OK": "OK", "COLD": "TOO COLD", "HOT": "TOO HOT"} def get_updates(): try: resp = requests.get(f"{API_URL}/getUpdates", params={"offset": last_update_id + 1, "timeout": 1}, timeout=5) data = resp.json() if data.get("ok"): return data["result"] except Exception as e: print(f"Error getting updates: {e}") return [] def send_message(chat_id, text): try: requests.post(f"{API_URL}/sendMessage", data={"chat_id": chat_id, "text": text}, timeout=10) except Exception as e: print(f"Error sending message: {e}") def read_water(): status = str(Bridge.call("get_probe_status")) # "OK", "OPEN" or "SHORT" temp_c = float(str(Bridge.call("get_temp_c"))) return status, temp_c def next_state(state, status, temp_c): if status != "OK": return "PROBE" if temp_c < TOO_COLD_C: return "COLD" if temp_c > TOO_HOT_C: return "HOT" # Inside the range: leave COLD or HOT only after the water came back by HYSTERESIS_C if state == "COLD" and temp_c < TOO_COLD_C + HYSTERESIS_C: return "COLD" if state == "HOT" and temp_c > TOO_HOT_C - HYSTERESIS_C: return "HOT" return "OK" def state_message(state, temp_c): if state == "COLD": return f"Too cold! Tank water is {temp_c:.1f} °C. Check the heater." if state == "HOT": return f"Too hot! Tank water is {temp_c:.1f} °C. Check the heater and the room." if state == "PROBE": return "Probe problem: no valid reading. Check the thermistor wires." return f"Back to normal: tank water is {temp_c:.1f} °C." def handle(chat_id, text): if text == "/start": subscribers.add(chat_id) return f"Water alerts are ON for this chat. Safe range: {TOO_COLD_C:.1f} to {TOO_HOT_C:.1f} °C." if text == "/stop": subscribers.discard(chat_id) return "Water alerts are OFF for this chat." if text == "/range": return f"Safe range: {TOO_COLD_C:.1f} to {TOO_HOT_C:.1f} °C." if text == "/temp": status, temp_c = read_water() if status != "OK": return f"Probe problem ({status}). Check the thermistor wires." temp_f = temp_c * 9.0 / 5.0 + 32.0 label = STATE_LABEL.get(water_state, "OK") return f"Tank water: {temp_c:.1f} °C ({temp_f:.1f} °F) - {label}" return HELP_TEXT def loop(): global last_update_id, water_state # 1. Automatic message, only when the water state changes (no repeats every second) try: status, temp_c = read_water() new_state = next_state(water_state, status, temp_c) if new_state != water_state: water_state = new_state msg = state_message(new_state, temp_c) print(msg) for chat_id in subscribers: send_message(chat_id, msg) except ValueError: pass # 2. Answer commands (getUpdates waits up to 1 second, which also paces the loop) for update in get_updates(): last_update_id = update["update_id"] if "message" not in update: continue chat_id = update["message"]["chat"]["id"] text = update["message"].get("text", "").strip().lower() print(f"Received: {text}") send_message(chat_id, handle(chat_id, text)) App.run(user_loop=loop)

Detailed Instructions

  • Token: Make a bot with @BotFather and paste its token into TELEGRAM_BOT_TOKEN. Never done this? Follow How to Create a Telegram Bot.
  • Swap the script: Open the NtcThermistorBridge App and replace its Python code with the bot script. The sketch stays as it is.
  • Run: Click the Run button.
  • Subscribe: In Telegram, open your bot and send /start, then /temp.
  • Test the alert: Without fish, a cup of cold tap water is enough. Move the probe from warm water into the cold cup and wait for the message.
  • Keep in mind: The /start list lives in memory only. Send /start again after you restart the App.

App Lab Console Output

DIYables_Apps
Stop
sketch.ino
1#include "Arduino_RouterBridge.h"
Serial Monitor
Python
[2026-11-17 22:05:11] Received: /start [2026-11-17 22:05:30] Received: /temp [2026-11-18 03:12:46] Too cold! Tank water is 21.9 °C. Check the heater. [2026-11-18 07:41:02] Received: /temp [2026-11-18 08:26:37] Back to normal: tank water is 22.5 °C.
Telegram
Telegram 12:45
Welcome to Telegram!
ArduinoBot 10:19
Chatting with Arduino...
telegram-botfather
BotFather Yesterday
Your bot has been created.

ArduinoBot

bot
Today
/start
10:15 AM ✓✓
Water alerts are ON for this chat. Safe range: 22.0 to 30.0 °C.
10:16 AM
/temp
10:17 AM ✓✓
Tank water: 24.6 °C (76.3 °F) - OK
10:18 AM
Too cold! Tank water is 21.9 °C. Check the heater.
10:19 AM
/temp
10:20 AM ✓✓
Tank water: 21.2 °C (70.2 °F) - TOO COLD
10:21 AM
Back to normal: tank water is 22.5 °C.
10:22 AM

The heater stopped a little after midnight, and the water fell below 22 °C at 03:12. One alert went out. Over the next five hours the bot stayed quiet, even though the water kept cooling. The heater was fixed in the morning, and the all-clear came only when the water reached 22.5 °C.

OpenClaw

You can adapt the OpenClaw to this tutorial by refering the instruction on Arduino Uno Q - OpenClaw Tutorial

Project Ideas

A waterproof probe that costs very little fits many places:

  • Fridge Door Watch: Put the probe inside the fridge. If the inside climbs above 8 °C for ten minutes, the door is probably open, and Telegram tells you.
  • Home Brew Log: Python on Linux saves the fermenter temperature to a CSV file every minute, from the first day to bottling, and plots the curve.
  • Hot Water Ready: Tape the probe to the outlet pipe of a water heater. Linux sends a message when the water is hot enough for a shower. Keep it under 105 °C.
  • Seed Tray Heater: Push the probe into the soil. The MCU switches a heat mat through a relay to keep the seeds near 24 °C.
  • Inside vs Outside: Add a second probe with its own 10K resistor on A2. A small web page from the Linux side shows both temperatures side by side.

Challenge Yourself

Ready for more?

  • Easy: Print only one decimal, and add up or down at the end of each line to show which way the temperature moved since the last reading.
  • Medium: Add a Bridge value get_trend that returns how many °C the temperature changed in the last minute. Give the Telegram bot a /trend command that reads it.
  • Advanced: Calibrate your own probe with the Steinhart-Hart equation. Measure it in ice water (0 °C), at room temperature next to a good thermometer, and in hot water. Work out the three coefficients and compare the result with the B formula.

Function References

※ OUR MESSAGES

  • As freelancers, We are AVAILABLE for HIRE. See how to outsource your project to us
  • Please feel free to share the link of this tutorial. However, Please do not use our content on any other websites. We invested a lot of effort and time to create the content, please respect our work!