
Arduino UNO Q - Slide Switch
A slide switch is the small switch you push left or right on a toy, a flashlight or a power bank. You move the handle once, and it stays there. That makes it a simple way to give a project a setting: mode A or mode B, armed or disarmed, sound on or sound off. On the Arduino UNO Q, the STM32 MCU reads where the handle is, and the Linux side can use that position in Python or send it to your phone.
What you will learn here:
- How the DIYables Mini Slide Switch SS12D10 works, and which of its three legs is COM
- Why pin 3 of the switch goes to 3.3V on the Arduino UNO Q
- How to wire it with three jumper wires and no resistor
- How to print ON or OFF each time the handle moves, with a short debounce
- How to save one wire with INPUT_PULLUP, and why the logic then flips
- How Python on Linux reads the position, the time in that position, and the number of moves through Bridge
- How to make a Telegram arm switch that messages you on every move and answers /status
- How to use OpenClaw on Arduino UNO Q with the slide switch
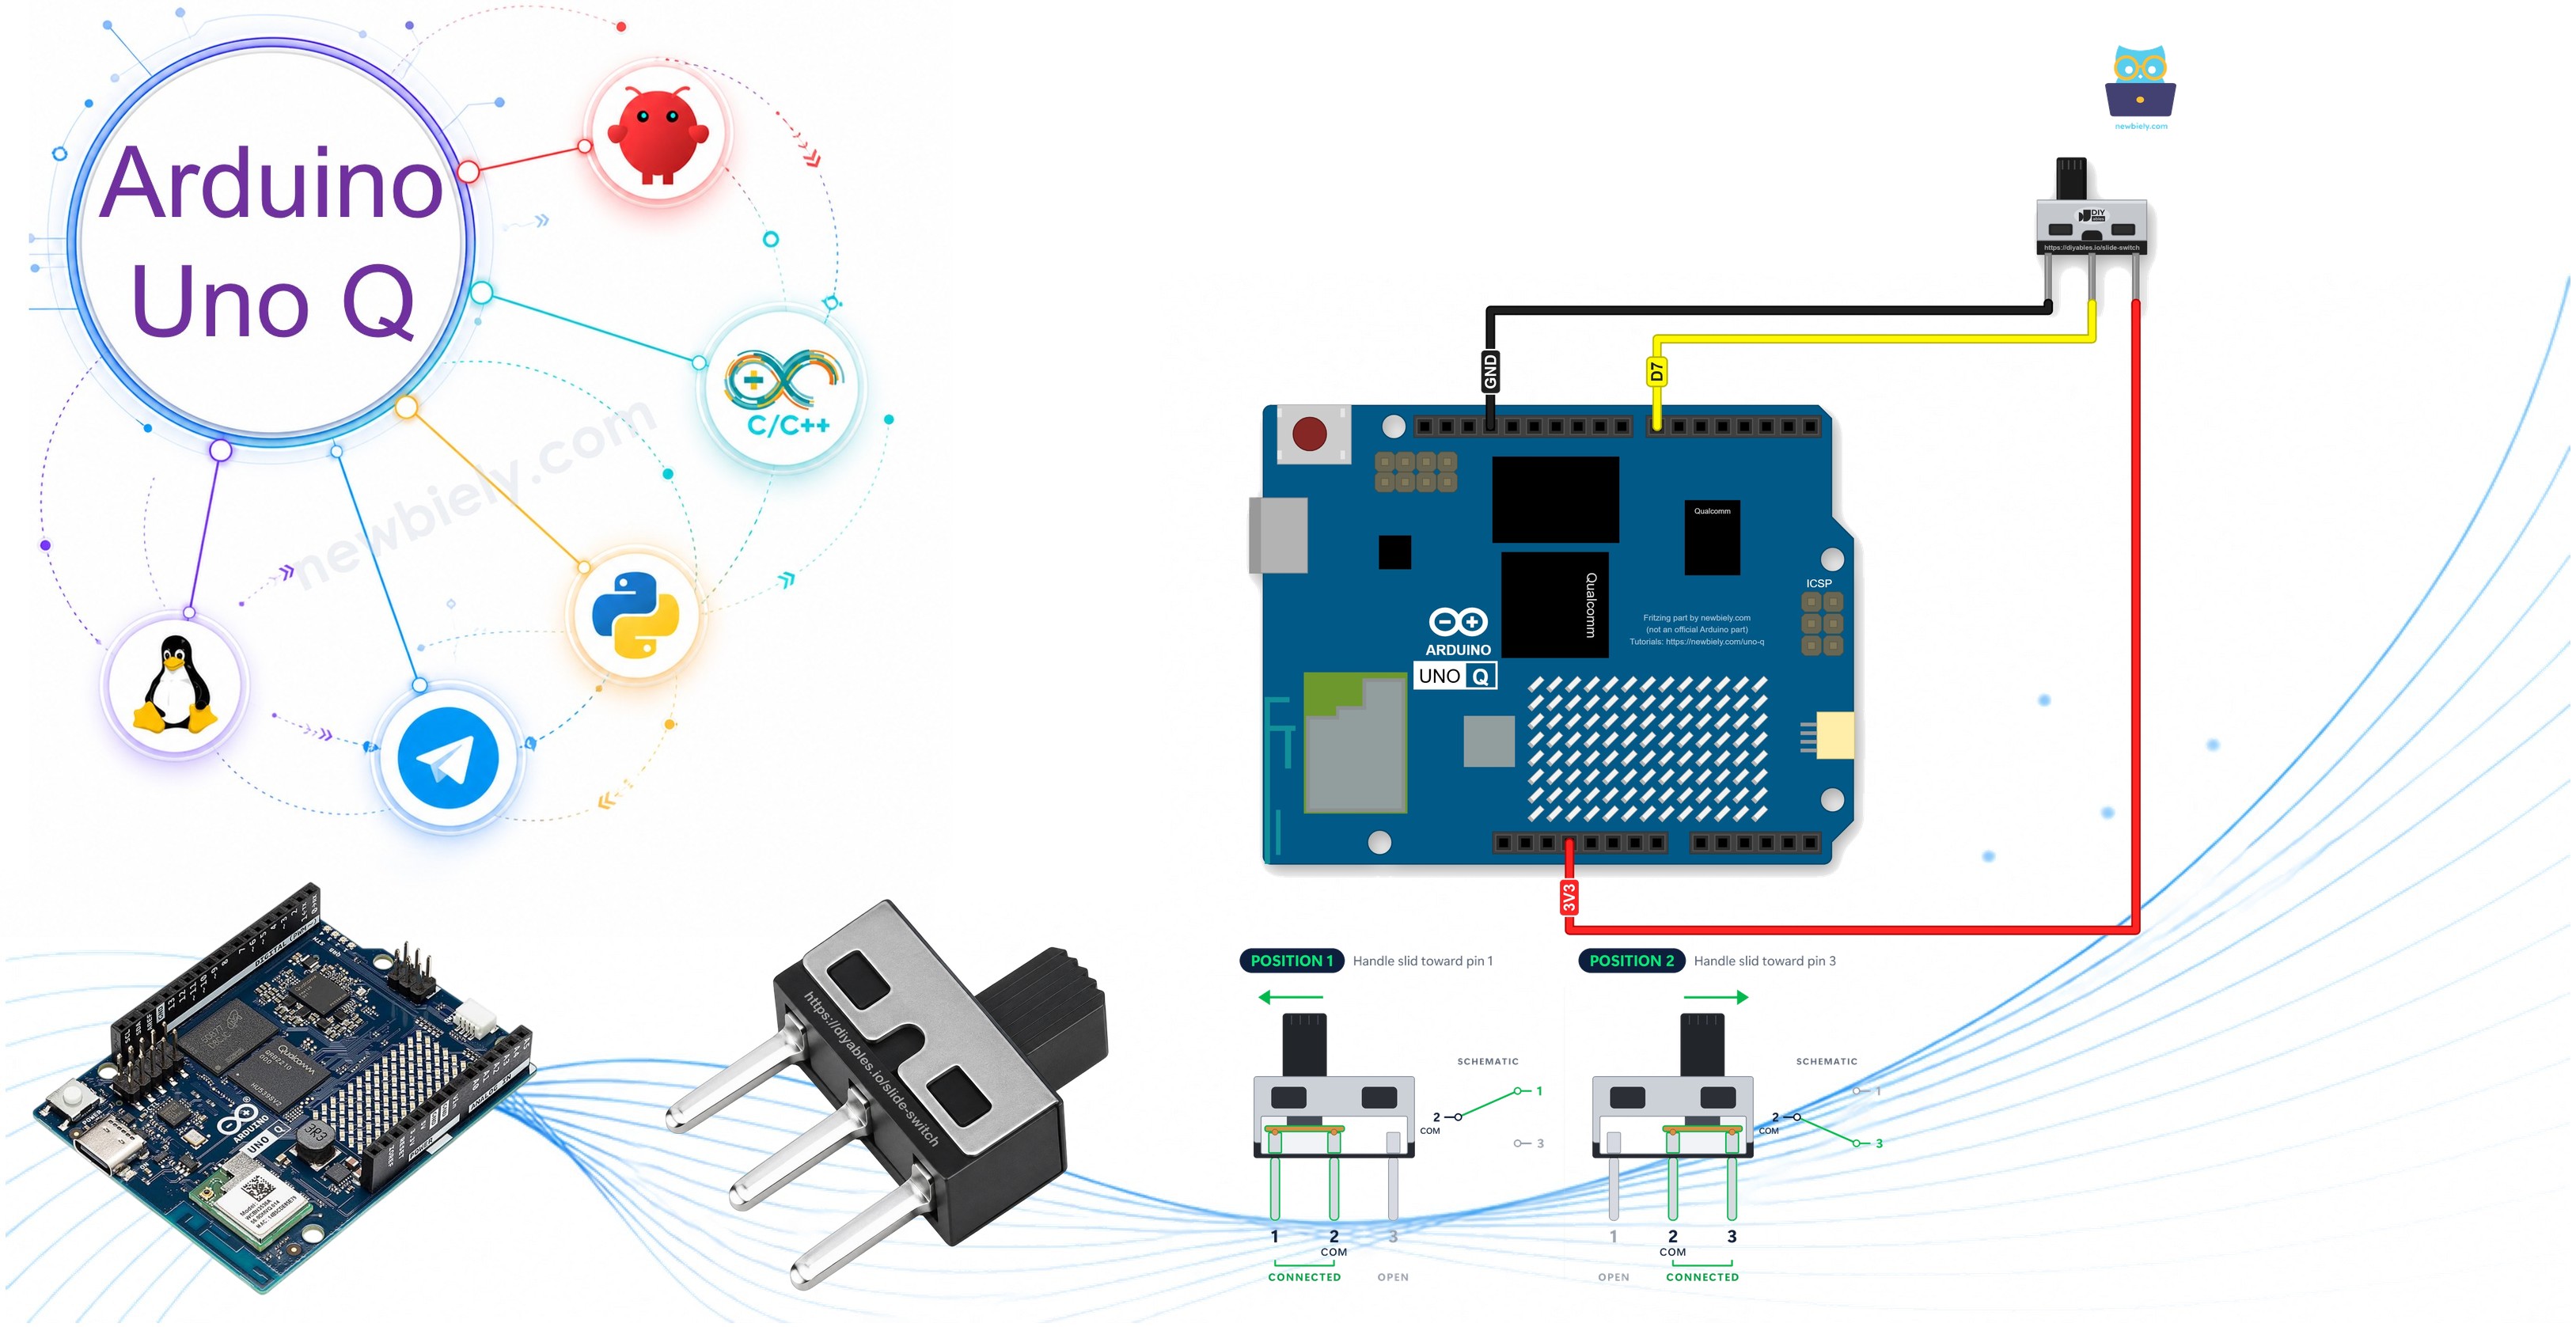
Hardware Preparation
Or you can buy the following kits:
| 1 | × | DIYables Sensor Kit (18 sensors/displays) |
Additionally, some of these links are for products from our own brand, DIYables .
Overview of the Slide Switch
The DIYables Mini Slide Switch SS12D10 is a tiny switch with a sliding handle on top and three legs in a row underneath. Push the handle to one side and it stays there until you push it back. A push button works the other way: it springs back the moment you let go. In switch terms, the SS12D10 is SPDT (single pole, double throw), also written 1P2T.
| Item | Value |
|---|---|
| Contact type | SPDT (1P2T), 2 positions |
| Pins | 3, with 4.7 mm pitch |
| Terminal length | 6.9 mm |
| Handle length | 5 mm |
| Body size | about 12.8 x 6.7 x 18.2 mm |
| Mounting | Vertical through-hole |
| Contacts | Silver-plated brass |
| Contact rating | AC 125V 2A |
| Life | More than 100,000 switching cycles |
| Operating temperature | -25°C to 80°C |
The 125V 2A rating is what the contacts can carry. In this tutorial, only a tiny signal current goes through the switch.
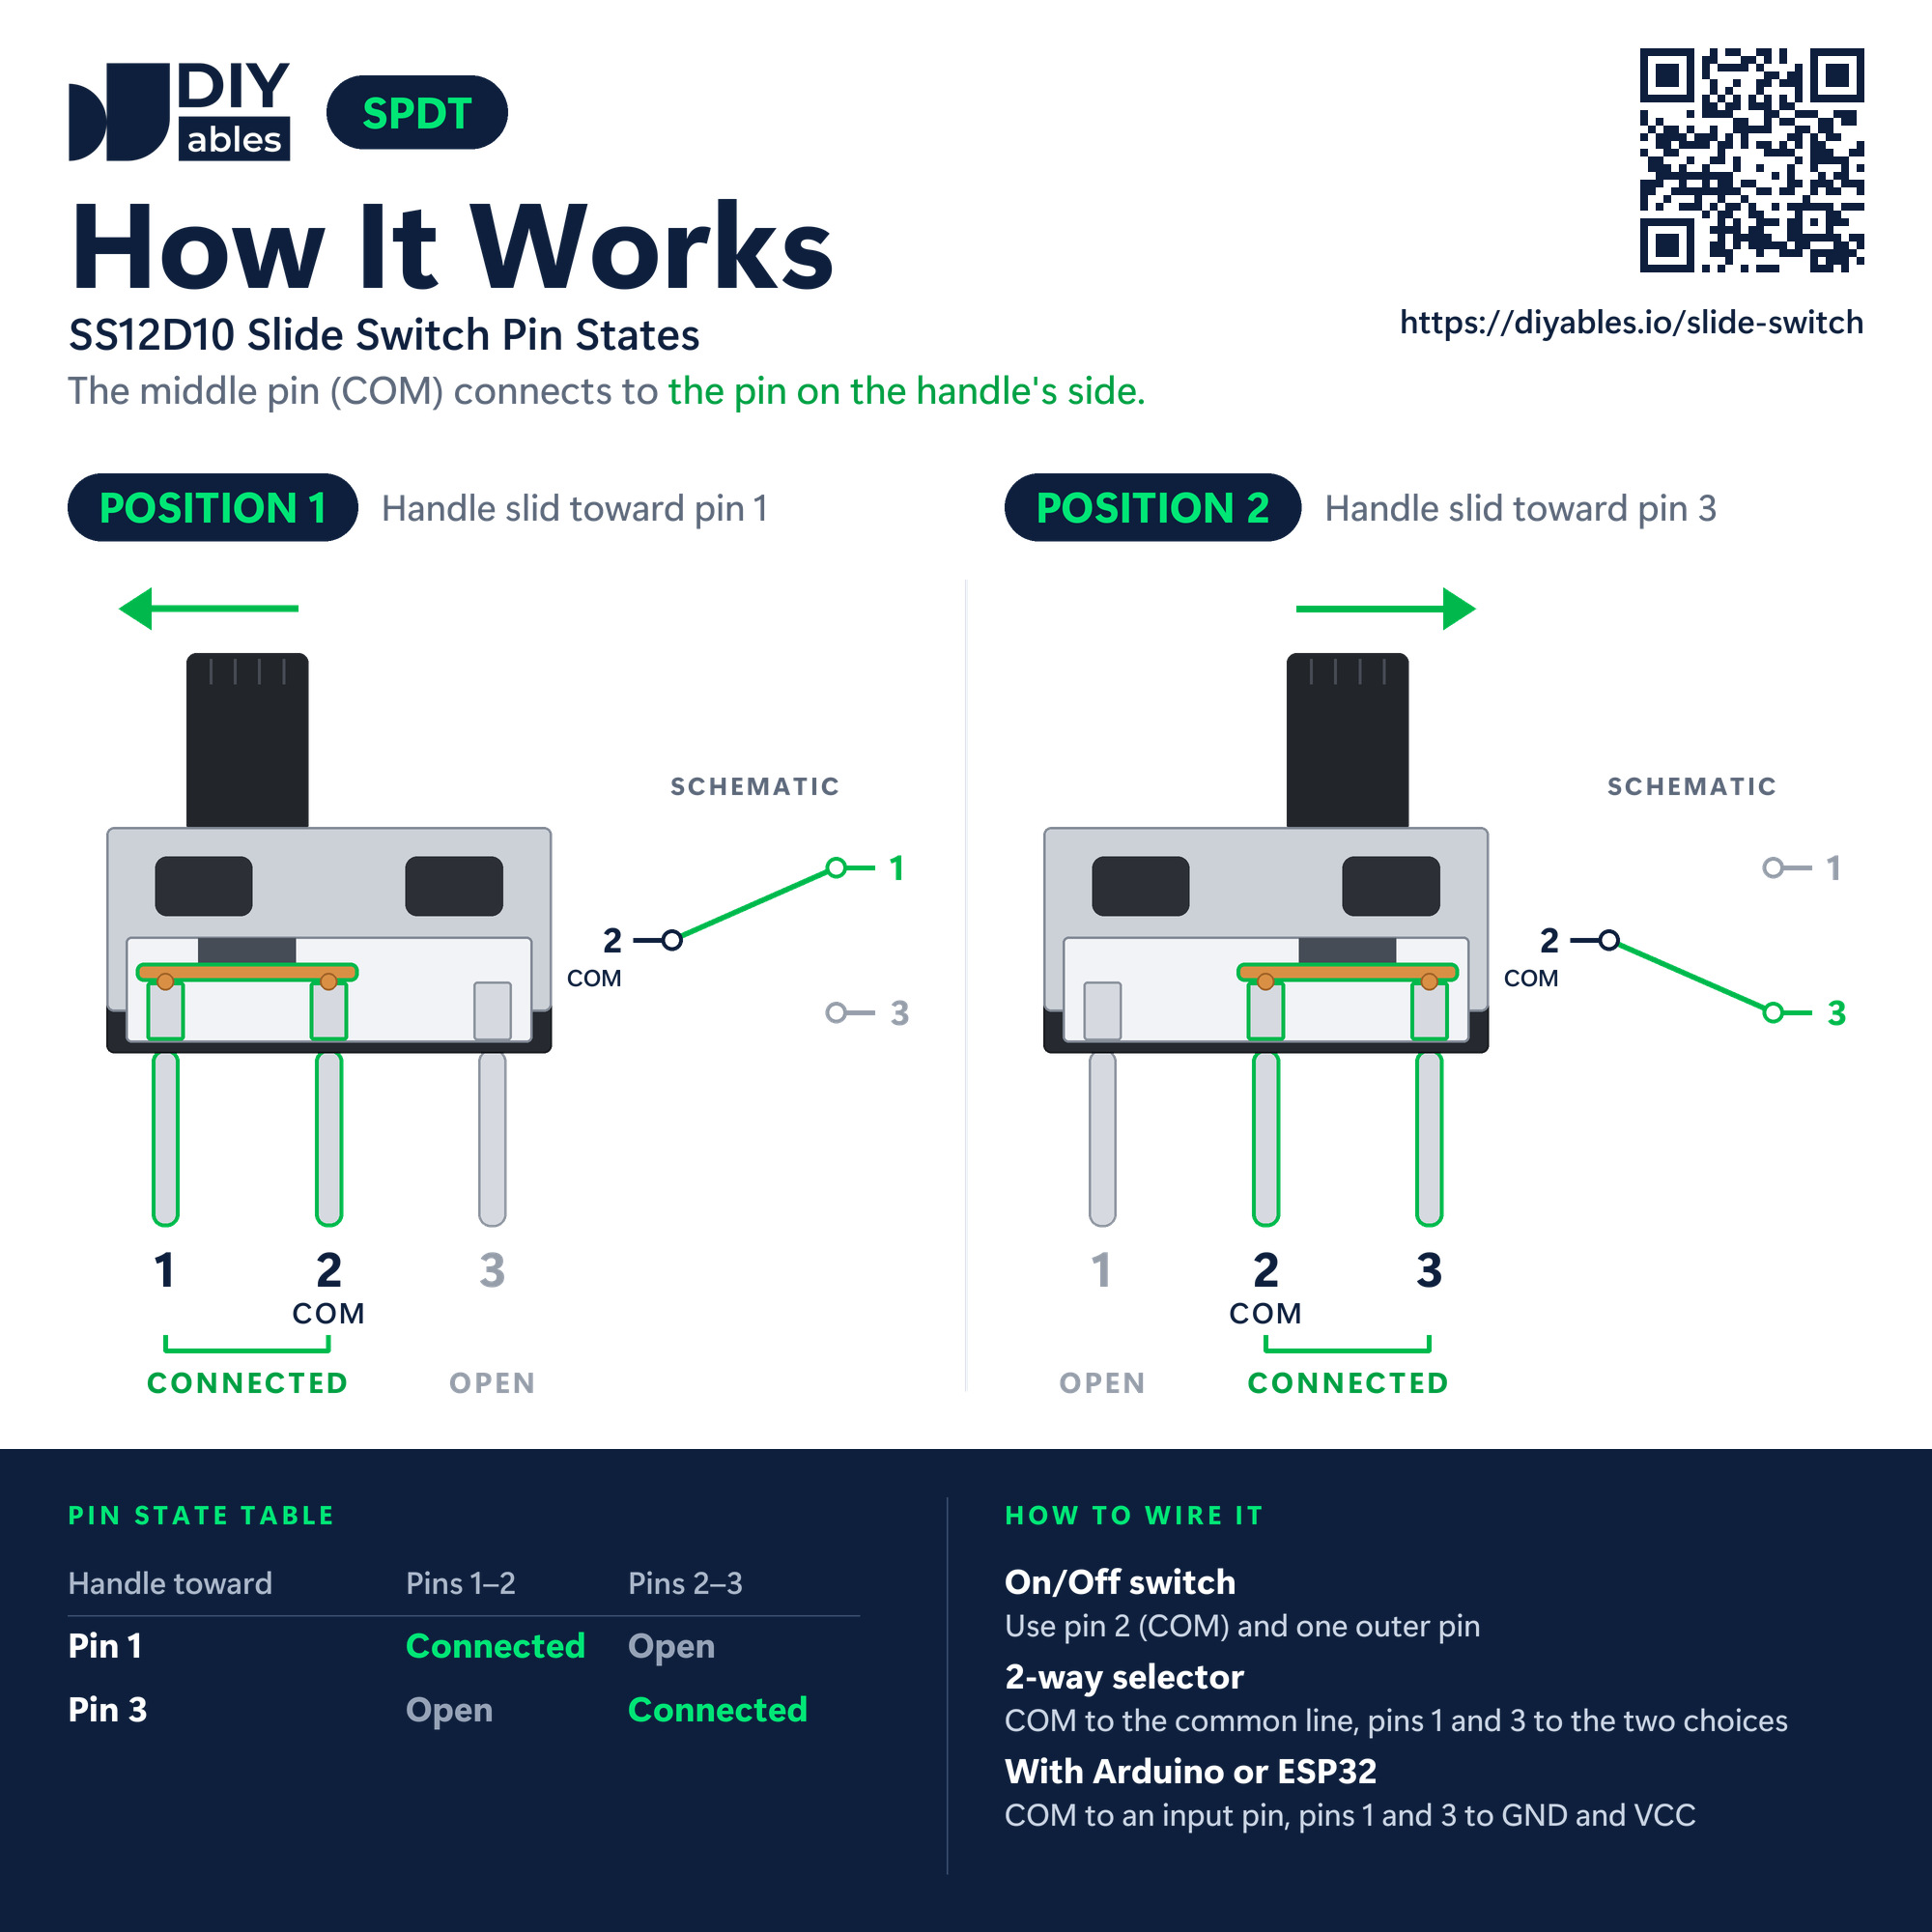
No names are printed on the legs. The middle one is always COM:
- Pin 1: an outer leg. In this tutorial it is wired to GND
- Pin 2 (COM): the middle leg, the common pin. It goes to the input pin of the board
- Pin 3: the other outer leg. On the Arduino UNO Q it is wired to 3.3V
How it works: inside, a small metal bridge always touches COM. It also touches the outer leg on the side where the handle is:
| Handle position | Connected | Open |
|---|---|---|
| Toward pin 1 | Pin 1 and COM | Pin 3 |
| Toward pin 3 | COM and pin 3 | Pin 1 |
So COM always copies one of the outer legs. With pin 1 on GND and pin 3 on 3.3V, the input pin sees LOW or HIGH and never floats. This is why the main wiring below needs no pull-up or pull-down resistor.
Which switch should I pick? A slide switch is small enough for a tiny box or the side of a case. For a big panel switch that you flip with a finger, see Arduino UNO Q - Switch (ON/OFF Toggle). To read several small switches at once, see Arduino UNO Q - DIP Switch. For something that springs back, see Arduino UNO Q - Button Module.
Wiring Diagram
Each leg gets one jumper wire. COM goes to pin 7, and the two outer legs go to GND and 3.3V, the two levels the MCU understands.
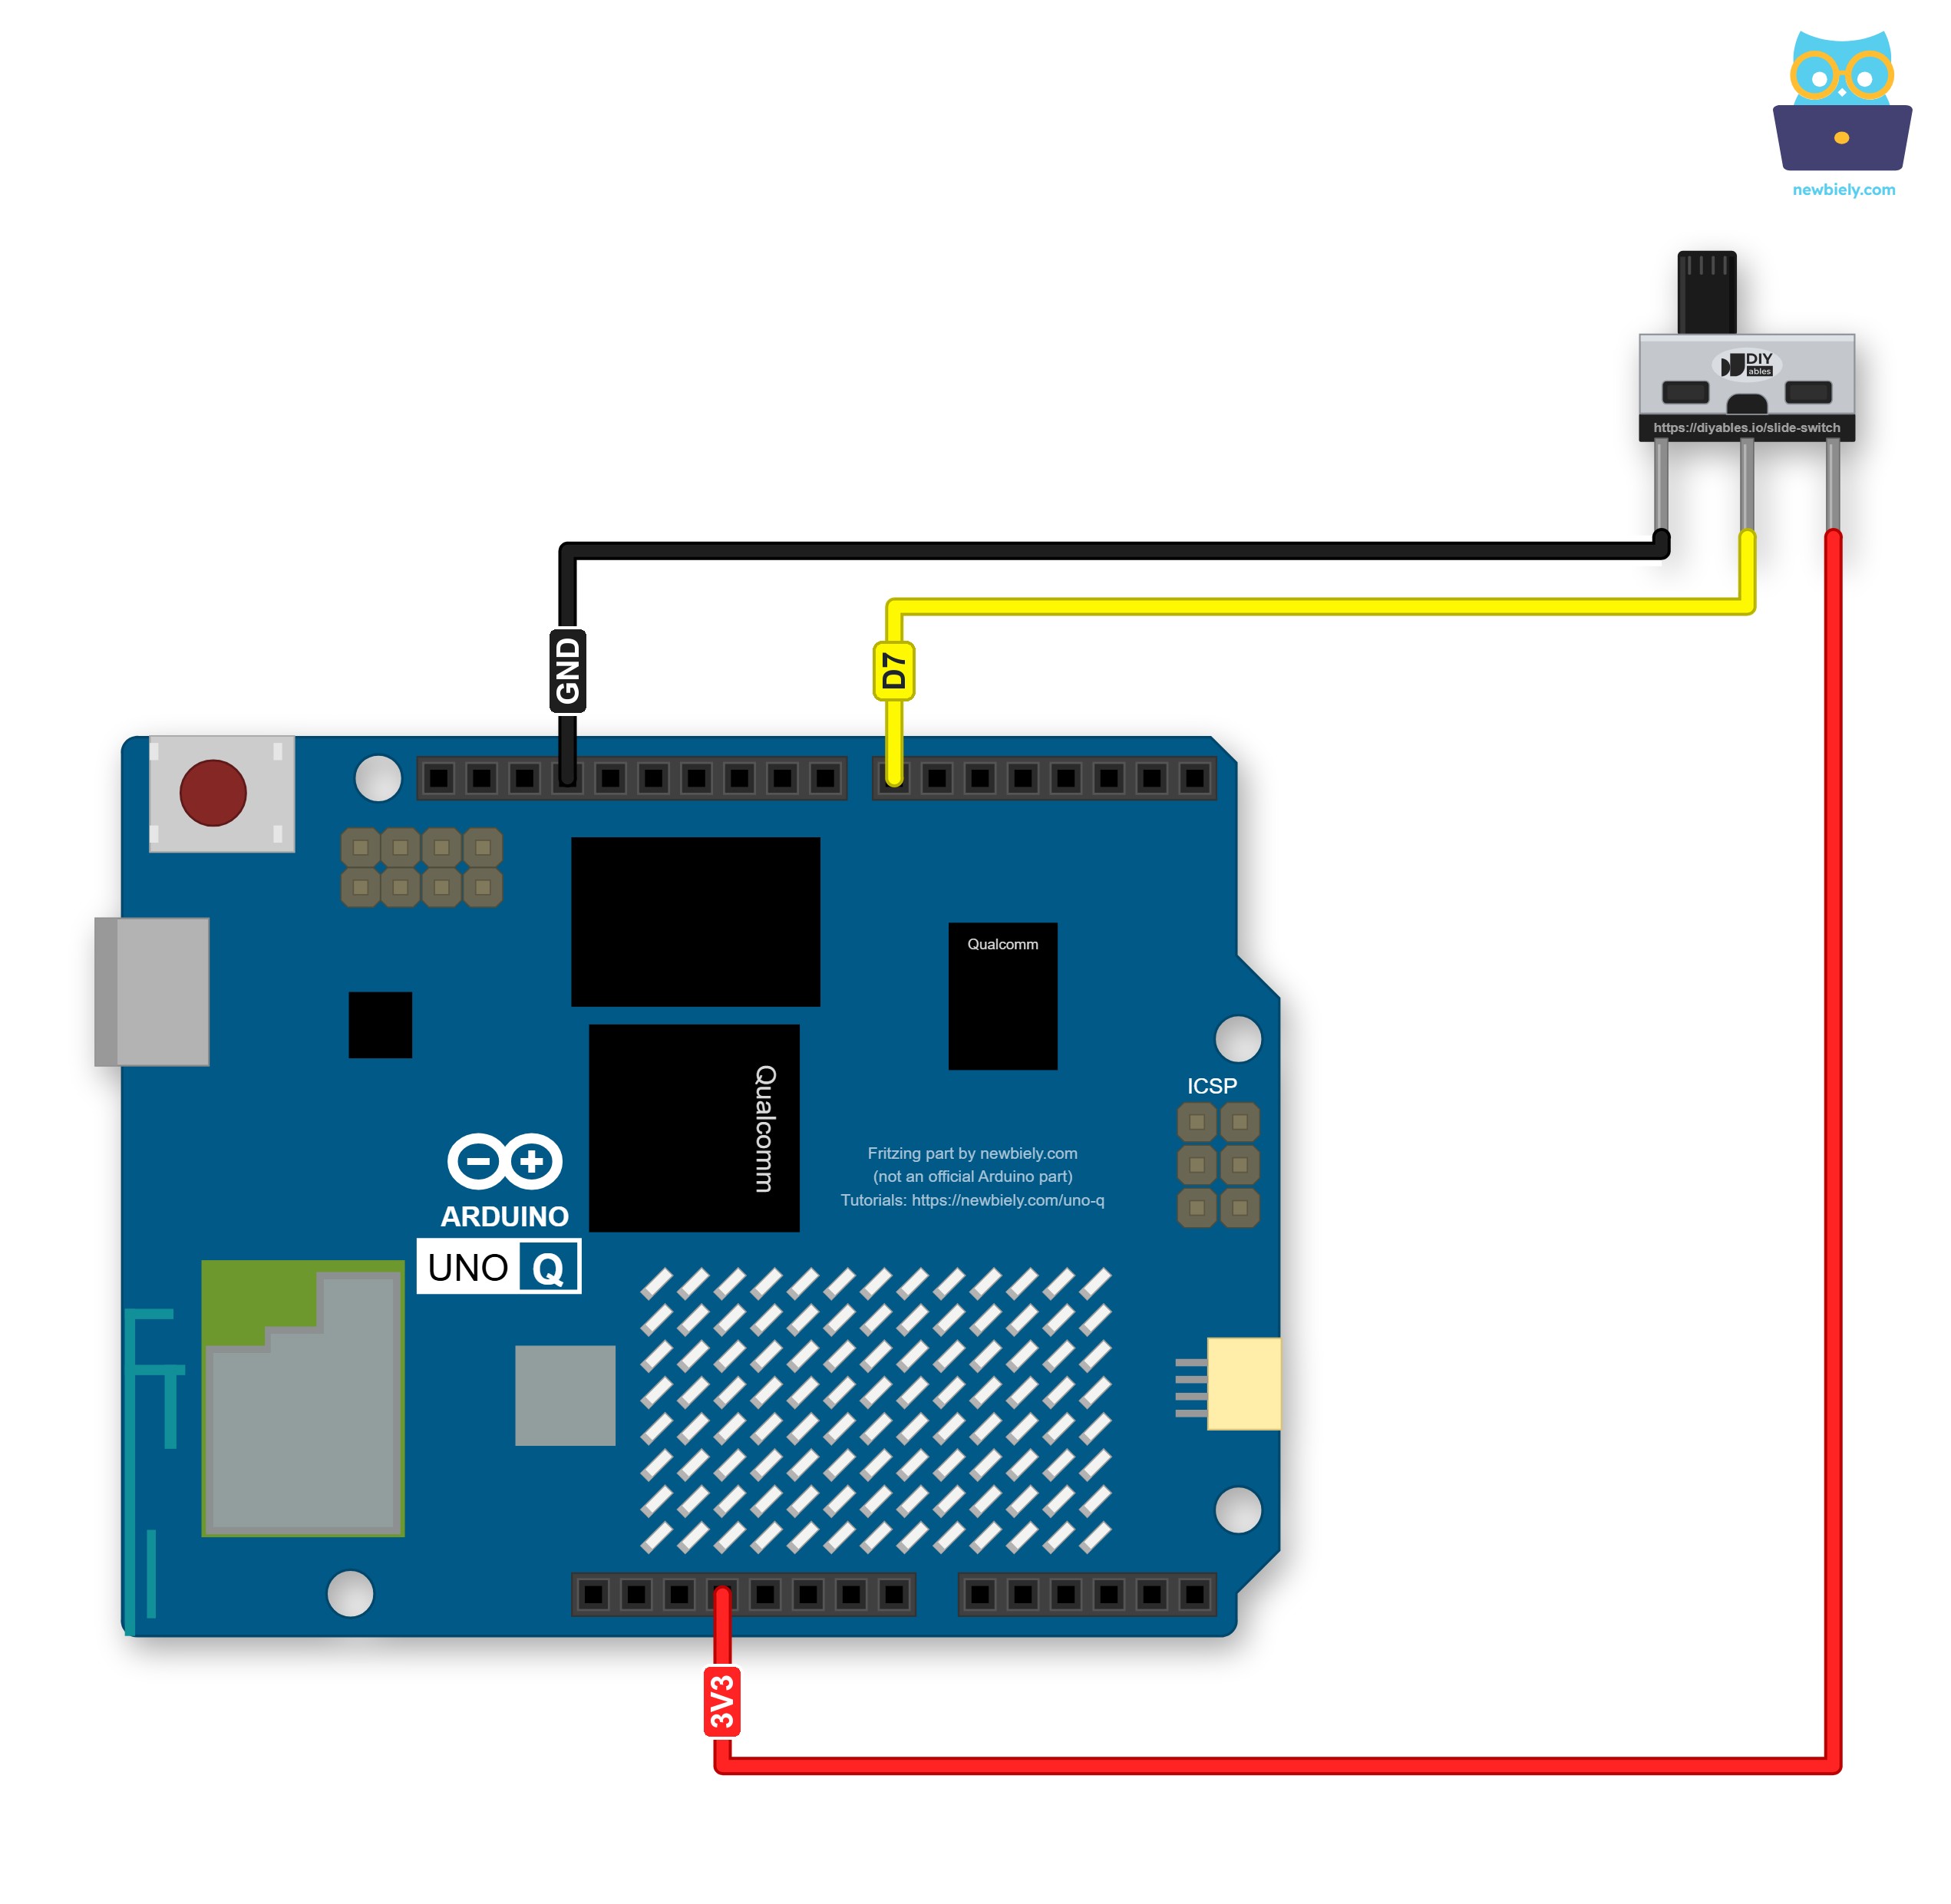
This image is created using Fritzing. Click to enlarge image
| Slide Switch Pin | Arduino UNO Q Pin |
|---|---|
| Pin 1 | GND |
| Pin 2 (COM) | Pin 7 |
| Pin 3 | 3.3V |
Jumper wires are good for a quick test, but not for a final build. The Arduino UNO Q works with both the Proto Screw Terminal Block Shield and the Screw Shield V2. Both turn the header pins into screw terminals. This is how it looks with the Screw Shield V2:
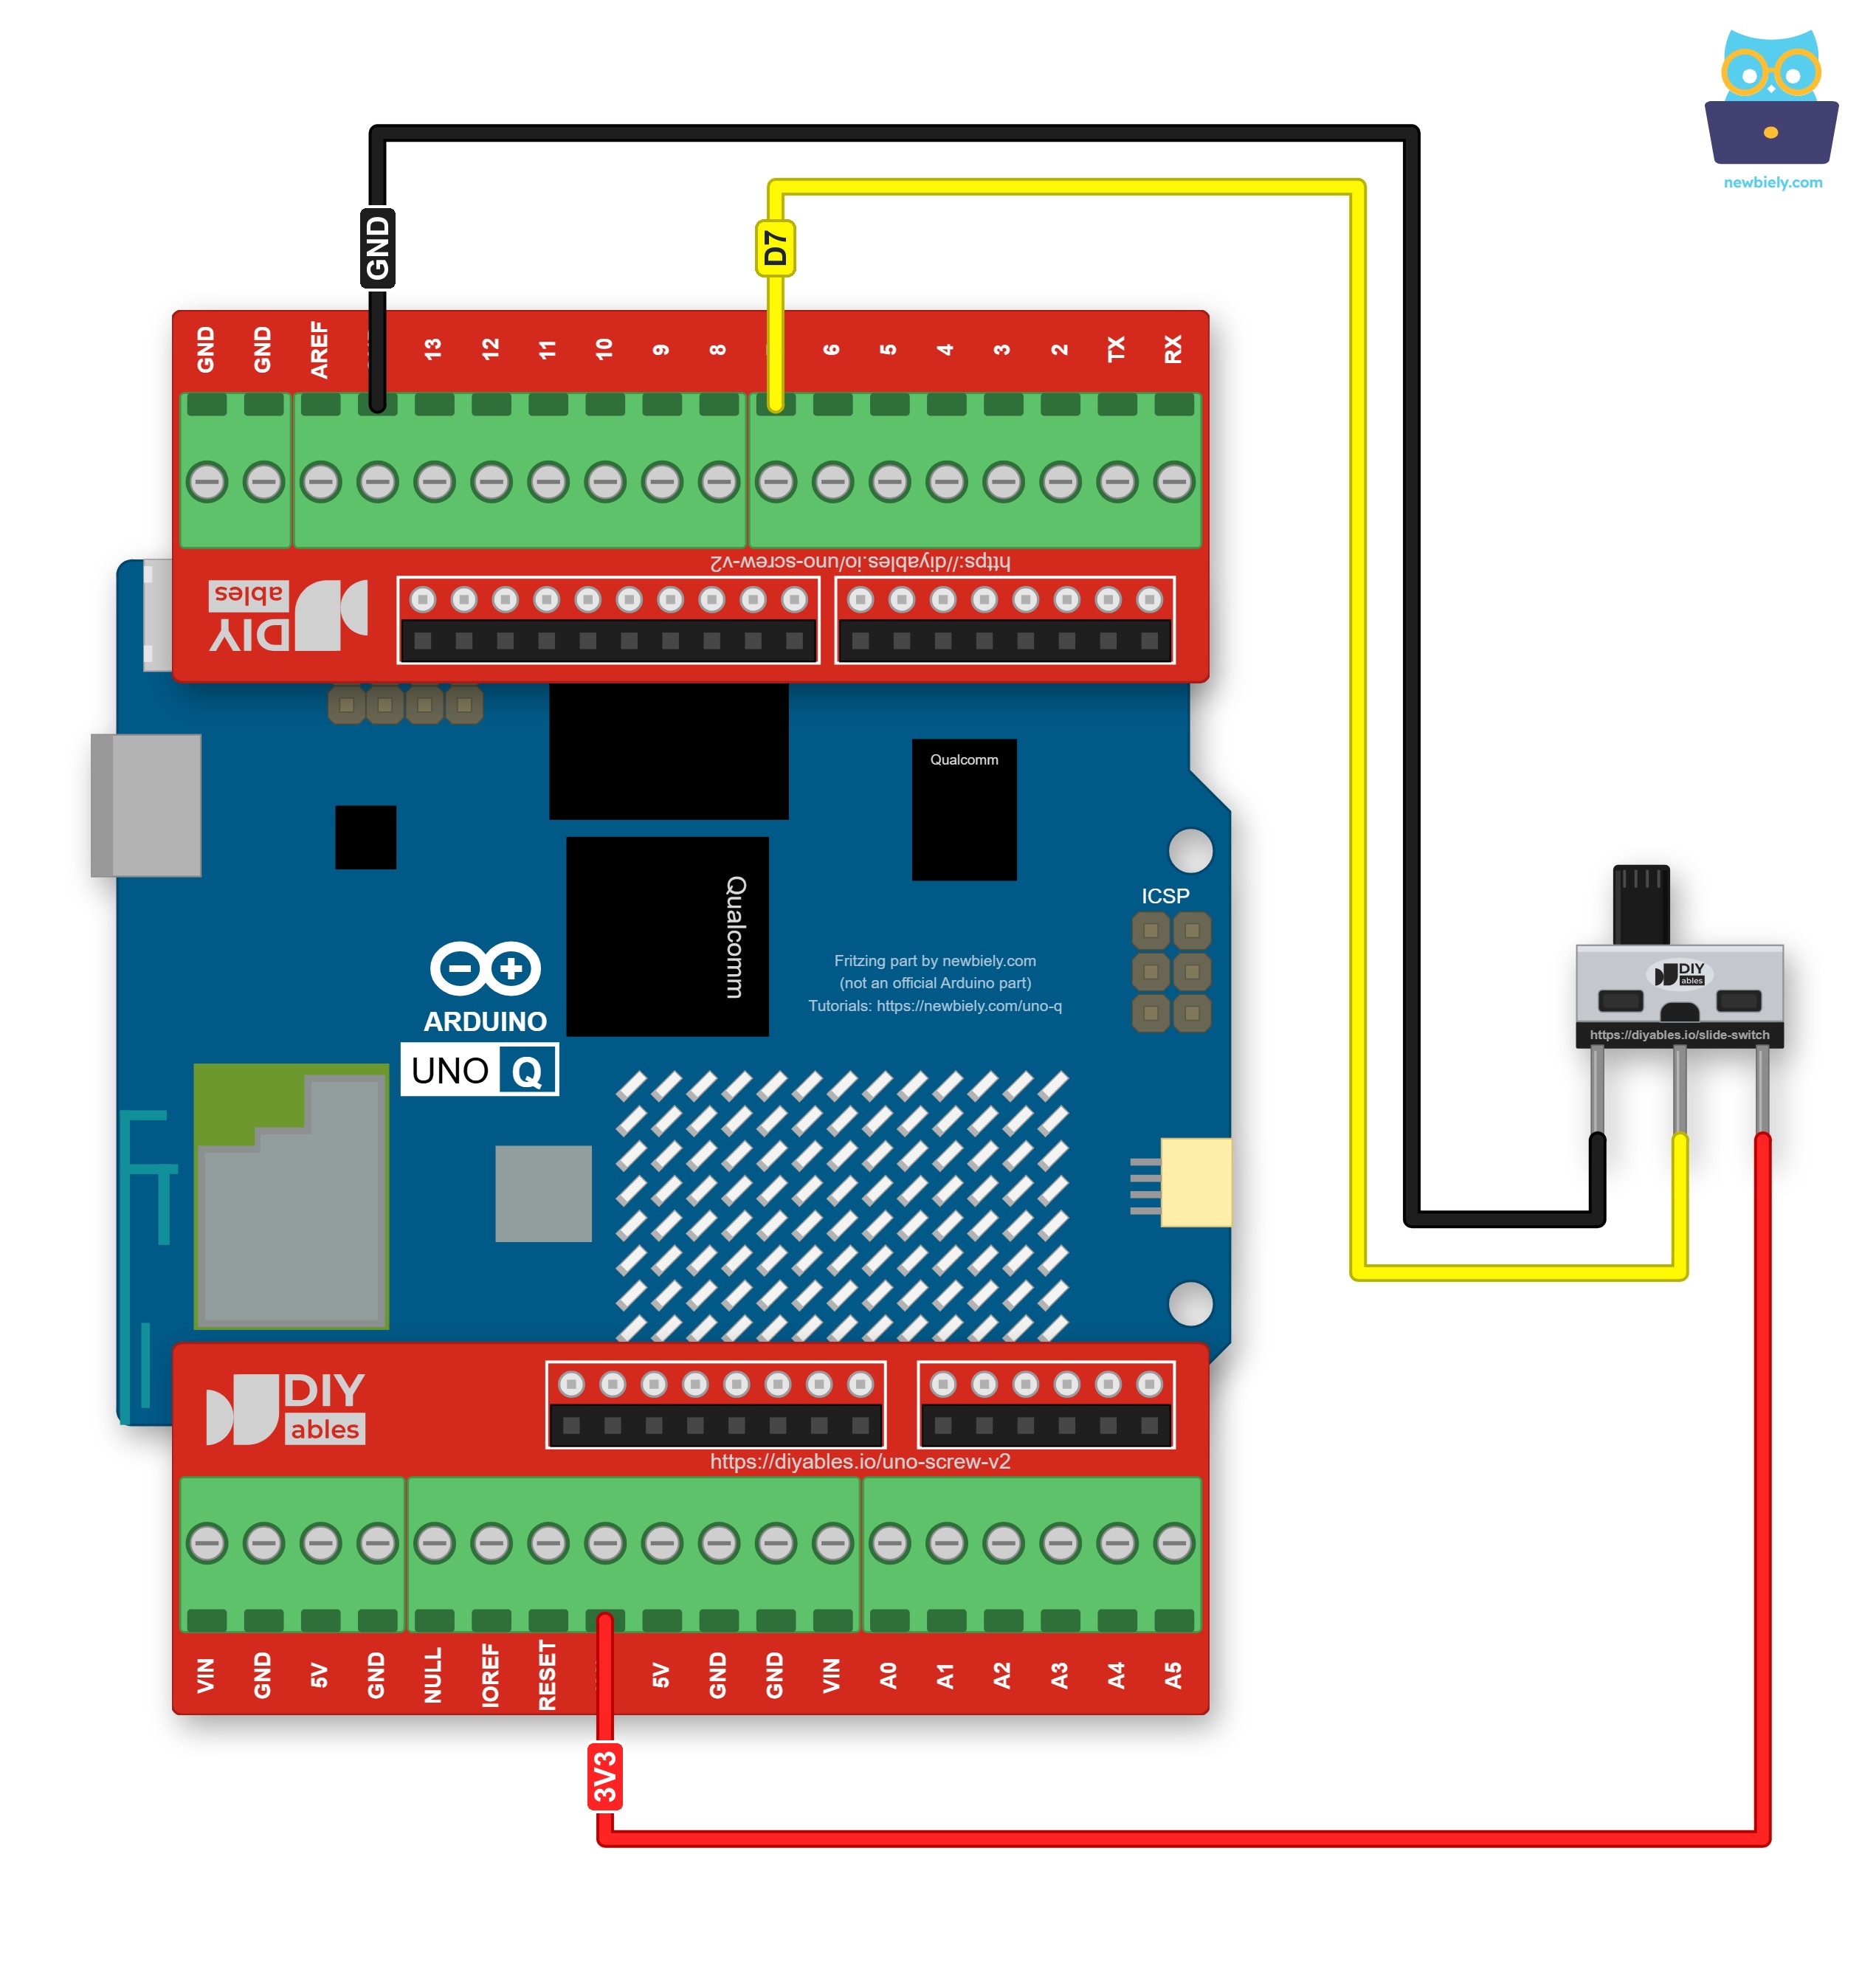
This image is created using Fritzing. Click to enlarge image
※ NOTE THAT:
⚠️ Pin 3 goes to 3.3V, not to 5V or VIN. COM passes the voltage of pin 3 straight to pin 7. The STM32 MCU of the UNO Q works with 3.3V logic, so 3.3V is its normal HIGH level. Most of its digital pins can stand 5V, but A0 and A1 cannot, so 3.3V is the safe habit if you ever move the wire.
⚠️ Keep pin 7 as an input. Never set it to OUTPUT. The switch ties the pin straight to 3.3V or to GND, so an output pin could be shorted.
Pin 7 is only an example. Any digital pin works. If you pick another one, change SLIDE_SWITCH_PIN in every sketch on this page.
How To Program For Slide Switch
The switch drives the pin by itself, so the MCU code stays short:
- Set the COM pin as a plain input with pinMode(). No pull-up is needed, because COM is always joined to GND or 3.3V:
- Read the level with digitalRead(). With the 3-wire wiring, HIGH means the handle is toward pin 3:
- Keep the last confirmed position. When a new reading is different, wait 50 ms and read again. The contacts flicker for a moment while they slide, so only a change that is still there counts:
- For the 2-wire wiring, switch on the internal pull-up and swap the meaning of the two levels:
Arduino UNO Q Code
There are two brains on the UNO Q:
- The STM32 MCU owns the header pins, so it is the one that reads pin 7
- The Qualcomm MPU runs Debian Linux with Python and Wi-Fi
- The two sketches below run on the MCU only. Linux joins in at the Bridge section
Read the Handle Position
At power-on, the sketch prints where the handle is. After that, it stays quiet and prints one line only when the handle moves to the other side.
Detailed Instructions
Never used the Arduino UNO Q before? Set up Arduino App Lab first with Getting Started with Arduino UNO Q.
- Wiring: Pin 1 to GND, COM to pin 7, pin 3 to 3.3V. Look at the pin 3 wire one more time. It must be on 3.3V.
- USB: Connect the Arduino UNO Q to your computer with the USB-C cable.
- App Lab: Open Arduino App Lab and wait until it finds the board.
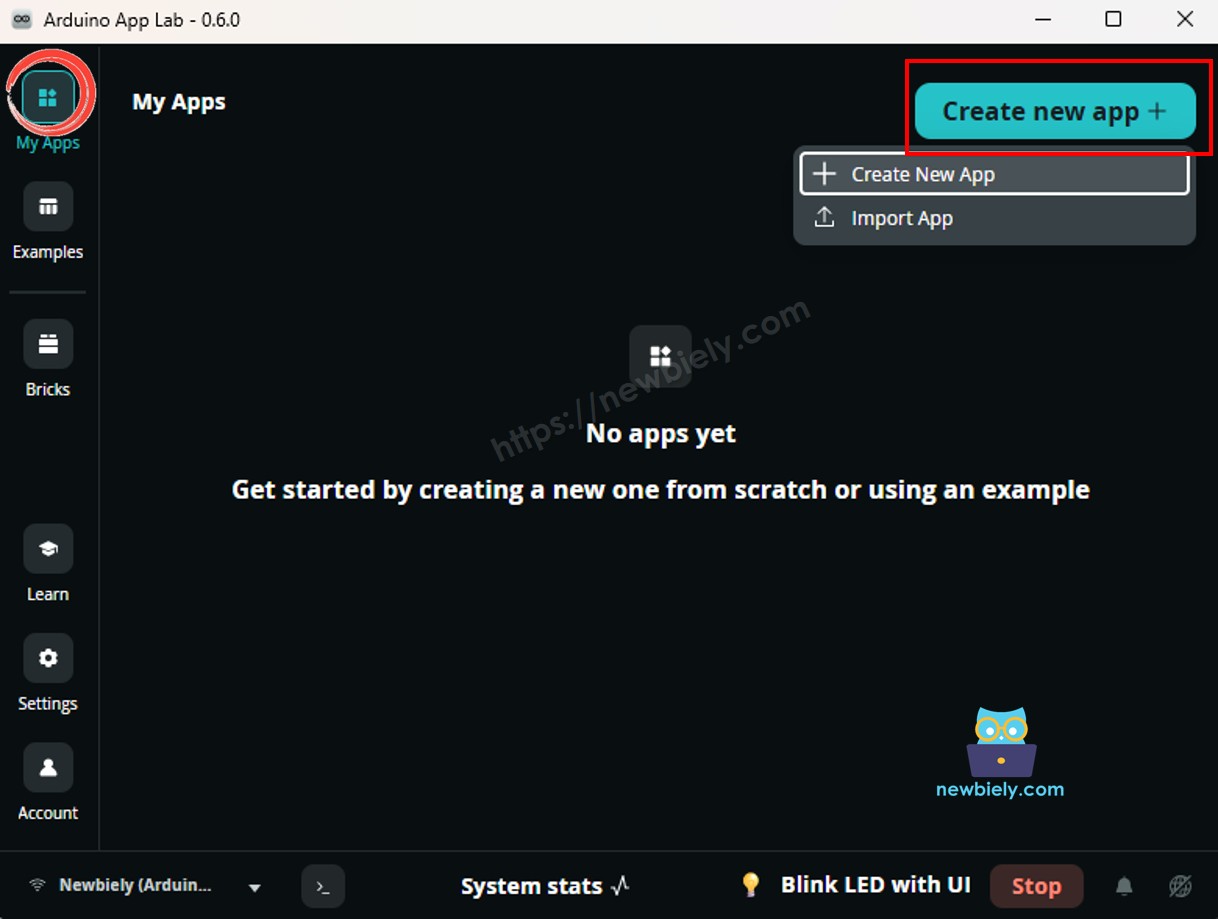
- New App: Click Create New App.
- Type the name SlideSwitch and click Create.
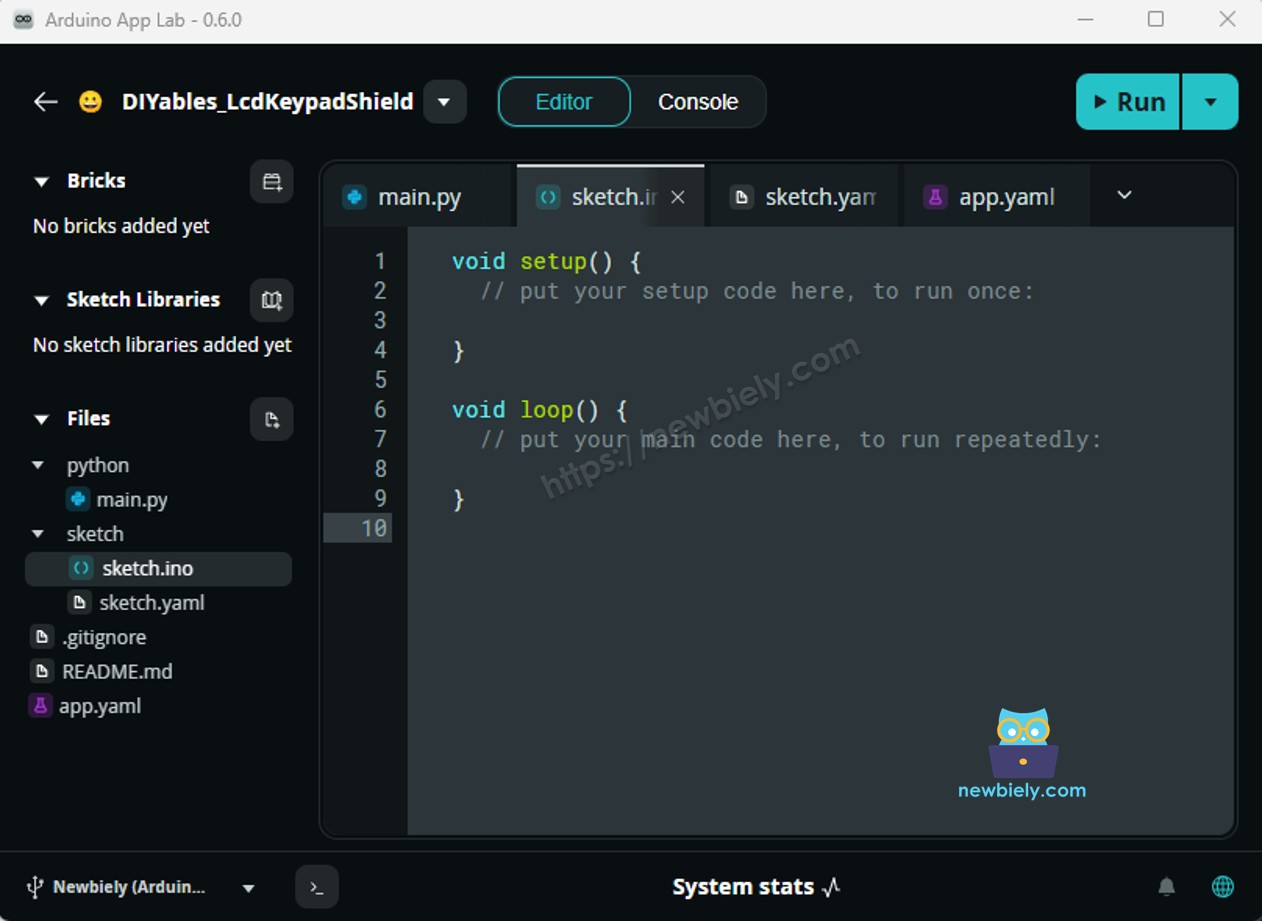
- Sketch: Open sketch/sketch.ino and replace everything in it with the code above. The other files stay as they are. No library is needed.
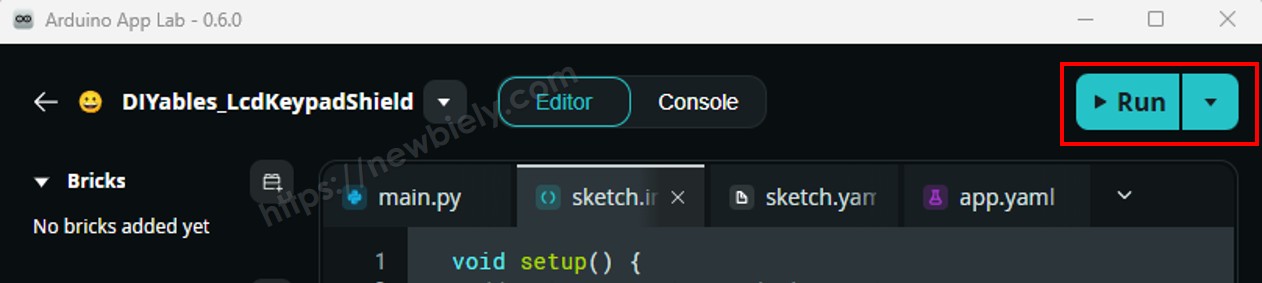
- Run: Click the Run button.
- Slide: Move the handle to the other side, wait a moment, then move it back. Do this a few times and watch the console.
App Lab Console Output
One move gives one line, never two. If you see ON and OFF the wrong way round, the outer wires are swapped: you can swap the GND and 3.3V wires on the switch, or swap the two messages in the code.
Slide Switch with Only Two Wires (INPUT_PULLUP)
Short on wires, or is the 3.3V pin already in use? You can leave pin 3 empty. The MCU has a pull-up resistor inside, and INPUT_PULLUP turns it on, so pin 7 stays HIGH when COM touches nothing. Just remove the pin 3 wire.
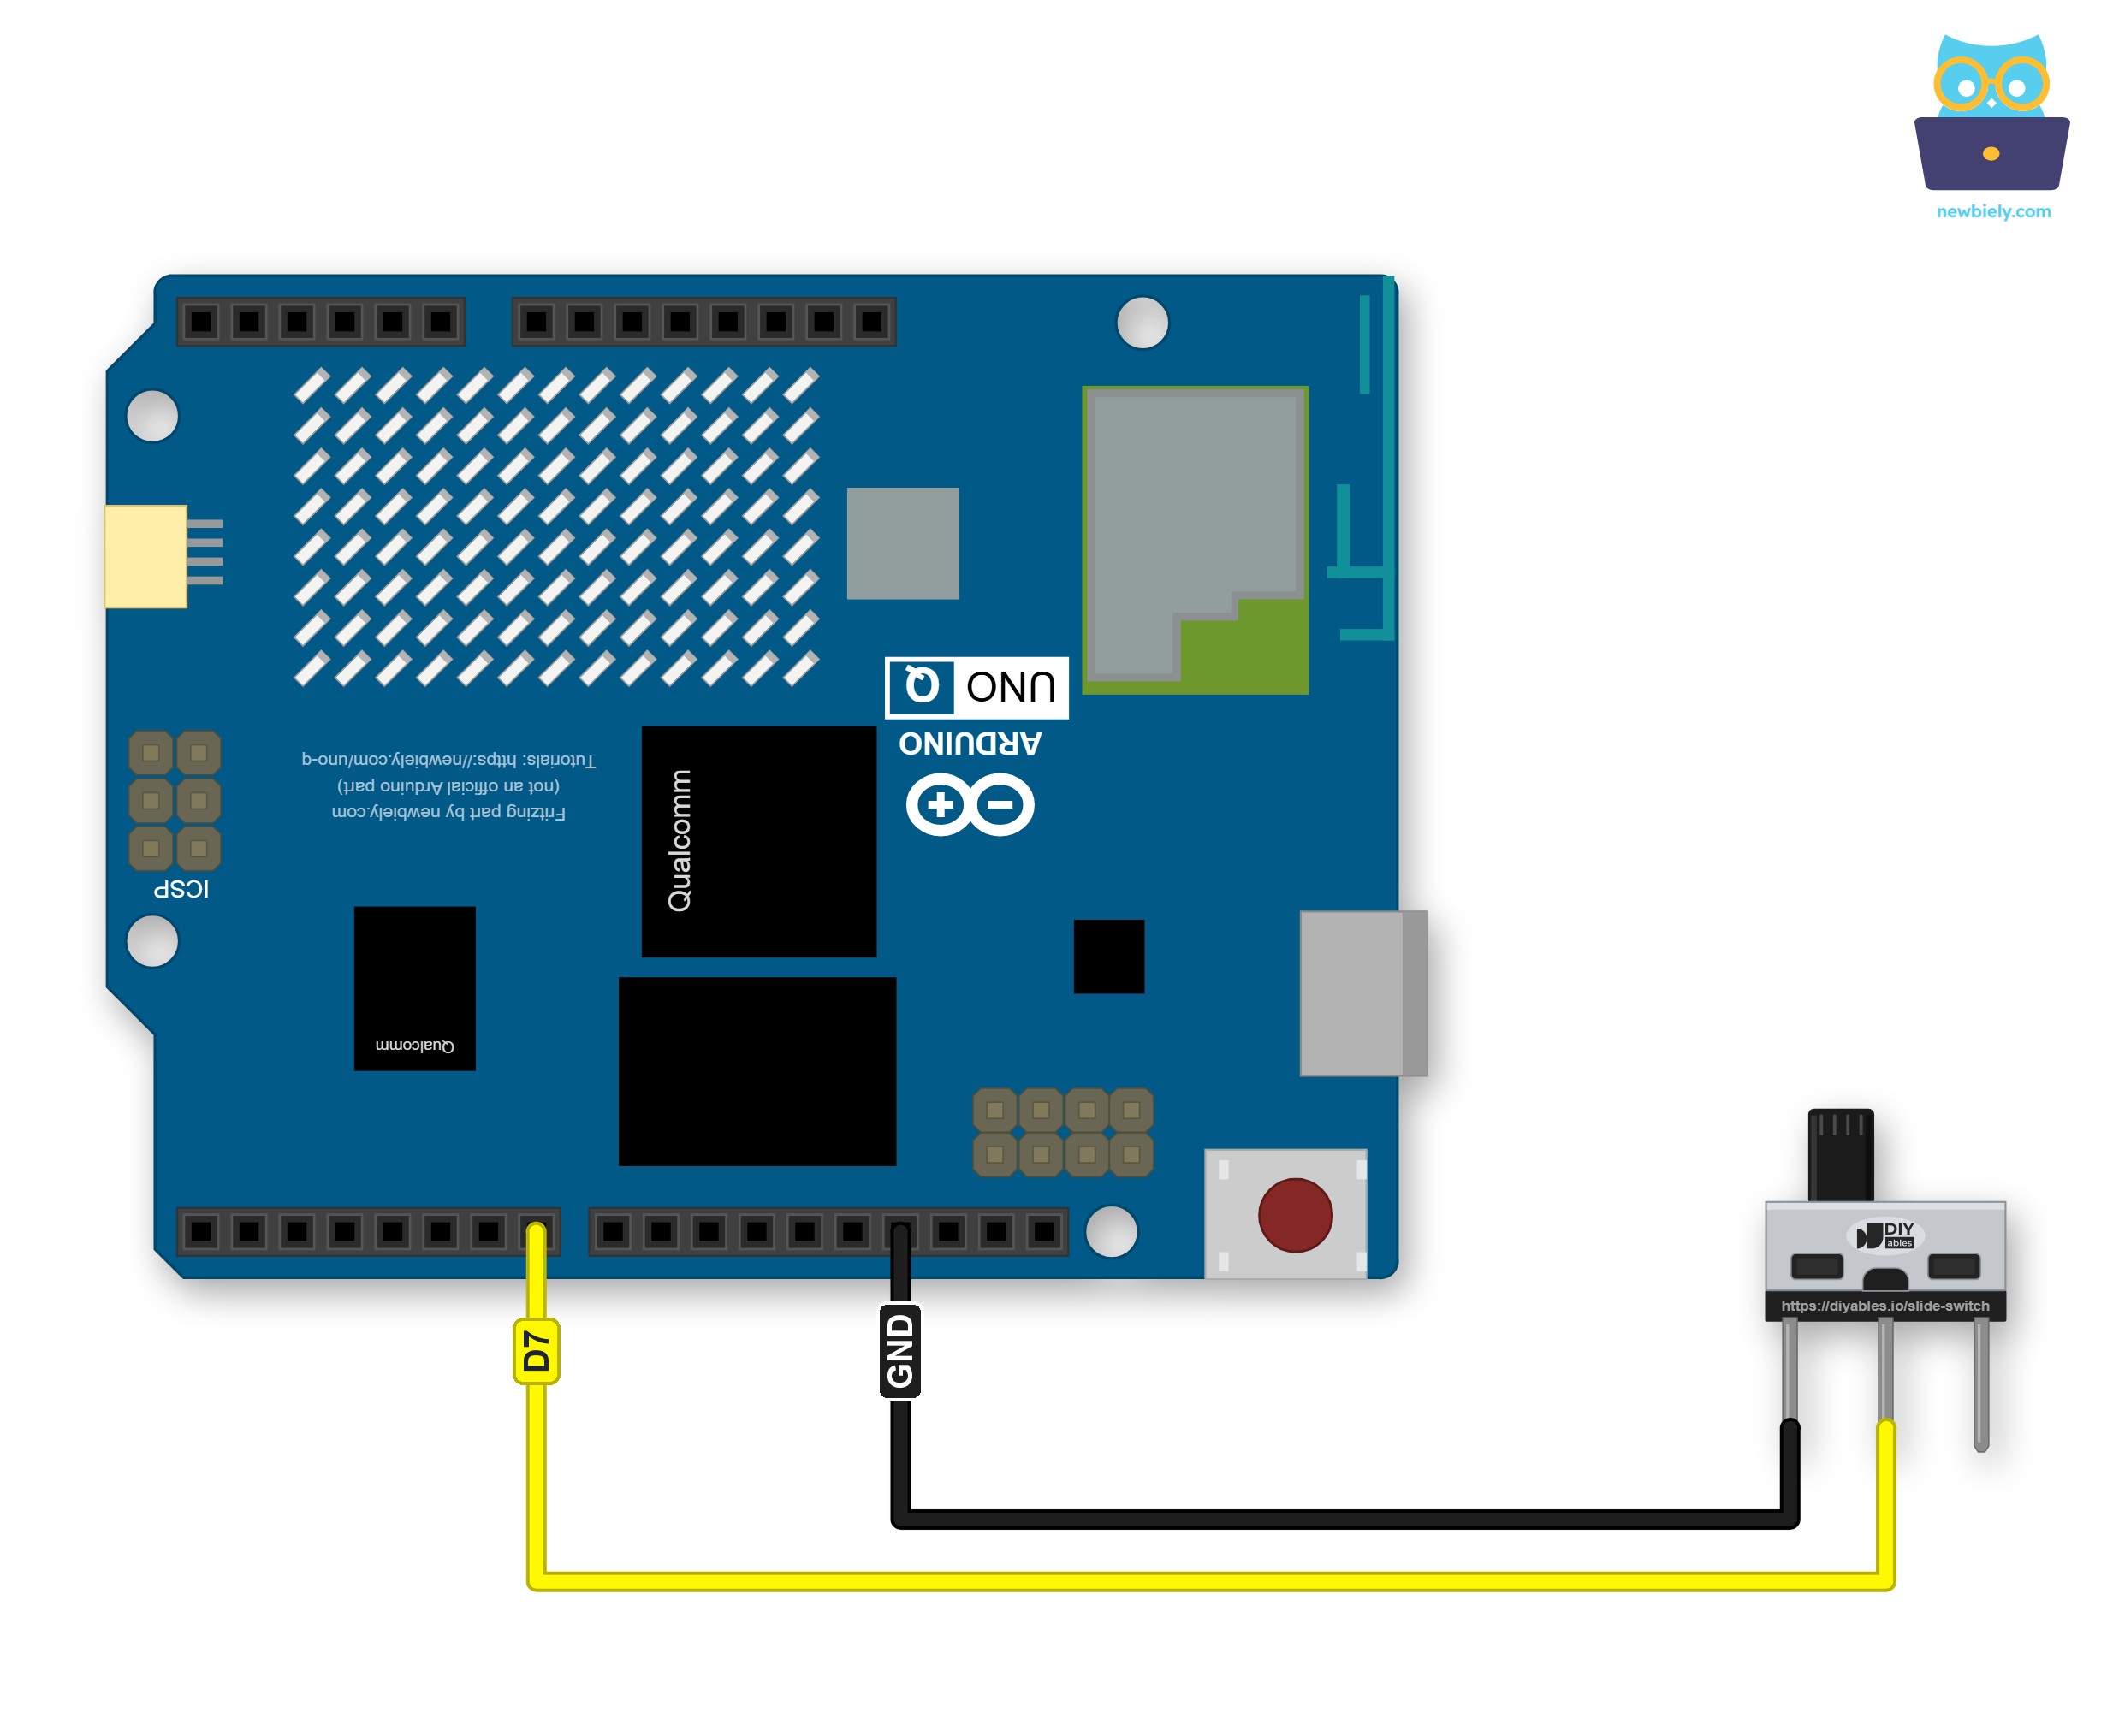
This image is created using Fritzing. Click to enlarge image
| Slide Switch Pin | Arduino UNO Q Pin |
|---|---|
| Pin 1 | GND |
| Pin 2 (COM) | Pin 7 |
| Pin 3 | Not connected |
Be careful, the logic is now the other way round:
- Handle toward pin 1: COM joins GND, pin 7 reads LOW, and the sketch prints ON
- Handle toward pin 3: COM is open, the pull-up holds pin 7 HIGH, and the sketch prints OFF
Detailed Instructions
- Take away the wire on pin 3. The other two wires stay where they are.
- Make a new App called SlideSwitchInputPullup, or reuse the last one, and put this code into sketch/sketch.ino.
- Click Run and move the handle a few times.
App Lab Console Output
Bridge: Linux + MCU
A slide switch holds a setting, so Linux mostly wants to know two things: where the handle is now, and when it last moved. Python cannot read pin 7 by itself, so it asks the MCU:
- The MCU watches pin 7. It debounces with millis() instead of delay(), so loop() never stops and every Bridge call gets a fast answer
- It shares three read-only values with Bridge.provide():
- get_switch_position — ON or OFF
- get_seconds_in_state — how many seconds the handle has stayed in that position
- get_flip_count — how many times the handle moved since power-on
- Why a flip counter? Python checks only twice per second. If someone flicks the handle to OFF and back to ON between two checks, the position looks the same as before. The counter still goes up by 2, so Python knows that something happened
- Python polls with Bridge.call(), prints a line on every move, and prints a short status line every 10 seconds
- ⚠️ Leave /dev/ttyHS1 (Linux) and Serial1 (MCU) alone. The router reserves them, so your code must never open them
In short: you move the handle → the MCU confirms and counts the move → Python calls the MCU → Python prints the news.
The MCU sketch is made for the 3-wire wiring. With the 2-wire wiring, change INPUT to INPUT_PULLUP and ON_LEVEL to LOW at the top of the sketch.
MCU Code (Bridge)
Python Code (Bridge)
Detailed Instructions
- New App: In Arduino App Lab, click Create New App and call it SlideSwitchBridge.
- MCU part: Put the MCU sketch into sketch/sketch.ino and add the Bridge library:
- Install the library: Click the Add sketch library button (the open book icon with a + sign) in the left sidebar.
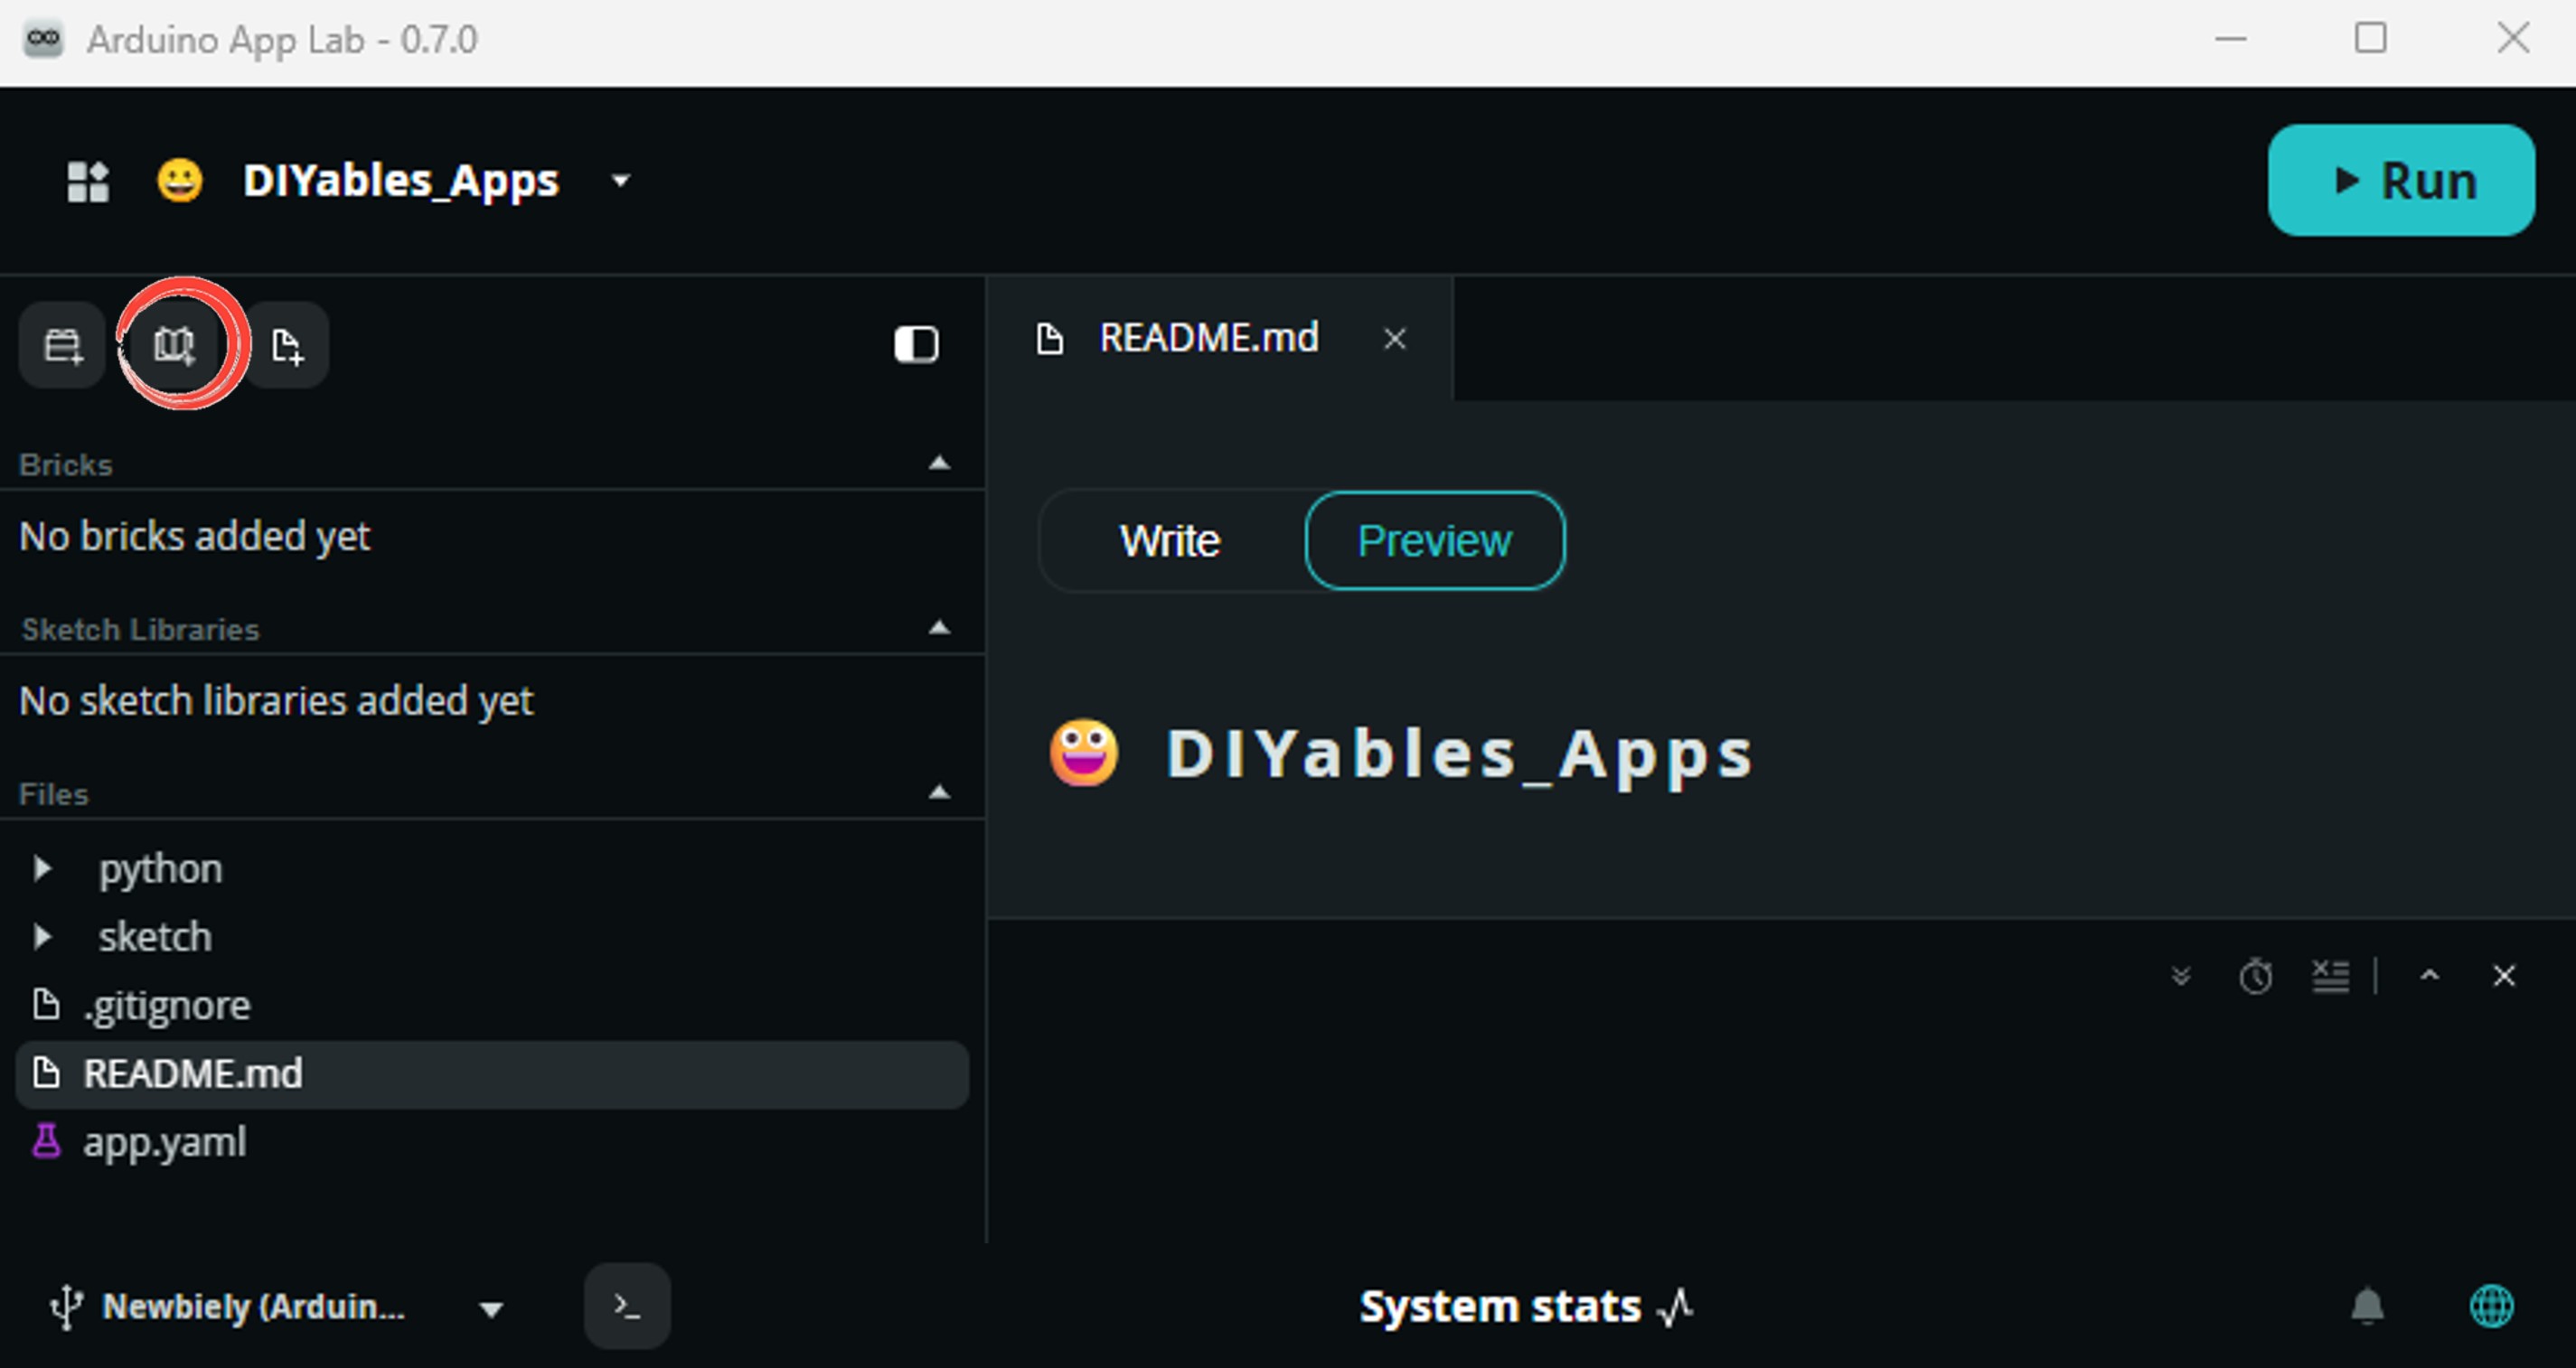
- Search for Arduino_RouterBridge created by Arduino and click the Install button.
- Linux part: Put the Python code into the Python file of the same App.
- Run: Click the Run button.
- Try it: Move the handle once and wait a few seconds. Then flick it to the other side and straight back, as fast as you can.
- Compare the consoles: The MCU Monitor lists every move. The Python console shows what Linux found out from its calls.
App Lab Console Output
Look at 09:02:33. Python never saw the short OFF, because it came and went between two checks. The flip counter jumped from 1 to 3, so Python still reported it. The time in state also started again from 0.
Telegram
Now the slide switch becomes the arm switch of a simple home alarm. Mount it next to the front door. Slide it to ON when you leave: the system is ARMED. Slide it to OFF when you come home: the system is DISARMED. The bot sends a message on every move, so you see at once if someone forgot to arm it or came home early.
| Command | What it does |
|---|---|
| /status | ARMED or DISARMED, and for how long |
| /start | send me a message each time the switch moves |
| /stop | stop the automatic messages for this chat |
Only chats that sent /start get the automatic messages. That way the script needs no chat ID. /status works in any chat. If the handle has not moved since power-on, the time in /status counts from power-on.
Do you want other words than ARMED and DISARMED? Change the MODE line at the top of the script, for example to "ON": "AWAY" and "OFF": "HOME".
MCU sketch: Keep the MCU sketch from the Bridge section. It needs no change.
Python Code (Telegram)
Detailed Instructions
- Token: Create a bot with @BotFather and paste its token into TELEGRAM_BOT_TOKEN. Not sure how? Read How to Create a Telegram Bot.
- Swap the Python file: Open the SlideSwitchBridge App and replace its Python code with this bot script. Leave the sketch alone.
- Run: Click the Run button.
- Say hello: In Telegram, open your bot and send /start, then /status.
- Arm it: Slide the handle to ON. The message should reach your phone within a second or two.
- Note: The bot keeps the /start list in memory only. After a restart of the App, send /start again.
App Lab Console Output


ArduinoBot
OpenClaw
You can adapt the OpenClaw to this tutorial by refering the instruction on Arduino Uno Q - OpenClaw Tutorial
Project Ideas
A switch that remembers its position is a natural "settings" input:
- Data Logger On/Off: While the switch is ON, Python on Linux writes sensor readings to a CSV file. Slide it to OFF and the logging stops.
- Quiet Mode: A buzzer or alarm project beeps only when the switch is ON. Slide it to OFF at night.
- Unit Selector: One position shows the temperature in °C, the other in °F, on a display or in a Telegram reply.
- Do Not Disturb Sign: A switch on your desk tells the family chat "busy" or "free" when you move it.
- Test or Live: In the OFF position, a Python script only prints what it would do. In the ON position, it really sends messages or switches a relay.
Challenge Yourself
Try these on your own:
- Easy: Change the messages in the first sketch so the console prints Mode A and Mode B instead of ON and OFF.
- Medium: In the Bridge sketch, add up the total time the switch spent in the ON position, and share it with Python as get_total_on_seconds.
- Advanced: Add a 30-second exit delay to the Telegram bot: after the switch moves to ON, wait 30 seconds before you send ARMED. If the switch goes back to OFF during that time, send nothing.